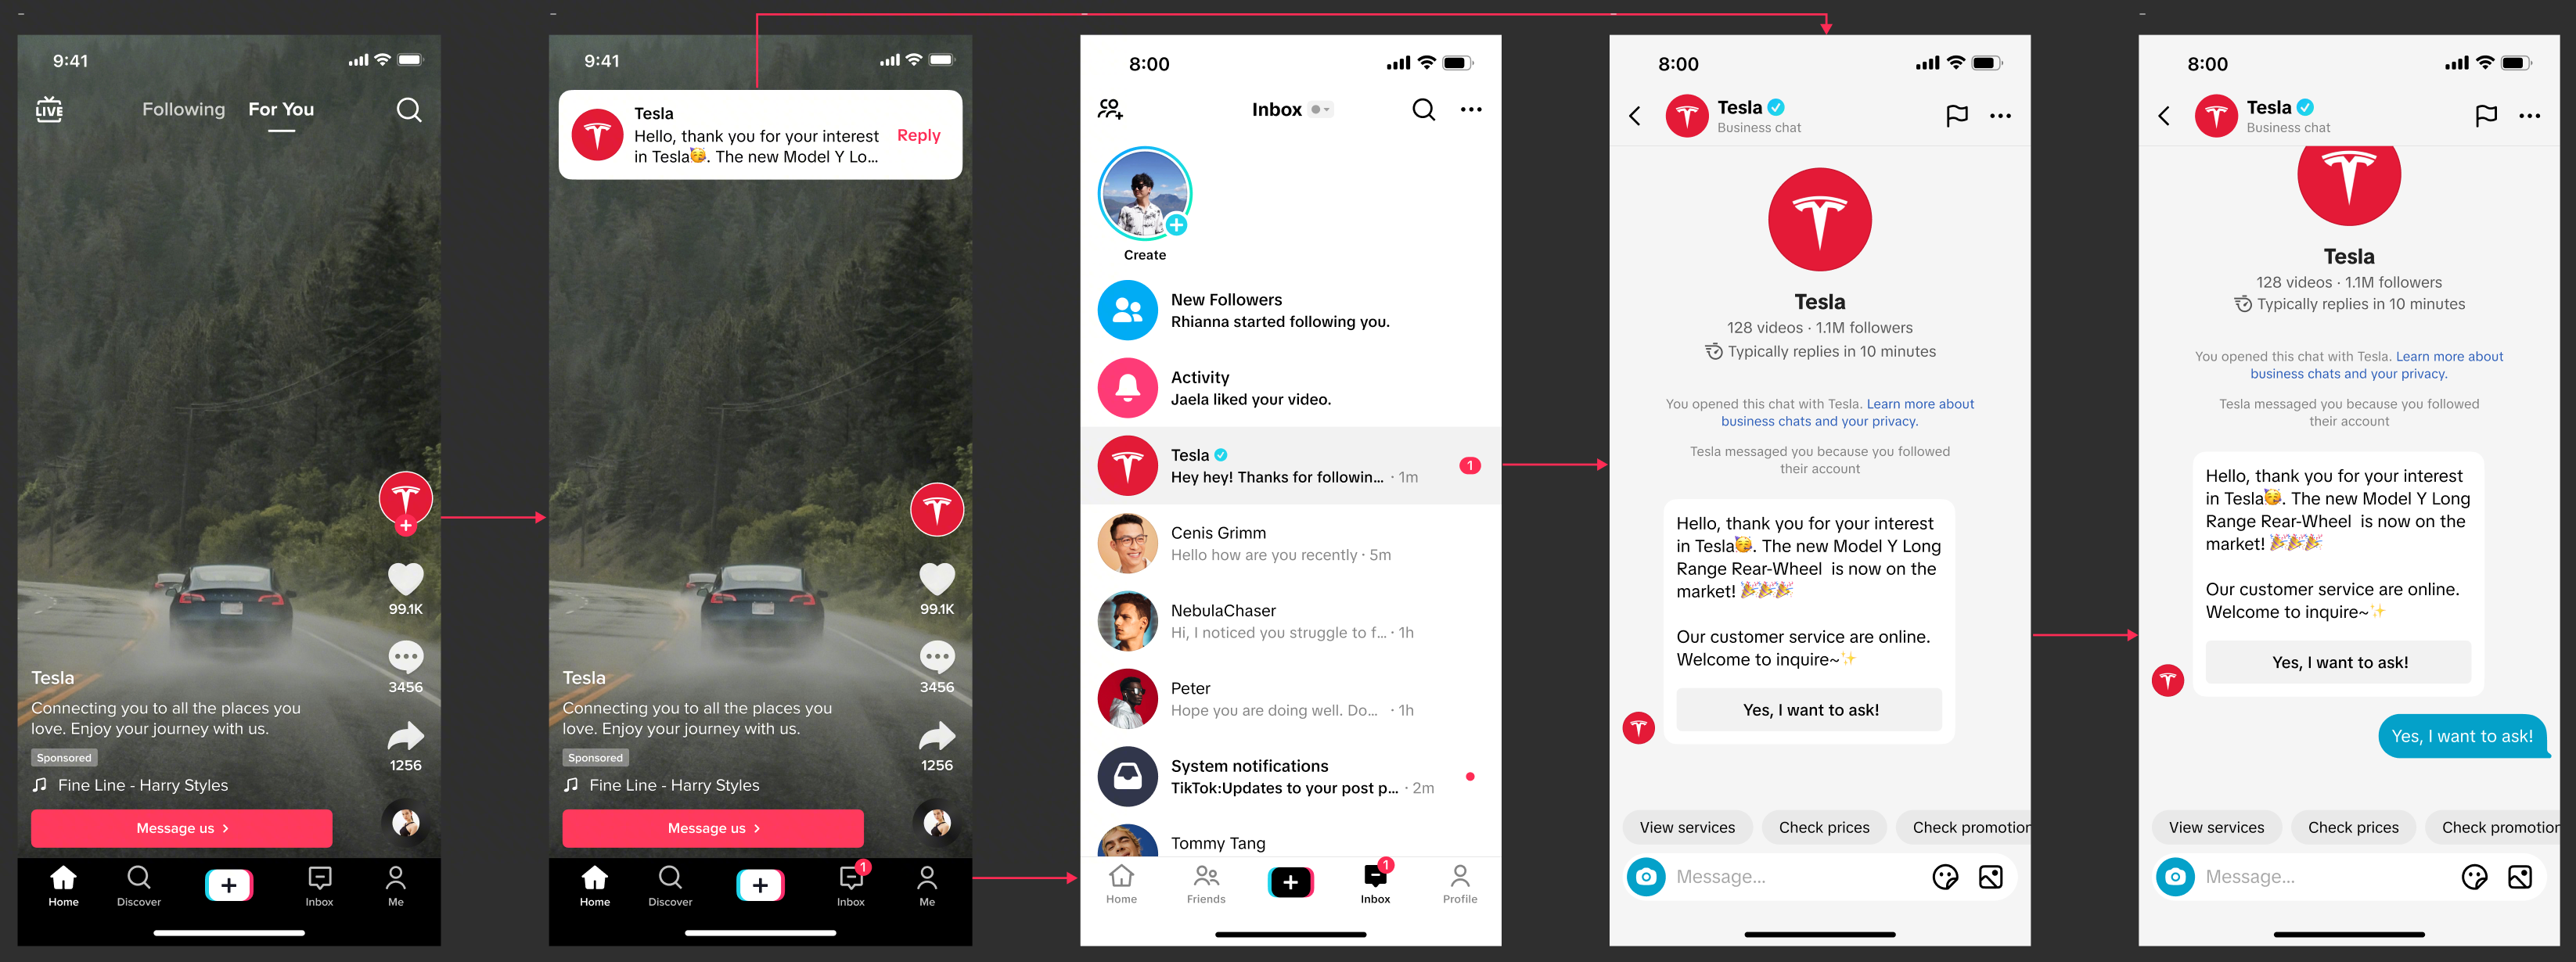
Discover the setup process, playbooks and success stories behind top TikTok Shop sellers.
Brand Live Growth
Build a durable brand business on TikTok Shop.
Brand Live Growth · Traffic-Driving Tools
Overview & Framework
Purpose This playbook covers every tool whose primary job is to bring viewers into a LIVE session and turn them into followers or a reachable audience: how each tool works, why it drives traffic, how to set it up on desktop and mobile, and how the tools combine across the LIVE lifecycle. For conversion-driving playbook covers the tools whose primary job is turning attention into purchases, please refer to it here. A few tools (LIVE Giveaway, Seller Coupons, LIVE Dashboard and Analytics, LIVE Auction) appear in both playbooks because they genuinely serve both goals – each playbook frames them for its own purpose.
Traffic Tool Overview & Operating Framework
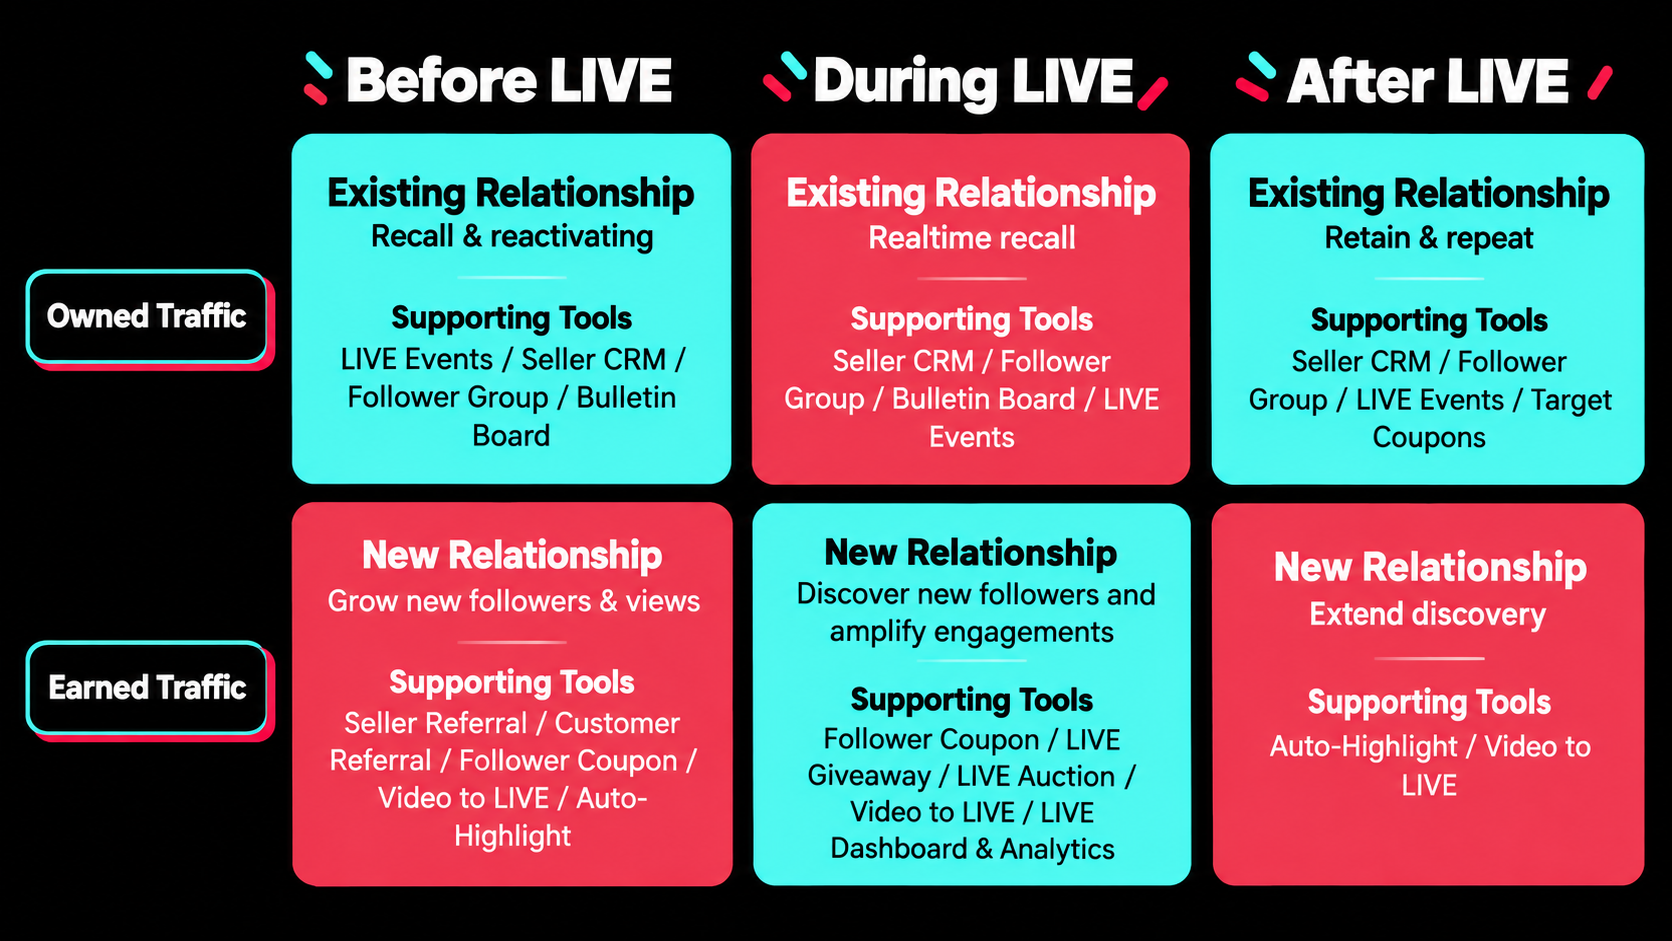
The traffic toolkit should be operated as a lifecycle system across Before LIVE, During LIVE, and After LIVE. At every stage, split the work into two types of traffic:
Owned traffic: audiences the seller can repeatedly reach through follower, customer, community, event, and message channels: , , , .
Earned traffic: reach that expands through platform discovery, viewer engagement, content distribution, and social proof: , , , .
Core Framework Use owned traffic to recall and activate existing relationships, then use strong LIVE content and participation mechanics to earn incremental discovery. Manage both purposes together: grow new followers so the seller owns more future reach, and maintain existing relationships so followers and past shoppers keep coming back.
The Traffic Toolkit at a Glance
Tool
Traffic Type
Use It When…
Pairs Best With
Owned (anchor)
Every time you plan a LIVE – it's the calendar anchor everything else is built around.
, , for promotion; for pre-heat video anchors.
Earned (always-on)
Continuously, before/during/after every LIVE – it is the mechanic that turns any short video (shoppable, non-shoppable, or ad) into a real-time LIVE entry point via the breathing-light avatar.
(supplies the video source material) and (the anchor pinned to pre-heat videos).
Earned (zero-effort)
Turn it on for every LIVE – it requires no manual recording or editing and keeps feeding fresh clips into the loop during and after the stream.
(the traffic mechanic those clips power) and (source of the next pre-heat cycle).
Owned (acquisition)
The goal is importing off-platform audiences as followers – it is the only tool that pays the seller per follower, uncapped.
, so the follow carries an immediate reward.
Customer Referral
Owned (acquisition)
The goal is turning existing buyers into an acquisition channel for new shoppers.
as the off-platform counterpart.
Owned (conversion of the follow)
During the LIVE opening minutes, to give a follow an immediate, claimable reward.
's follow task and , to move the new follow into an owned channel.
Earned + owned hybrid
You need a low-friction reason for a viewer to stay, comment, watch longer, or follow – every task pairs with a required non-purchase entry method.
(reward the follow) and (capture it).
Earned
You want a competitive, countdown-driven moment that lifts comments and watch time on top of a normal demo.
to watch engagement signals and decide when to run it.
Owned (community)
You want an always-on space that keeps high-intent fans reachable between LIVEs.
to message the group at scale instead of manually posting.
Owned (broadcast)
The account has 50,000+ followers and is unrestricted – use it for reminders, polls, and community updates between LIVEs.
to promote upcoming sessions.
Owned (segmentation)
You need to message a specific customer segment (new follower, cart abandoner, lapsed, etc.) rather than everyone at once.
and as delivery channels; to define segments.
Measurement layer
Continuously – to see which traffic source, hook, or LIVE moment is actually working, including the dedicated channel view.
Every tool above – it's the feedback loop that tells you what to do more or less of.
Priority: What to Set up First
Always-on foundation (every LIVE, no exceptions): schedule as the calendar anchor, switch on , and keep a posting cadence running before, during, and after the stream.
Owned-audience layer (any LIVE with an existing base worth reactivating): add , , and (where eligible) to recall known audiences at the right moments.
Acquisition layer (when the objective is explicitly growing reach): add , Customer Referral, and to bring off-platform or buyer audiences into the follow path.
In-room amplification (during the LIVE): add and to convert attention into comments, watch time, and follows in real time.
Feedback loop (always on): use – including its channel view – to see what is actually working and adjust the layers above.
Traffic Framework by LIVE Stage, Traffic Type, and Purpose
LIVE Stage
Traffic Type
Primary Purpose
Recommended Tool Mix
Why This Mix
Before LIVE
Owned
Maintain existing relationships through recall and activation
, , Follower Group,
anchors a specific date. CRM and recall known audiences against it. warms fans who already have LIVE notifications enabled.
Owned
Increase new followers
, Customer Referral, ,
's per-follower payout is the only tool built to import external audiences as followers. Pair with so the follow has an immediate reward.
Earned
Increase new views & new followers
(pre-heat videos), ,
Pre-heat short videos posted before a LIVE carry the breathing light the moment the account goes live. Prior highlight clips and event teasers give unfamiliar viewers a benefit-led preview before they've committed to following.
During LIVE
Owned
Maintain existing relationships through real-time activation
, , ,
Timed and pushes bring known high-intent audiences back at specific moments – hero reveal, deadline, launch.
Owned
Increase new followers
,
Turn current viewers into followers by connecting immediate participation benefits with future access to deals, reminders, and community updates.
Earned
Increase new followers and widen discovery
, , ,
Lift engagement signals – comments, watch time, shares, follows, product clicks – so the room has stronger discovery momentum. keeps converting anyone scrolling the feed while you're live, via the breathing light on any of your recent videos.
After LIVE
Owned
Maintain existing relationships through retention
, , , Target Coupons
Segment new followers, buyers, viewers, product clickers, and cart abandoners, then give each group a next-best action for the next session or purchase.
Earned
Increase new followers through content extension
,
Turn the best LIVE moments into always-on discovery assets. Every Auto-Highlight clip re-enters circulation as a new entry point that keeps attracting viewers long after the session ends.
Before LIVE: build the audience pool and attendance intent
Before LIVE, traffic work should make the session worth attending and ensure the right audience knows when and why to come. Don't treat pre-LIVE traffic as one reminder blast – combine relationship recall, follower acquisition, and discovery content.
Objective
Owned Traffic Actions
Earned Traffic Actions
Recall and activate existing relationships
Schedule as the calendar anchor. Use CRM to message relevant customer segments, to warm up fans, and where available to reinforce the campaign promise.
Increase new followers
Use and Customer Referral to bring off-platform or buyer audiences into the shop follow path. Pair with a clear reason to attend the upcoming LIVE.
Publish short, benefit-led videos that preview what non-followers gain by following before LIVE – early reminder access, access, or community-only updates. Attach the LIVE Event link to each one so its breathing light is live-ready the moment you go on air, and follow the Video to LIVE posting cadence: at least 4 non-shoppable videos in the 24 hours before a daily LIVE (more in the last 12 hours), and at least 10 pre-heat videos starting 3 days out for a Mega LIVE.
During LIVE: convert attention into followers, engagement, and repeatable reach
During LIVE, owned and earned traffic should work together. Owned channels bring known audiences back at the right moments; in-room mechanics create engagement that exposes the session to more viewers and converts first-time viewers into followers
LIVE Moment
Traffic Purpose
Recommended Tool Mix
Operating Guidance
Opening 5–10 minutes
Increase new followers and activate early viewers
, ,
Lead with a low-friction reason to stay. A Giveaway follow-task plus gives an immediate reward for following; a prompt converts that follow into an owned channel on the spot.
Before major deal or hero product reveal
Recall existing relationships
, , ,
Send a short, benefit-led reminder to high-intent audiences before the strongest traffic and conversion moment. Avoid long copy; emphasize timing, scarcity, and the hero product.
Engagement dip
Earn incremental reach
, ,
Trigger participation before momentum drops too far. Watch signals and adjust product demo, script, or incentive if viewers are not commenting, staying, or clicking products.
High-engagement spike
Capture new followers and post-LIVE assets
, ,
Use the spike to ask for follows and group joins, then mark the moment for post-LIVE shoppable content if it contains a strong demo, reaction, deal, or social proof – will turn it into the next asset automatically.
Final 10 minutes
Retain and reactivate
, ,
Don't end only with a purchase call-to-action. Direct viewers to the next relationship step: follow, join group, reserve next LIVE, or watch for recap clips.
After LIVE: retain the audience and extend discovery
After LIVE, traffic work should protect the value created during the session. New followers need a reason to stay connected, existing customers need a next-best action, and high-performing LIVE moments should be reused as discovery content.
Segment the audience immediately. Separate new followers, returning viewers, buyers, product clickers, cart abandoners, giveaway participants, and high-engagement viewers. Each segment should receive a different CRM follow-up message or incentive.
Retain new followers. Invite them into , send a welcome or thank-you message where applicable, and point them to the next LIVE Event or upcoming product moment.
Reactivate existing relationships. Use CRM and community updates to recap the value of the session, remind shoppers of products they engaged with, and create a reason to return.
Extend earned reach. Publish or shoppable clips from the strongest demos, deal reactions, comparison moments, or host explanations. Treat each clip as a new entry point, not a passive recap – reprocess the strongest ones into pre-heat material for the next session.
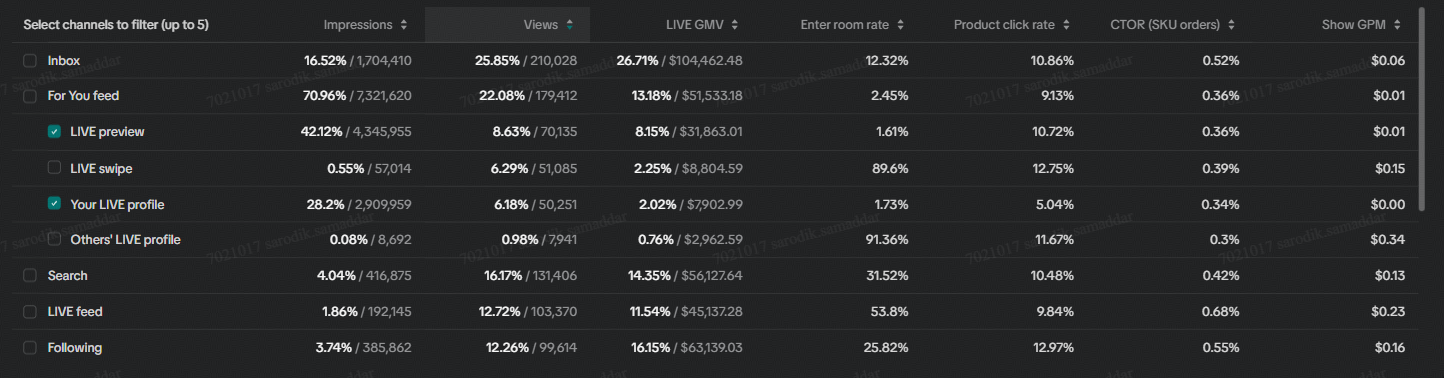
Feed learnings into the next traffic plan. Use – including the channel breakdown (impressions, watch PV, GMV, and video-level ranking) – to identify which audience source, reminder timing, content hook, or engagement mechanic created the most valuable traffic.
Brand Live Growth · Traffic-Driving Tools
Live Giveaway
LIVE Giveaway helps sellers and creators reward viewers during a TikTok Shop LIVE to increase engagement, watch time, purchases, and customer loyalty.
What is it?
LIVE Giveaway helps sellers and creators reward viewers during a TikTok Shop LIVE to increase engagement, watch time, purchases, and customer loyalty. Hosts can choose from two ways for viewers to participate:
Task-based Giveaway: Viewers enter by completing selected participation tasks, such as following the host, commenting, watching for a minimum amount of time, or making a purchase. Winners are selected from eligible participants.
Top Shopper Giveaway: Viewers compete based on their total purchase GMV during the LIVE. The top shoppers with the highest GMV when the Giveaway ends automatically win. Both Auction and Buy Now purchases made in the LIVE count toward the ranking.
For either Giveaway type, hosts can select the prize, set the number of winners, choose the Giveaway duration, and launch the Giveaway directly during their LIVE. Only one LIVE Giveaway can be active at a time, regardless of Giveaway type.
Why it drives traffic?
Task-based Giveaway — Follow task: "Follow the host" is a selectable task, which makes this the only mechanic in the kit that converts a spectator into a follower against a concrete, immediate reward rather than an implicit ask. Stack it with a Follower Coupon so the follow itself unlocks a claimable discount, compounding the incentive. Task-based Giveaway — Comment / watch-time tasks: These tasks are chosen specifically to lift comments and watch time — the engagement signals that widen algorithmic discovery — even from viewers with no purchase intent at all.
How to set it up?
Step 1
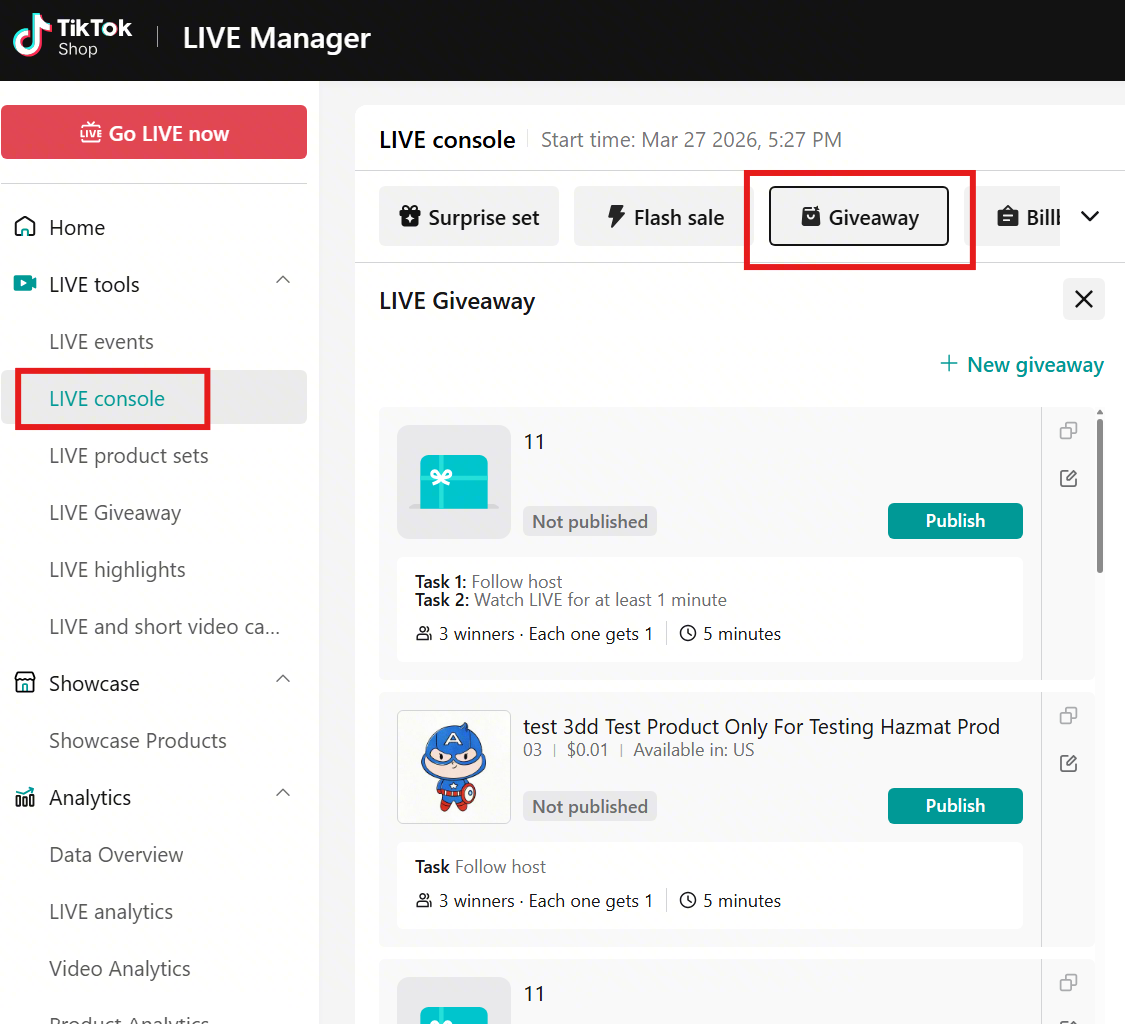
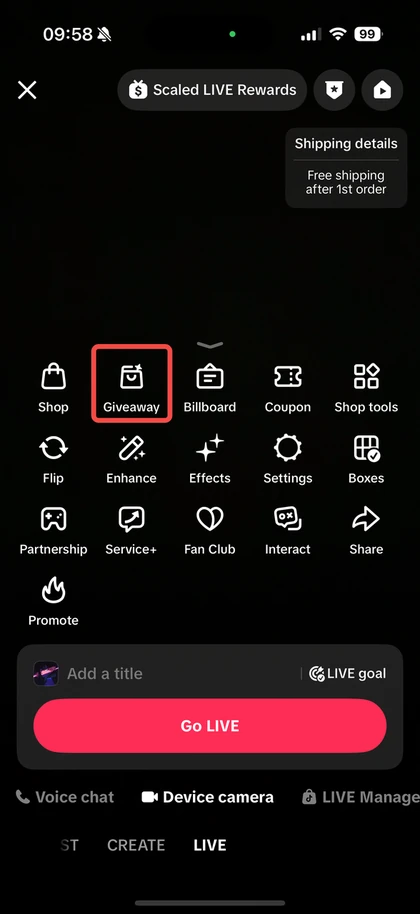
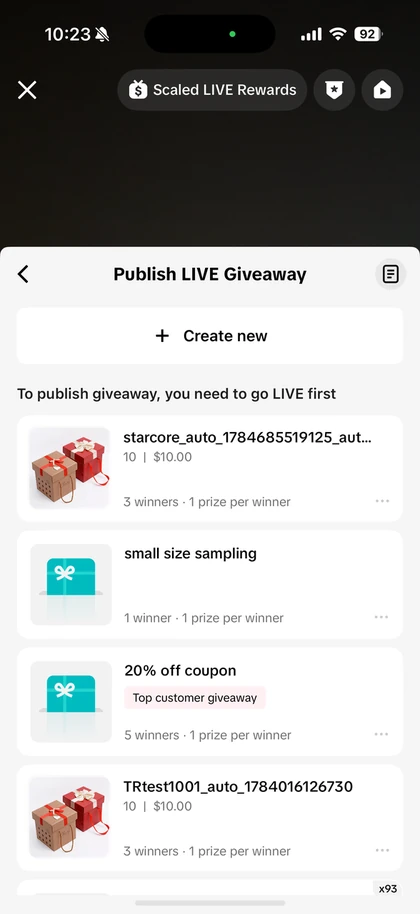
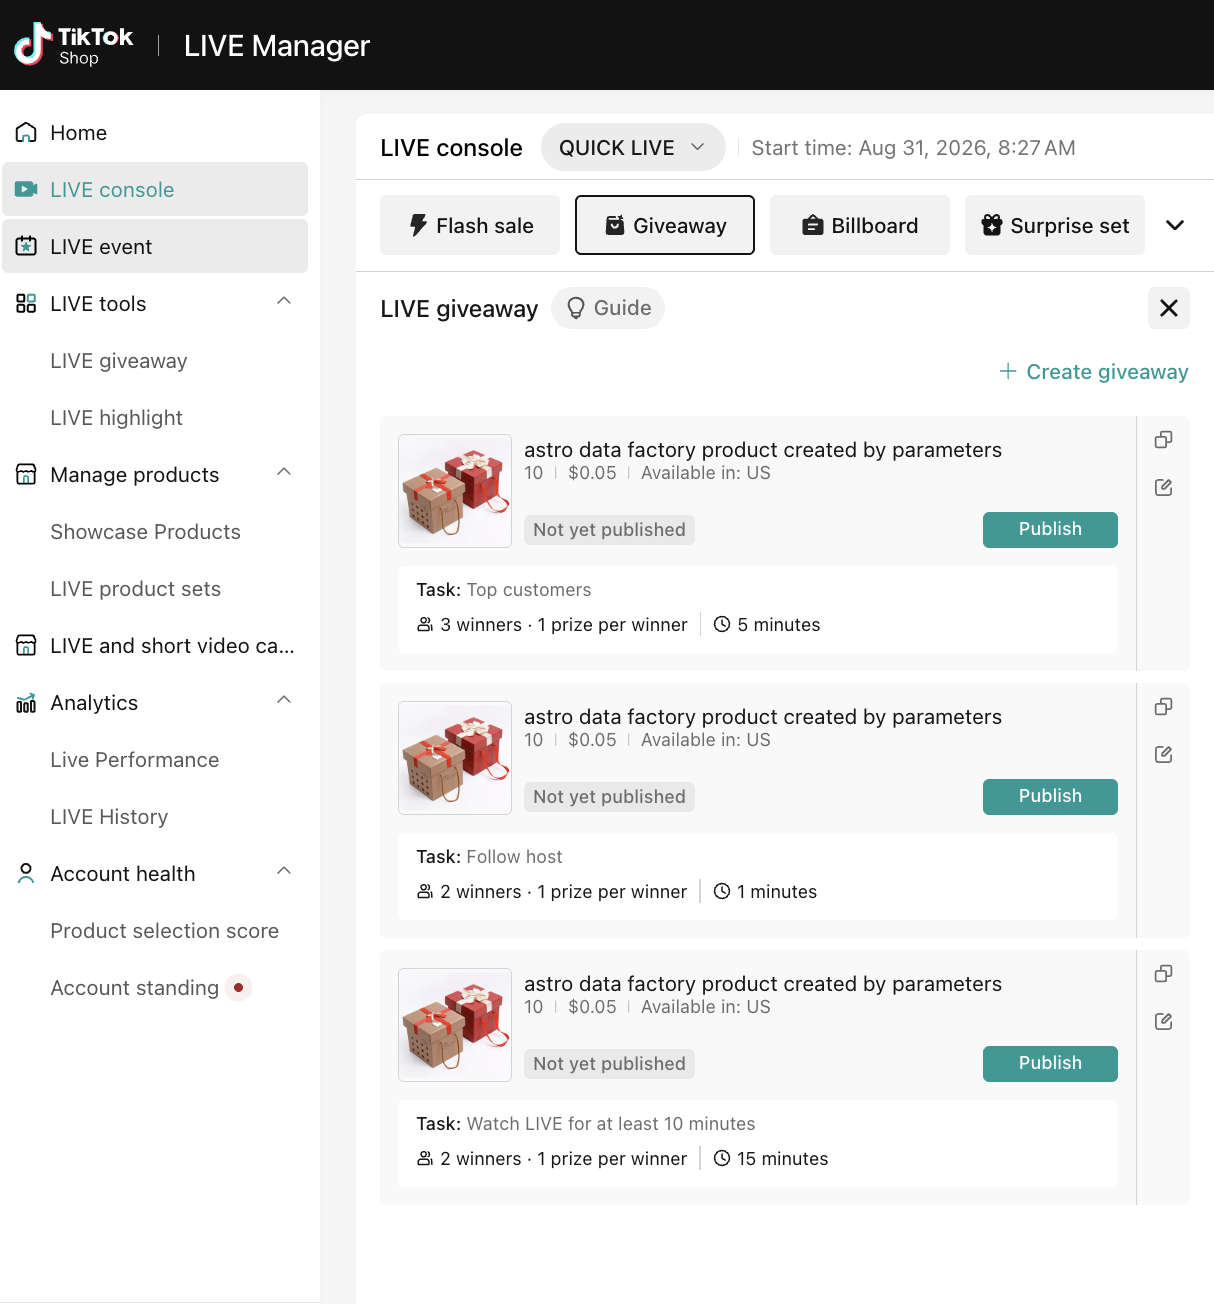
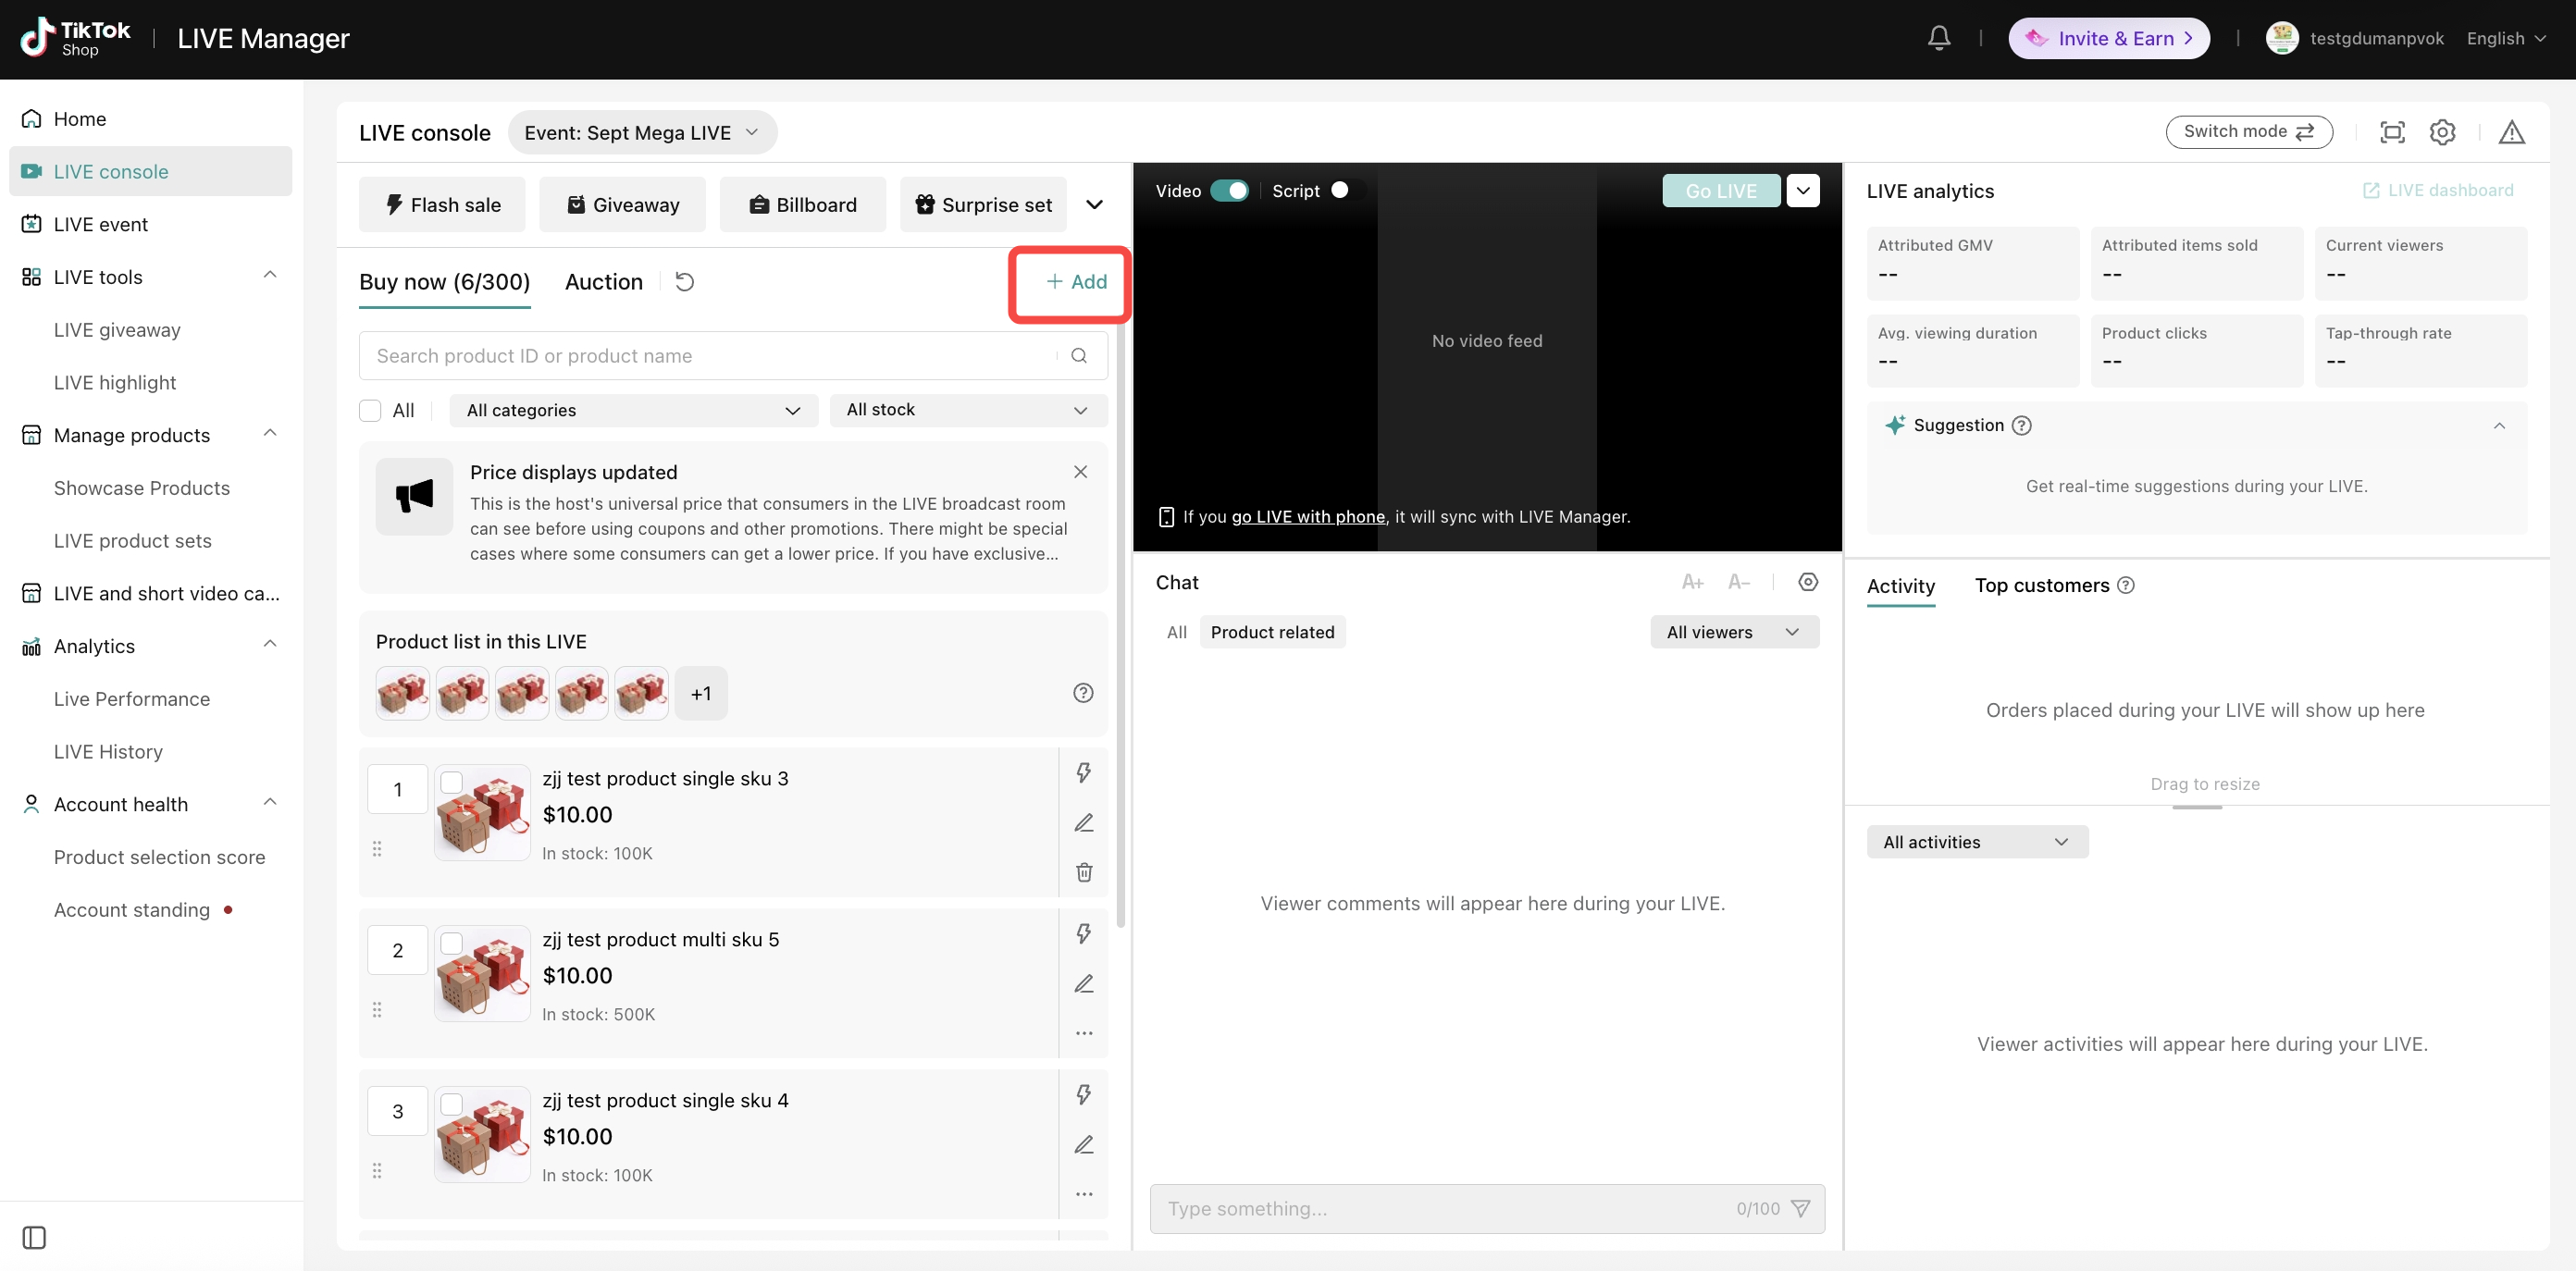
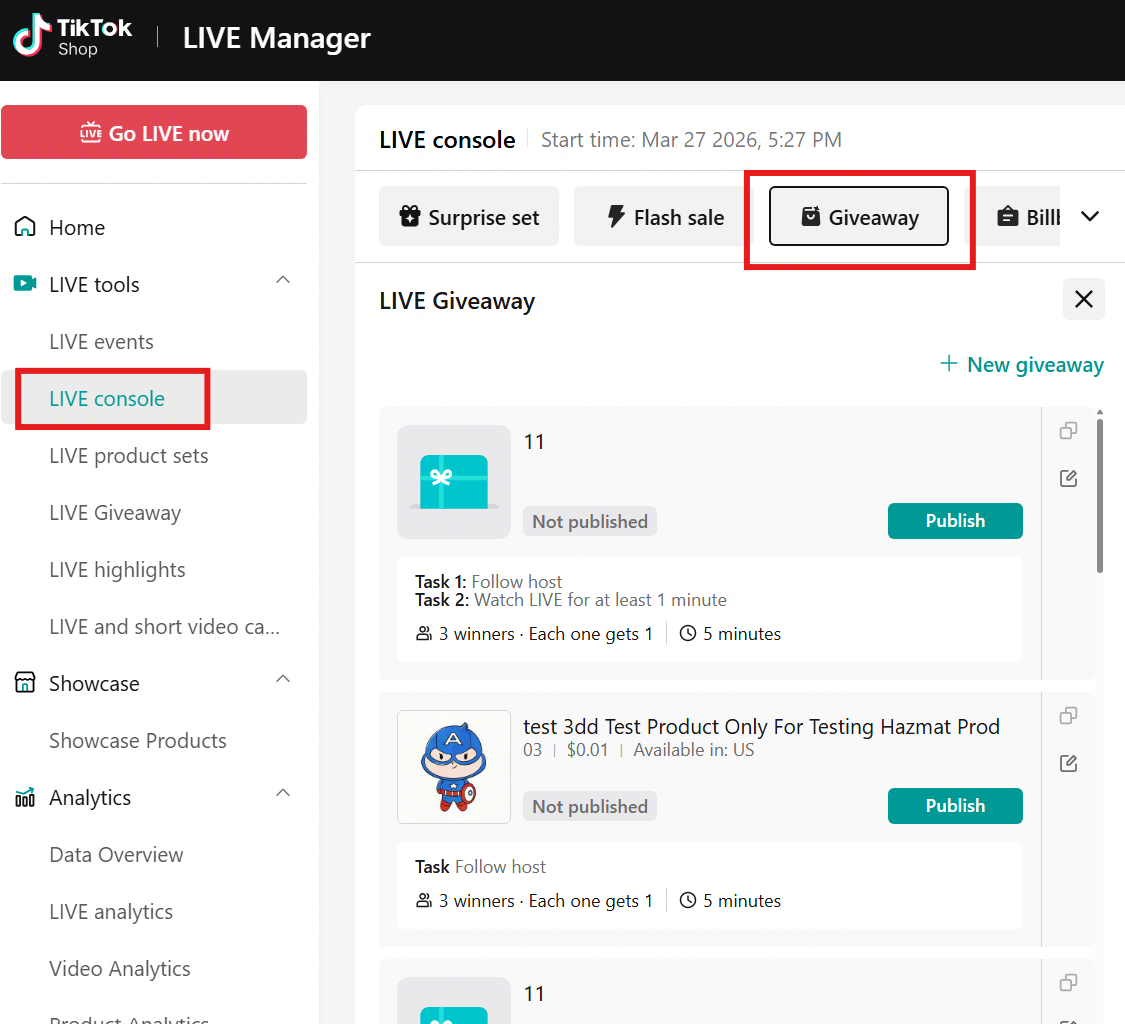
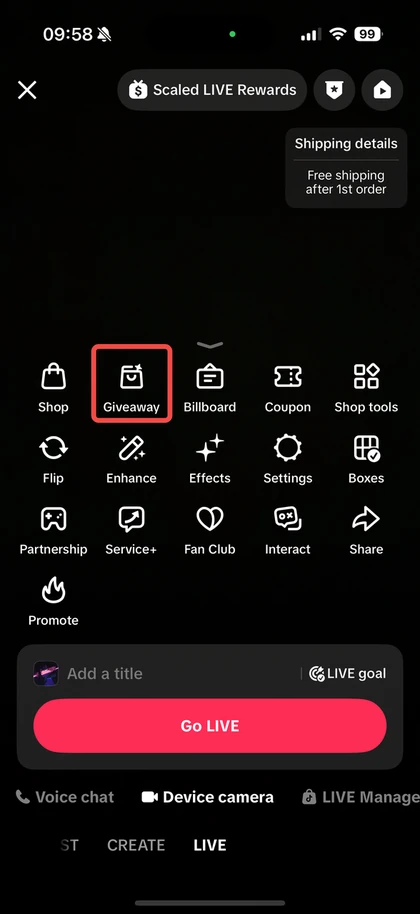
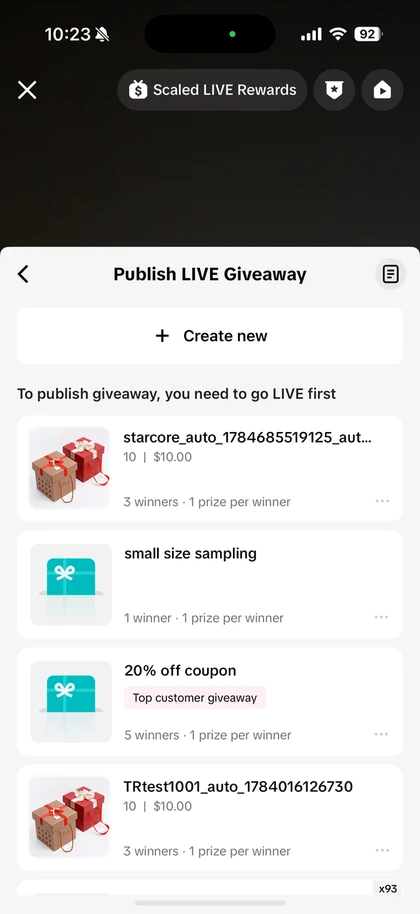
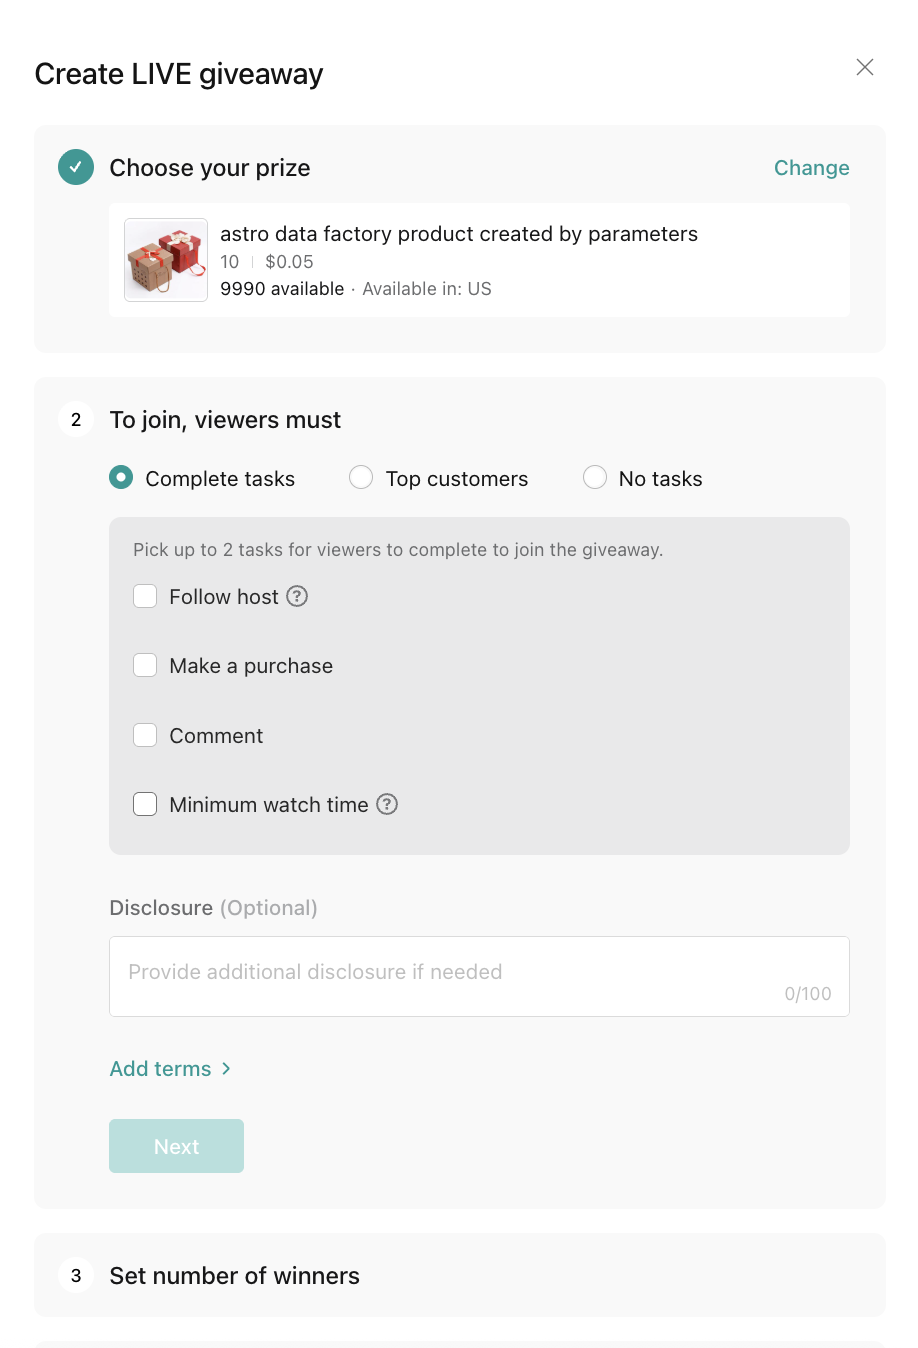
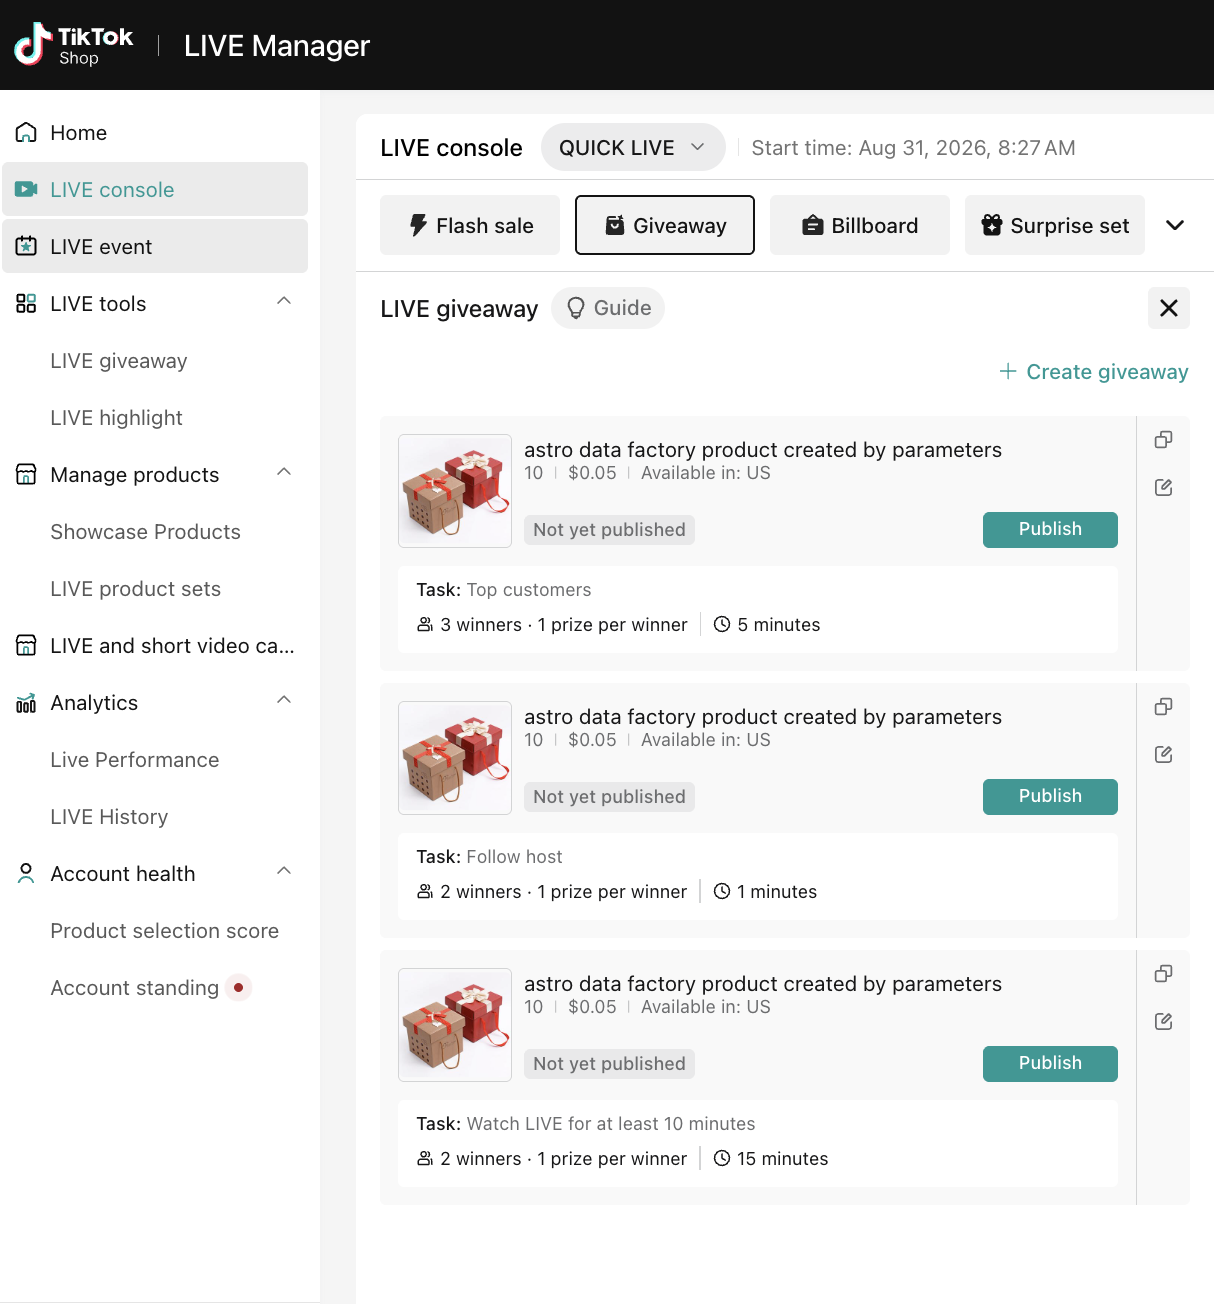
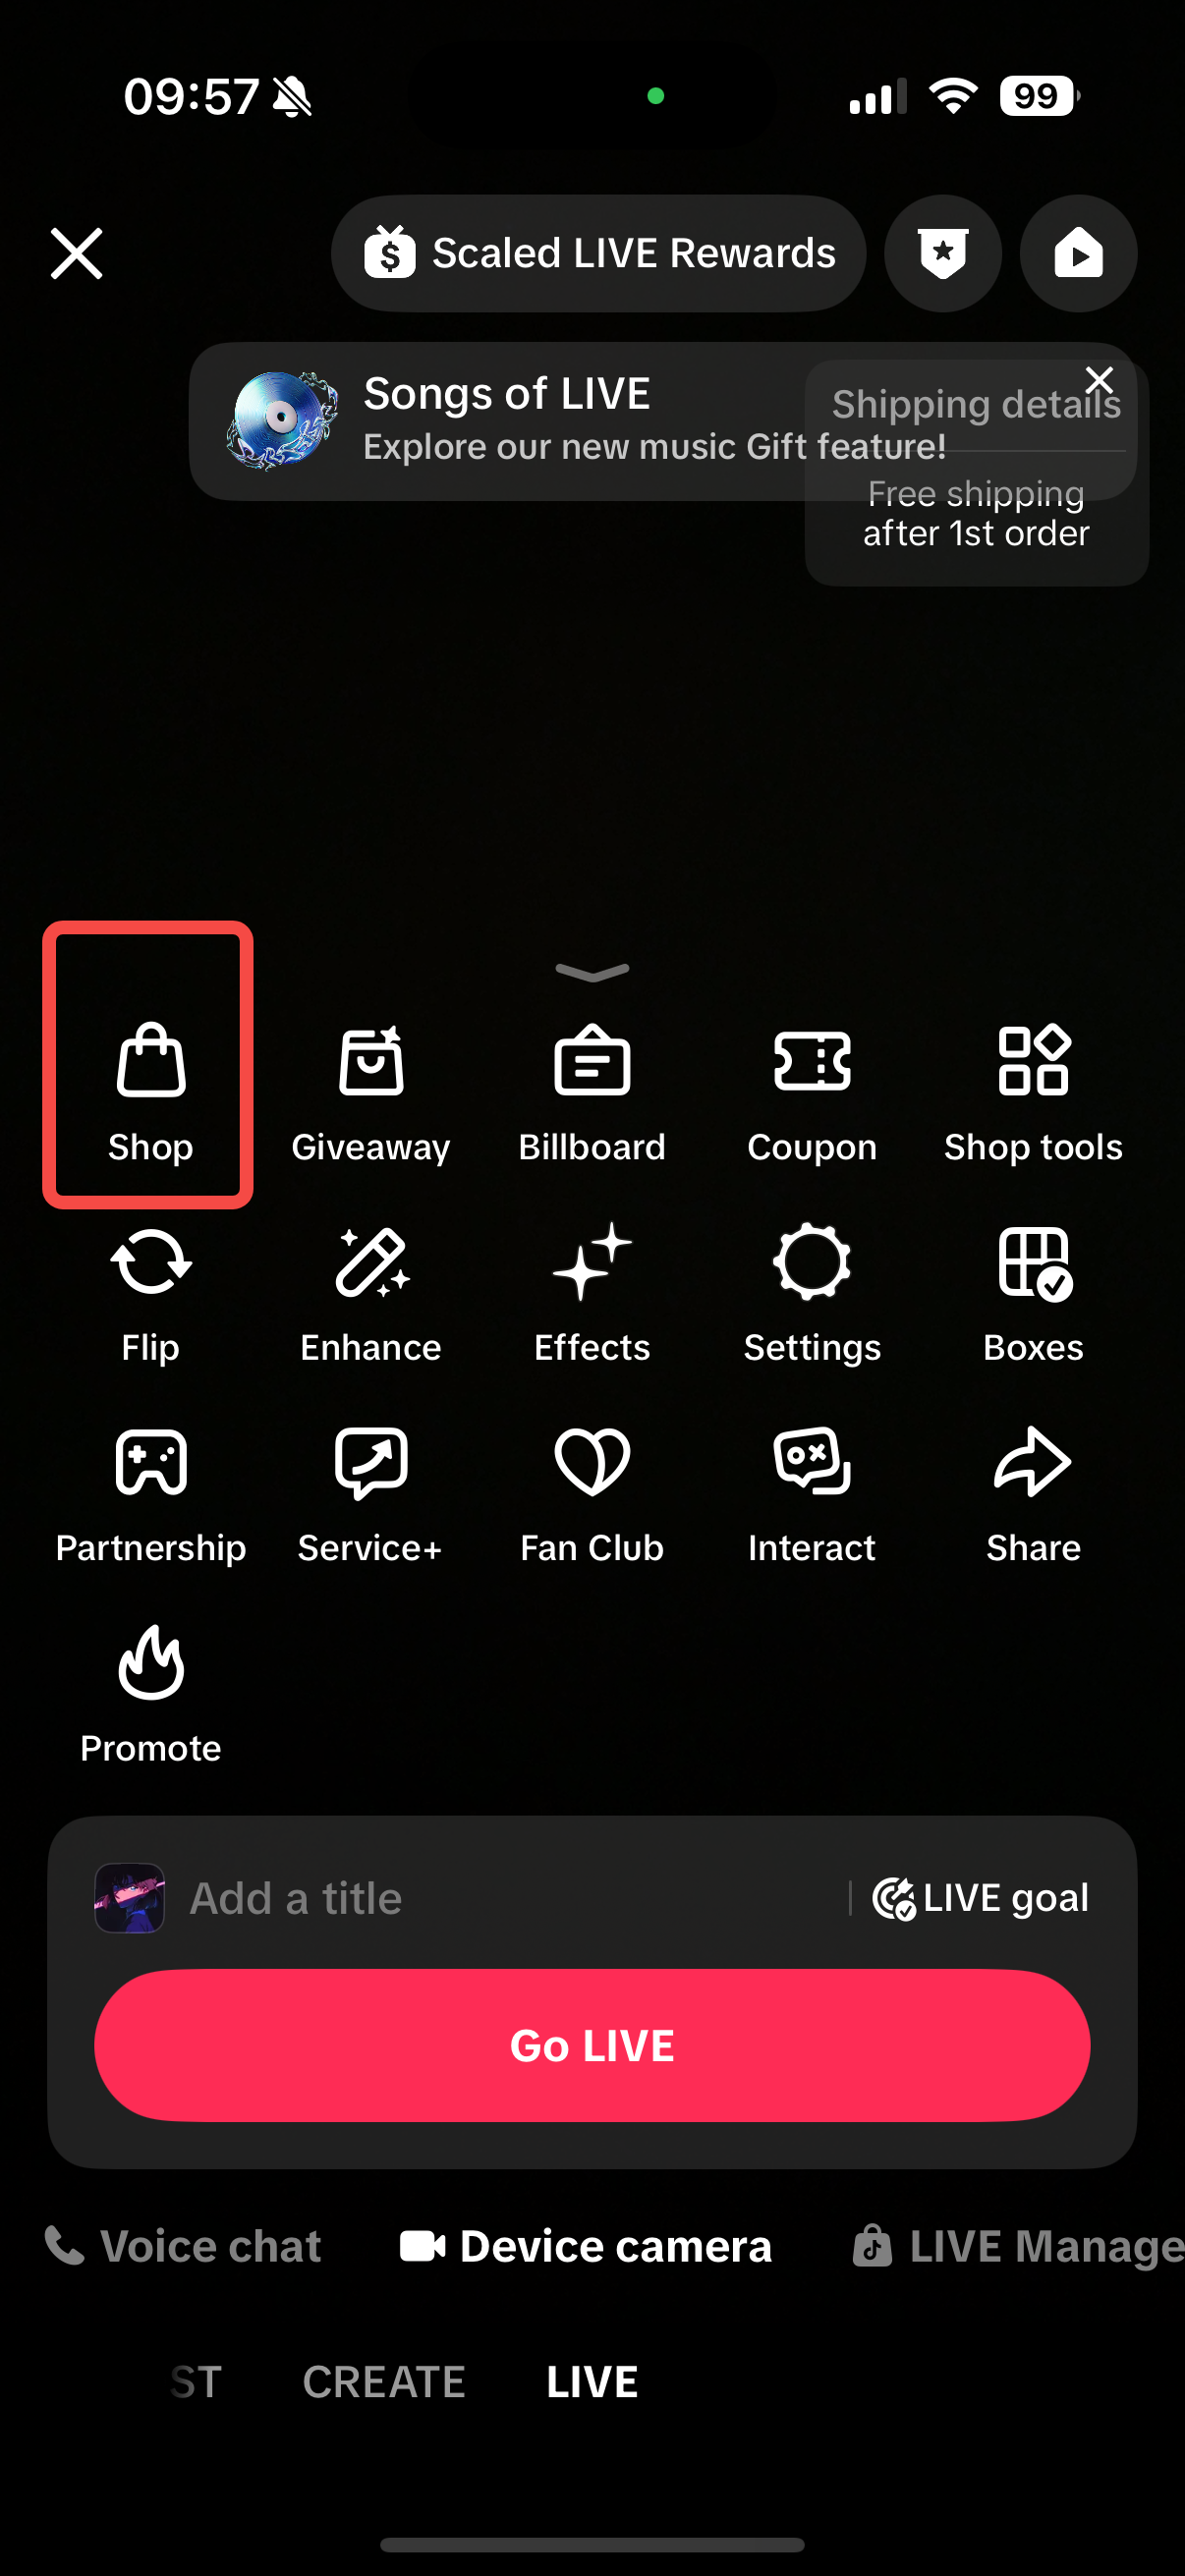
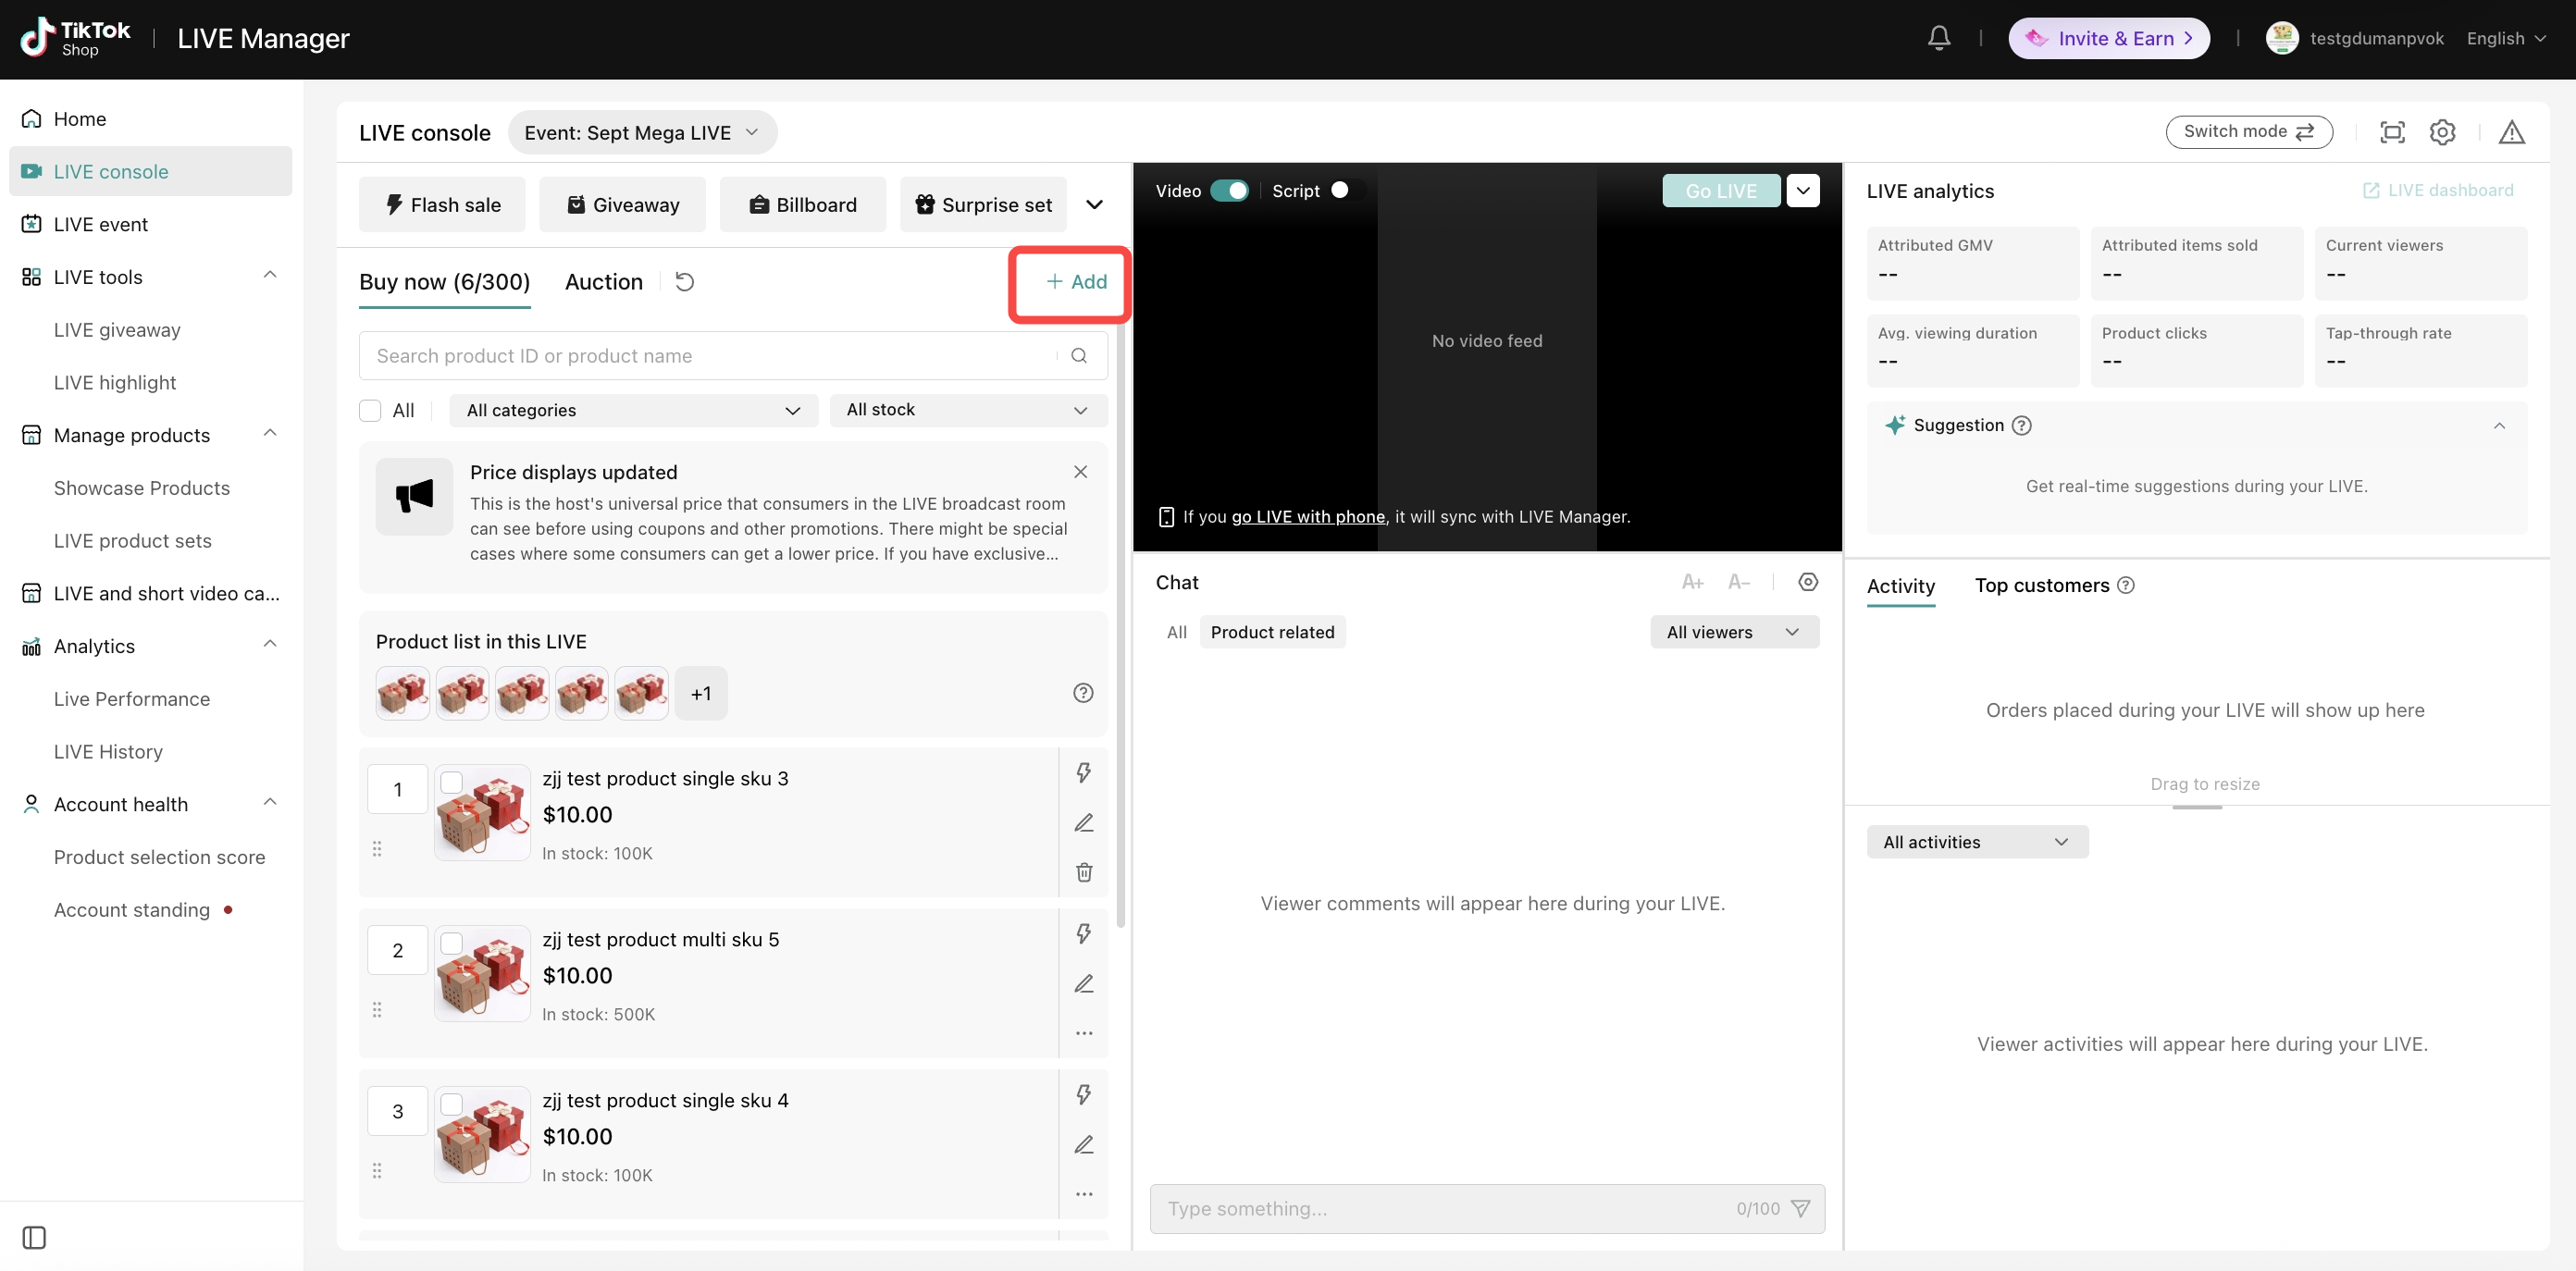
Step 1: Open LIVE Giveaway On desktop, log in to LIVE Manager and go to LIVE Console > Giveaway. You can create a Giveaway before your LIVE or while you are LIVE. Select + New giveaway to get started. From your LIVE in the TikTok app, open LIVE tools > LIVE Giveaway. Existing Giveaways will appear here. Select Create new to create a Giveaway.
DesktopMobile
Step 2
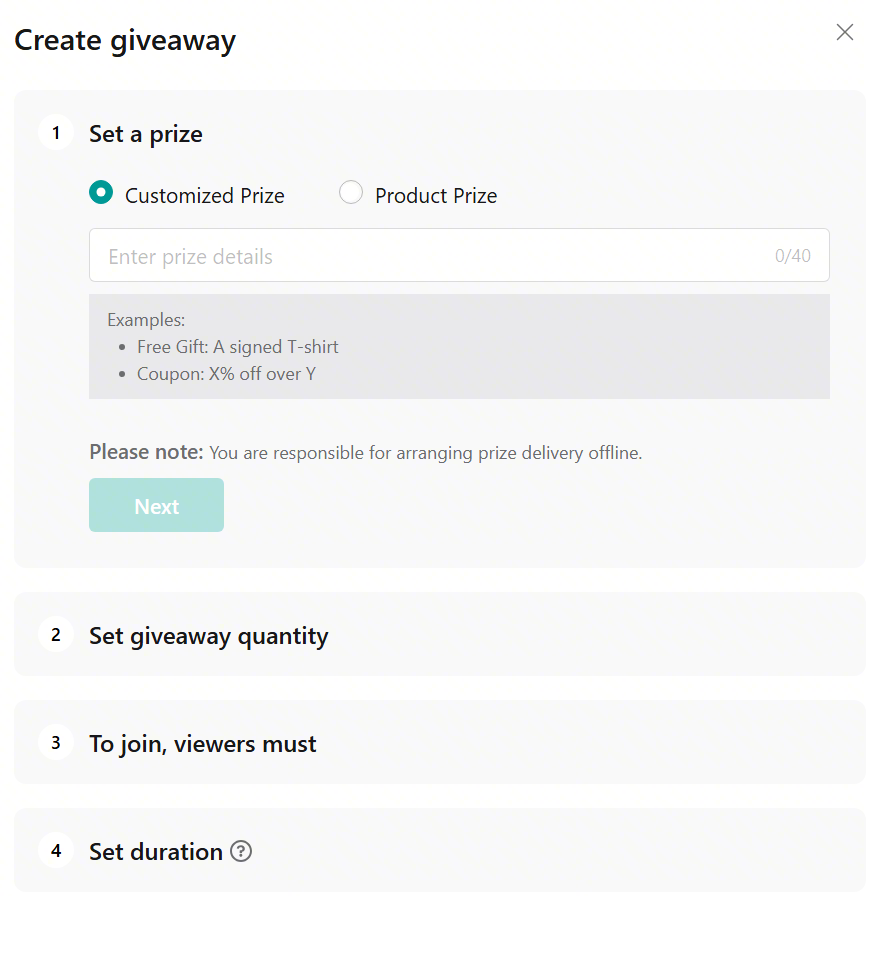
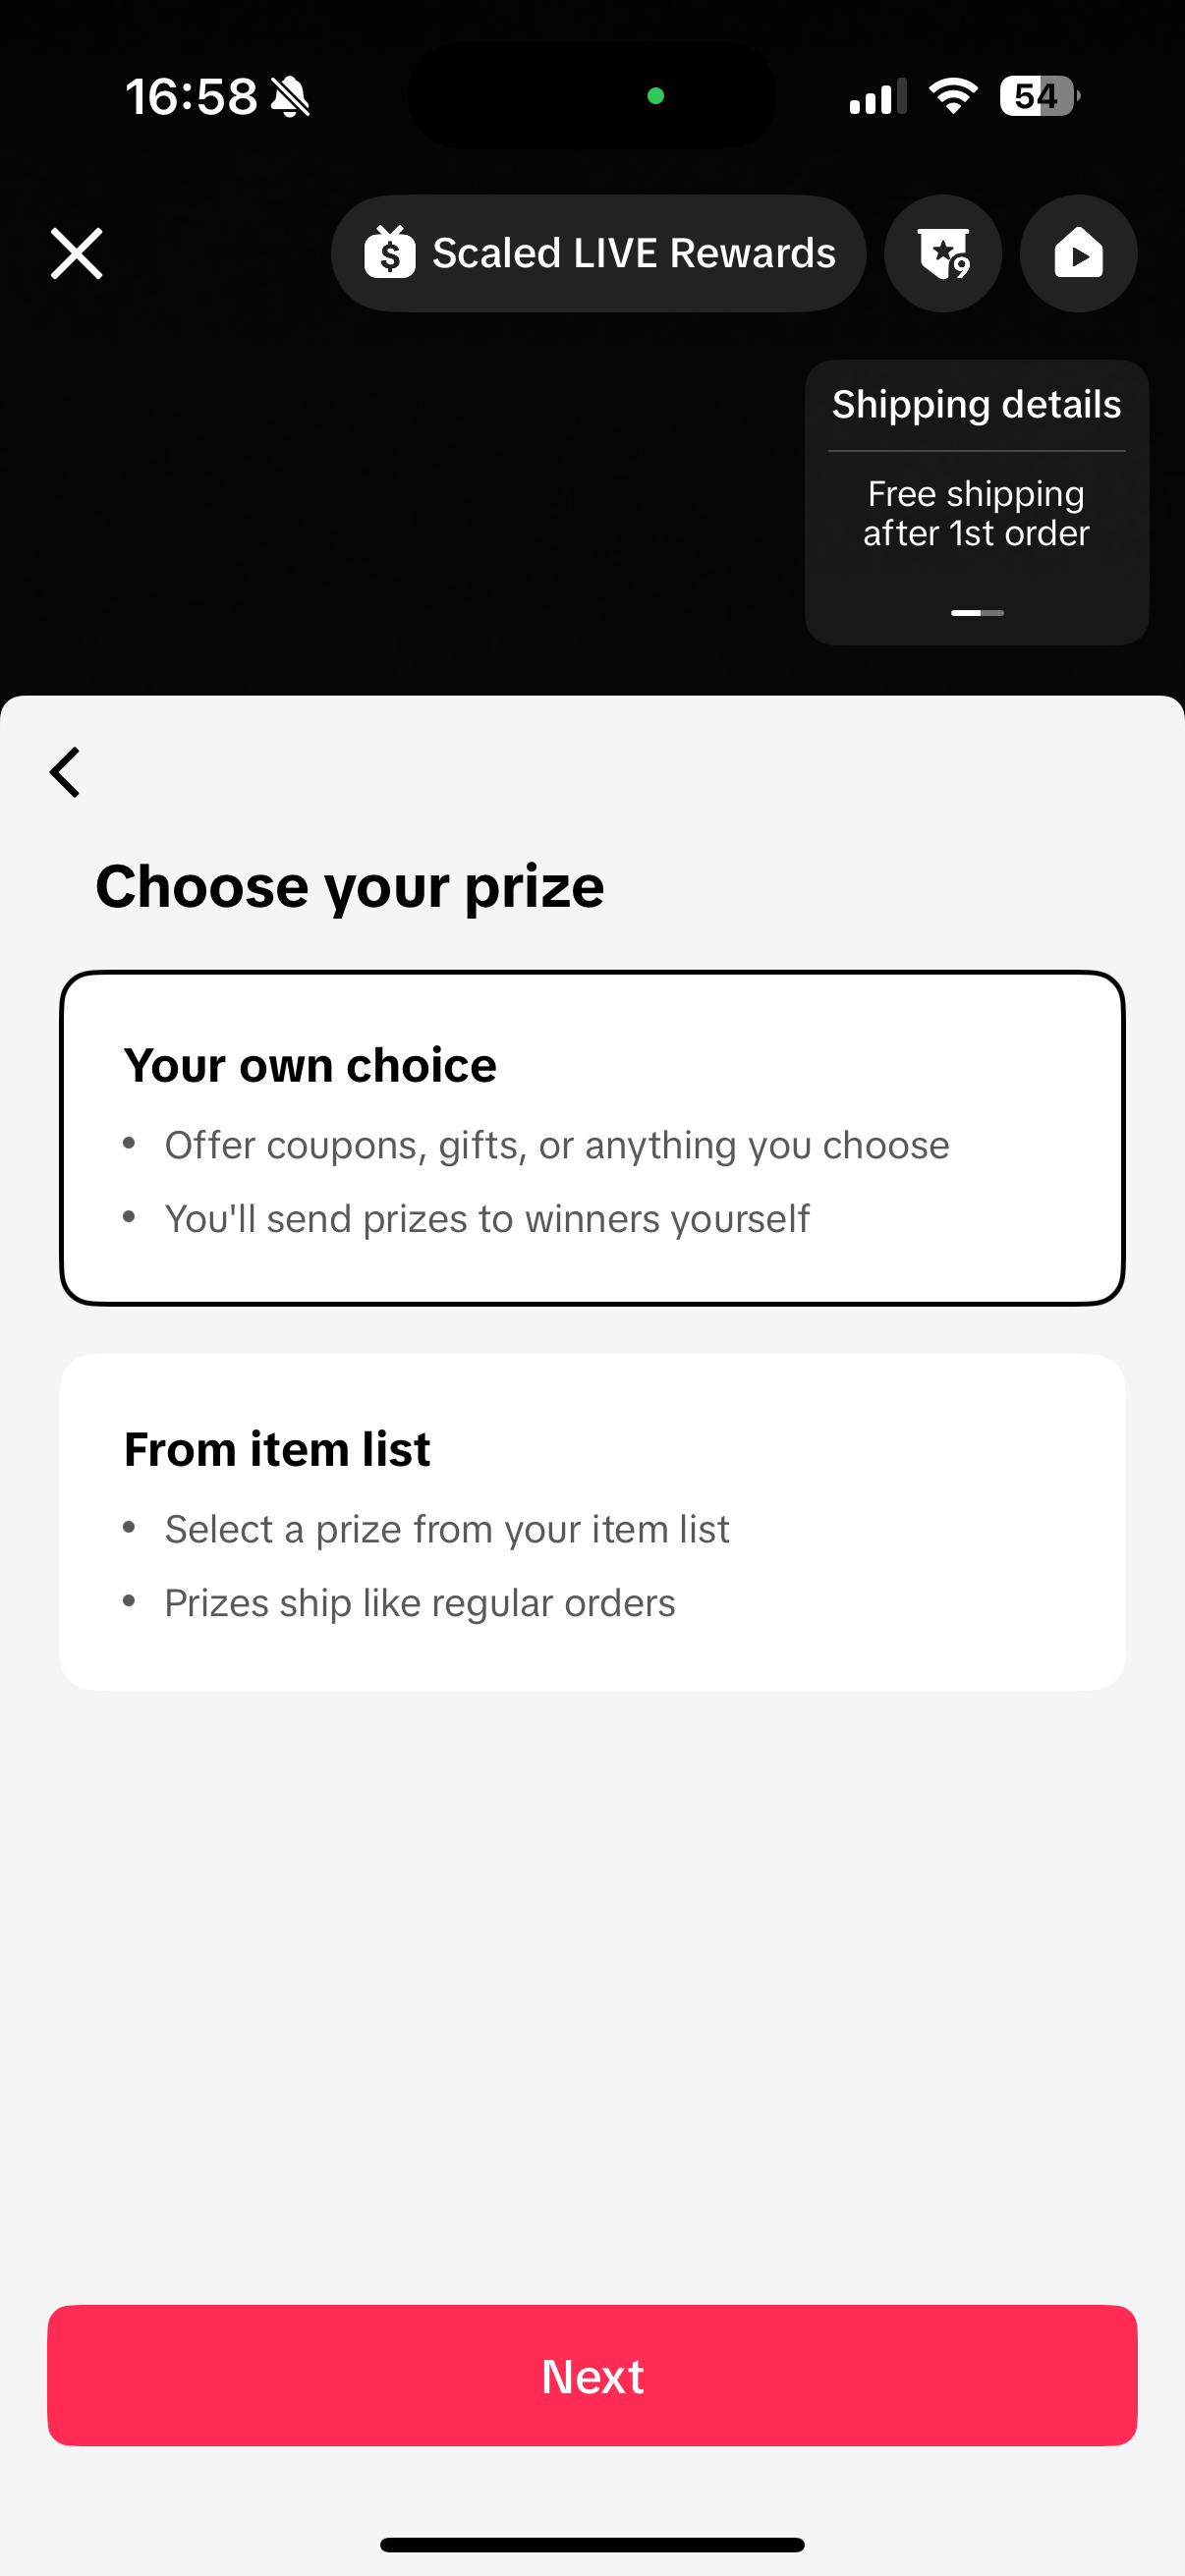
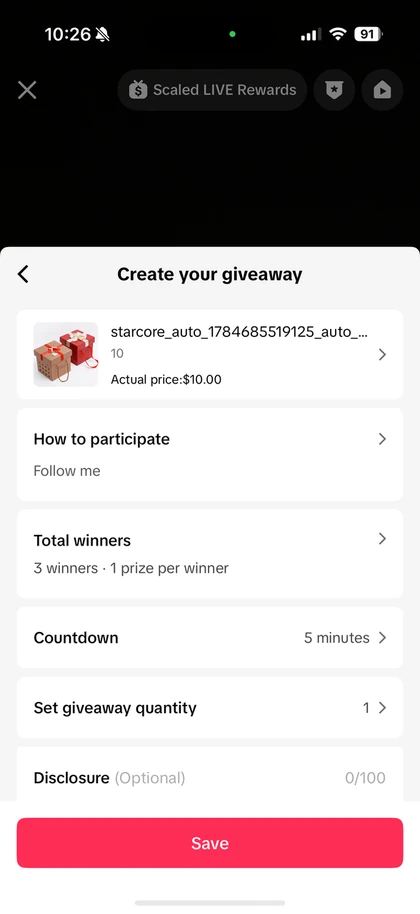
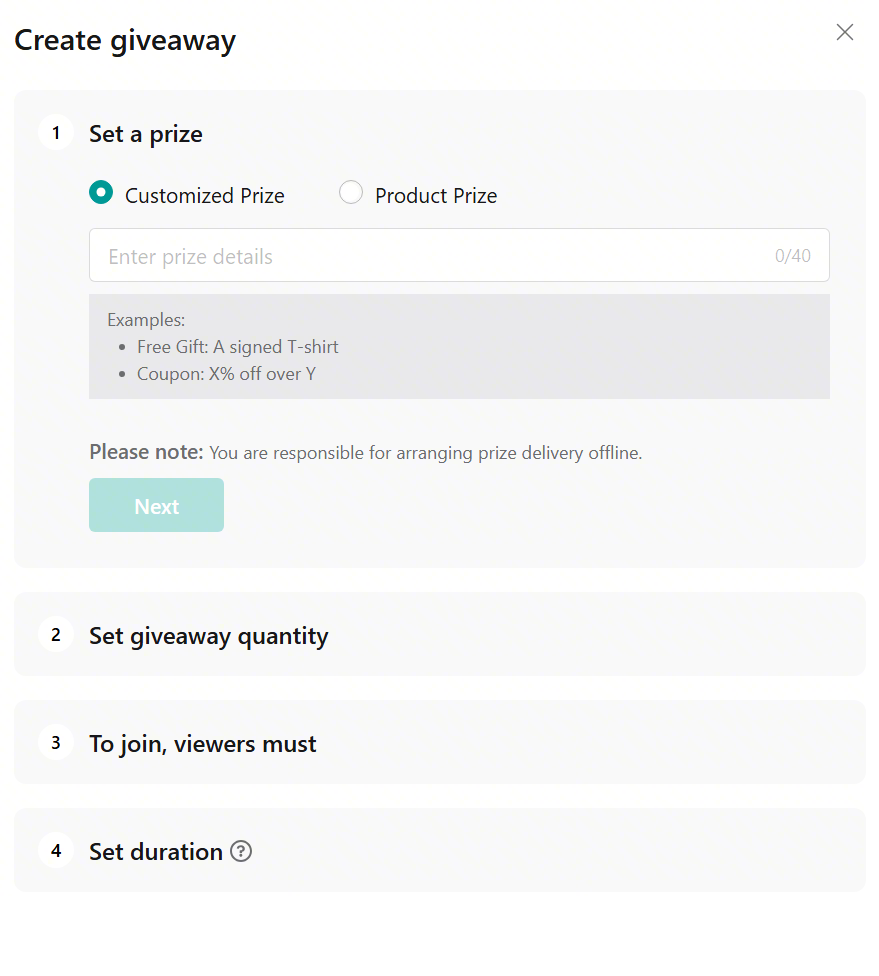
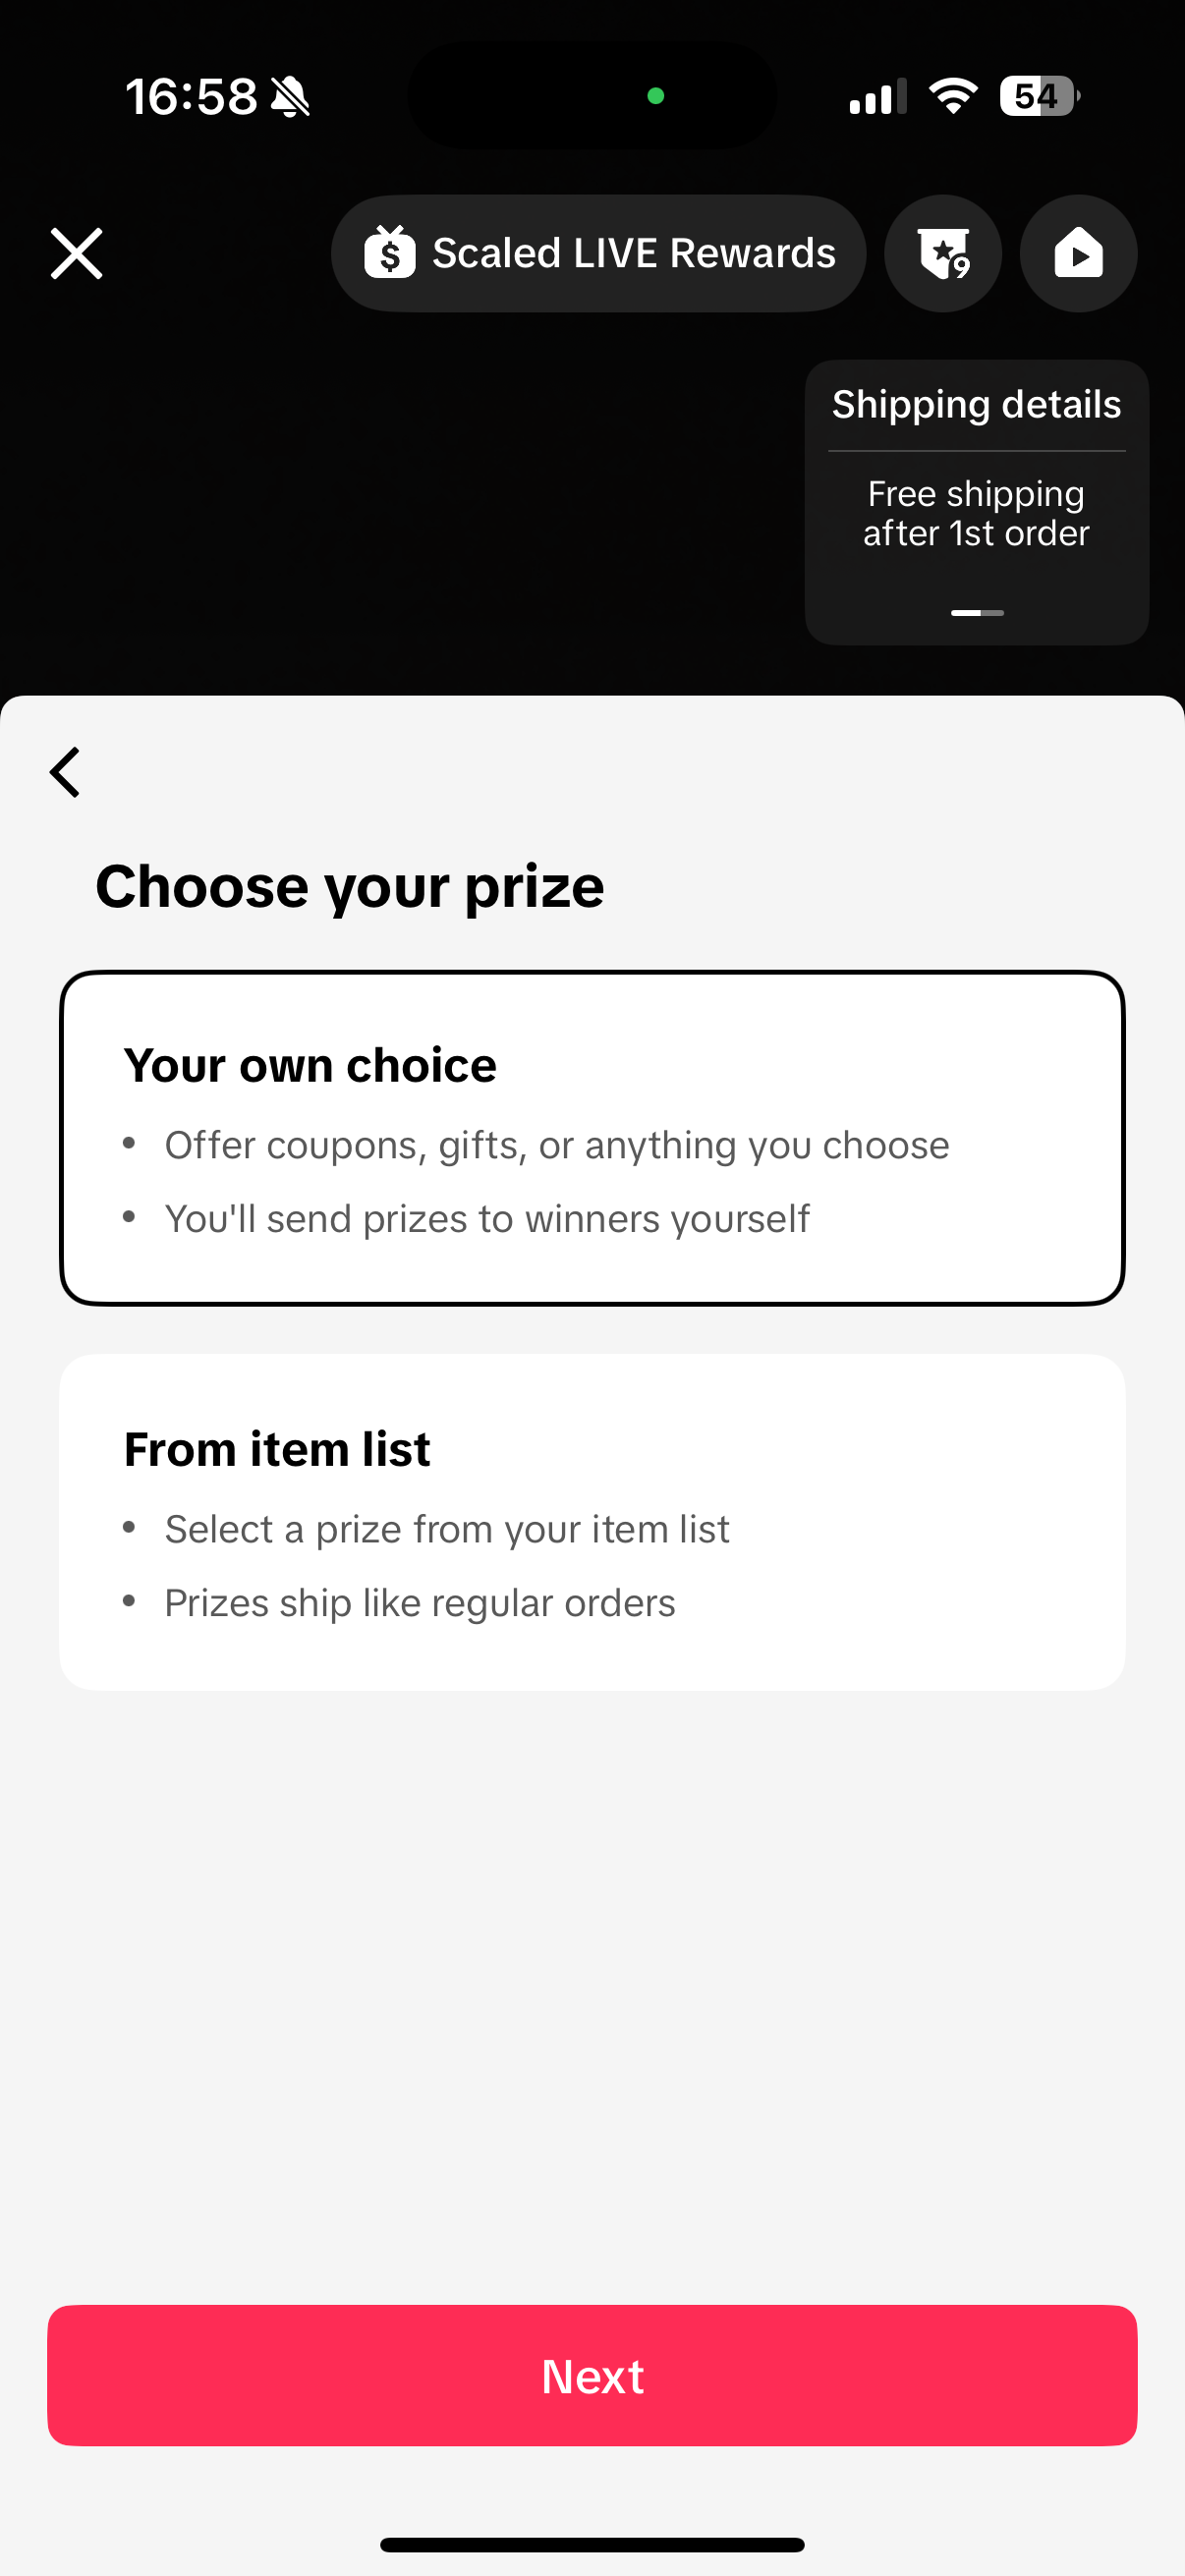
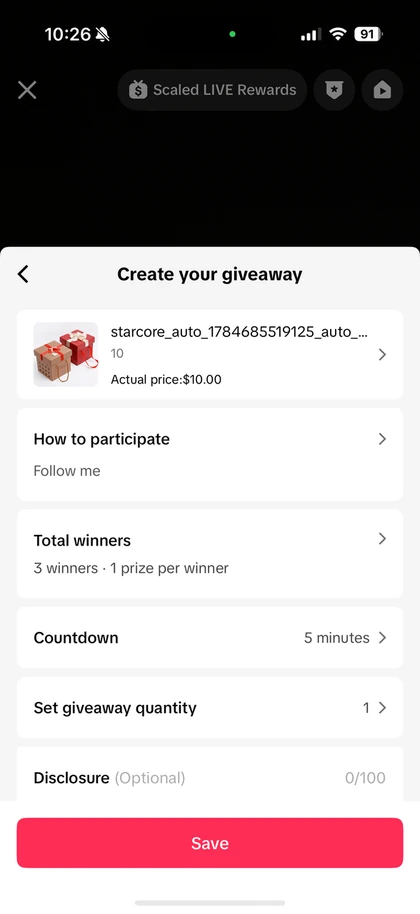
Step 2: Select a Prize Choose the prize you want to offer. You can set up:
A custom prize, such as merchandise or another reward; or
A product prize from your shop.
Then, set the prize quantity or number of winners.
DesktopMobile
Step 3
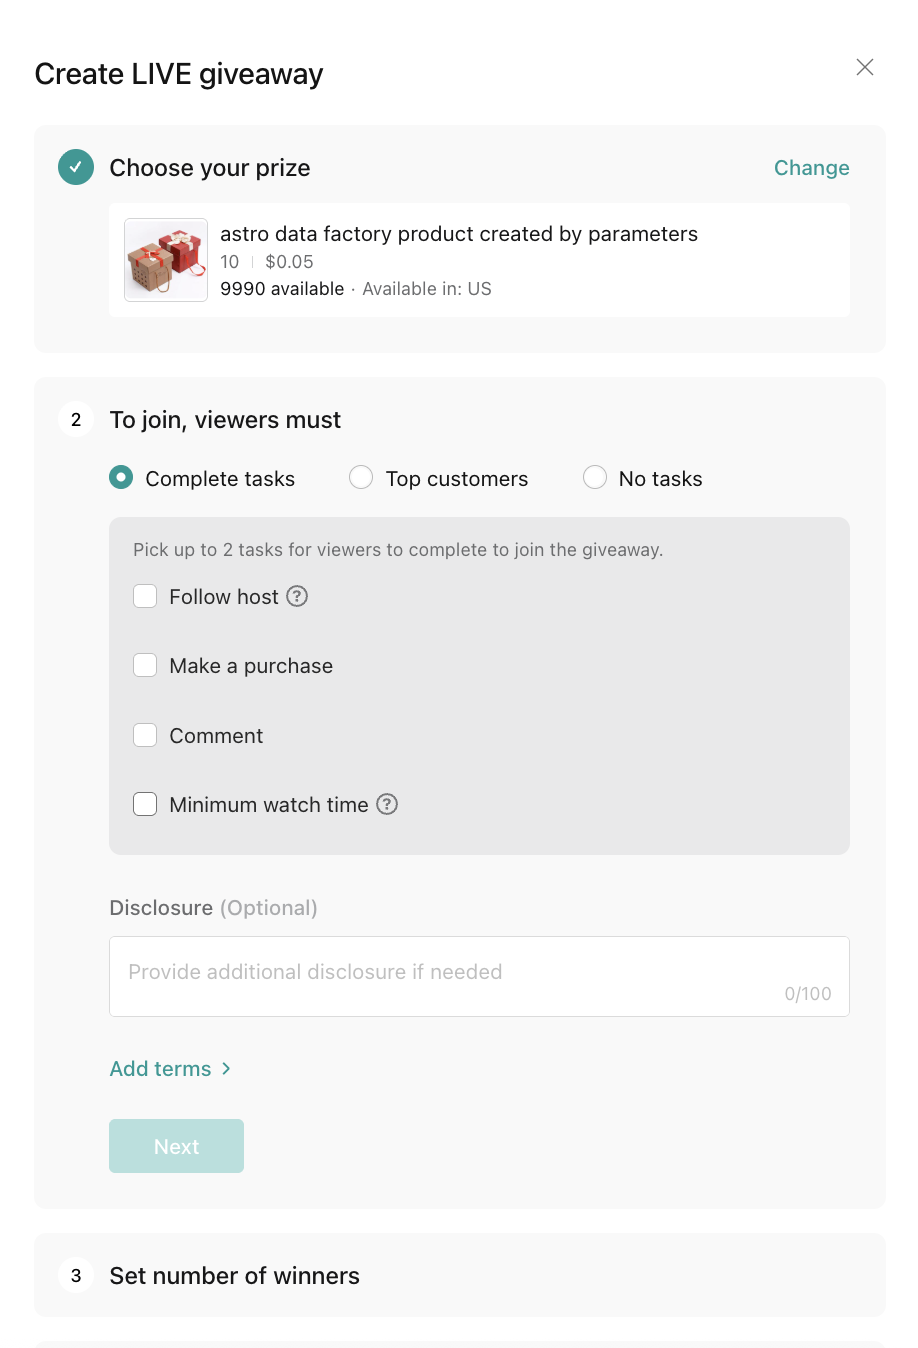
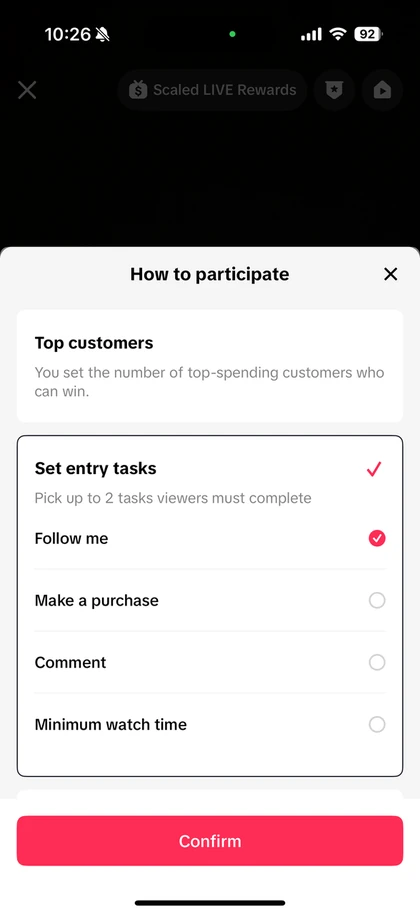
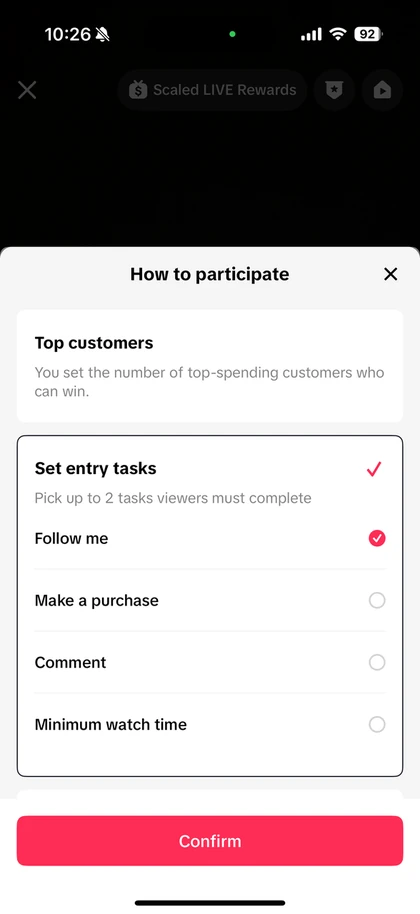
Step 3: Choose How Viewers Can Win Select your Giveaway participation method: Task-based Giveaway Choose up to two participation tasks:
Follow the host
Comment with a specified phrase
Watch the LIVE for a minimum amount of time
Make a purchase*
*Viewers must also be provided a non-purchase method of entry in accordance with TikTok Shop requirements. Top Shopper Giveaway Under How to participate, select top customers. Choose the number of winners. Viewers who purchase during the LIVE are automatically ranked by GMV, and the top shoppers when the Giveaway ends will win. Both Auction and Buy Now purchases count. If shoppers have the same GMV, the shopper who reached that amount first ranks higher.
DesktopMobile
Step 4
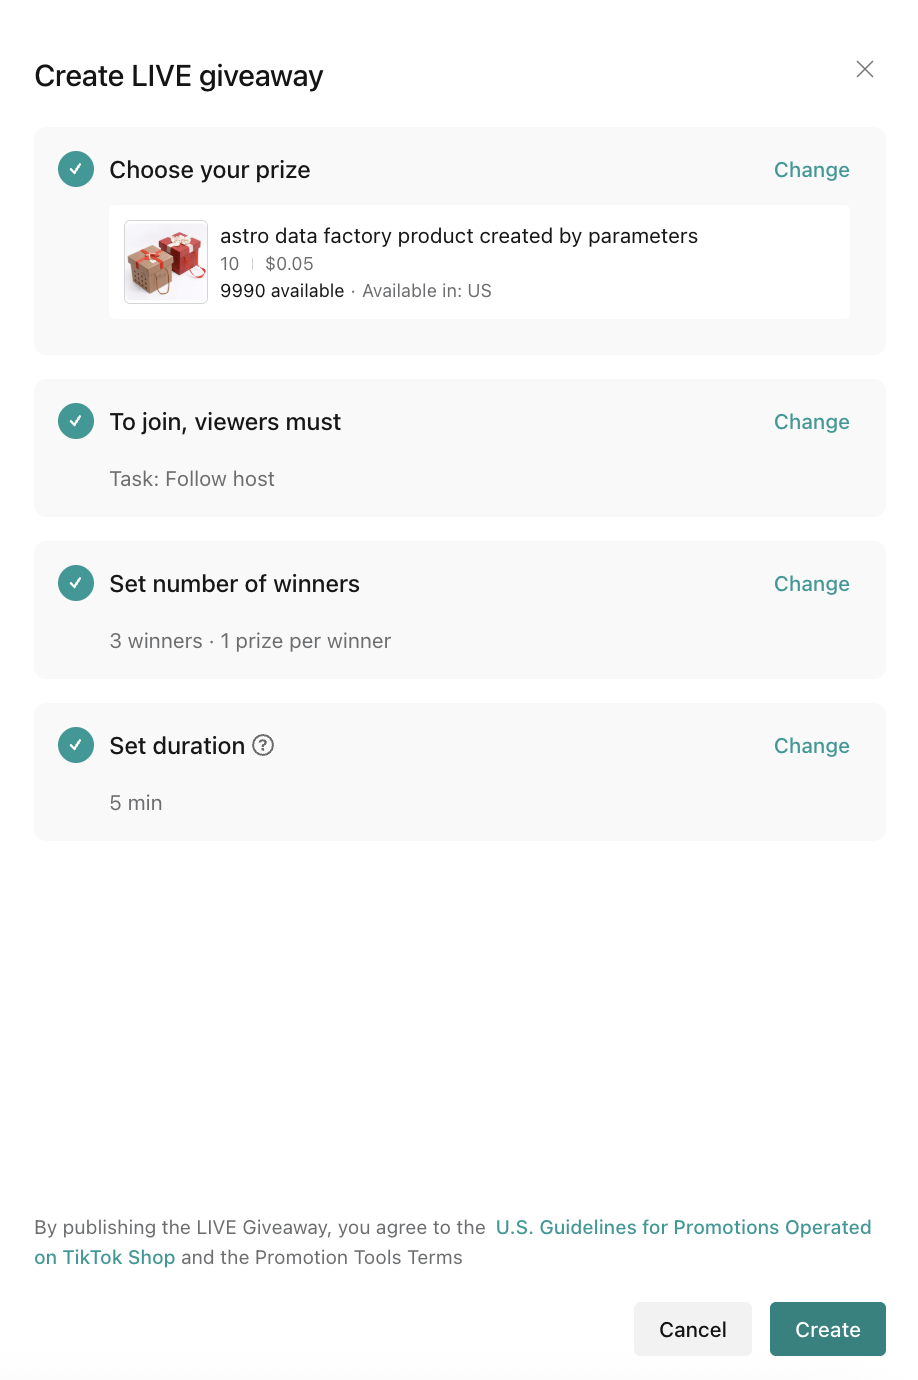
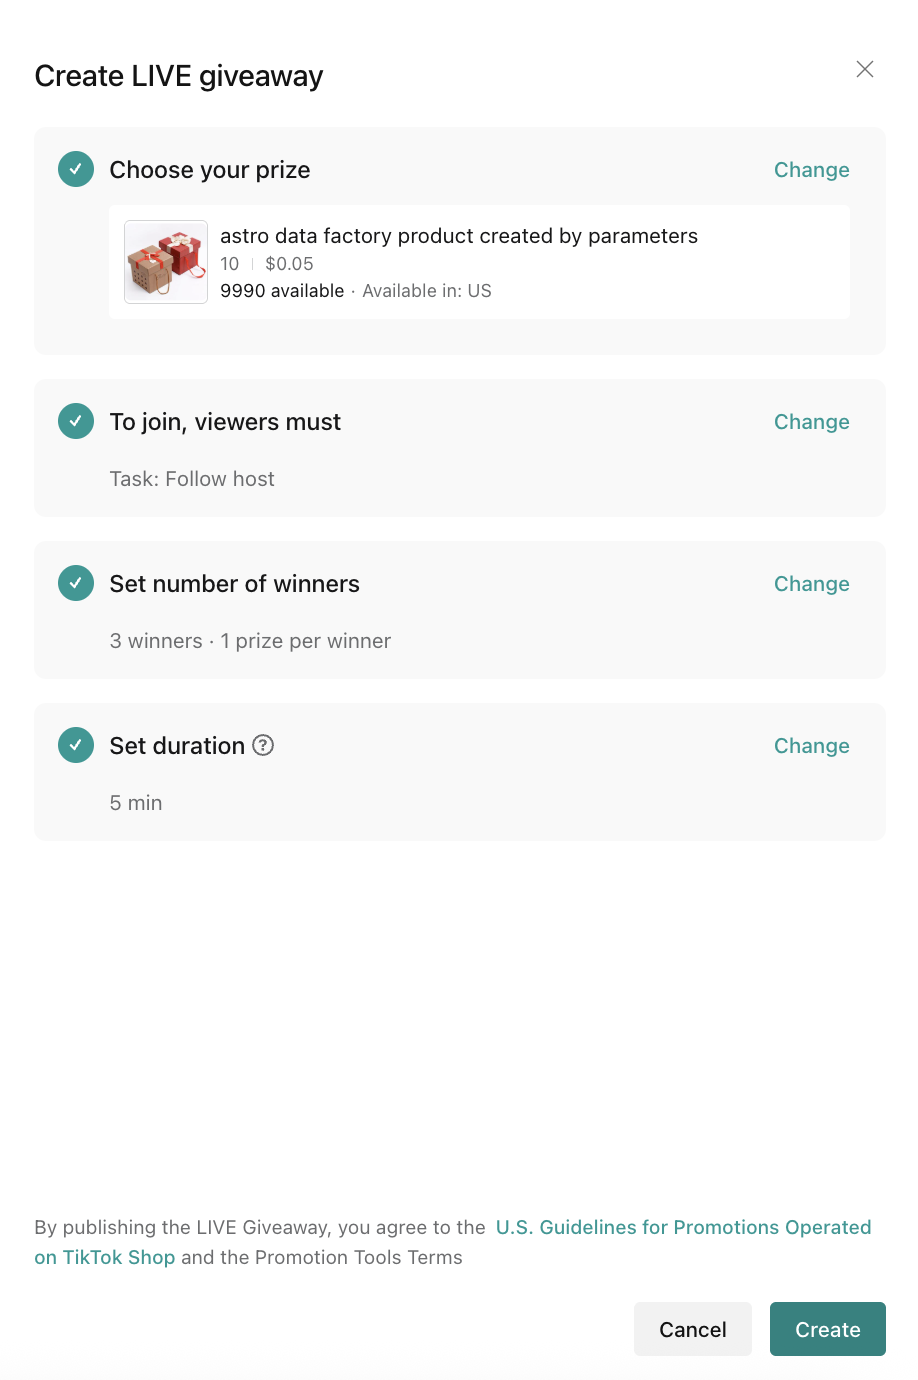
Step 4: Set the Number of Winners and Duration of the Giveaway Choose how many winners and how long the Giveaway will run. Note: For a task-based Giveaway with a minimum watch-time requirement, the Giveaway must run for at least 2 minutes longer than the required watch time. For example, if viewers must watch for 3 minutes, the Giveaway must run for at least 5 minutes.
DesktopMobile
Step 5
Step 5: Create and Launch Review your settings and select Finish > Create. Your Giveaway will appear under the Giveaway tab. You can edit it before launch or select Publish when you're ready to start it during your LIVE.
A Follower Coupon rewards customers for following your shop or LIVE.
What is it?
A Follower Coupon rewards customers for following your shop or LIVE. It is designed to help you turn viewers and shoppers into followers, build a larger audience, and encourage those followers to make a purchase. The eligible audience updates automatically as new customers follow your shop. Each customer can claim and use a Follower Coupon only once, even if they unfollow and follow your shop again. Following both your shop and LIVE also does not provide two separate coupons.
Why it drives traffic?
It is the direct monetary hook that turns a follow ask into a completed action — pair it with LIVE Giveaway's follow task or a pre-LIVE promotion so the incentive is visible before the moment of decision. Because the eligible audience updates automatically, it keeps working passively across every LIVE without needing to be recreated each session.
How to set it up?
Step 1
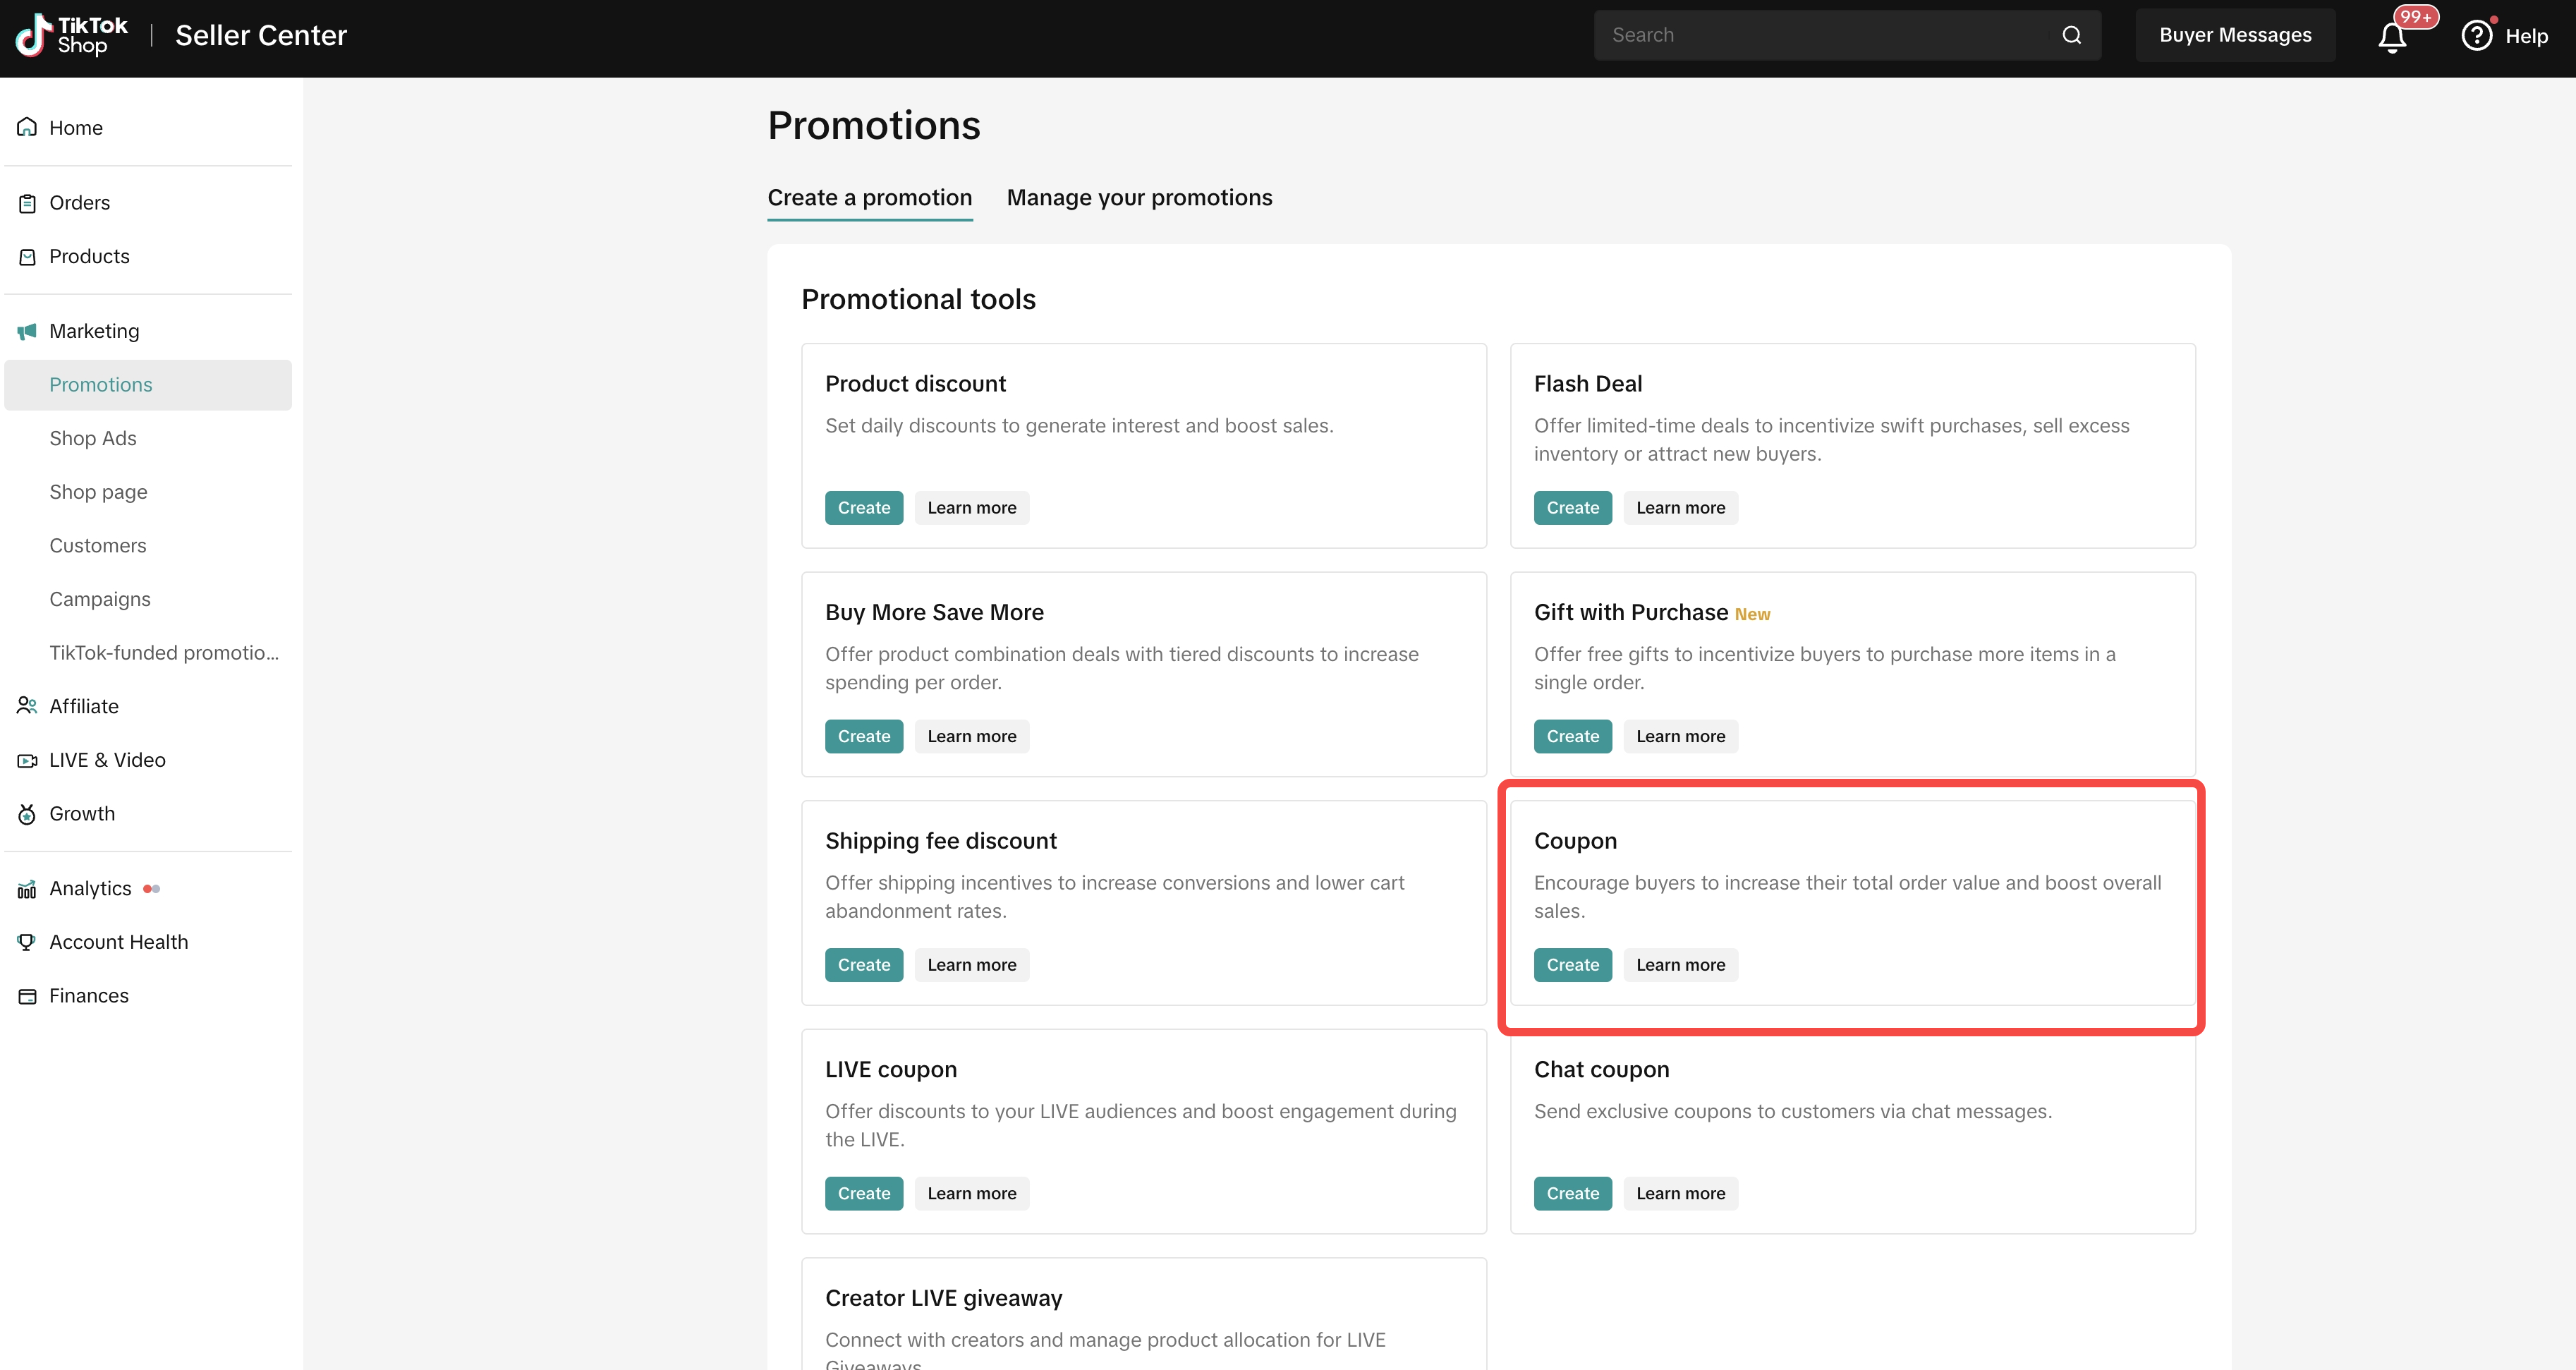
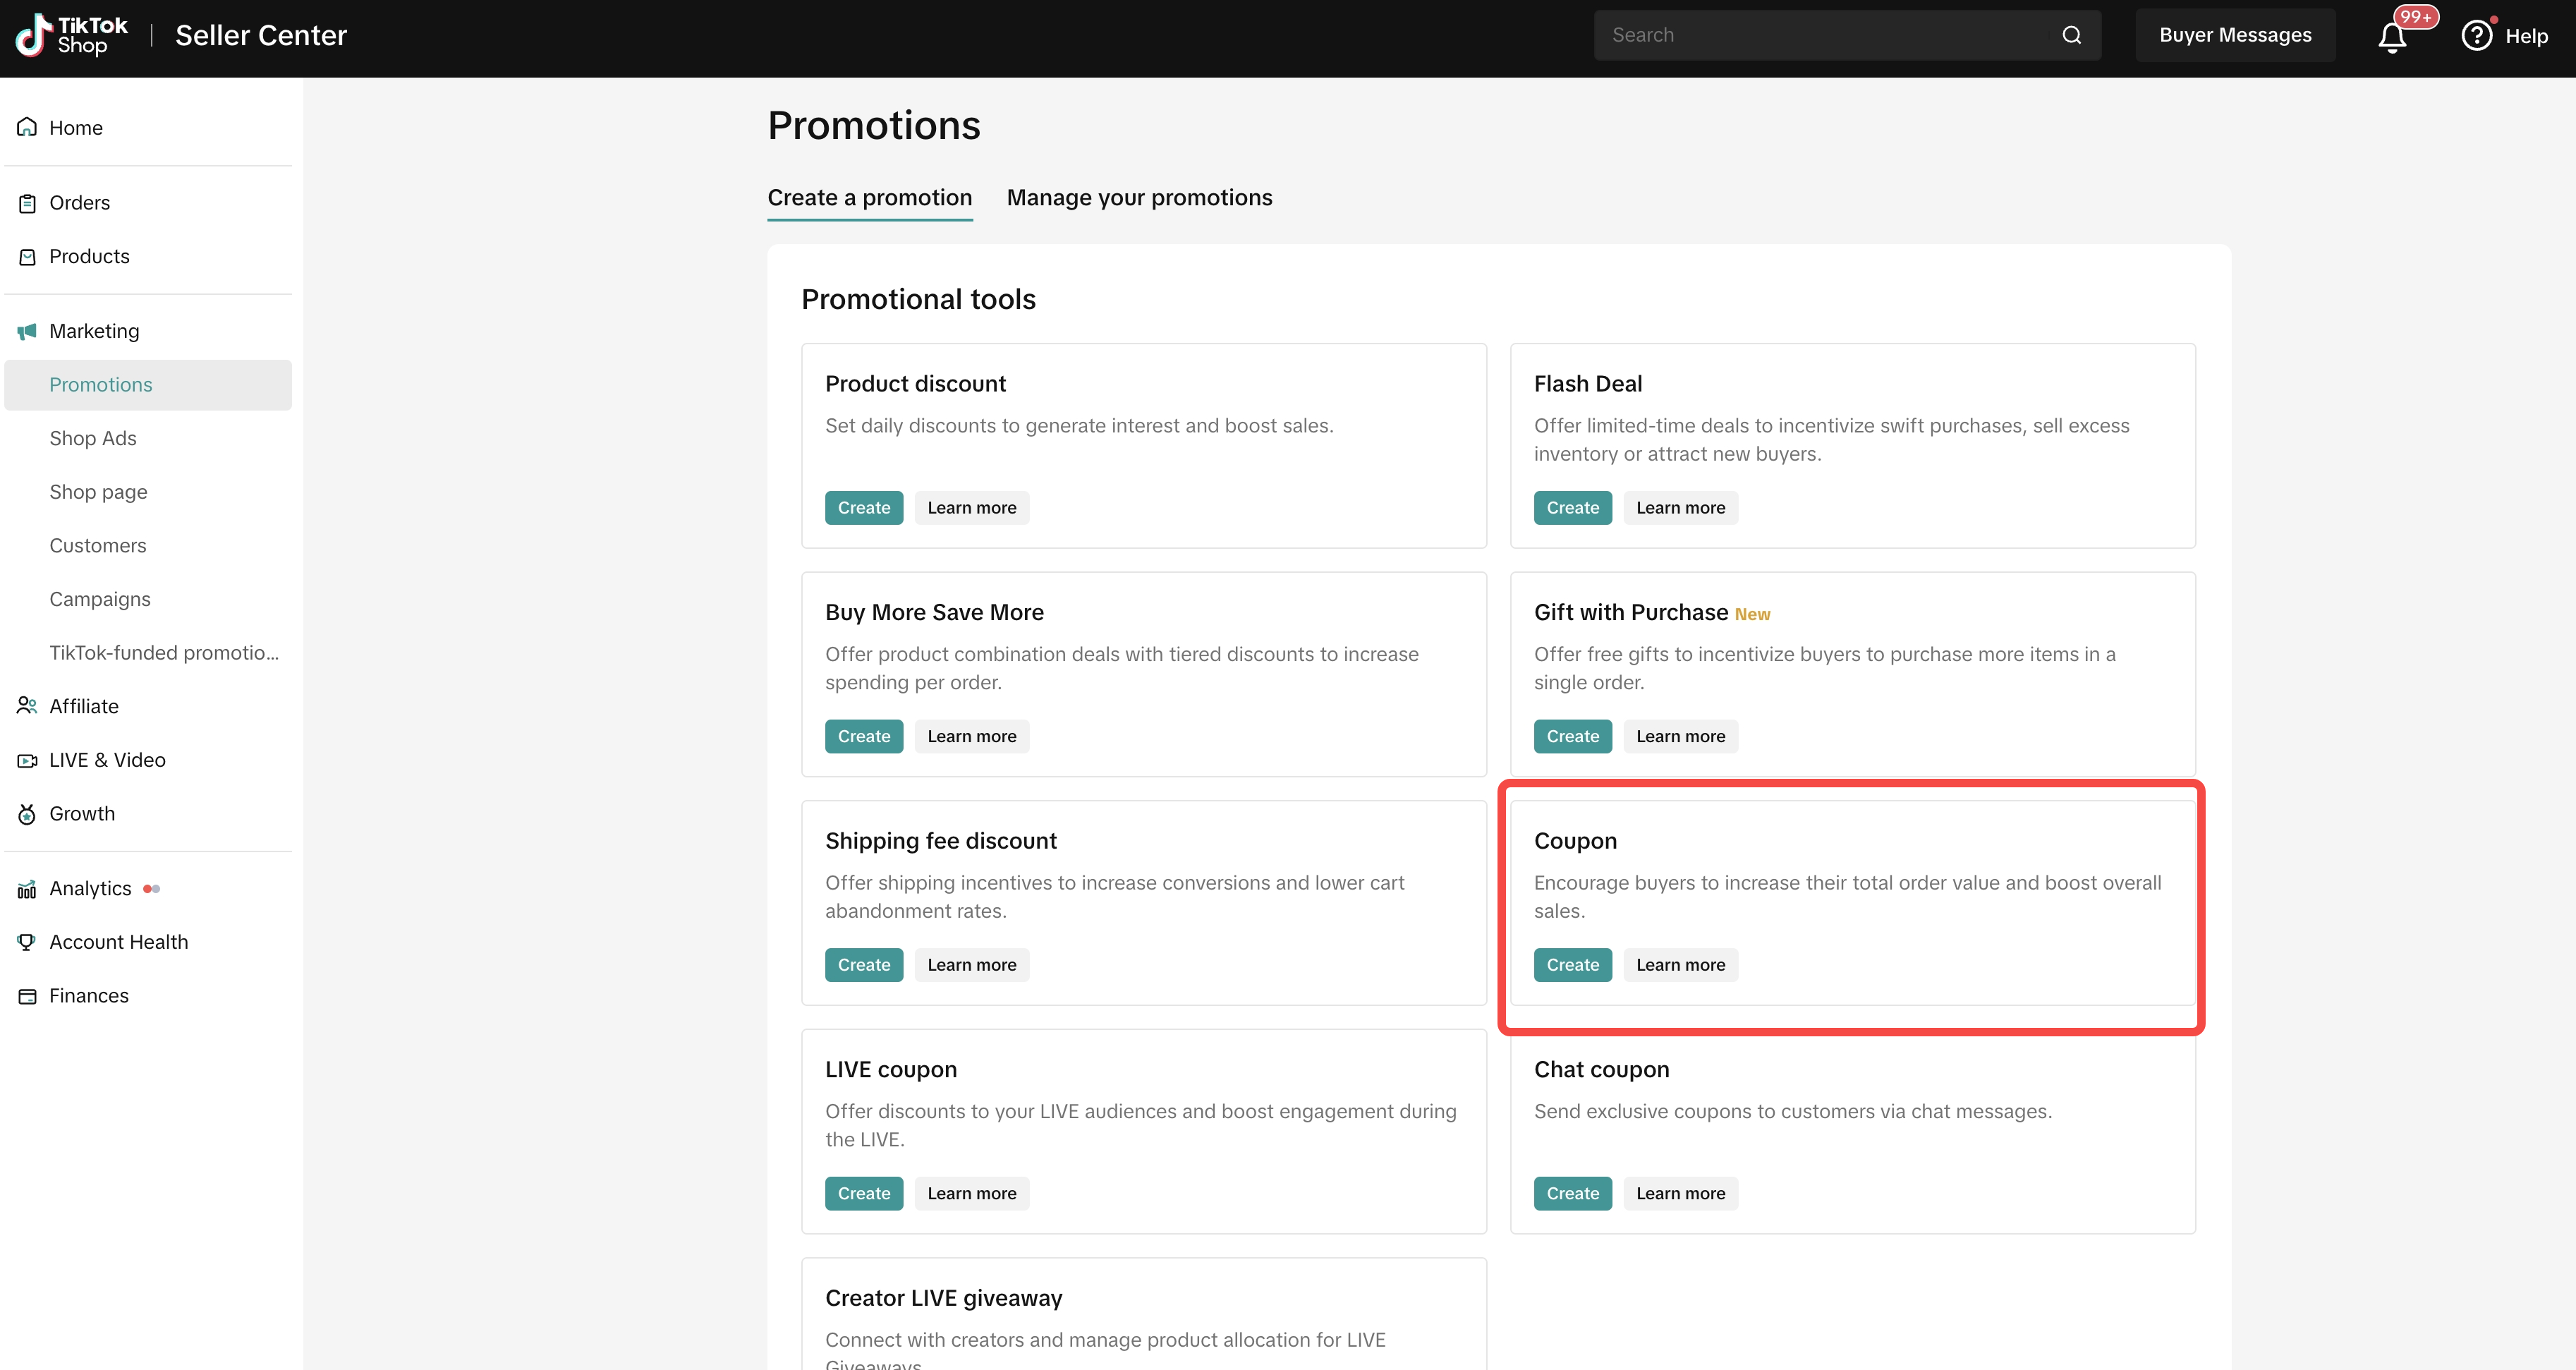
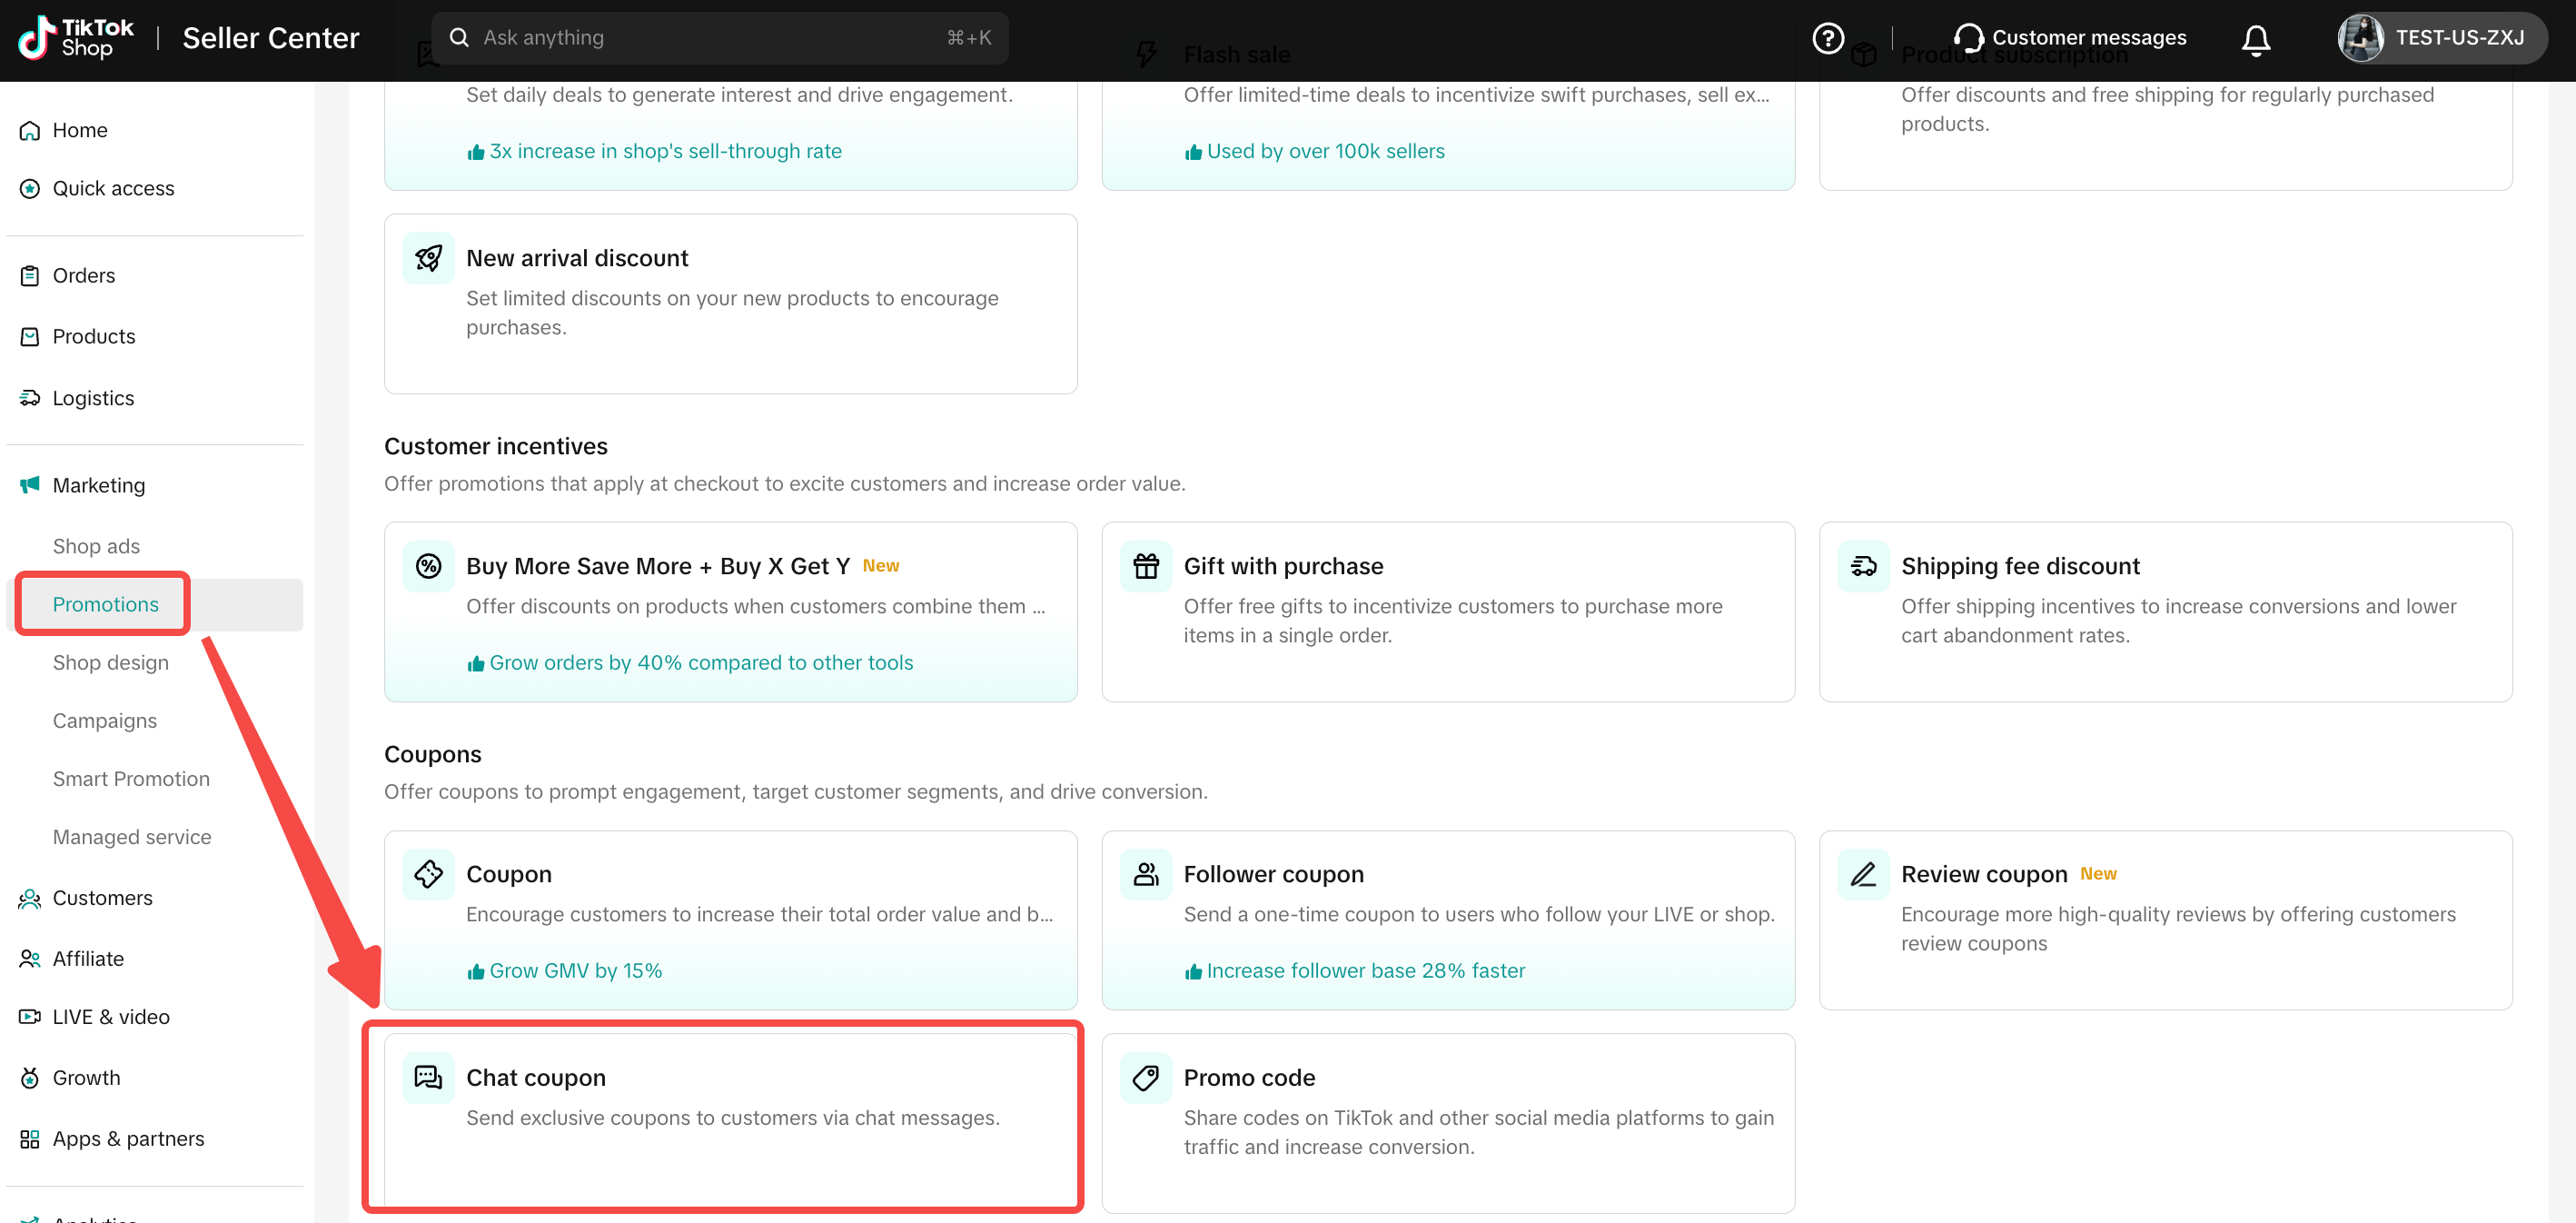
Step 1: Access Coupons In Seller Center, go to Marketing > Promotions > Coupon > Create.
Desktop
Step 2
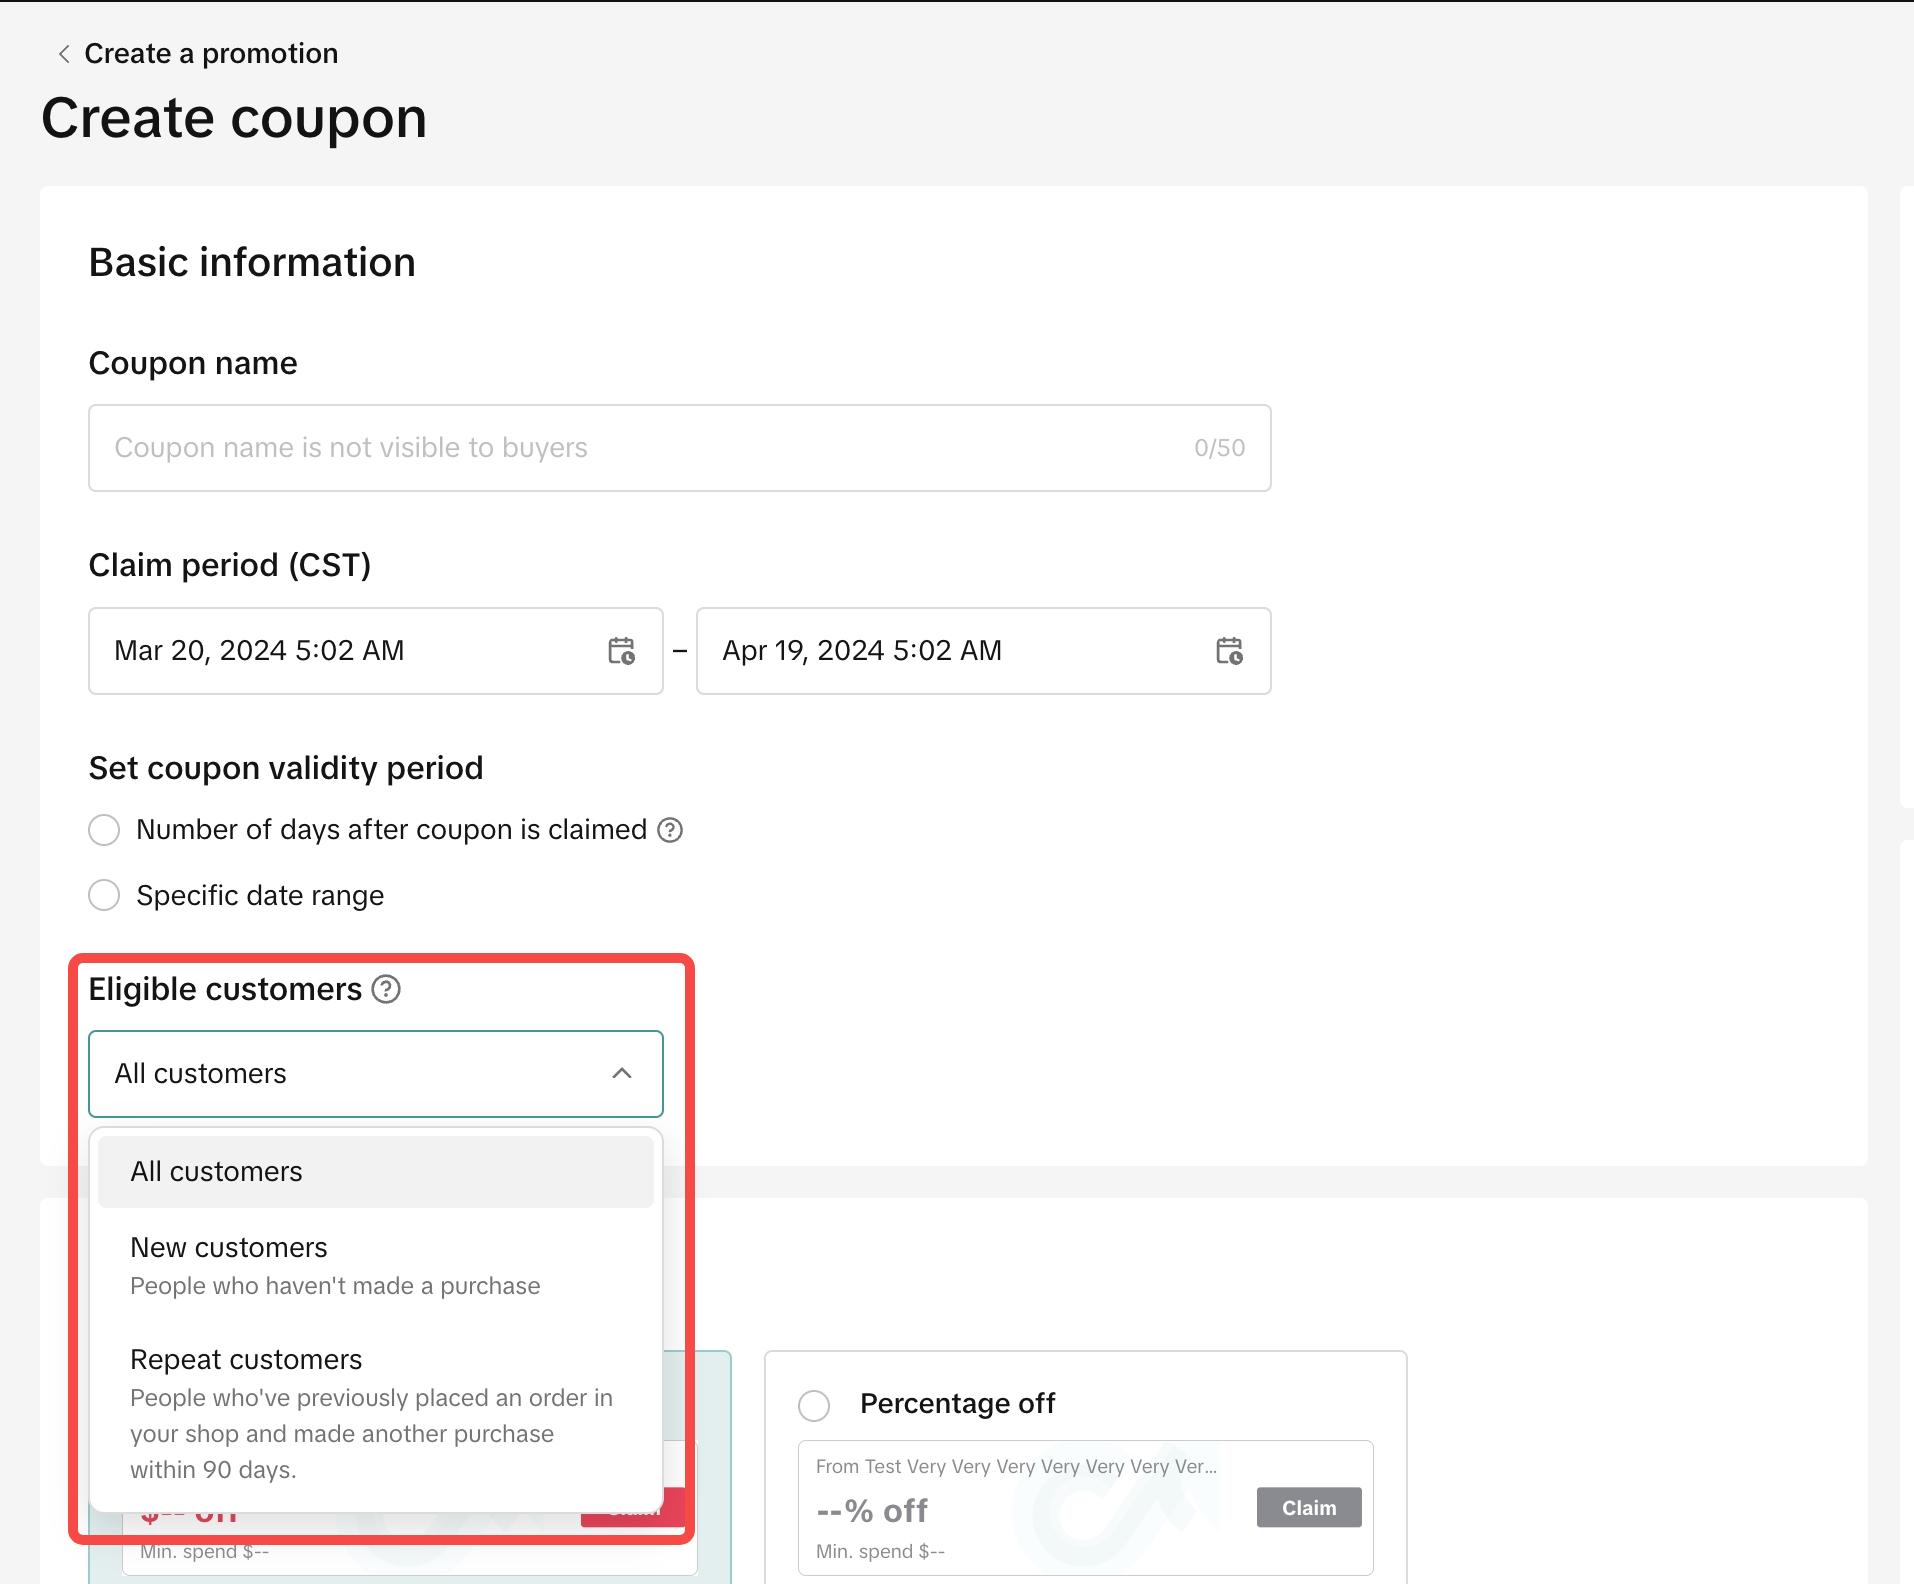
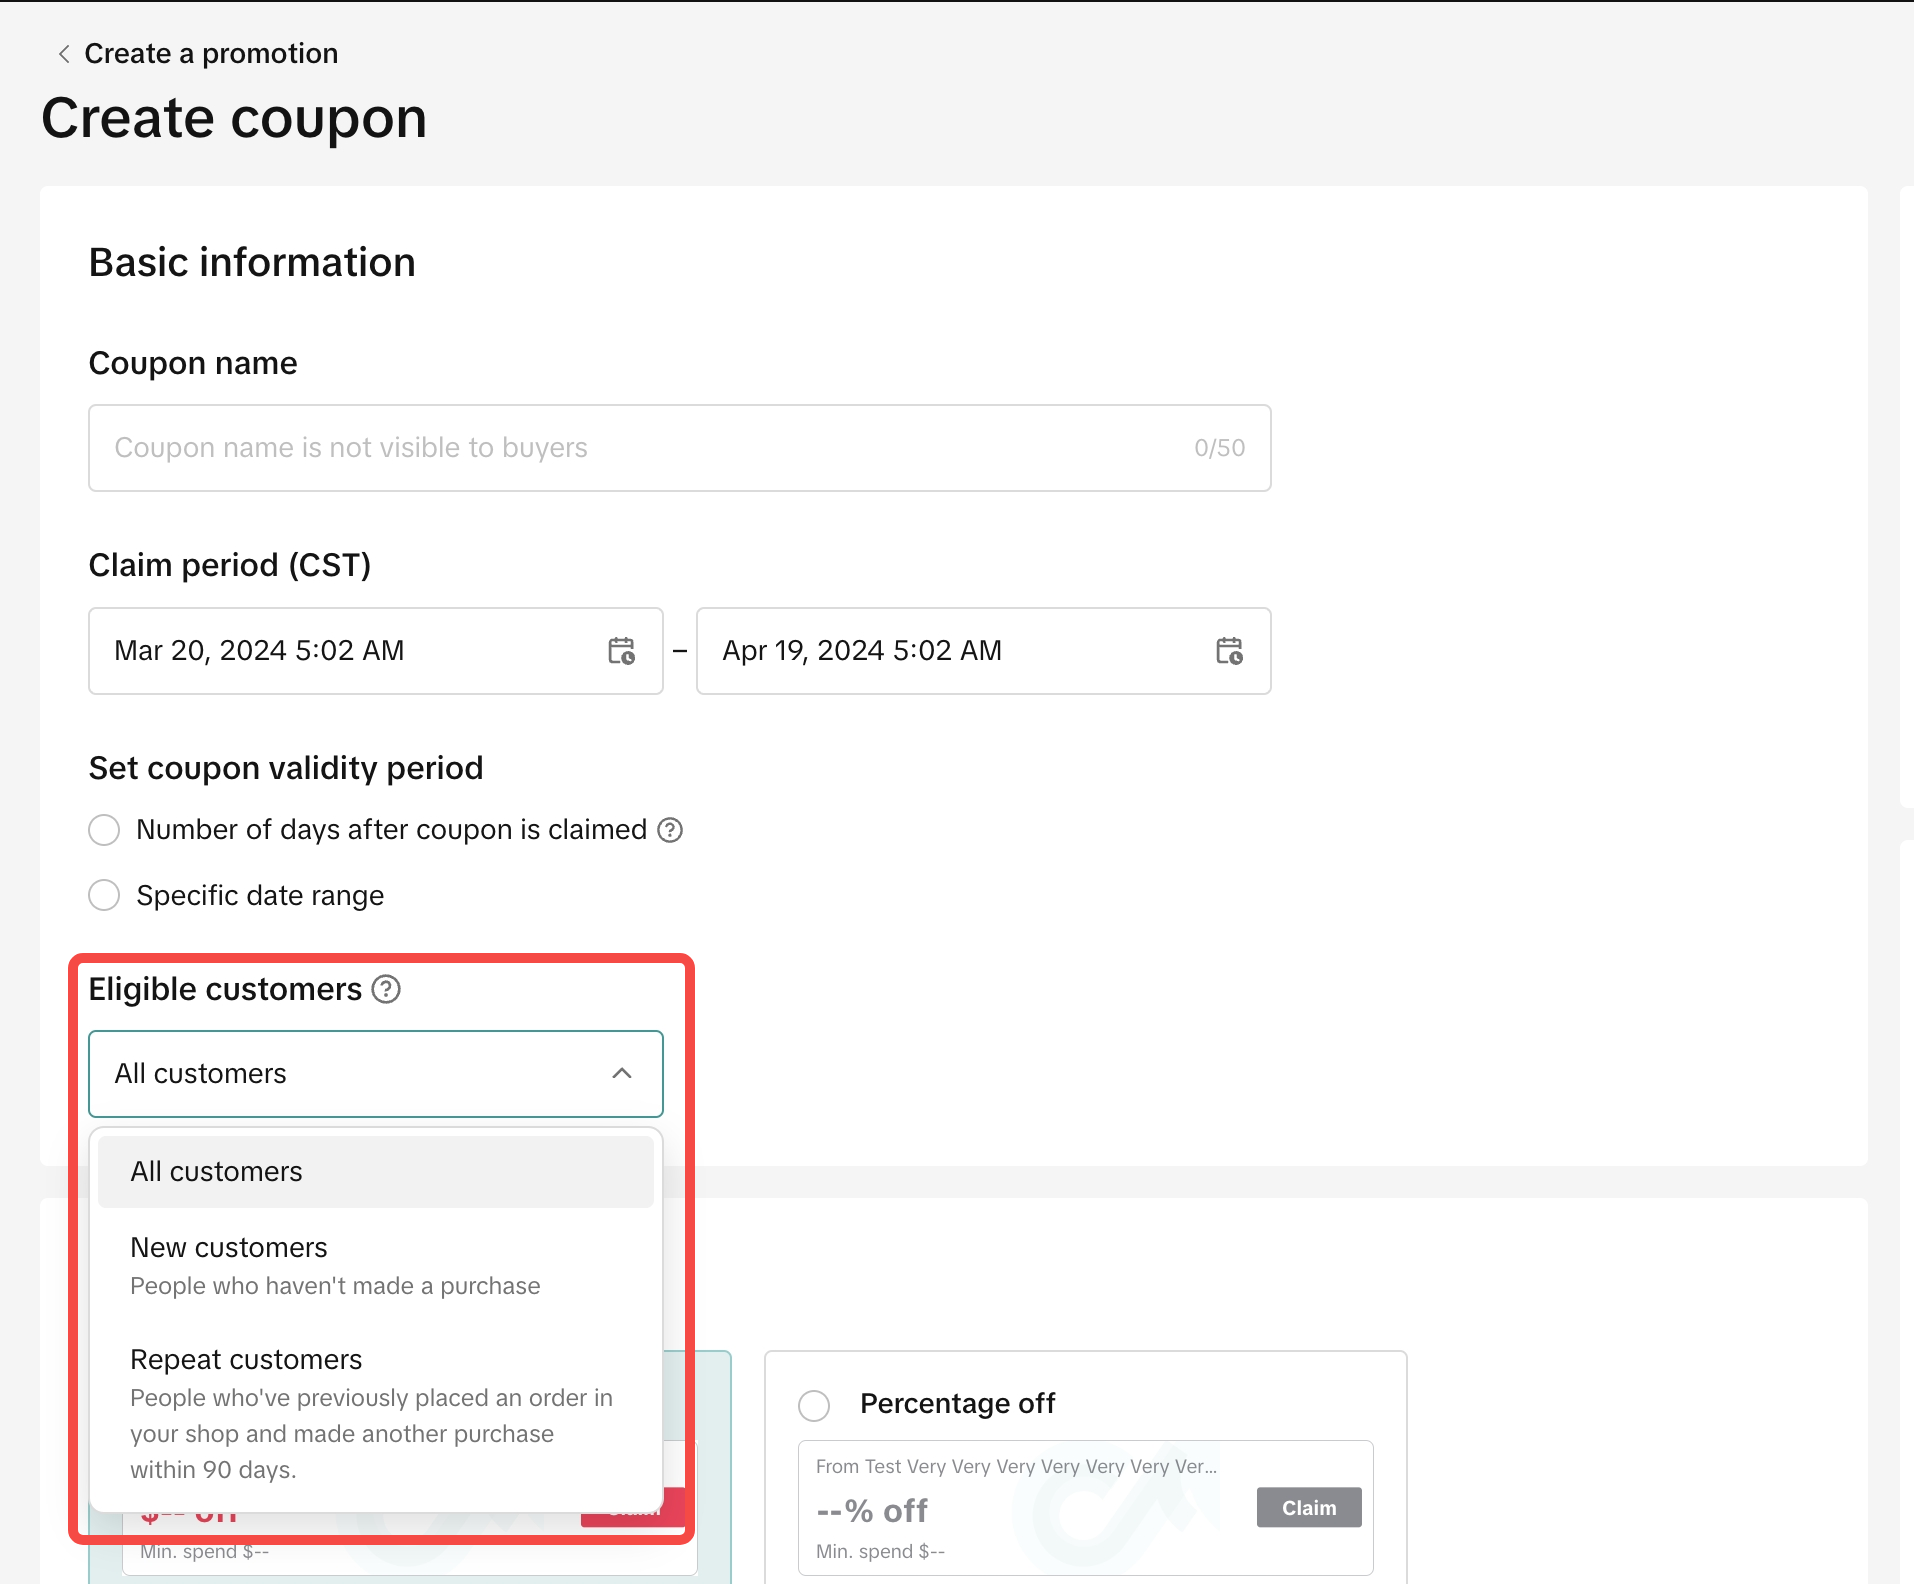
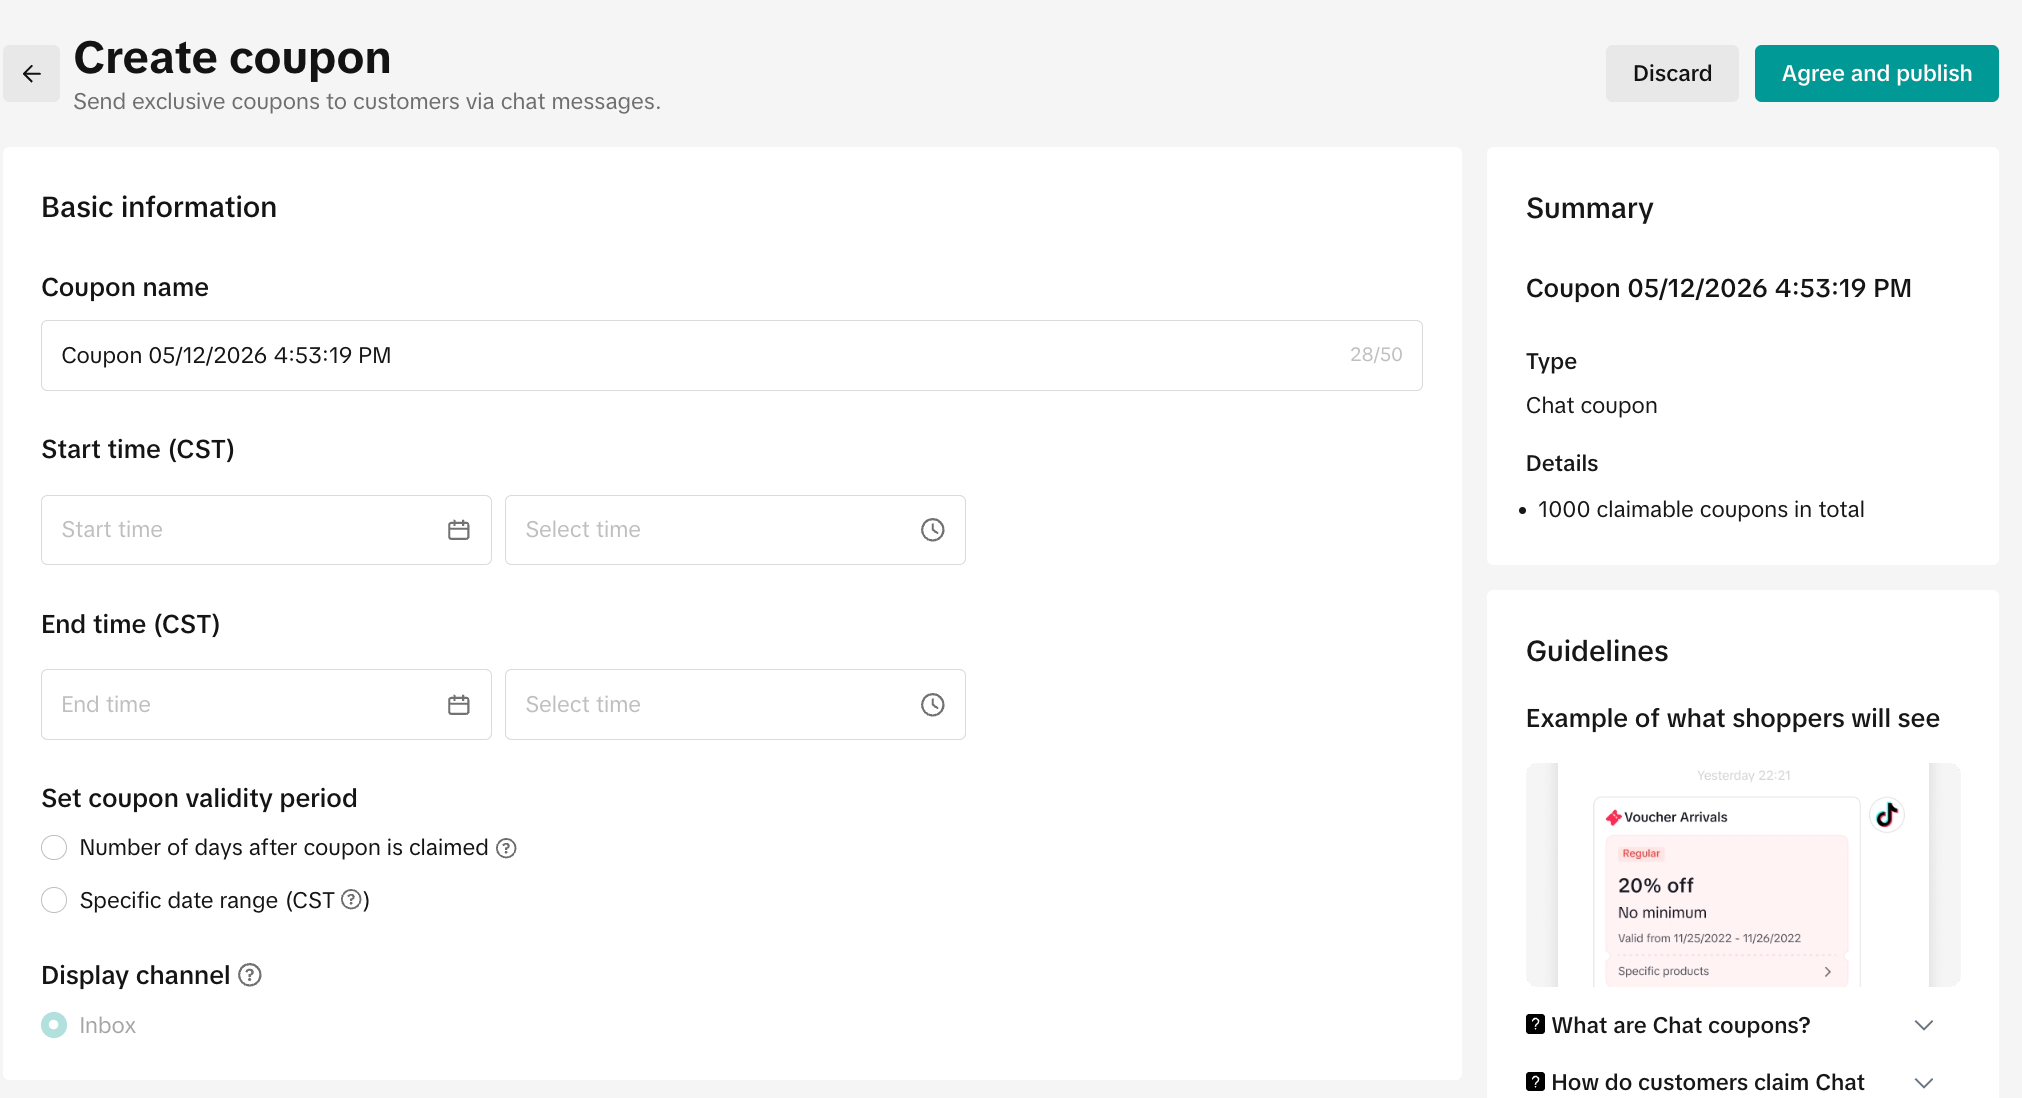
Step 2: Set Up Your Coupon Enter the coupon name, claim period, and coupon validity. Then select who can claim the coupon:
All customers
New customers
Repeat customers
Desktop
Step 3
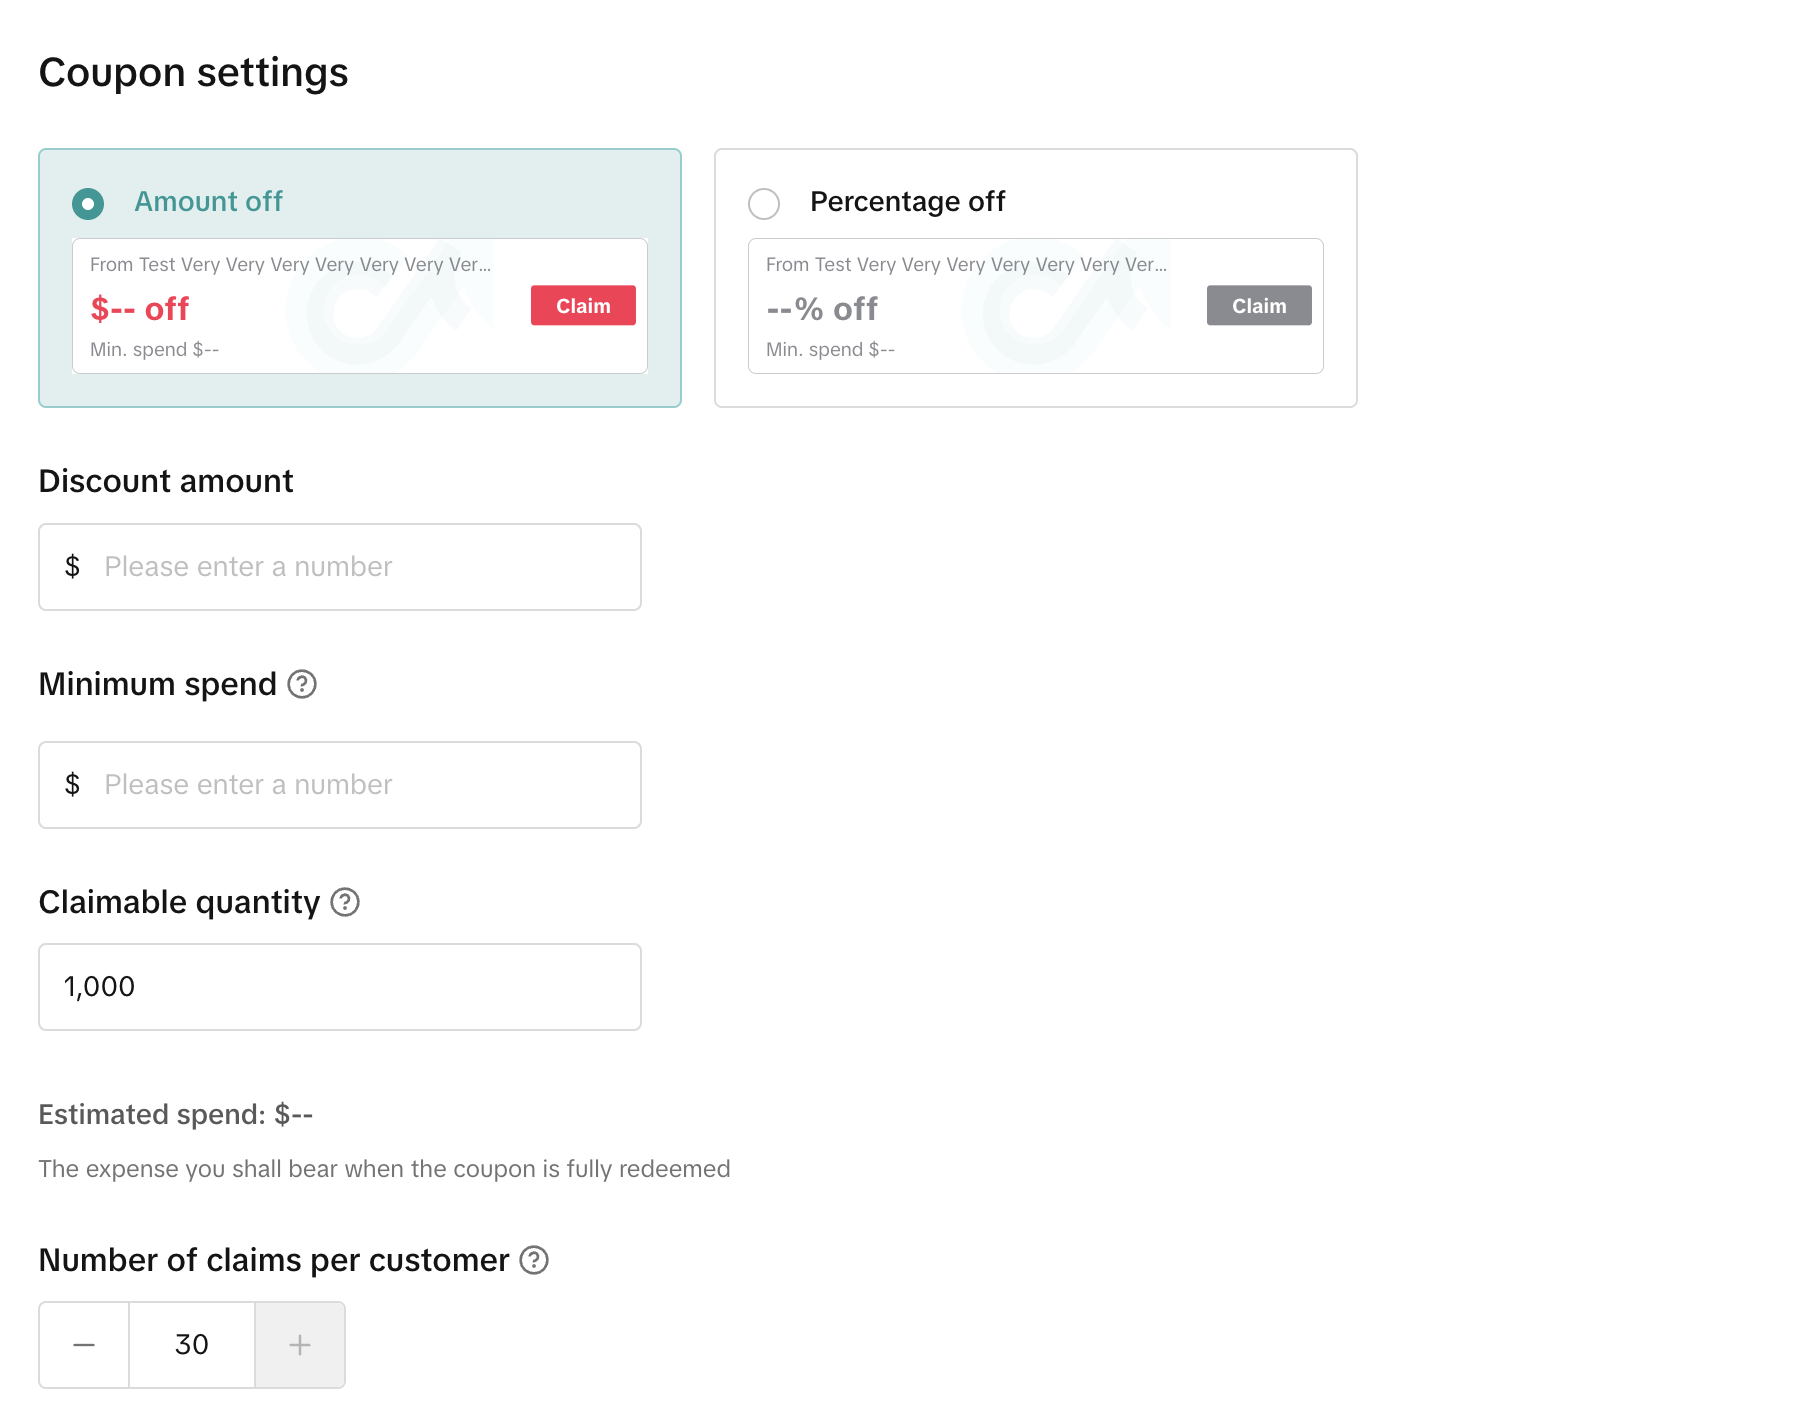
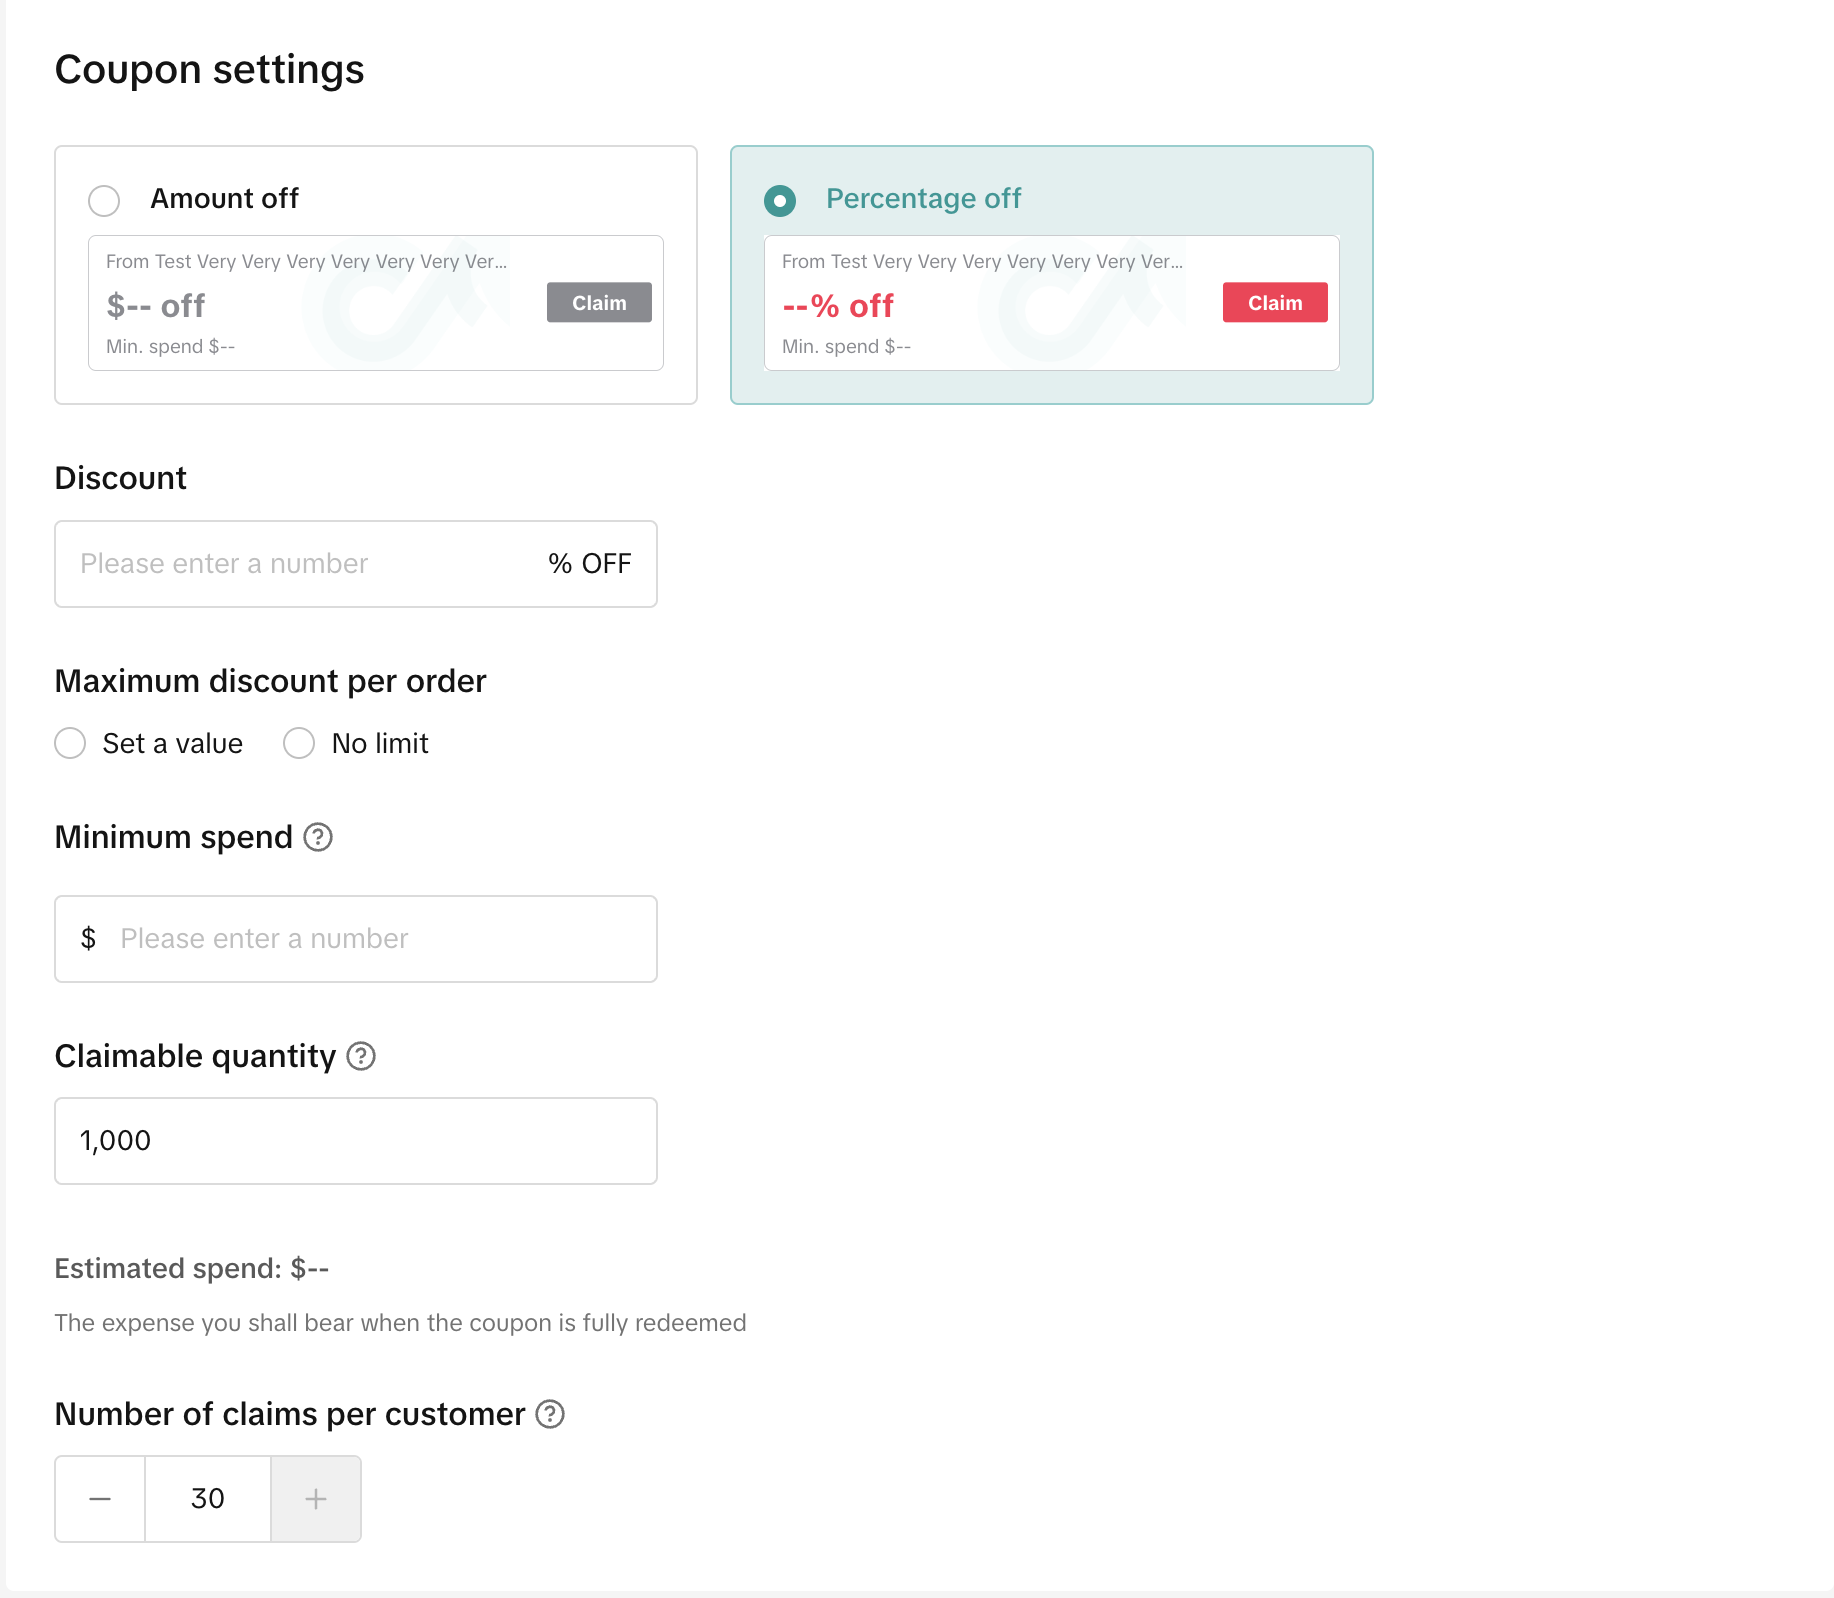
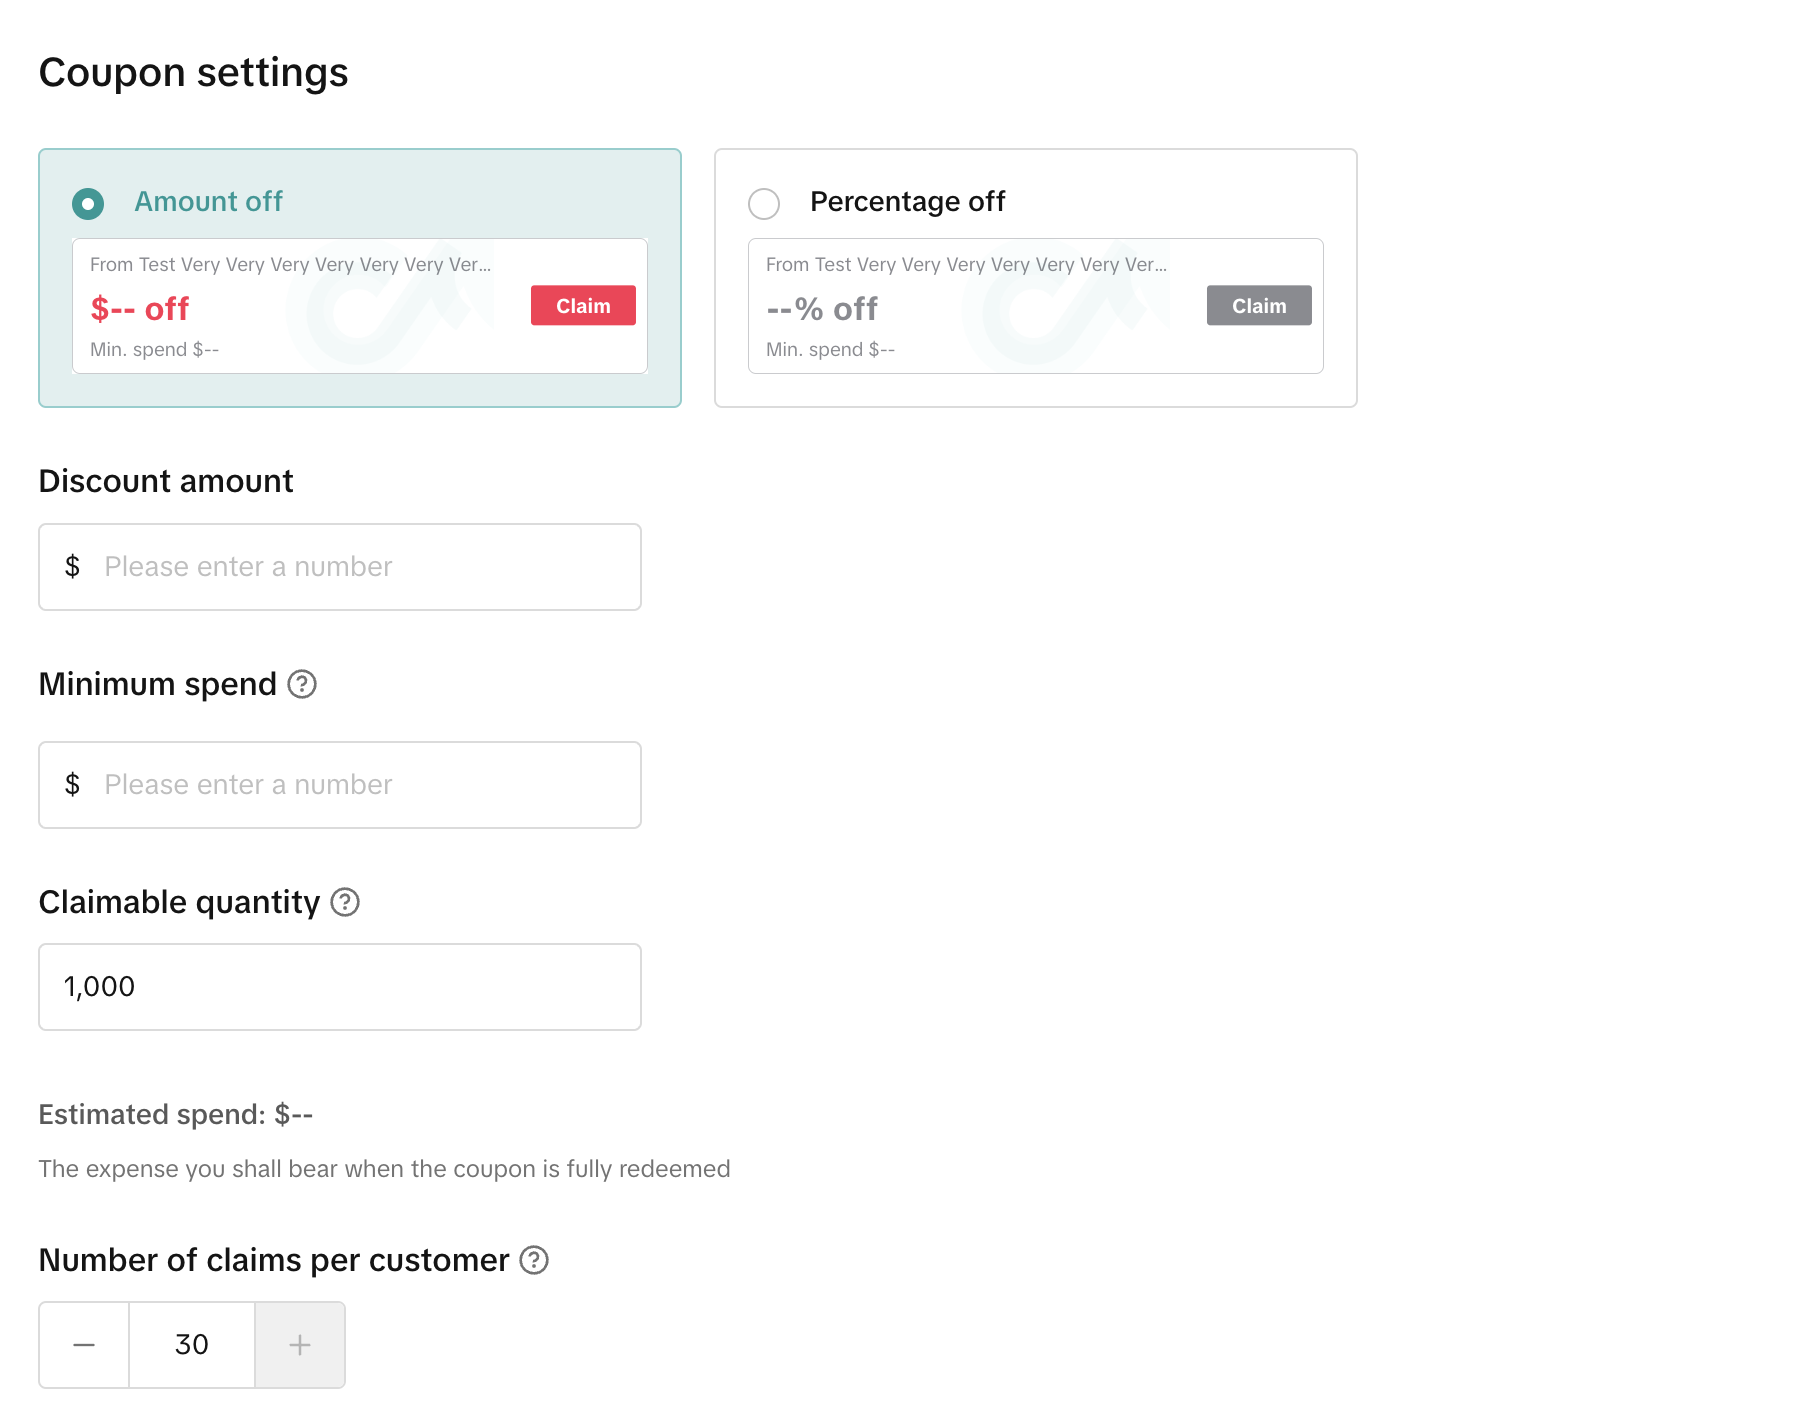
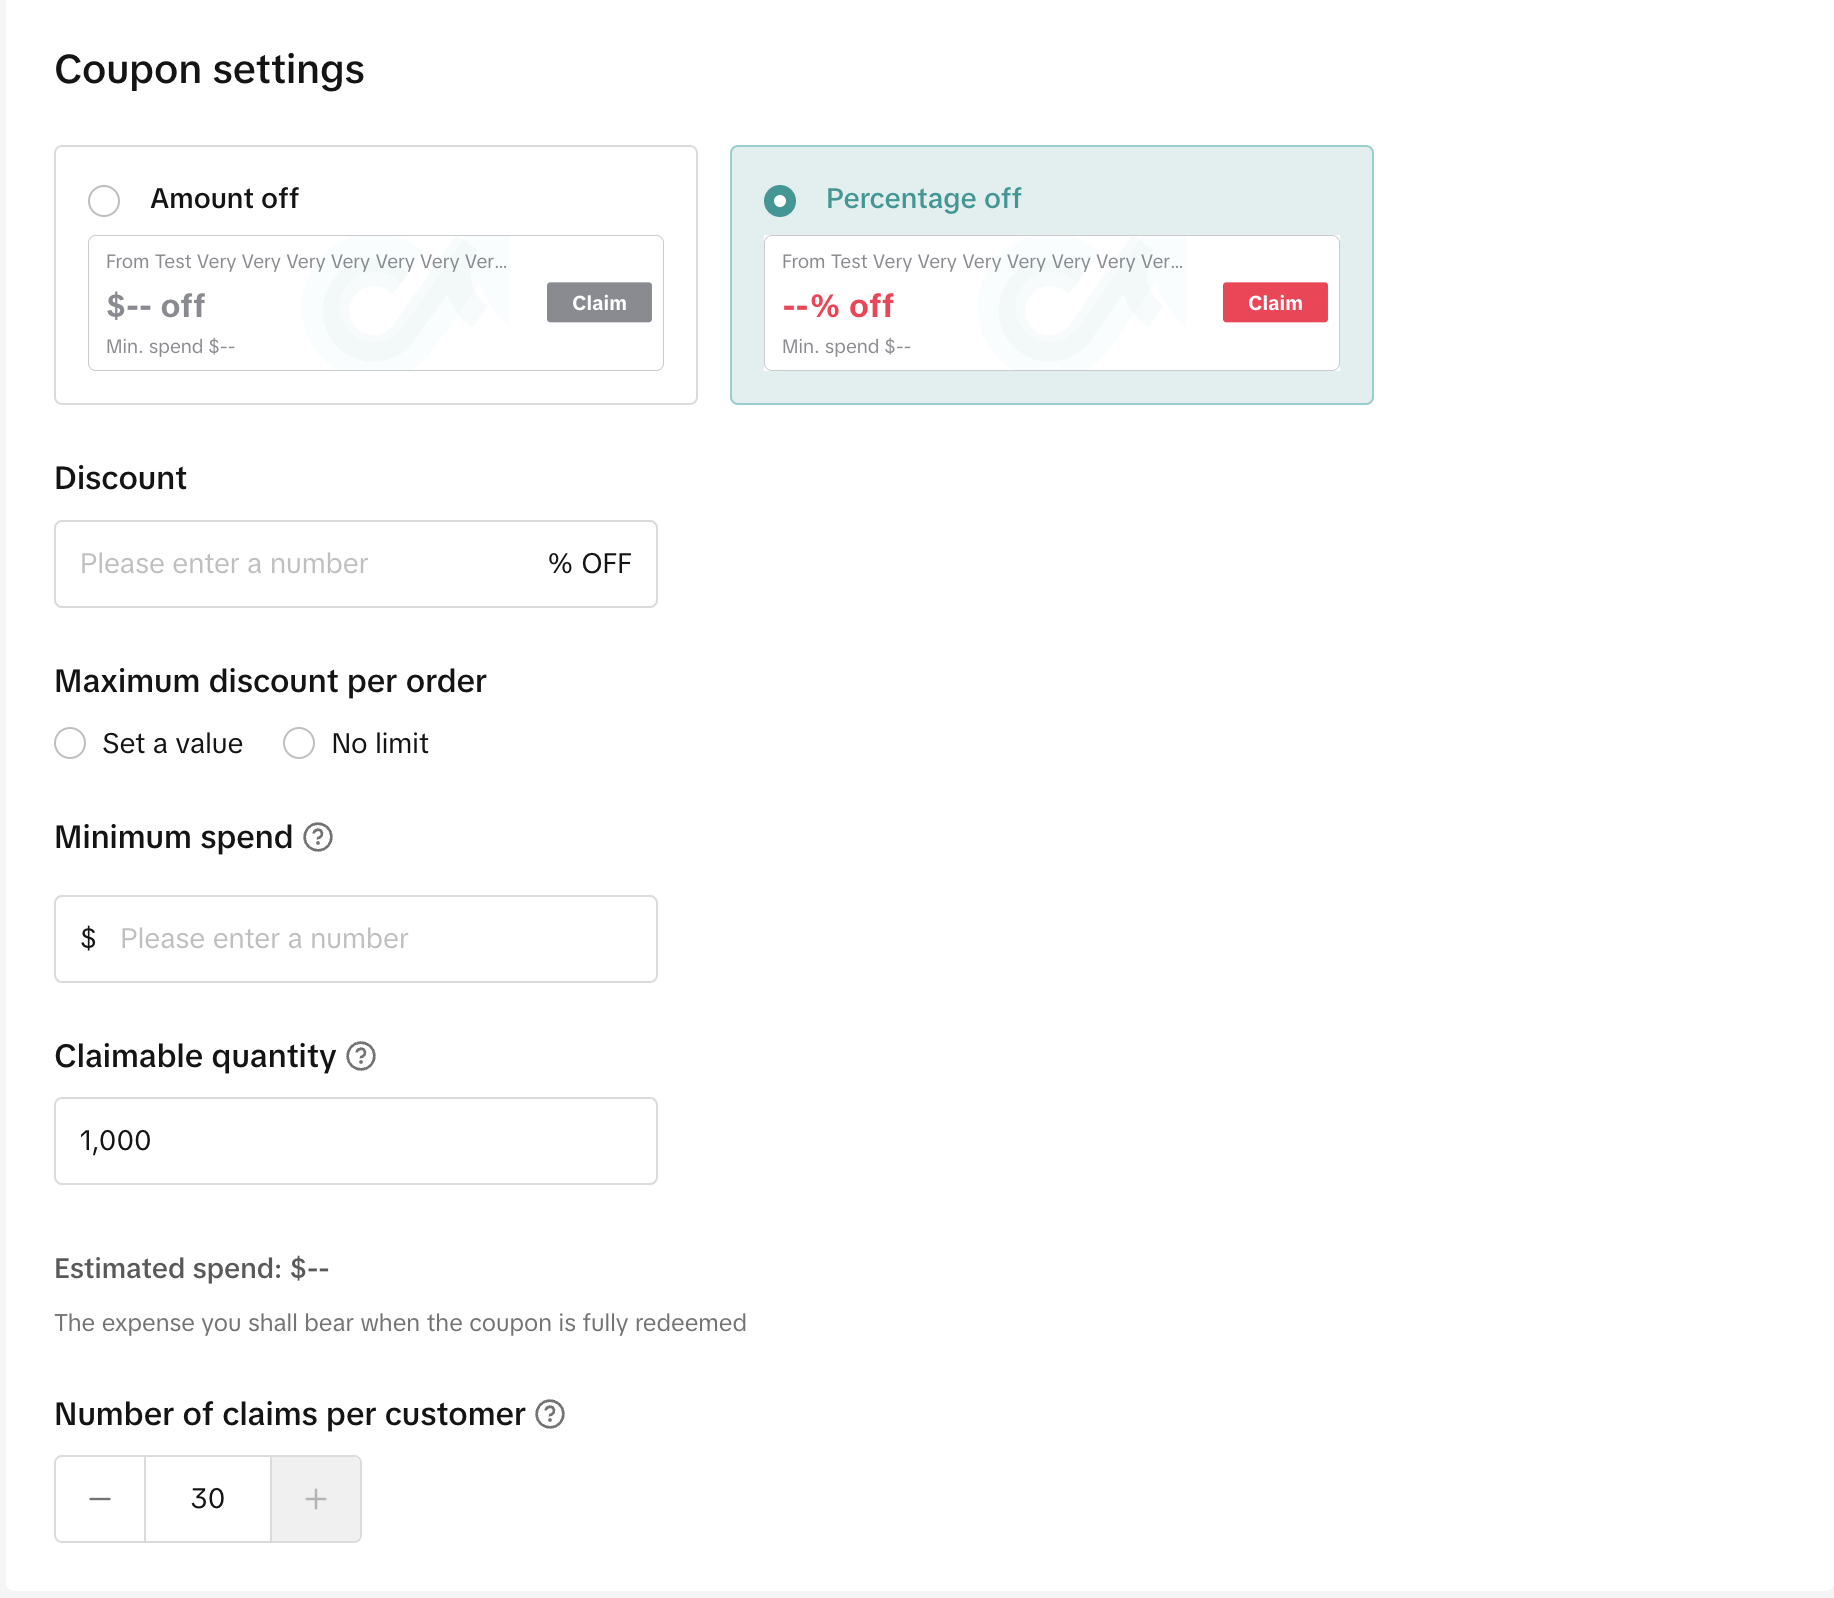
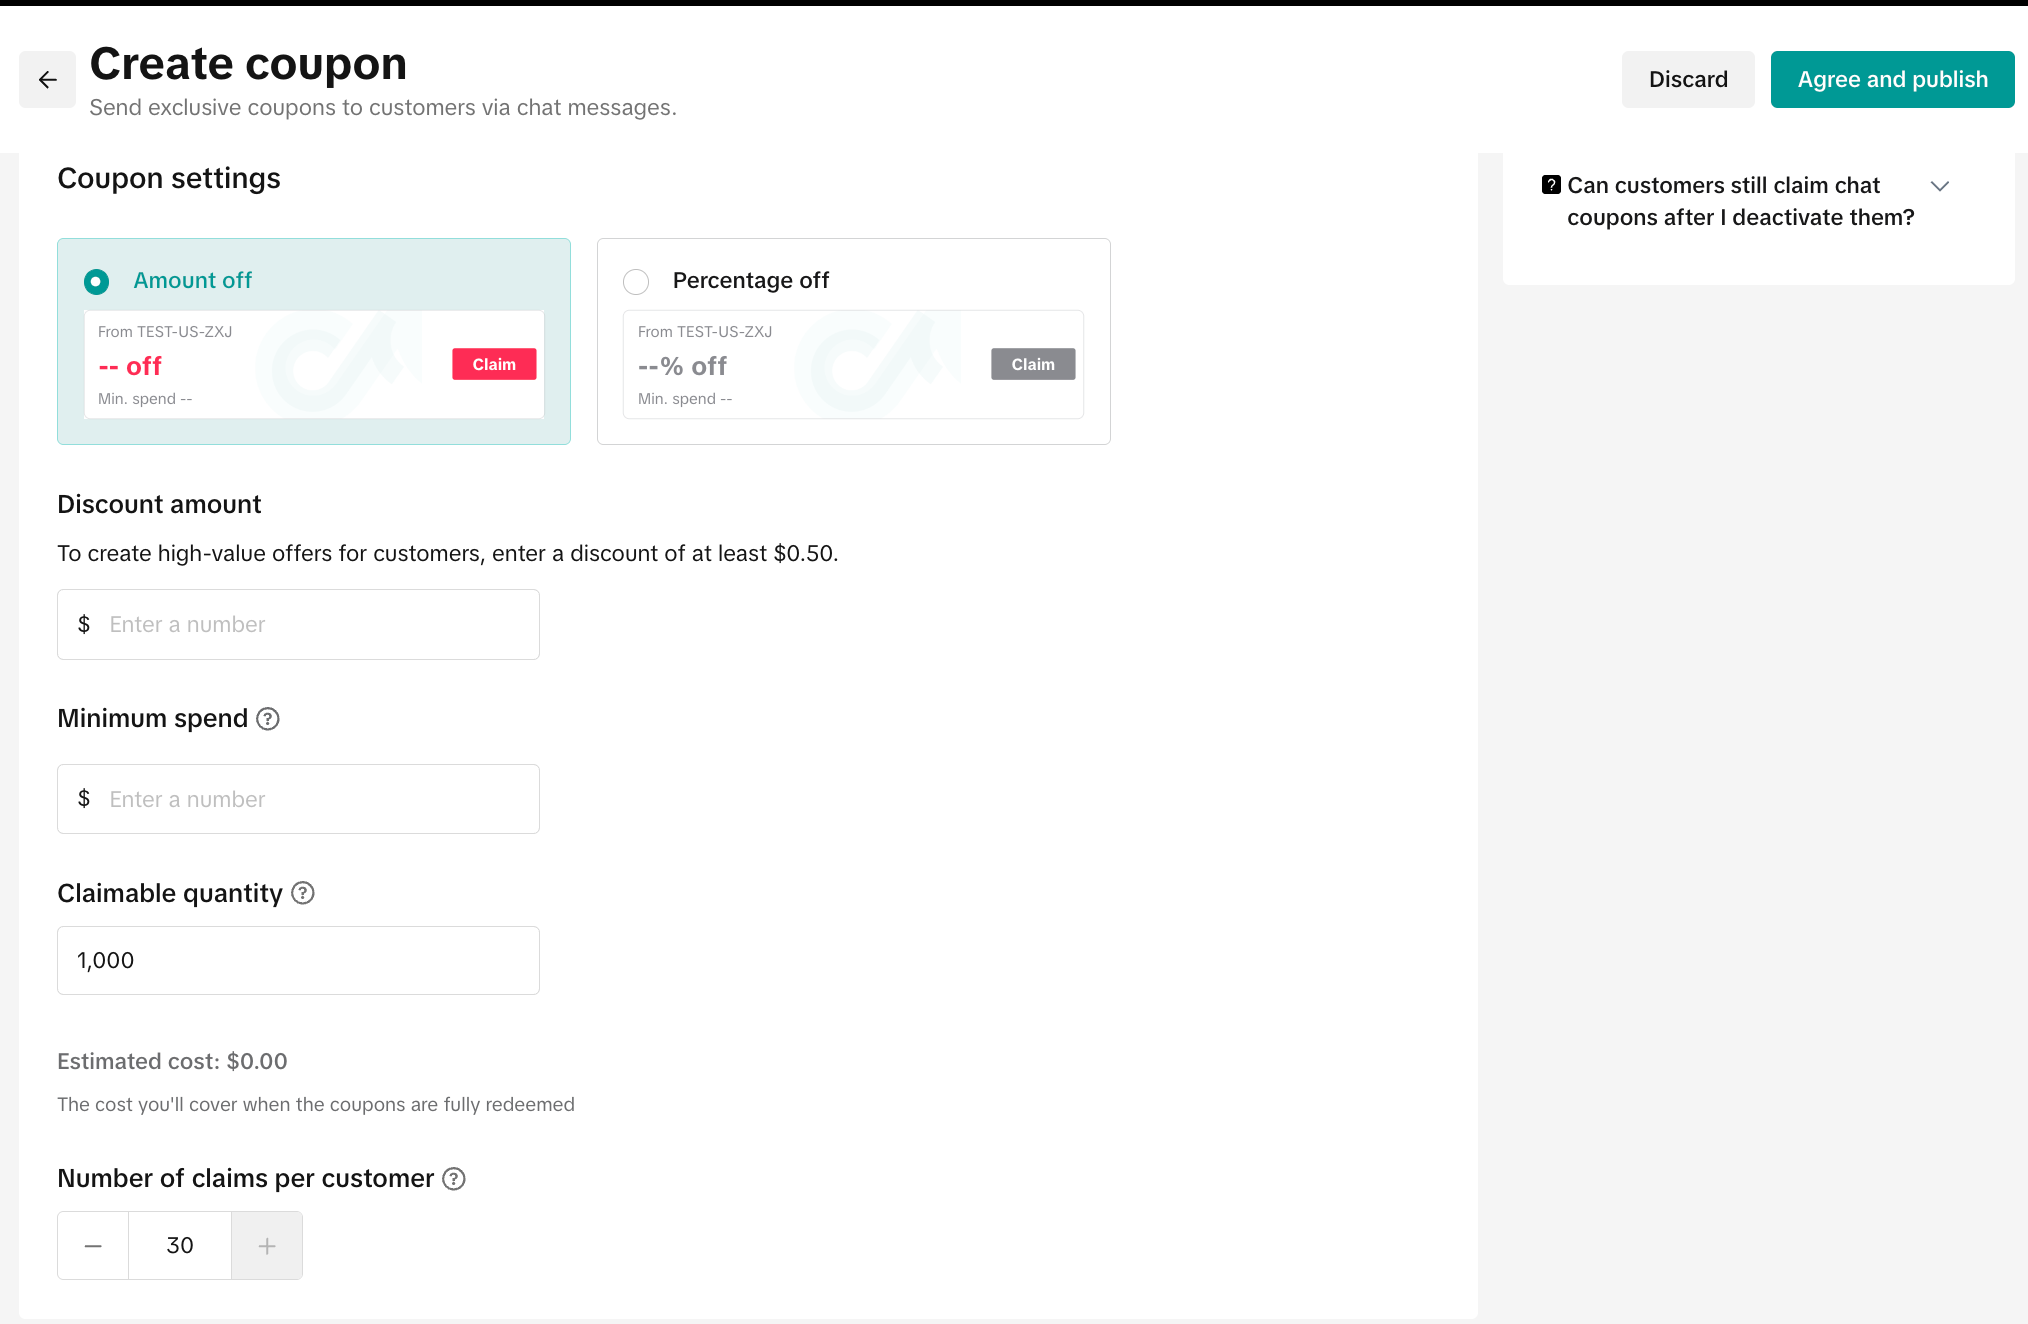
Step 3: Configure the Offer Choose between:
Amount off: A fixed dollar amount off the order.
Percentage off: A percentage discount.
Set the minimum spend requirement, discount value, claimable quantity, and eligible products as applicable.
Desktop
Step 4
Step 4: Publish Your Coupon Review the promotion settings and publish the coupon. Eligible customers will be able to discover and claim it during the configured promotion period.
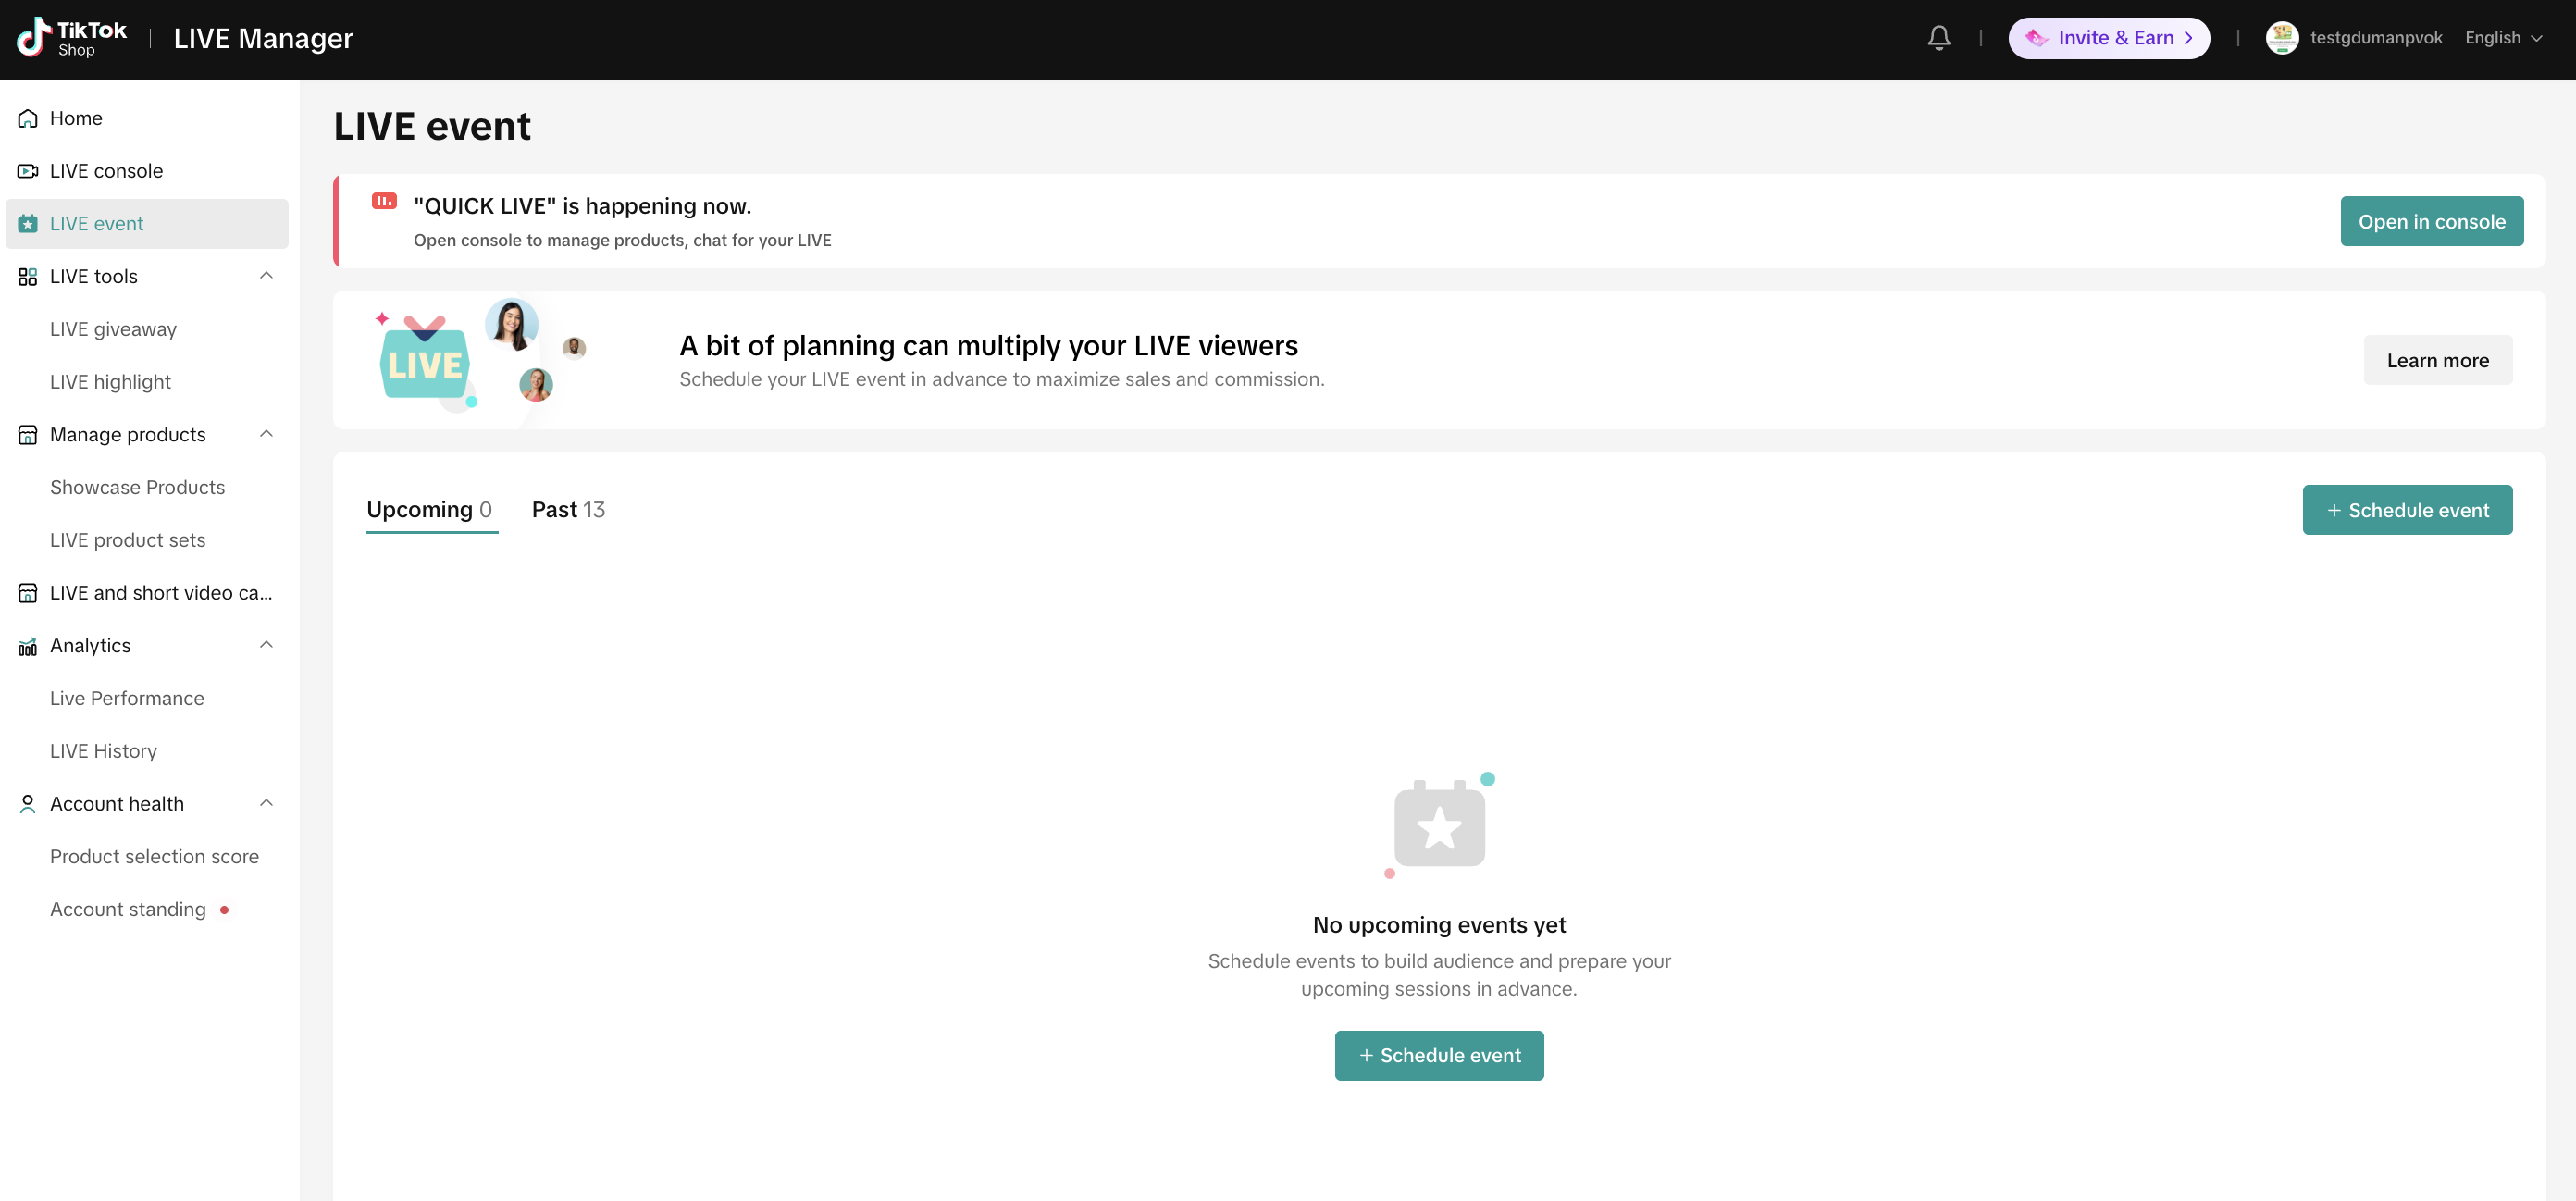
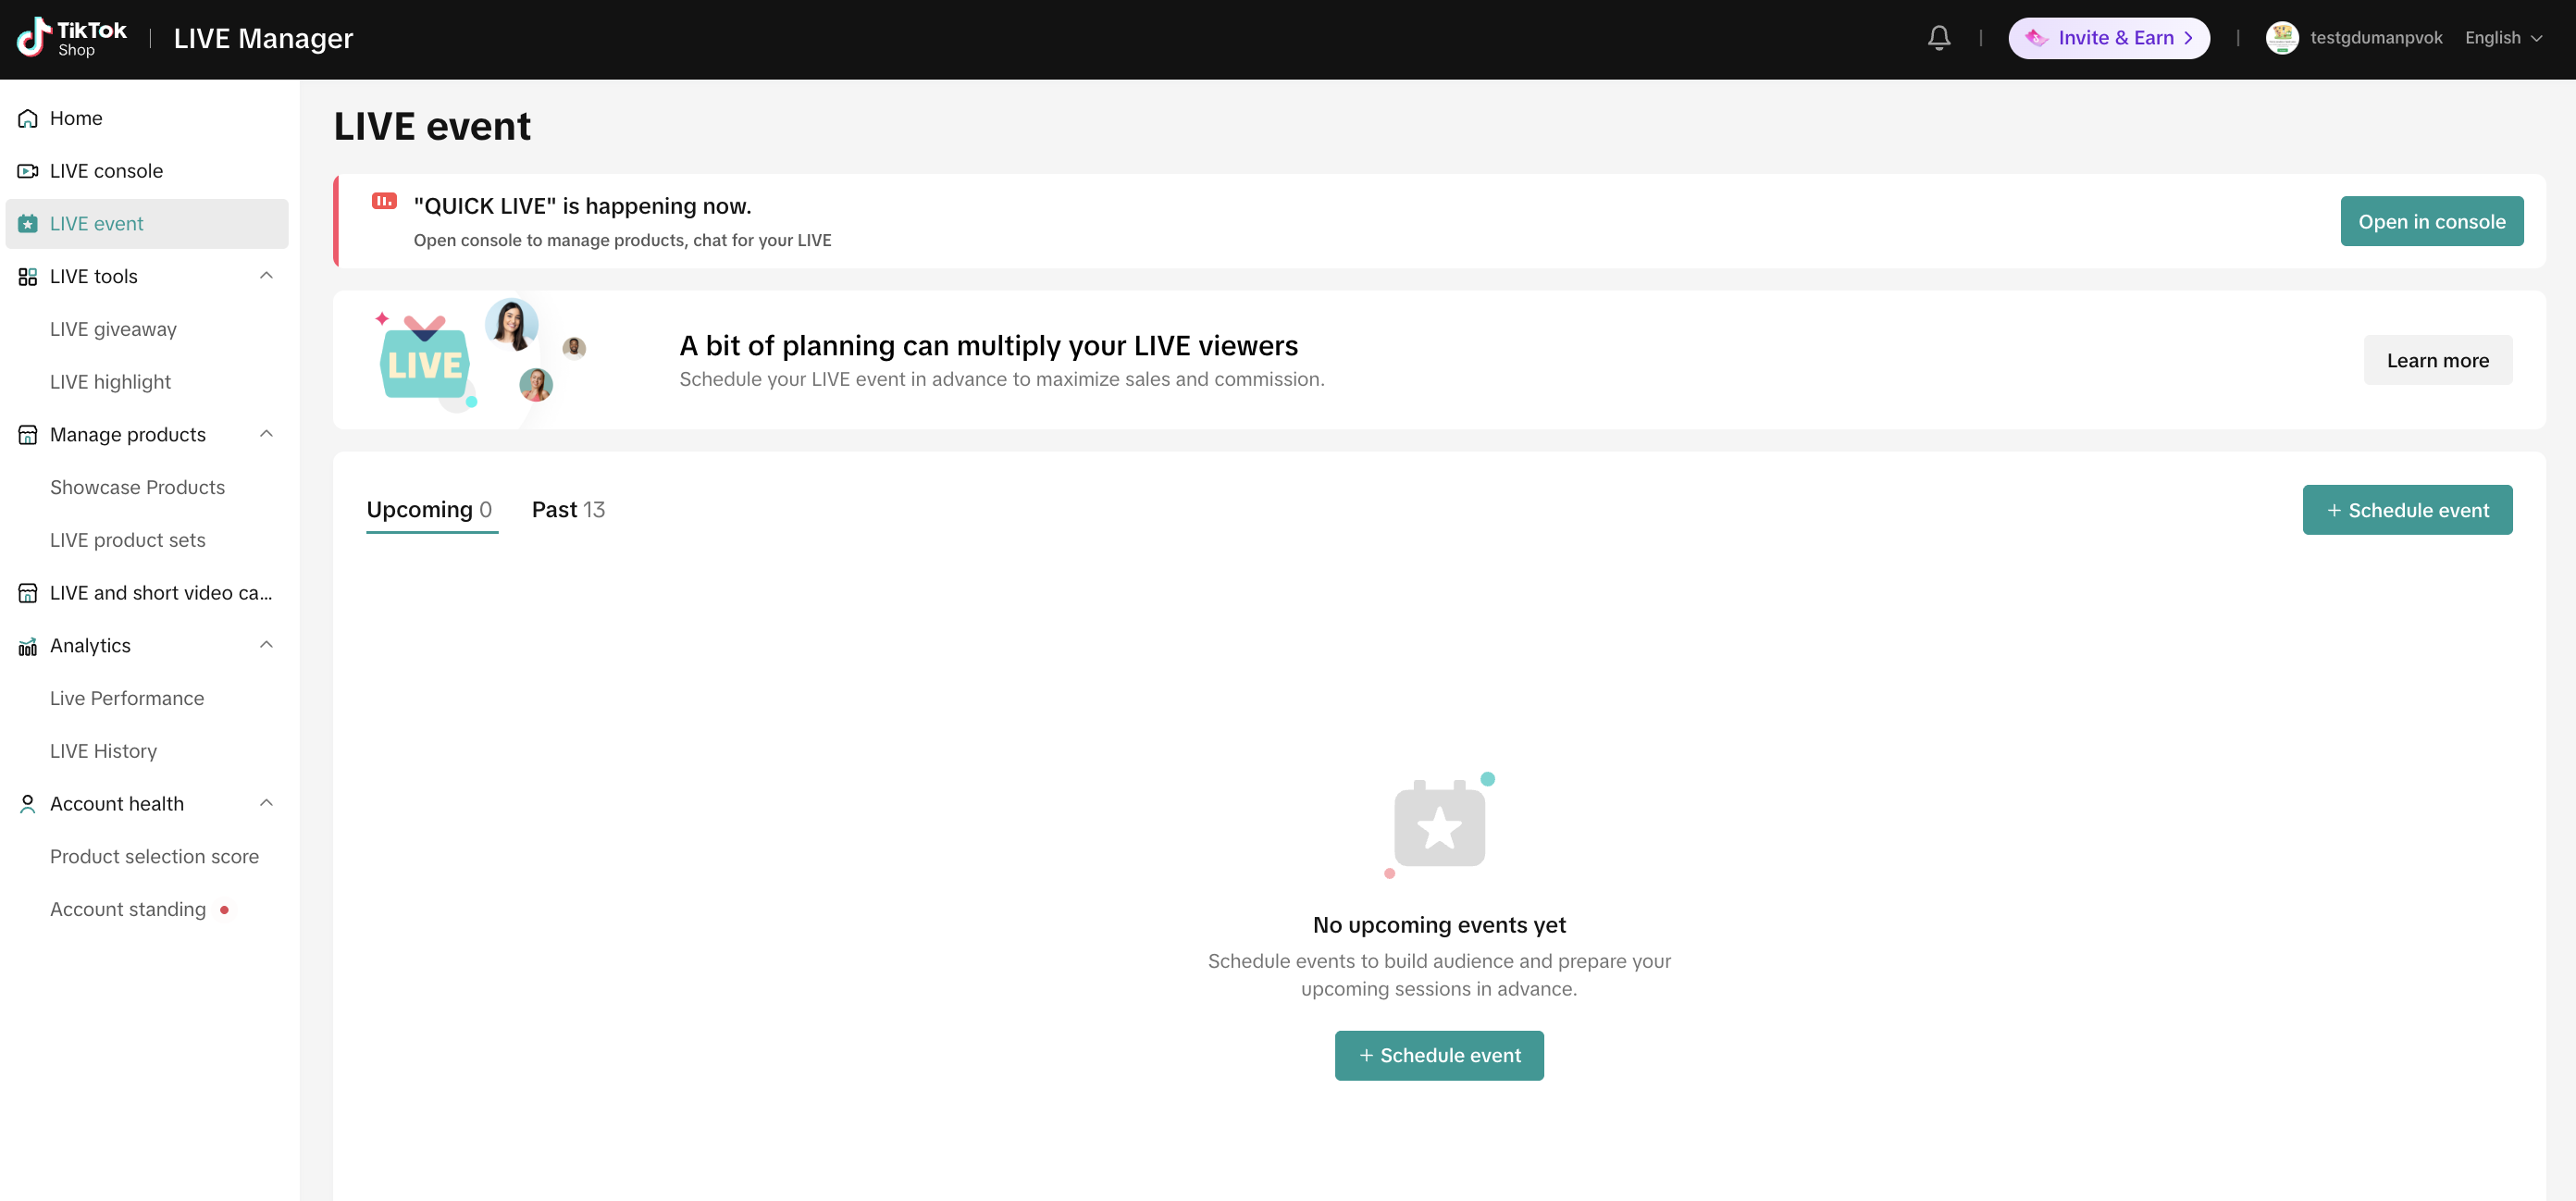
LIVE Events helps you plan, promote, and manage upcoming TikTok Shop LIVE sessions before you go LIVE. By scheduling a LIVE Event in advance, you can:
Set the date, start time, and expected duration of your LIVE.
Prepare products and LIVE Giveaways before the session starts.
Promote the upcoming LIVE through videos, event links, and QR codes.
Let viewers discover the event and register in advance.
Launch the scheduled LIVE from either desktop or mobile.
Review individual LIVE sessions and performance after the event.
LIVE Events created on desktop can include multiple LIVE sessions within one event. This means you can pause, take a break, and resume streaming during the scheduled event period without creating a new event. There is also an important scheduling difference between platforms: LIVE Events created on mobile must be scheduled at least 2 hours in advance, while desktop LIVE Manager lets you schedule an event in advance or start immediately.
Why it drives traffic?
A scheduled LIVE Event converts vague follower awareness into calendar-committed attendance intent — this is the mechanism that gives a LIVE room a starting concurrent-viewer floor instead of relying entirely on cold discovery at open. The three promotion formats (short video, URL, QR code) let the same LIVE Event run across owned channels (CRM, Follower Group, Bulletin Board) and earned/off-platform channels (a QR code in other content) at once, on a completely different timeline from the LIVE itself. Multi-session support on desktop means a single Event absorbs a technical pause or break without losing the pre-registrations already tied to it — a mechanical reason to always create the Event even for a same-day LIVE.
How to Set It Up?
Step 1
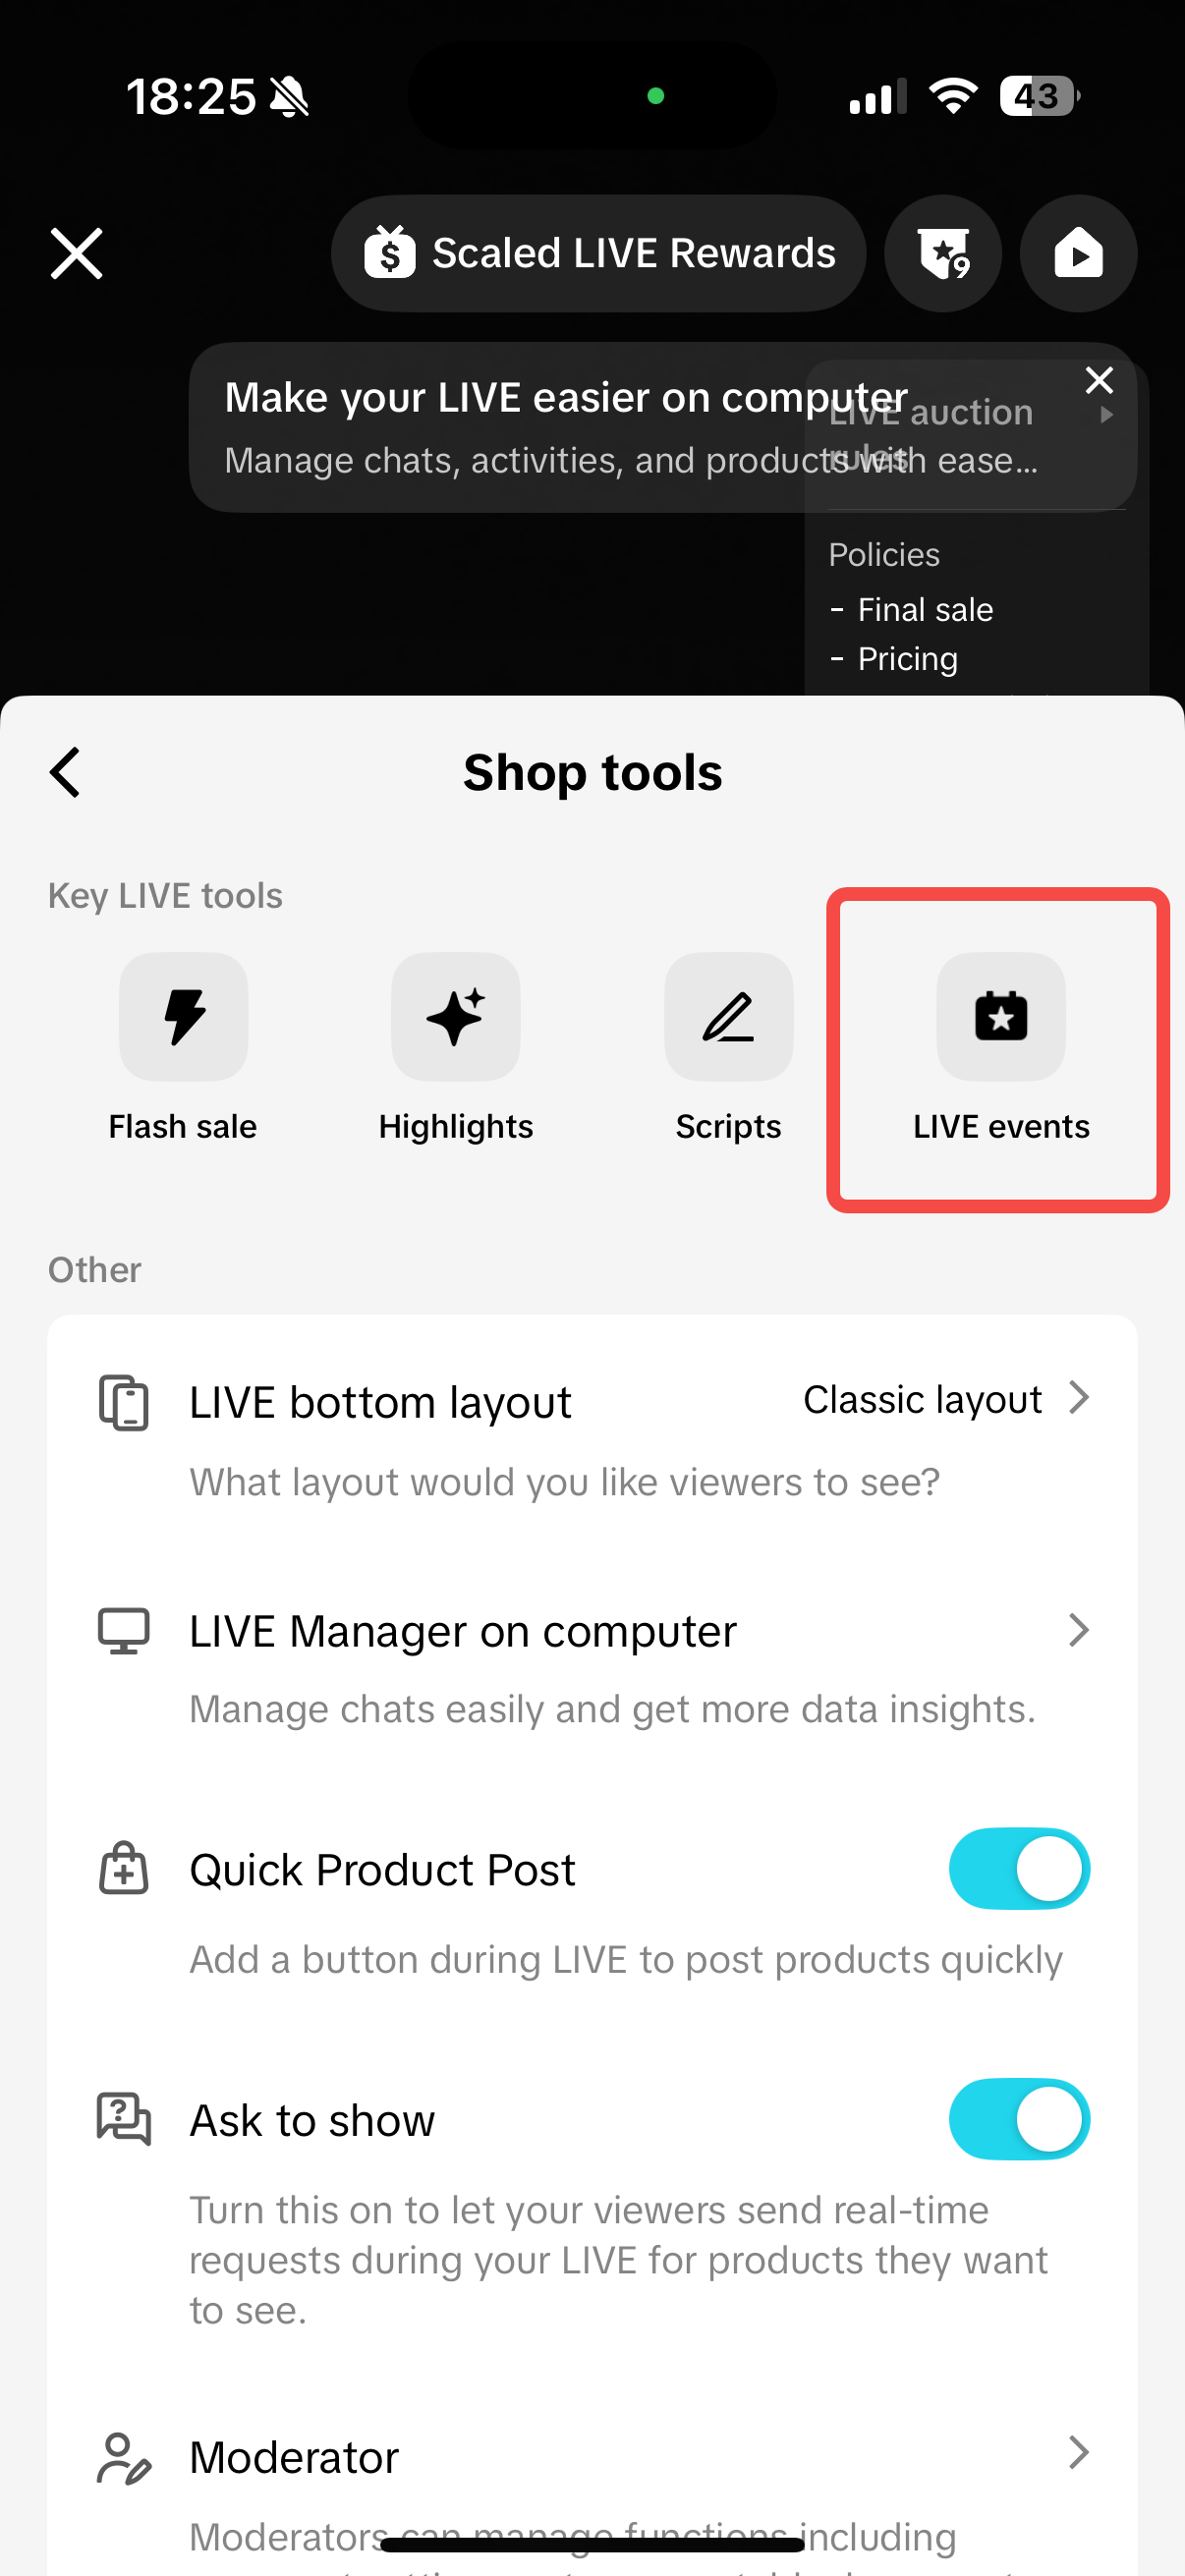
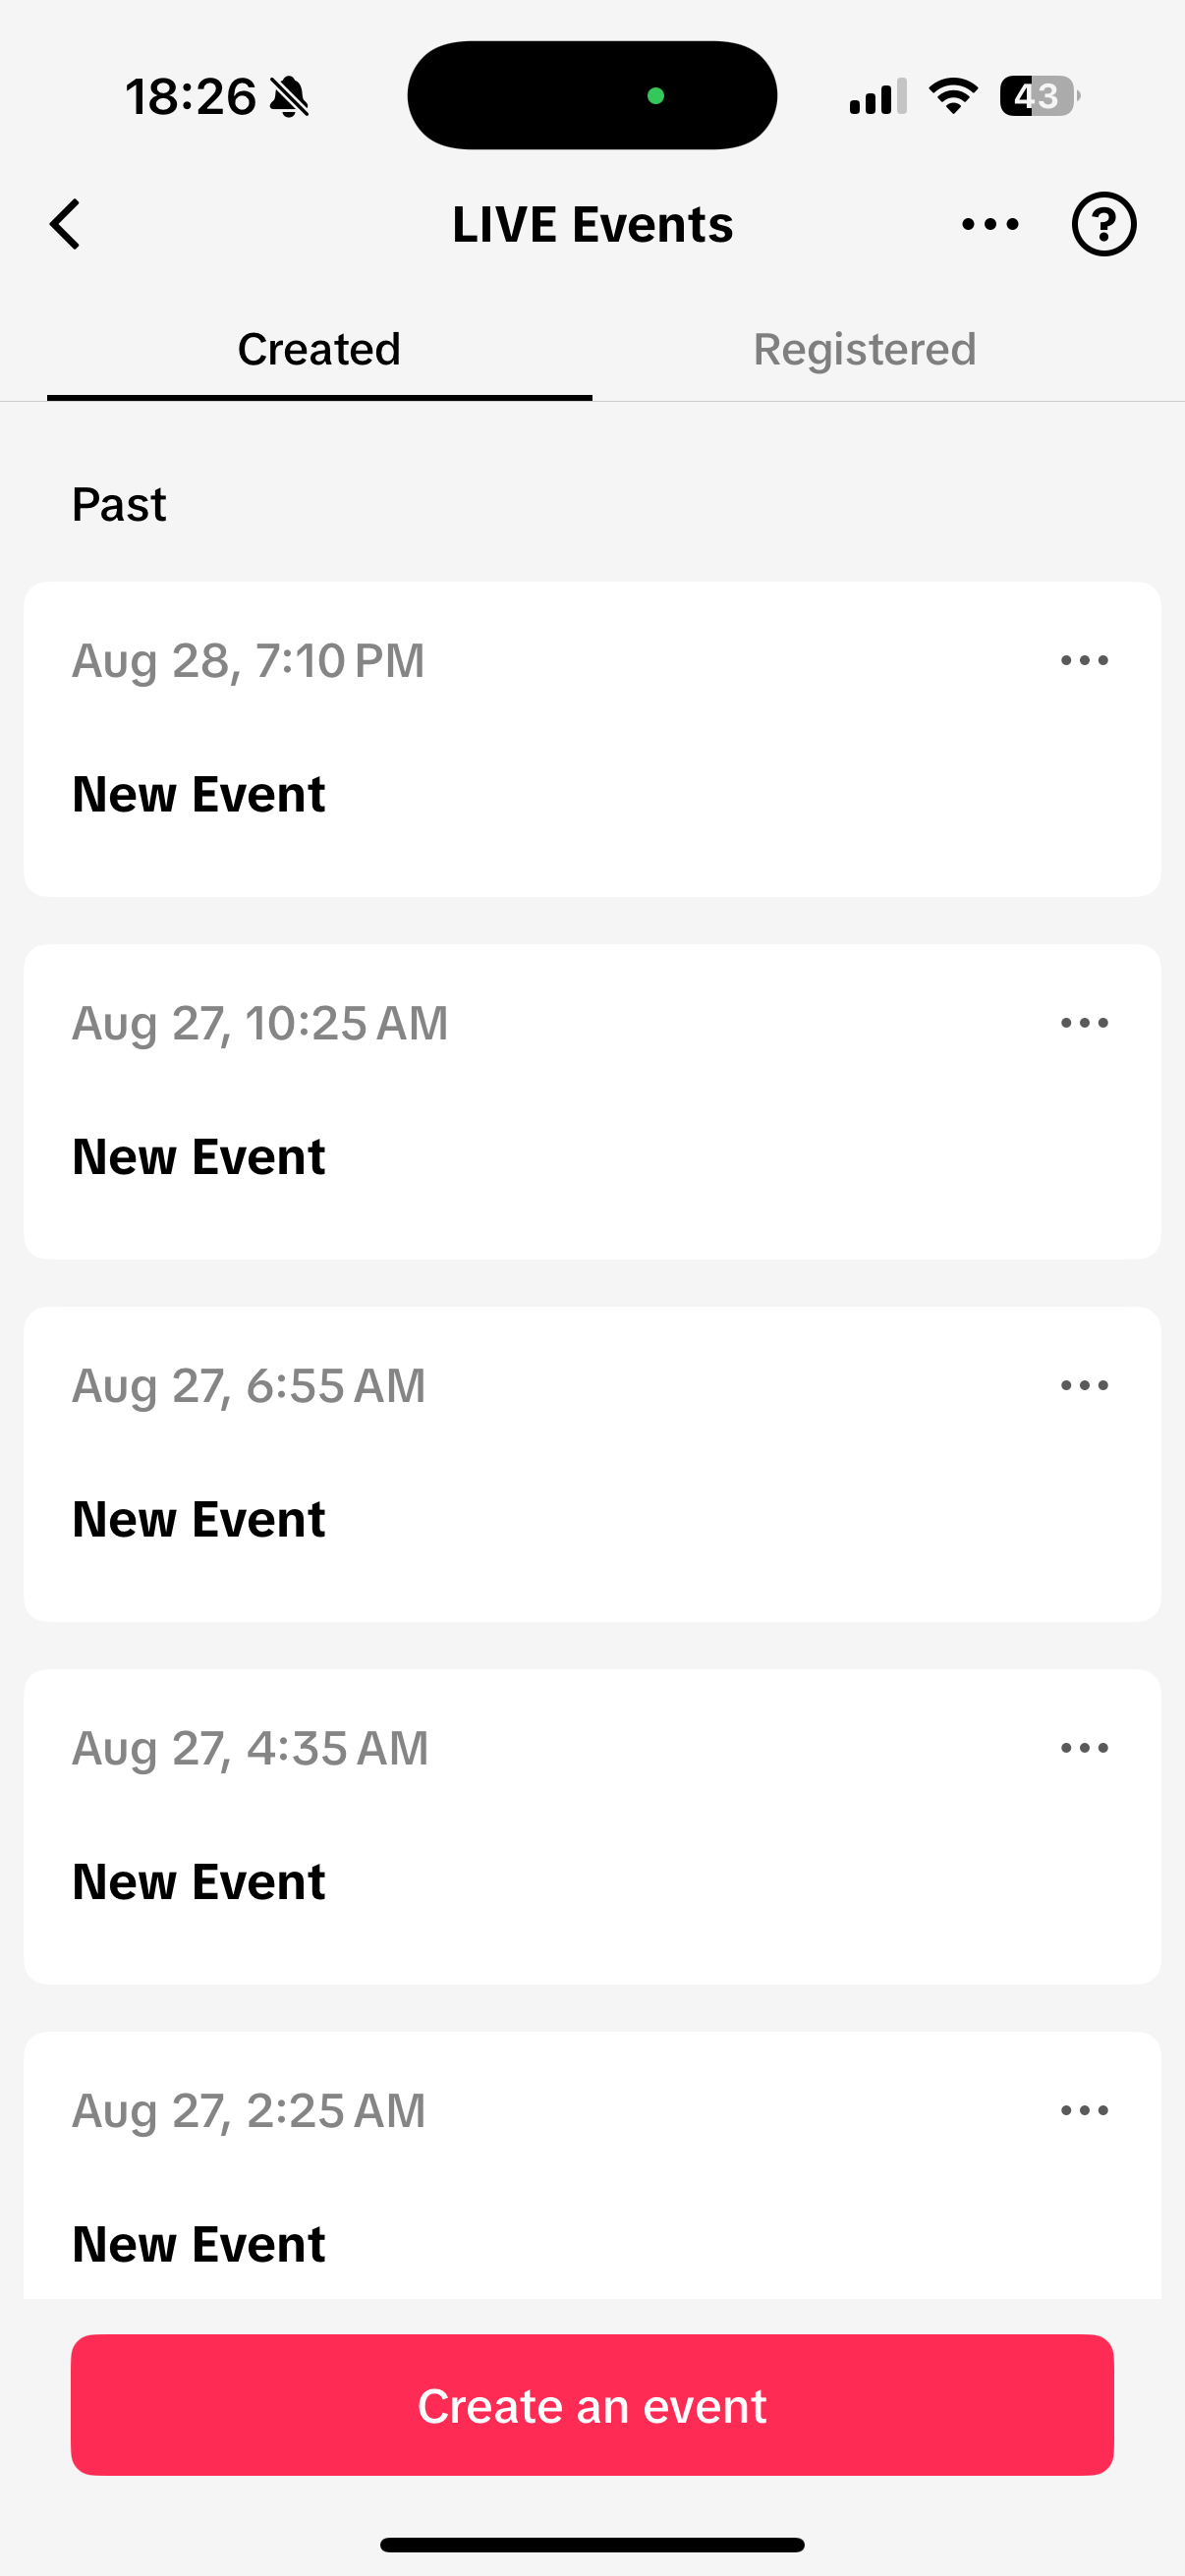
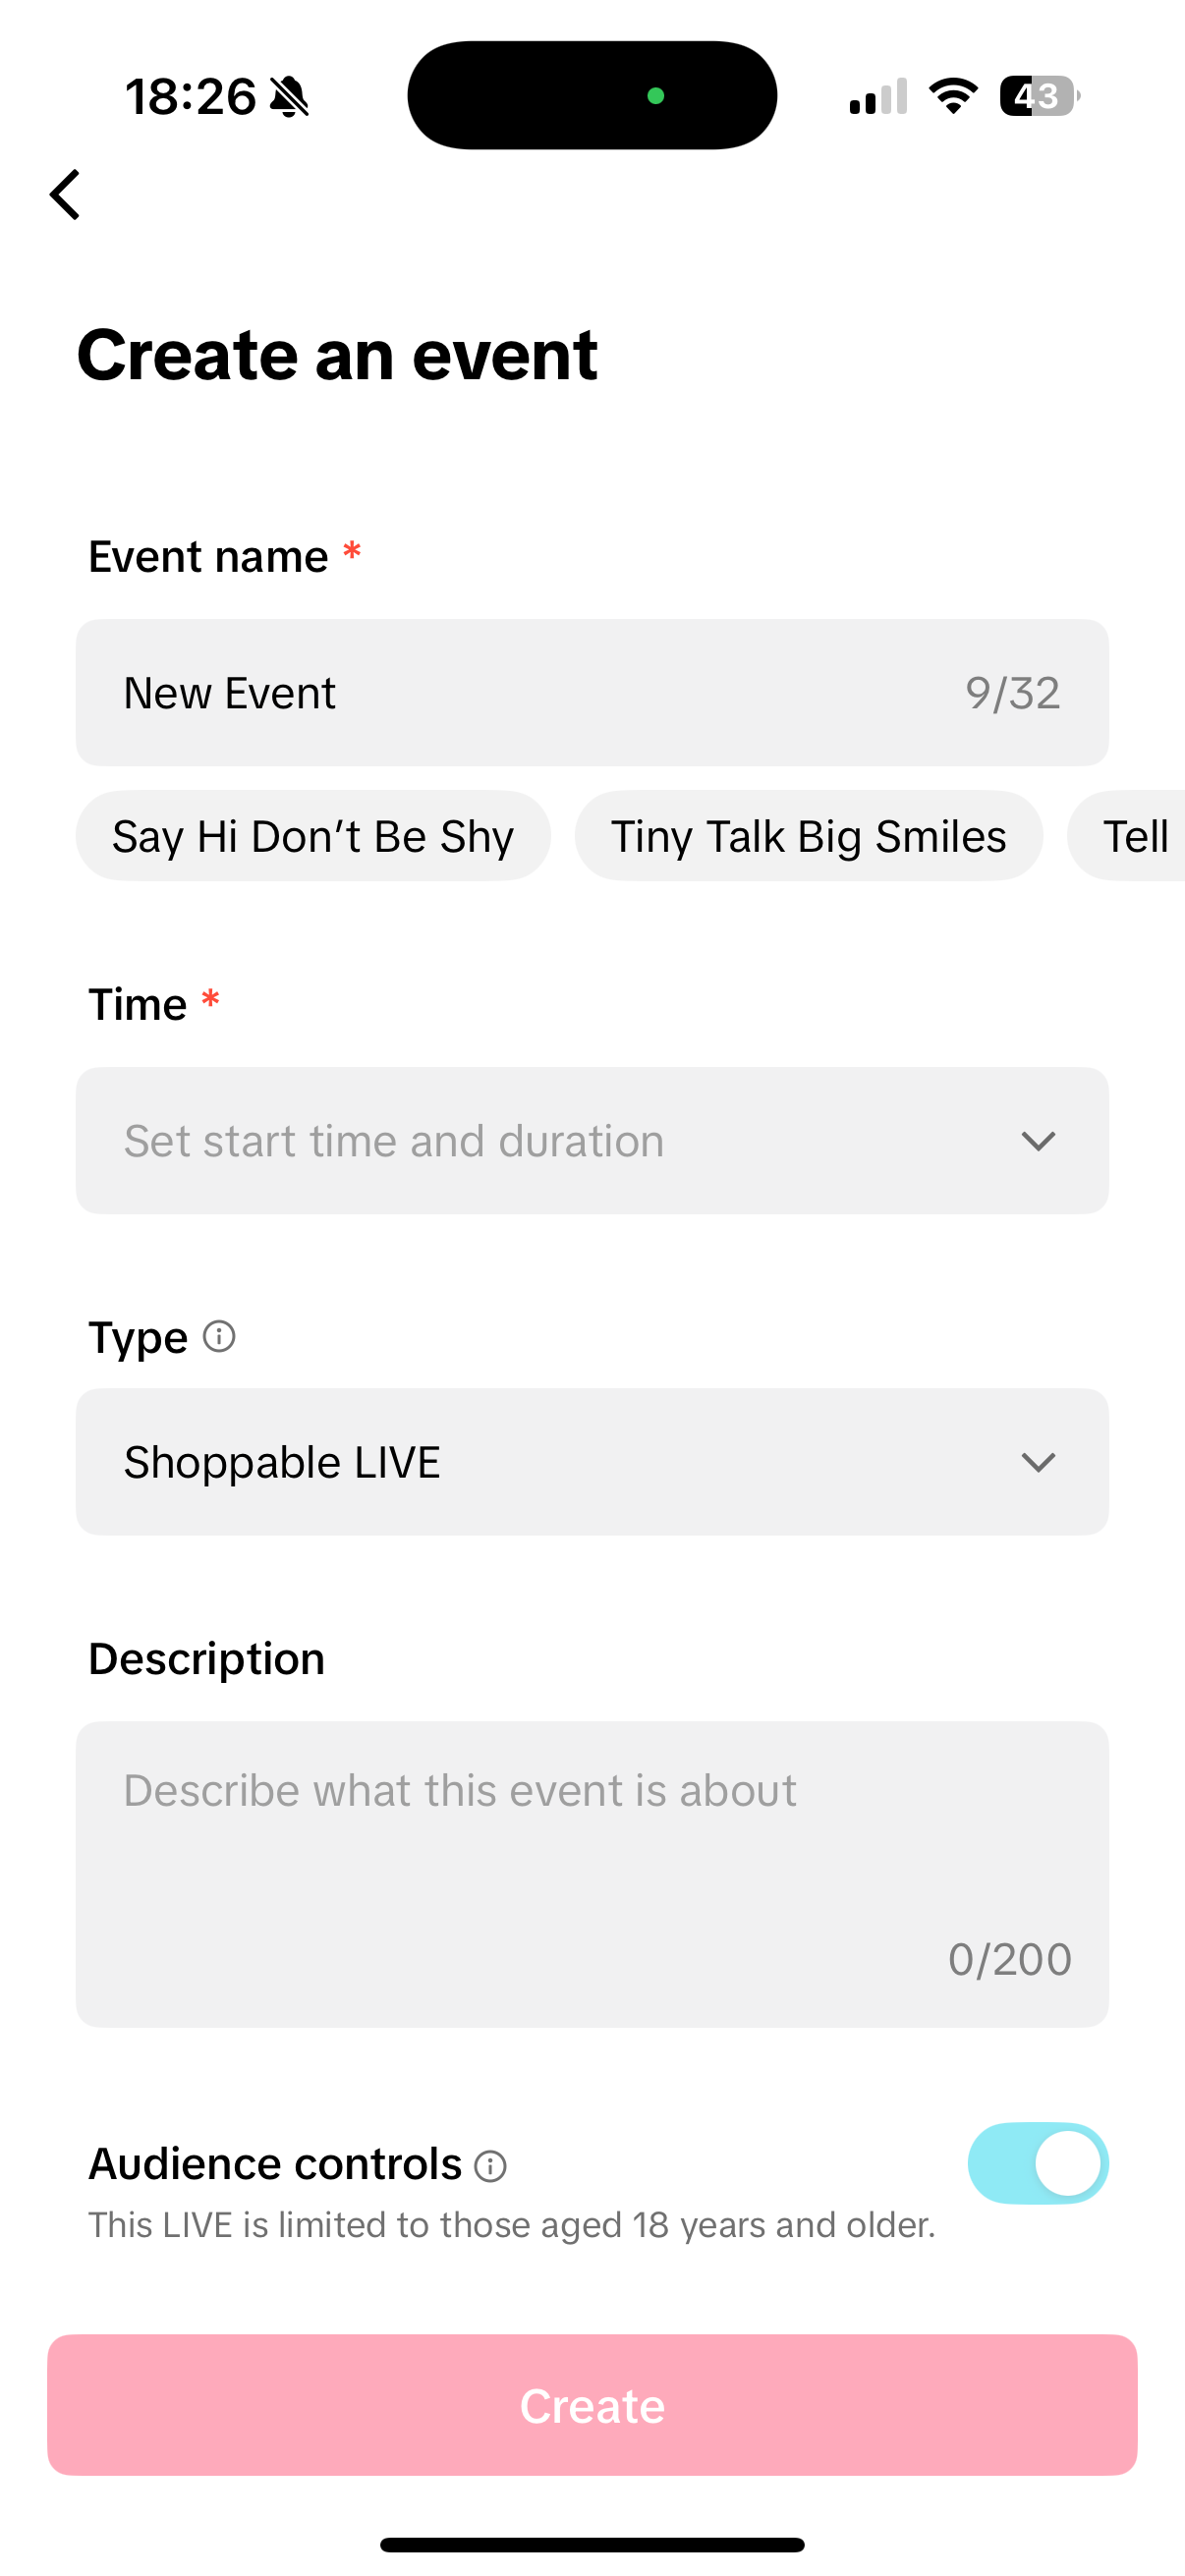
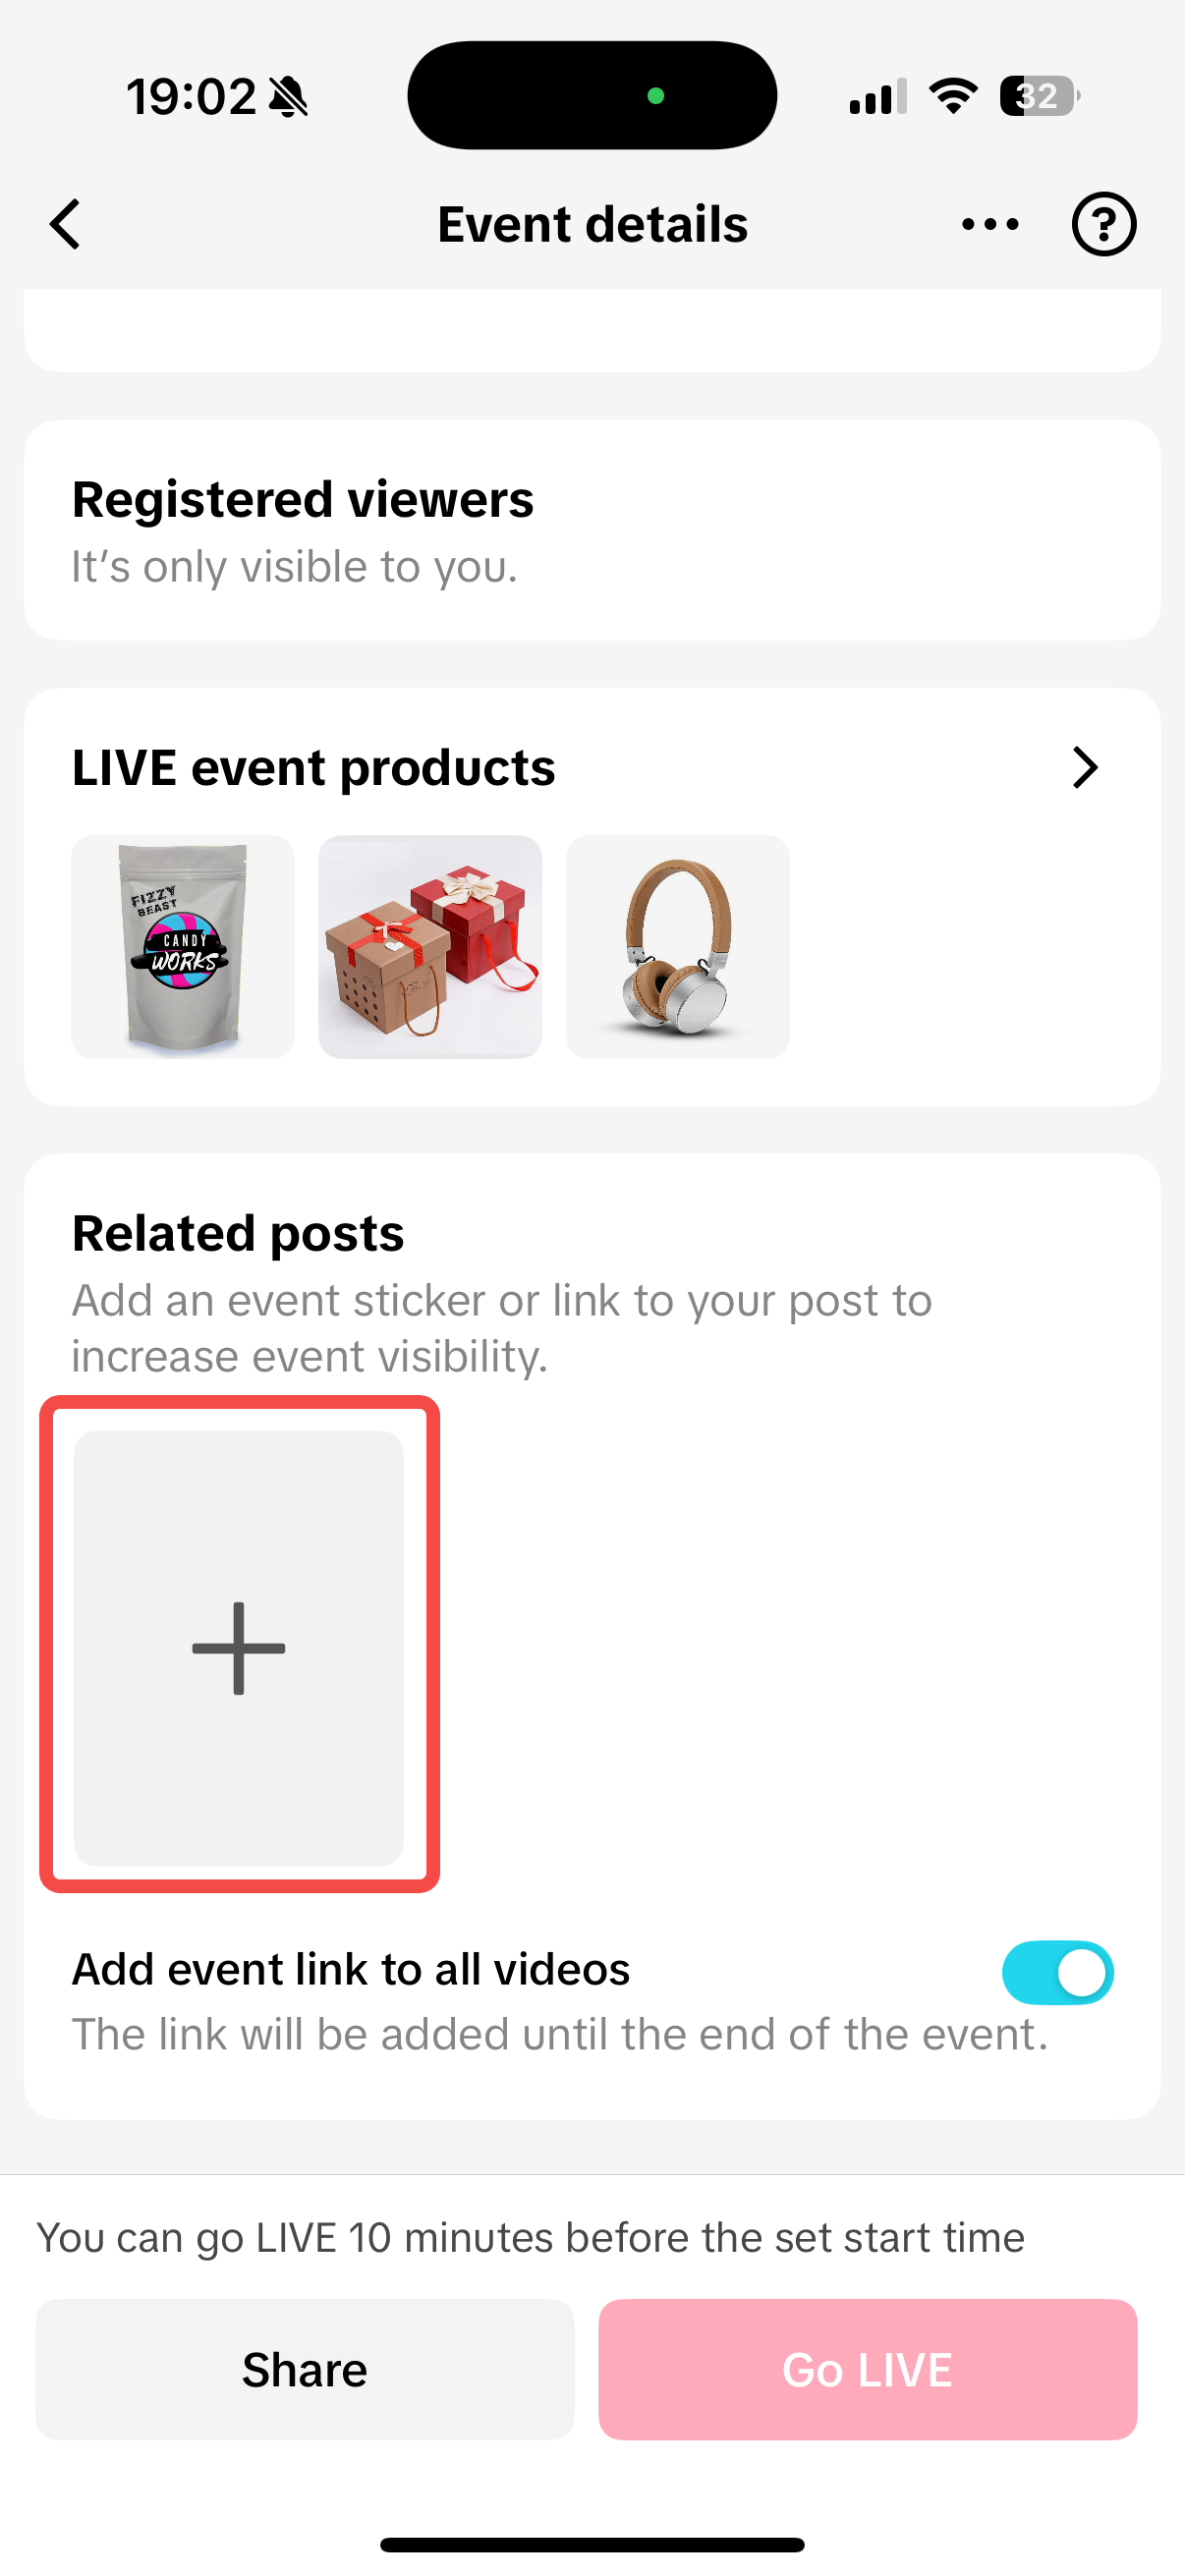
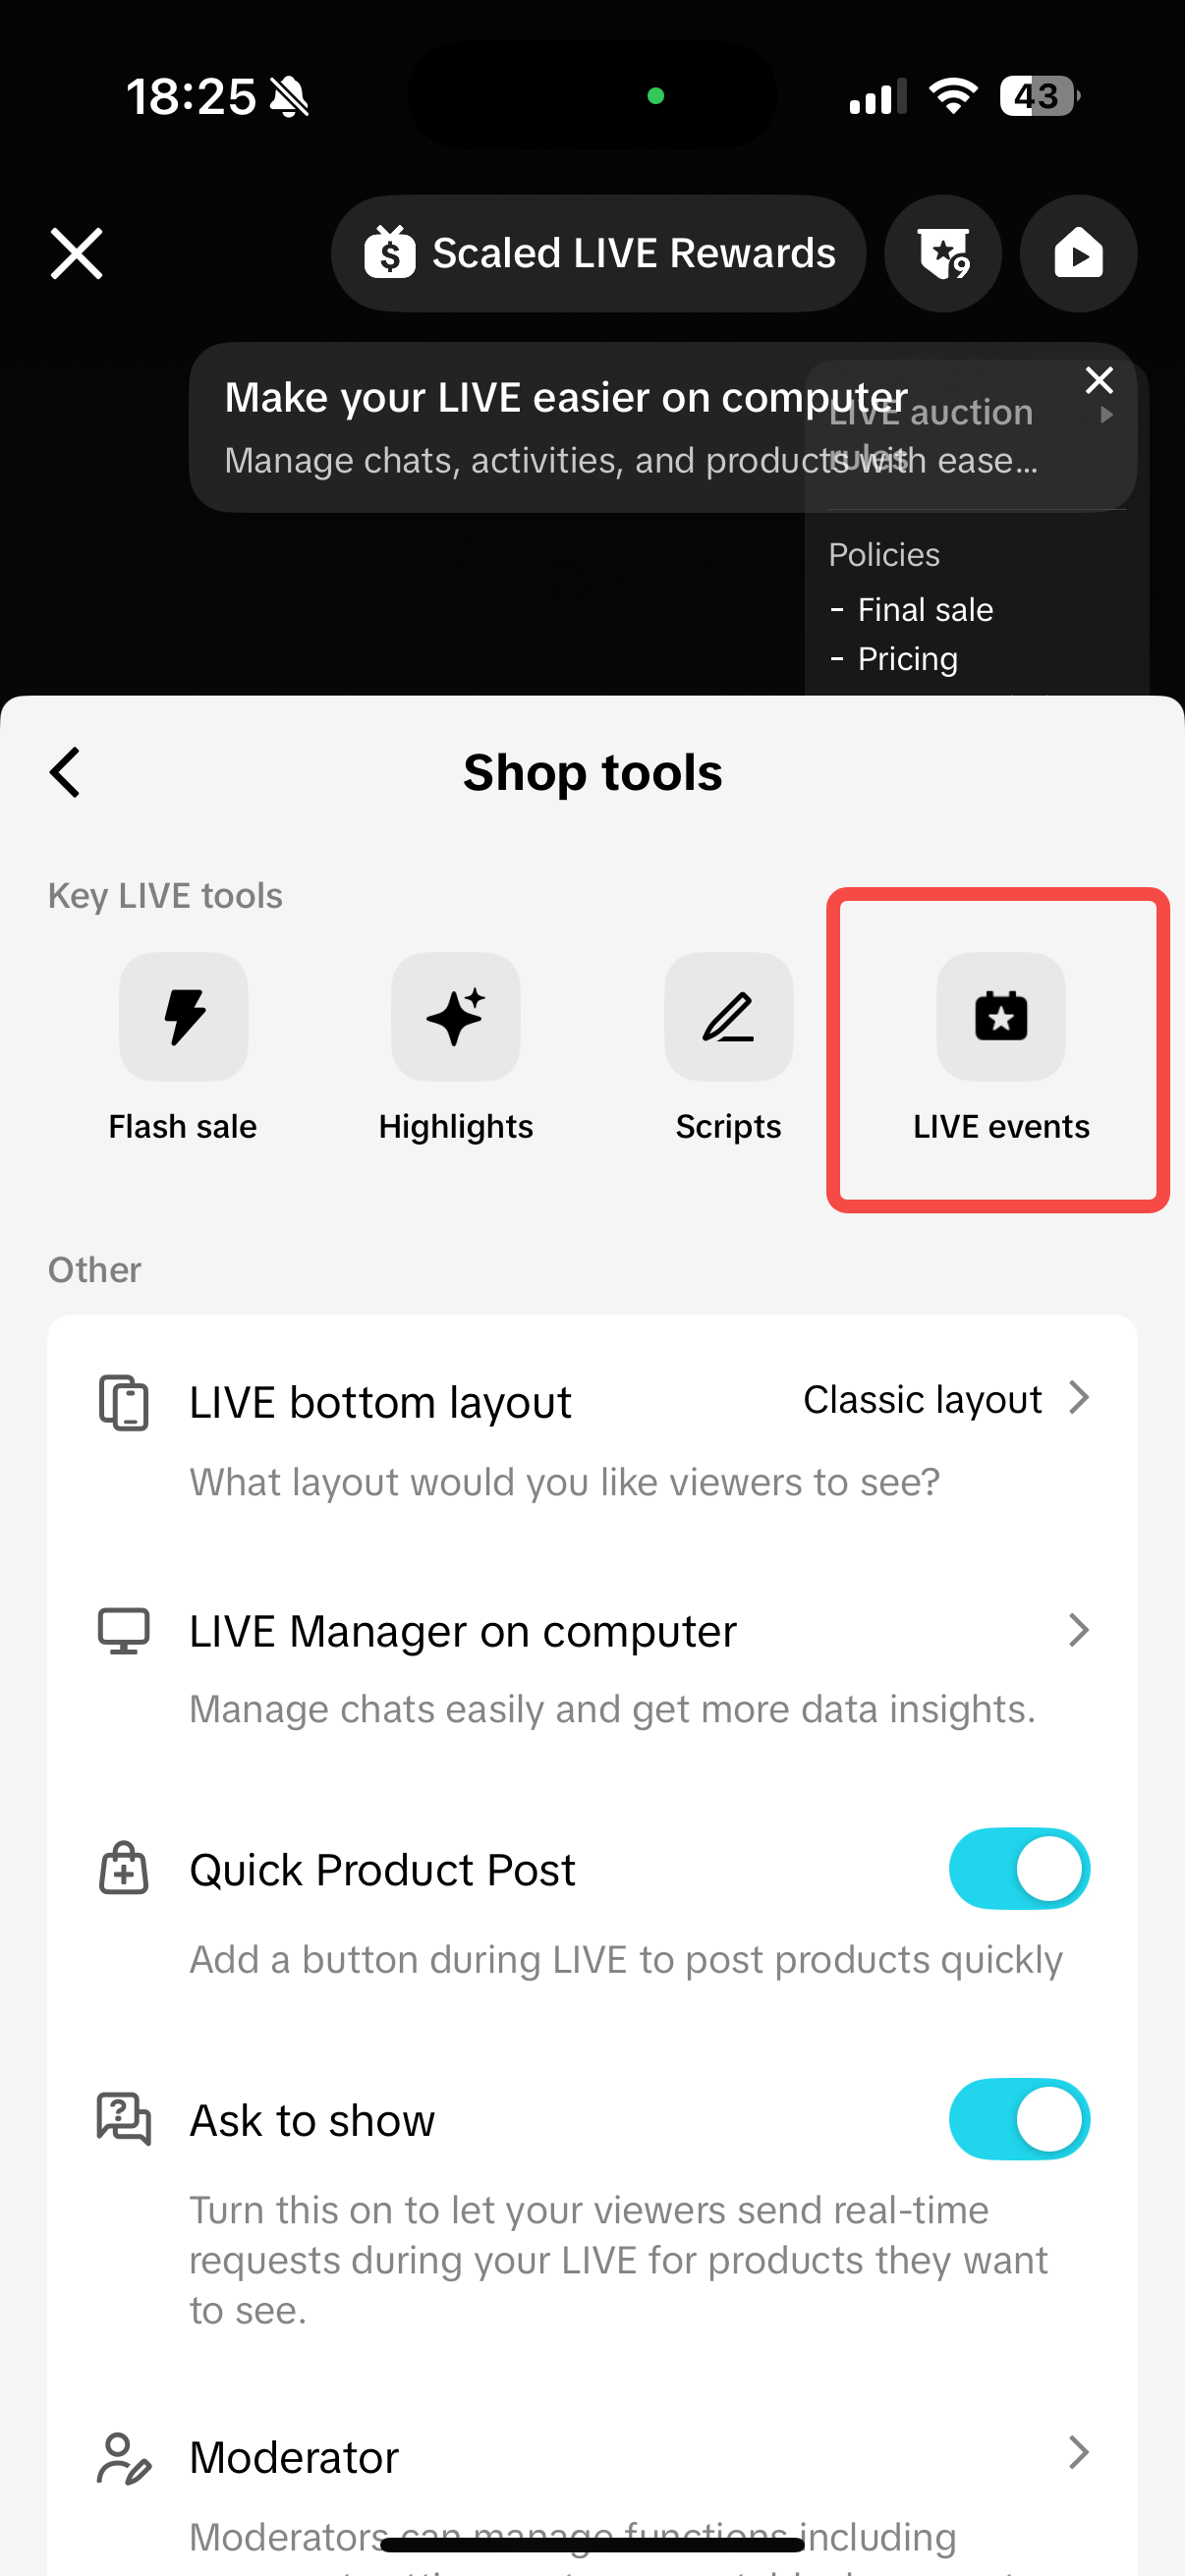
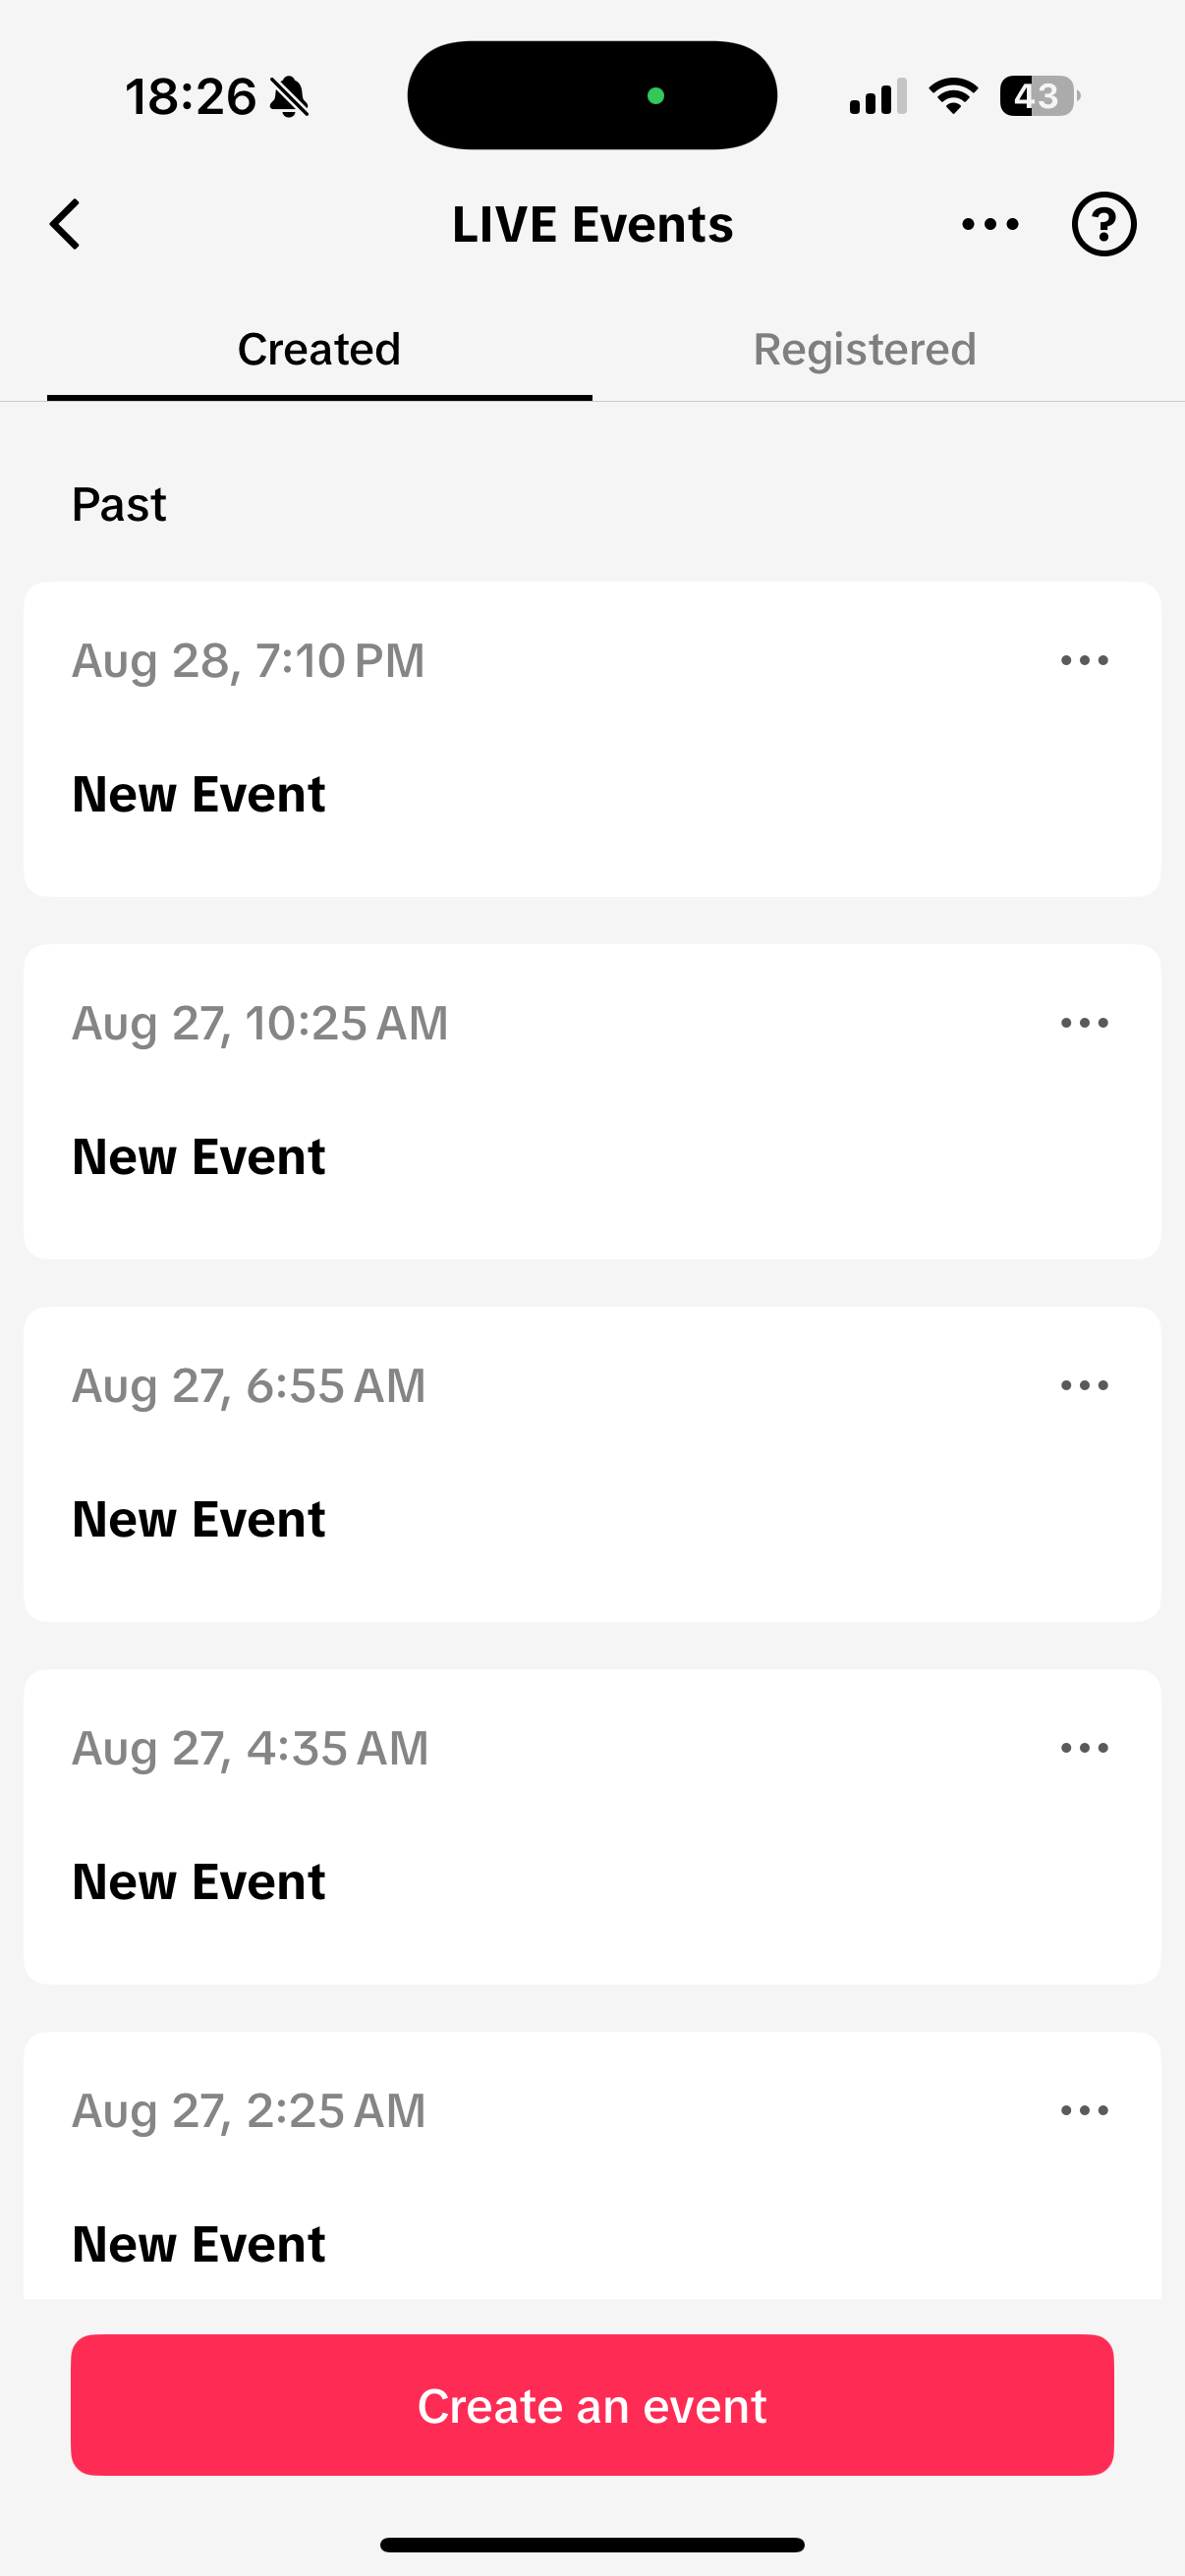
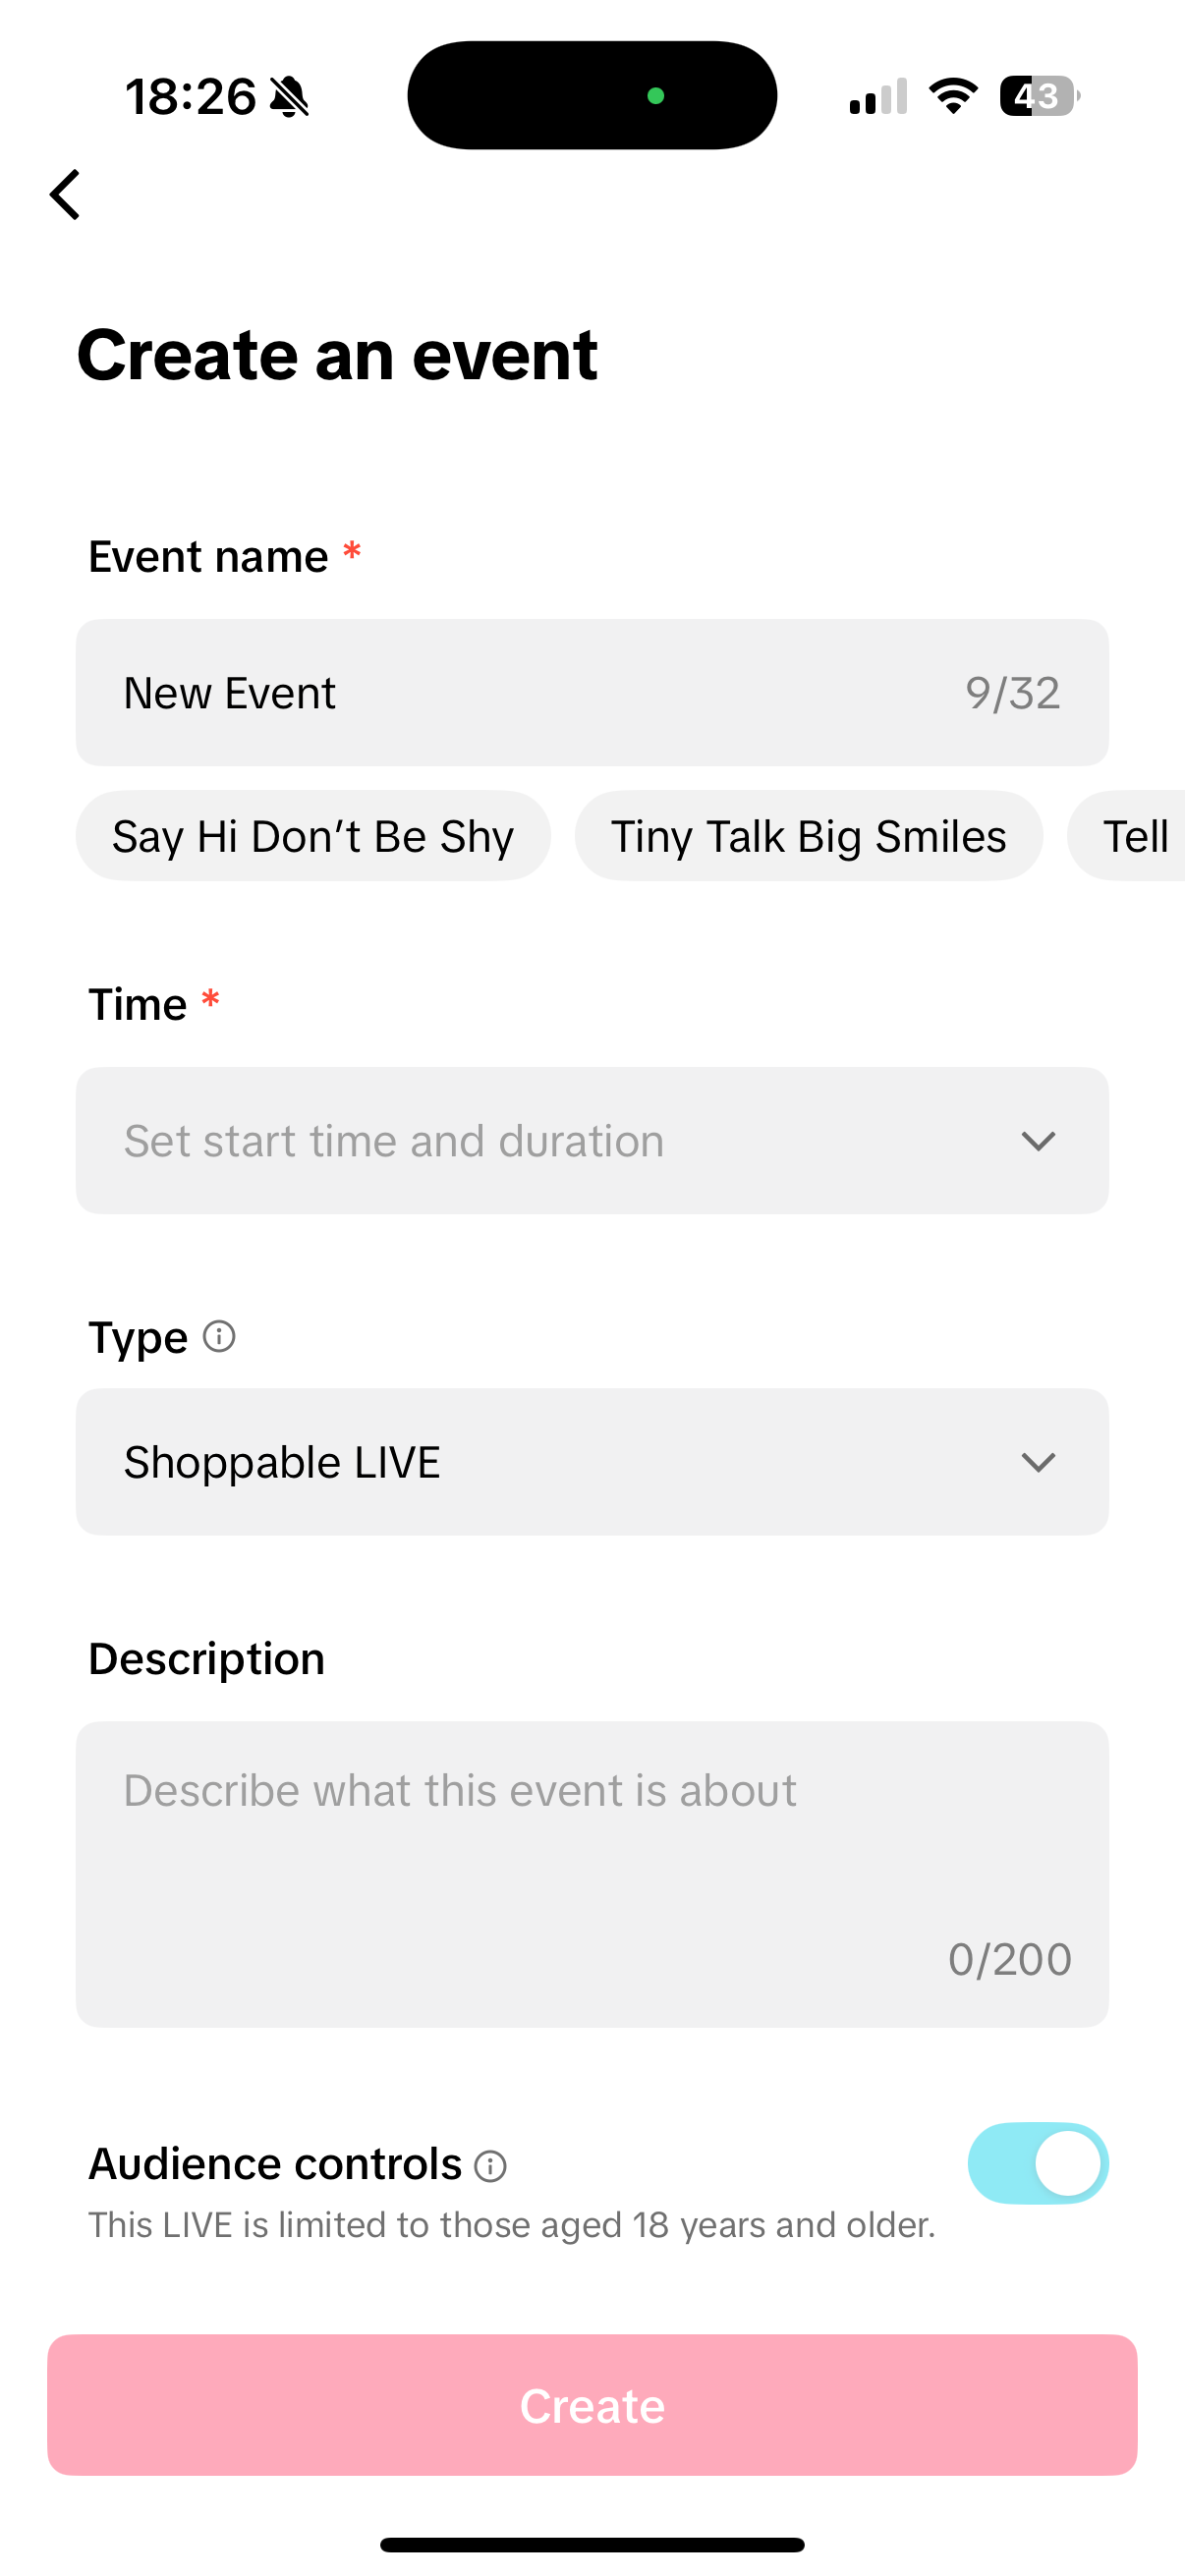
Step 1: Create Your LIVE Event In LIVE Manager, go to LIVE tools > LIVE events. In the TikTok app, go to your Profile > Menu > Creator tools > LIVE Events
DesktopMobile
Step 2
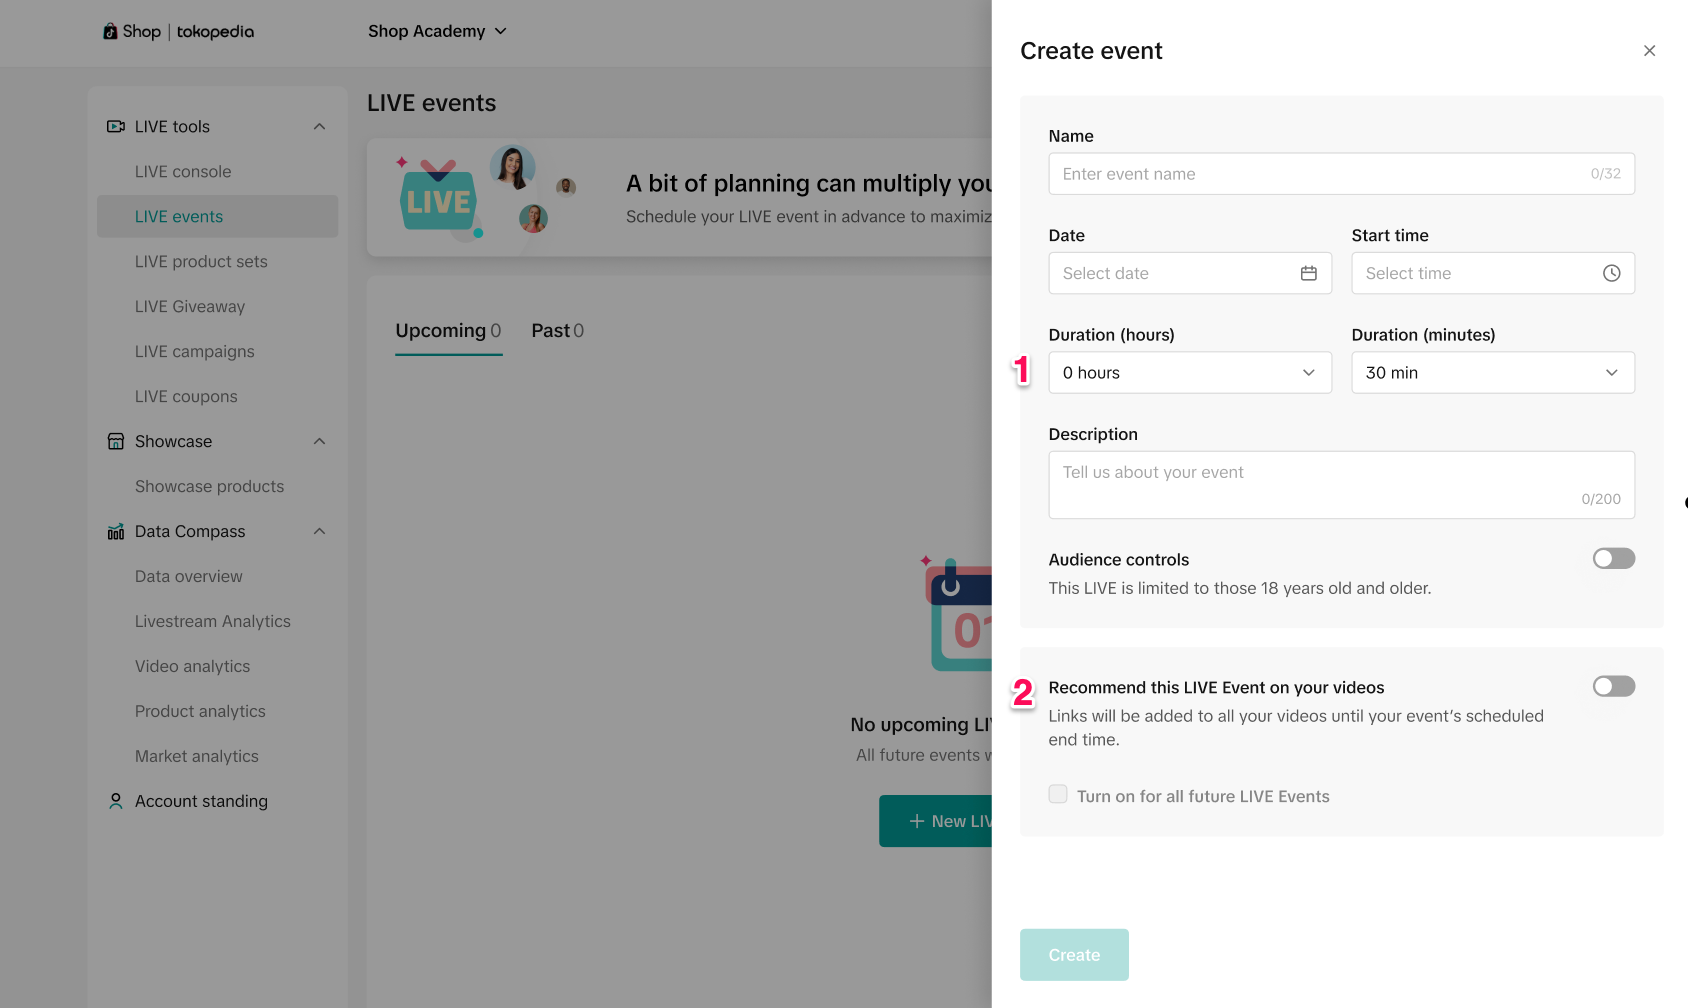
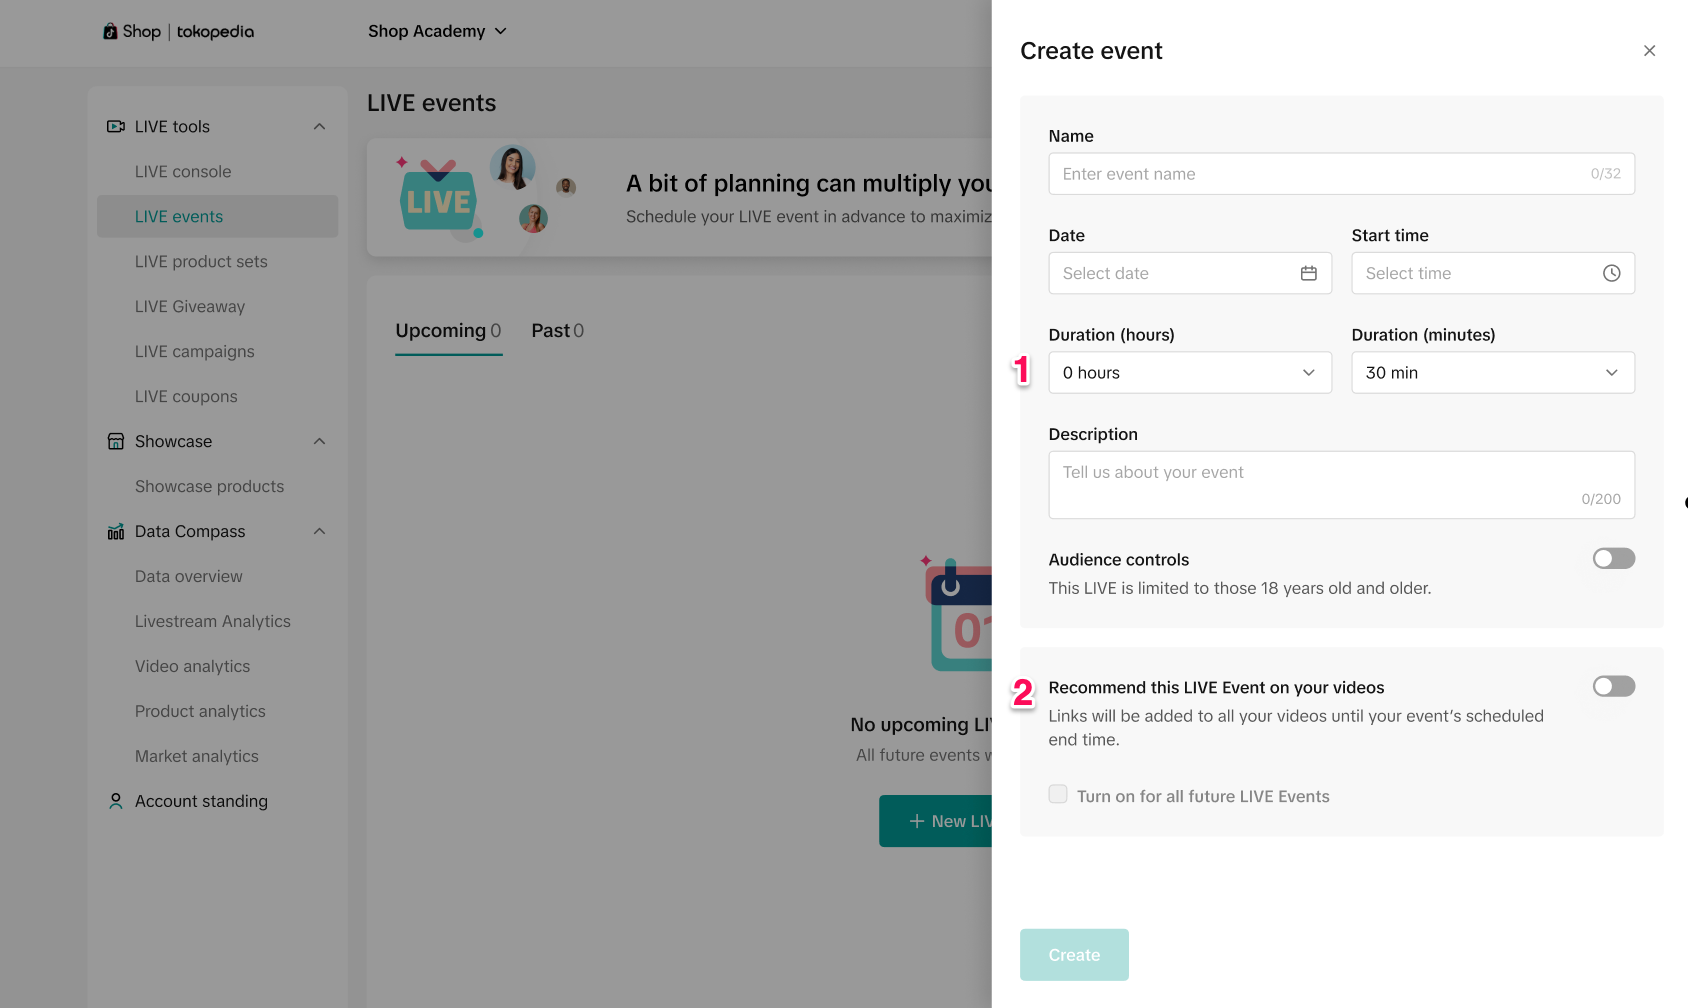
Step 2: Create LIVE Event Select New LIVE event, then enter your event details, including:
Event information
Start time
Duration
The event duration must be between 30 minutes and 13 hours. Note: LIVE Events created on mobile must be scheduled at least 2 hours in advance.
DesktopMobile
Step 3
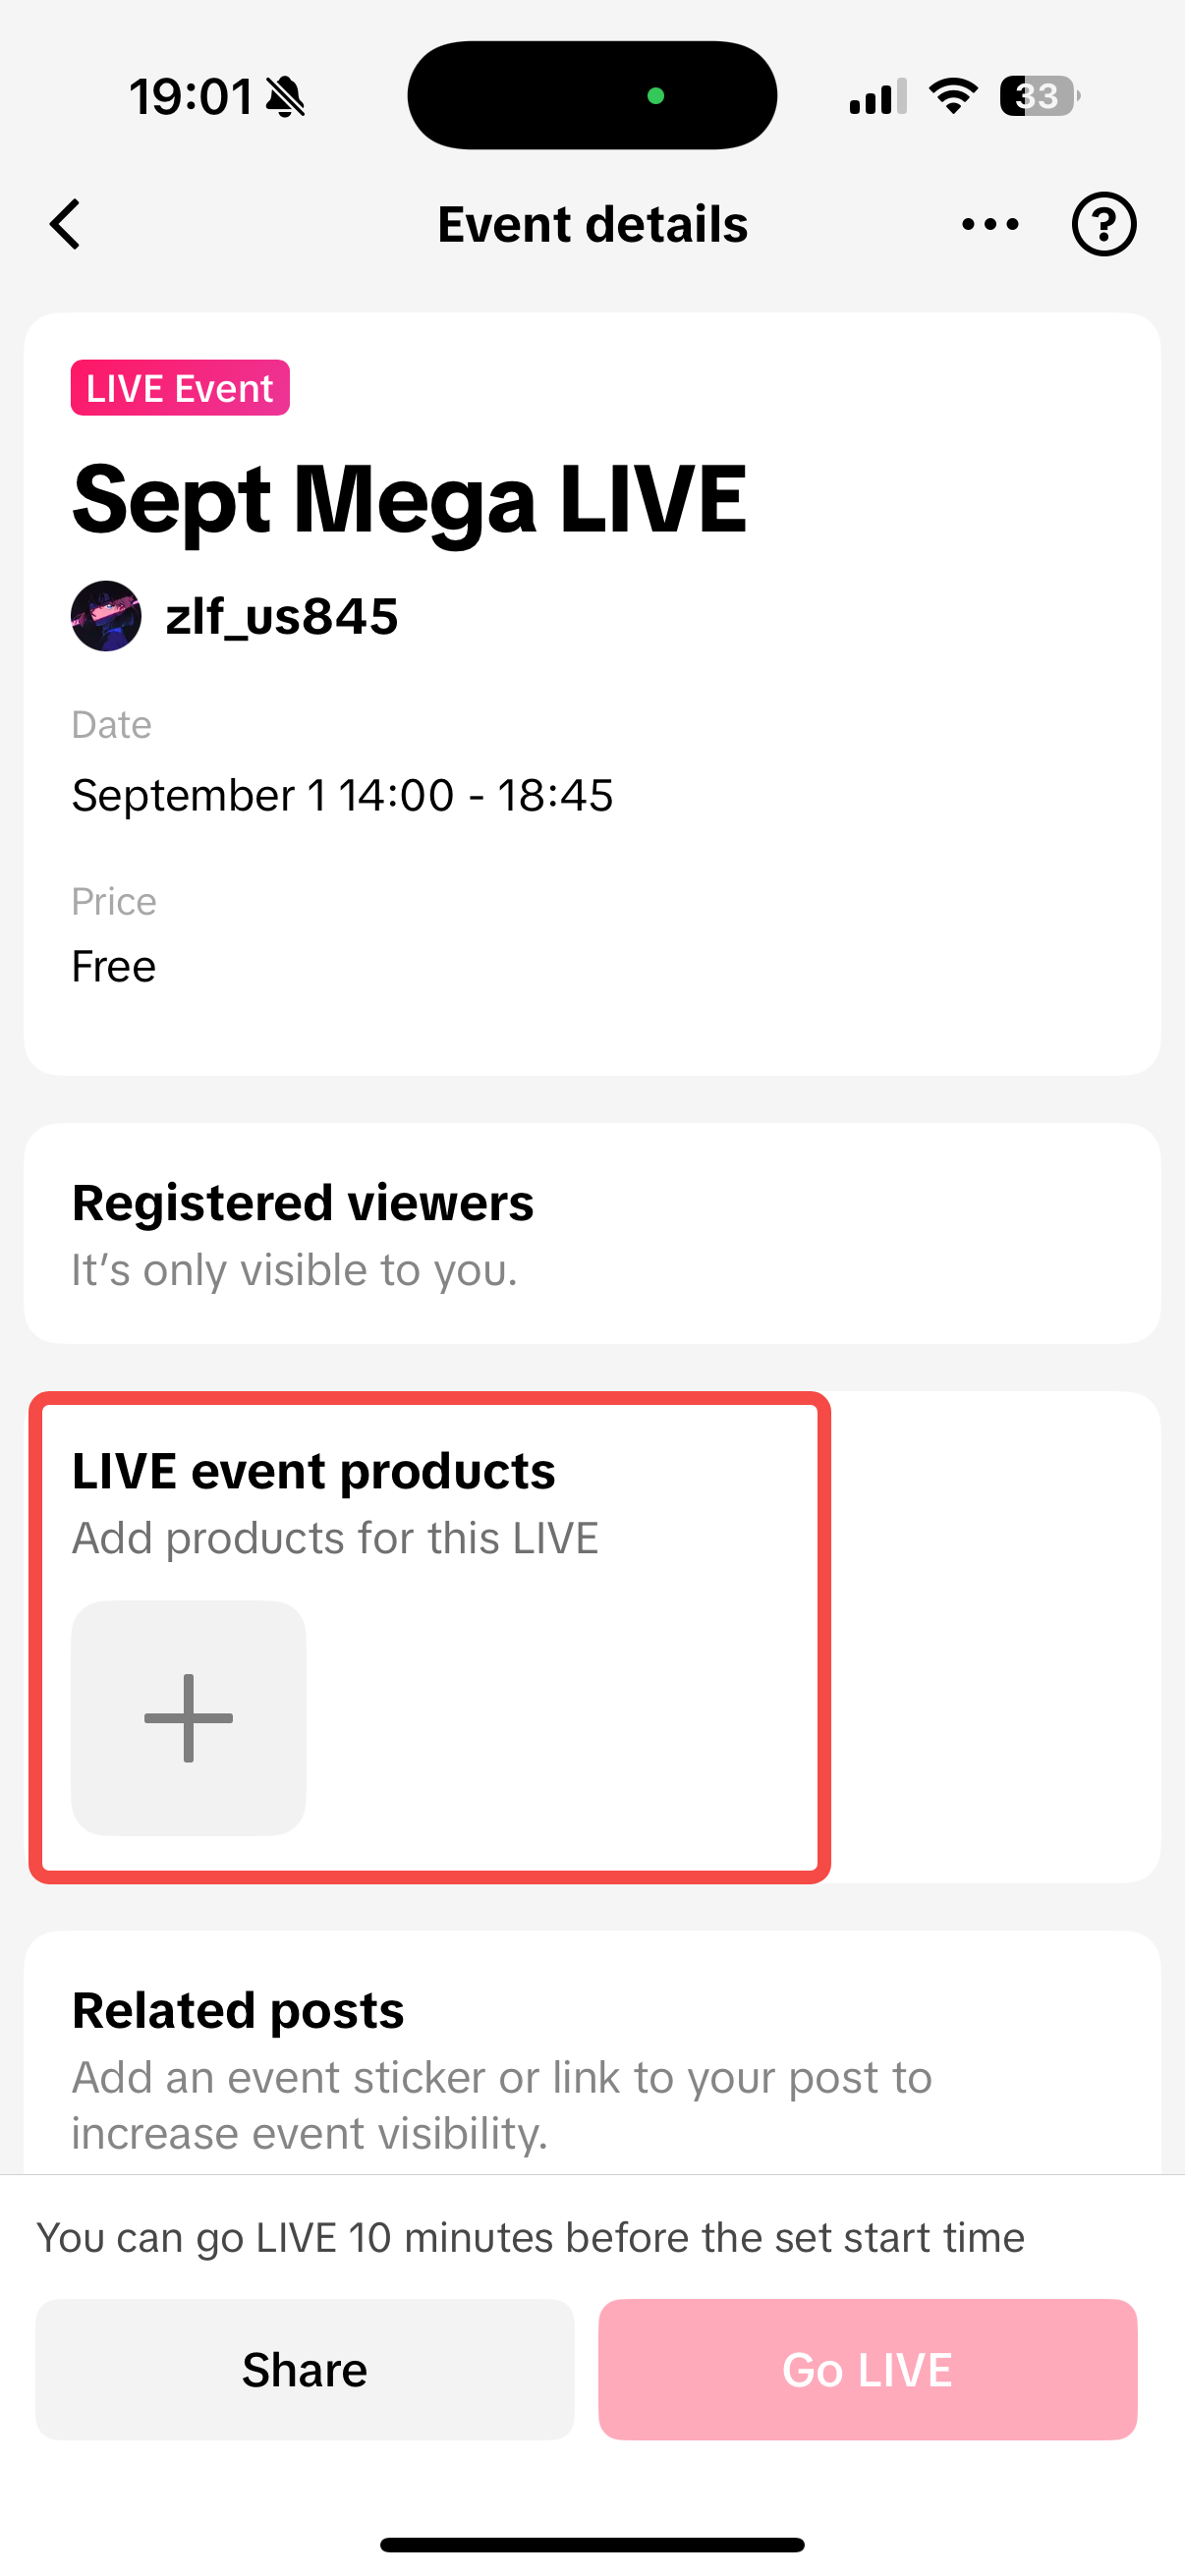
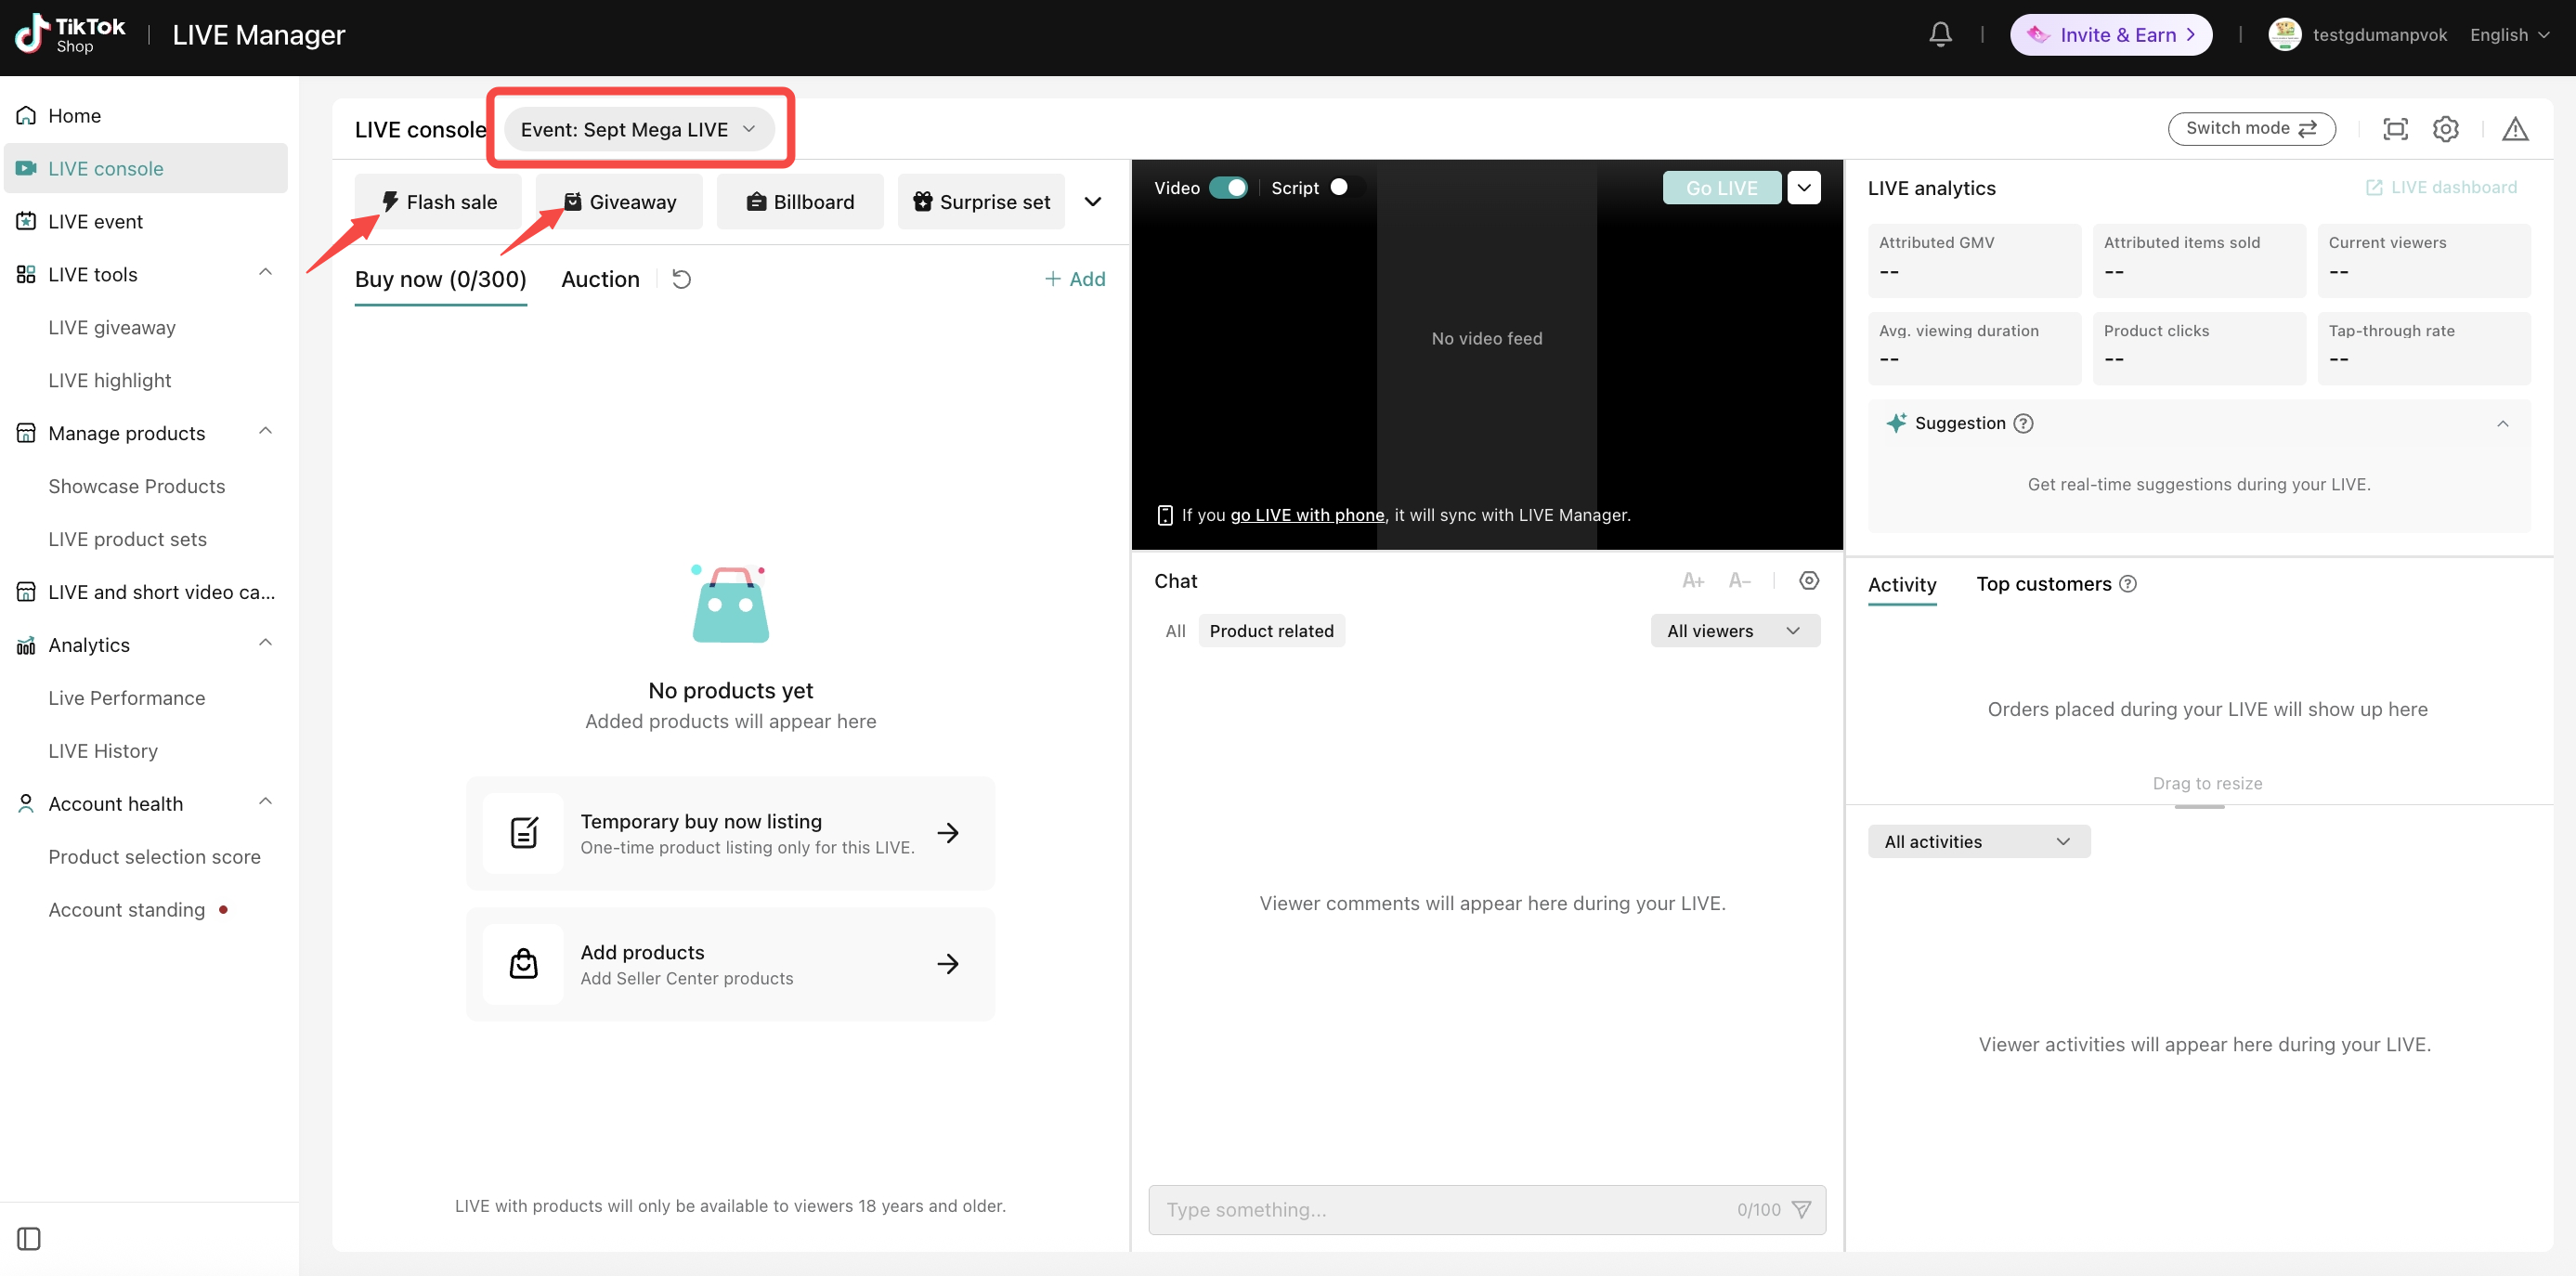
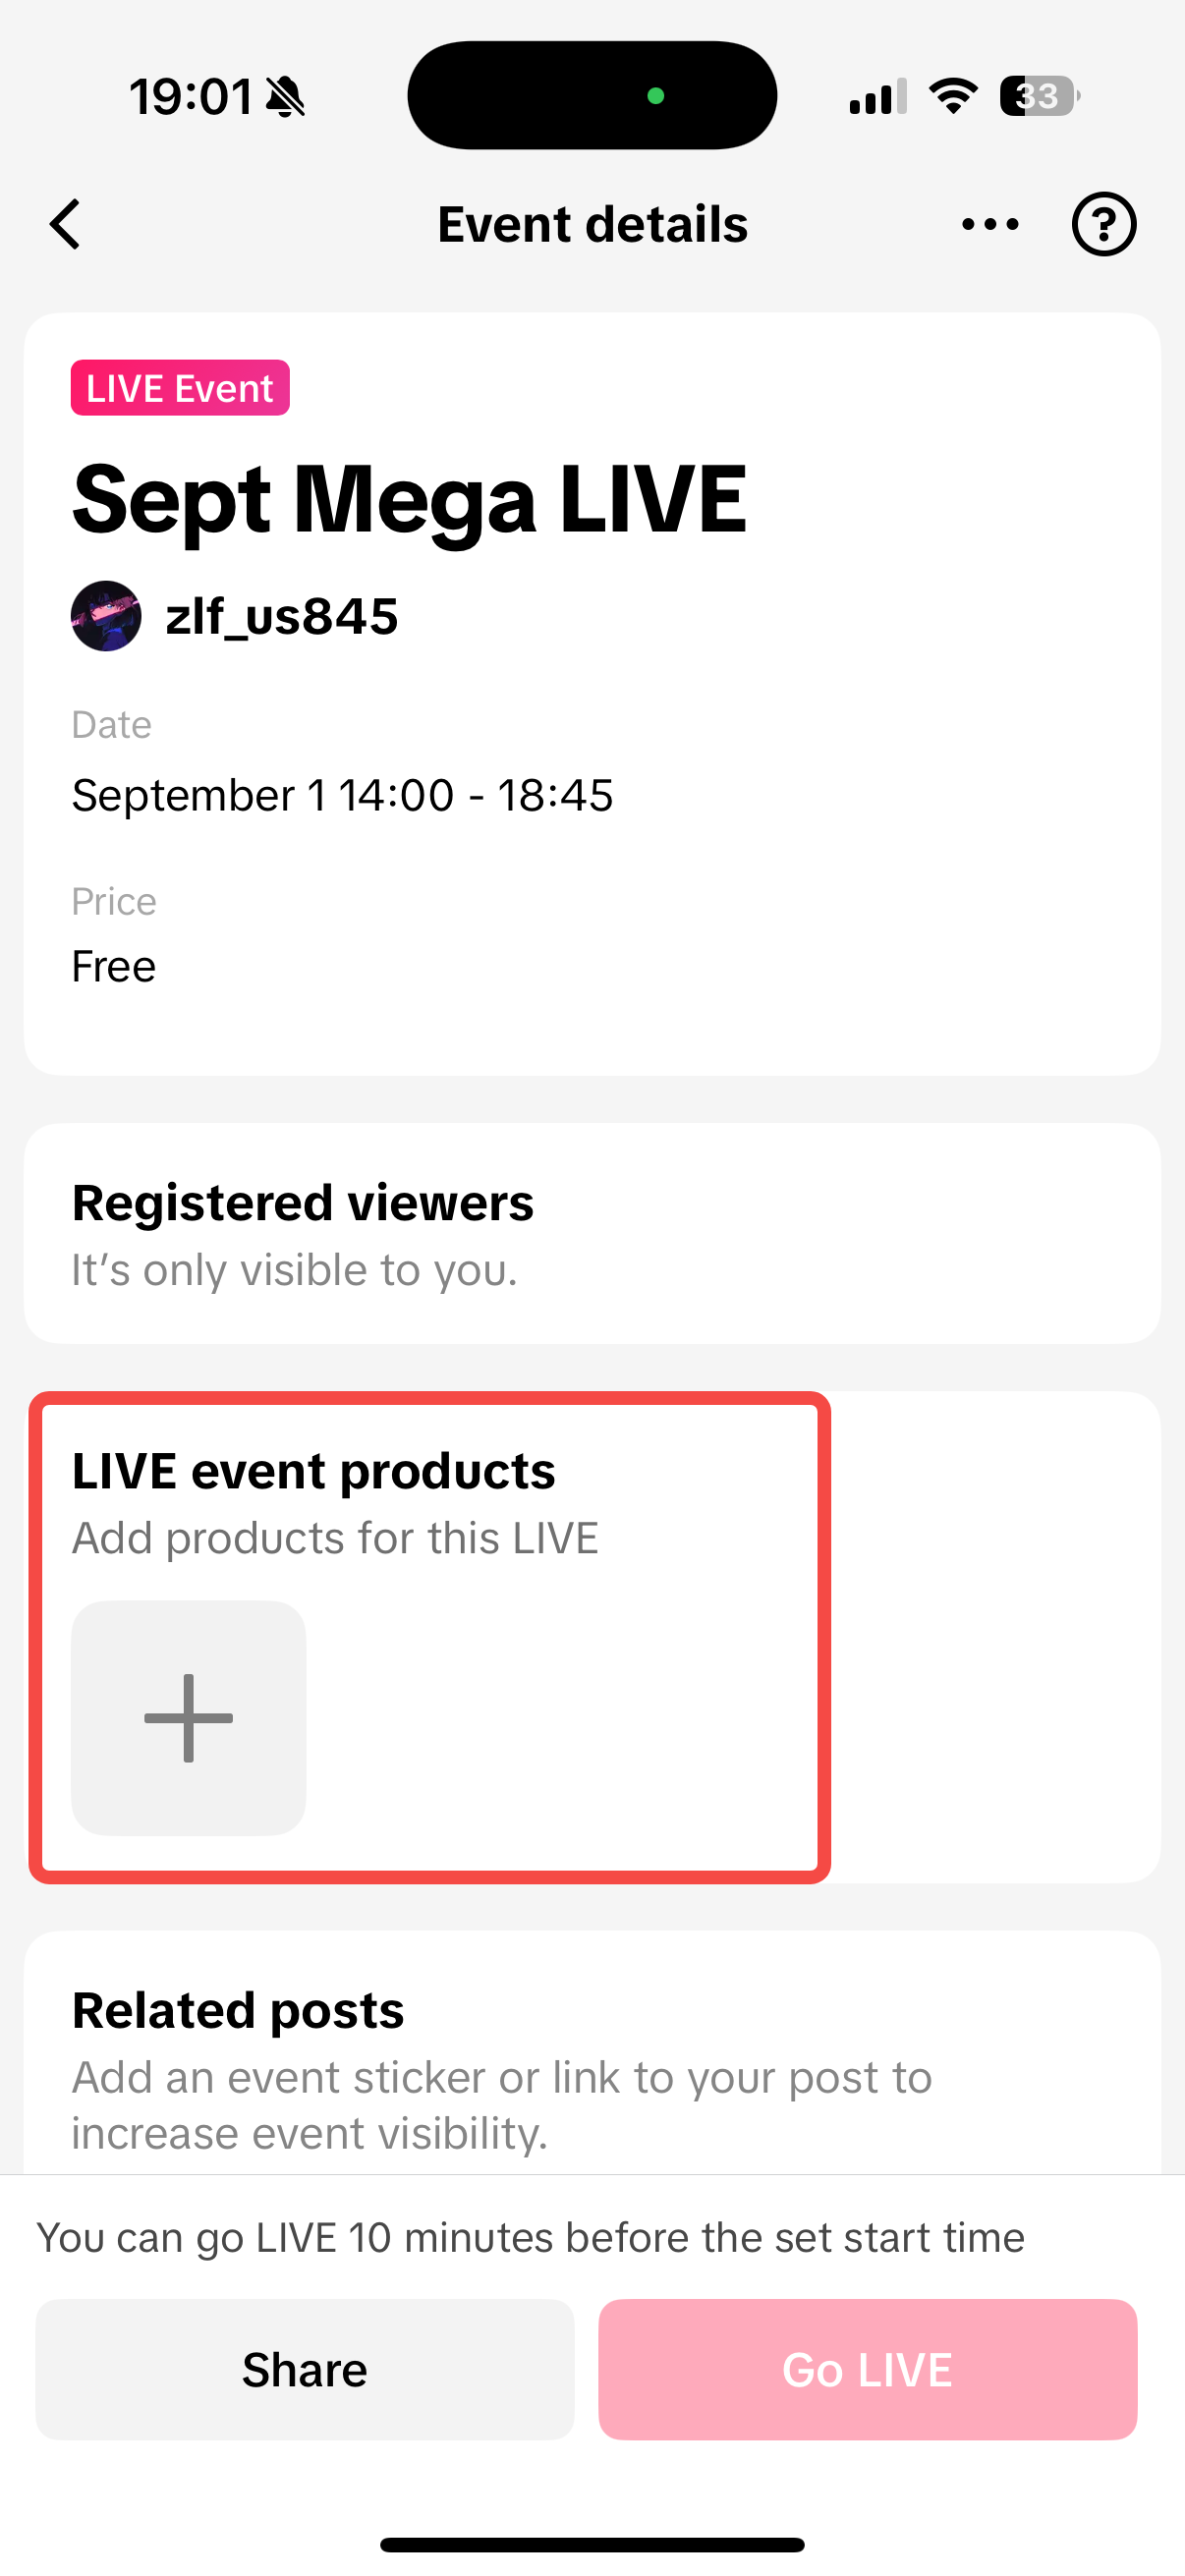
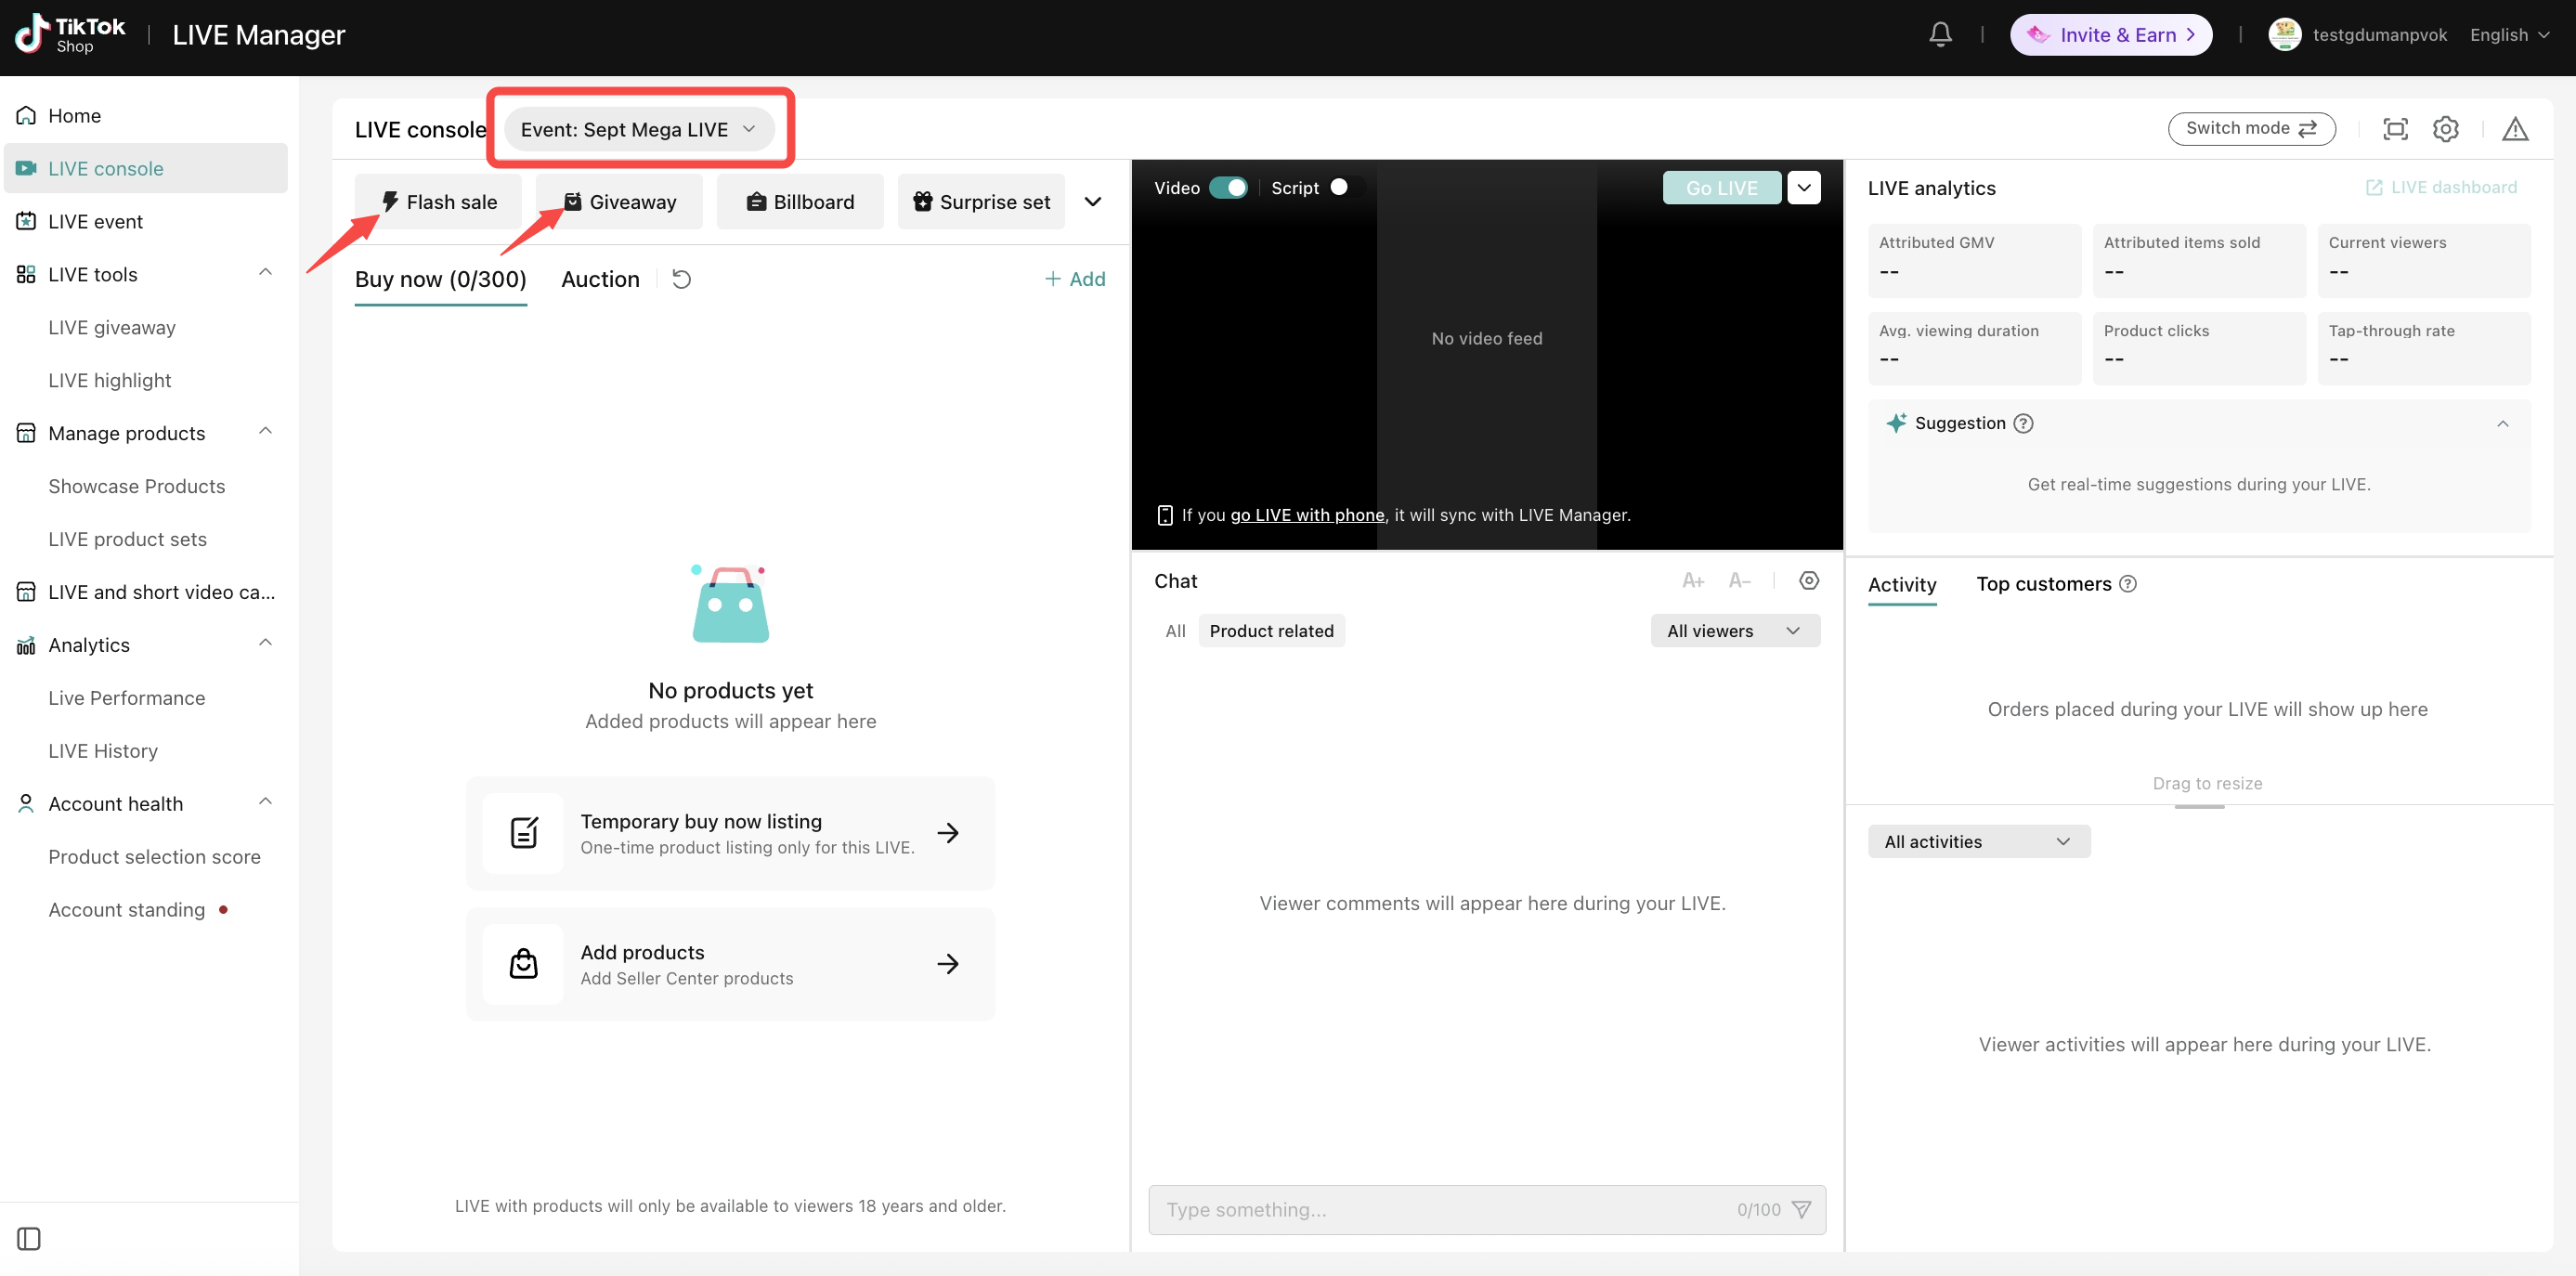
Step 3: Prepare Products and Promotions Open your scheduled event to enter its LIVE console. Add the products you plan to feature during the event. You can add up to 100 products from sources such as:
LIVE product sets
Showcase
Seller product links
Collaboration invitations
DesktopMobile
Step 4
Step 4: Attach Giveaway, Flash Sale to Your LIVE Event
Desktop
Step 5
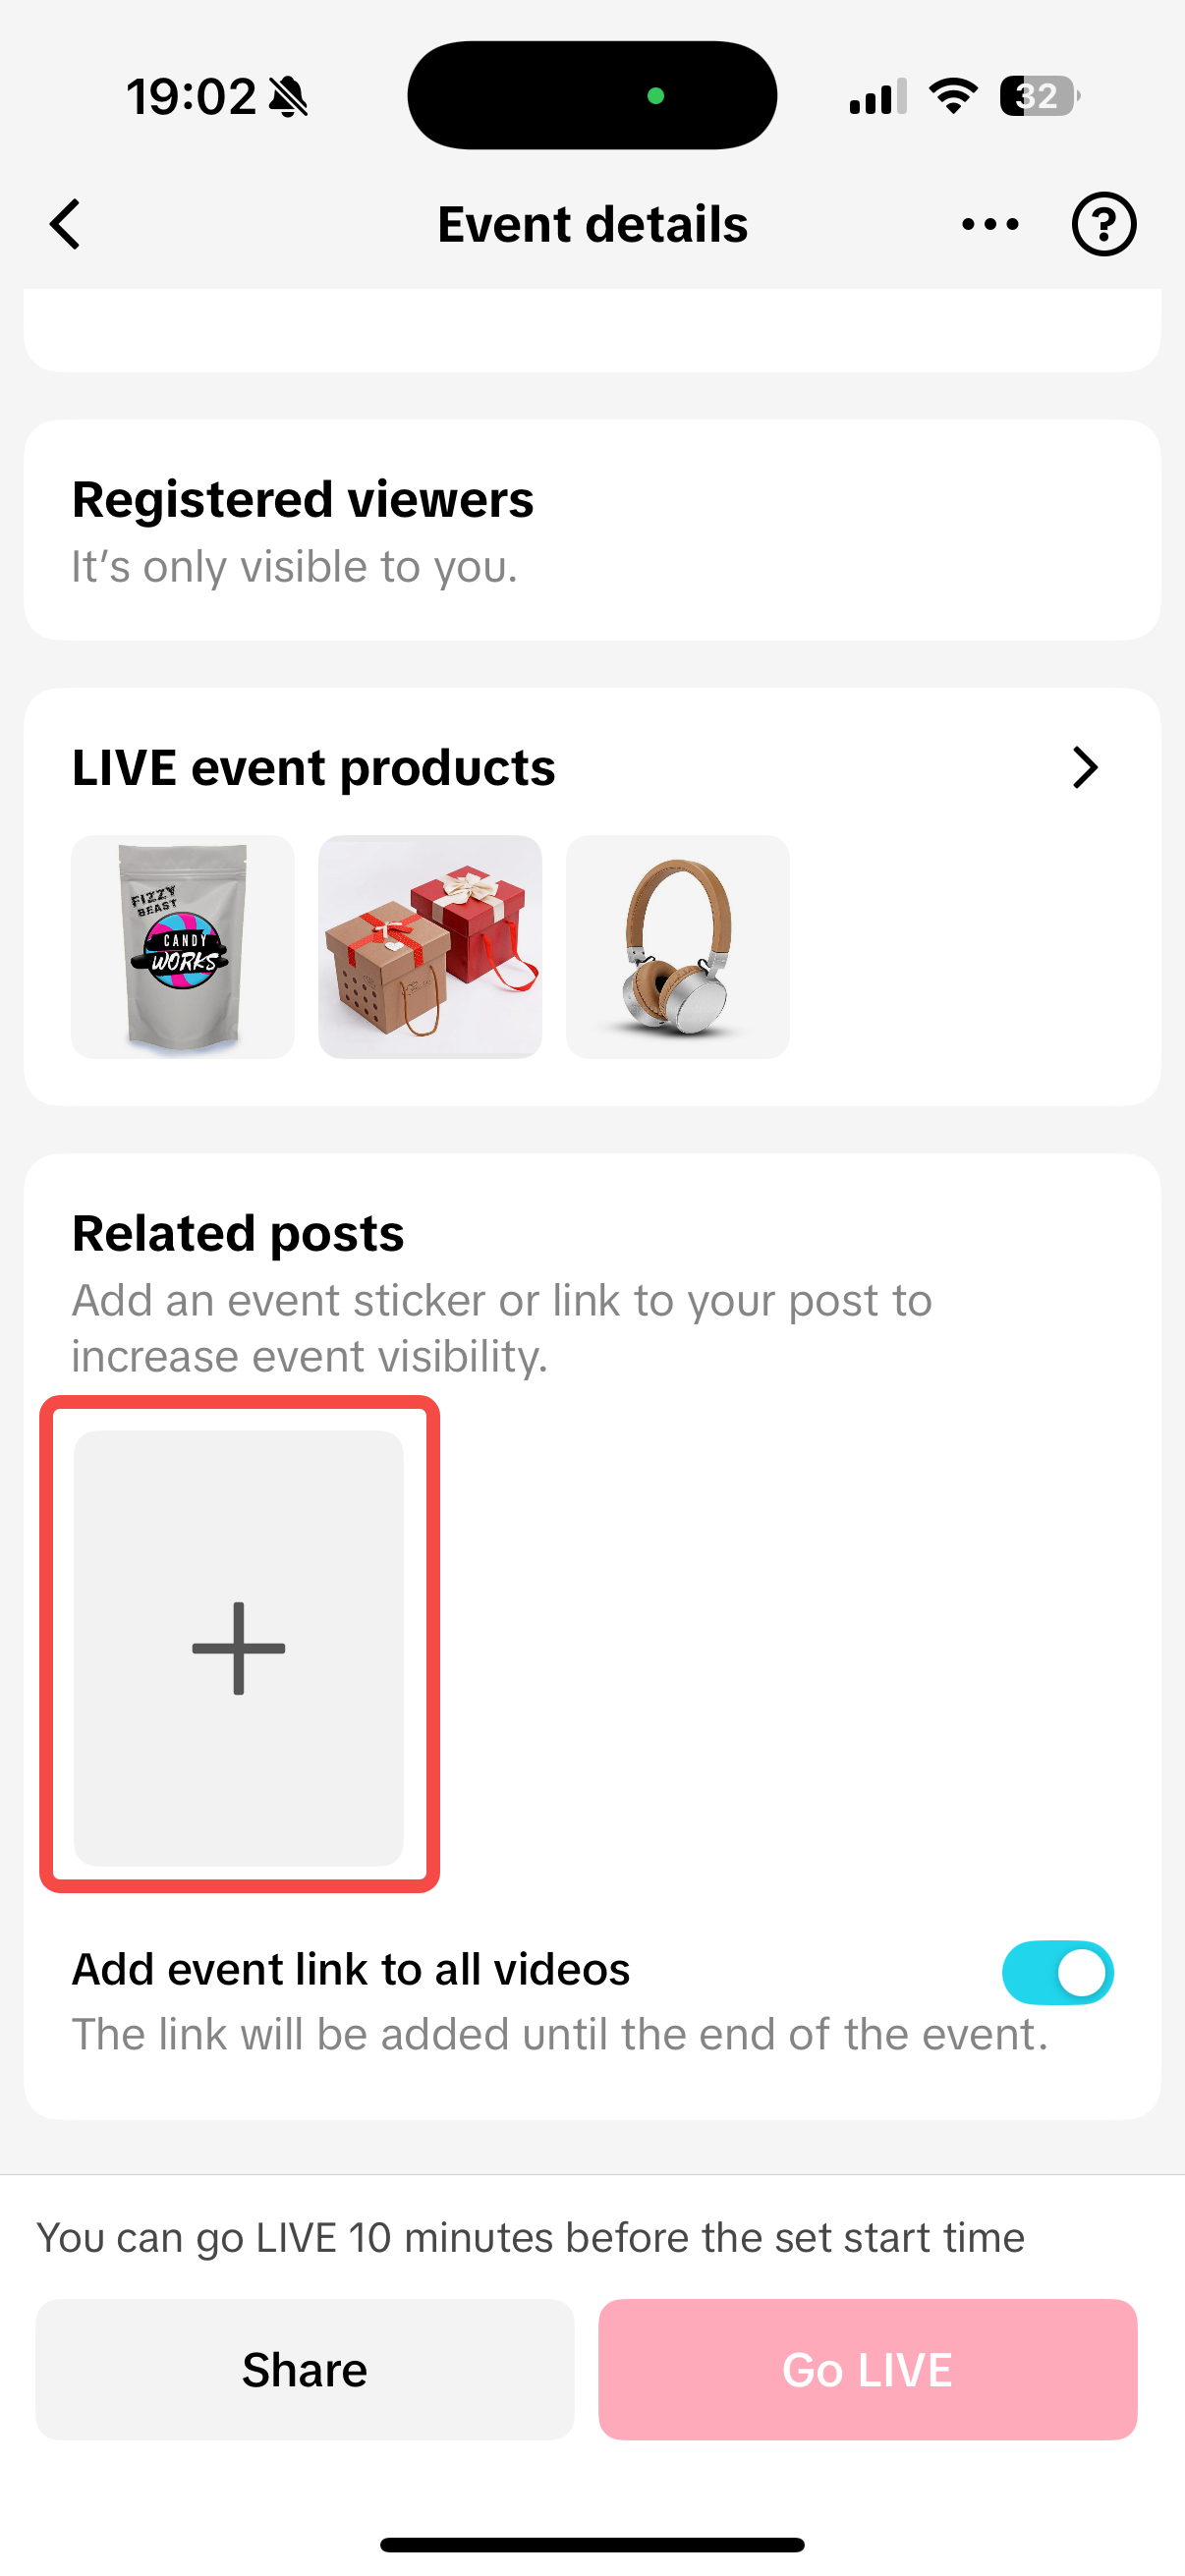
Step 5: Attach Short Videos to Your LIVE Event
Mobile
Step 6
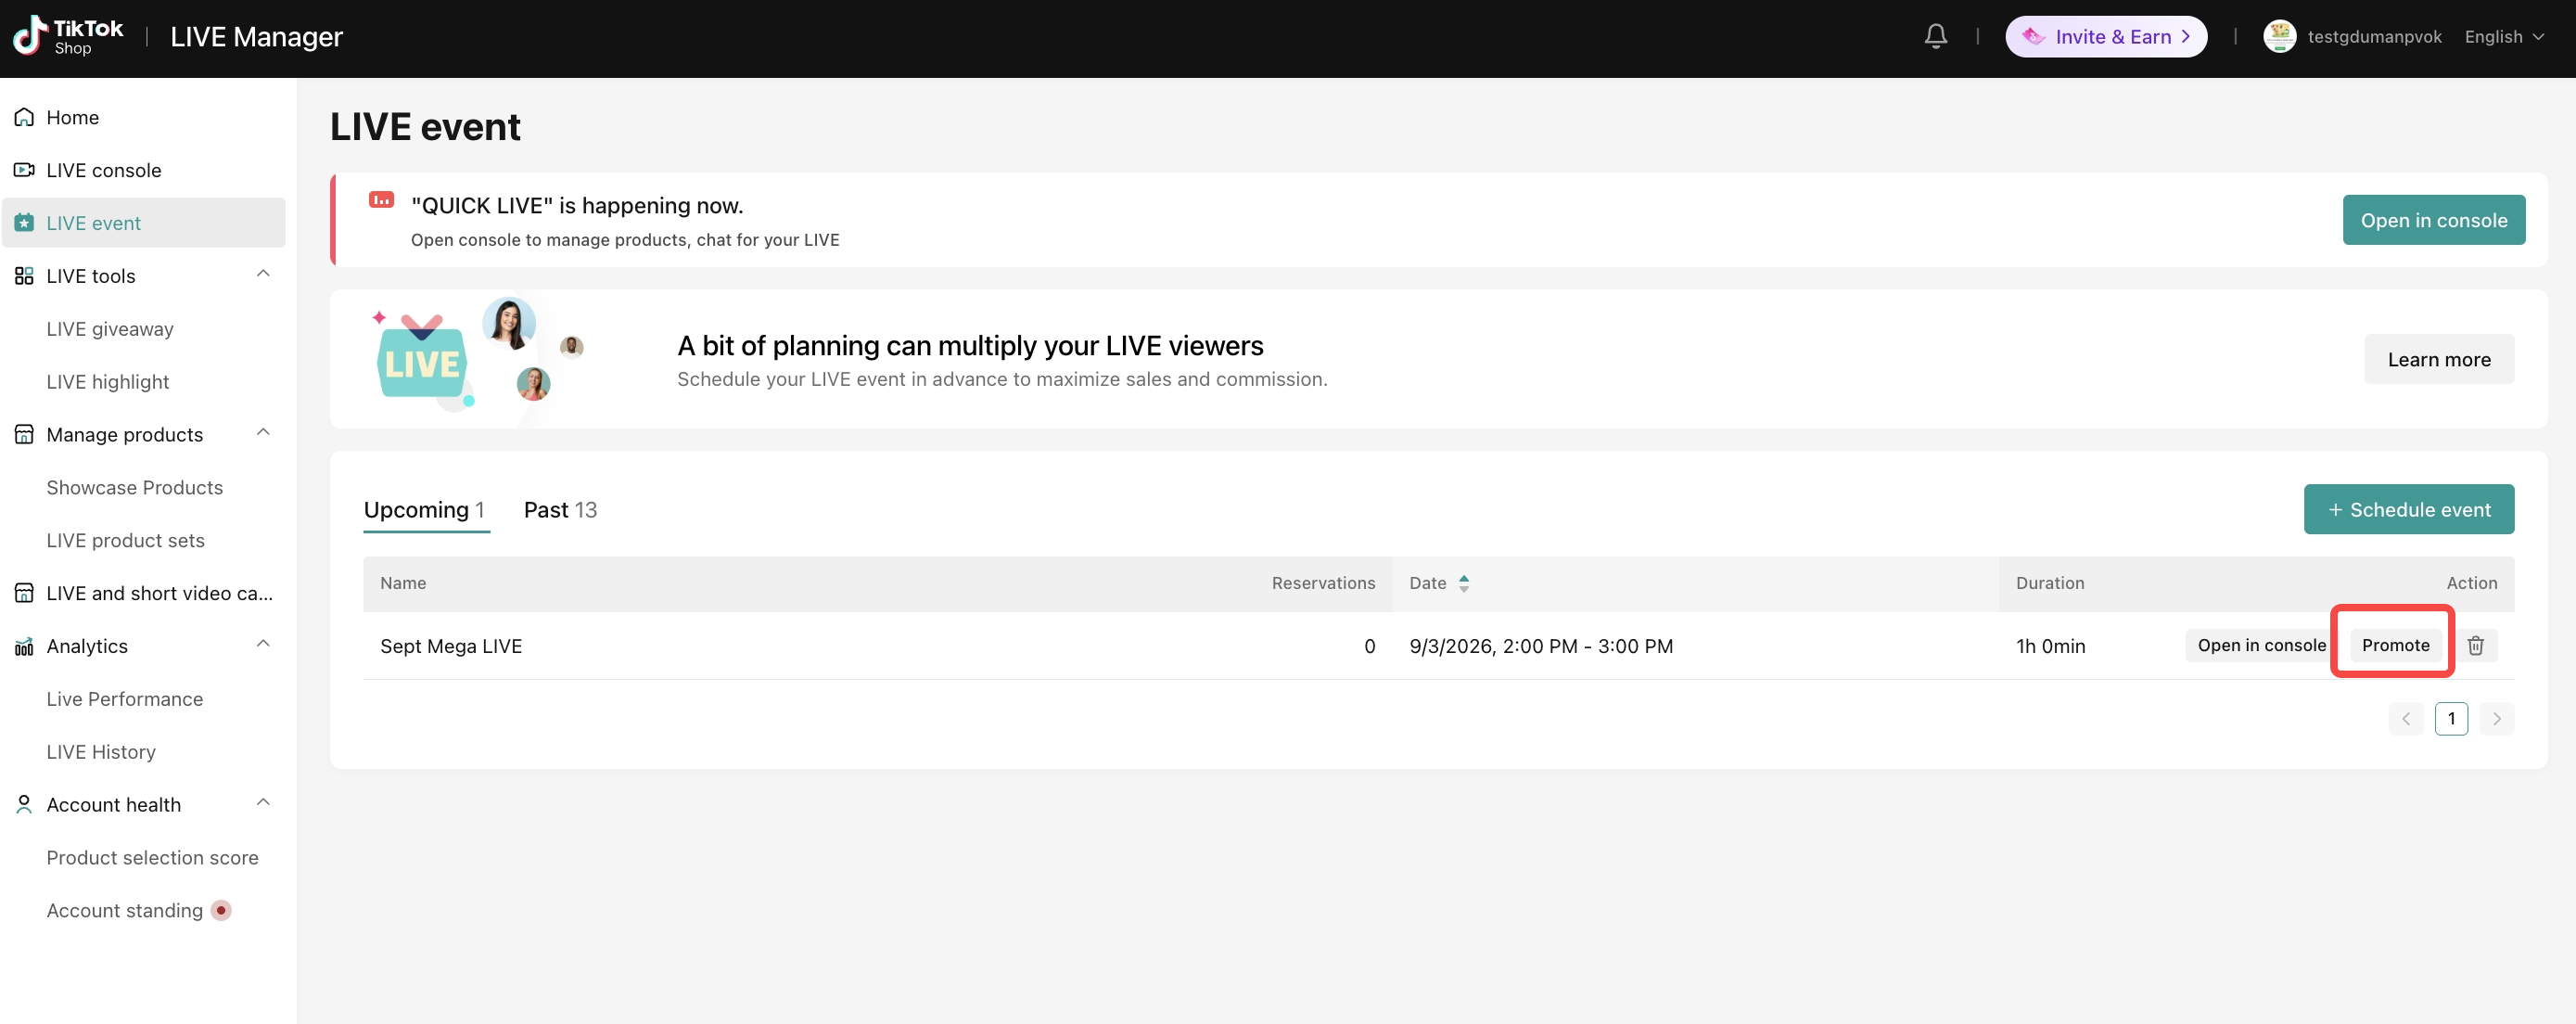
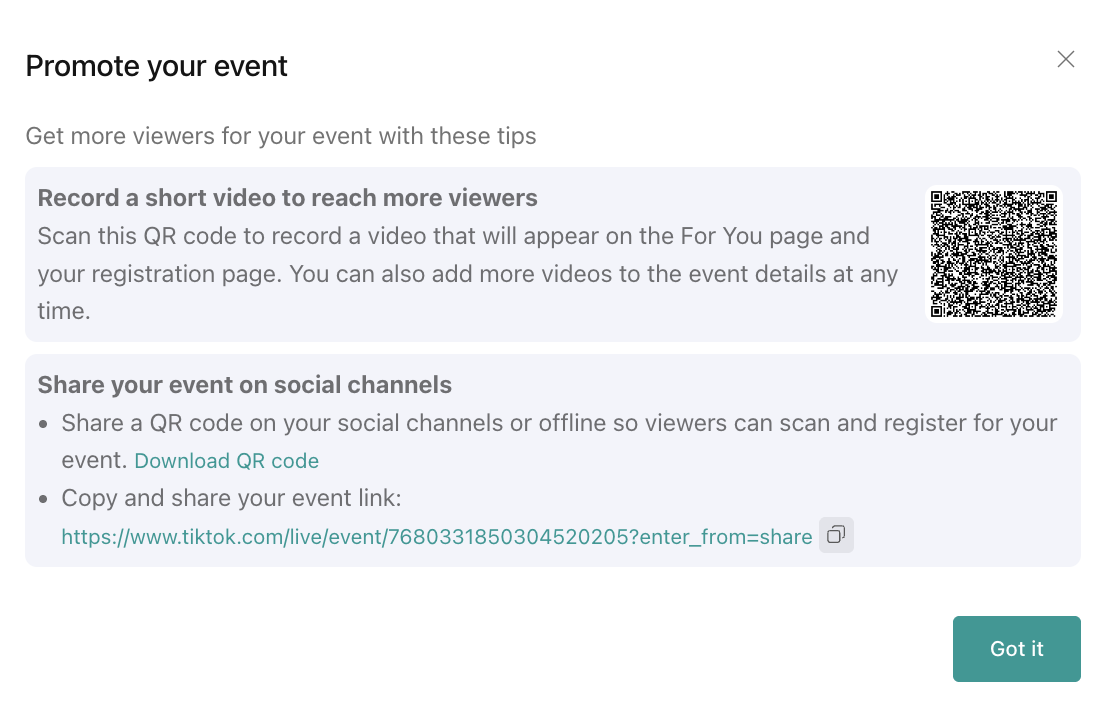
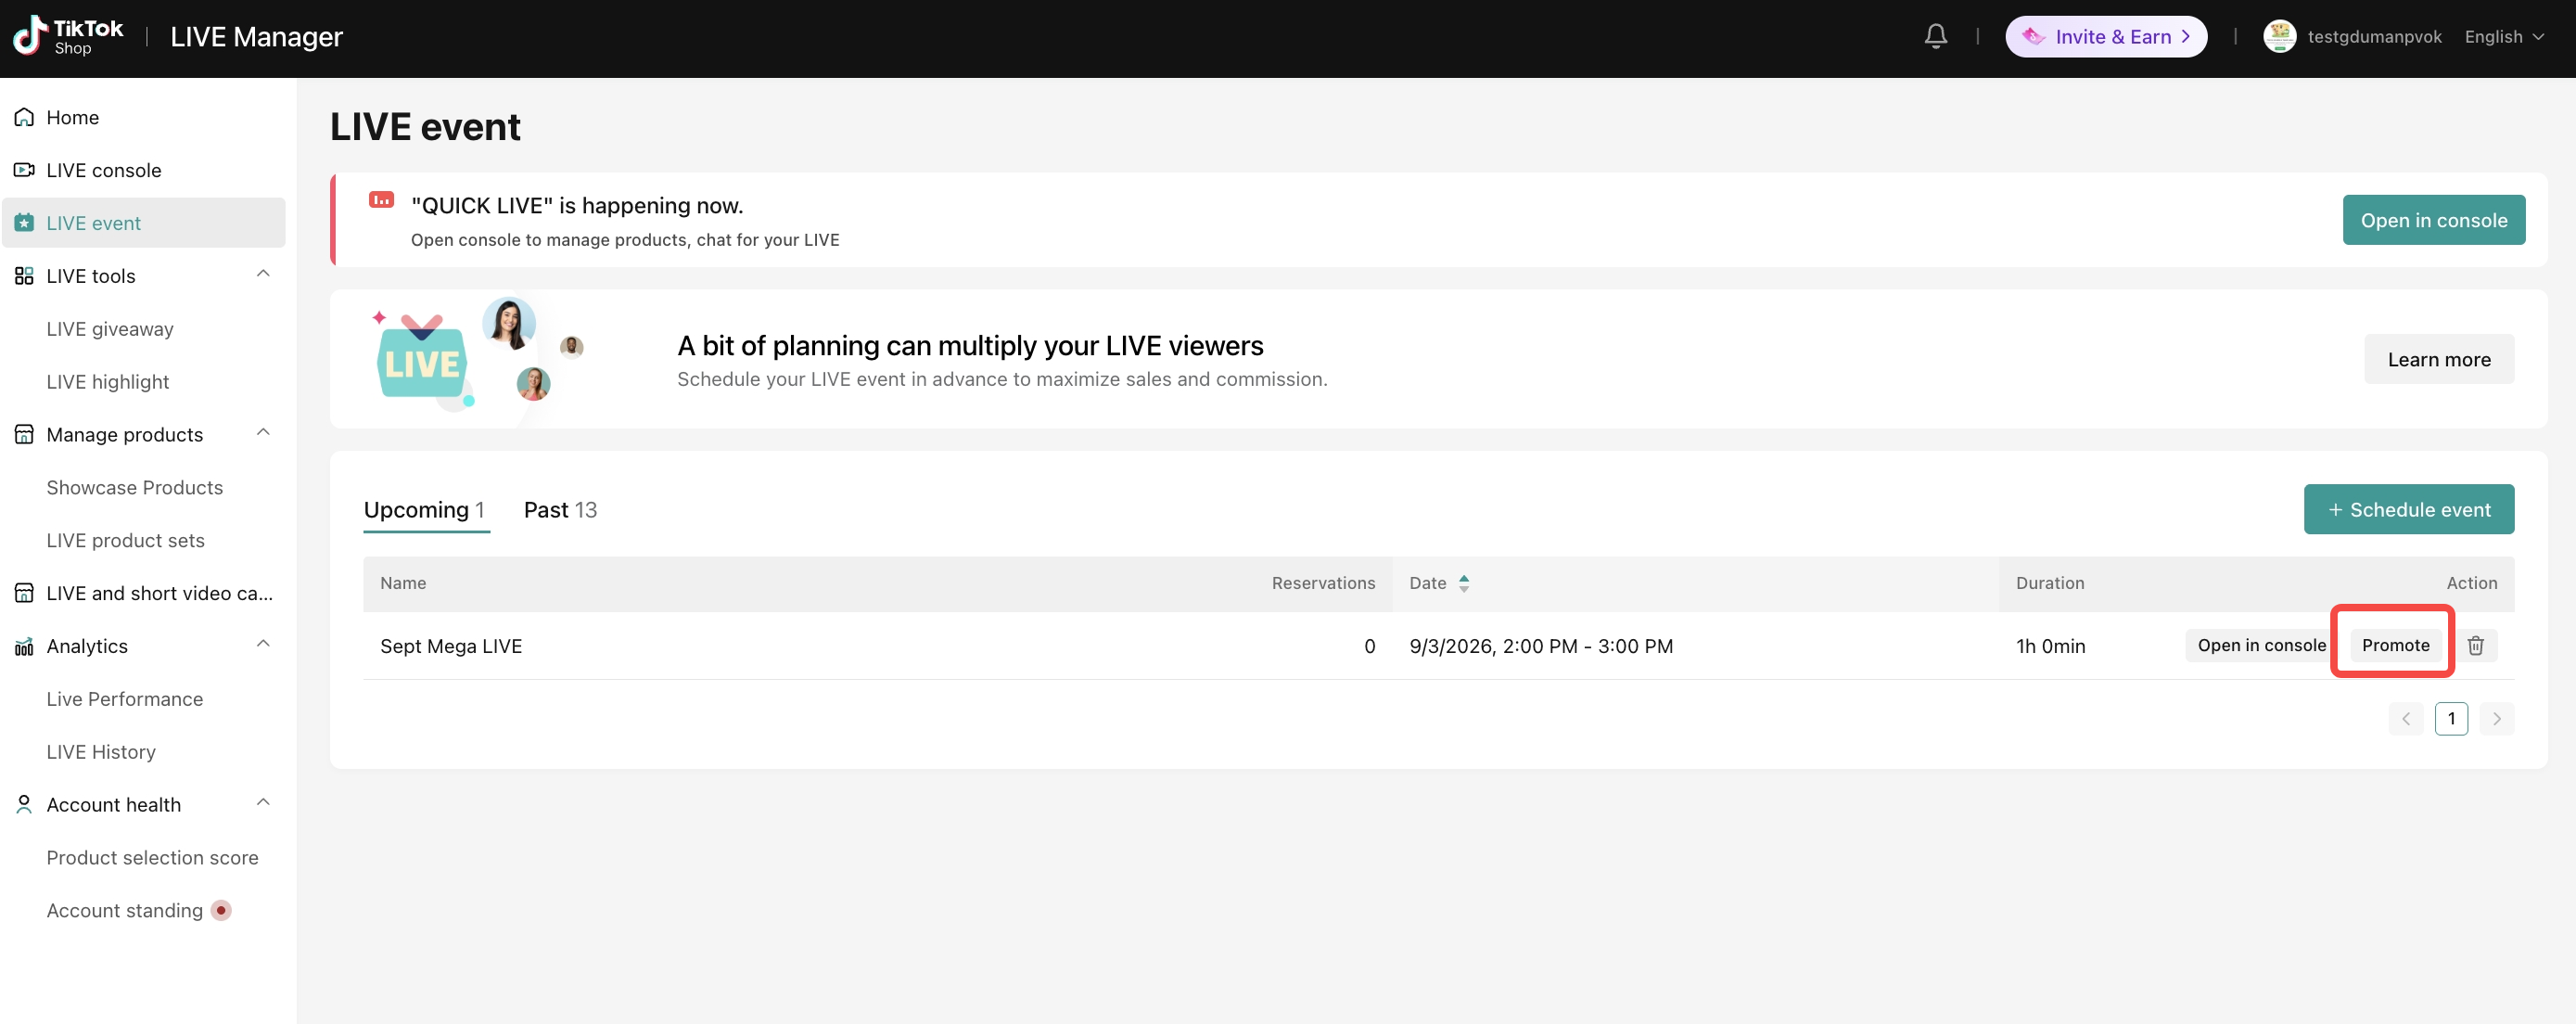
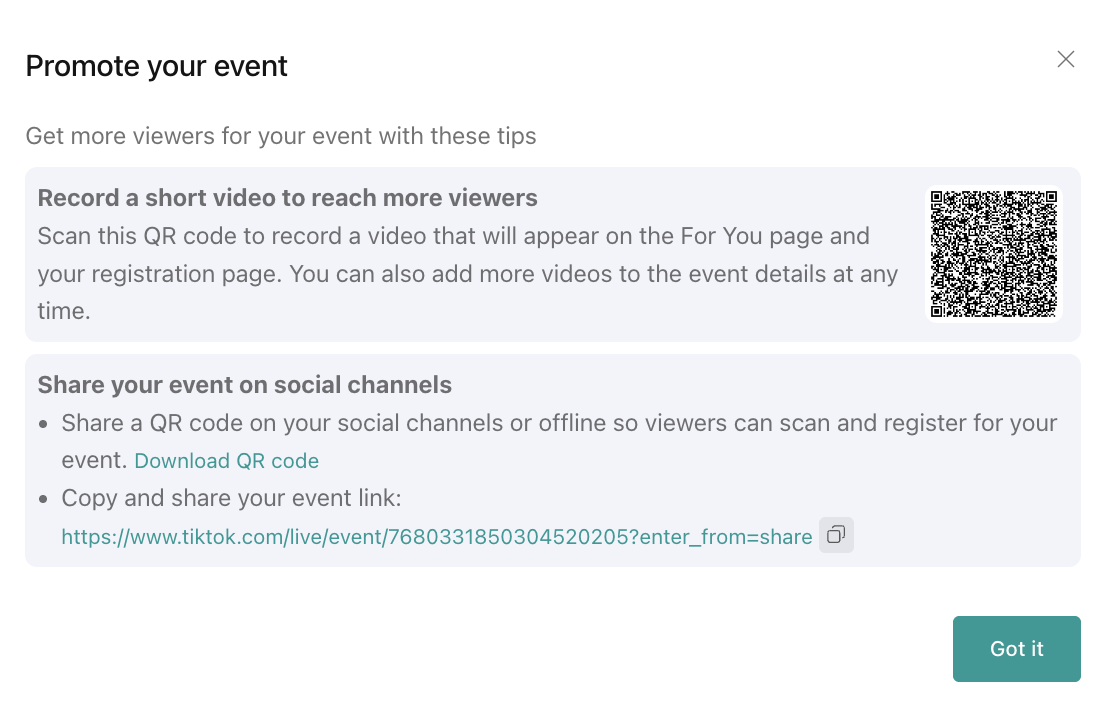
Step 6: Promote Your LIVE Event From LIVE Events, select Promote next to your scheduled event. You can:
Create a promotional short video with a link to the event.
Copy the event URL and share it on or off TikTok.
Download the event QR code for digital or offline promotion.
Scan the QR code with your phone to open the event in the TikTok app and create promotional content.
Video to LIVE is the mechanic that turns any short video — shoppable, non-shoppable, or an ad — into a real-time entry point into your LIVE room. When a viewer watches a short video from an account, and that account is currently LIVE, a “breathing light” appears on the video author's avatar. If the viewer taps the breathing light, they are dropped directly into the LIVE room. That click-through is defined as a Video to LIVE.
What is it?
Video to LIVE is the mechanic that turns any short video — shoppable, non-shoppable, or an ad — into a real-time entry point into your LIVE room. When a viewer watches a short video from an account, and that account is currently LIVE, a “breathing light” appears on the video author's avatar. If the viewer taps the breathing light, they are dropped directly into the LIVE room. That click-through is defined as a Video to LIVE. The breathing light can appear anywhere a viewer encounters one of your videos while you're live: the For You feed, Following feed, Friends feed, other creators'/homepage video heads, a viewer's own personal homepage (on liked videos), and search results. In effect, every short video you have ever posted becomes a live traffic entry point the moment you go on air. Sellers can track Video to LIVE performance directly on LIVE Dashboard — impressions, views, and GMV attributed to the channel, shown as “Video profile taps” and “Others' video profiles” — along with a video-level ranking by impressions, views, and GMV for the current session.
Why it drives traffic?
It is the only traffic mechanic that works entirely off content you've already posted — there is no separate setup per LIVE beyond keeping a healthy library of recent, relevant videos, since every eligible video's avatar starts breathing the moment you go live.
Because it fires across six-plus discovery surfaces at once (feed, following, friends, search, profile, other creators' video heads), it captures viewers who were never going to see a LIVE Event promotion or a CRM message — pure incremental, earned reach.
It compounds with : every automatically generated highlight clip becomes a new breathing-light entry point the next time you're live, so the two tools should always be run together.
How to set it up?
the WAVE model
Way to post — timing and quantity. For a daily LIVE, post at least 4 non-shoppable videos in the 24 hours before the stream starts — the more posted within the final 12 hours, the better. For a Mega LIVE, start posting pre-heat videos at least 3 days ahead and post at least 10 non-shoppable videos before the LIVE begins. Non-shoppable videos consistently show a higher entry-room rate and GPM than shoppable ones for this channel.
Action plan — build a release plan and use the “3H” content structure. Reserve production time a week ahead of the LIVE date. Structure each video as: Hold attention (hit the viewer's pain point or spark curiosity in the first 3 seconds), Highlight selling points (good content, good product, or good mechanic tied to the LIVE), and Heighten clicks (an explicit gesture and verbal or on-screen cue to tap the breathing light and enter the LIVE room). Attach a LIVE Event link to pre-heat videos to reinforce the anchor, and keep 's auto-post switched on during the LIVE so highlight clips continuously re-supply this channel — both during the session and as pre-heat material for the next one.
Verify metrics. Before each LIVE, track video views, watched-full-video rate (aim to keep videos under 1 minute), and engagement rate. During the LIVE, use LIVE GMVMAX or LSA to boost your highest-performing videos and increase spend behind whichever ones are already driving the largest share of Video to LIVE traffic. Weekly, review exposure PV, entry-room rate (ERR), and Video to LIVE GMV per video, and turn your top performers into templates for future content.
Evolve strategy as your program matures. Basic (growth-stage sellers): post one pre-heat video with a LIVE Event link before every LIVE, ending with a clear entry prompt. Intermediate (established production capability): plan video releases like a LIVE plan, and increase pre-heat intensity for Mega LIVEs using the 3H structure. Advanced (strong content capability seeking a traffic breakthrough): trade volume for quality, keep the account's established tone, and pair important sessions with a carefully designed LIVE mechanic.
Brand Live Growth · Traffic-Driving Tools
LIVE Highlight
Instead of manually recording and editing your LIVE, LIVE Highlight lets you quickly reuse high-performing or memorable moments—such as product demonstrations, popular products, special offers, or engaging interactions—to create additional shoppable content.
What is it?
LIVE Highlight helps you capture key moments from your LIVE and turn them into short videos that can be shared after the stream. Instead of manually recording and editing your LIVE, LIVE Highlight lets you quickly reuse high-performing or memorable moments—such as product demonstrations, popular products, special offers, or engaging interactions—to create additional shoppable content. You can use LIVE Highlights to:
Extend the value of your LIVE content after the stream ends.
Turn strong LIVE moments into short videos more efficiently.
Promote featured products through additional shoppable content.
Continue reaching and converting shoppers who did not watch the original LIVE.
Why it drives traffic?
Because it runs on auto-post, this is the only traffic tool in the kit that requires zero incremental seller effort per LIVE. Every strong demo, offer reveal, or reaction automatically becomes an independent discovery entry point after the stream ends. It extends the LIVE's traffic value well past its live window, reaching viewers who never saw the original broadcast — the direct mechanism behind the After-LIVE "Extend Earned Reach" step
How to set it up?
Step 1
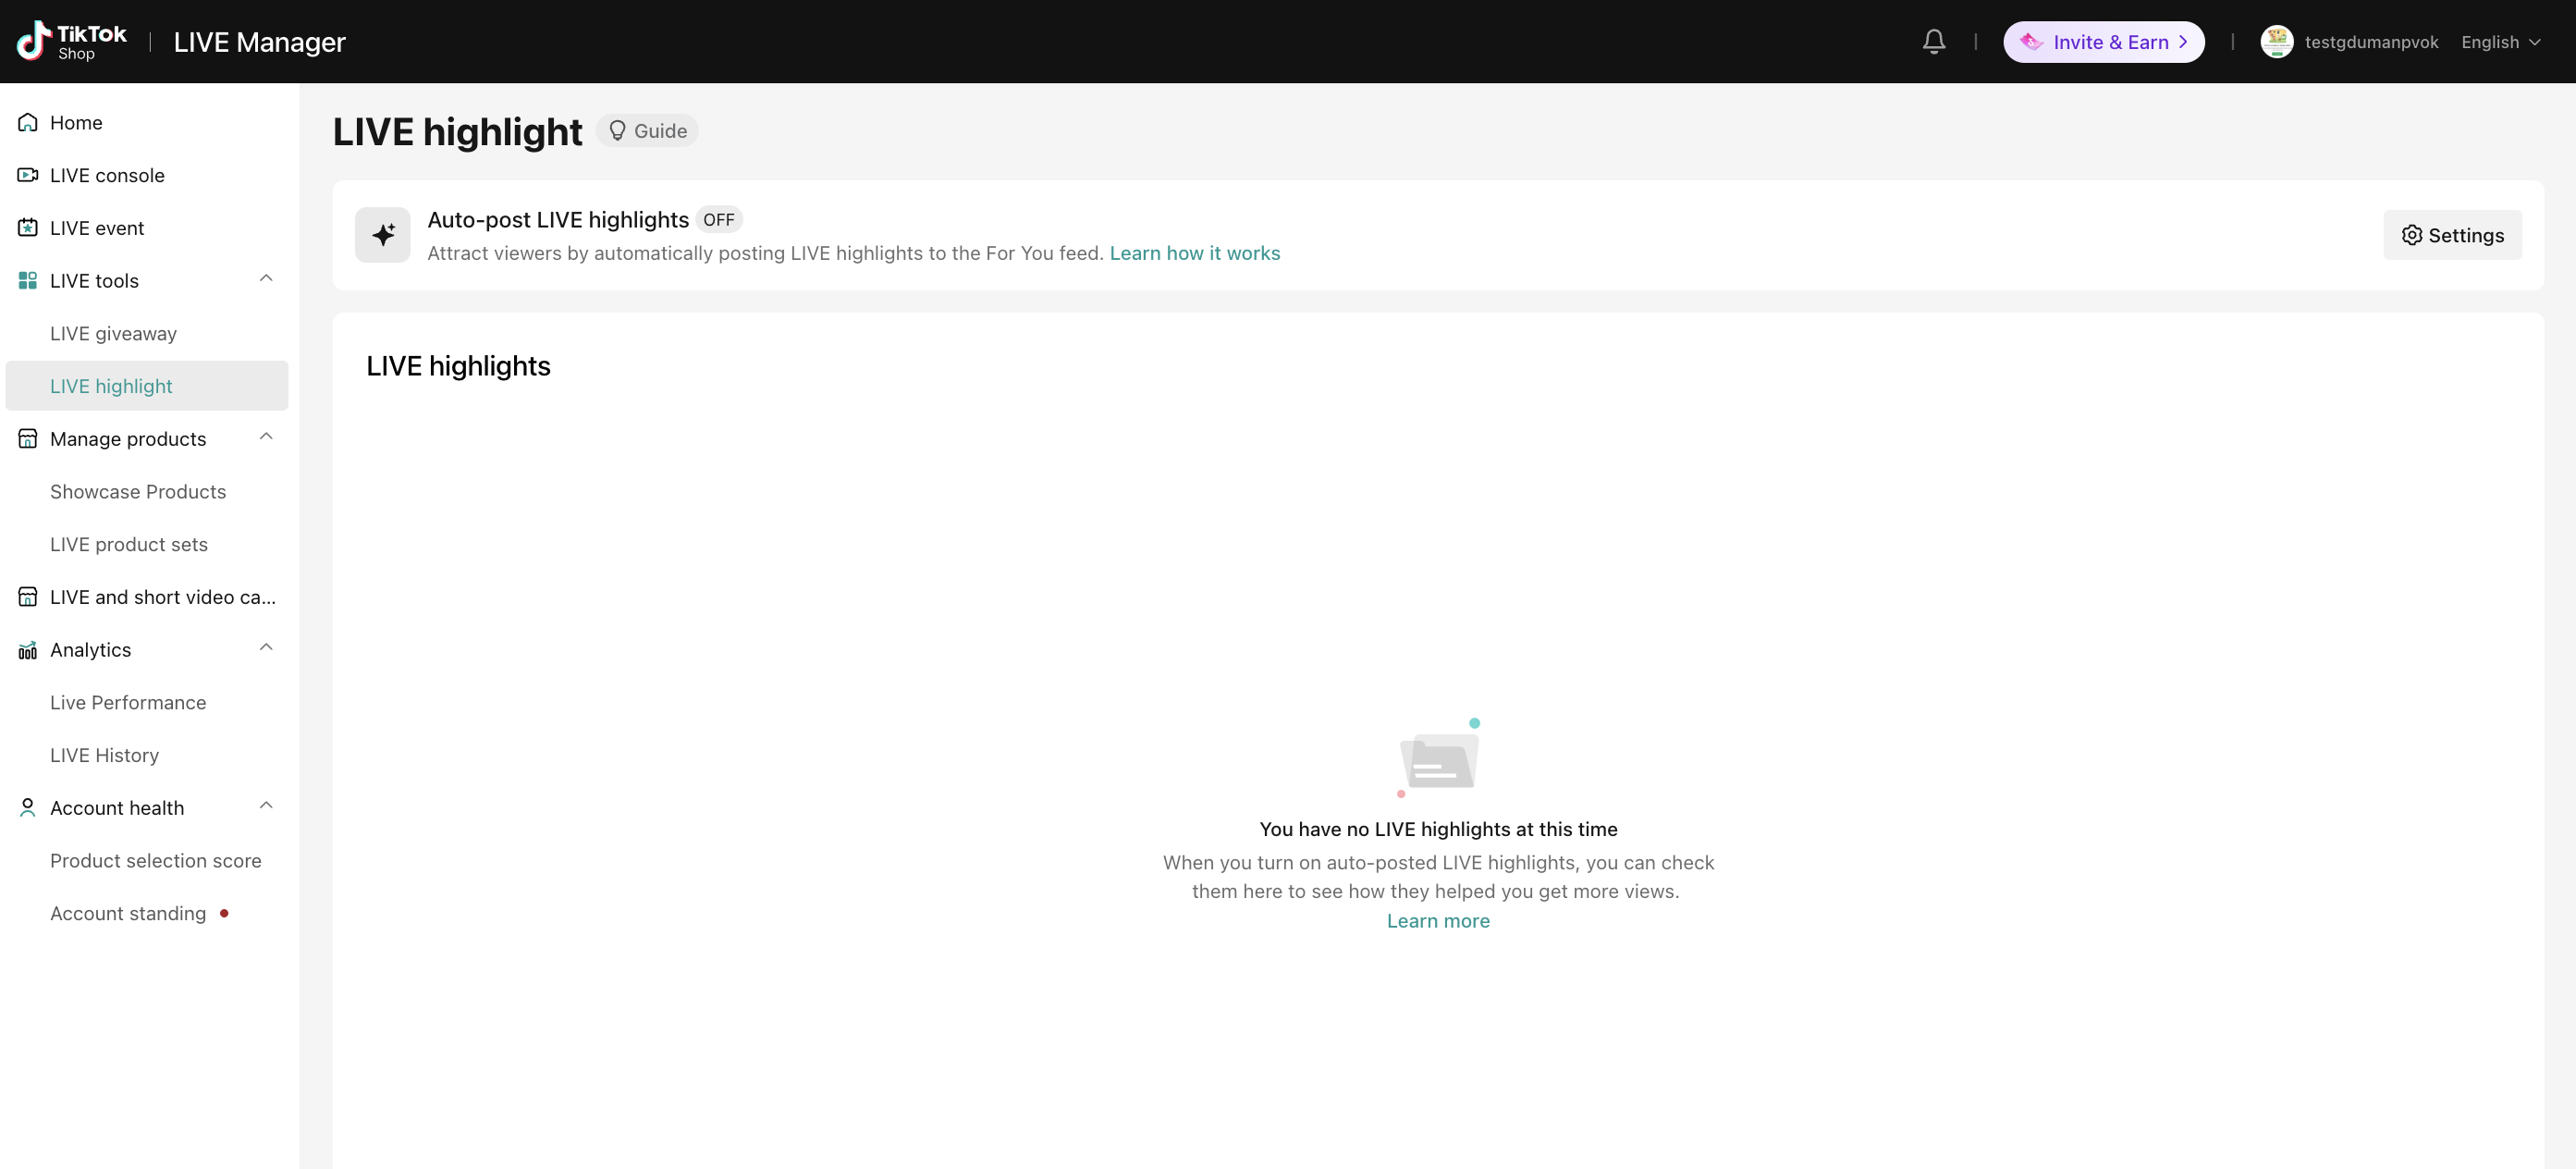
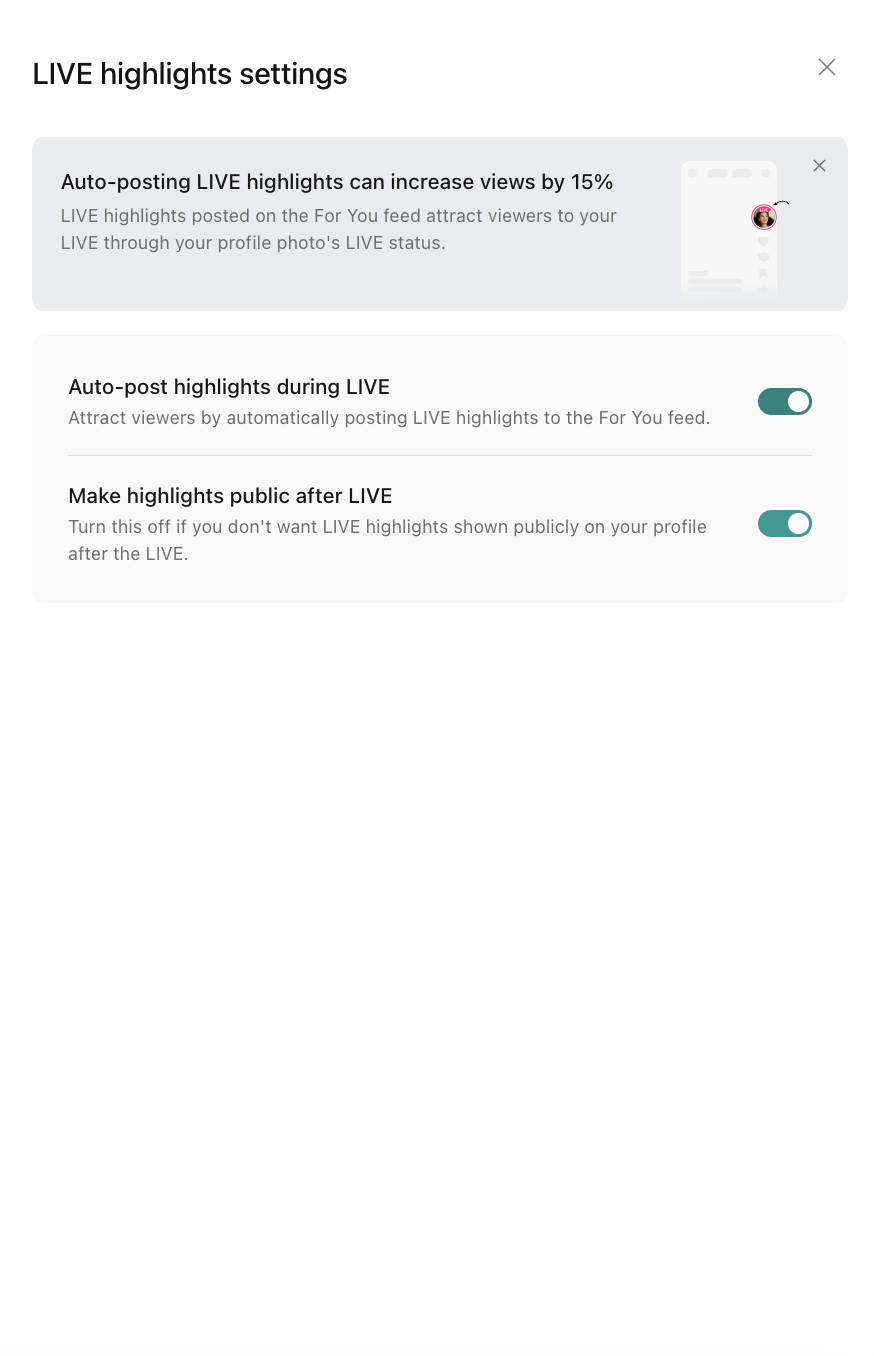
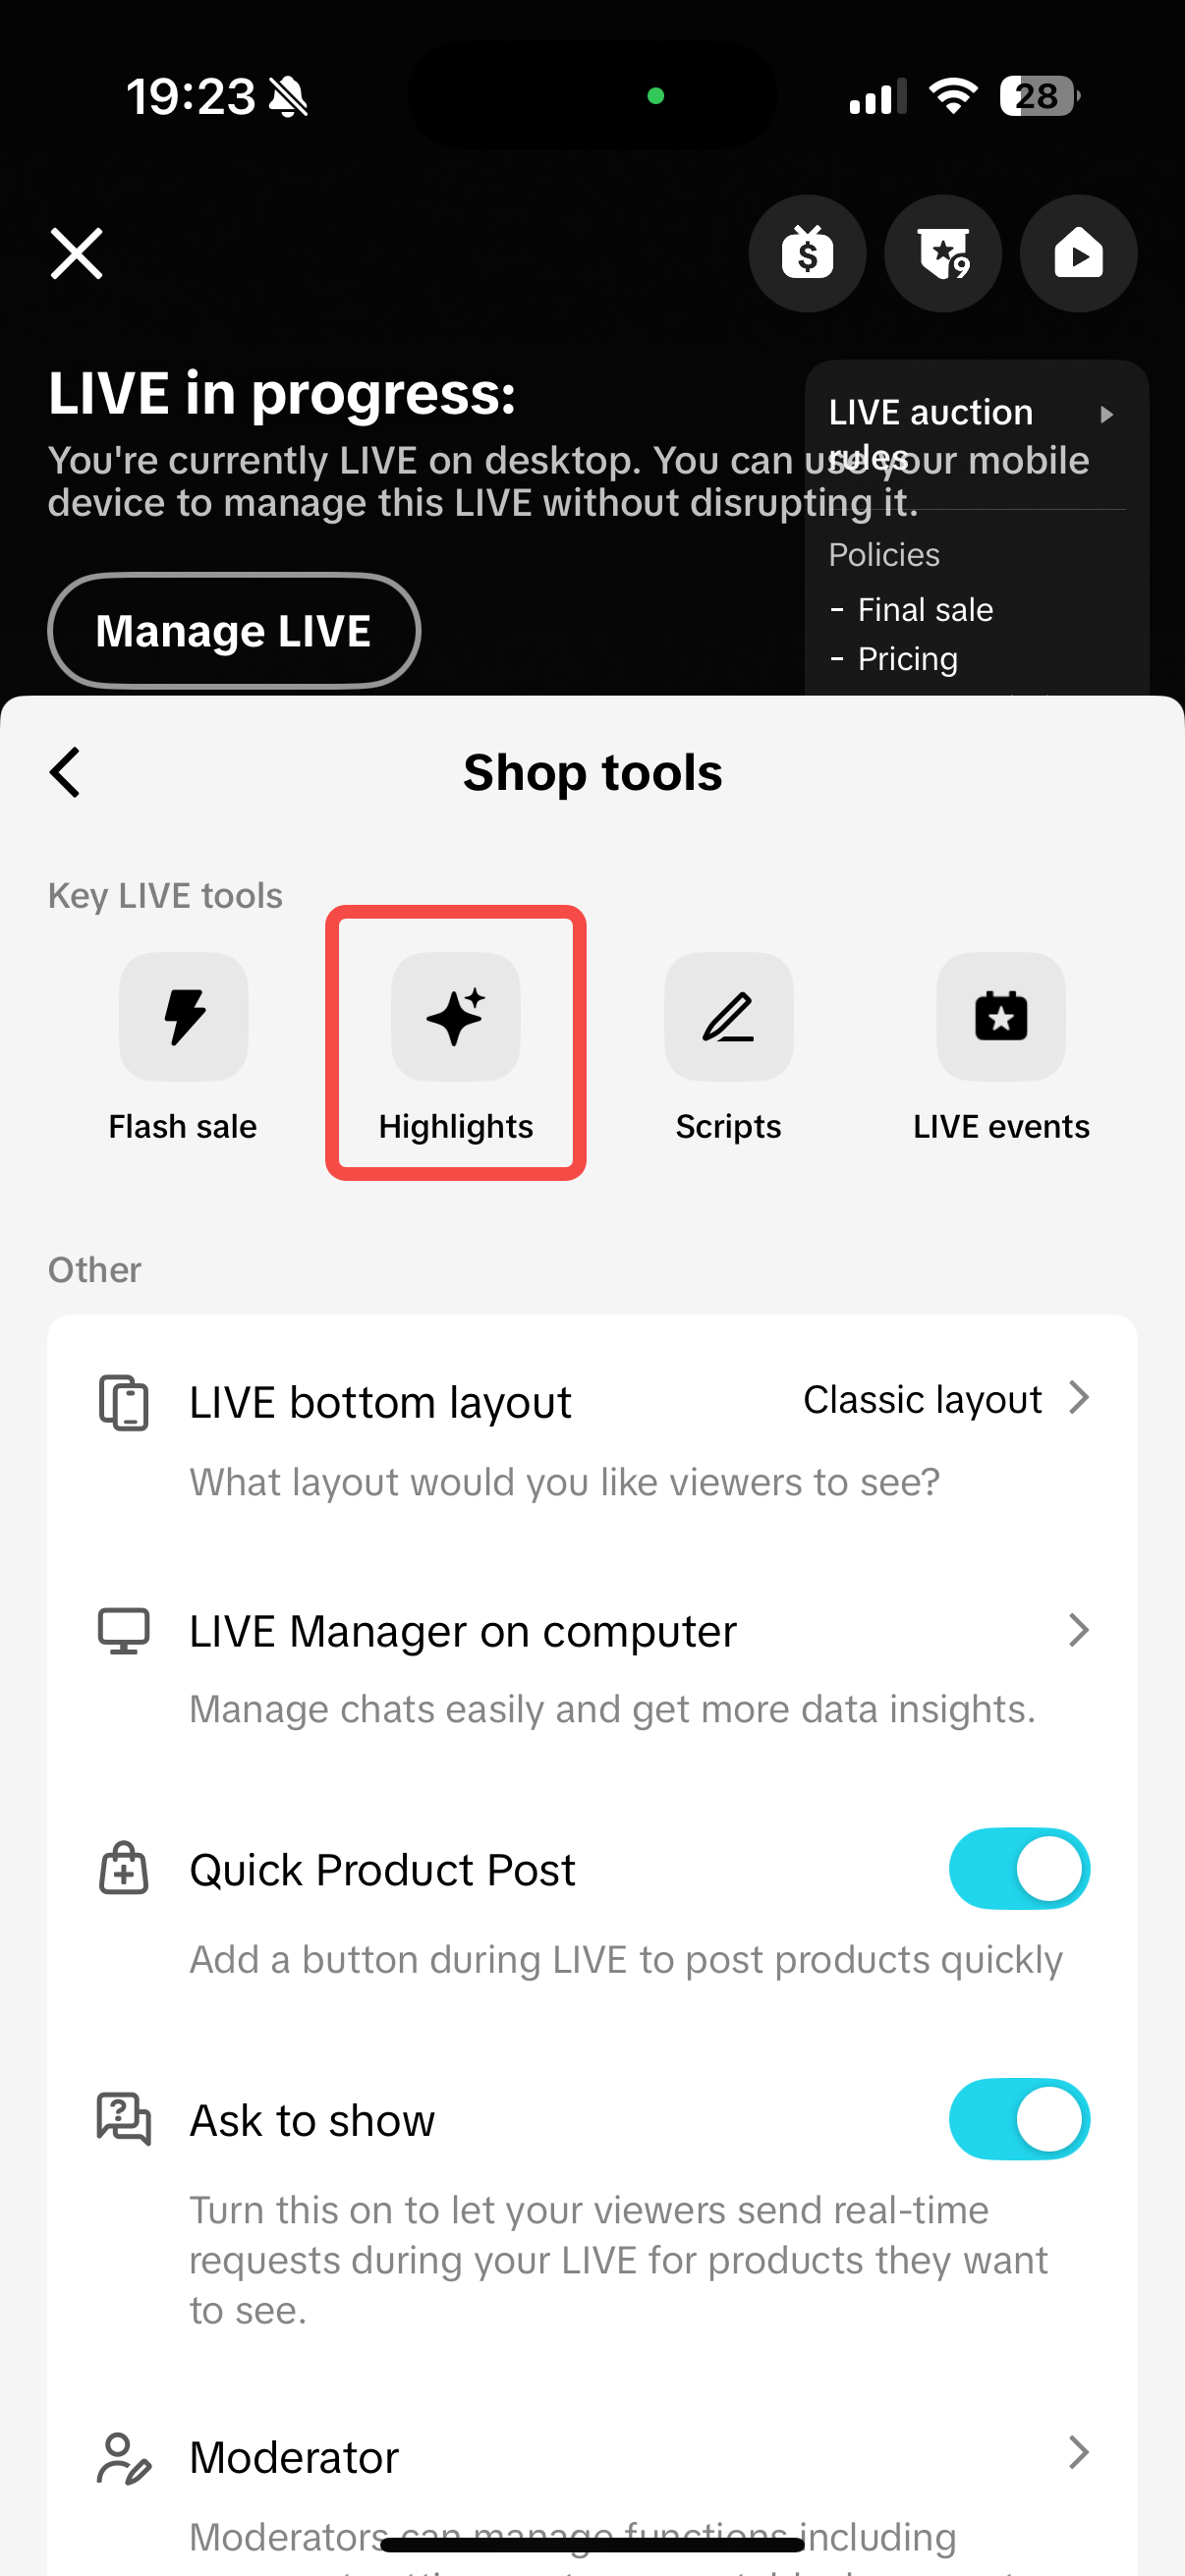
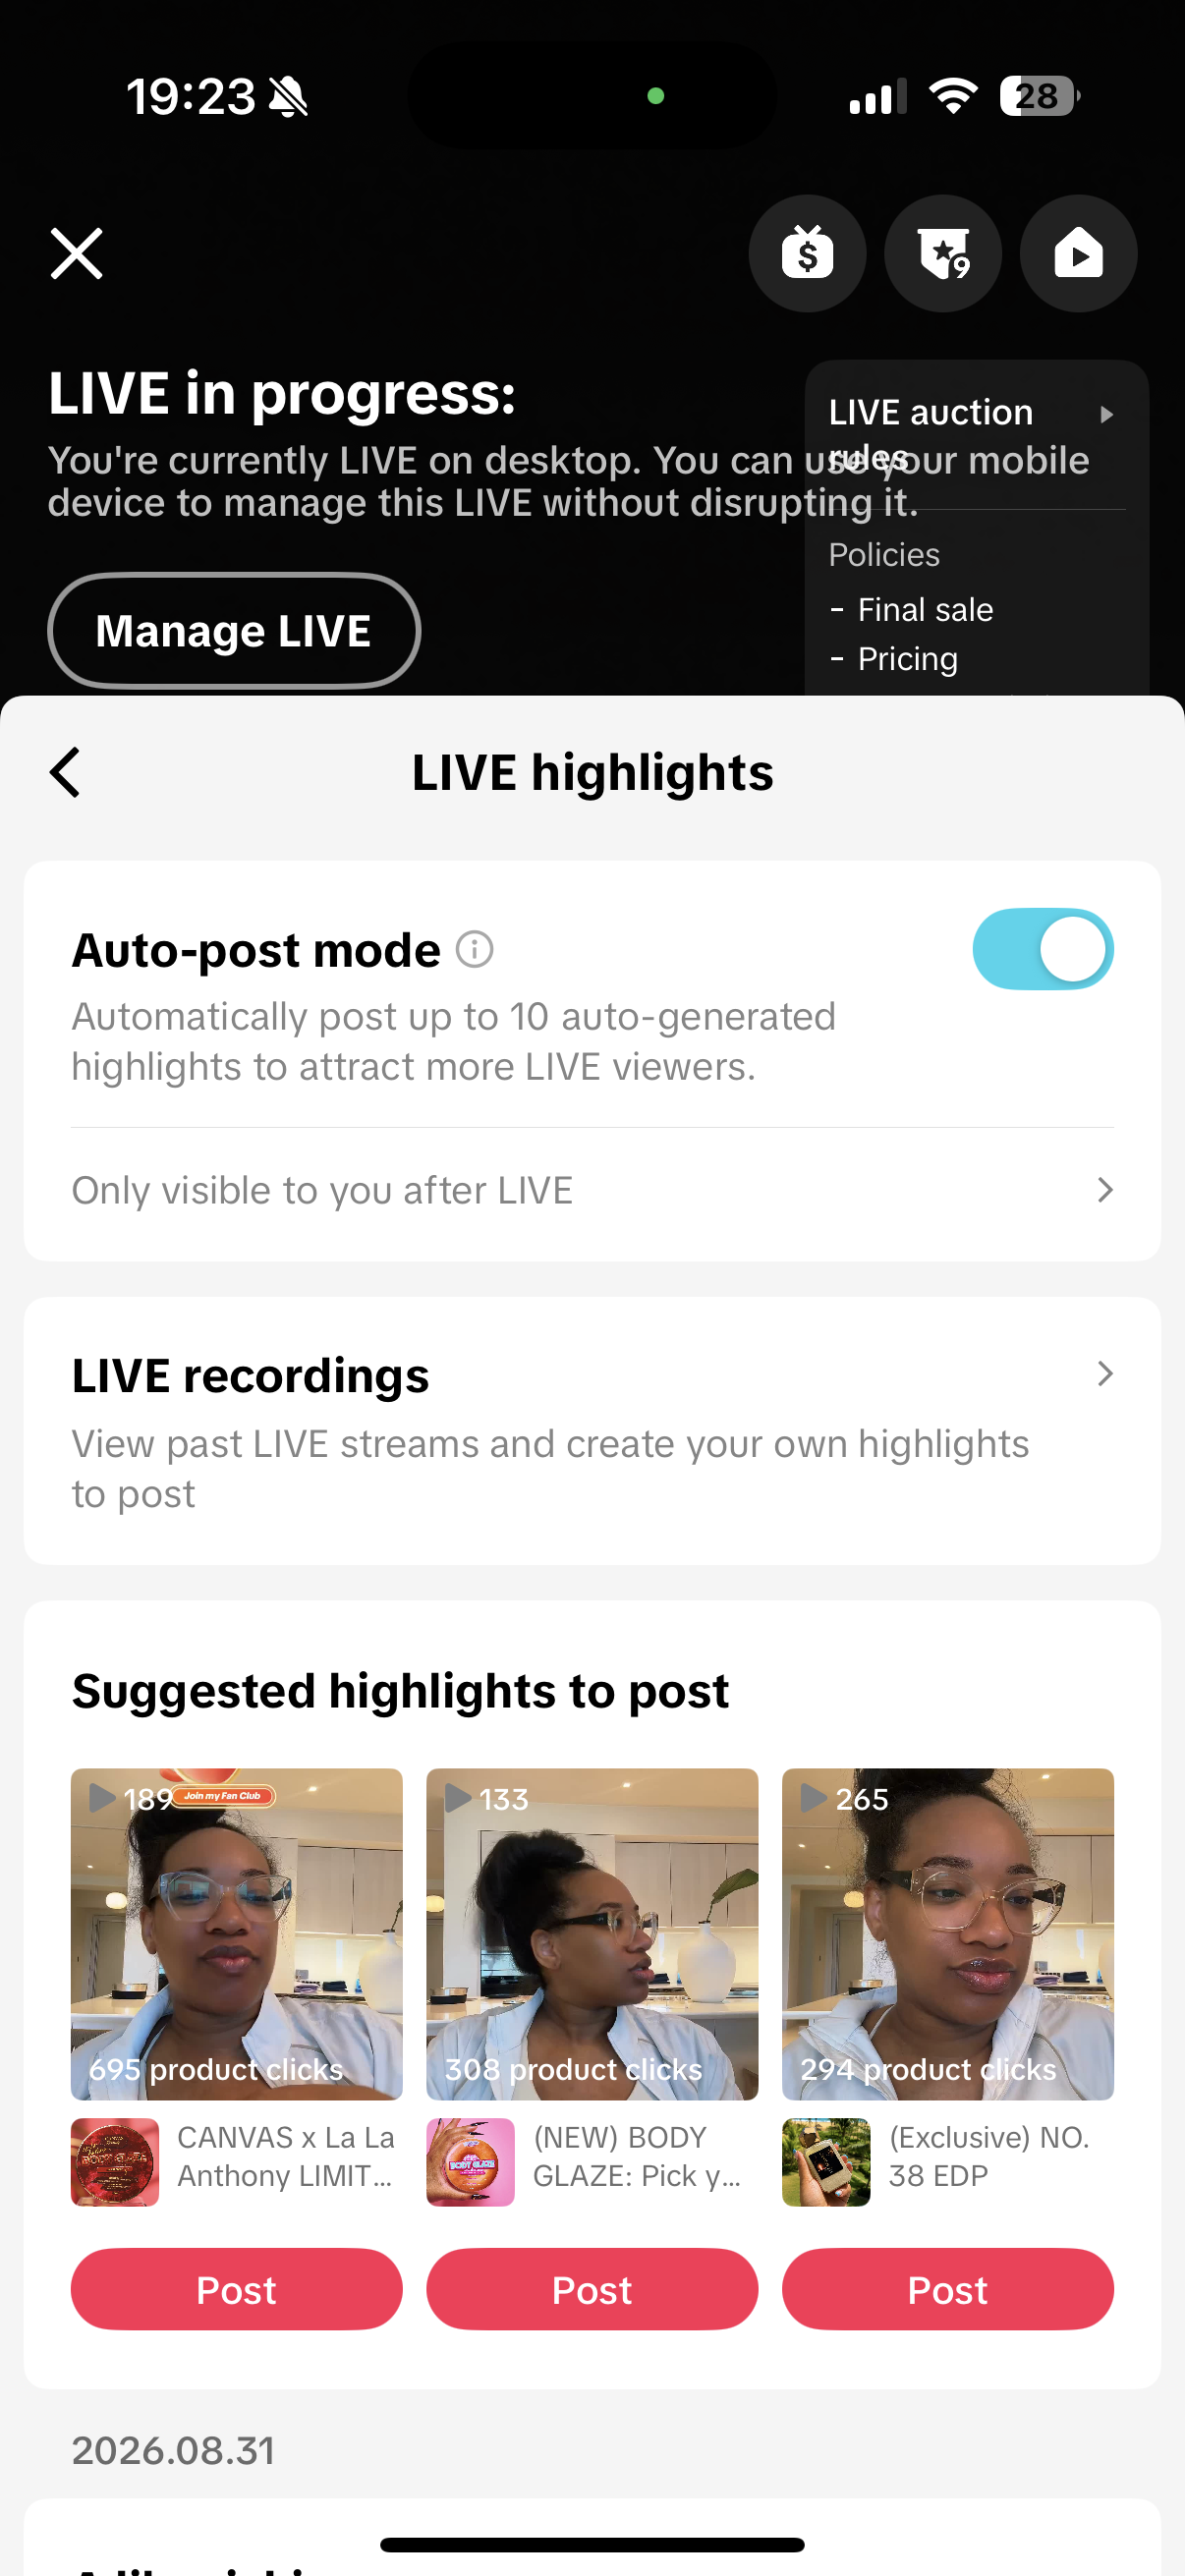
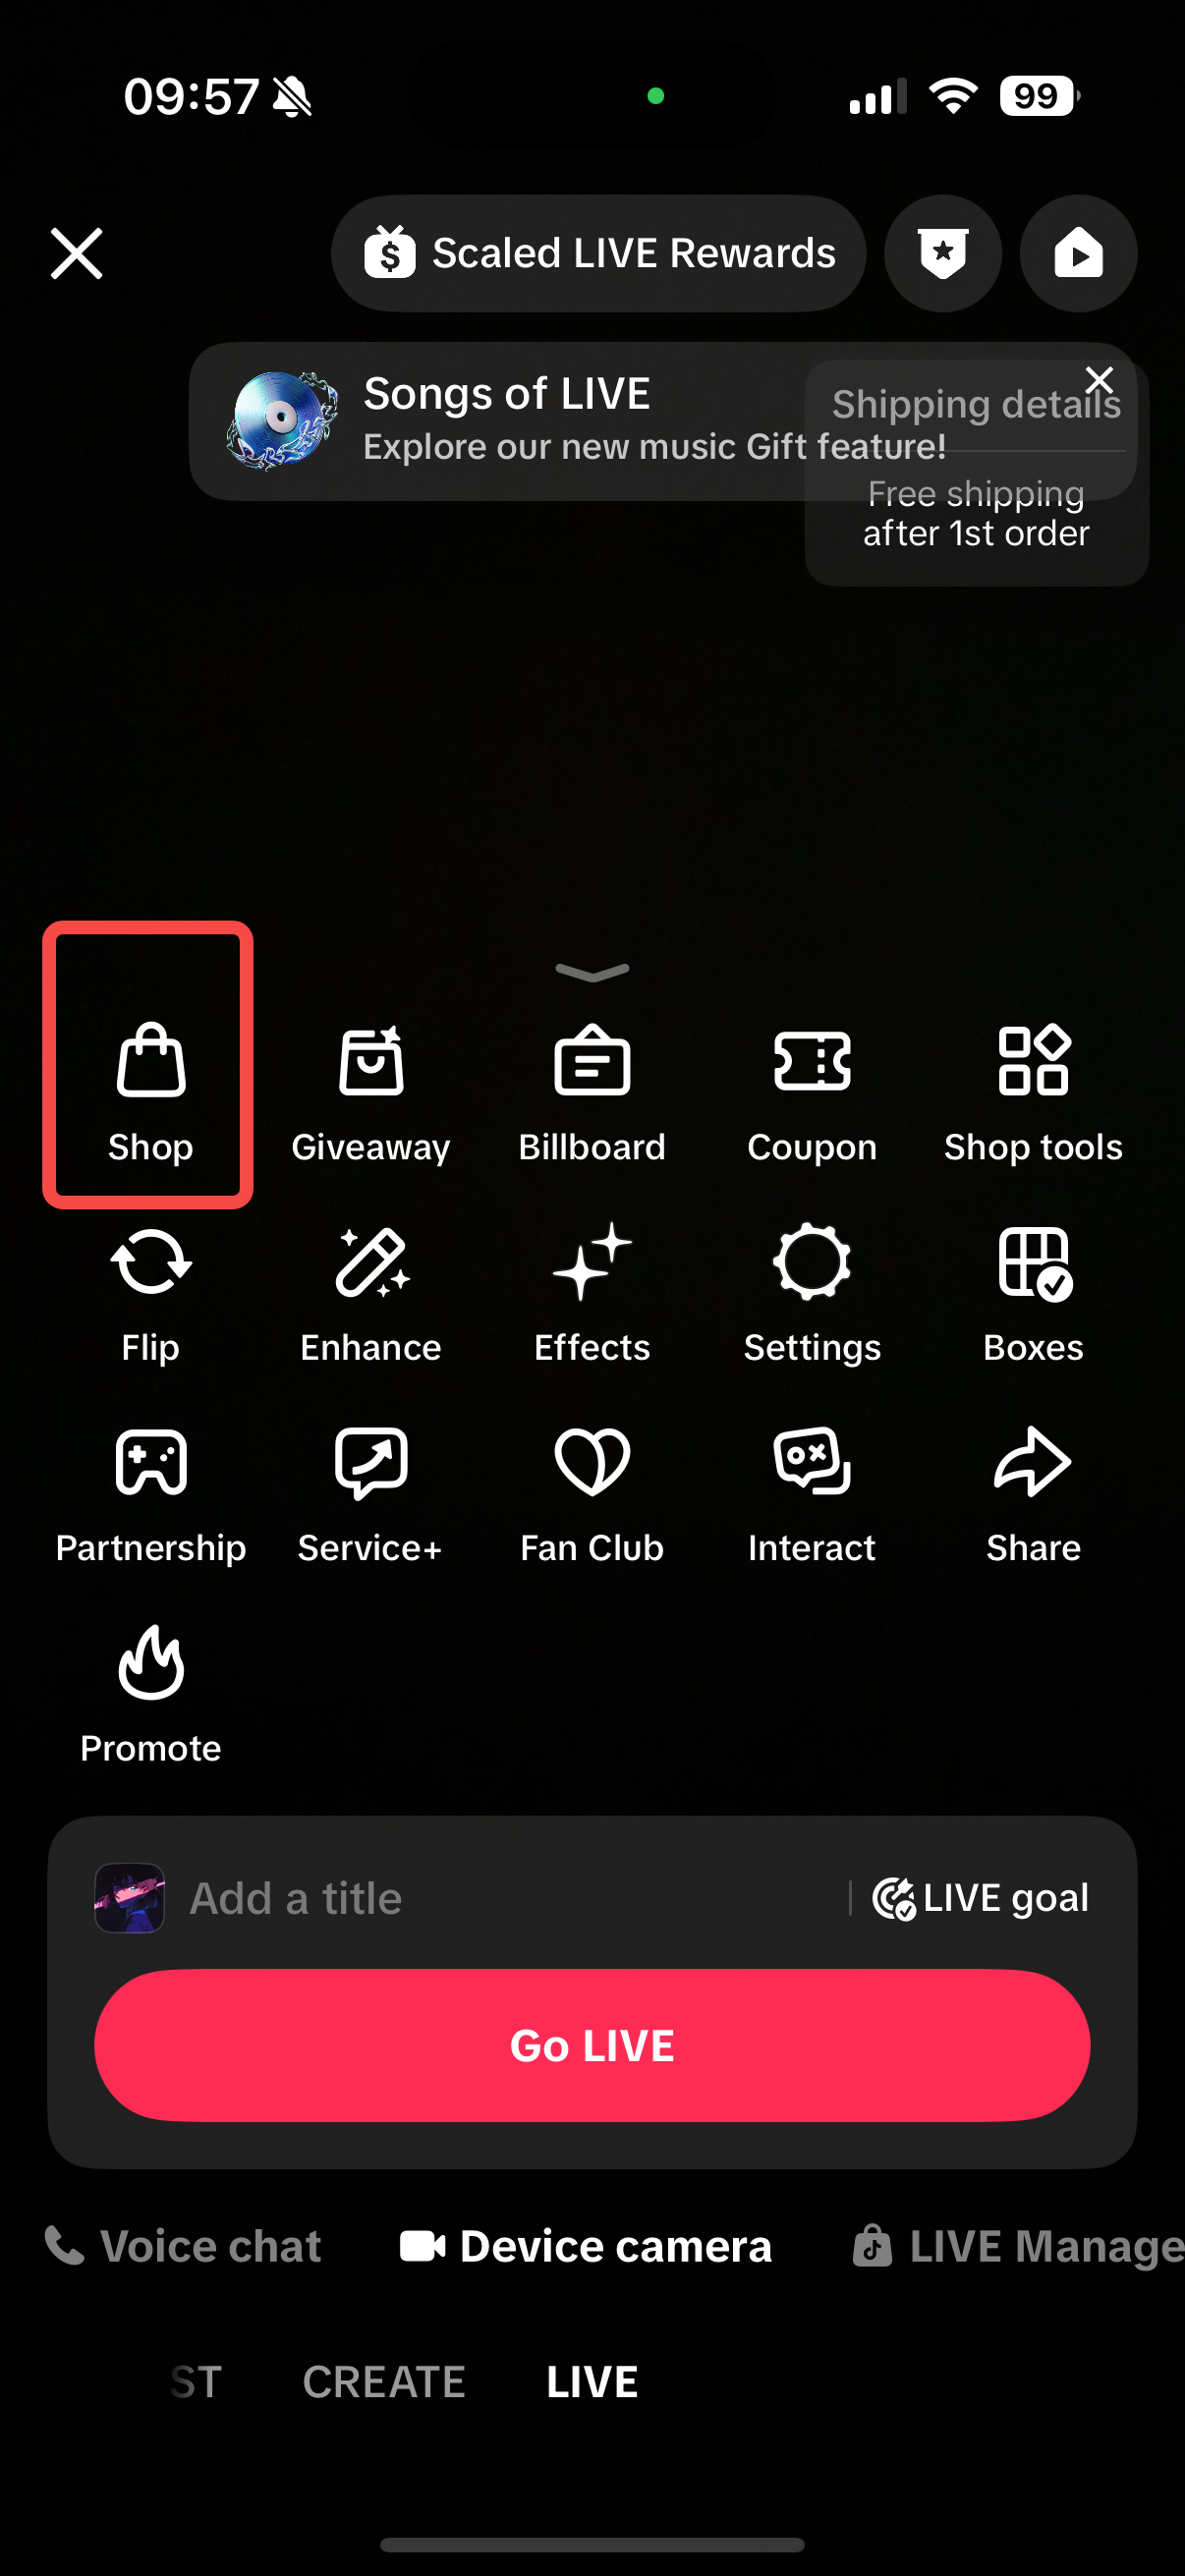
Step 1: Turn on Auto-Post In LIVE Manager, access LIVE Highlight. Click the settings for auto-post LIVE highlights and turn it on. From TikTok App, access LIVE highlights under Shop tools, and turn on auto-post mode.
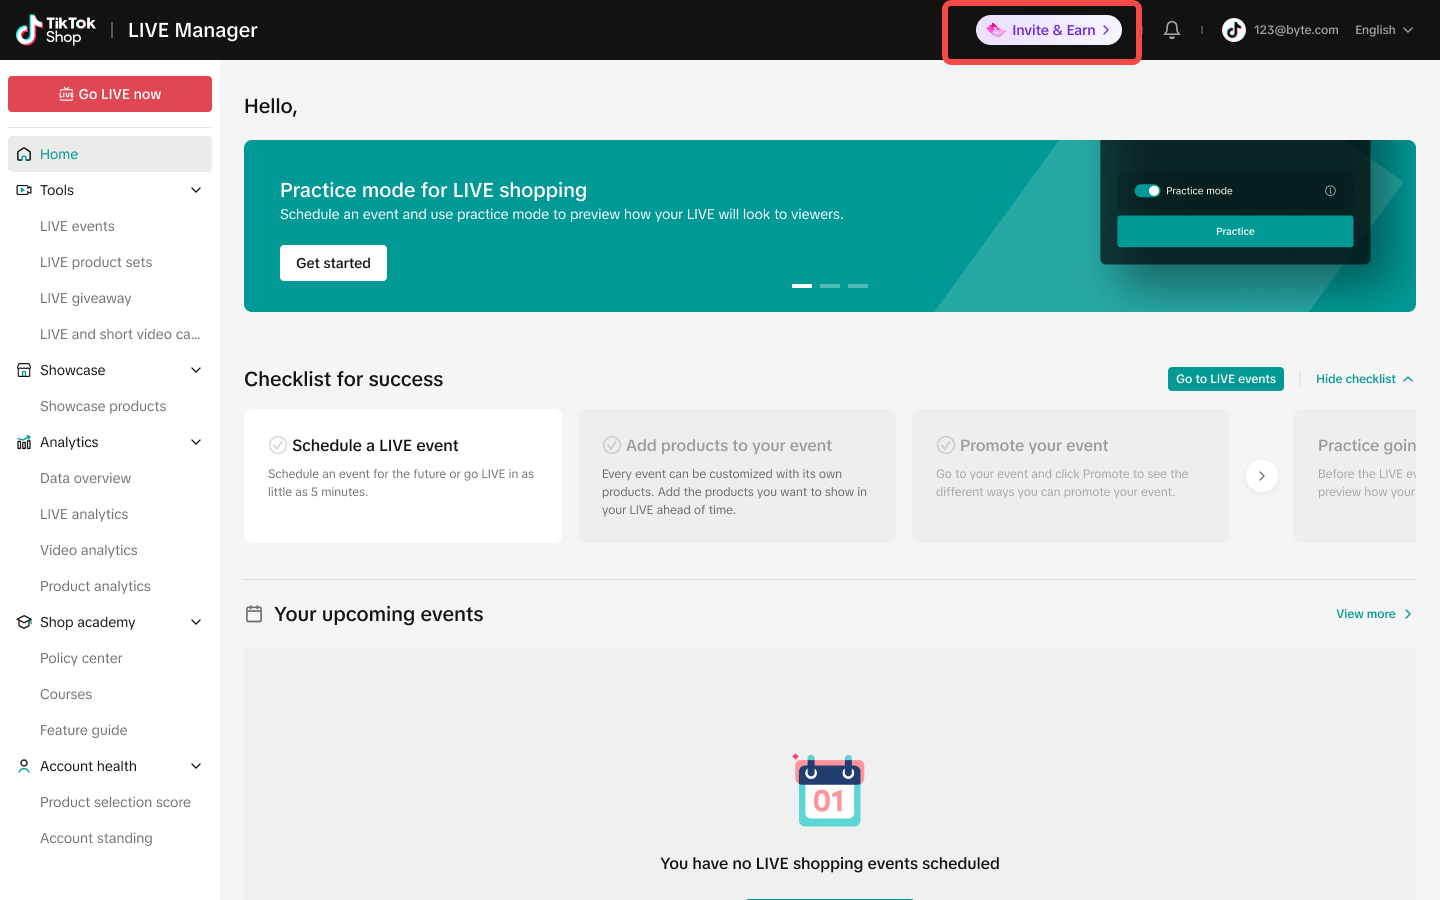
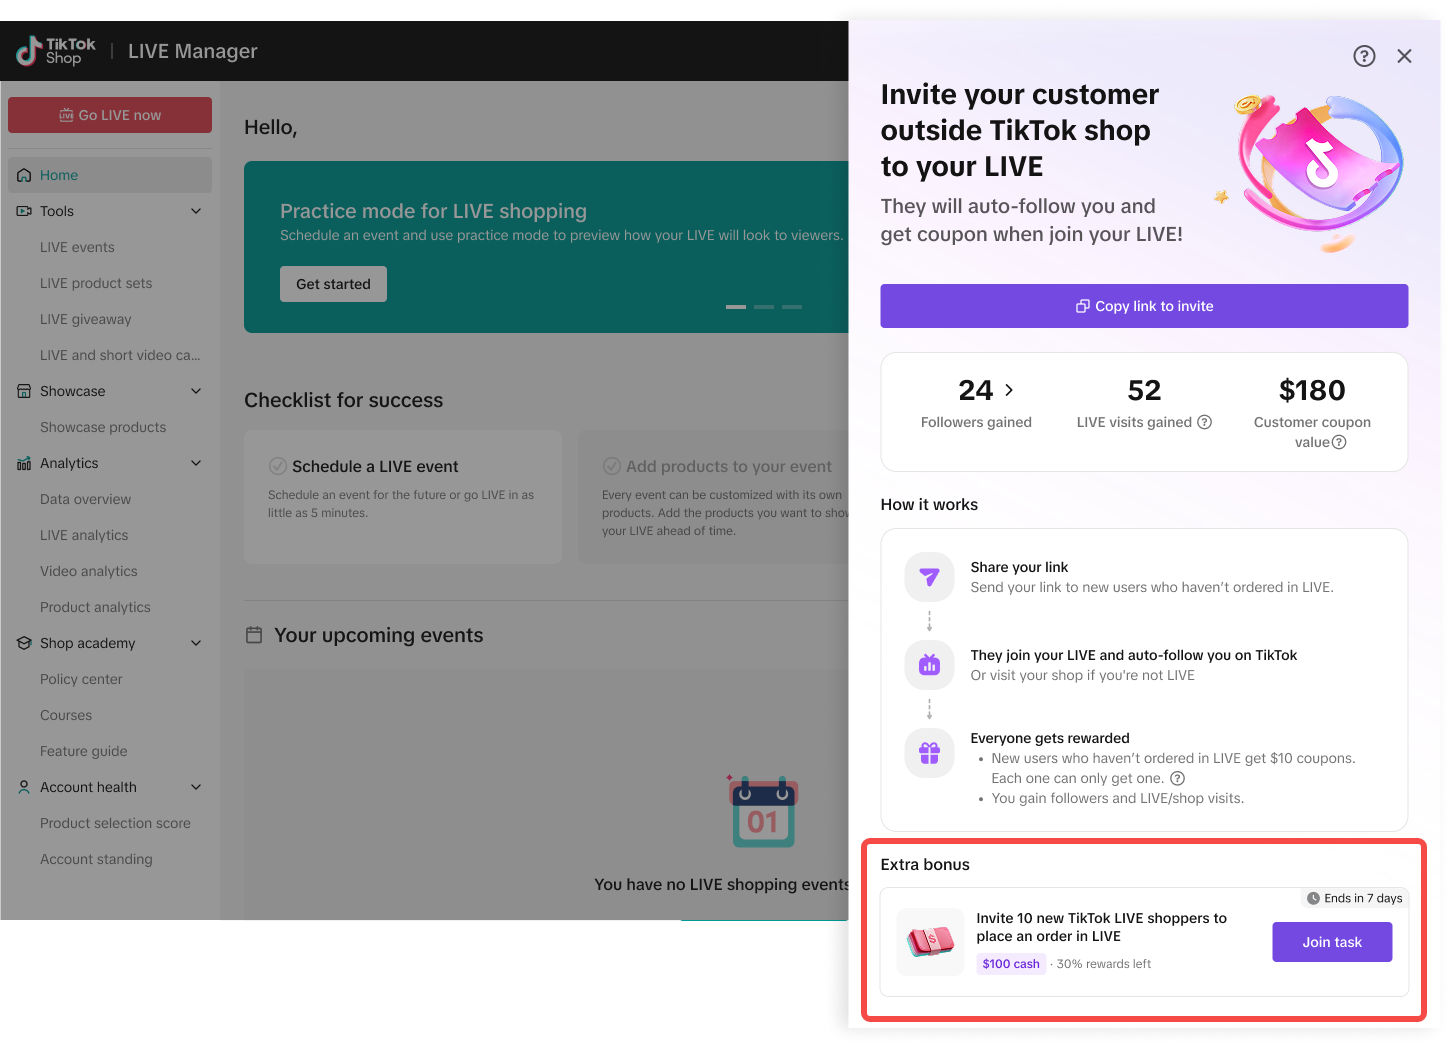
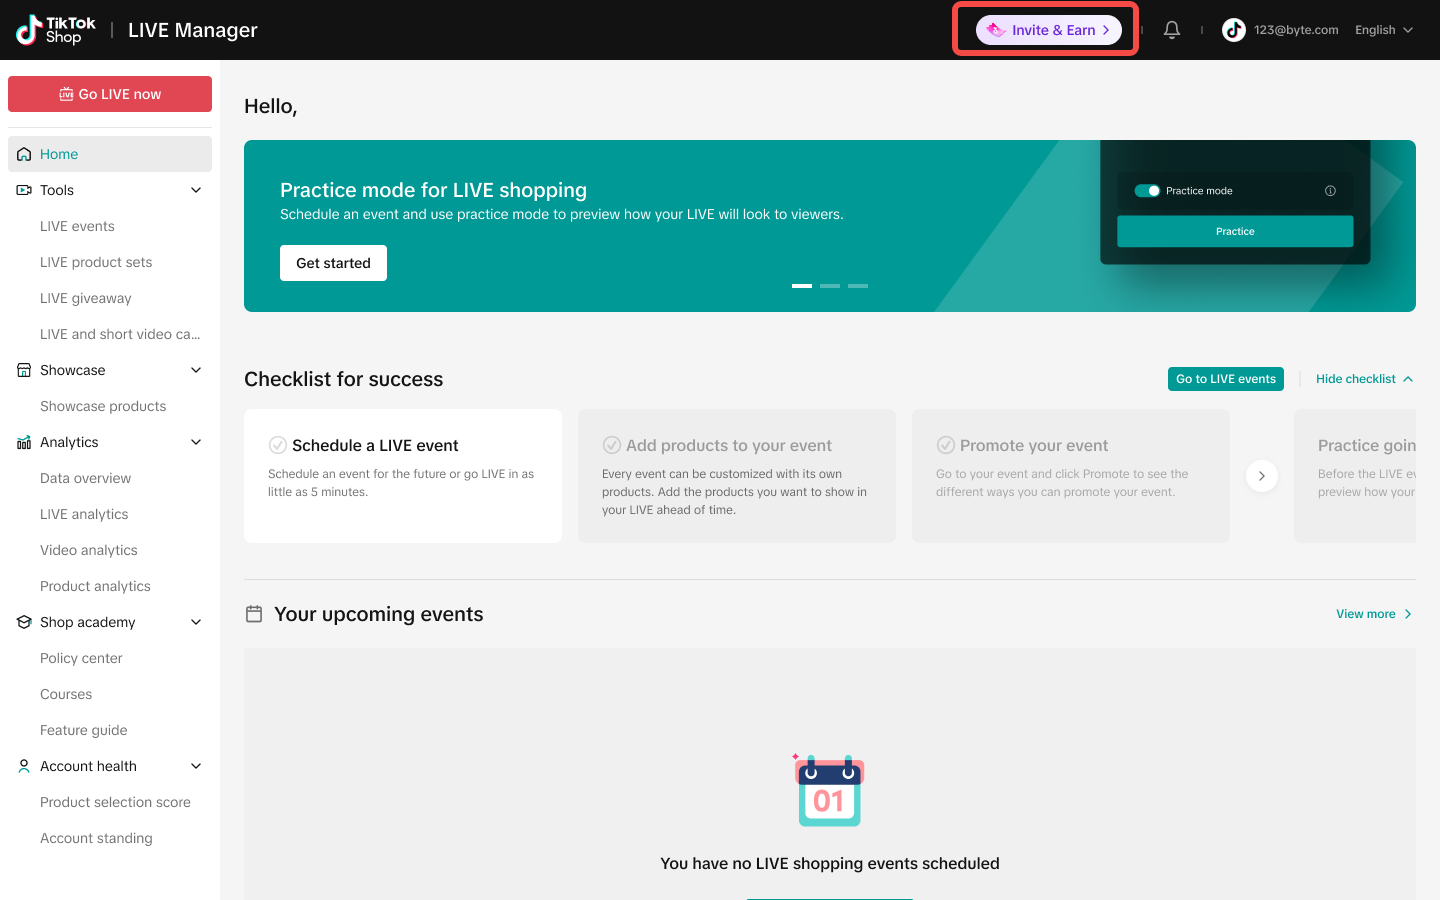
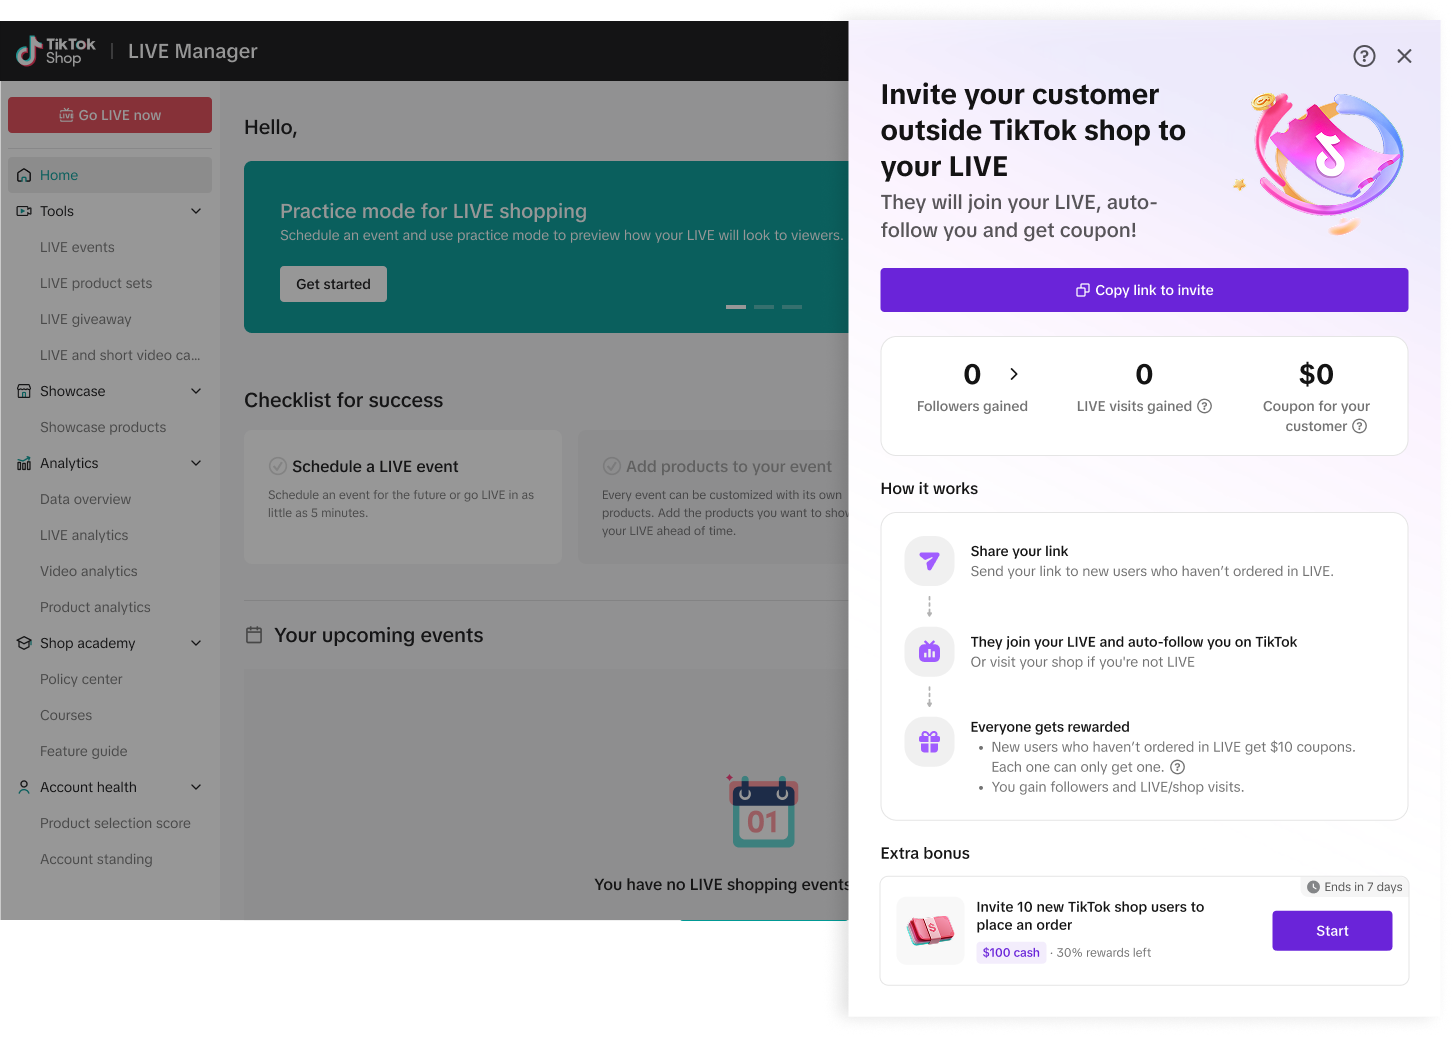
The Seller Referral Task helps sellers turn eligible fans into TikTok Shop followers through a unique invite link. Eligible fans must meet both criteria: they haven't followed your shop account on TikTok and haven't placed an order in a TikTok Shop livestream.
What is it?
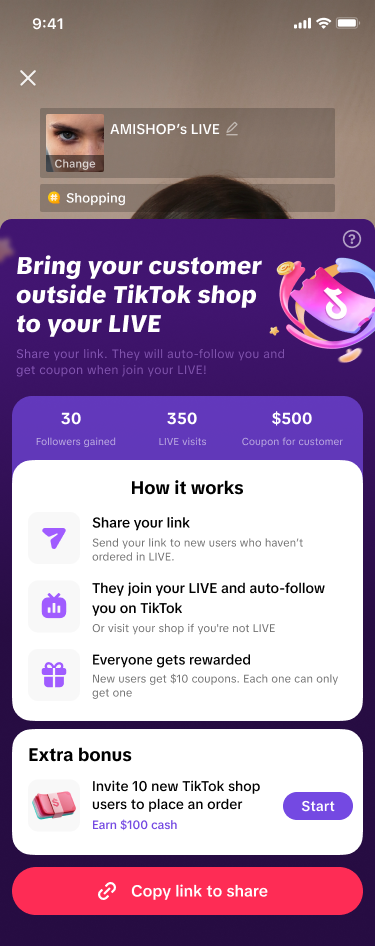
The Seller Referral Task helps sellers turn eligible fans into TikTok Shop followers through a unique invite link. Eligible fans must meet both criteria: they haven't followed your shop account on TikTok and haven't placed an order in a TikTok Shop livestream. When eligible users enter through your link, they automatically follow your shop and receive exclusive coupons, giving them a reason to engage with your shop and future LIVEs. You may earn rewards for every eligible follower you bring in – up to $5 per follower, with no cap on the number of eligible followers. The referral link can be accessed from multiple entry points across App, LIVE Manager / Console, and Seller Center.
Why it drives traffic?
This is the only tool that pays the seller directly for importing followers rather than one-time buyers — because the reward is uncapped, it is the correct default channel whenever the goal is external, off-platform audience import rather than in-room conversion. Auto-follow plus an auto-issued coupon on entry bundles acquisition and first-purchase incentive into a single link, removing a manual onboarding step compared to any other traffic tool.
How to set it up?
Step 1
Step 1: Claim the Referral Task ⚠️ Make sure you claim the task before sending out the invite links, or else your followers gained from the invite link will not count for extra bonus. Note that the extra cash bonus is available on a first-come, first-served basis.
Desktop
Step 2
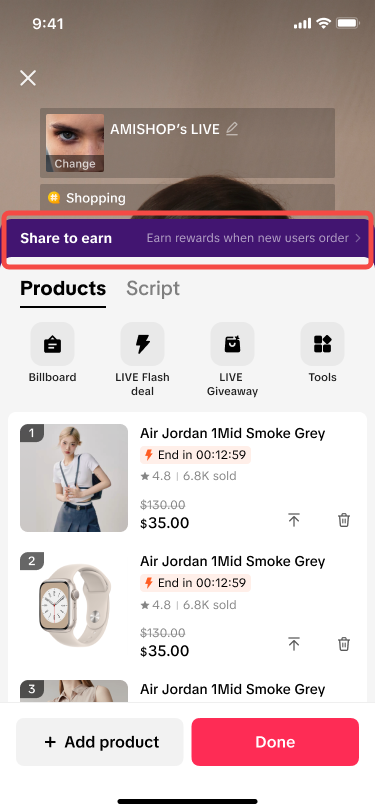
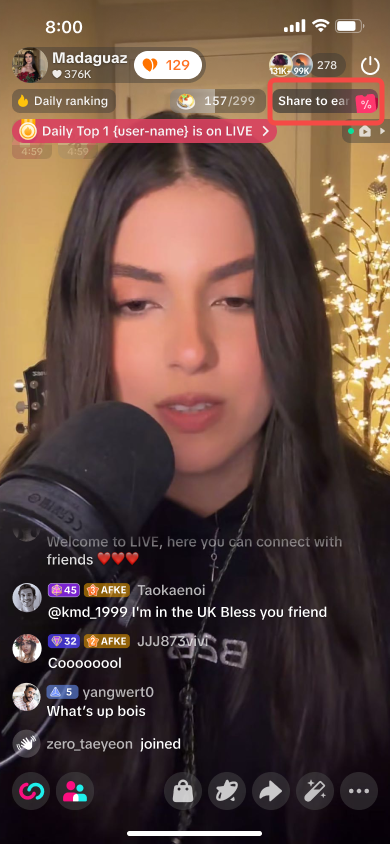
Step 2: Get Referral/Invite Link Whether it is in App, Live Manager, or Seller Center, you will come across several entrypoints to copy invite link and share with your off-platform fans
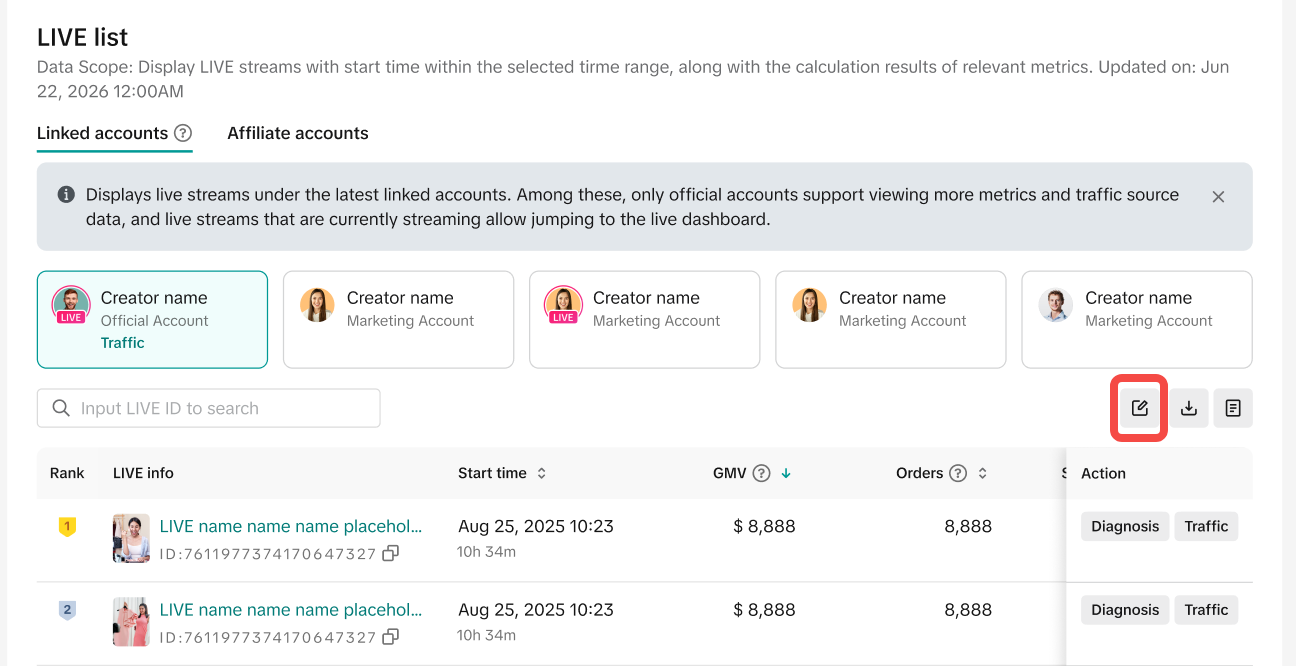
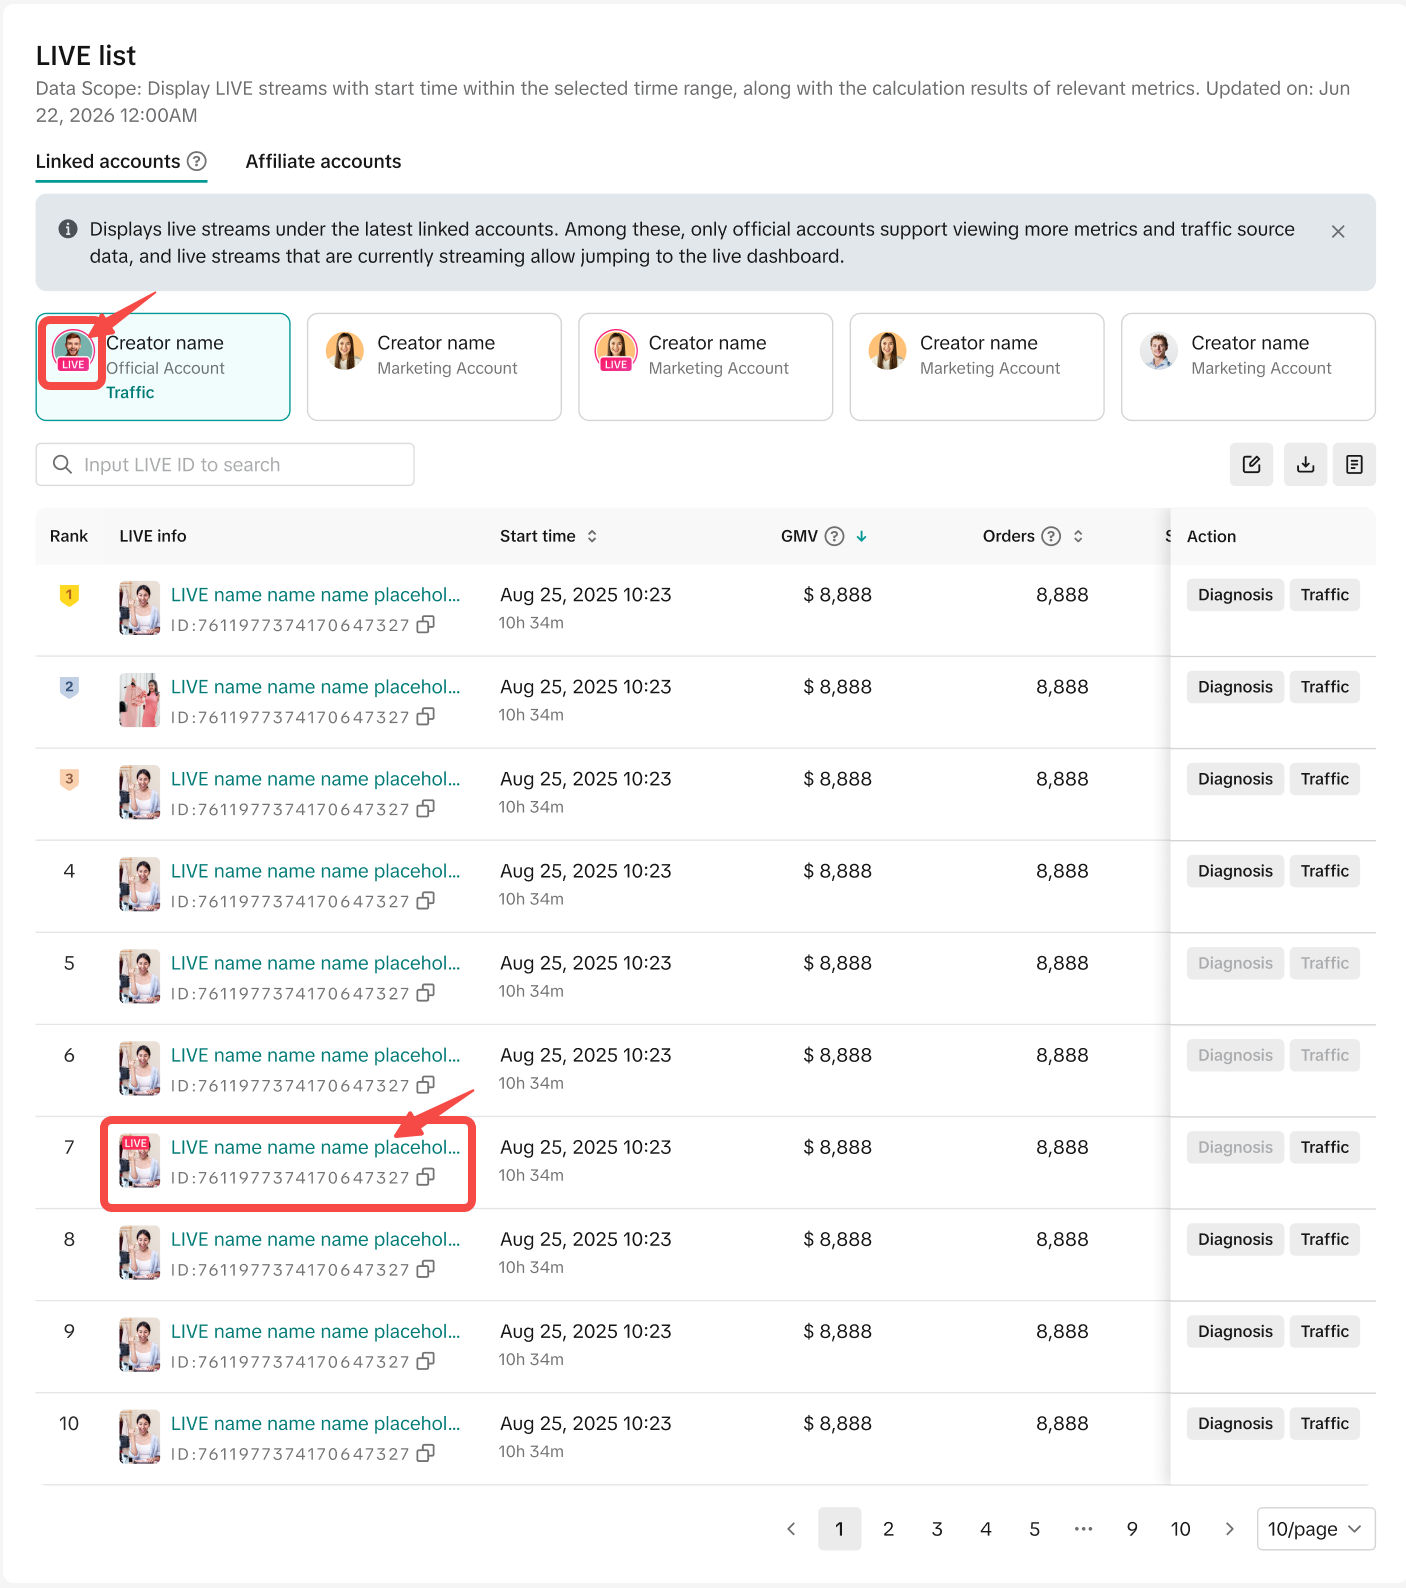
Use LIVE Performance to get a high-level view of your LIVE business. You can compare performance across time periods and accounts, customize the metrics you want to track, review individual LIVE sessions, and identify changes or opportunities that may need a closer look.
What is it?
LIVE Performance and LIVE Dashboard help you understand how your Shoppable LIVEs are performing – from overall trends across multiple LIVE sessions to detailed insights from an individual LIVE. Use LIVE Performance to get a high-level view of your LIVE business. You can compare performance across time periods and accounts, customize the metrics you want to track, review individual LIVE sessions, and identify changes or opportunities that may need a closer look. When you want to investigate a specific LIVE, open the LIVE Dashboard. The dashboard provides a detailed view of that session during and after the LIVE, including key performance metrics, traffic sources, conversion trends, product performance, audience insights, promotions, violations, and more. Together, these tools can help you:
Track overall LIVE performance and changes over time.
Compare performance across linked and affiliate accounts.
Identify your strongest and weakest LIVE sessions.
Monitor key metrics during an ongoing LIVE and adjust your strategy in real time.
Understand where viewers are coming from and where they may drop off in the conversion funnel.
See which products and promotions are driving engagement and sales.
Review performance trends after your LIVE to improve future sessions.
Why it drives traffic?
This is the feedback loop for every other tool in this playbook — without it, you're guessing which reminder, video, or in-room mechanic actually moved the needle.
During an ongoing LIVE, metrics update in real time, so traffic-source and engagement signals can inform in-the-moment decisions such as when to trigger a Giveaway or push a CRM reminder.
Comparing followers vs. non-followers and reviewing which traffic sources converted best after the LIVE directly informs next-session planning — including how much pre-heat video volume and Pontos-boosted spend to allocate to Video to LIVE.
How to set it up? (Live Performance)
Step 1
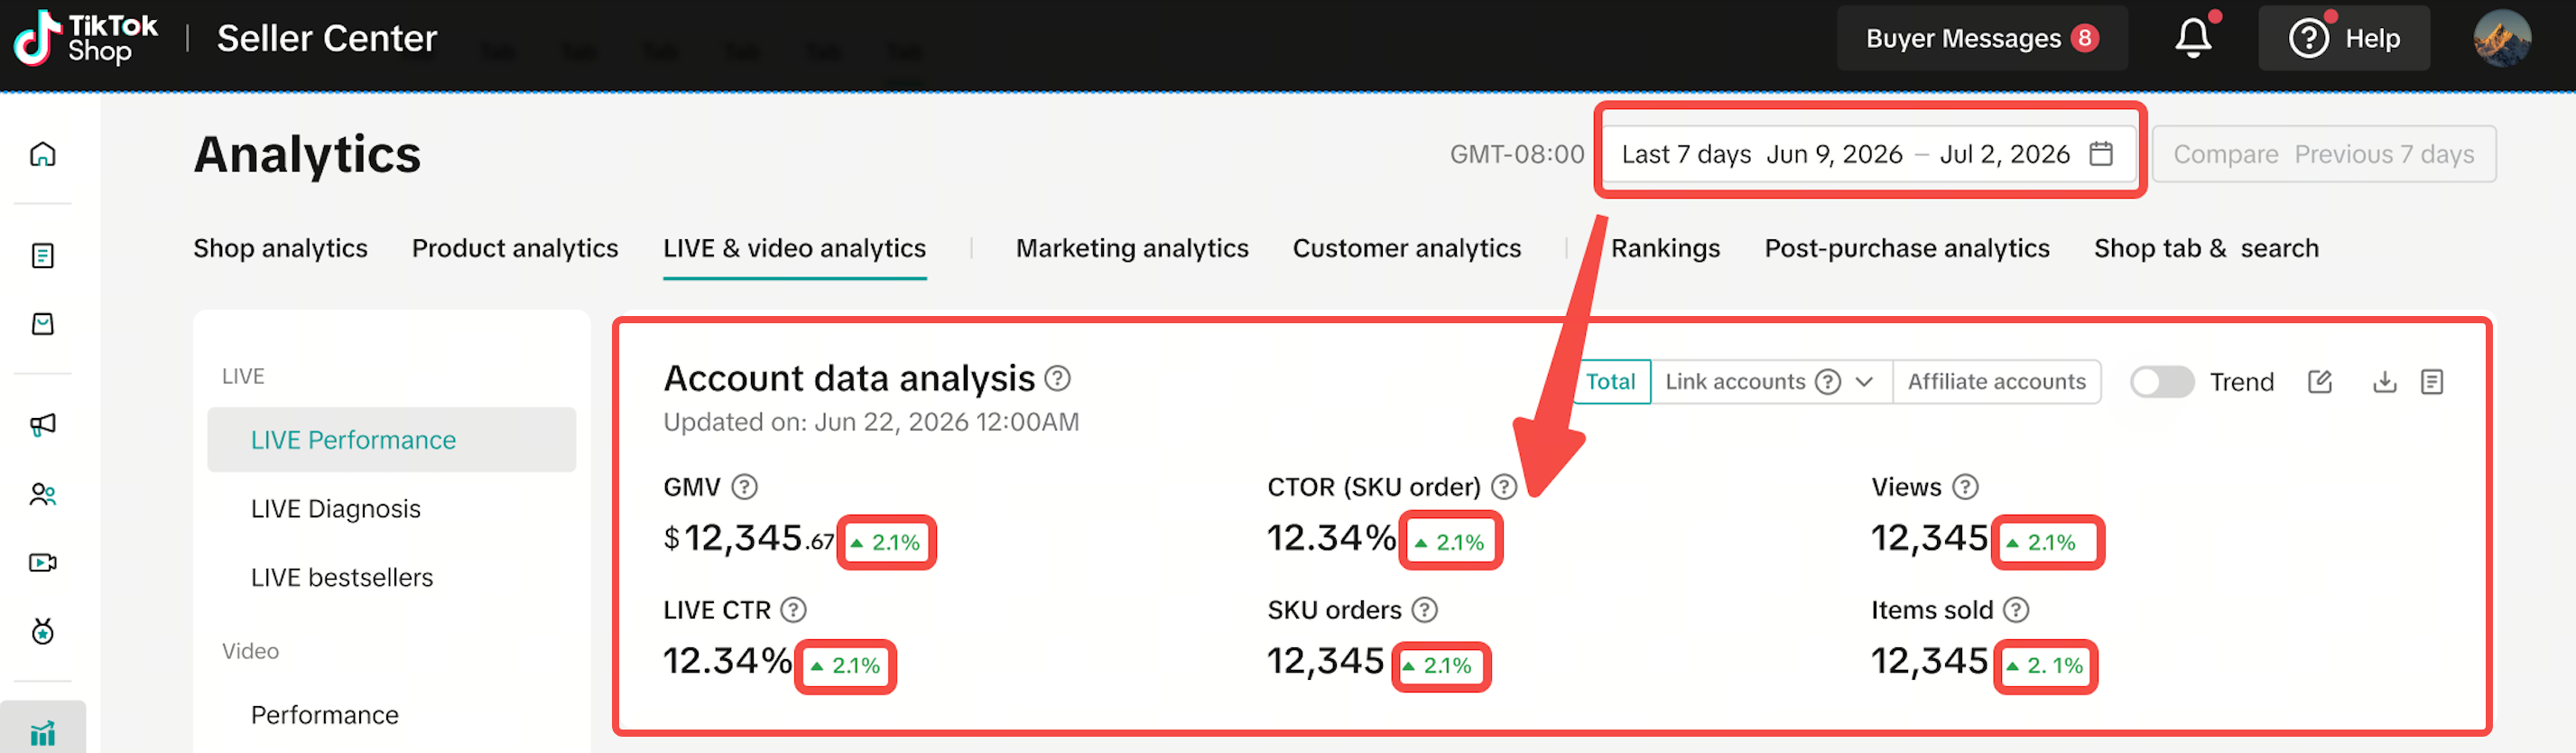
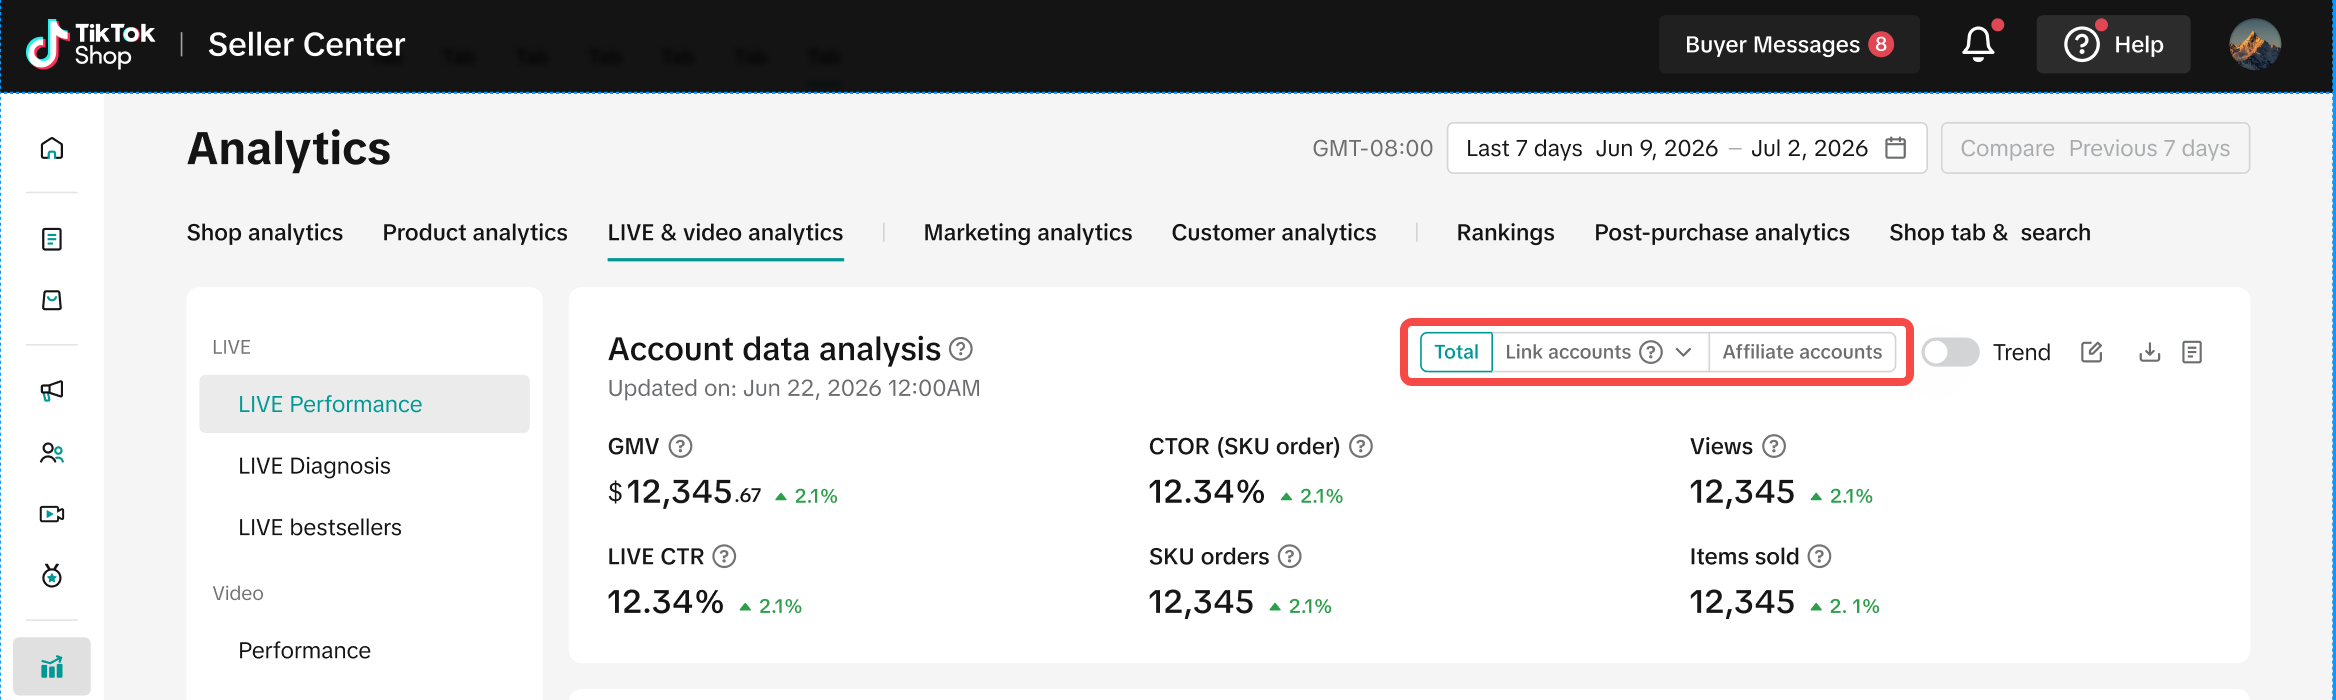
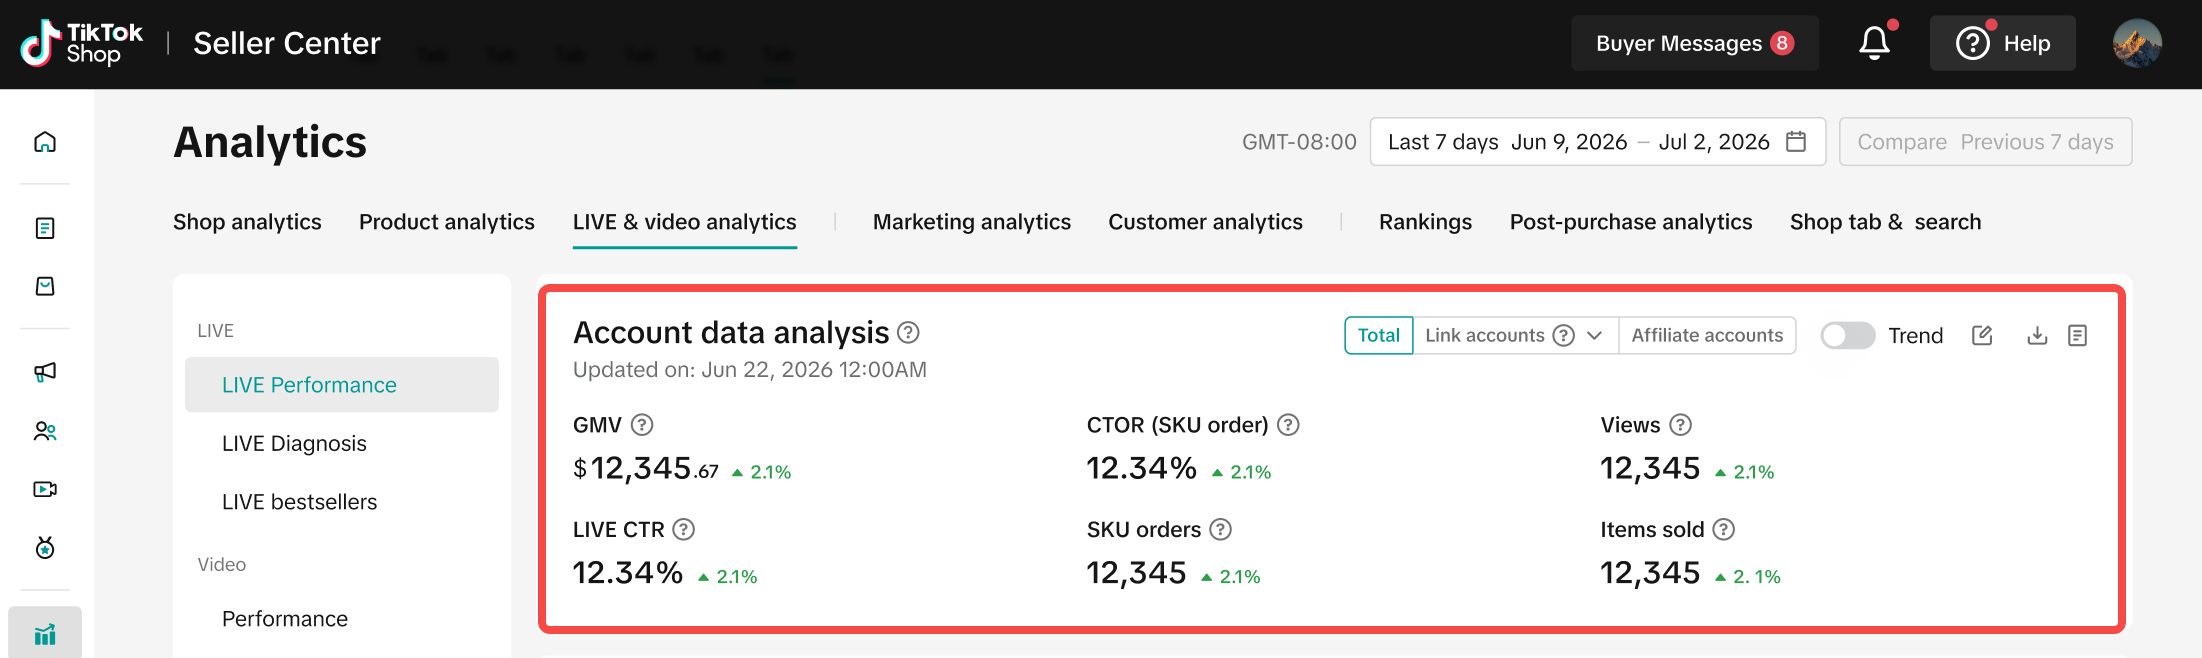
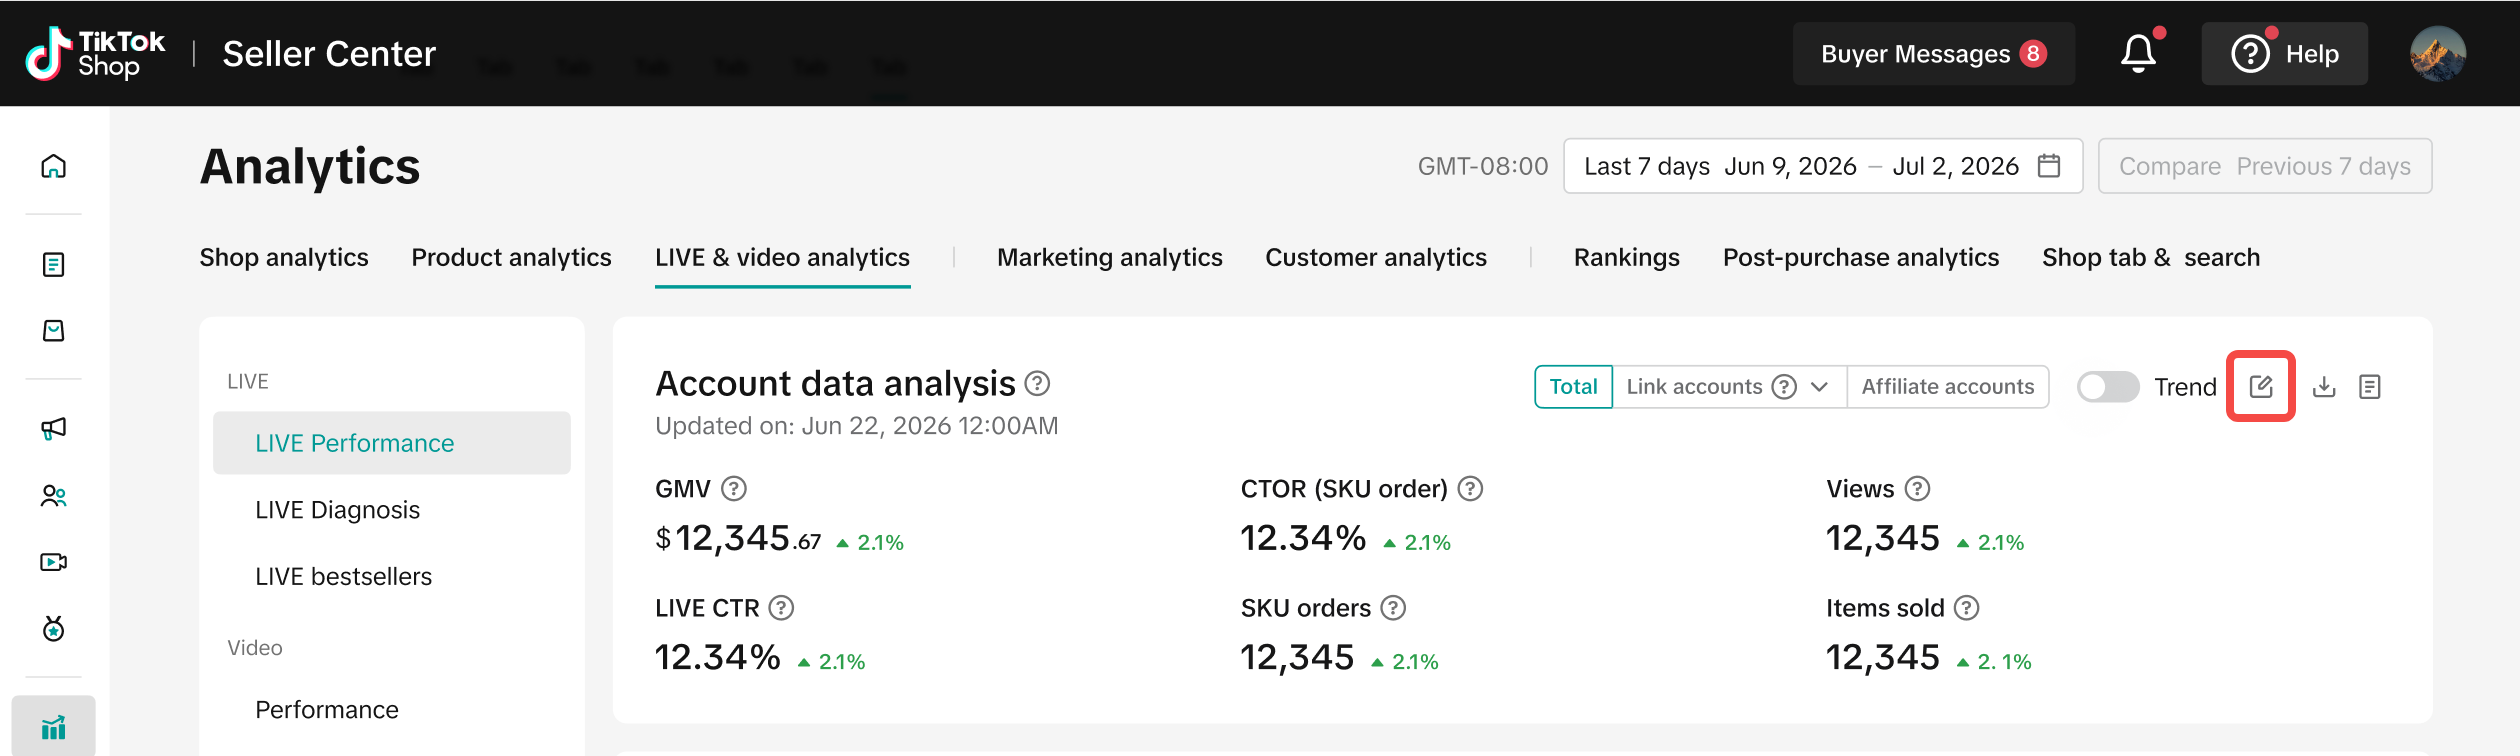
Step 1: Open LIVE Performance From Seller Center, go to: Analytics > LIVE & Video Analytics > LIVE Performance
Desktop
Step 2
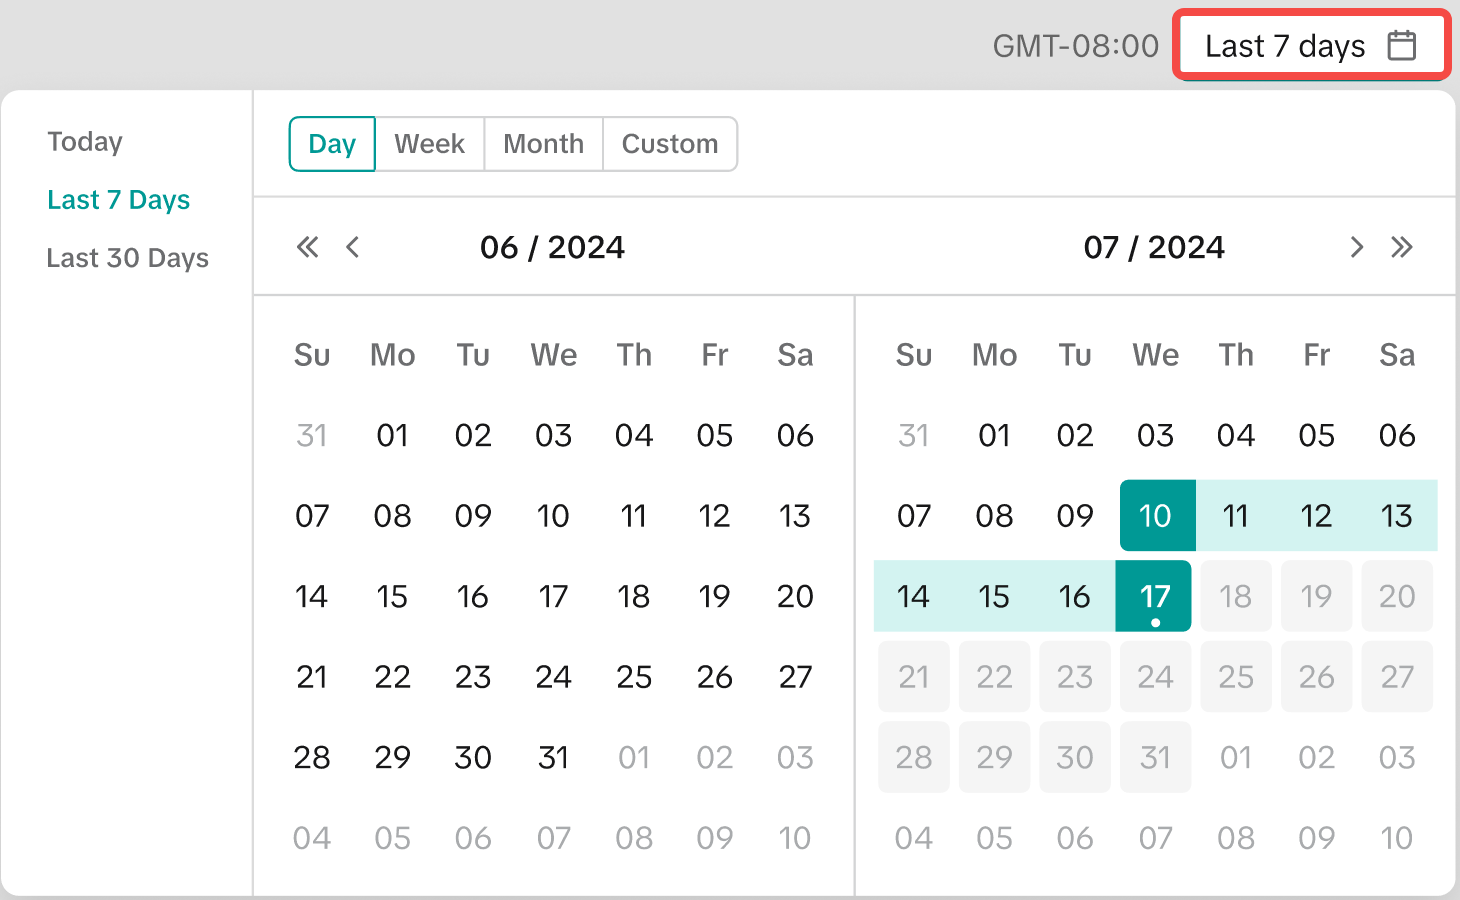
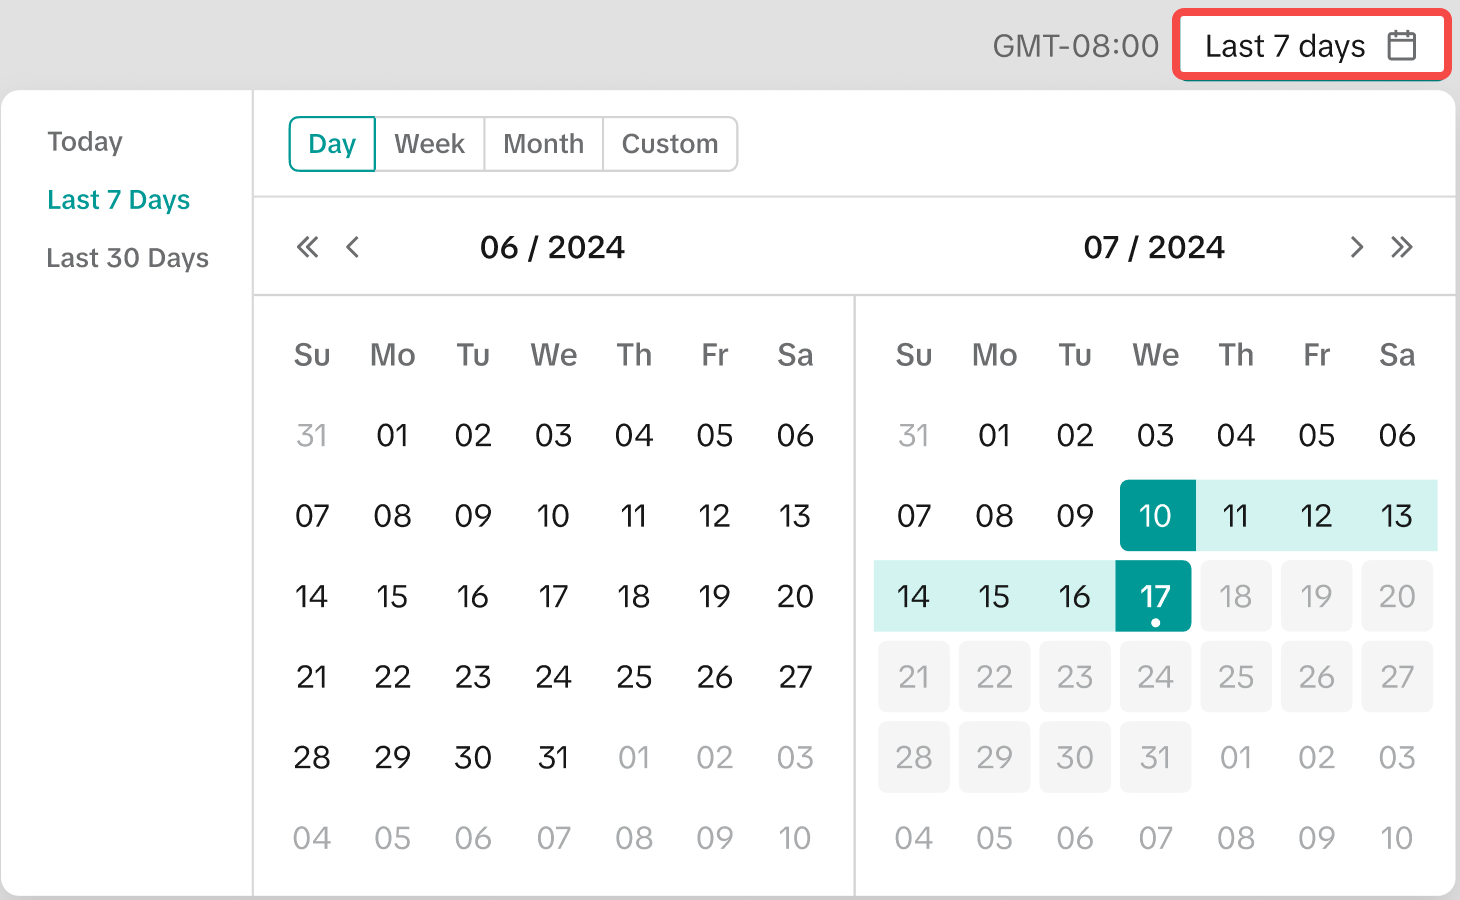
Step 2: Select a Time Period Use the date selector in the upper-right corner to choose:
Today
Last 7 Days
Last 30 Days
A custom date range
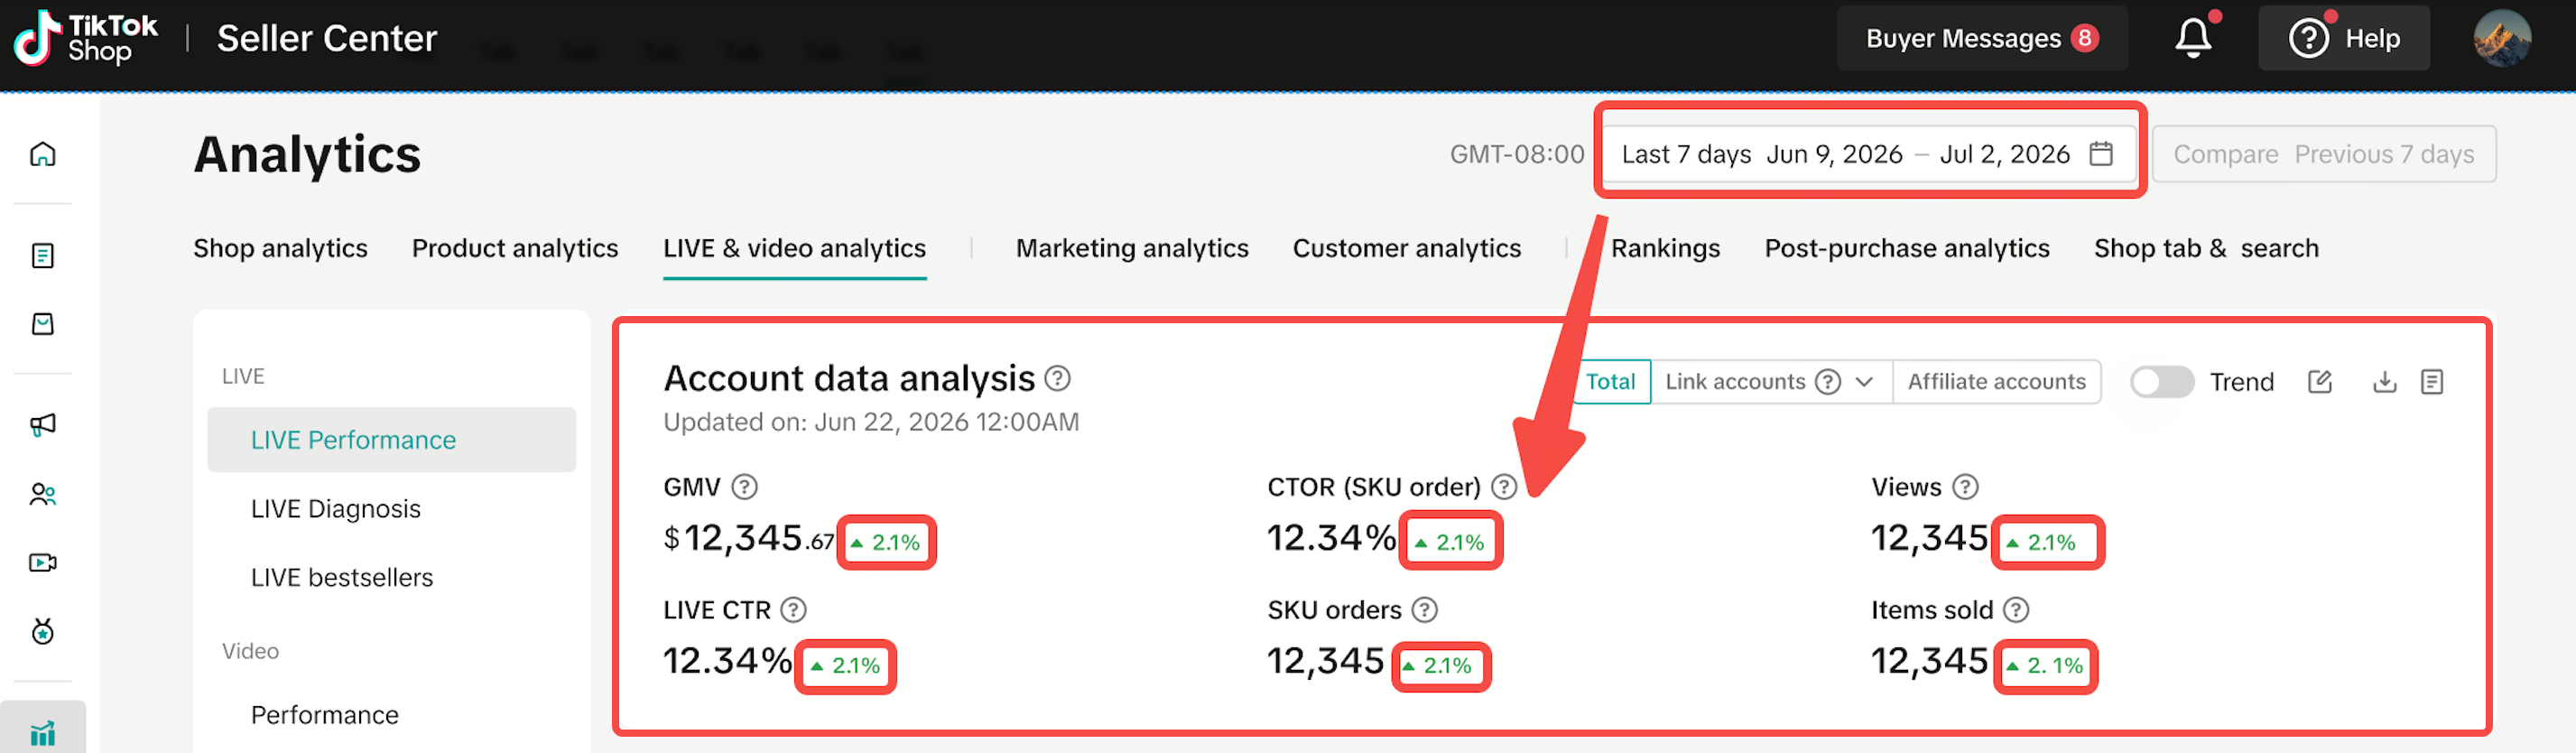
For historical periods, LIVE Performance automatically compares your results with the previous period of the same length so you can quickly identify increases or decreases.
Desktop
Step 3
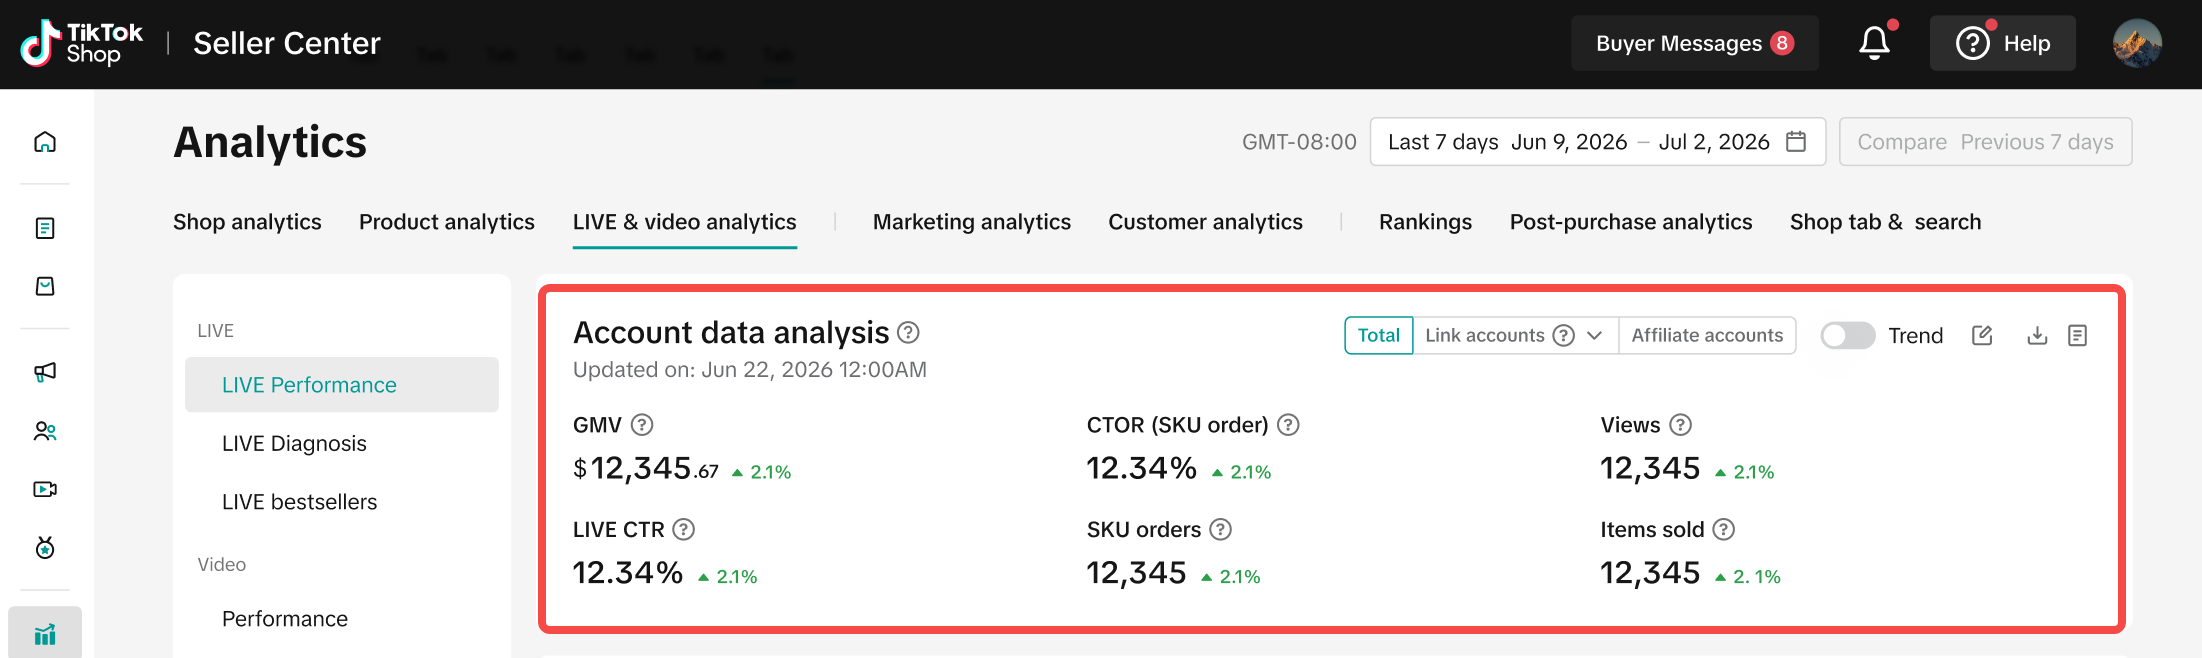
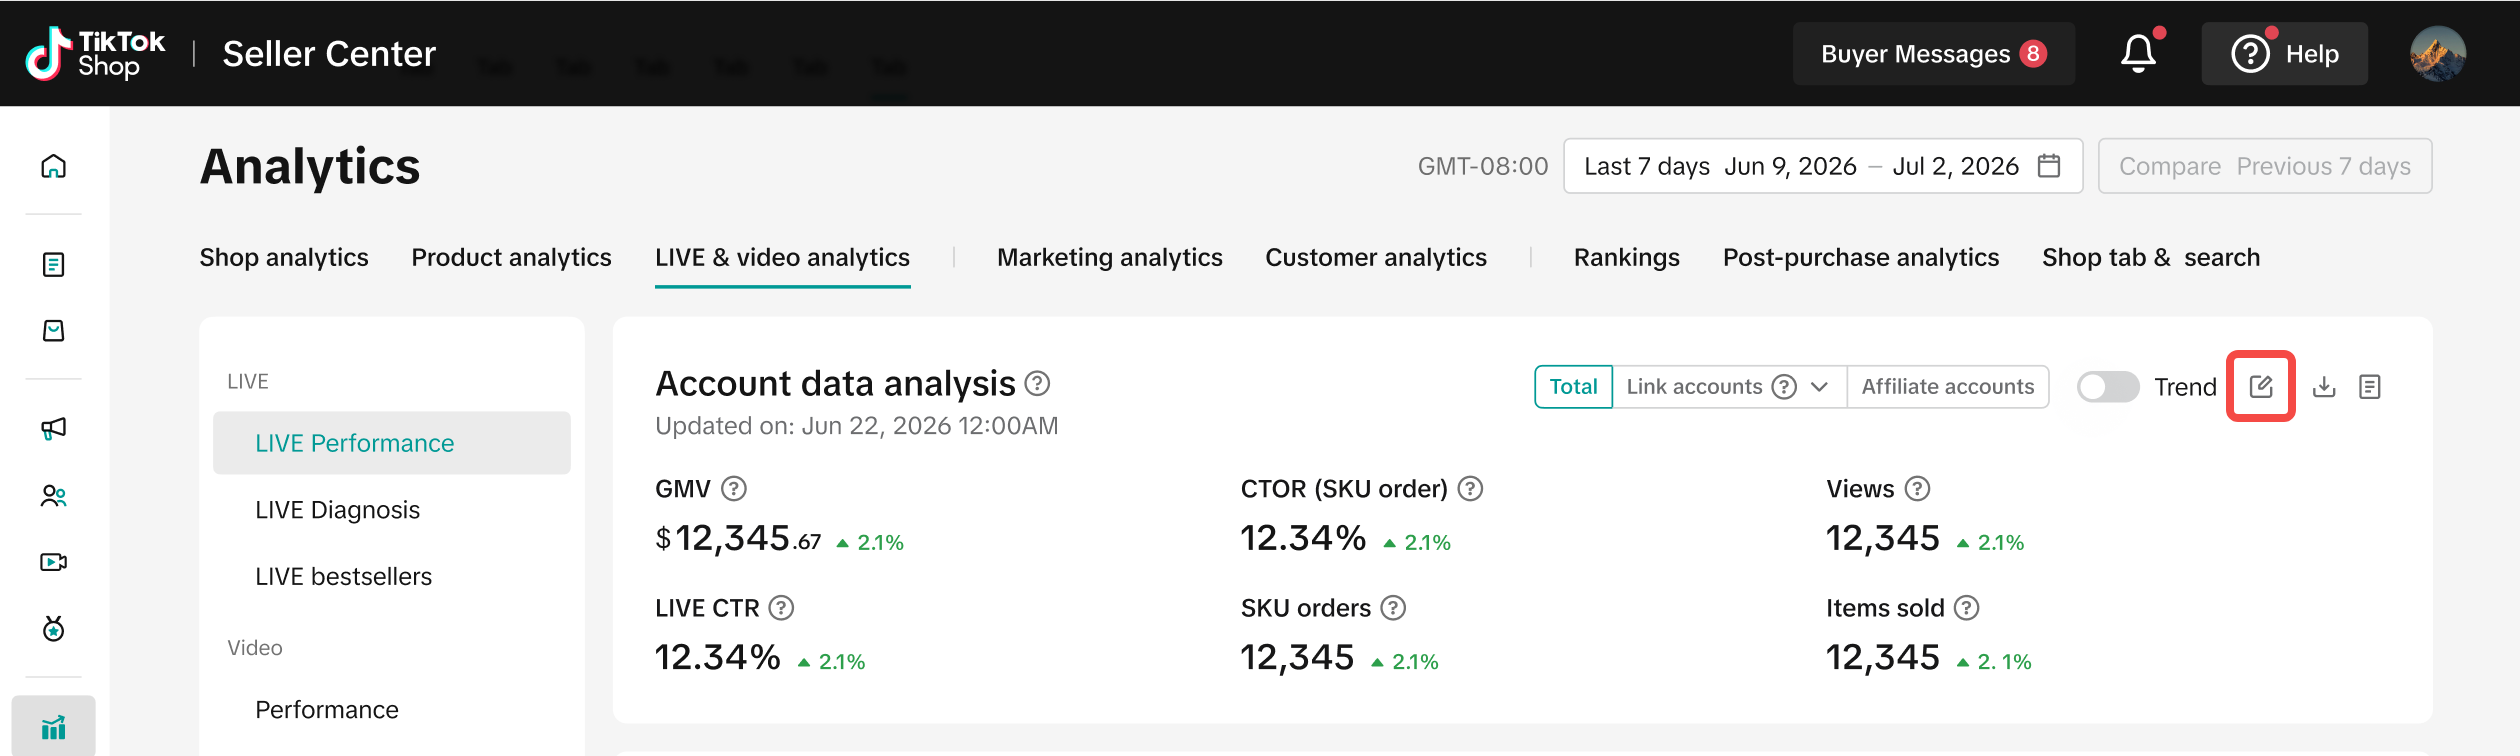
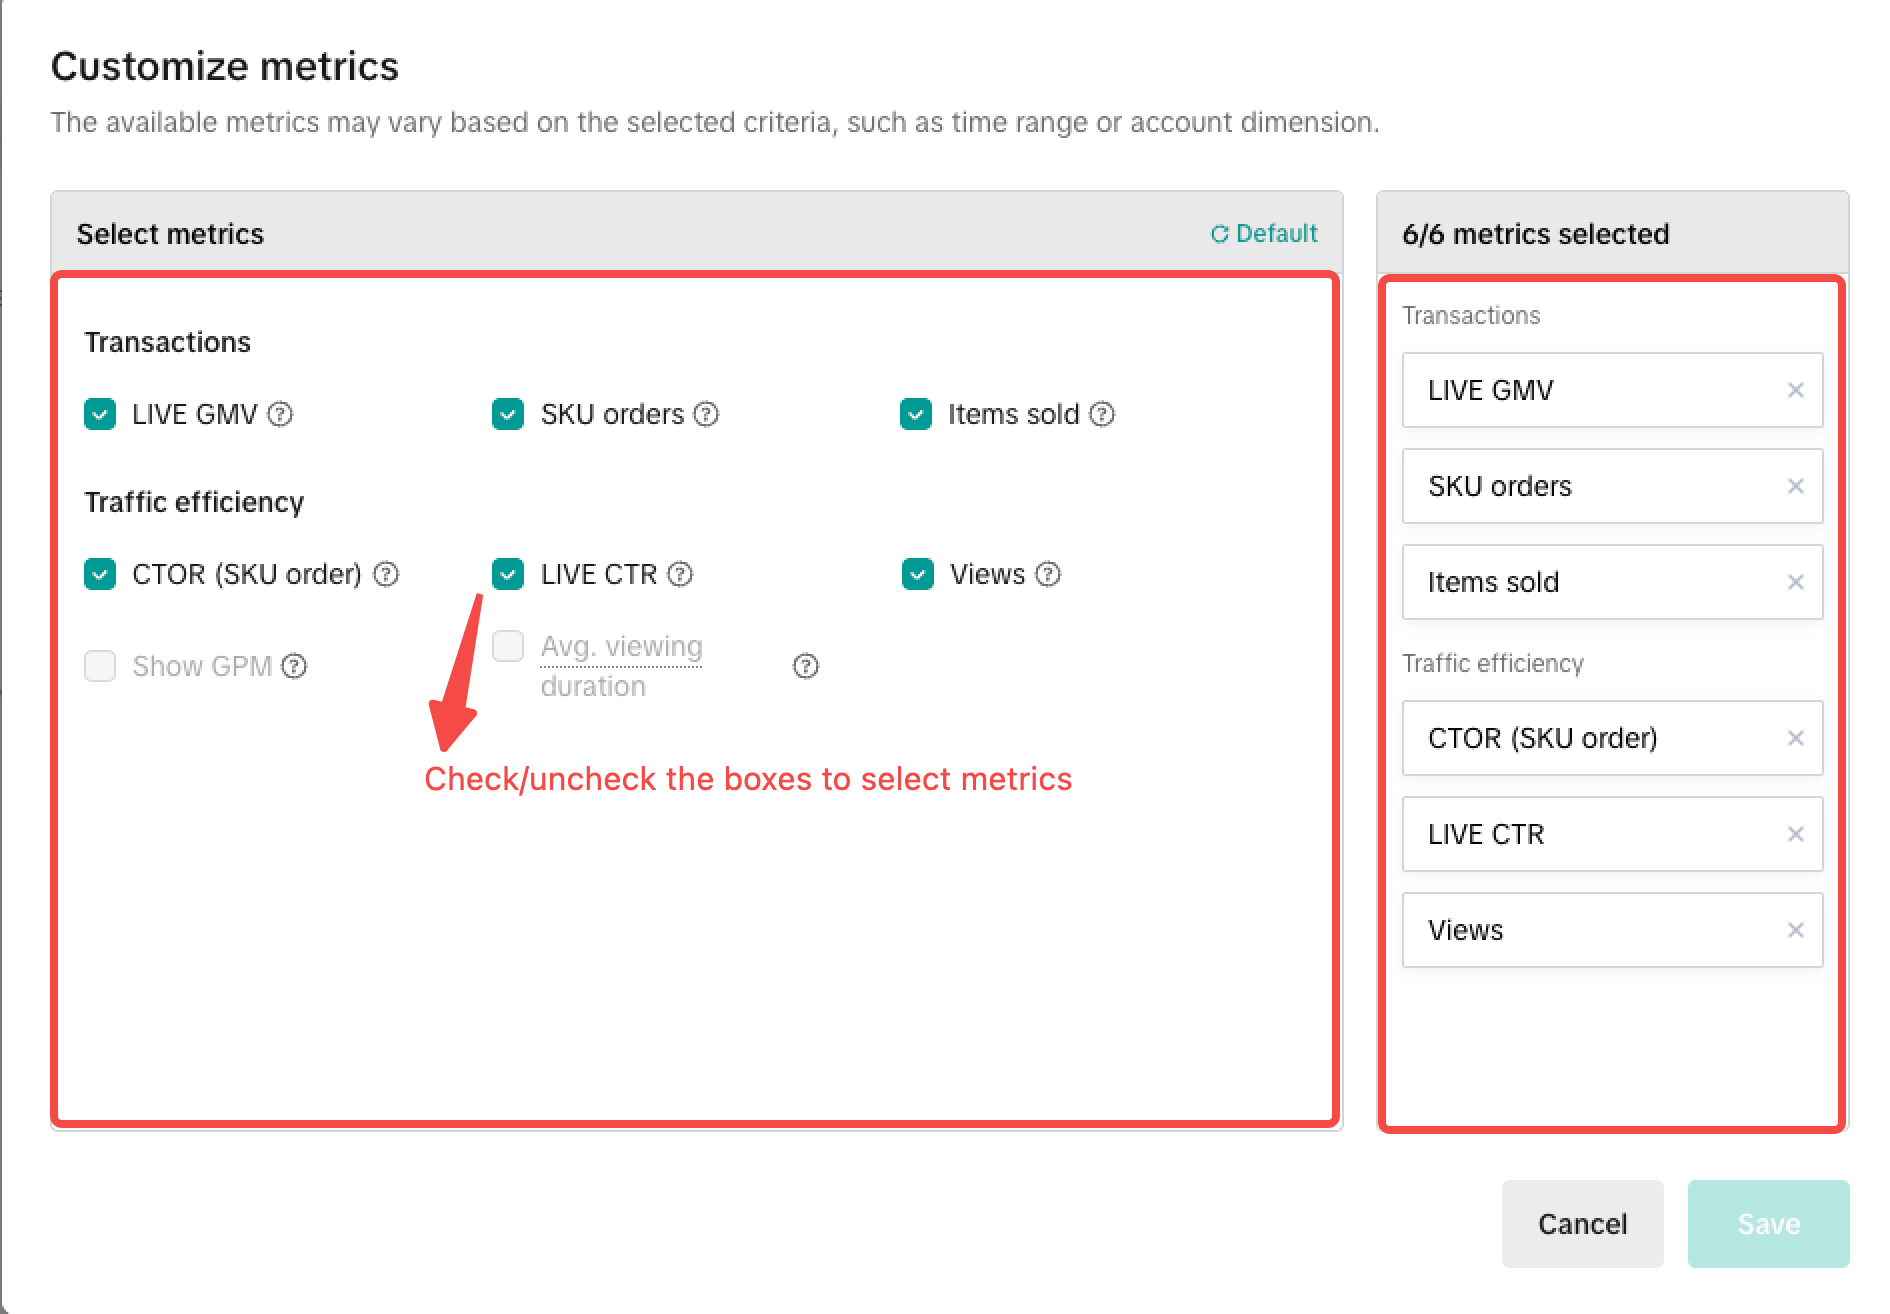
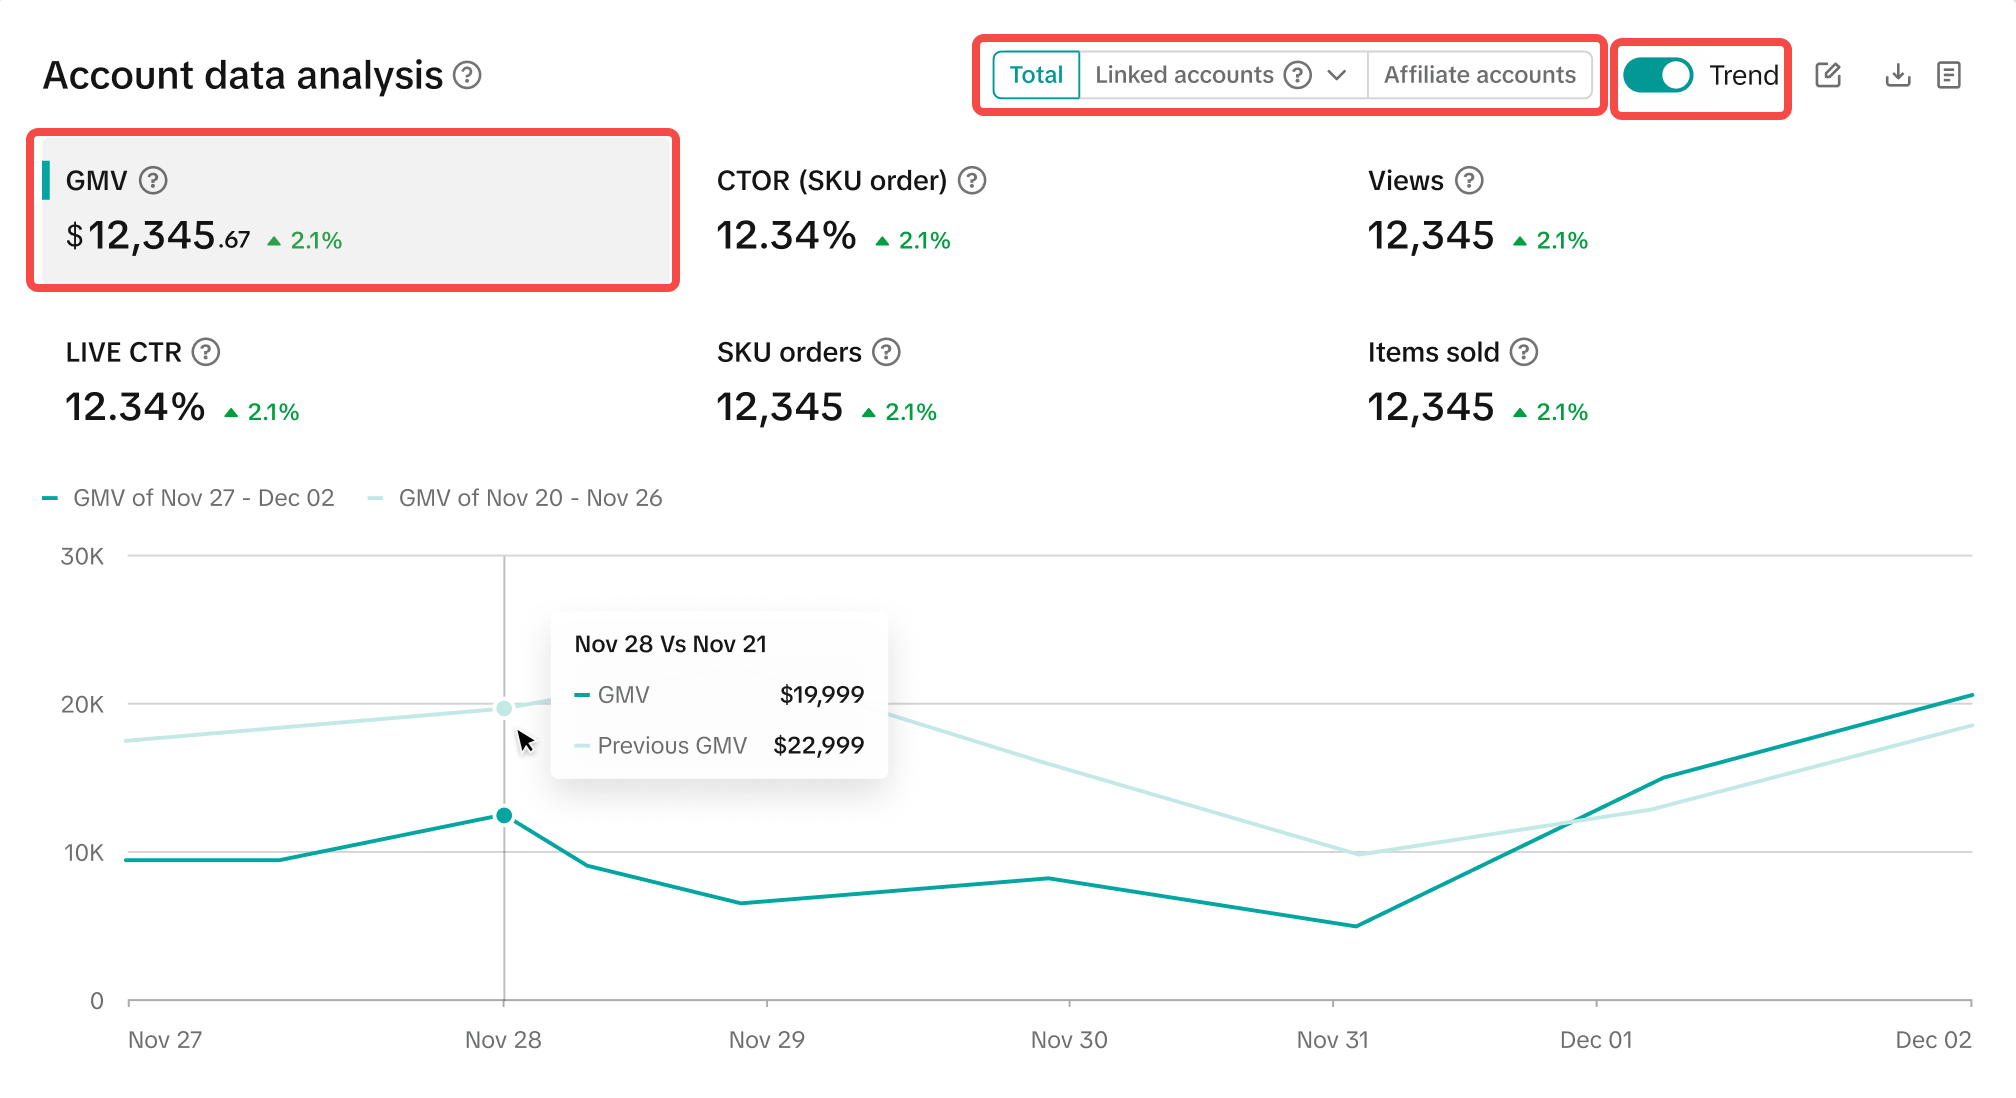
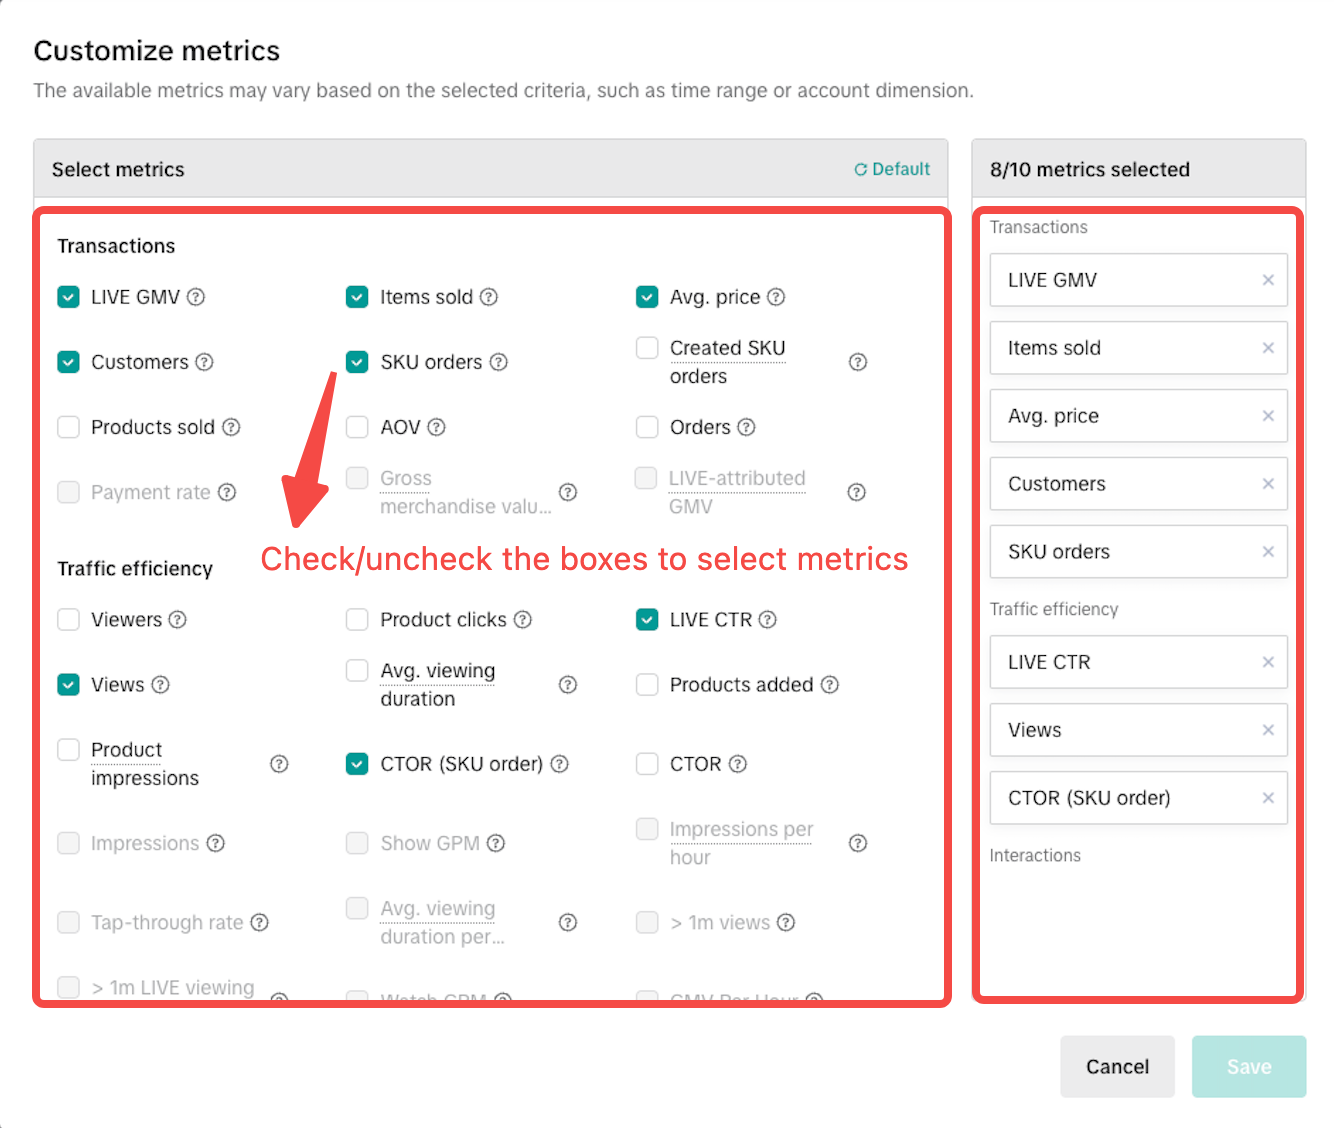
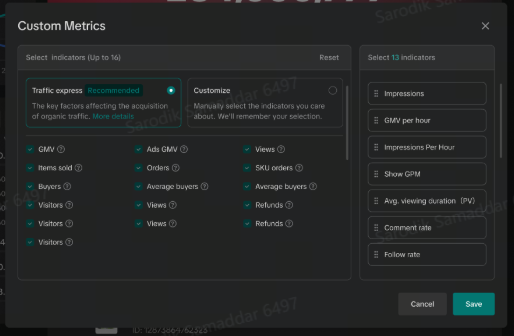
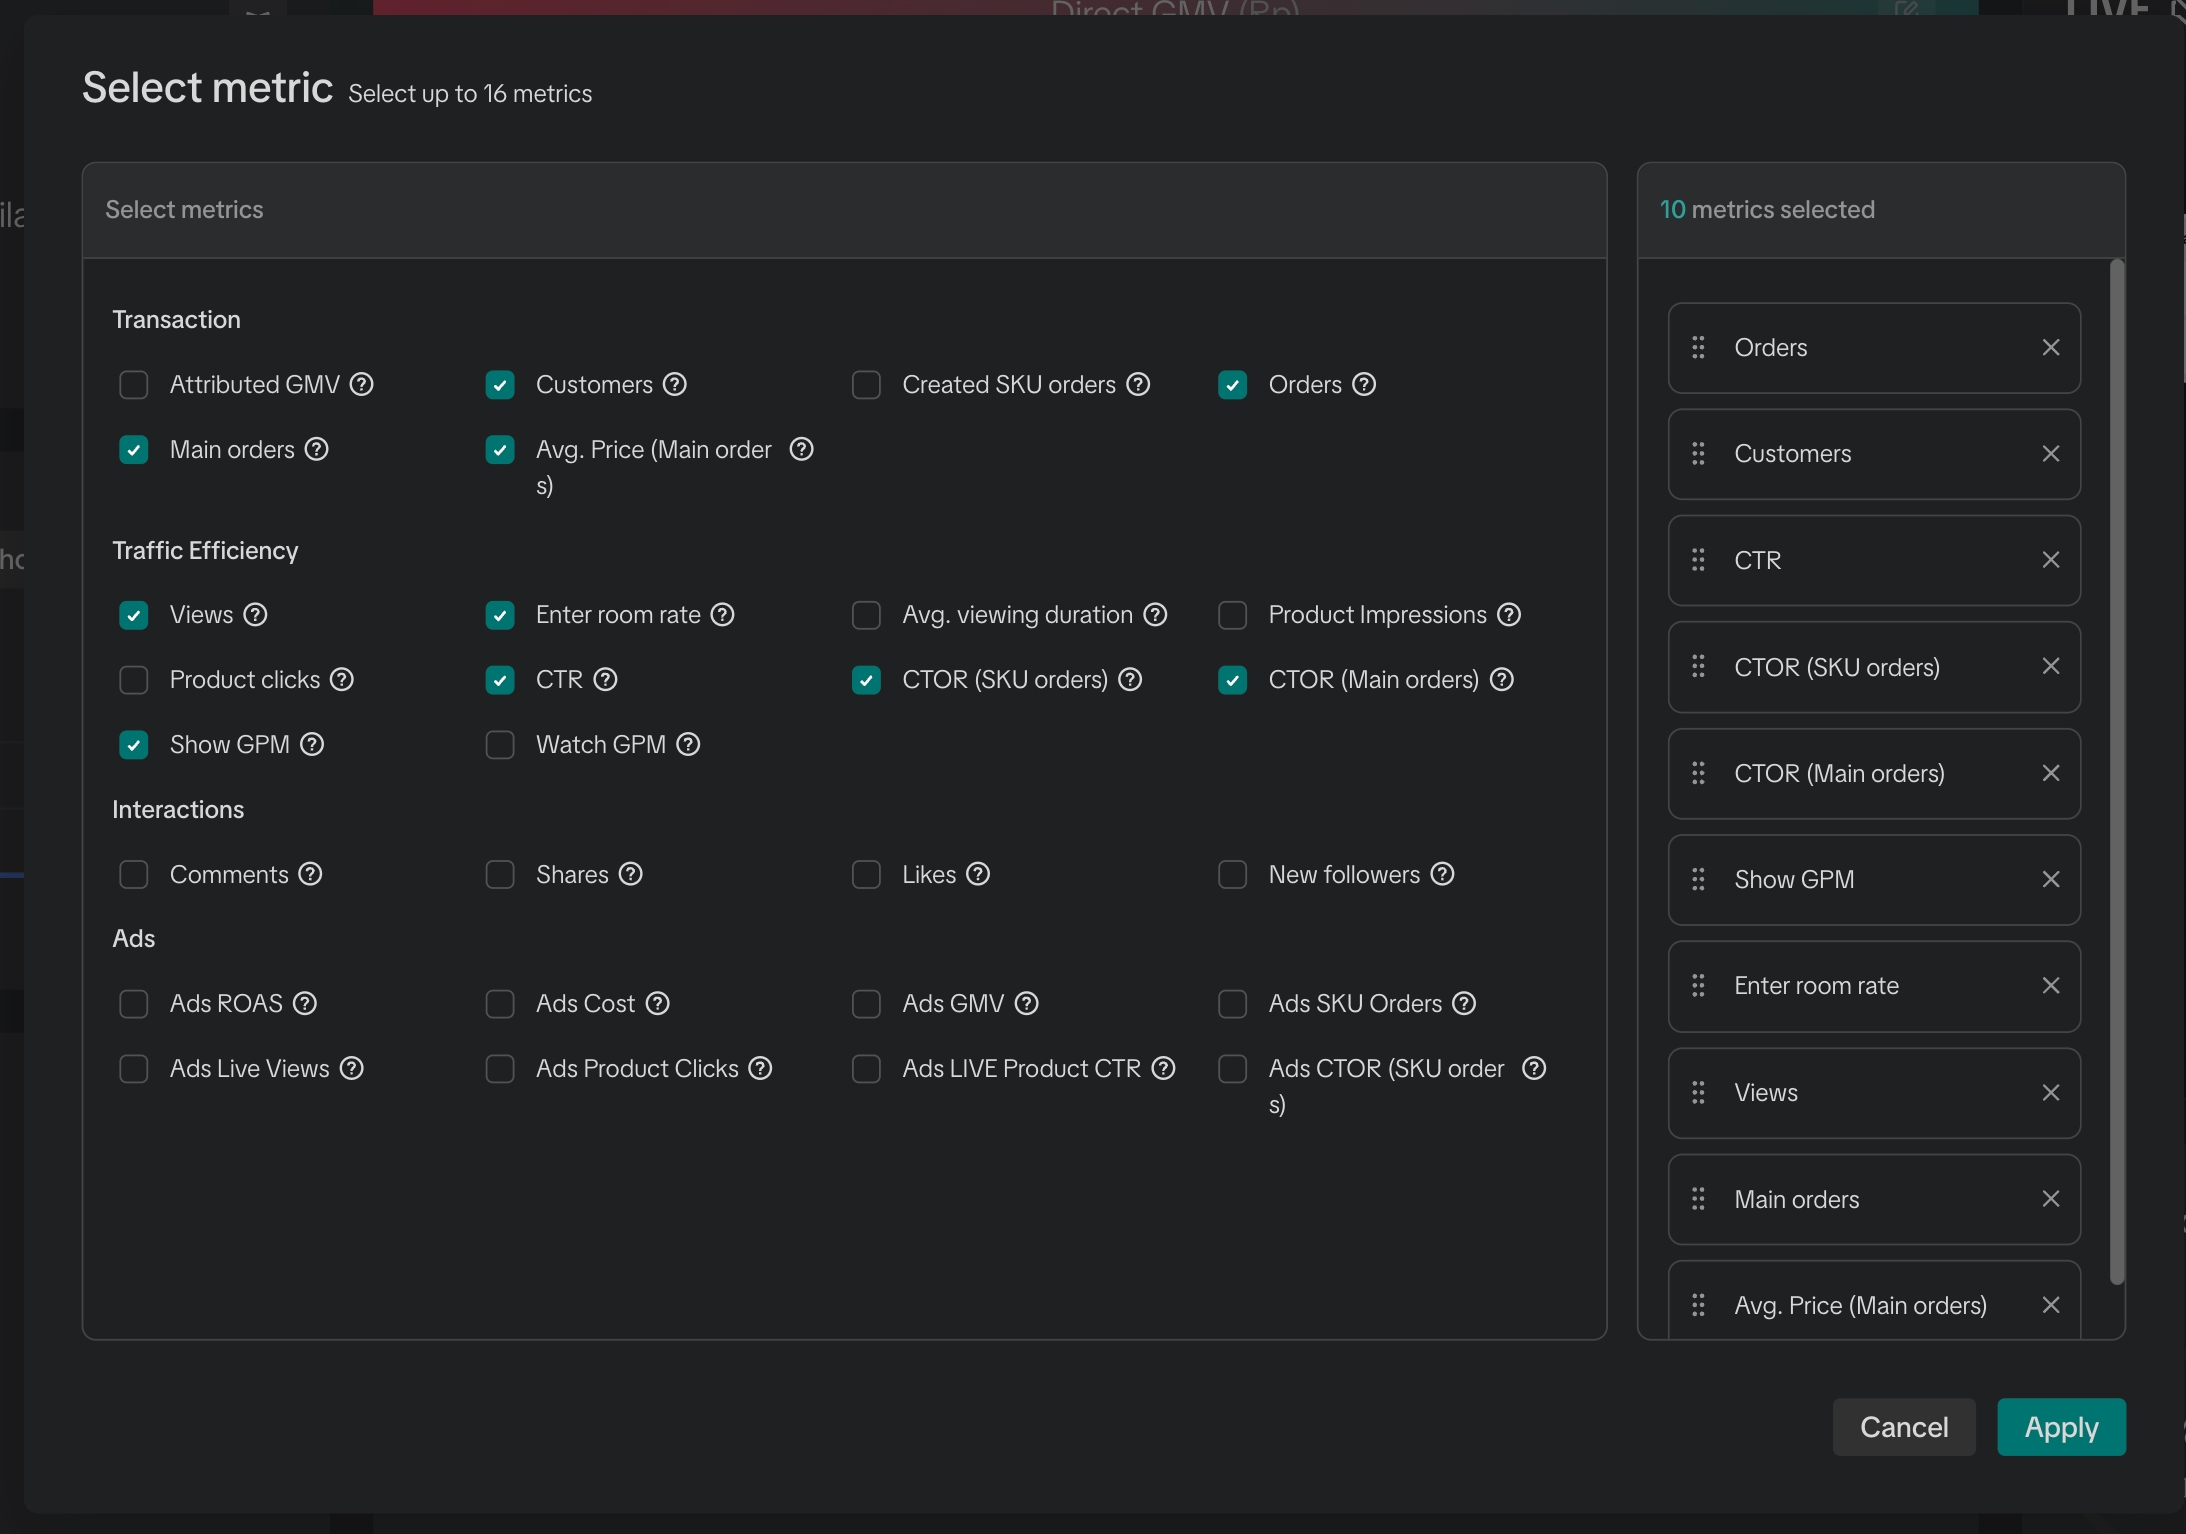
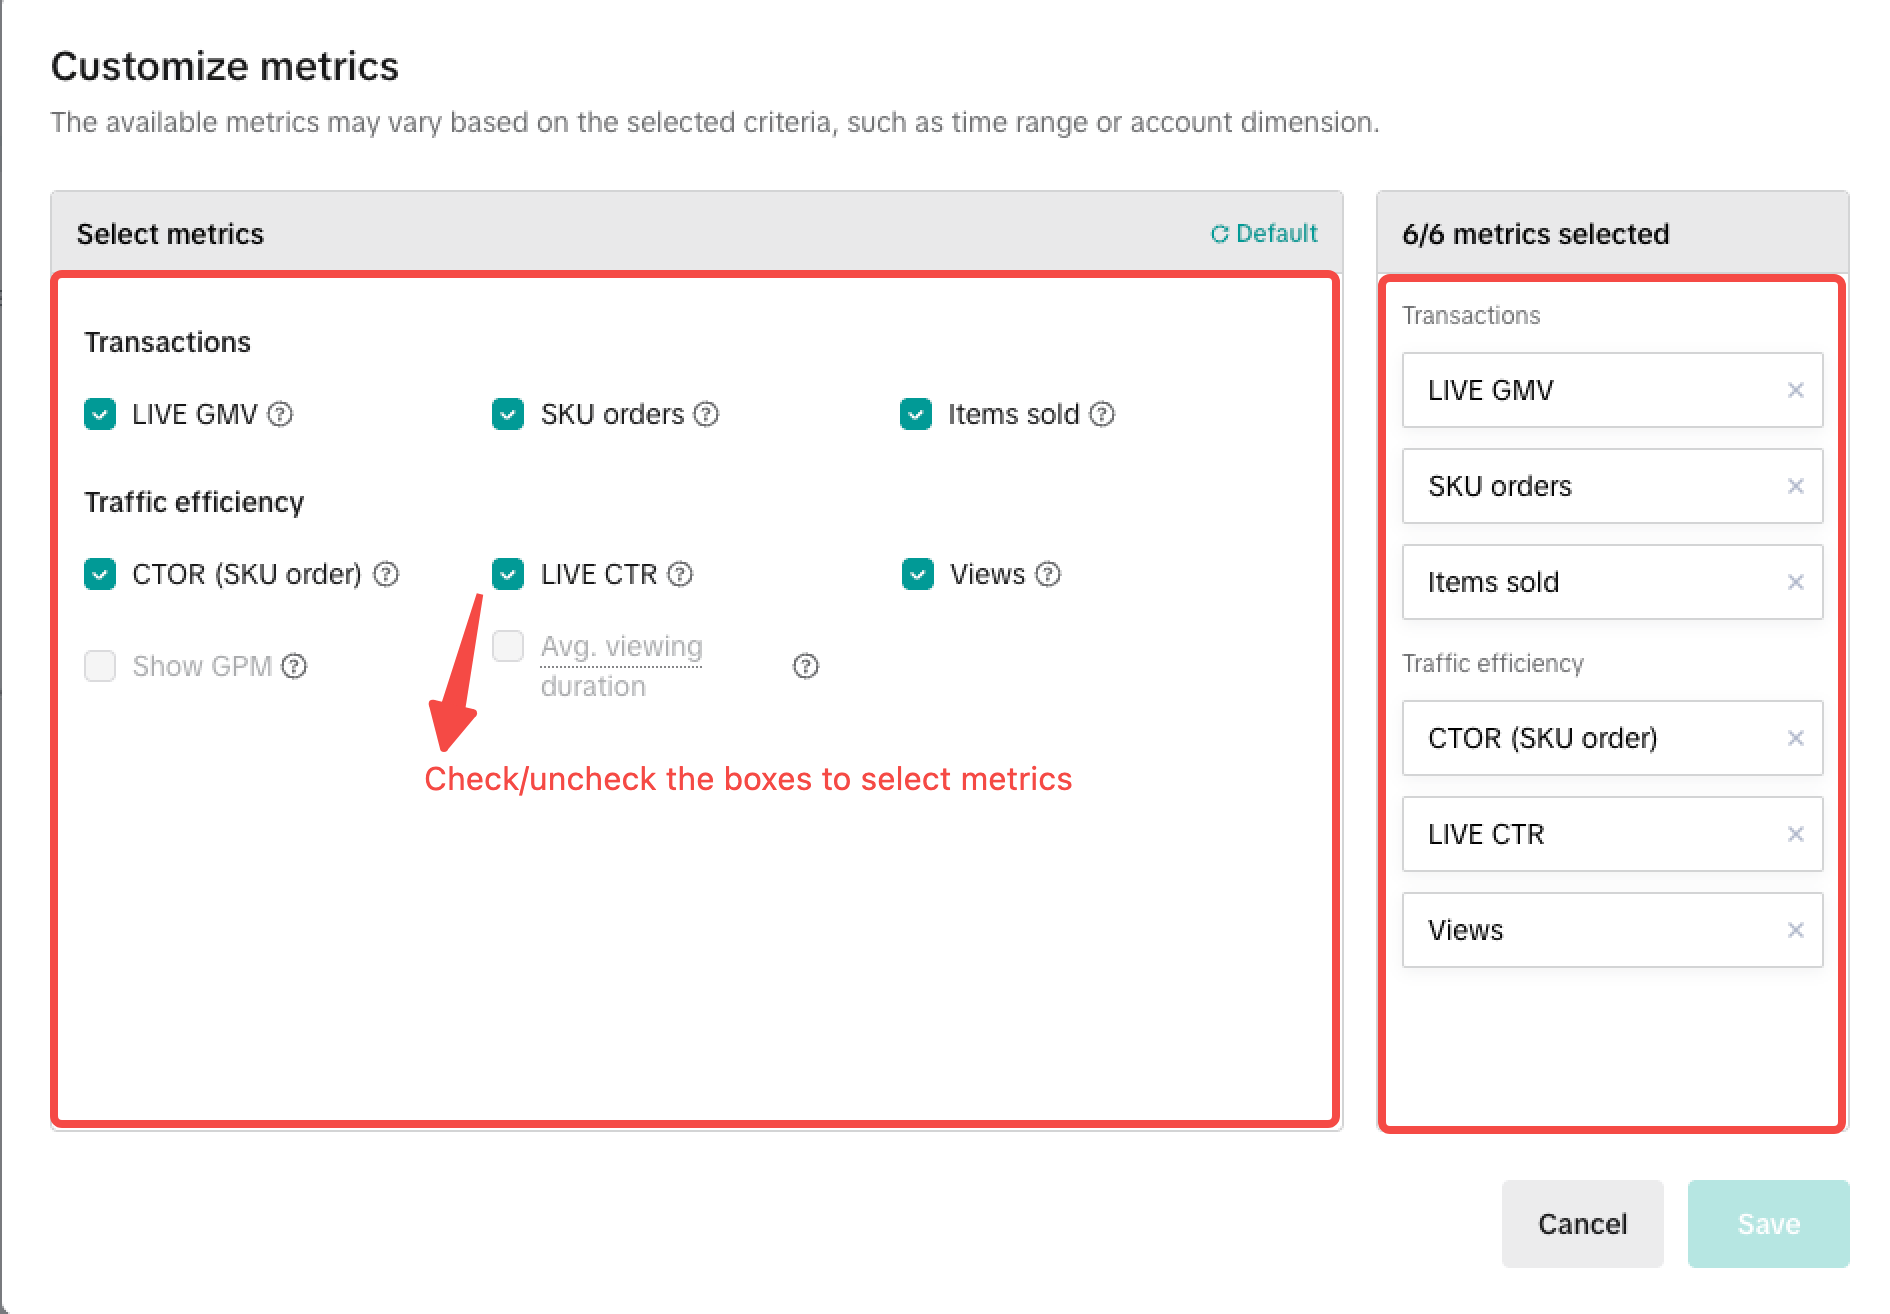
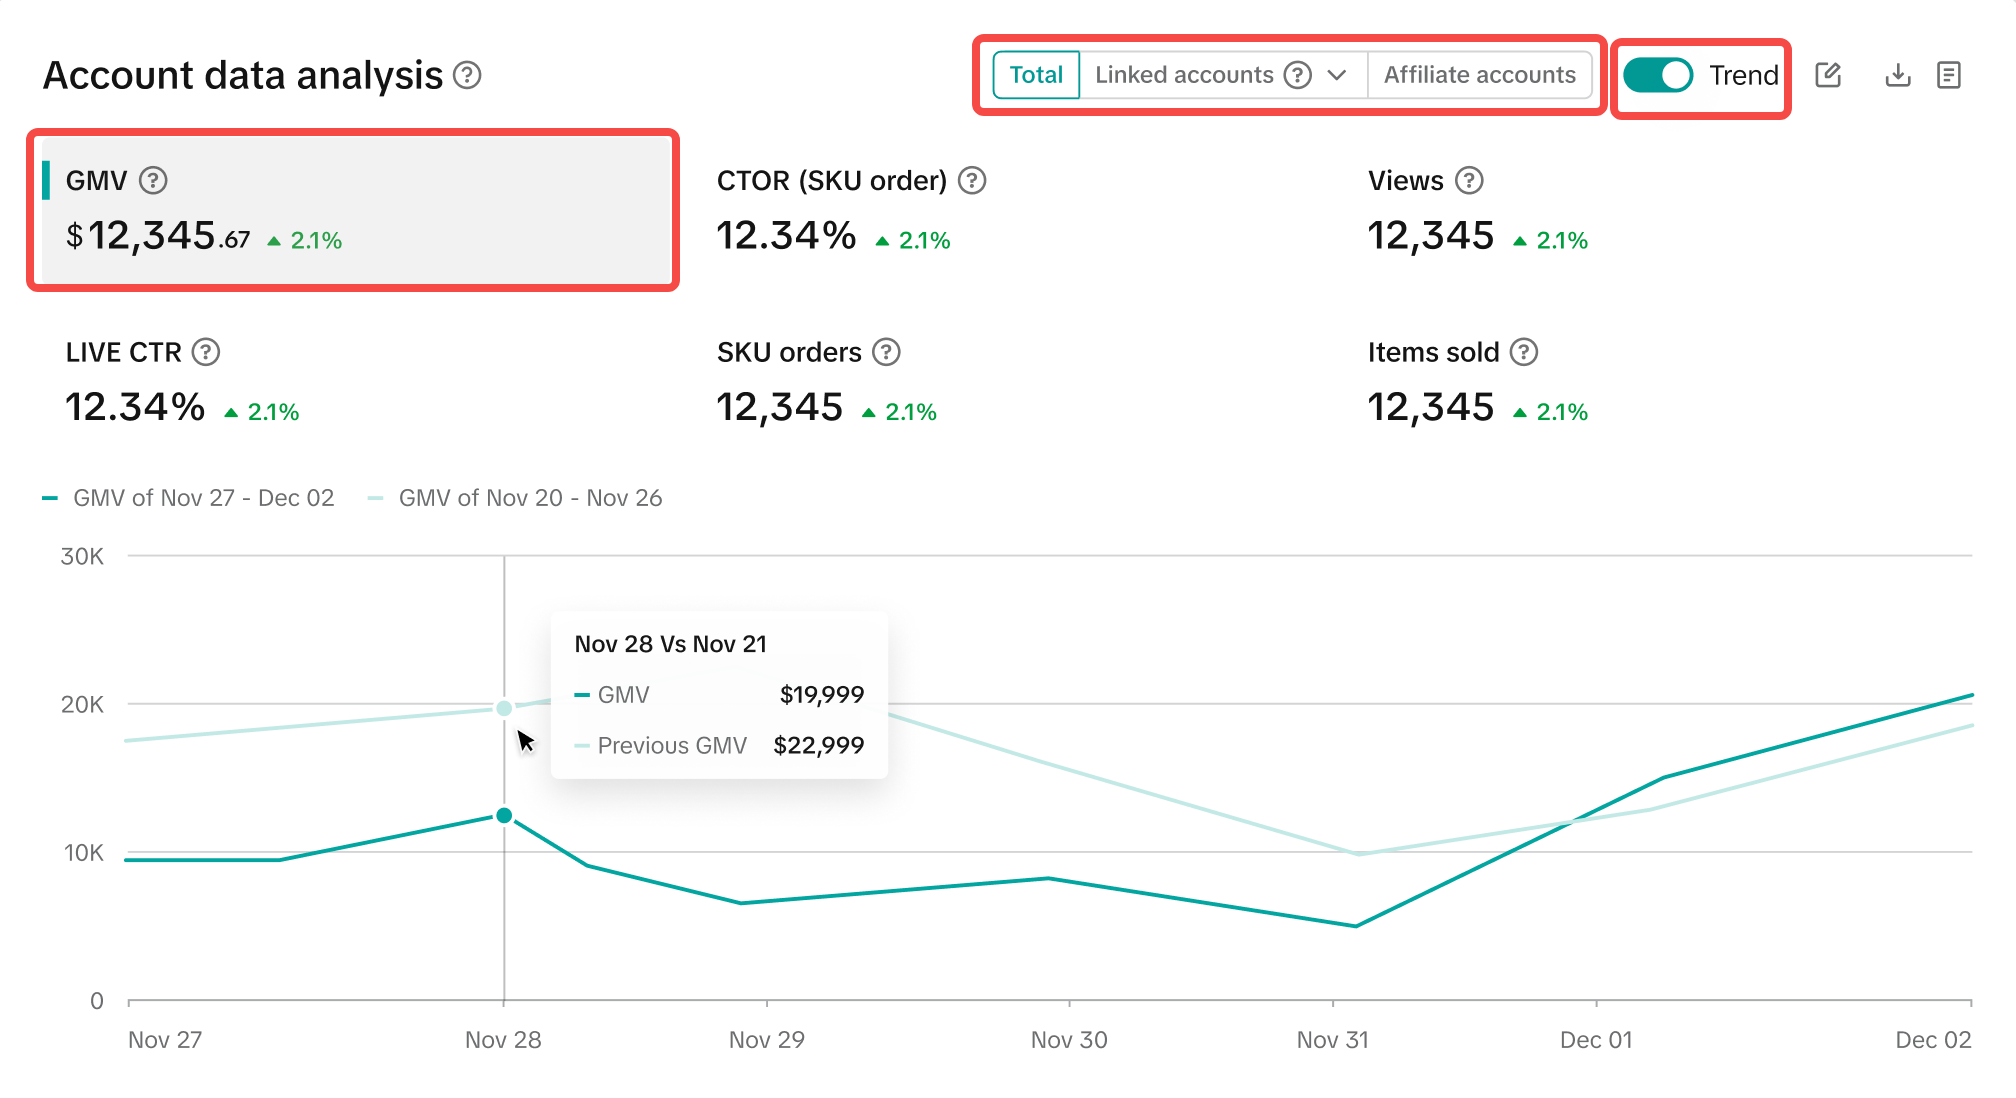
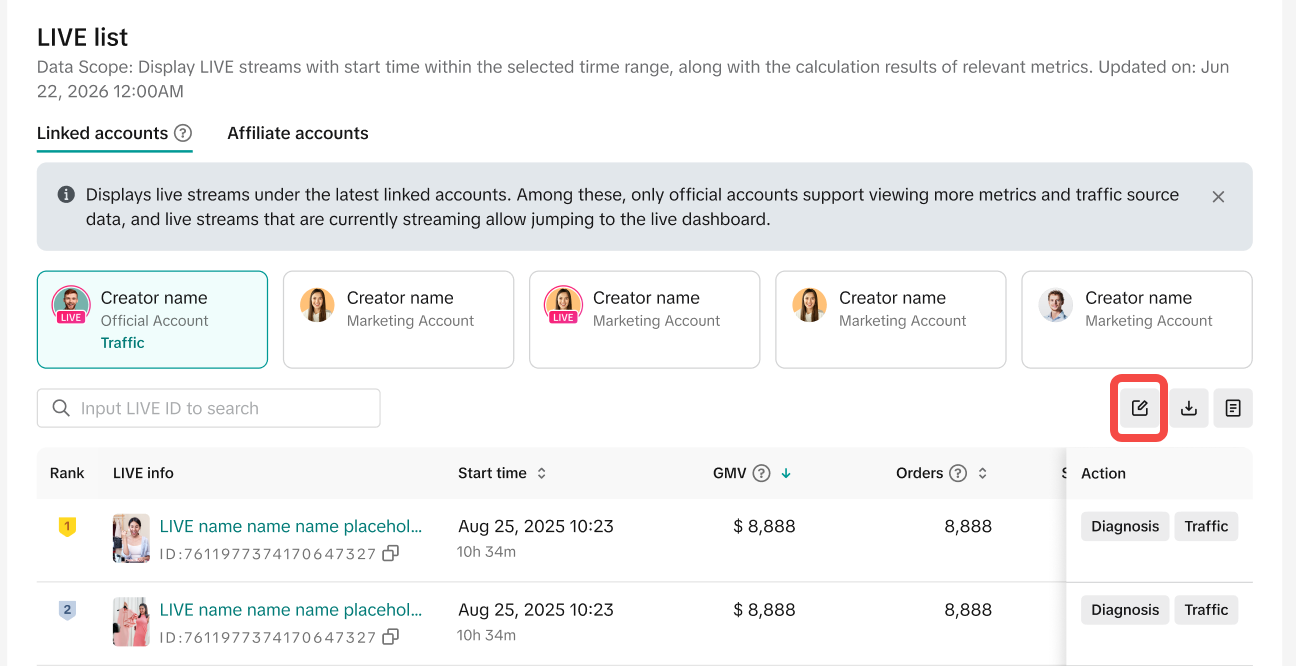
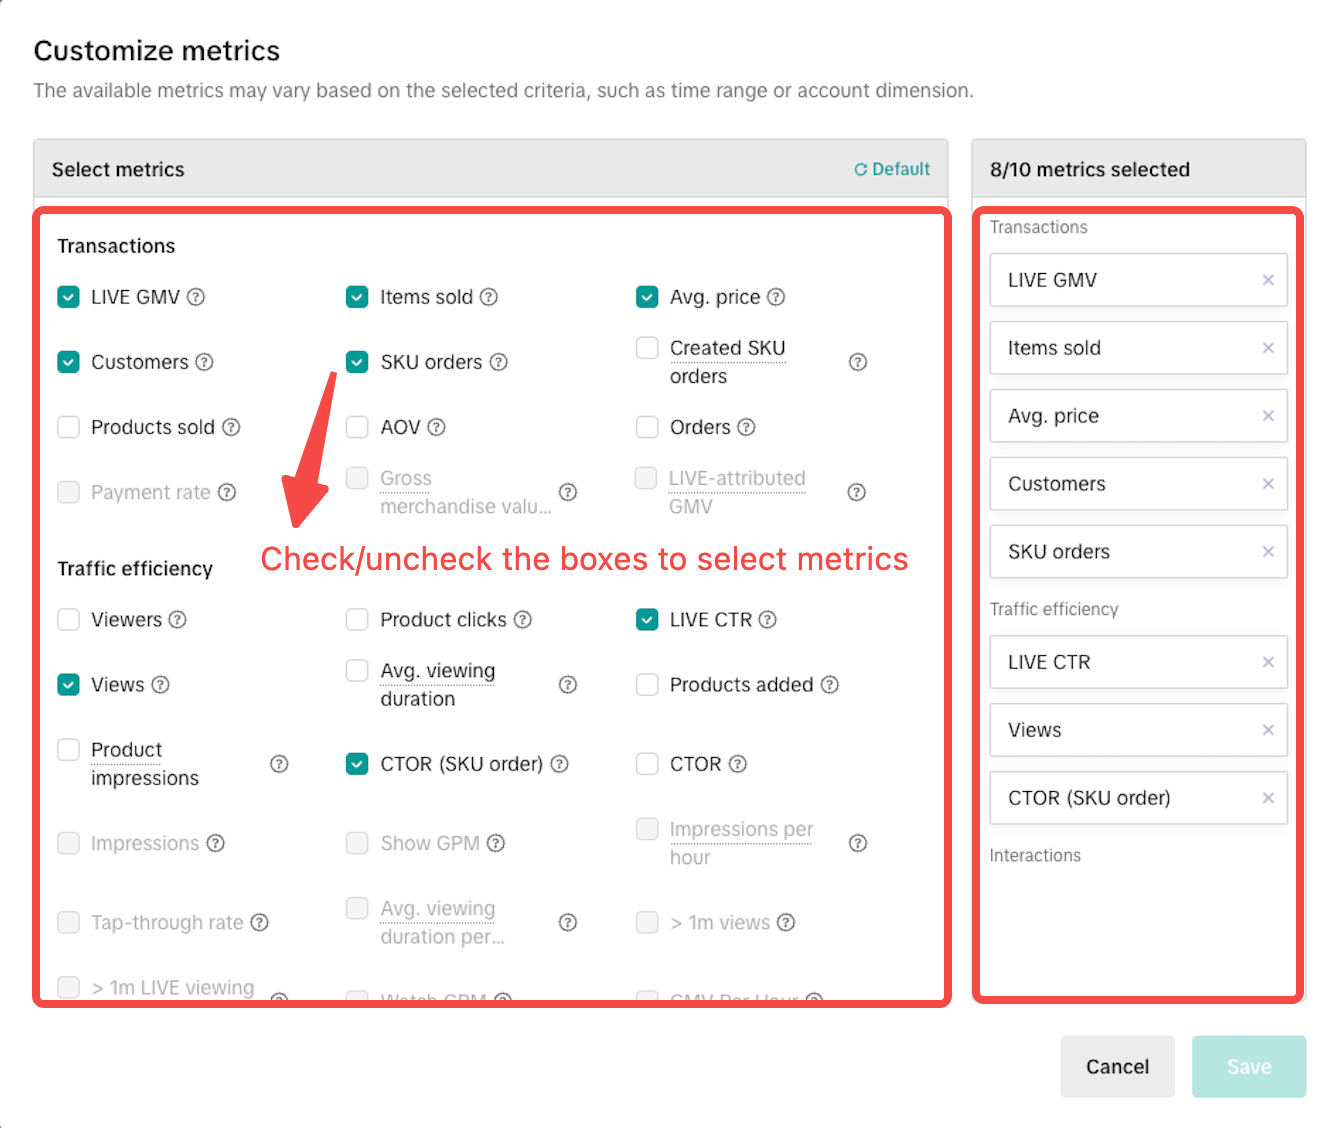
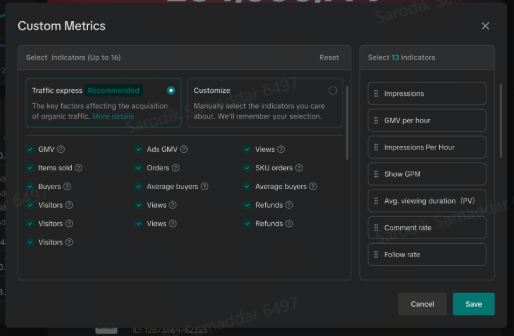
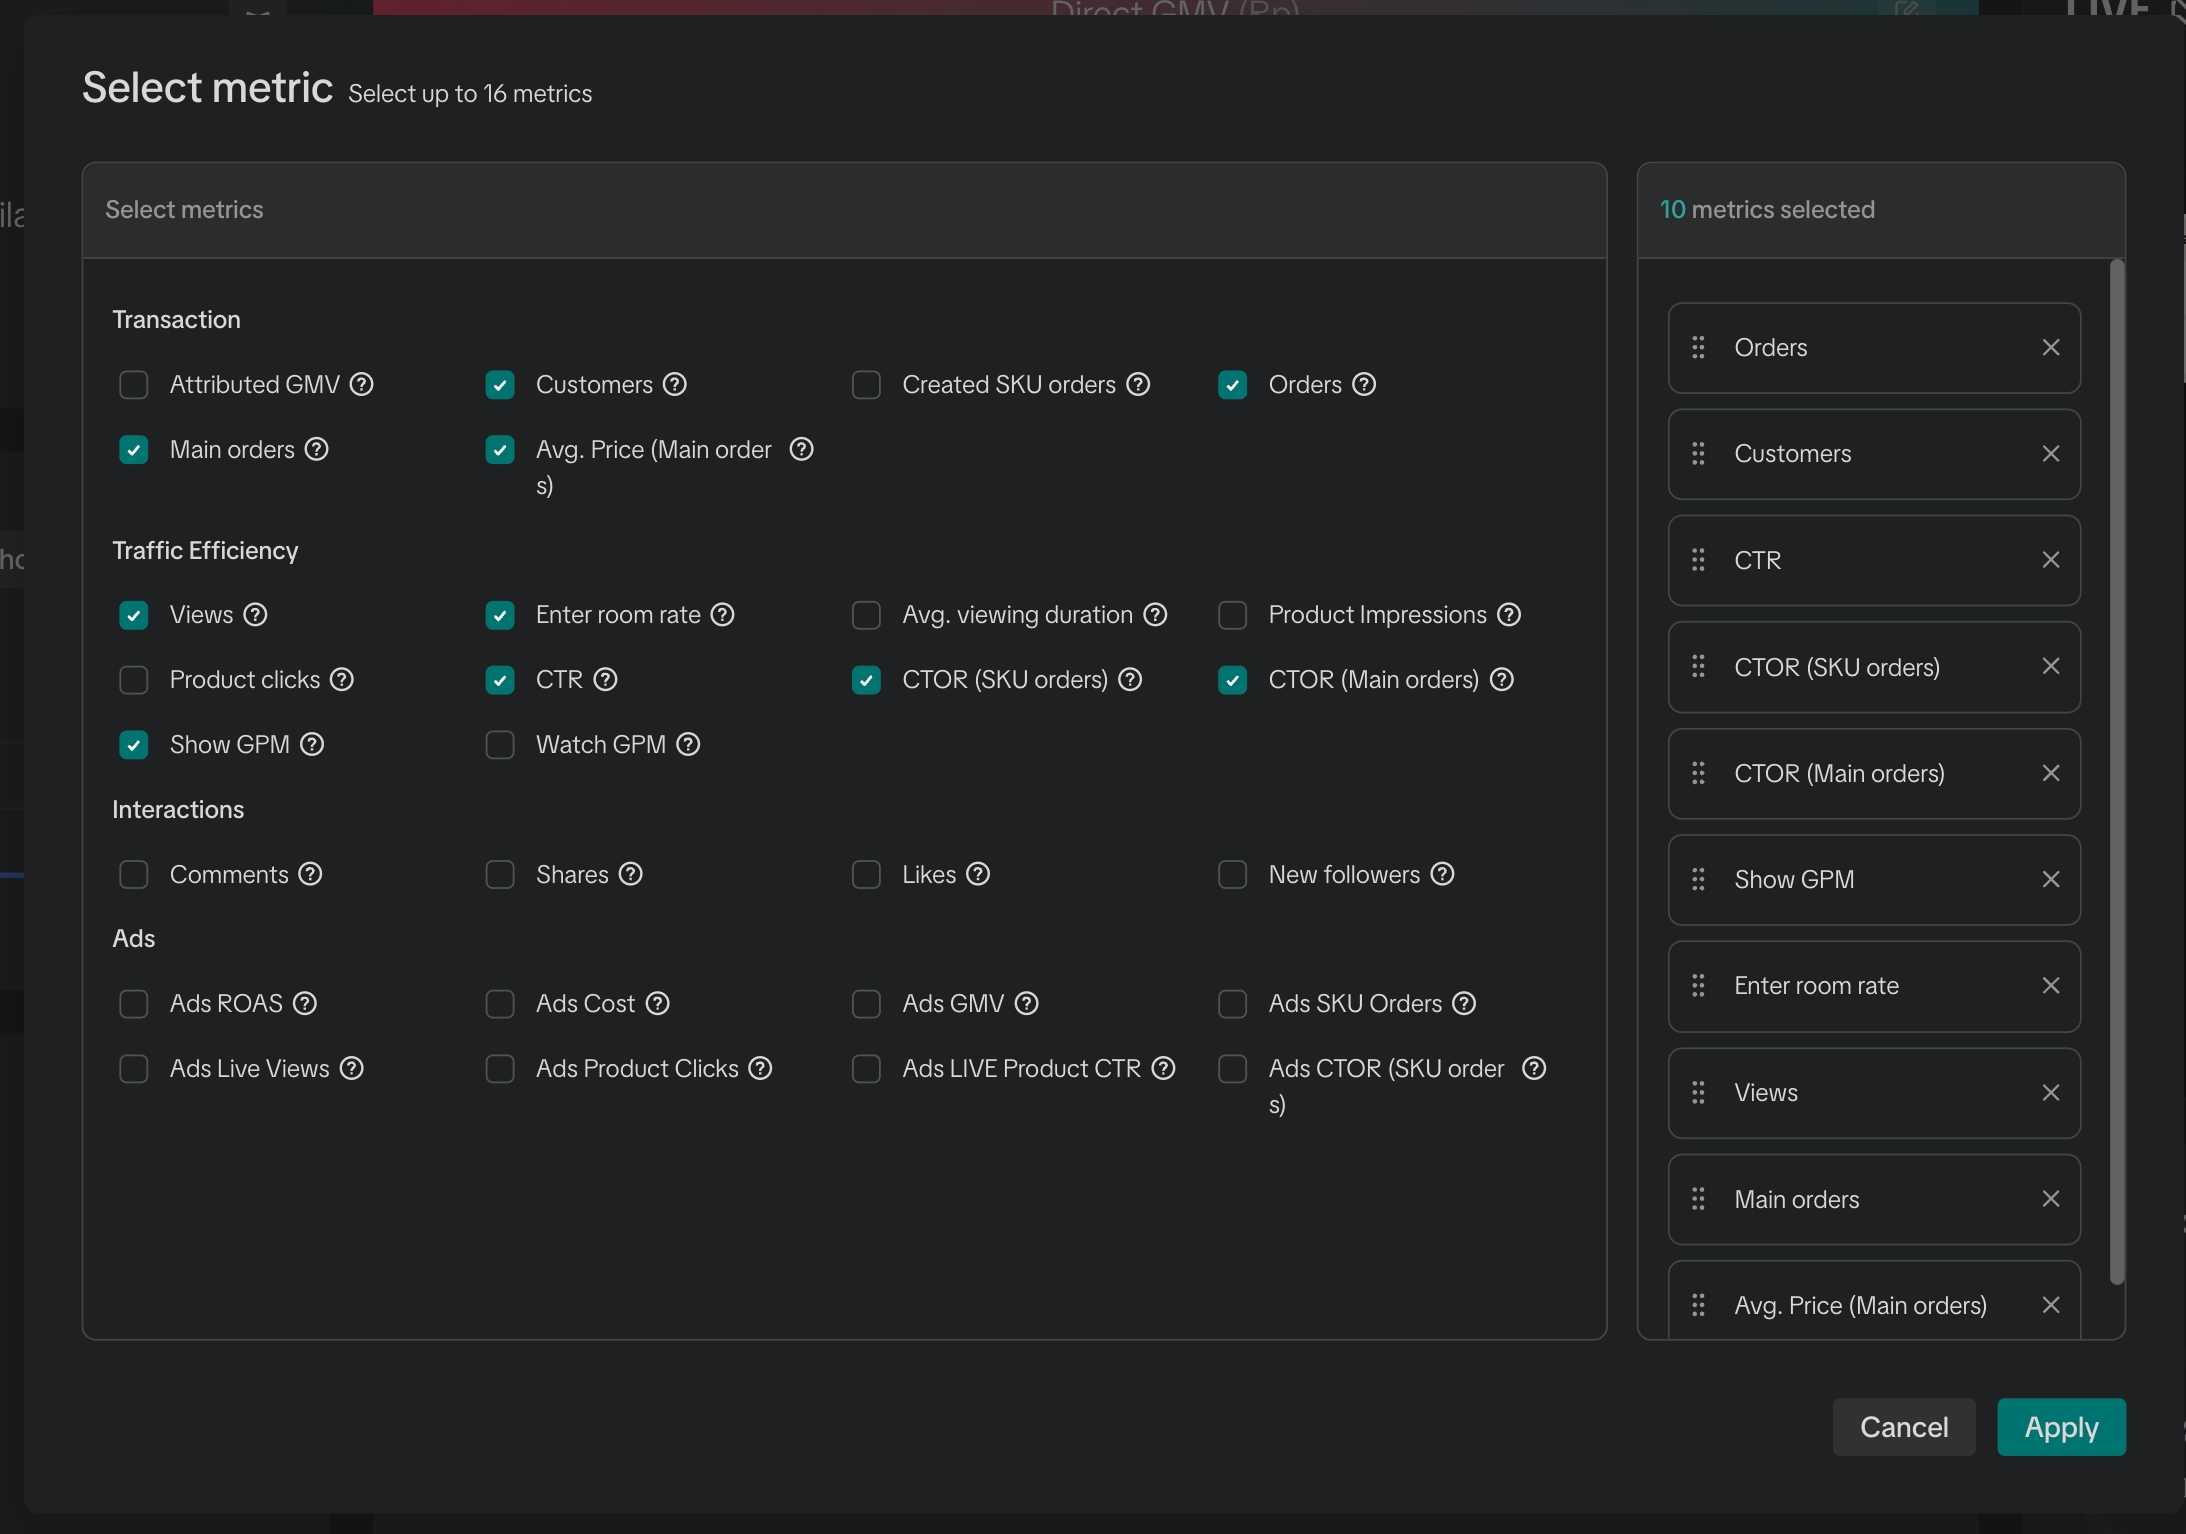
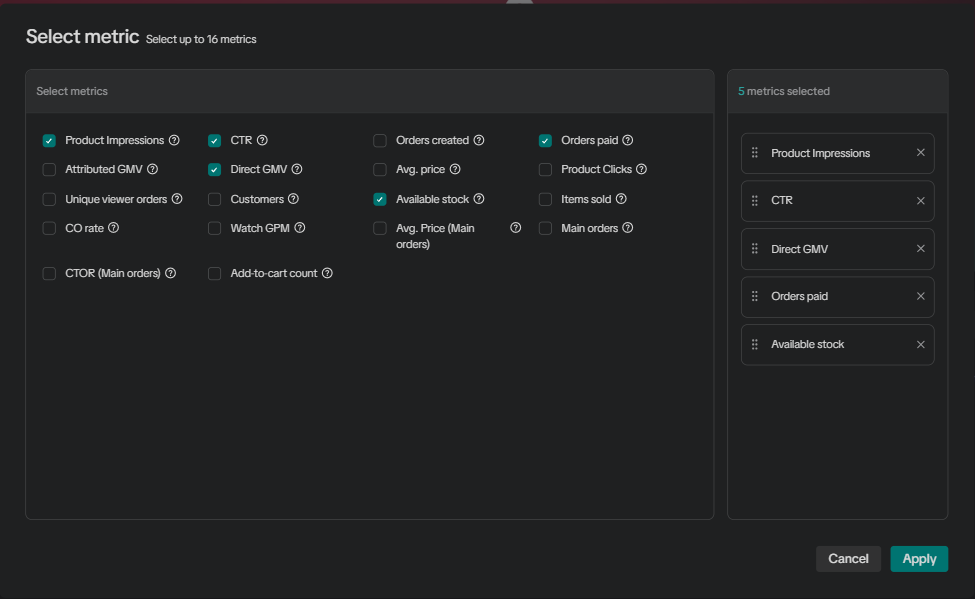
Step 3: Customize your key metrics Select the edit icon in the Account data analysis section. Choose the metrics most relevant to your LIVE goals, remove metrics you don't need, and select Save. You can also select a metric and turn on Trend to see how its performance changes over time or across accounts.
Desktop
Step 4
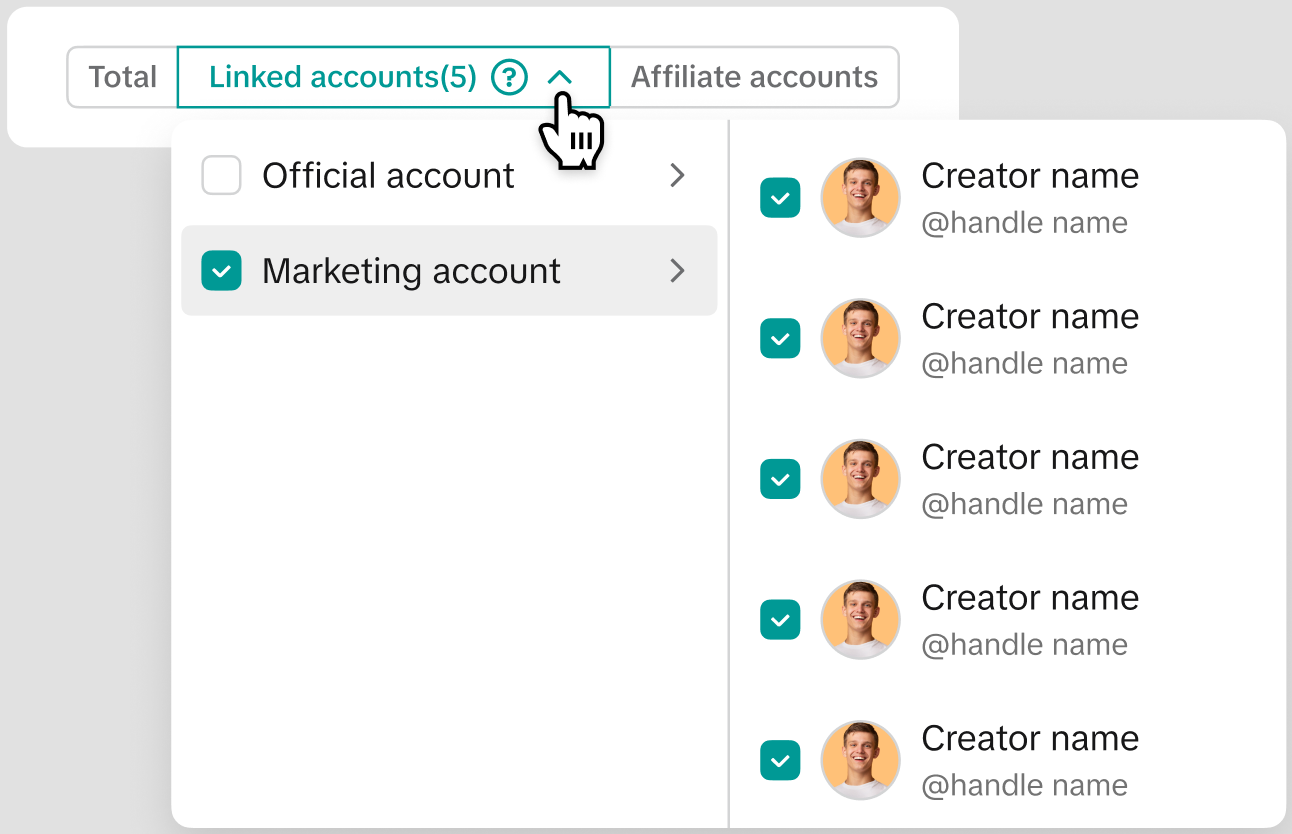
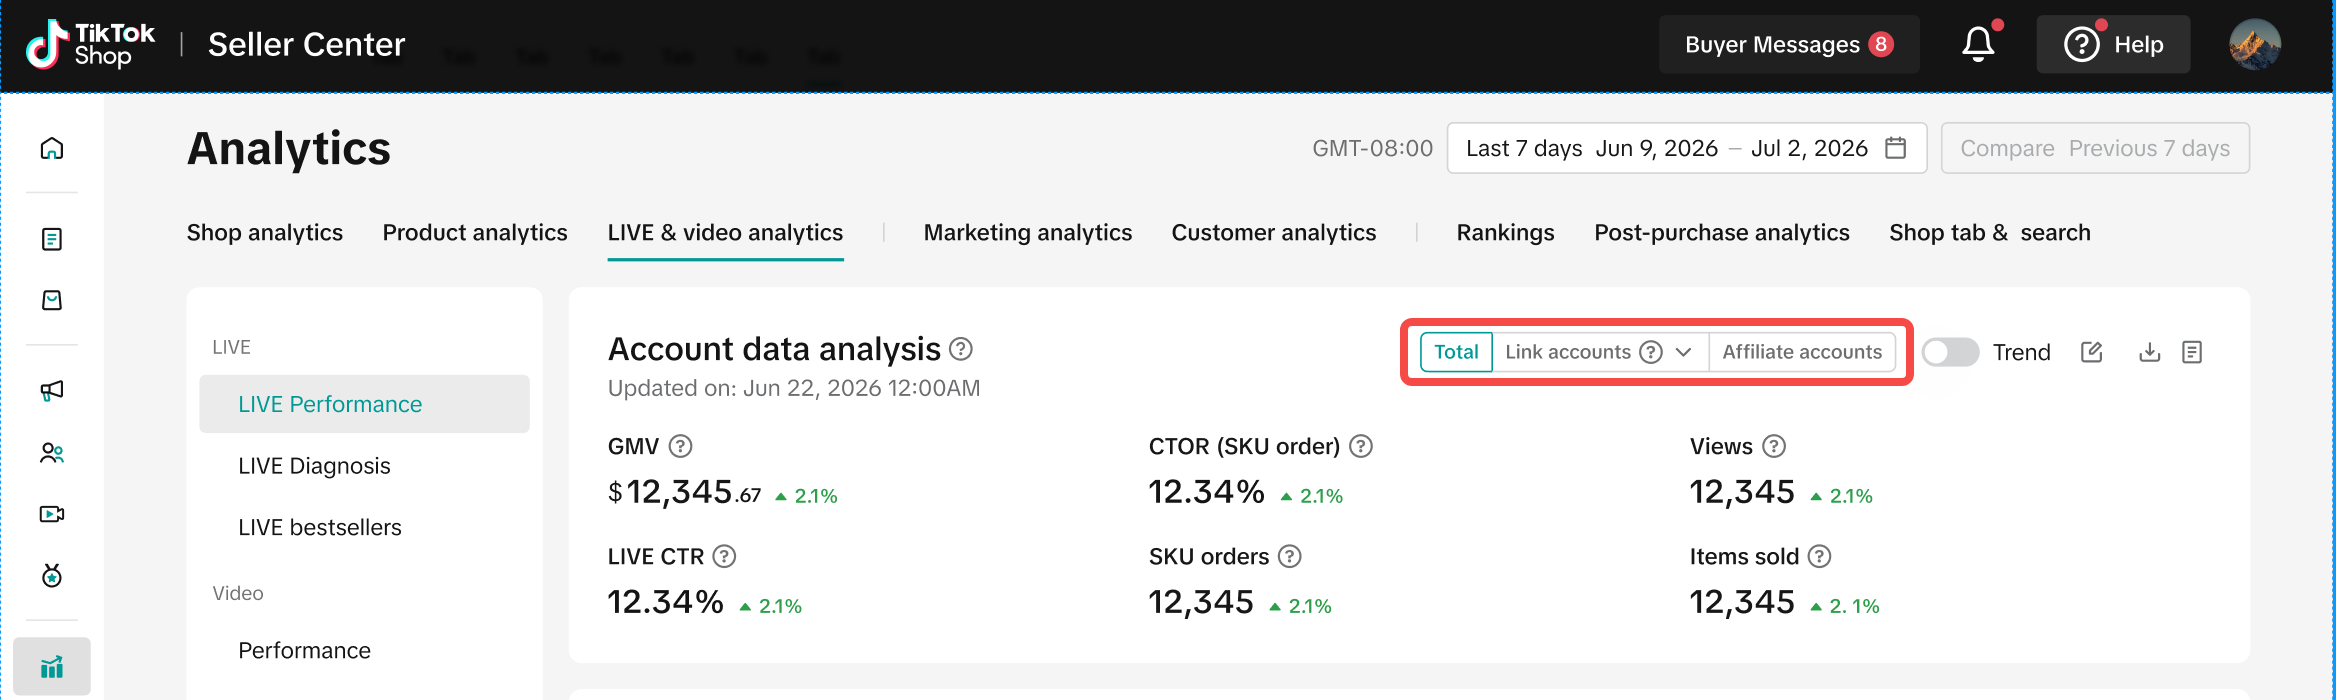
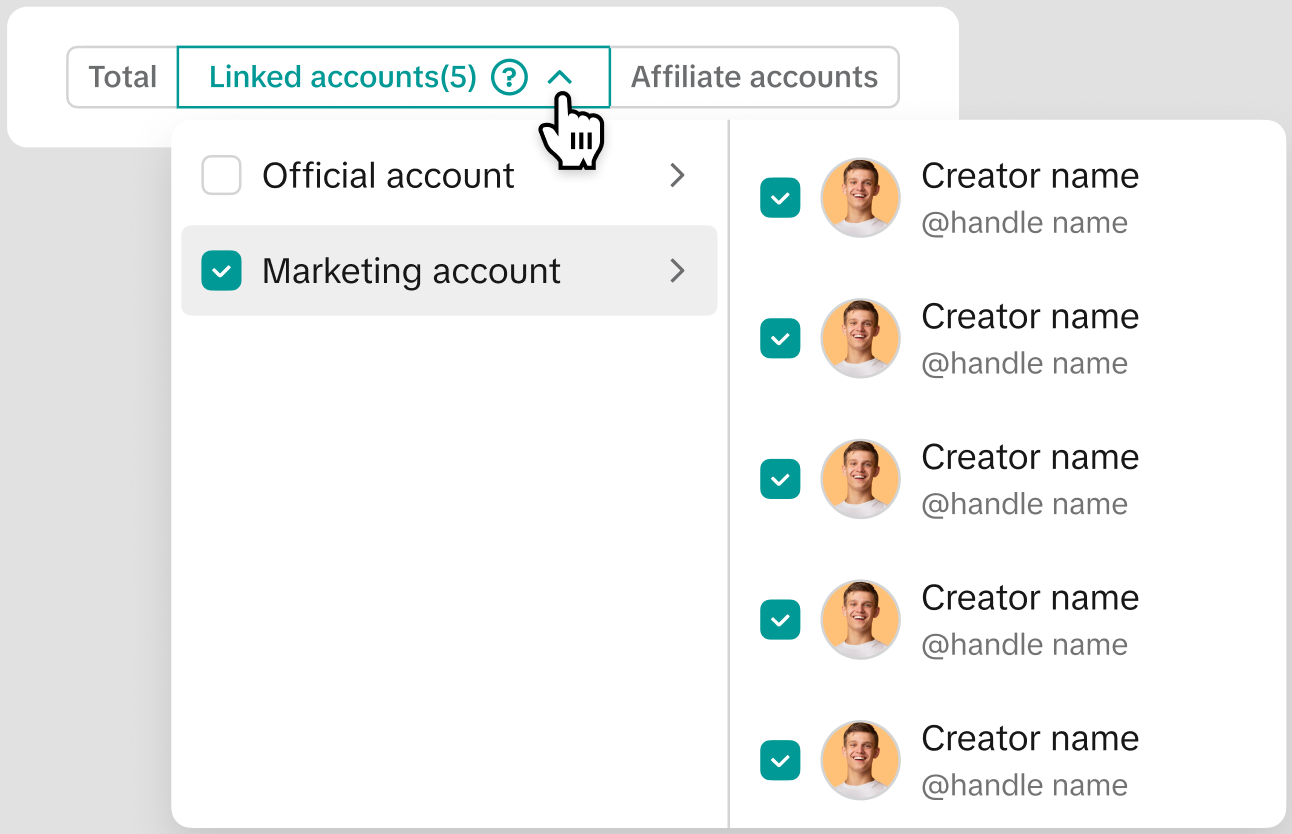
Step 4: Choose the accounts you want to analyze Switch between:
Total: View aggregated LIVE performance.
Linked Accounts: Review Official and Marketing Account performance.
Affiliate Accounts: Review LIVE performance generated by affiliate creators.
Desktop
Step 5
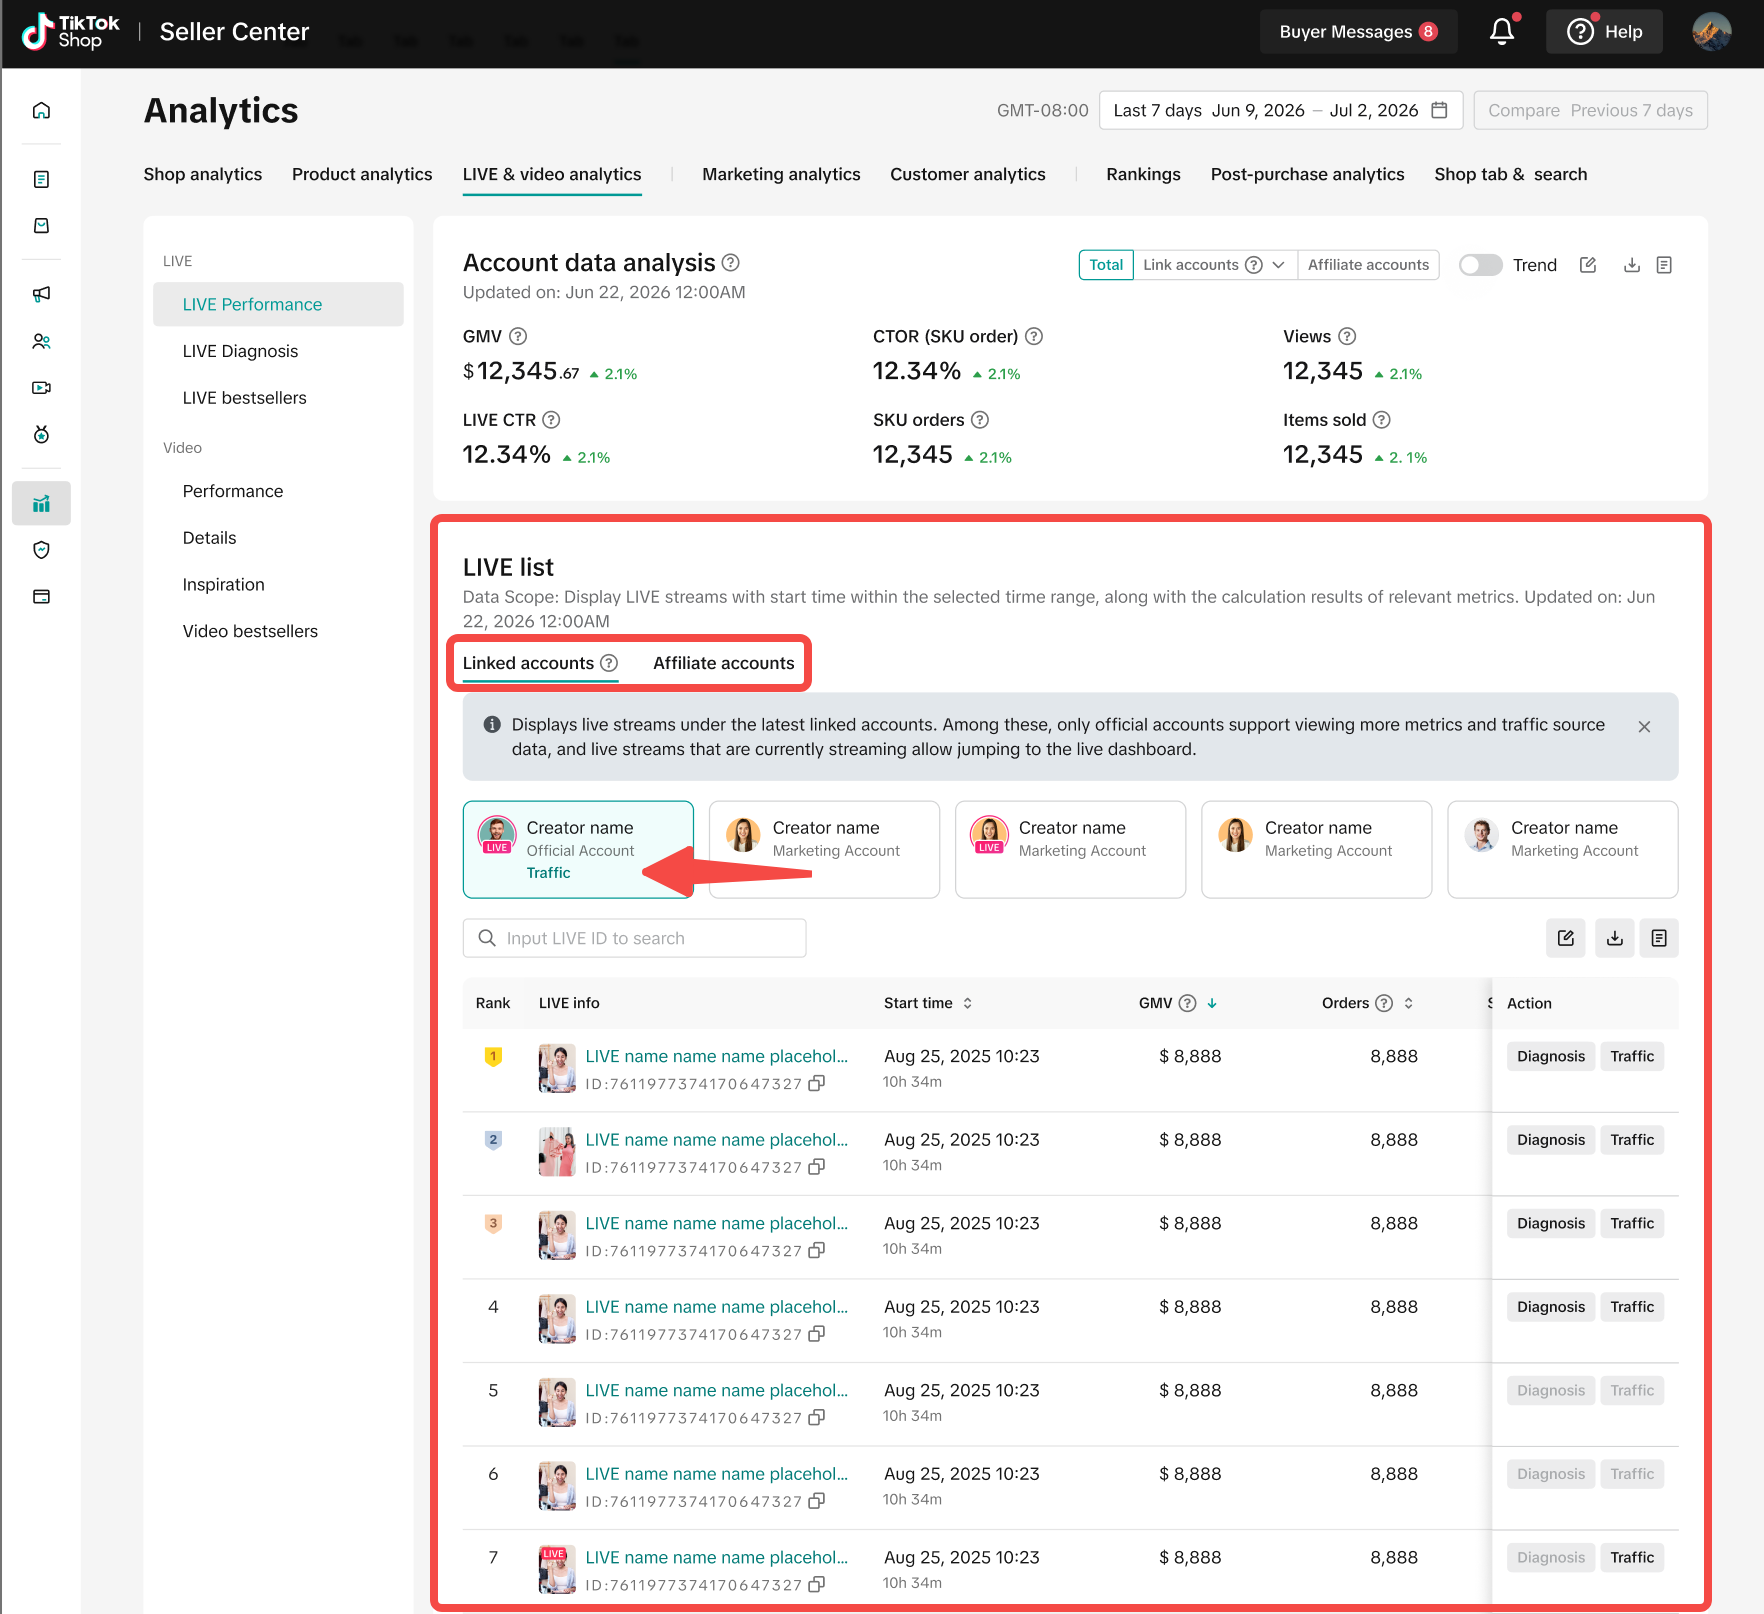
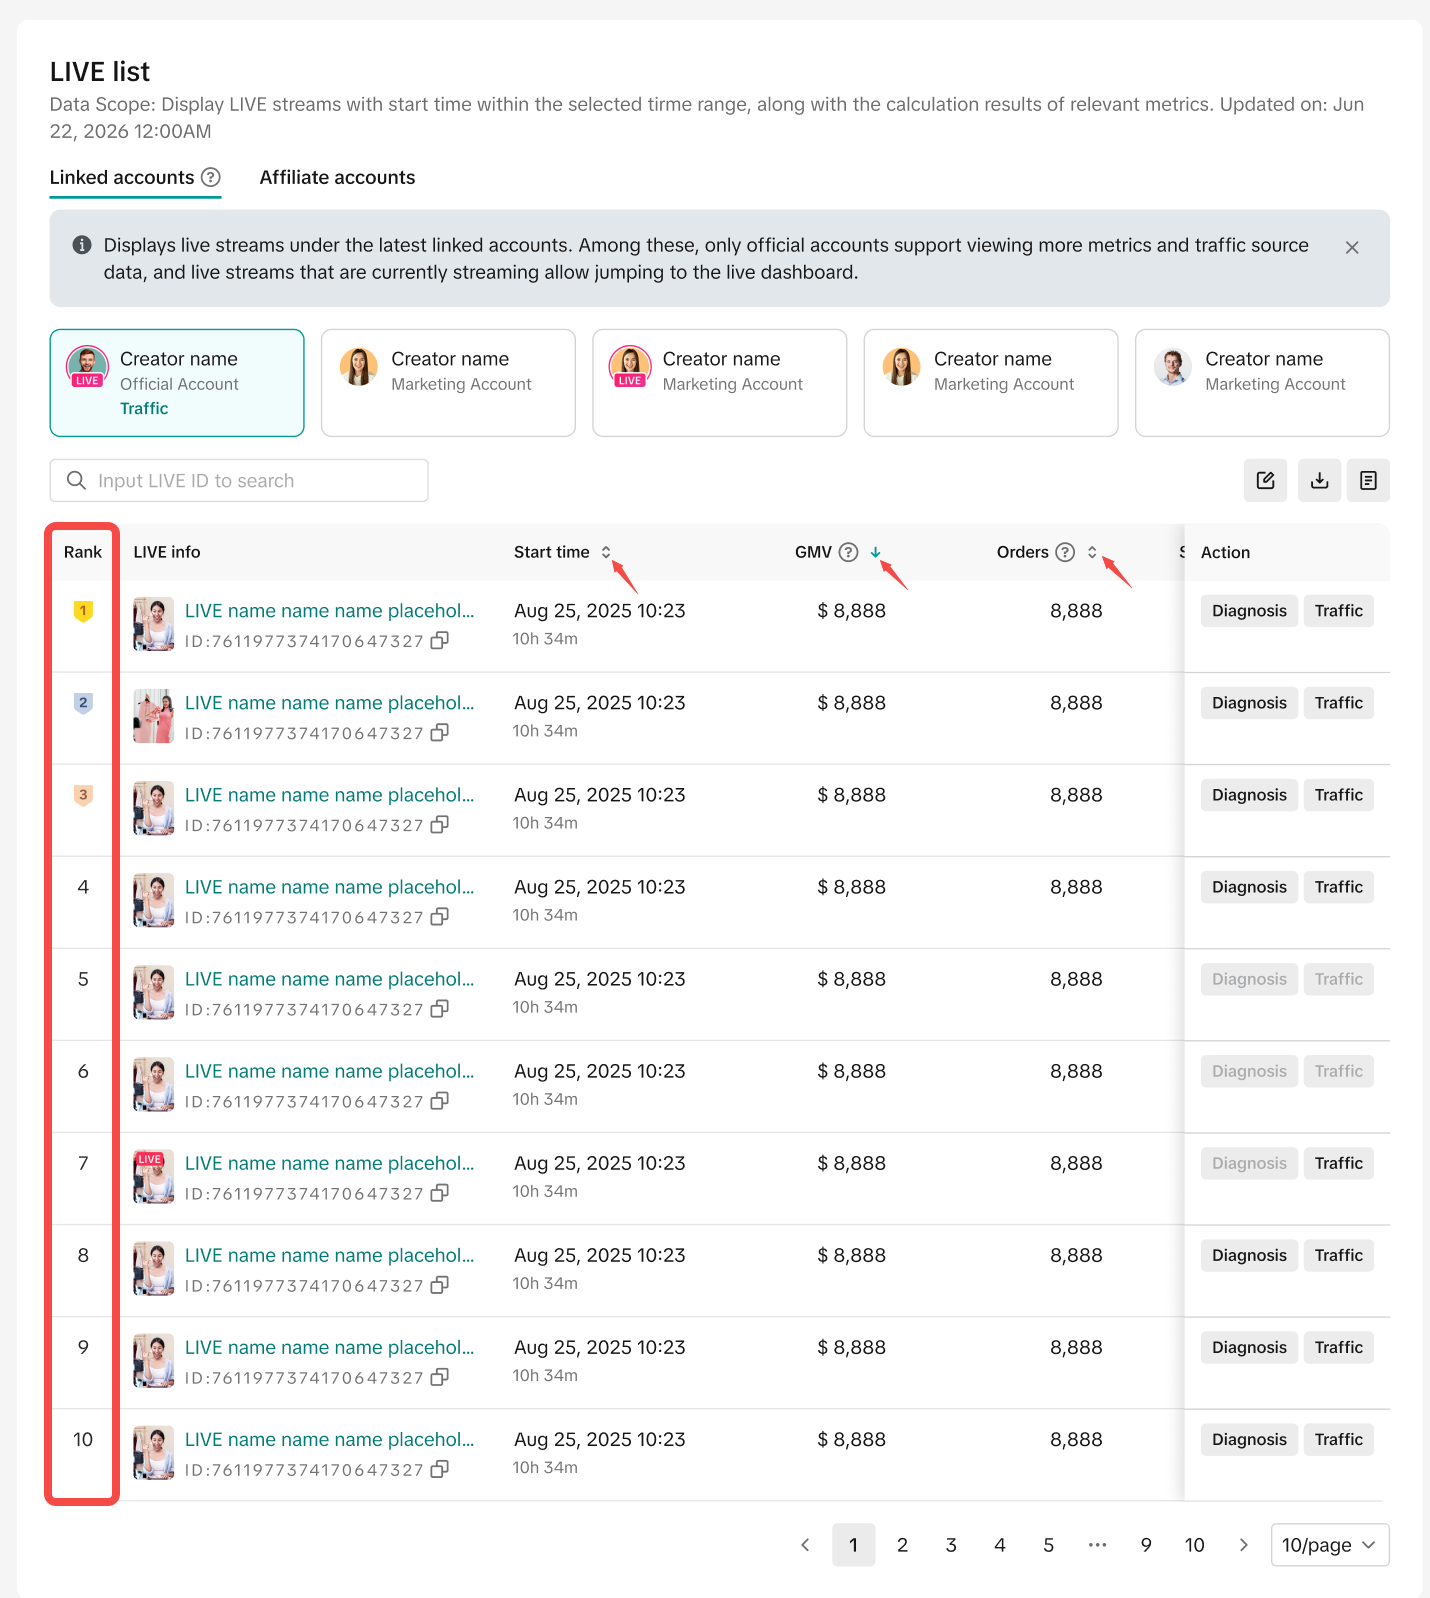
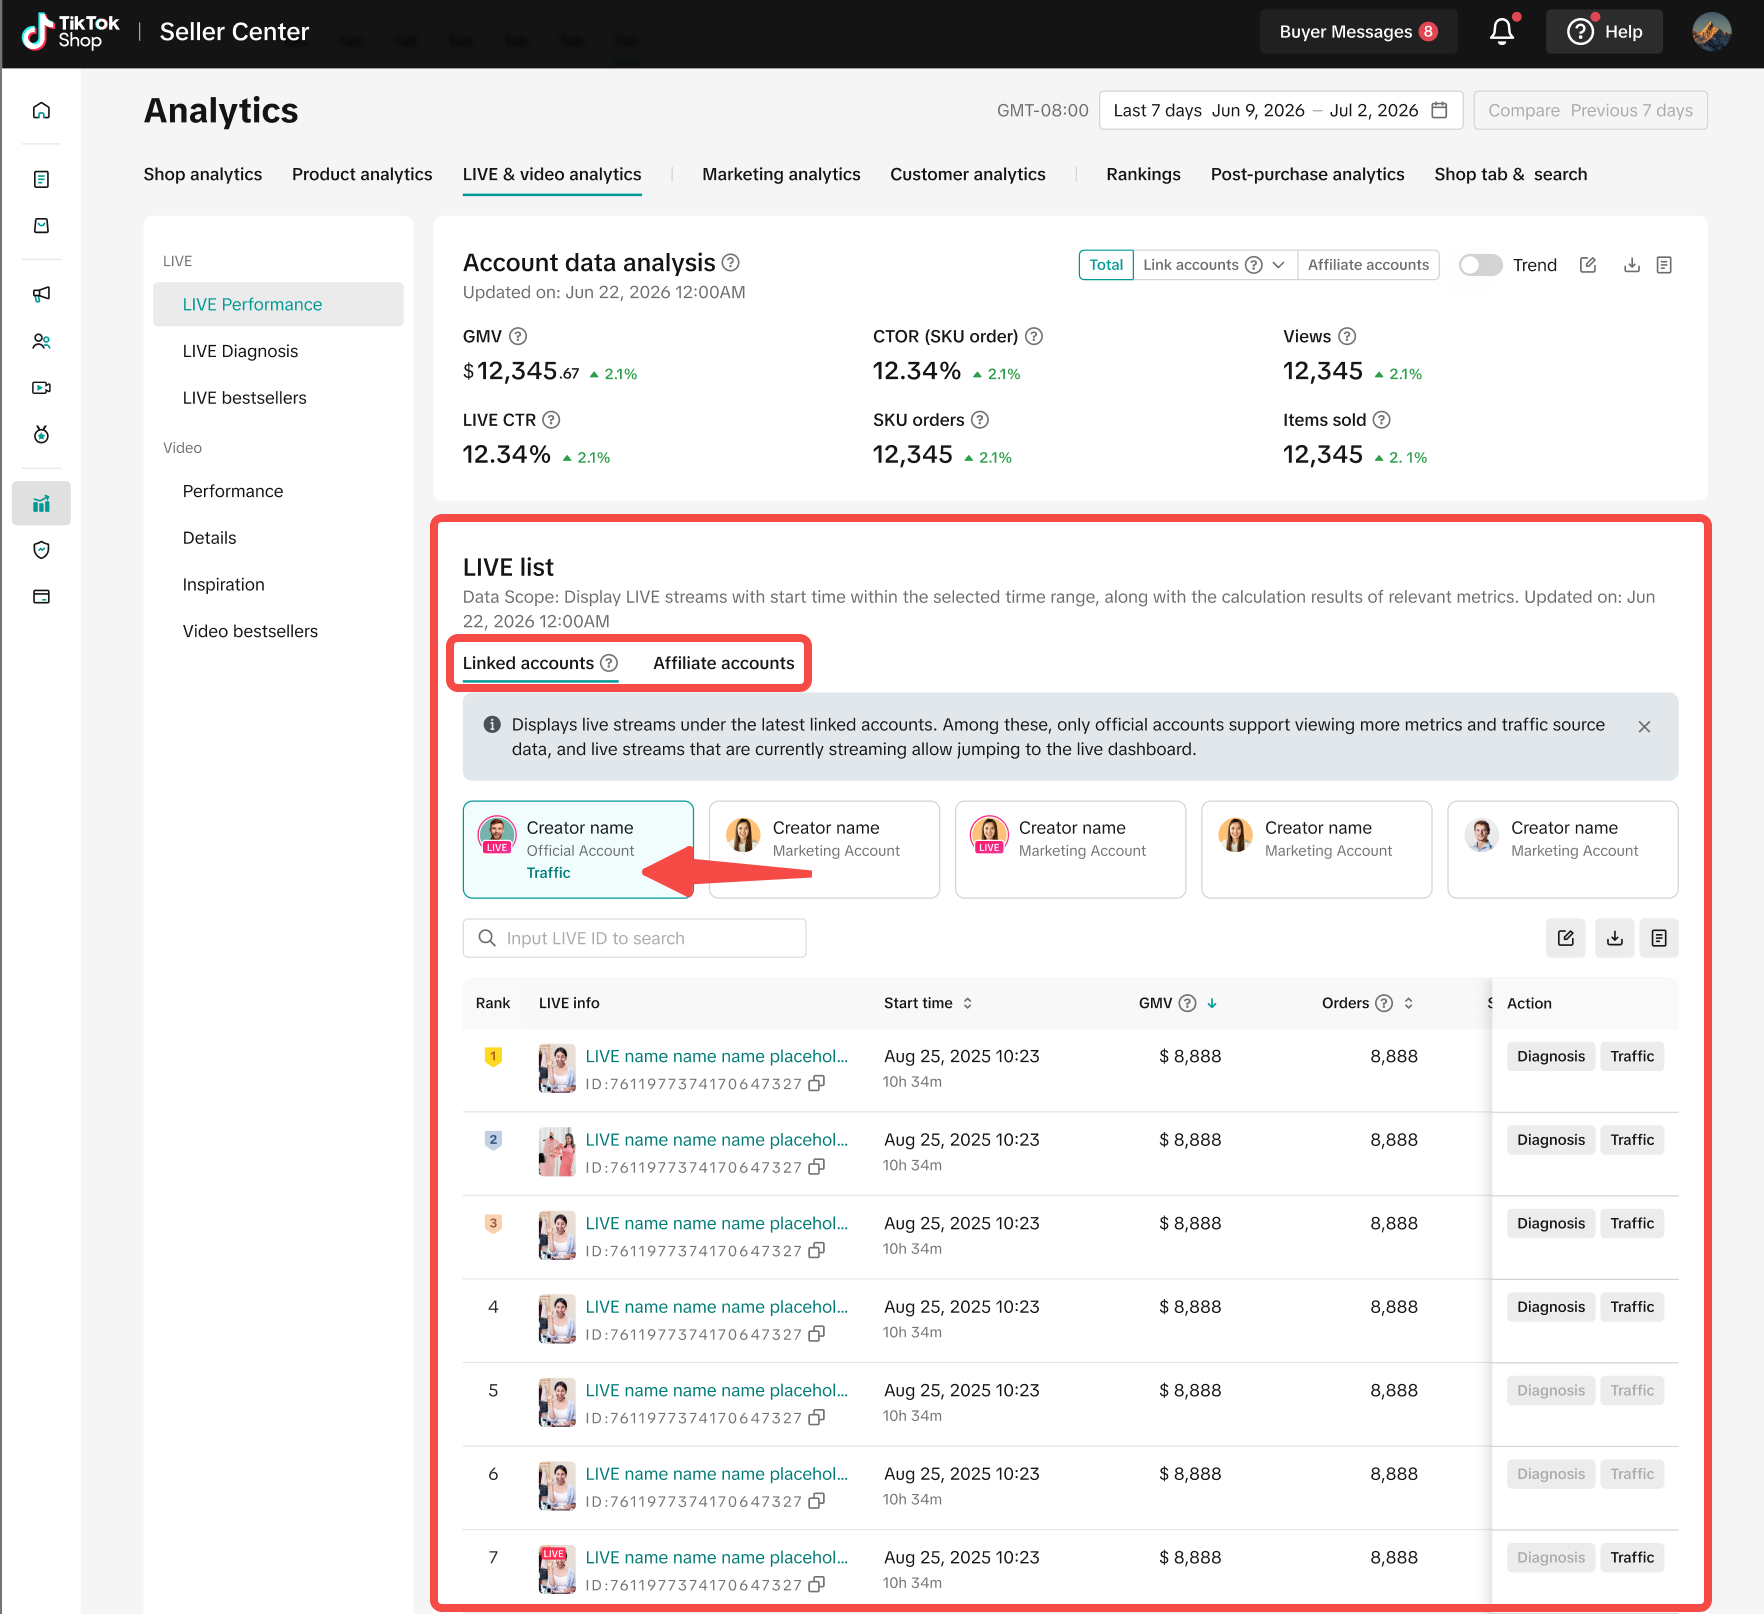
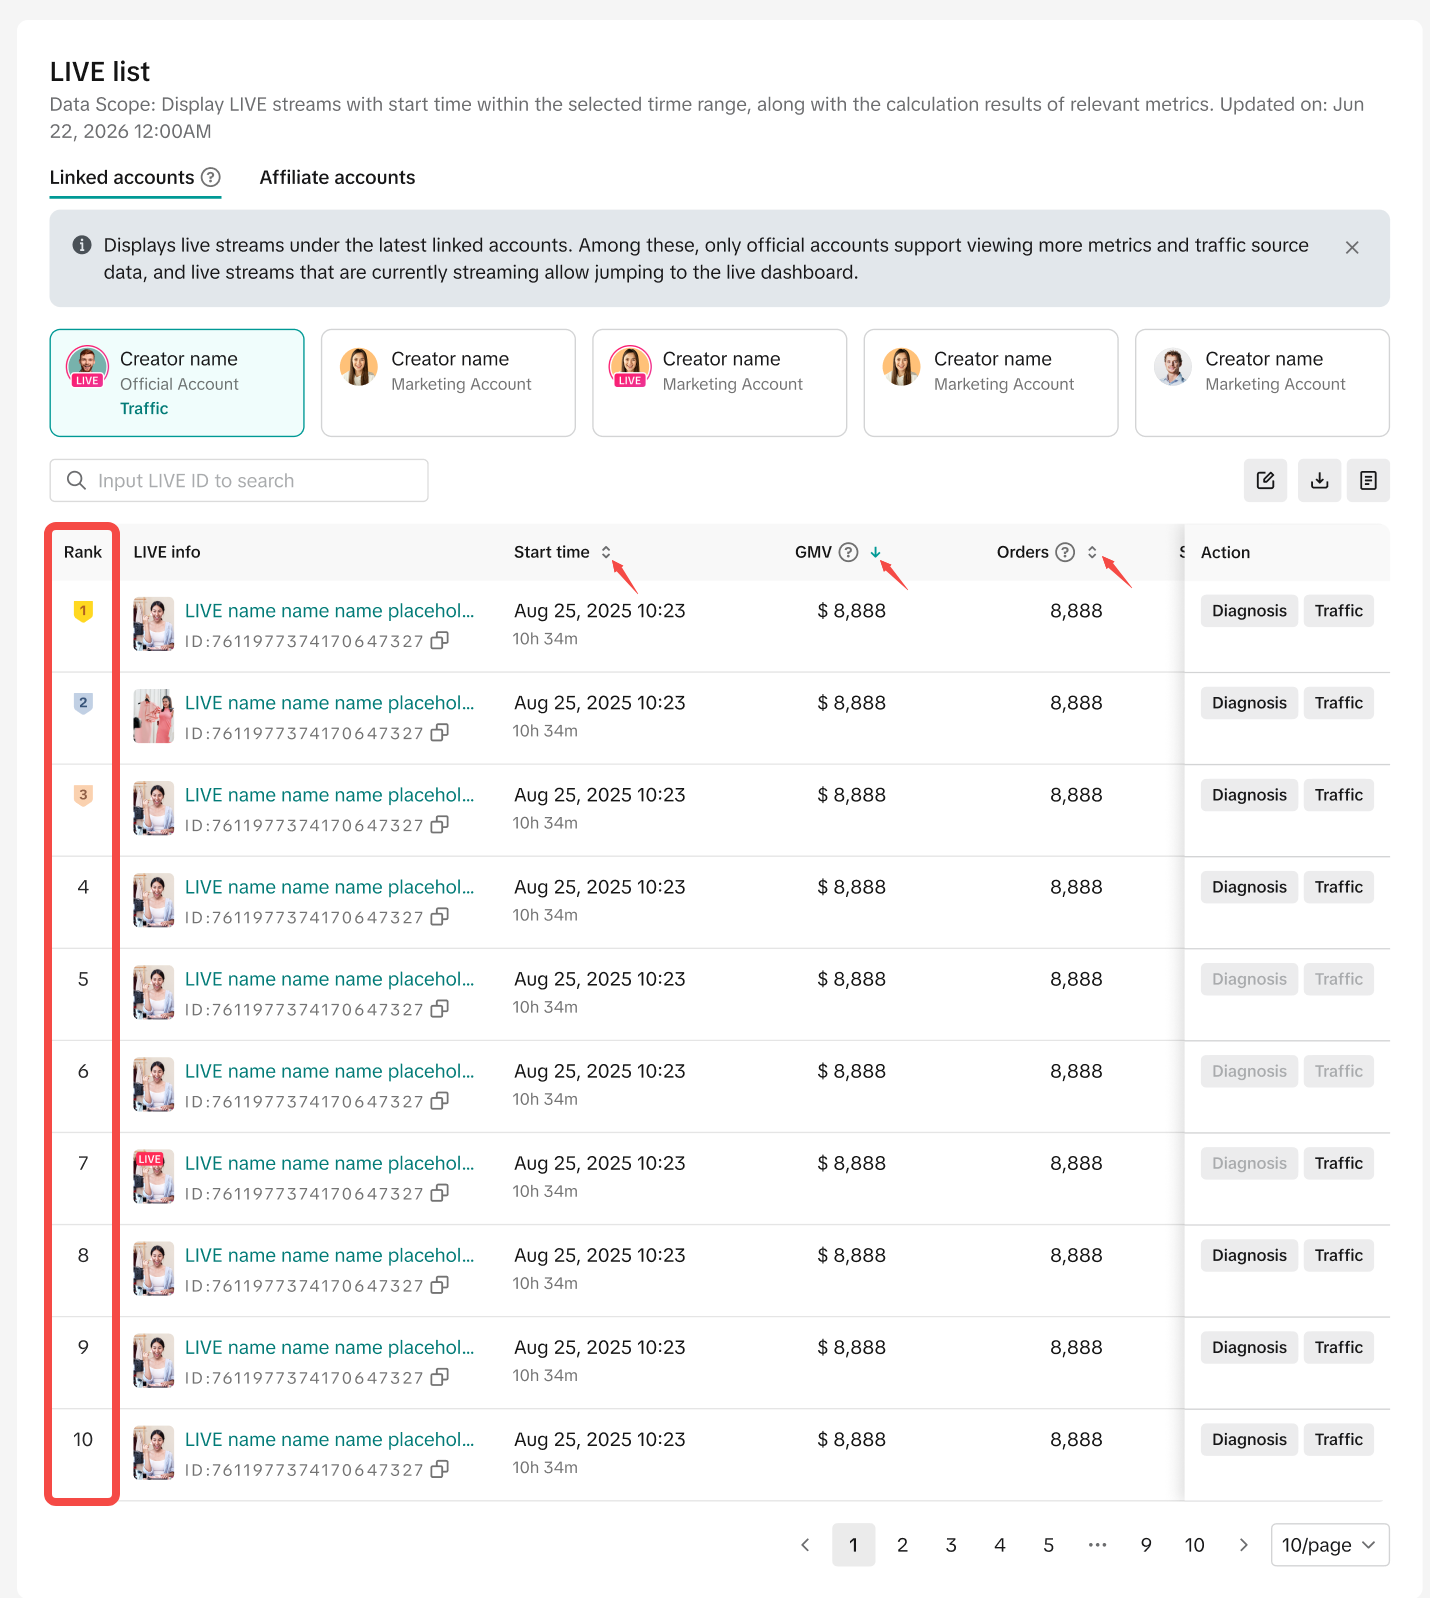
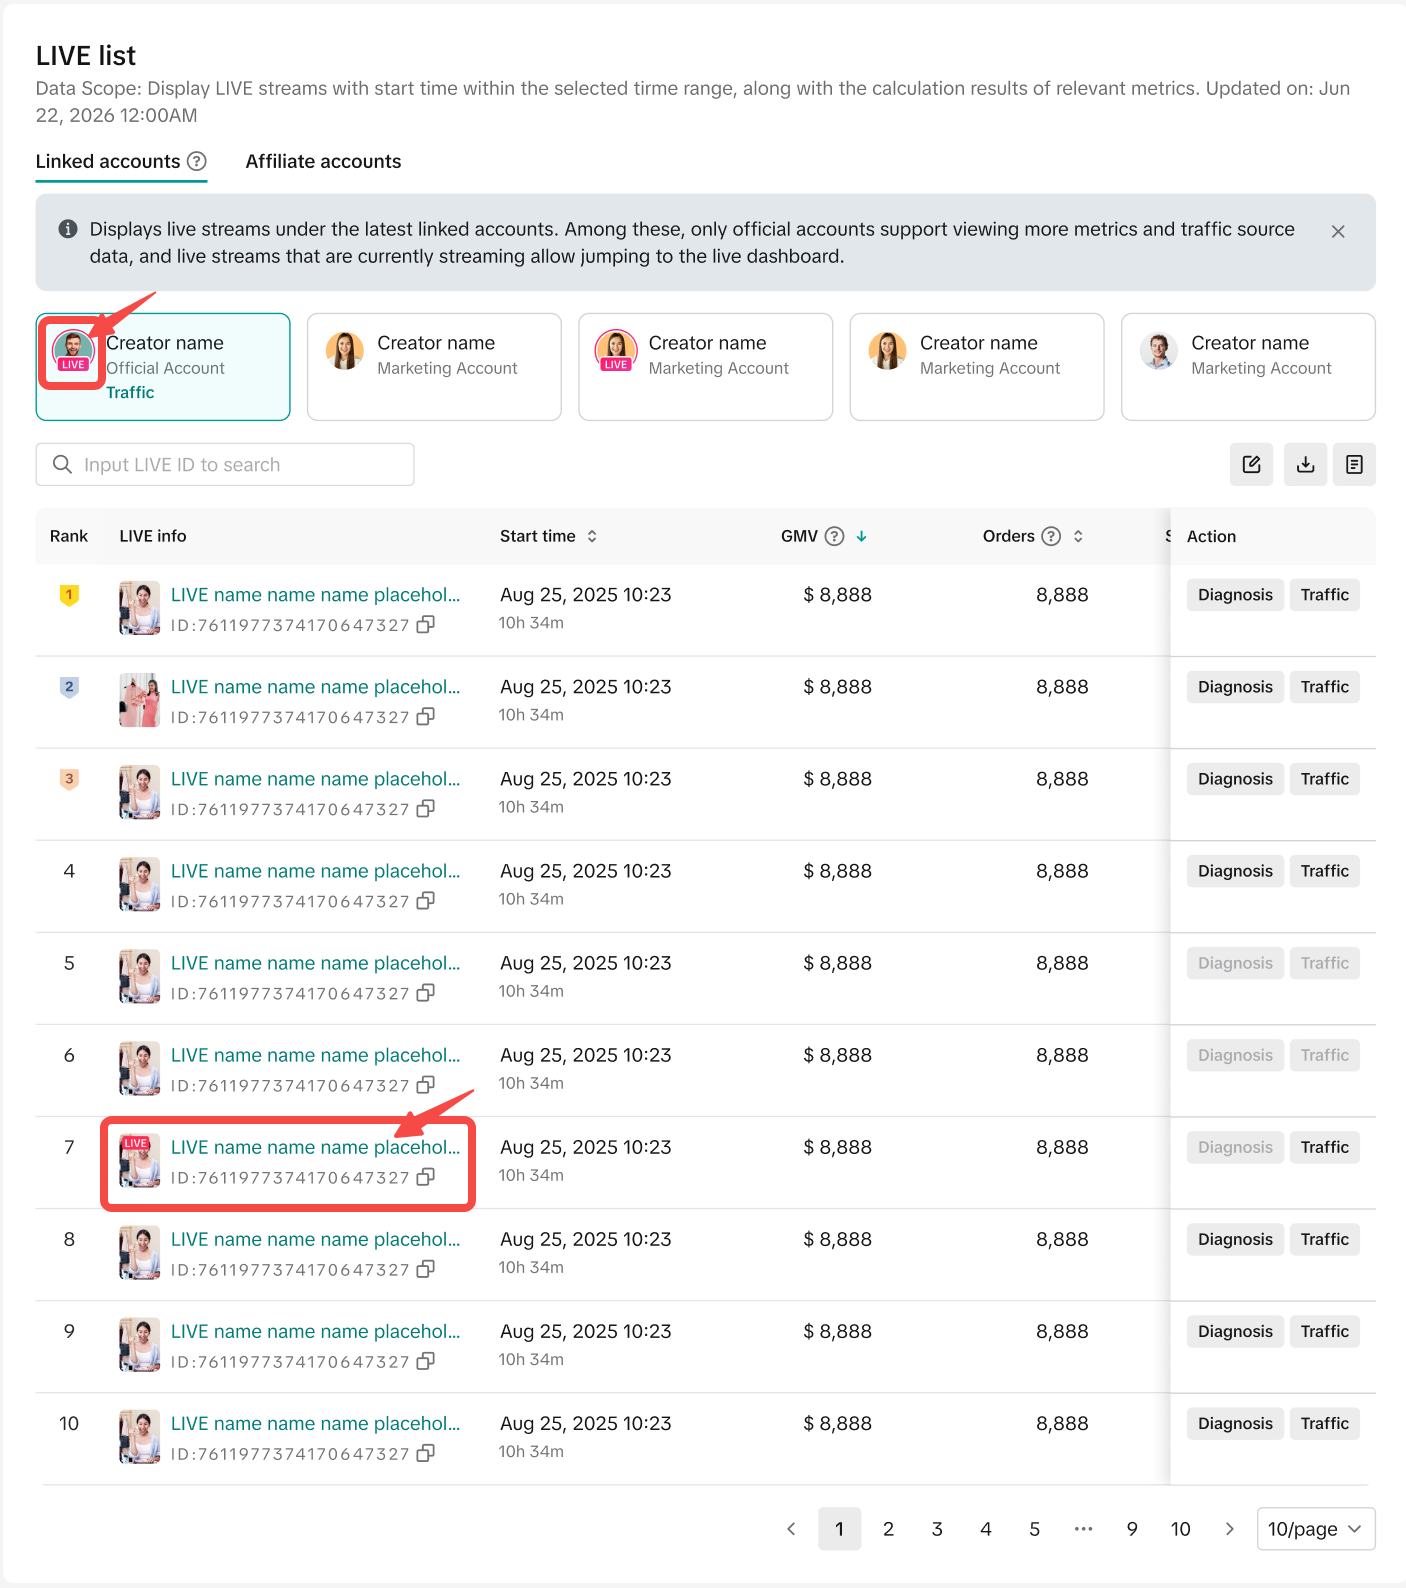
Step 5: Review individual LIVE sessions Scroll to the LIVE List to see the sessions included in your selected filters. You can:
Customize the metrics shown in the list.
Sort sessions by supported metrics.
Filter sessions by linked or affiliate account.
Compare sessions to identify high- or low-performing LIVEs.
For an ongoing LIVE, select the LIVE session name or the creator's avatar with the LIVE badge to open its LIVE Dashboard.
Desktop
How to set it up? (Live Dashboard)
Step 1
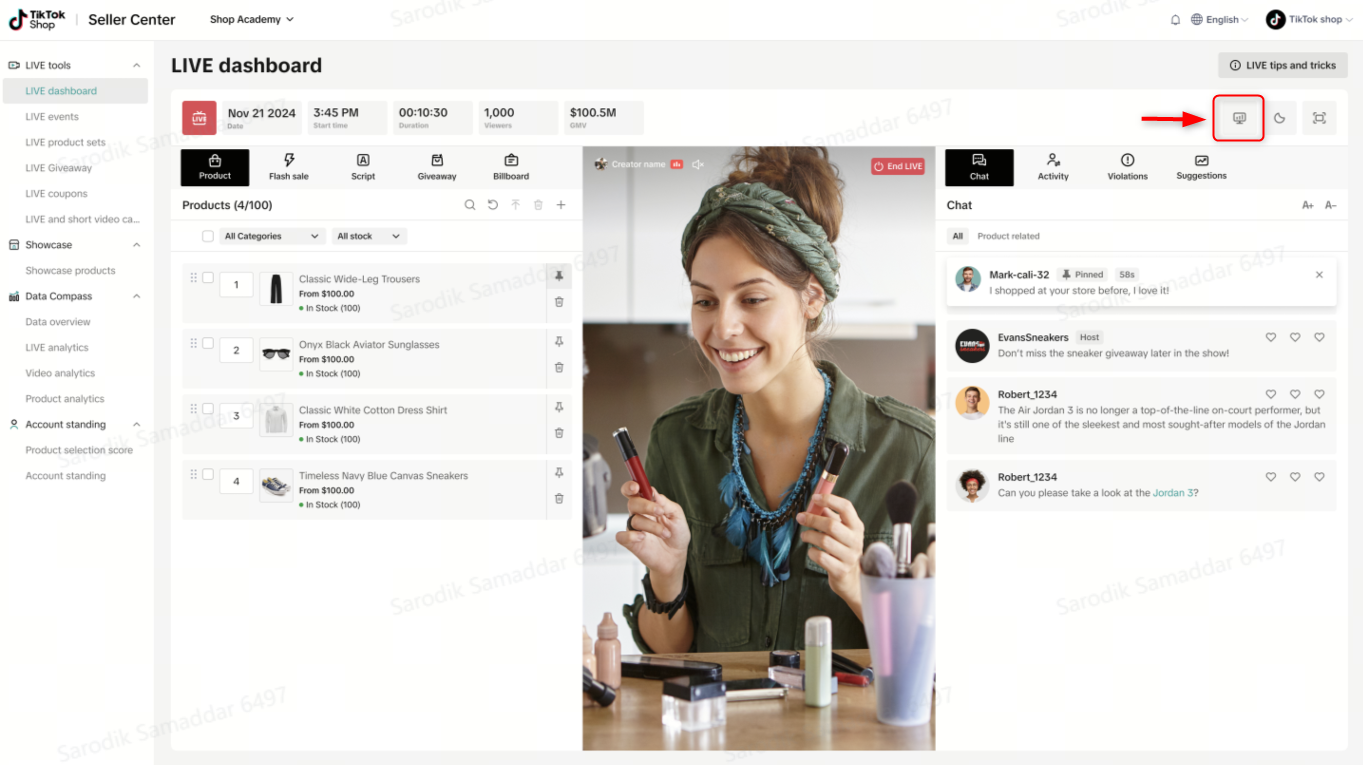
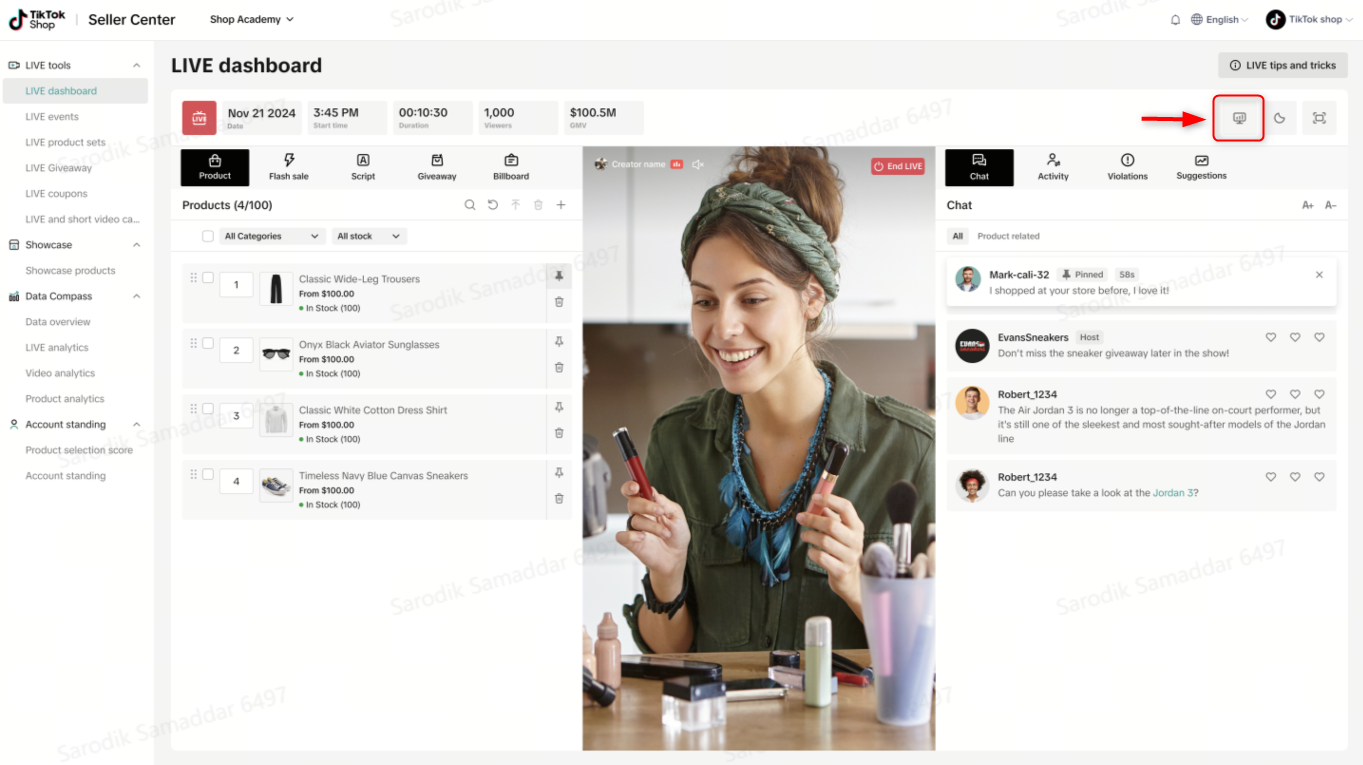
Step 1: Open the LIVE Dashboard Open LIVE Manager on desktop and select the LIVE Dashboard. You can also enter the dashboard directly from an ongoing session listed under LIVE Performance.
Desktop
Step 2
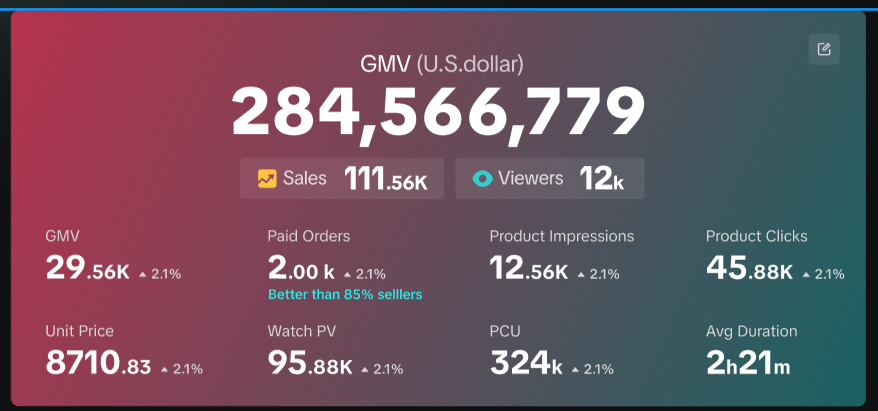
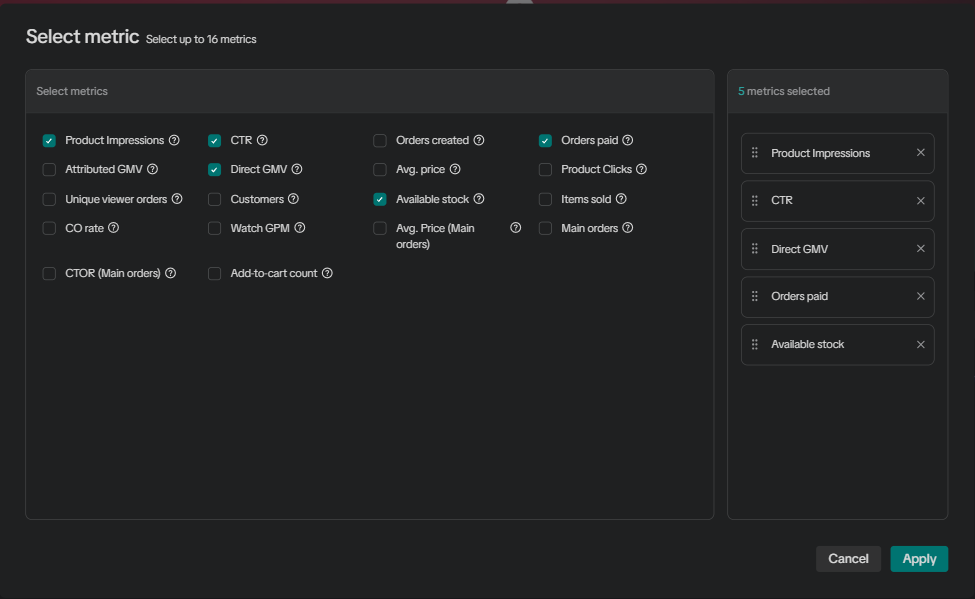
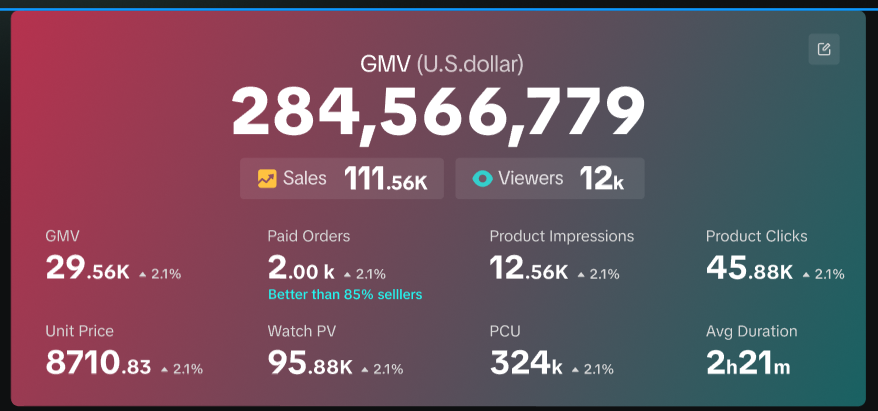
Step 2: Review your key LIVE metrics Start with the Key Data tab to see an overview of your LIVE performance. You can customize the metrics displayed based on your goals. During a LIVE, metrics update in real time; after the LIVE, you can review the session's final aggregated results. The dashboard can also highlight metrics performing below relevant benchmarks, helping you quickly identify areas that may need attention.
Desktop
Step 3
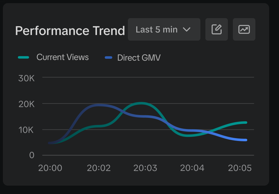
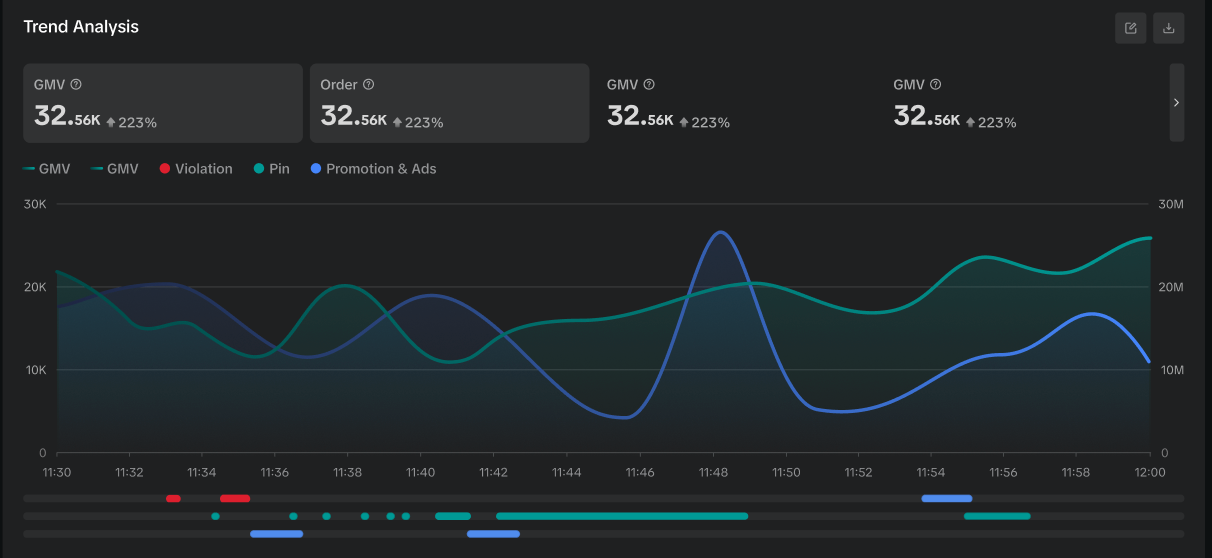
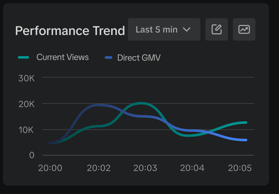
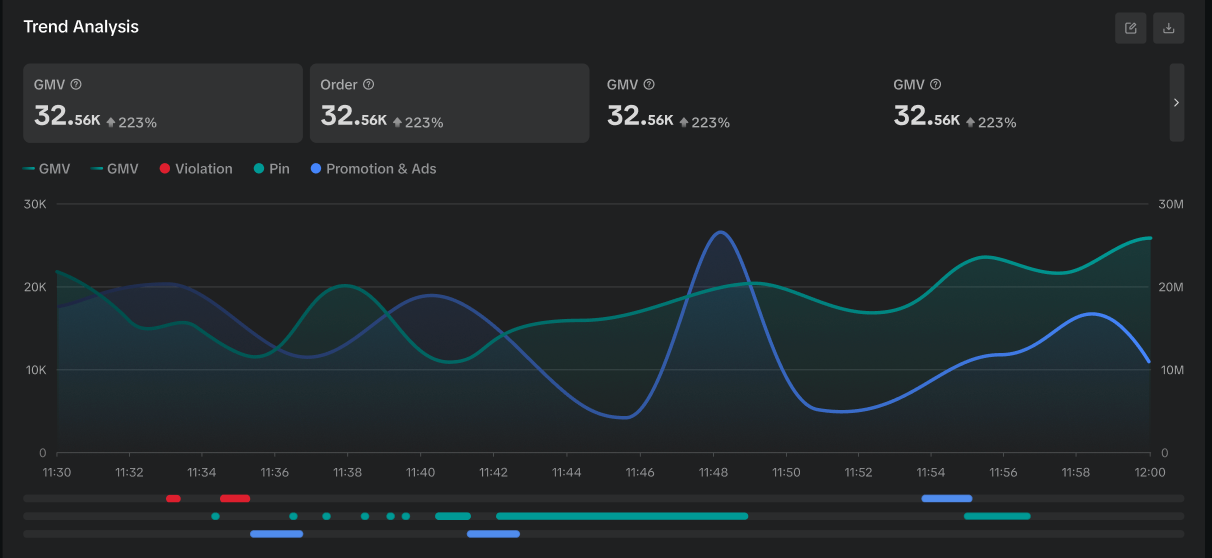
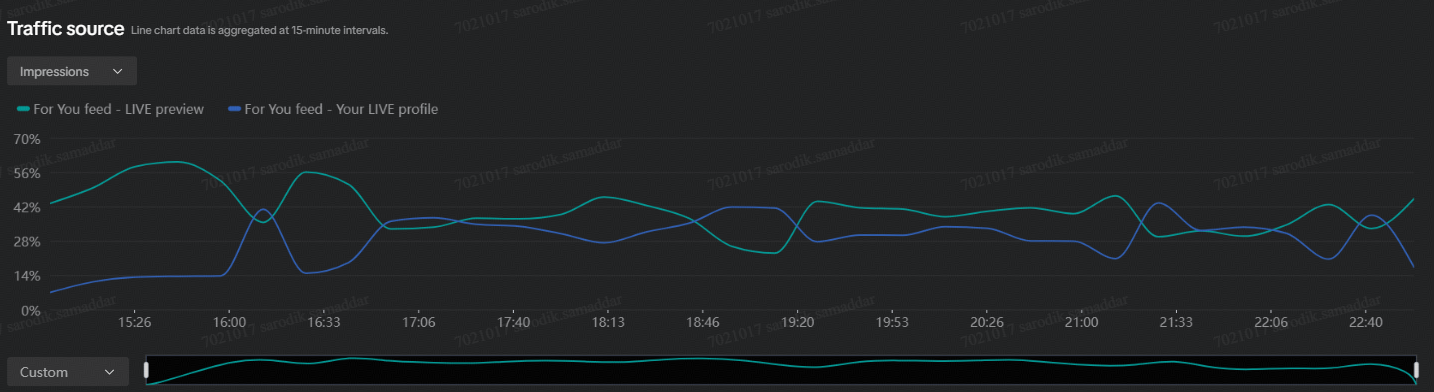
Step 3: Understand when performance changed Open Performance Trends to see how key metrics changed throughout the LIVE. You can:
Compare up to two metrics at a time.
Review the whole LIVE or focus on shorter periods such as the last 30 or 5 minutes.
Select a custom time range.
Compare changes in performance with key LIVE events such as product pins, promotions, and violations.
After the LIVE, you can also use the timeline alongside the LIVE replay to review what was happening when a spike or drop occurred.
Desktop
Step 4
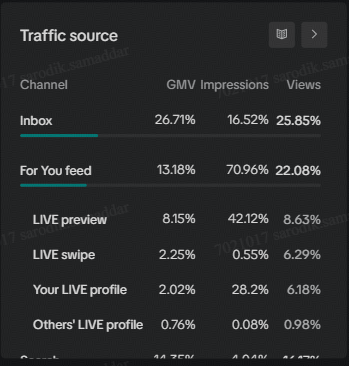
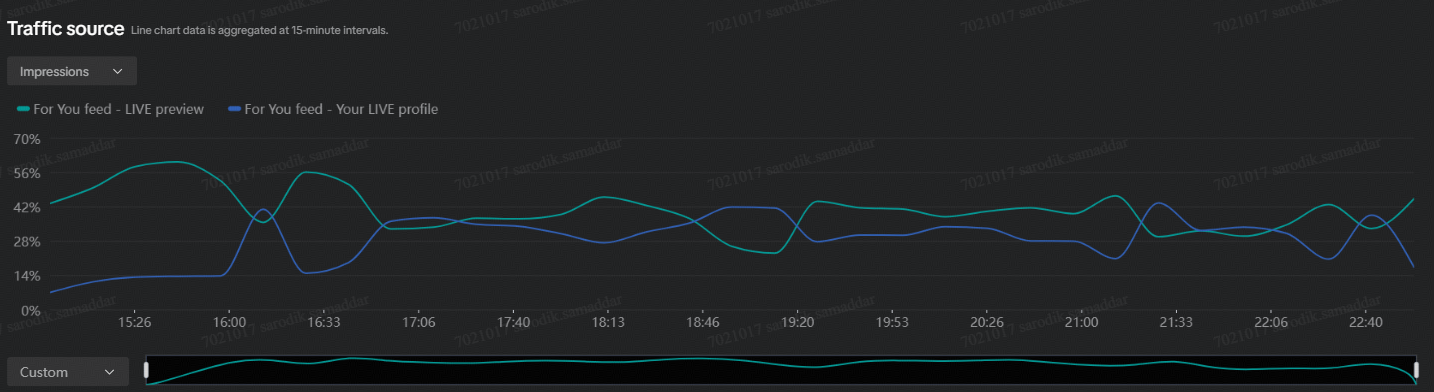
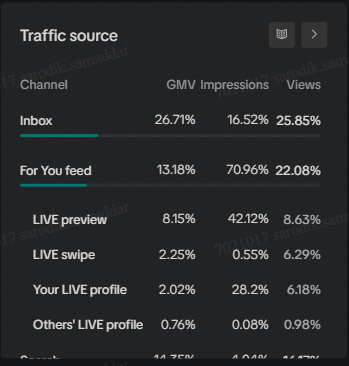
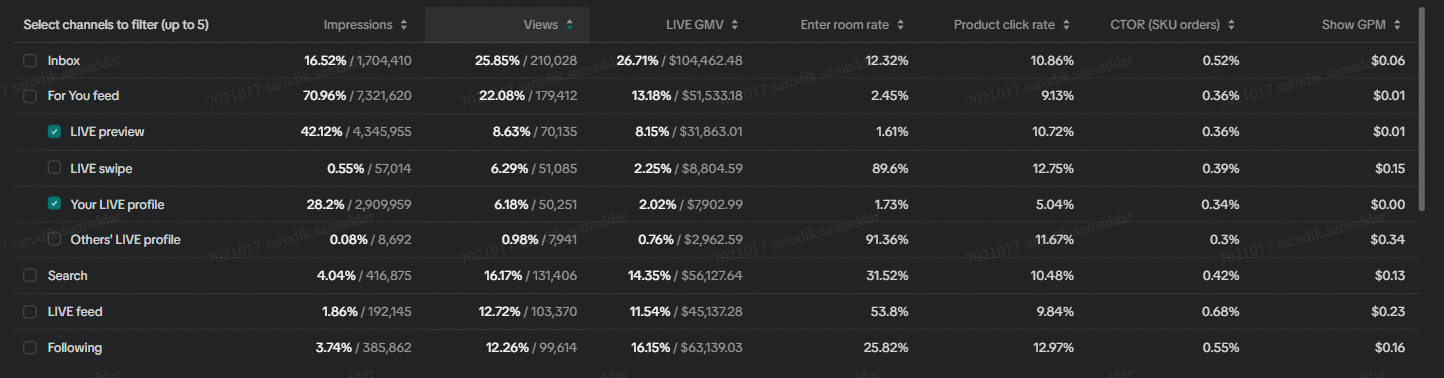
Step 4: Analyze your traffic sources Open the Traffic Source tab to understand where LIVE viewers came from. Compare traffic channels using metrics such as impressions, views, GMV, and conversion-related metrics. You can also select multiple traffic sources to compare their performance trends. Use these insights to understand which channels are contributing the most traffic and sales and where you may have opportunities to improve.
Desktop
Step 5
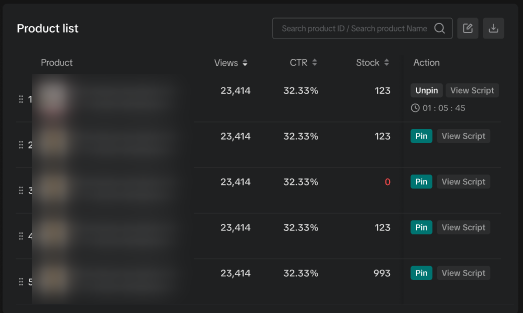
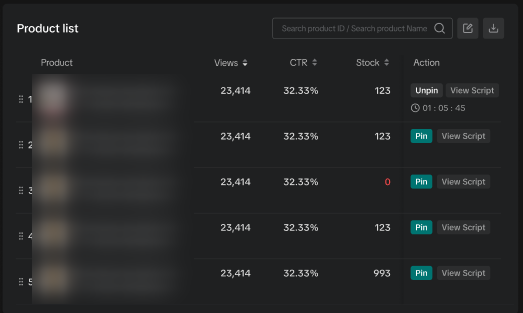
Step 5: Review product performance Use the product-level data to understand how individual products performed during the LIVE. You can review metrics related to product exposure, conversion, and sales, search for individual products, customize the metrics displayed, and sort products based on the data most important to you. During an ongoing LIVE, you can also take product-level actions such as pinning or unpinning products.
Desktop
Step 6
Step 6: Review additional LIVE insights Depending on the session and available data, the LIVE Dashboard can also help you:
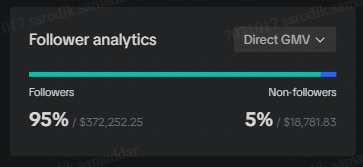
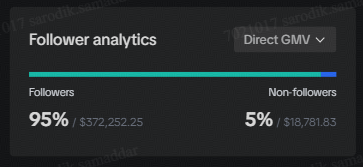
Compare followers vs. non-followers.
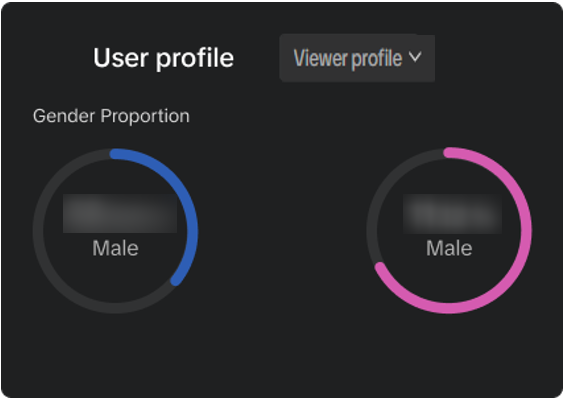
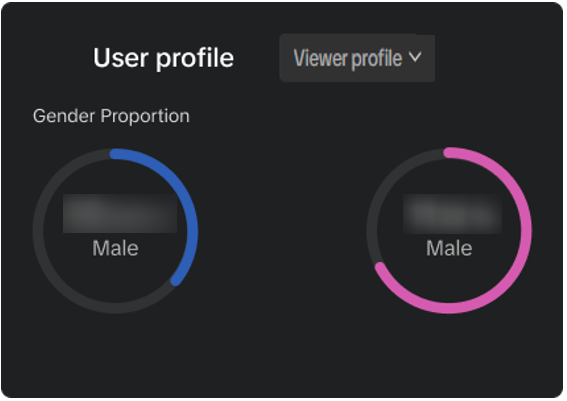
Understand viewer and customer demographics.
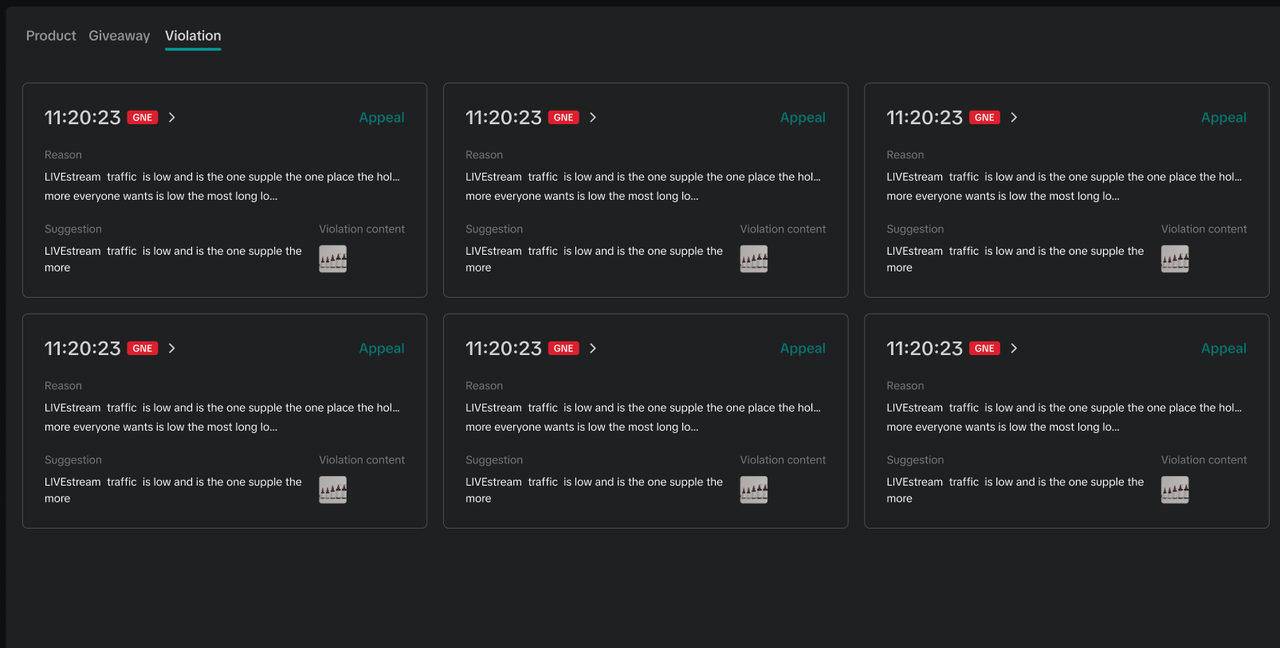
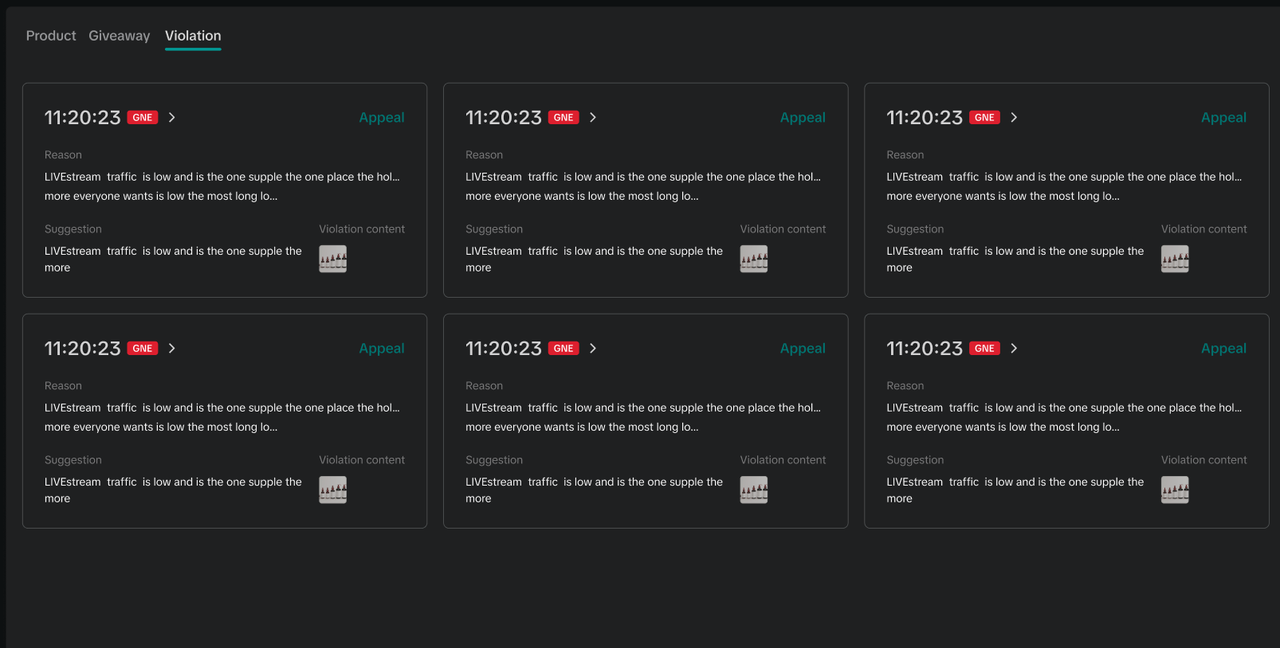
Review violations and recommended actions.
Evaluate Giveaway performance.
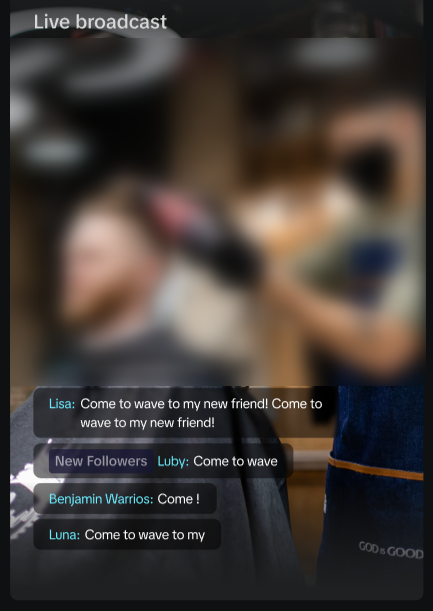
Review your LIVE broadcast alongside viewer comments.
Identify how specific events during the LIVE affected performance.
Use these insights after every LIVE to understand what worked, what didn't, and what you can adjust for your next session.
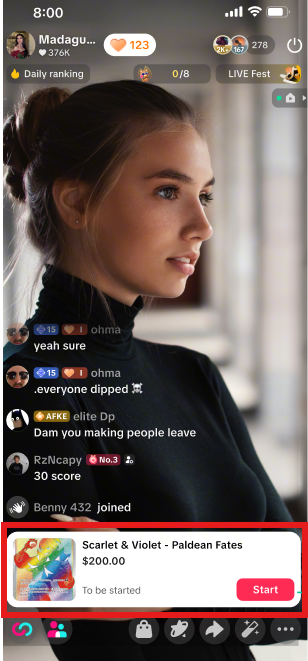
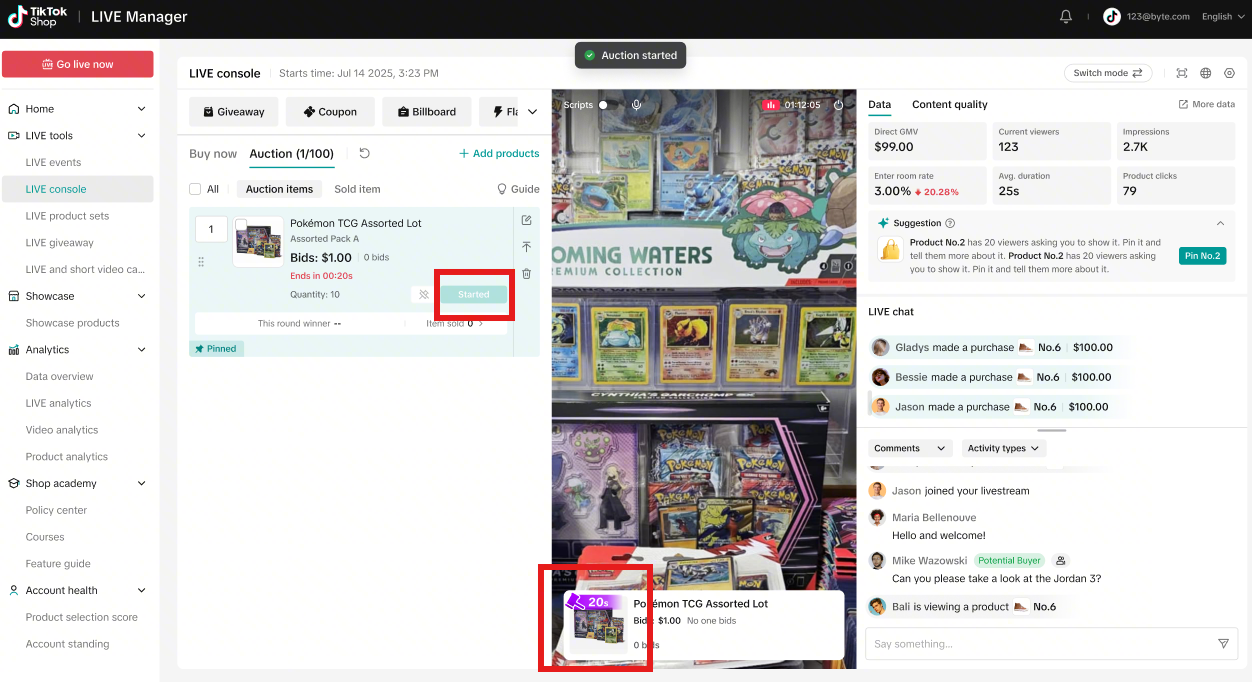
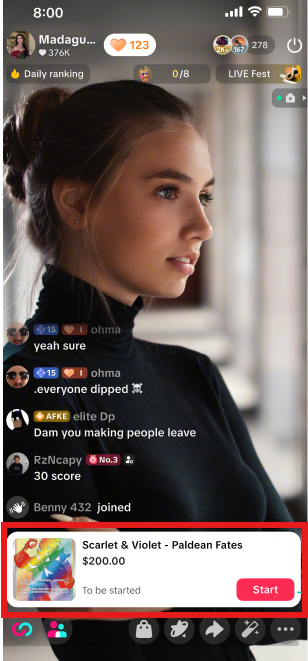
Instead of purchasing at a fixed price, viewers place bids while the auction countdown is running. When the auction ends, the highest bidder wins the item.
What is it?
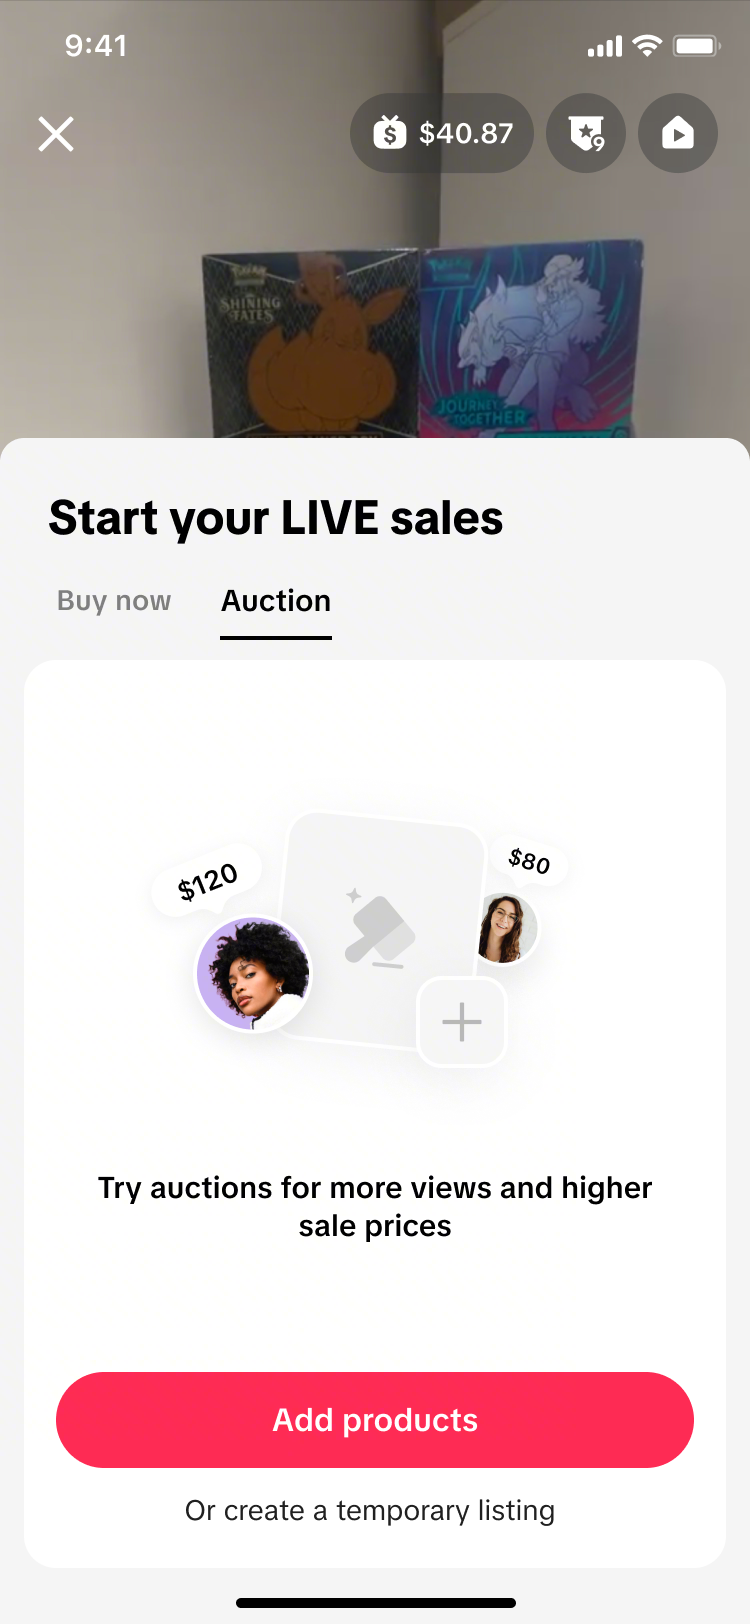
LIVE Auction lets you sell products through real-time bidding during a LIVE, creating a more interactive and competitive shopping experience for viewers. Instead of purchasing at a fixed price, viewers place bids while the auction countdown is running. When the auction ends, the highest bidder wins the item. LIVE Auction can help you:
Create urgency with countdown-based bidding.
Increase viewer participation and engagement.
Showcase unique, collectible, or limited-quantity products.
Encourage purchase decisions through real-time competition.
LIVE Auction is available to eligible sellers and creators and can be managed through LIVE Manager on desktop or directly in the TikTok app.
*Why it drives traffic*
Bidding is inherently a spectator sport — viewers who have no intent to bid still watch, comment, and stay for the countdown, which lifts the engagement signals (comments, watch time) that widen algorithmic discovery.
Because an auction, once started, must run until the countdown ends, it creates a fixed high-attention window that's a natural moment to layer in a Giveaway follow-task or CRM push without losing momentum.
How to set it up?
Step 1
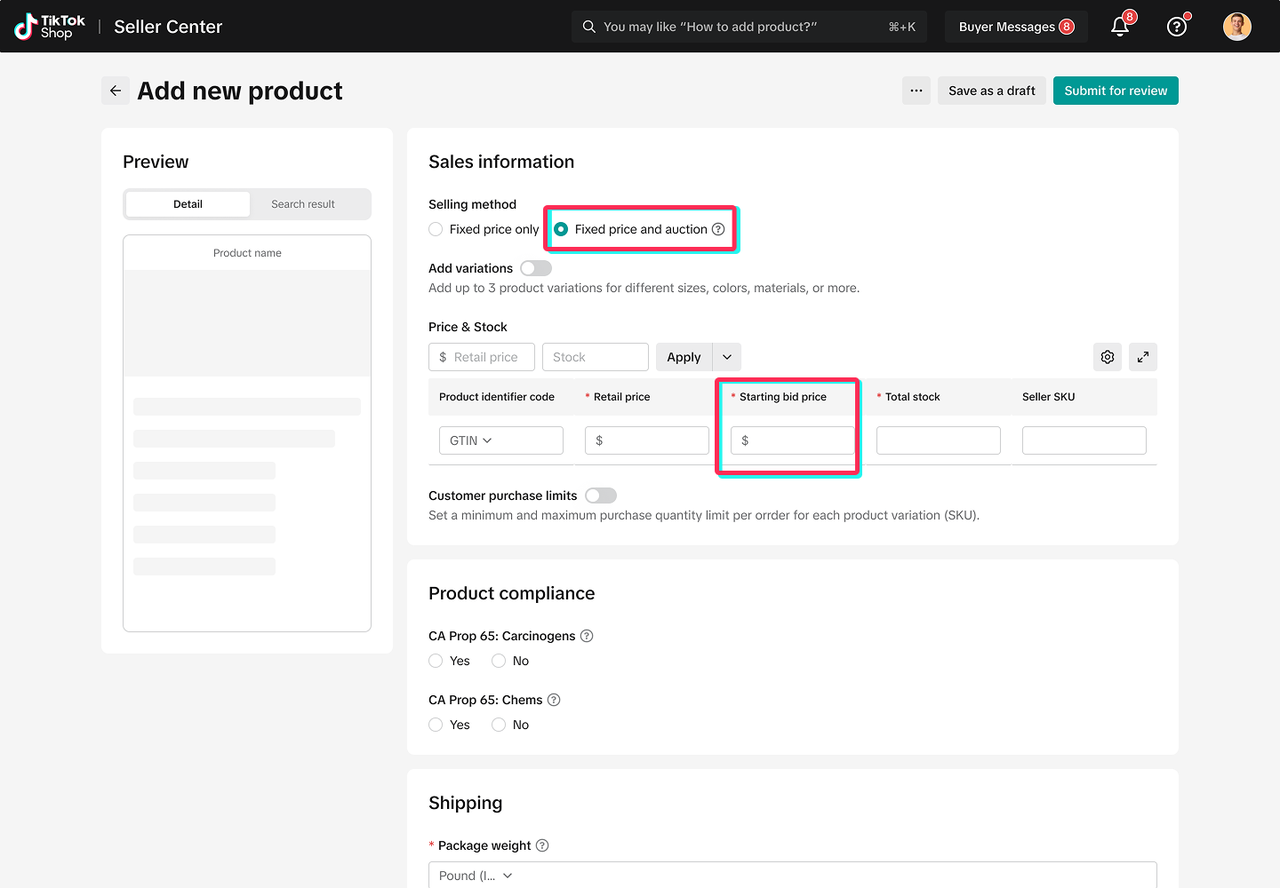
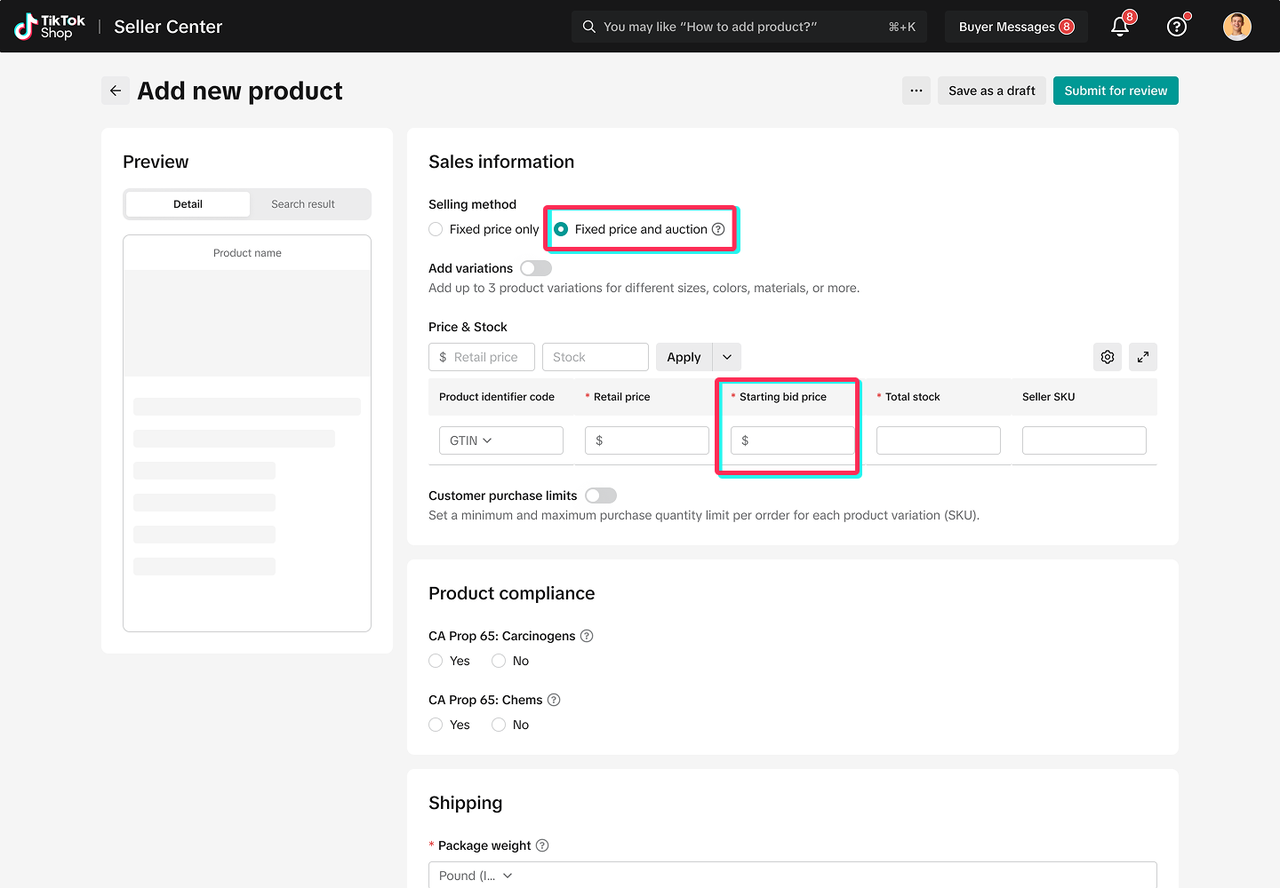
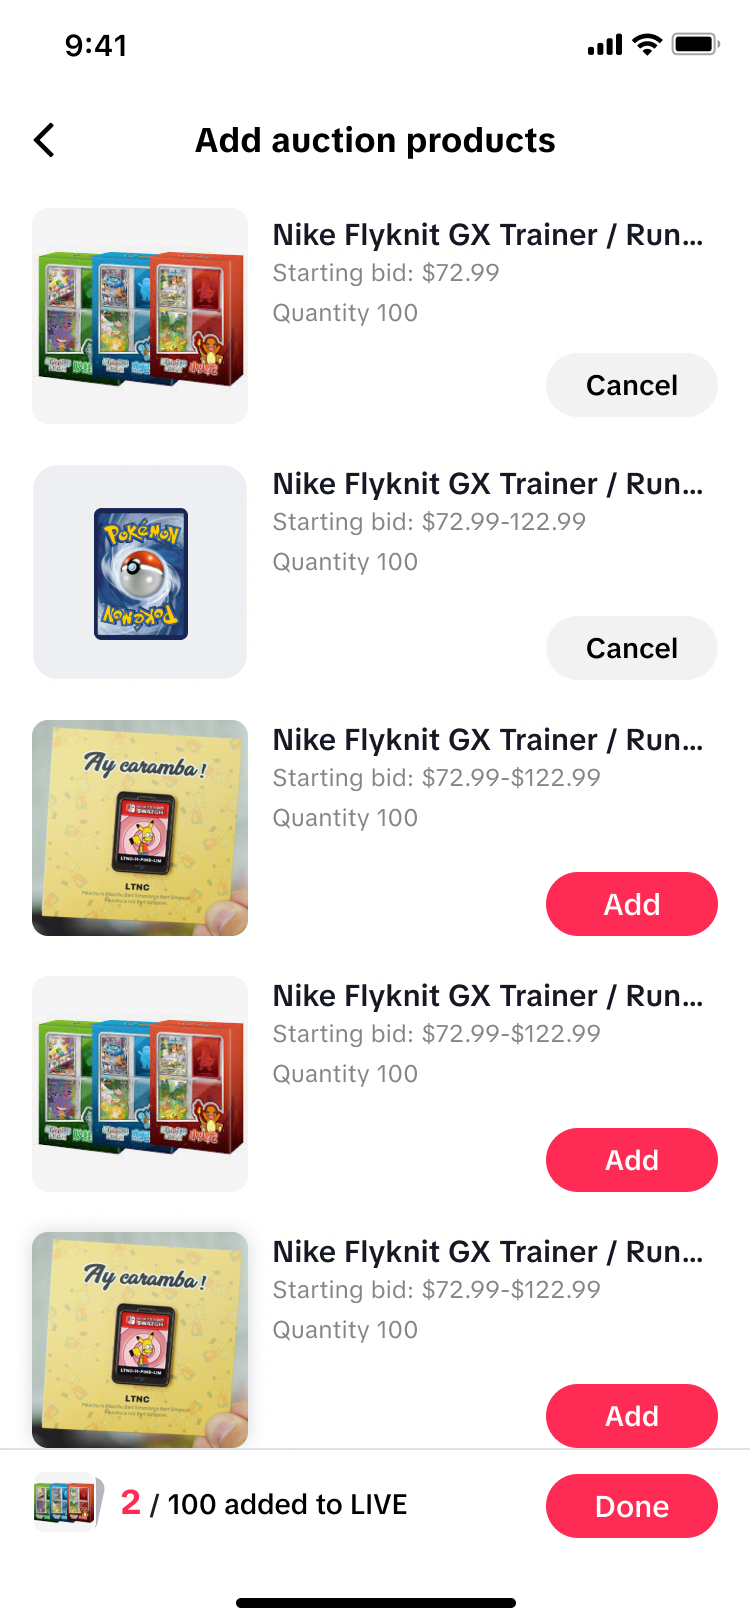
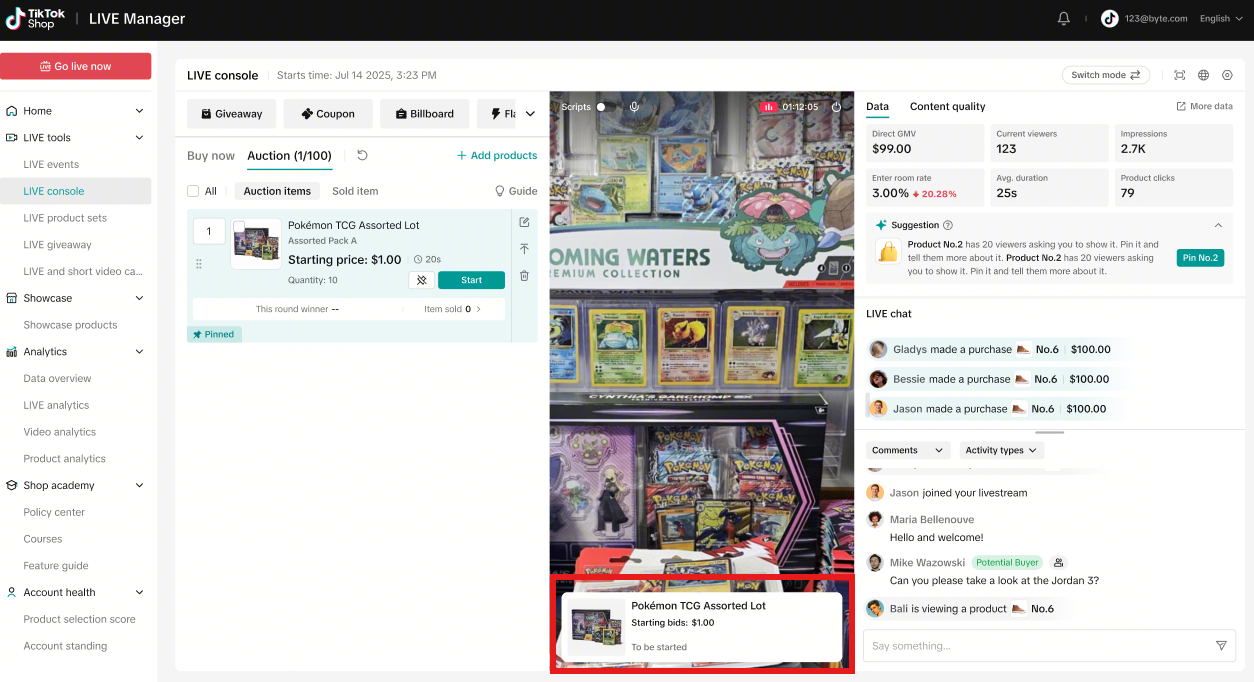
Step 1 : Create Auction Product Listing (Option 1) In Seller Center, when creating a product listing, select fixed price only and auction to allow the same listing to also sell through LIVE auctions.
Desktop
Step 2
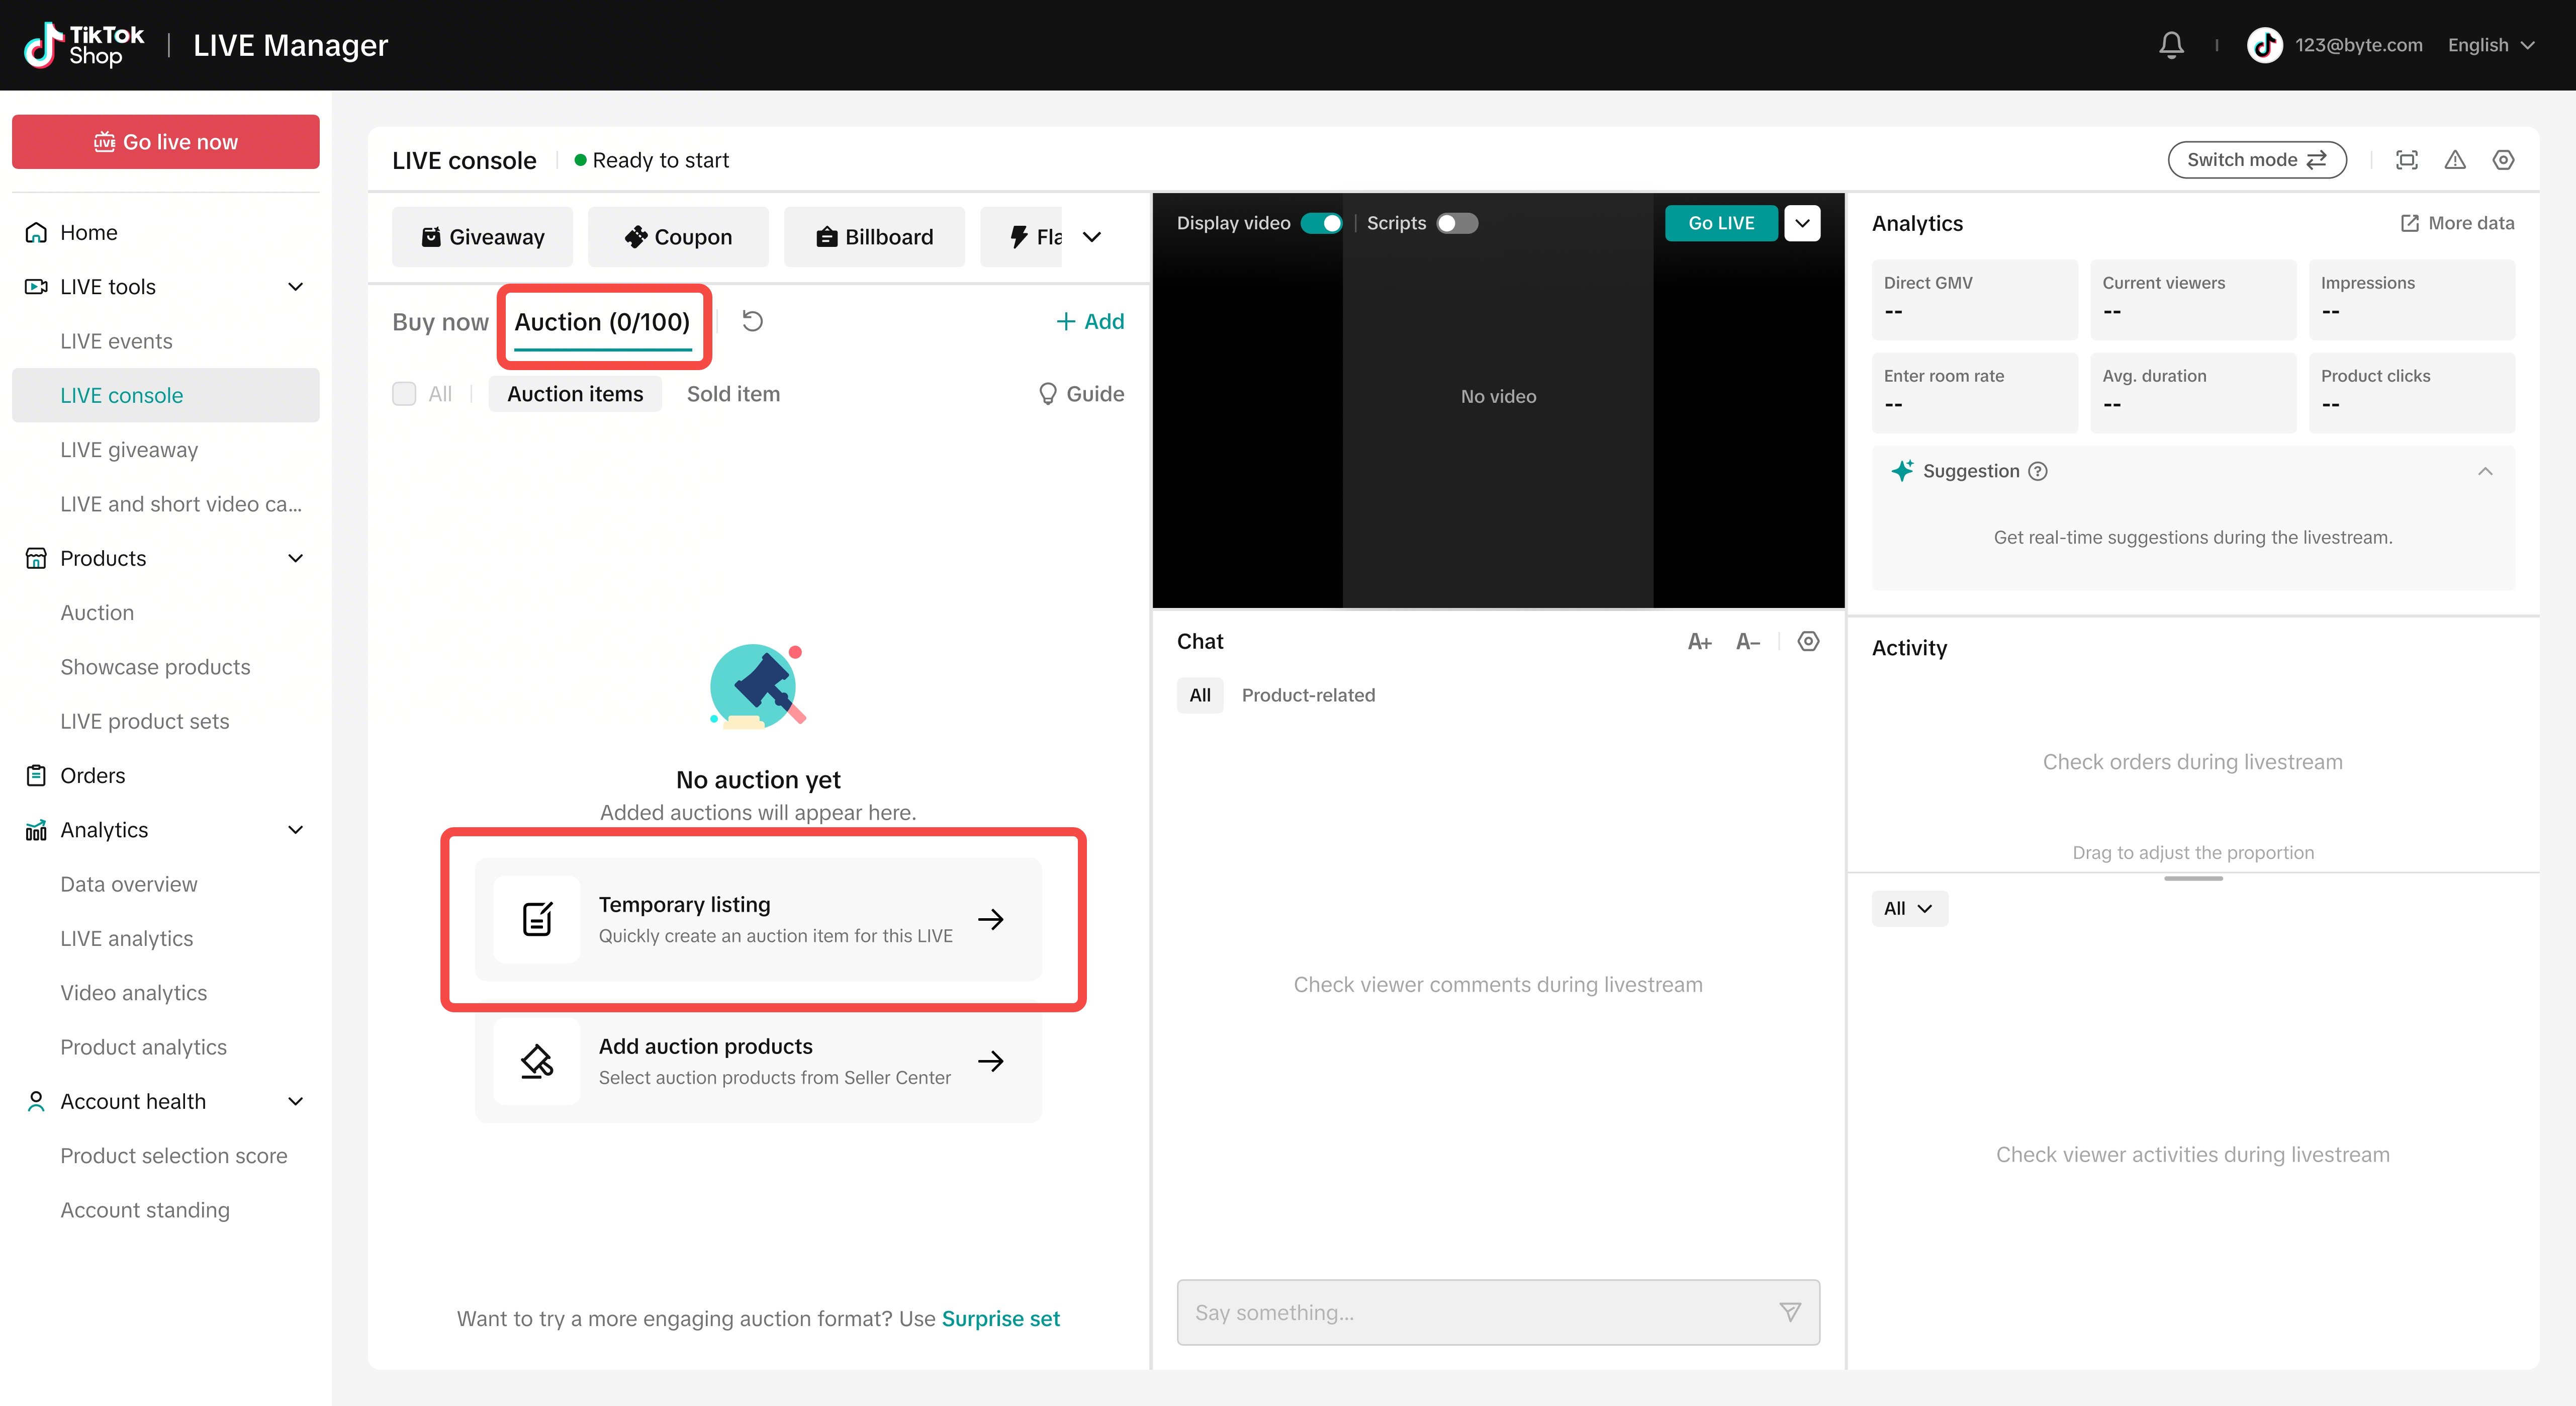
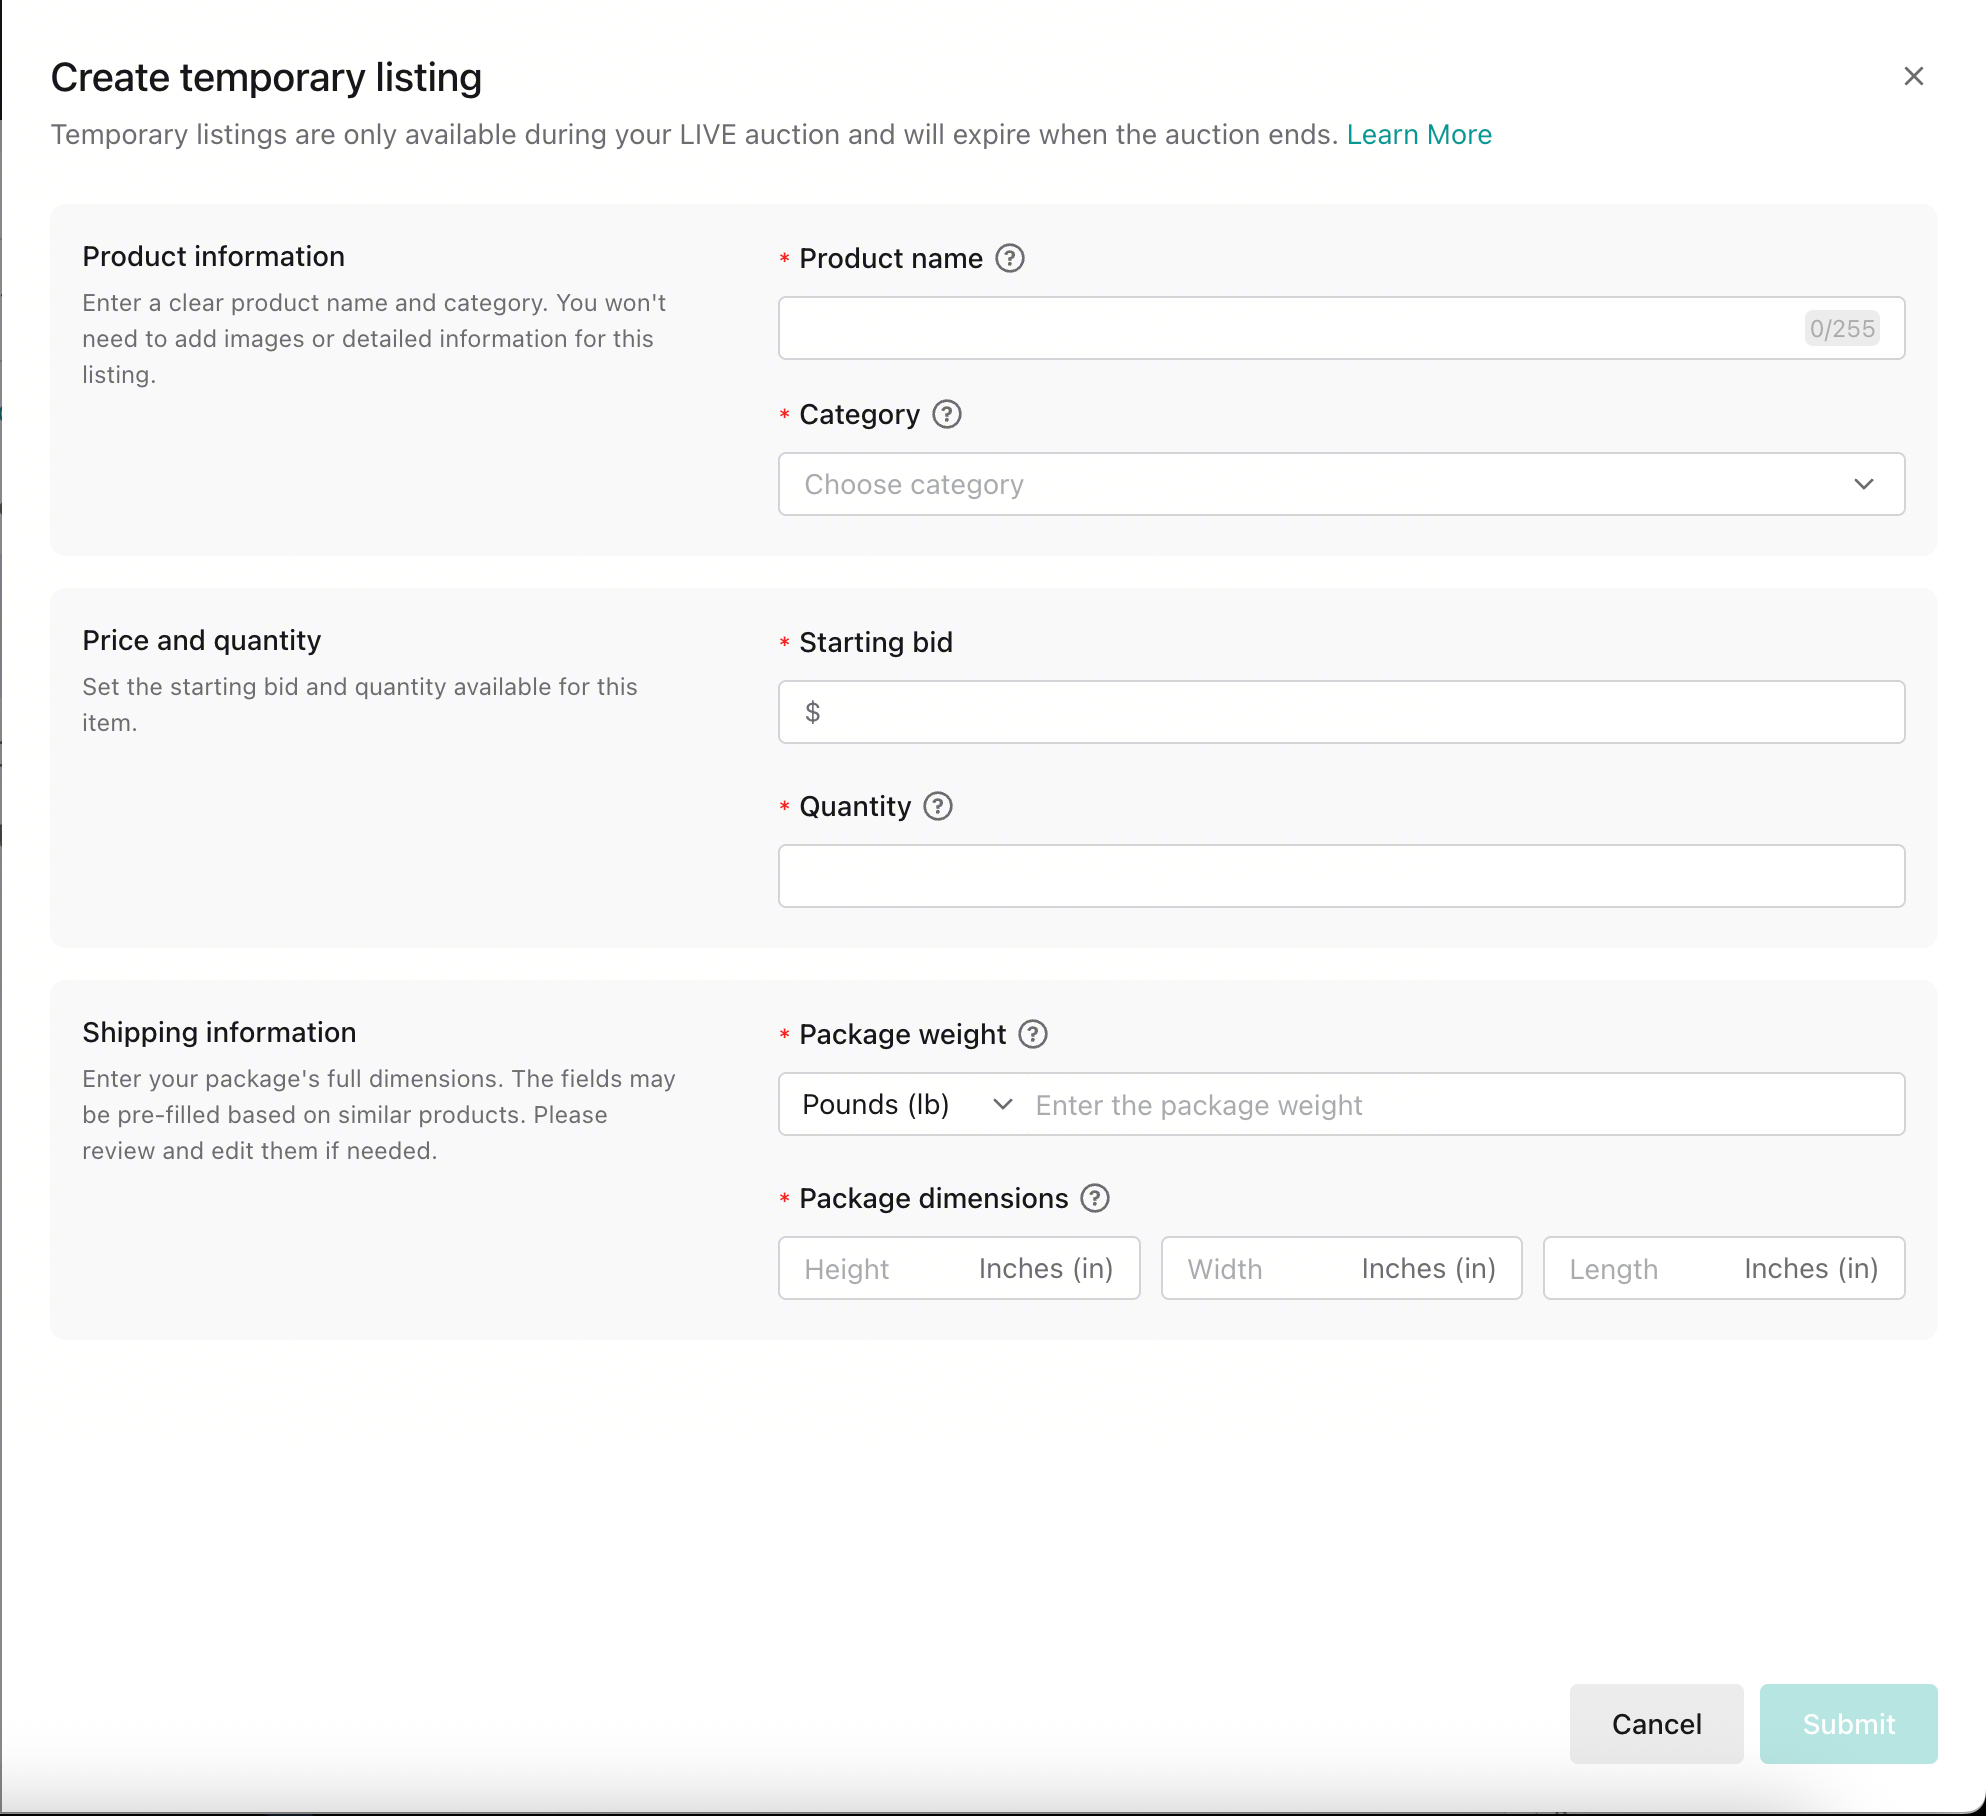
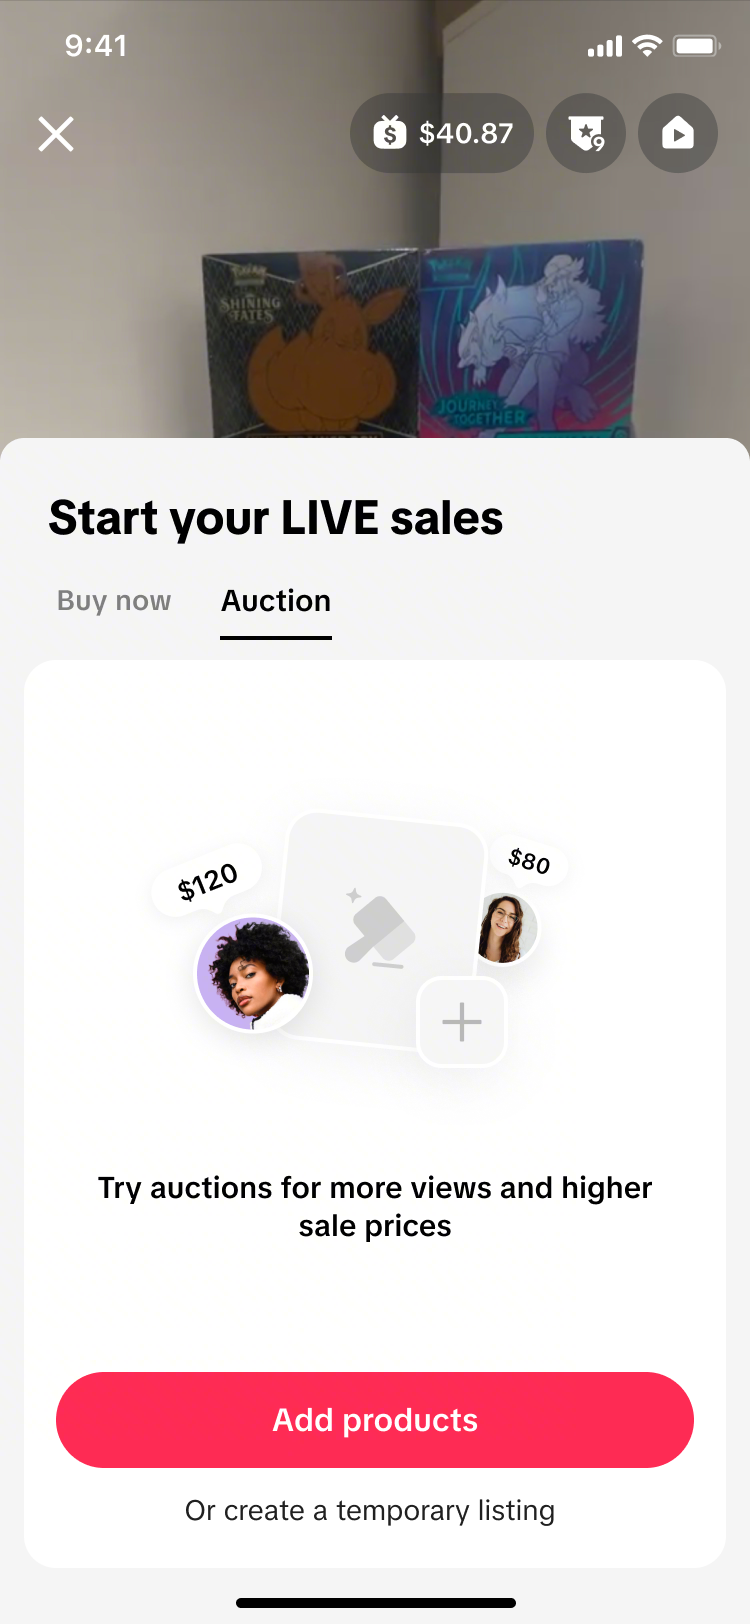
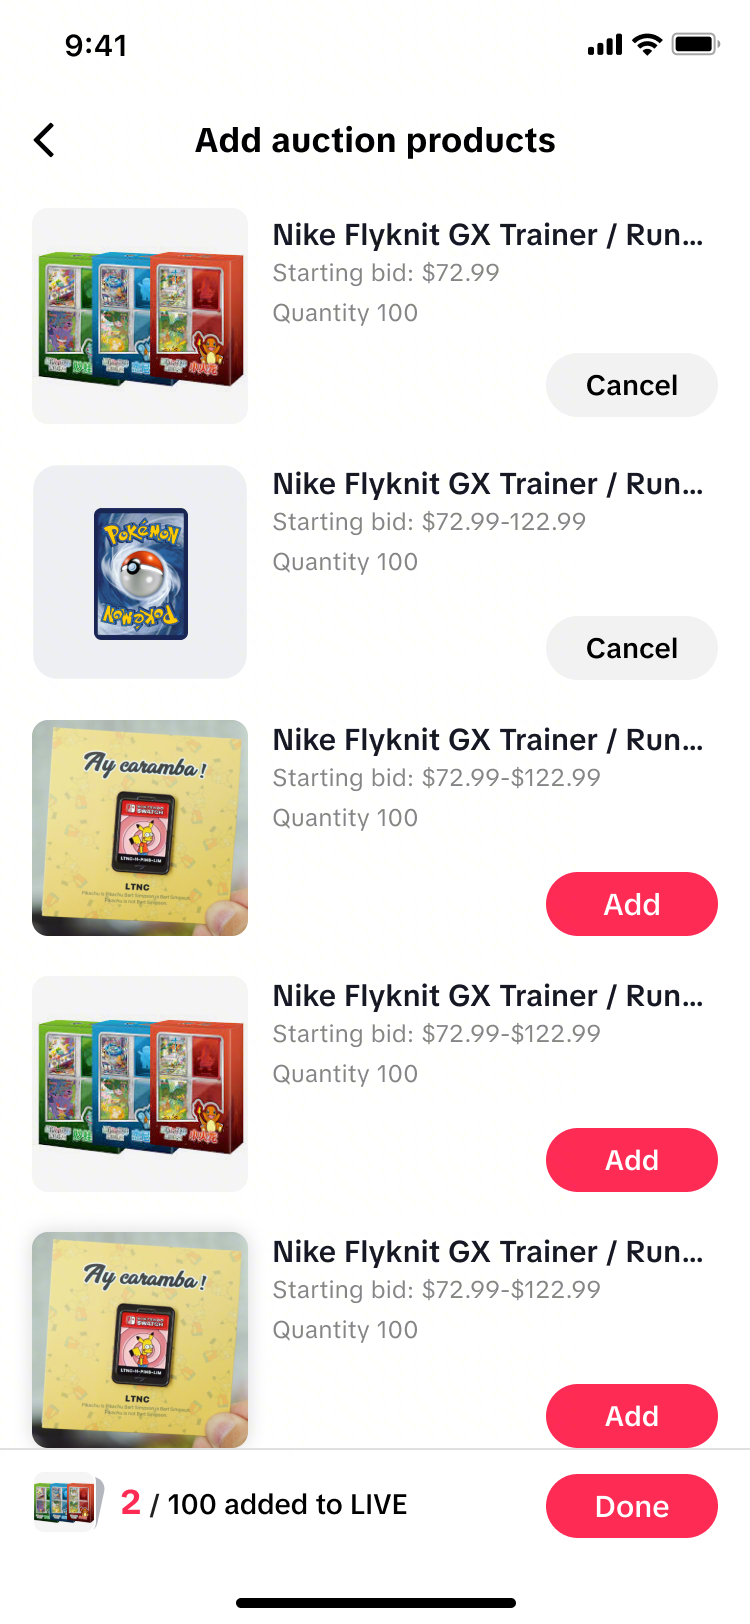
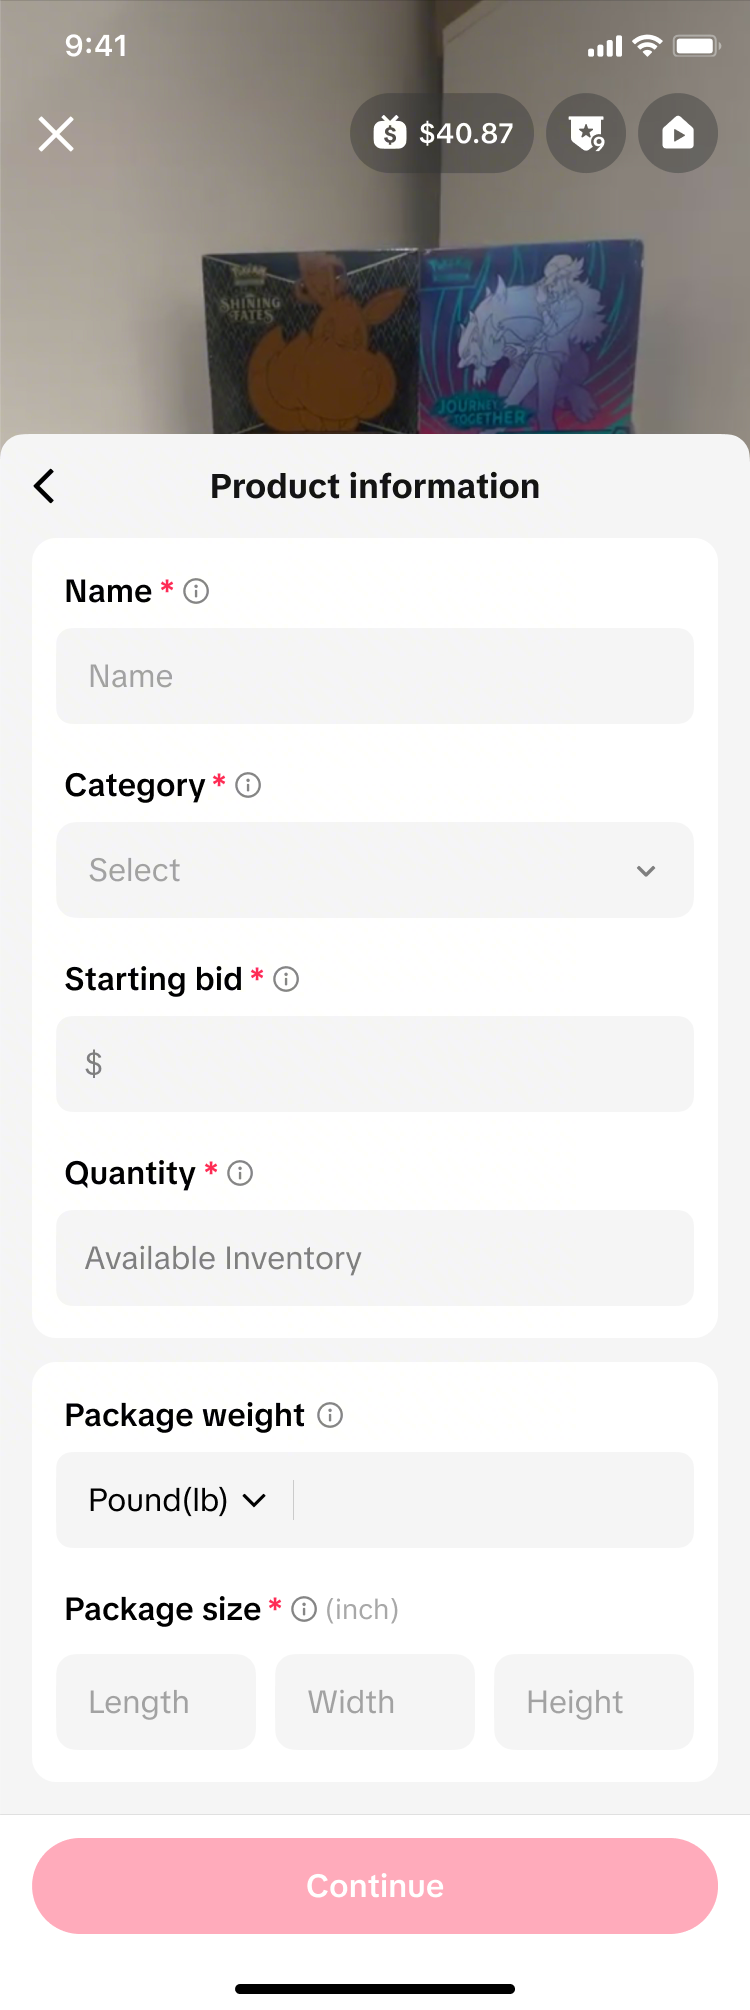
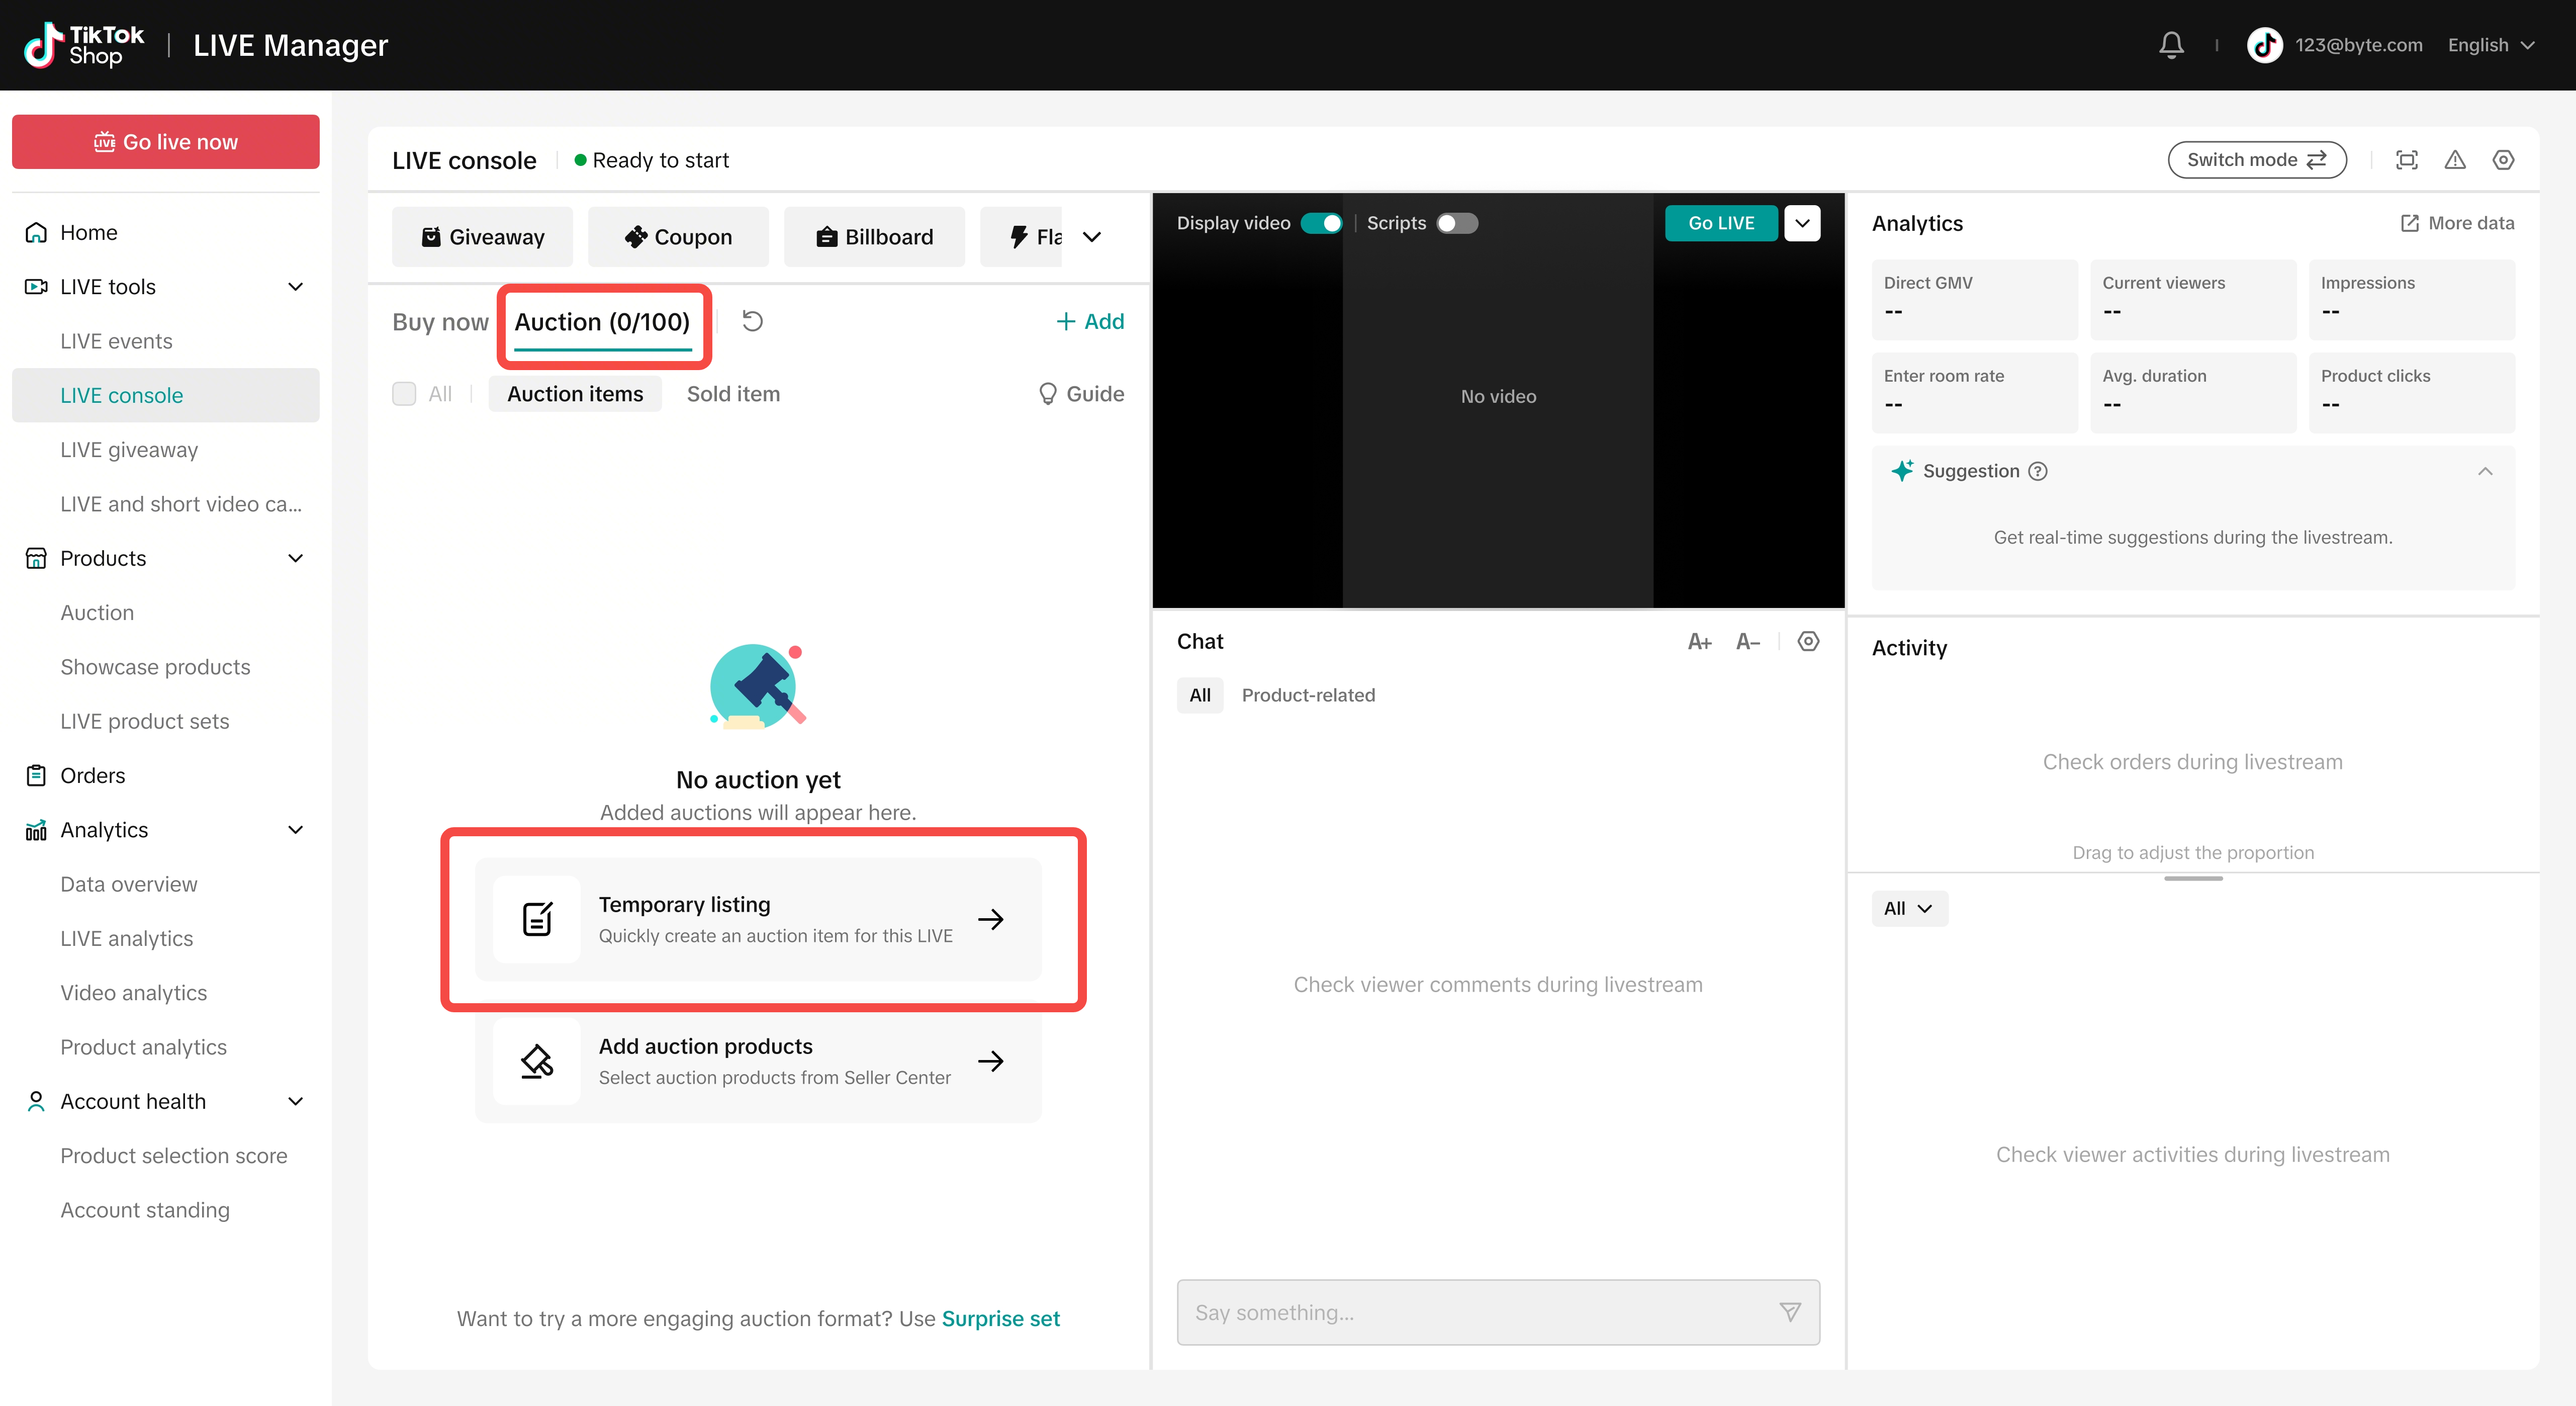
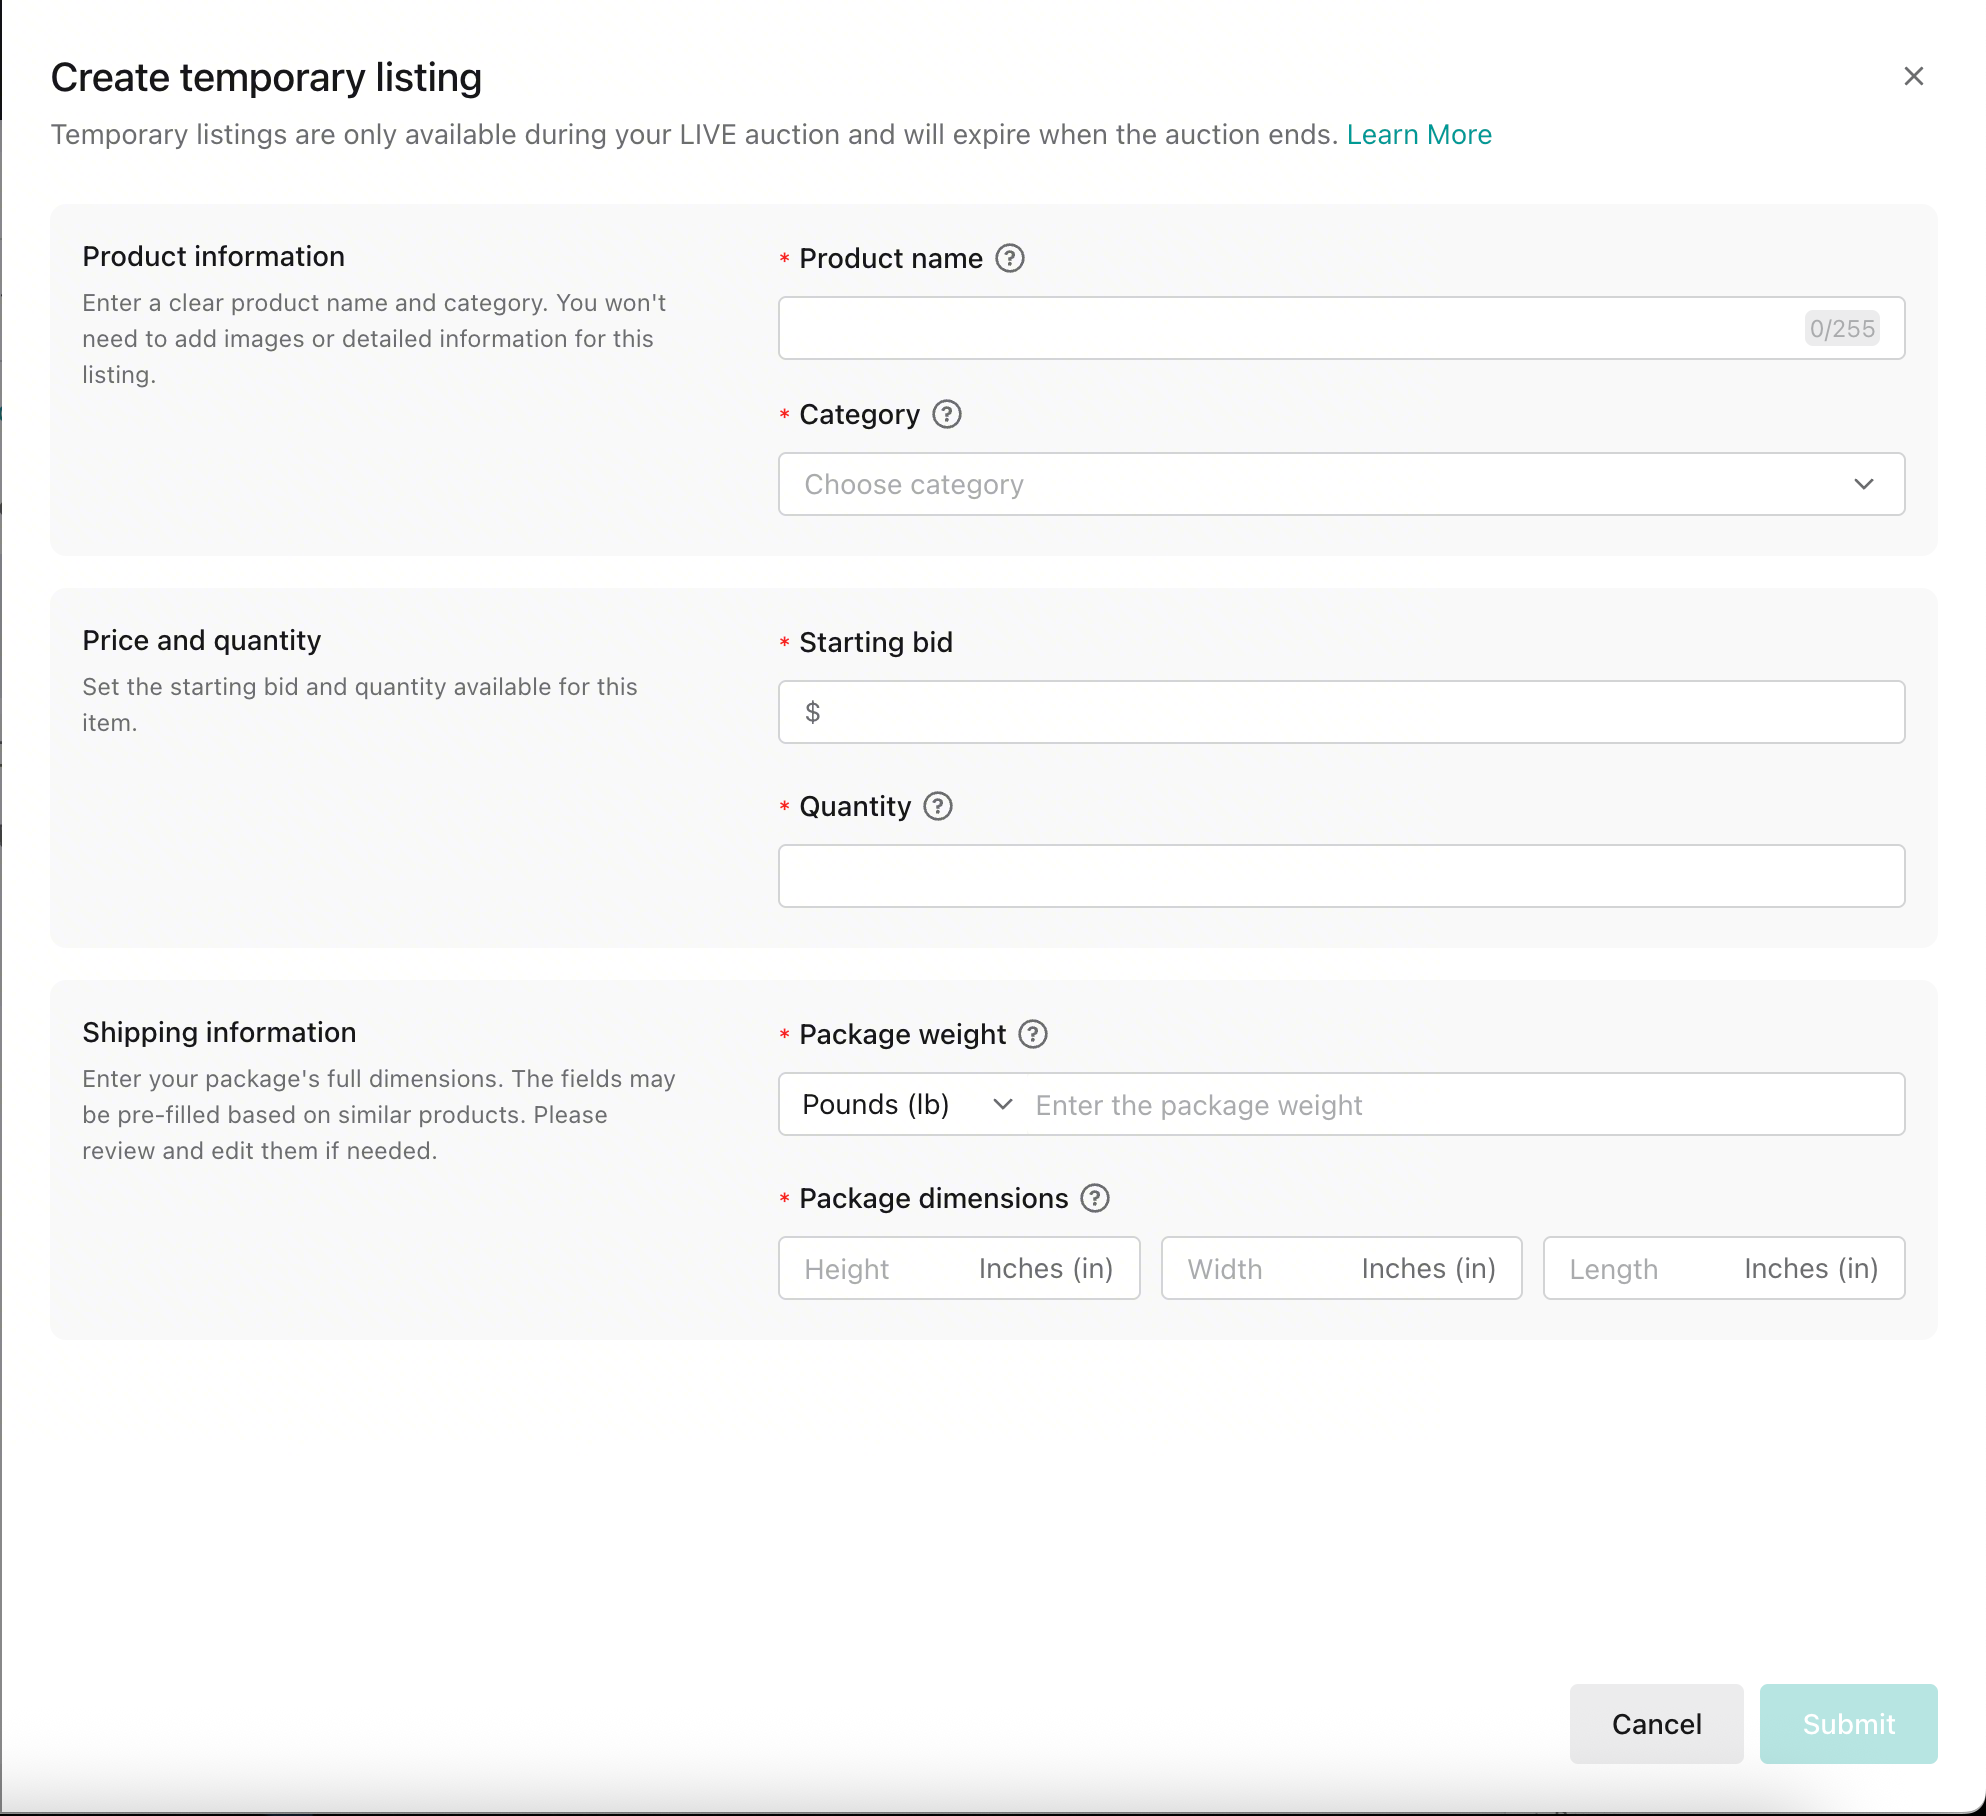
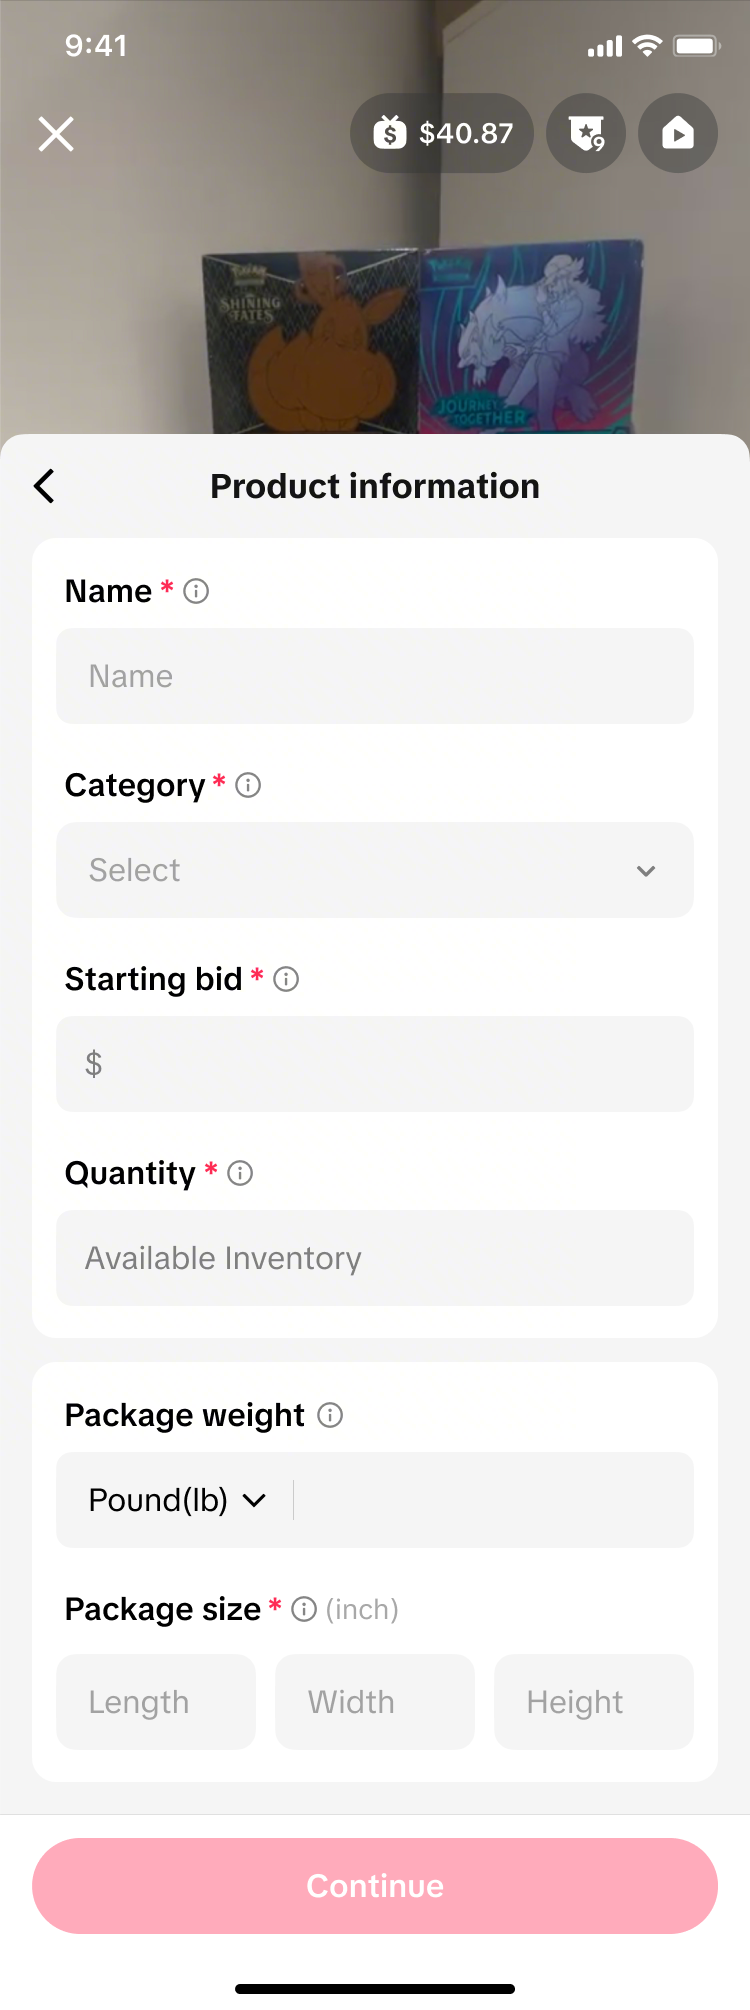
Step 1 : Create Auction Product Listing (Option 2) Open LIVE Console > Auction. Select Create temporary auction listing and enter the required product information, including:
Product name and category
Starting bid
Quantity
Package and shipping information
Avoid using terms such as “Bid” or “Auction” in the product name, as this may prevent the listing from passing review.
Desktop
Mobile
Step 3
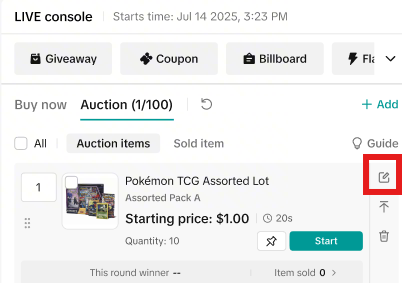
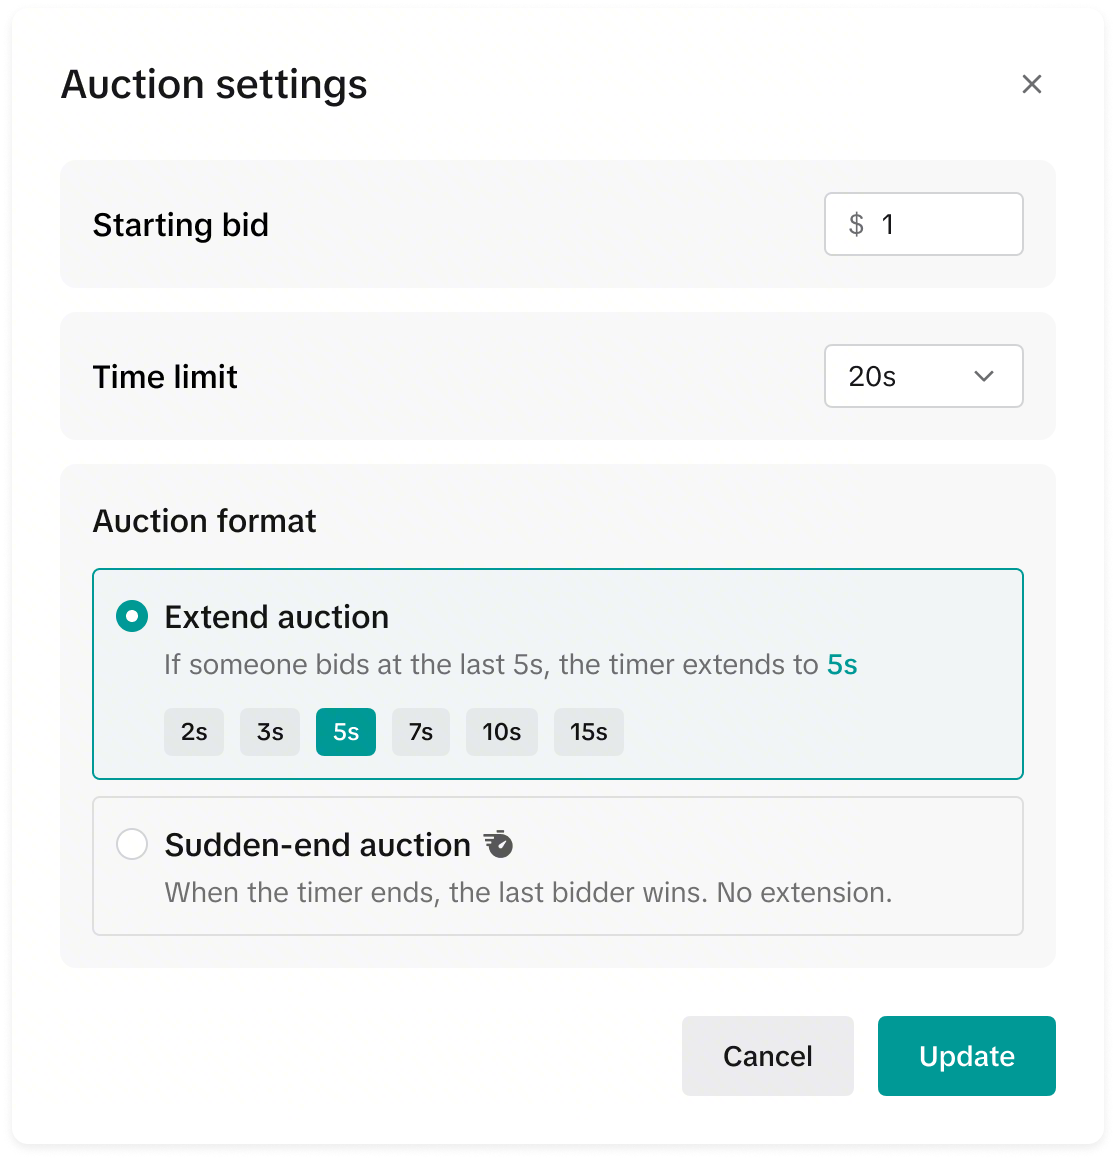
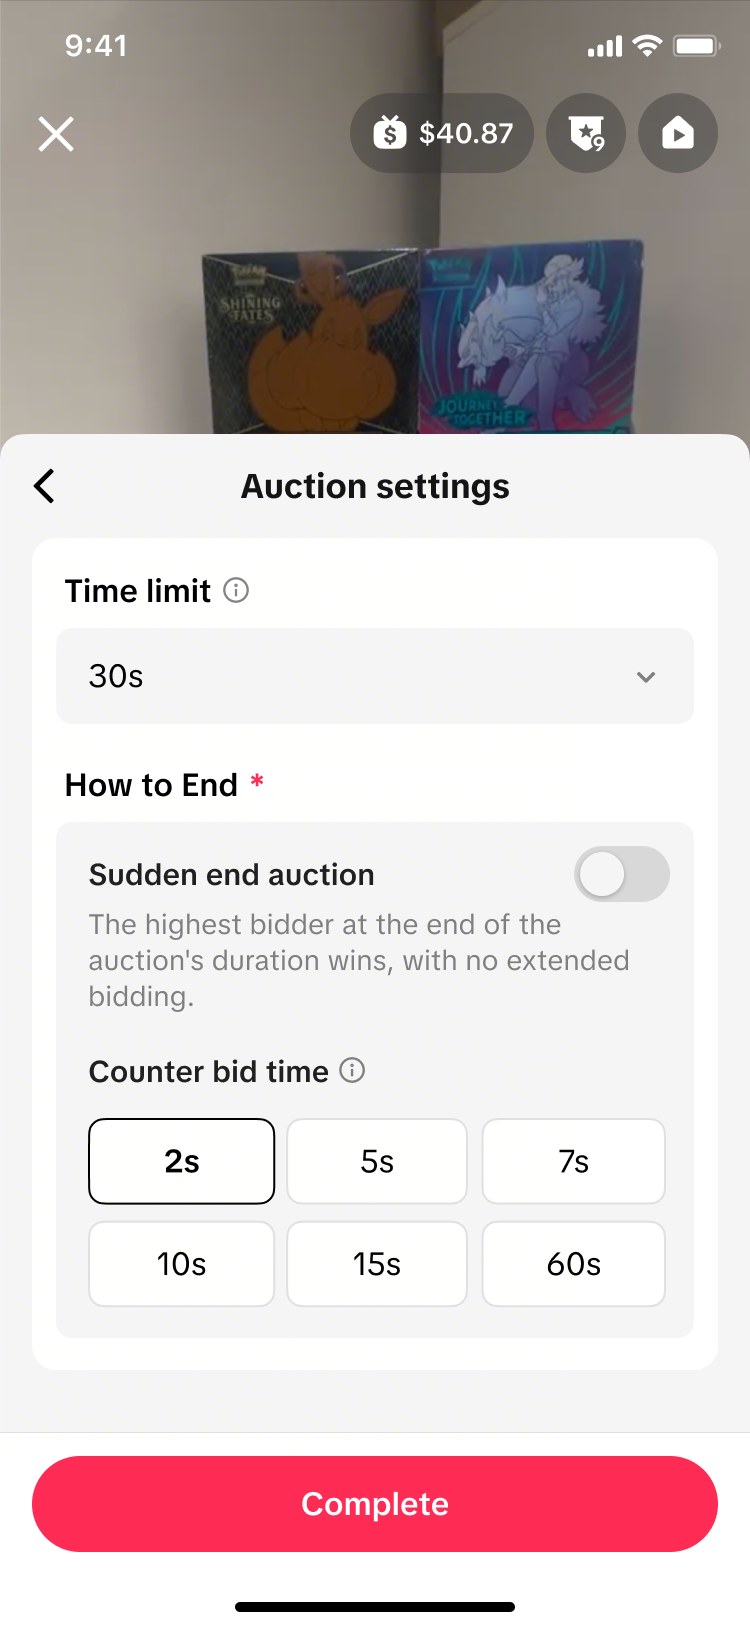
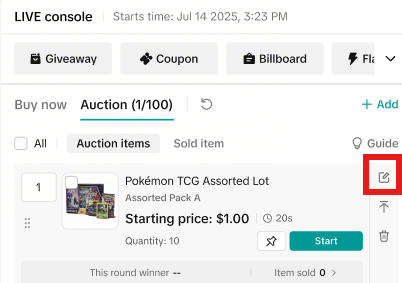
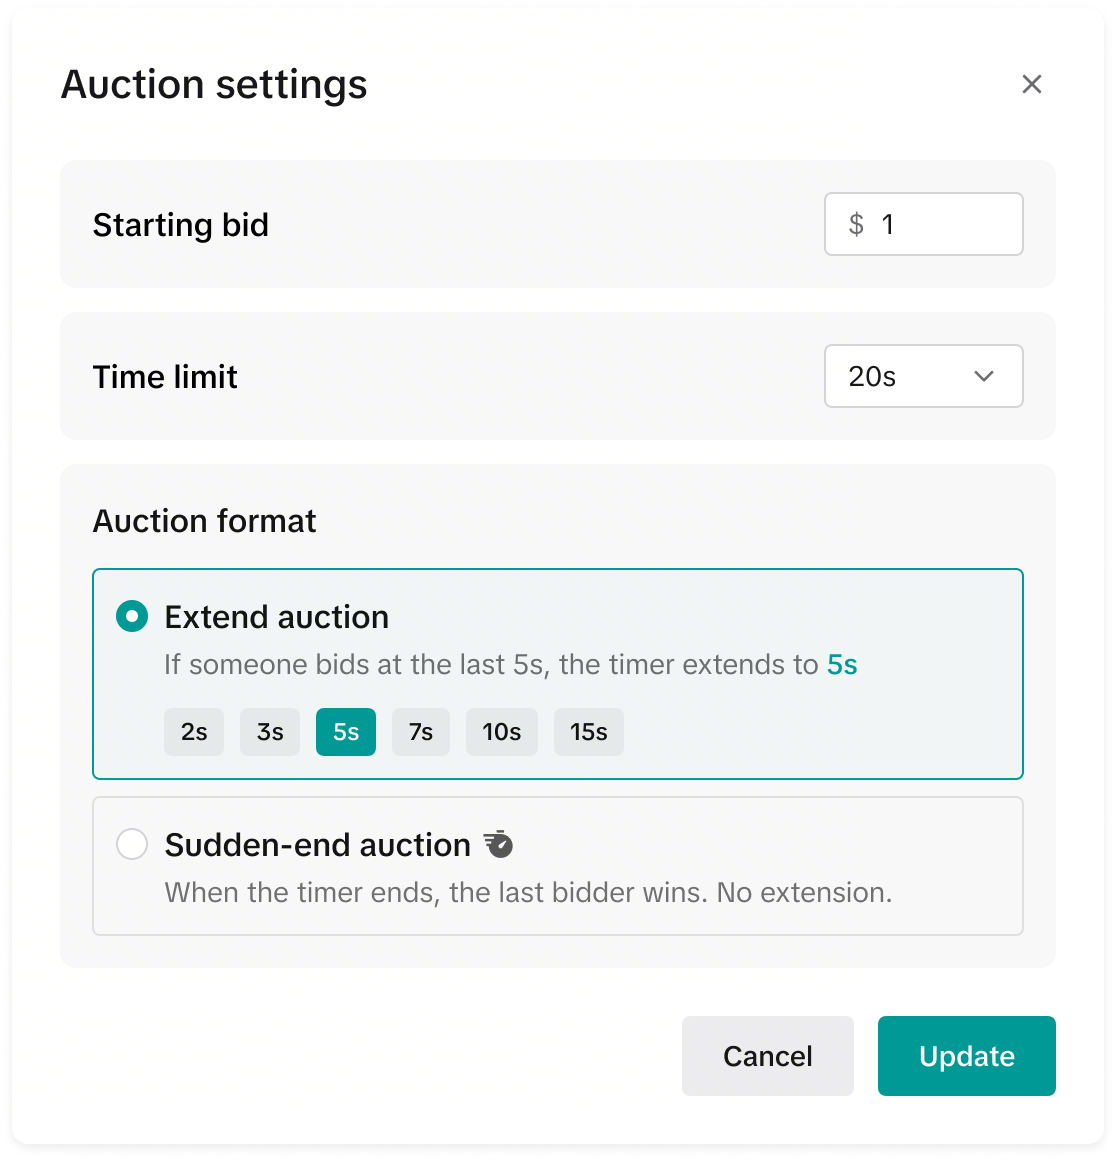
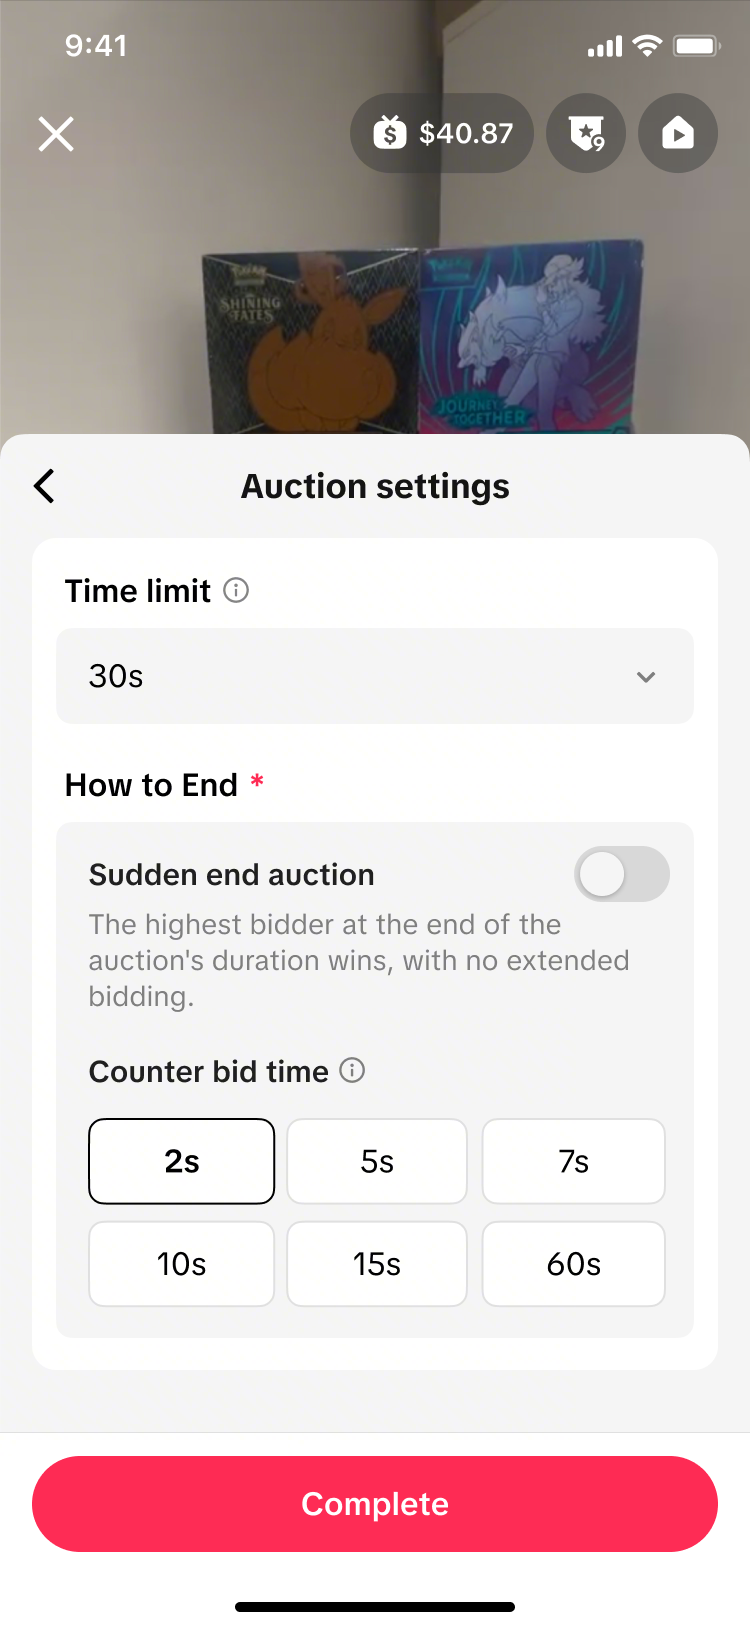
Step 2: Configure your auction Once the listing appears under the Auction tab, select the edit icon to configure the auction settings. Set:
Auction duration: From 3 seconds to 2 minutes.
Extend Auction: Automatically resets the countdown to a preset time when a bid arrives at the last moment.
Sudden Death: Prevents the countdown from extending when a last-second bid is placed.
Select Submit when finished.
Desktop
Mobile
Step 4
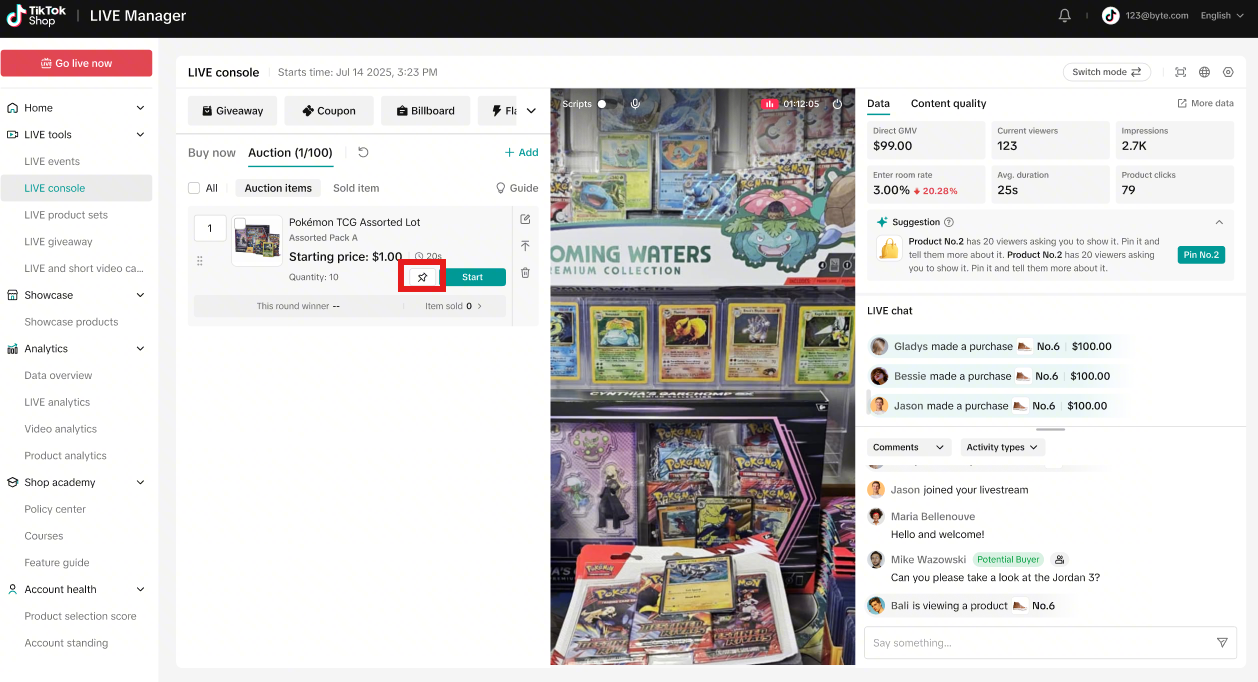
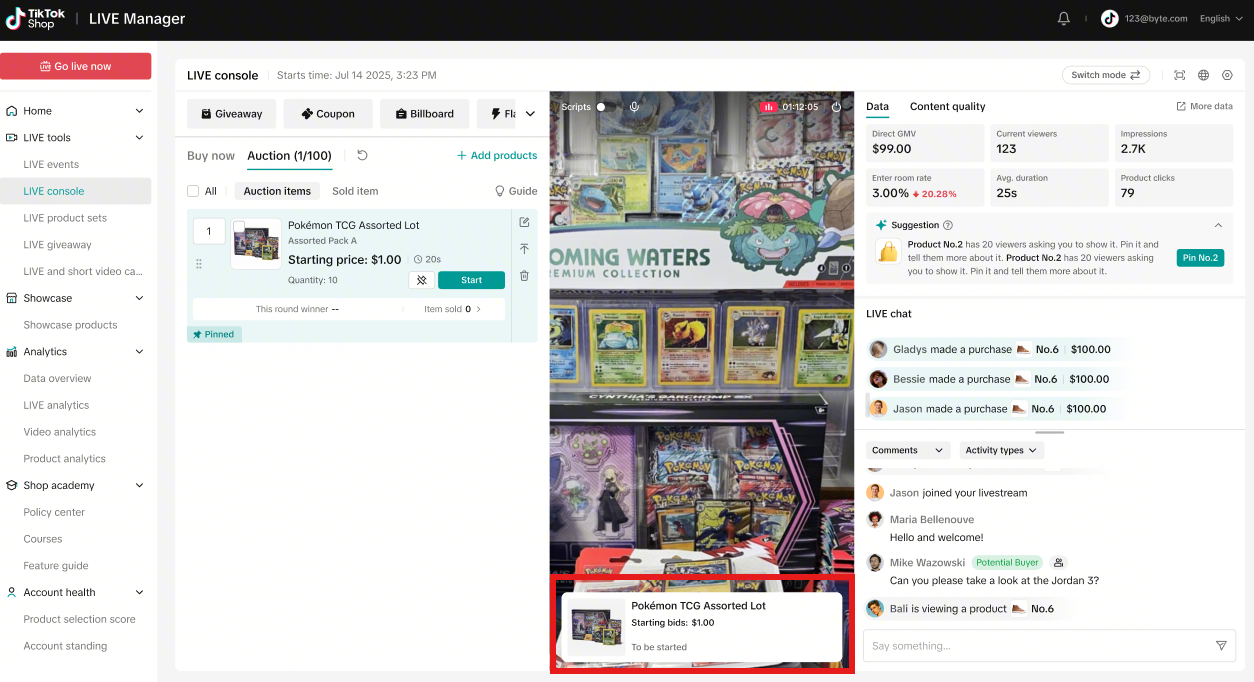
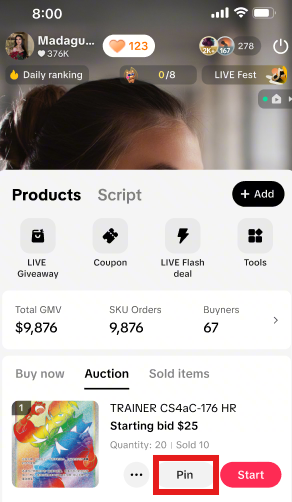
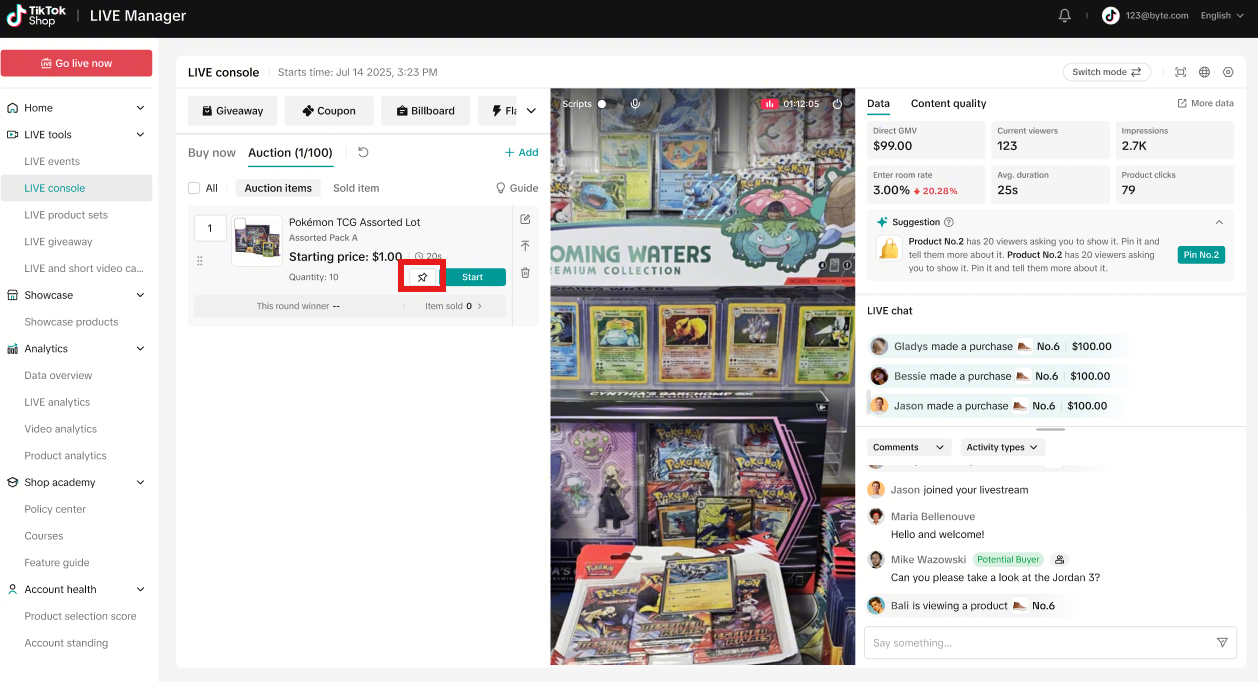
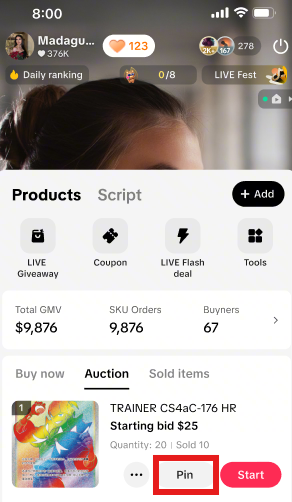
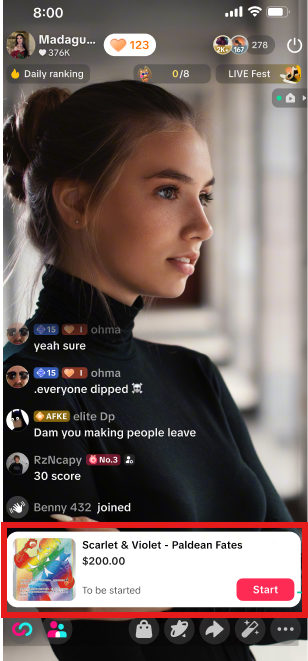
Step 3: Pin the product Select the pin icon next to the auction product you want viewers to see.
Desktop
Mobile
Step 5
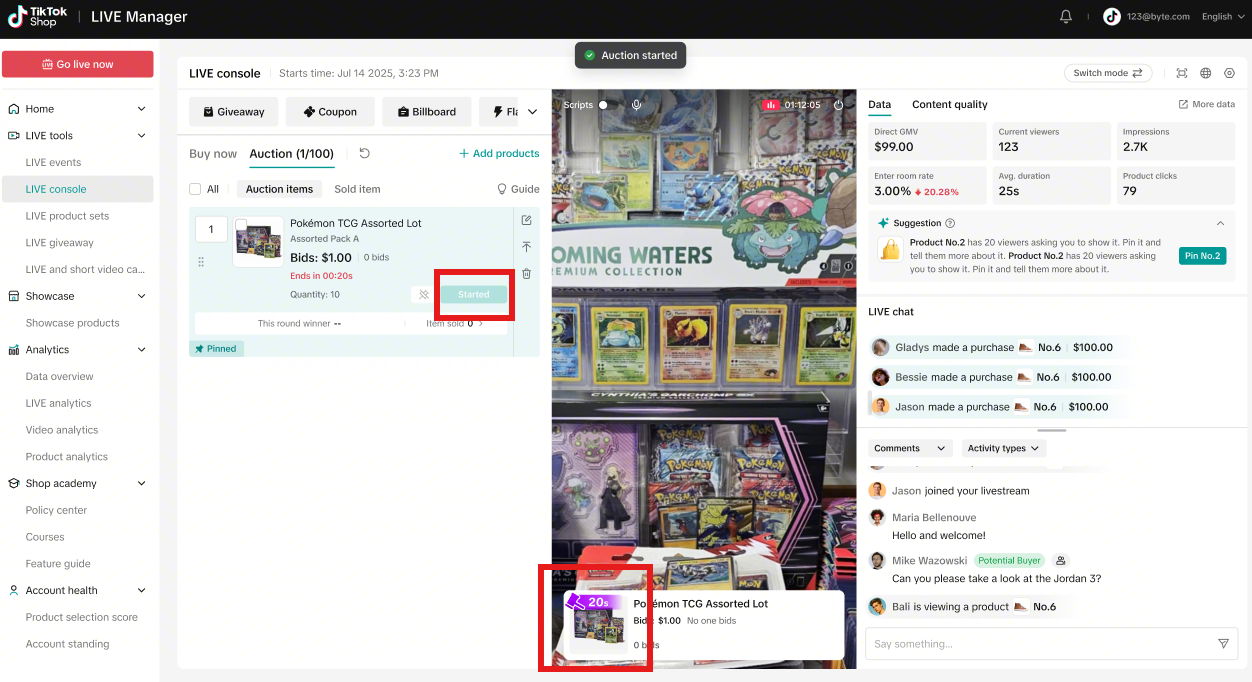
Step 2: Start the auction When you're ready, select Start. The auction countdown will begin and viewers can start placing bids. Once an auction starts, it must run until the countdown ends.
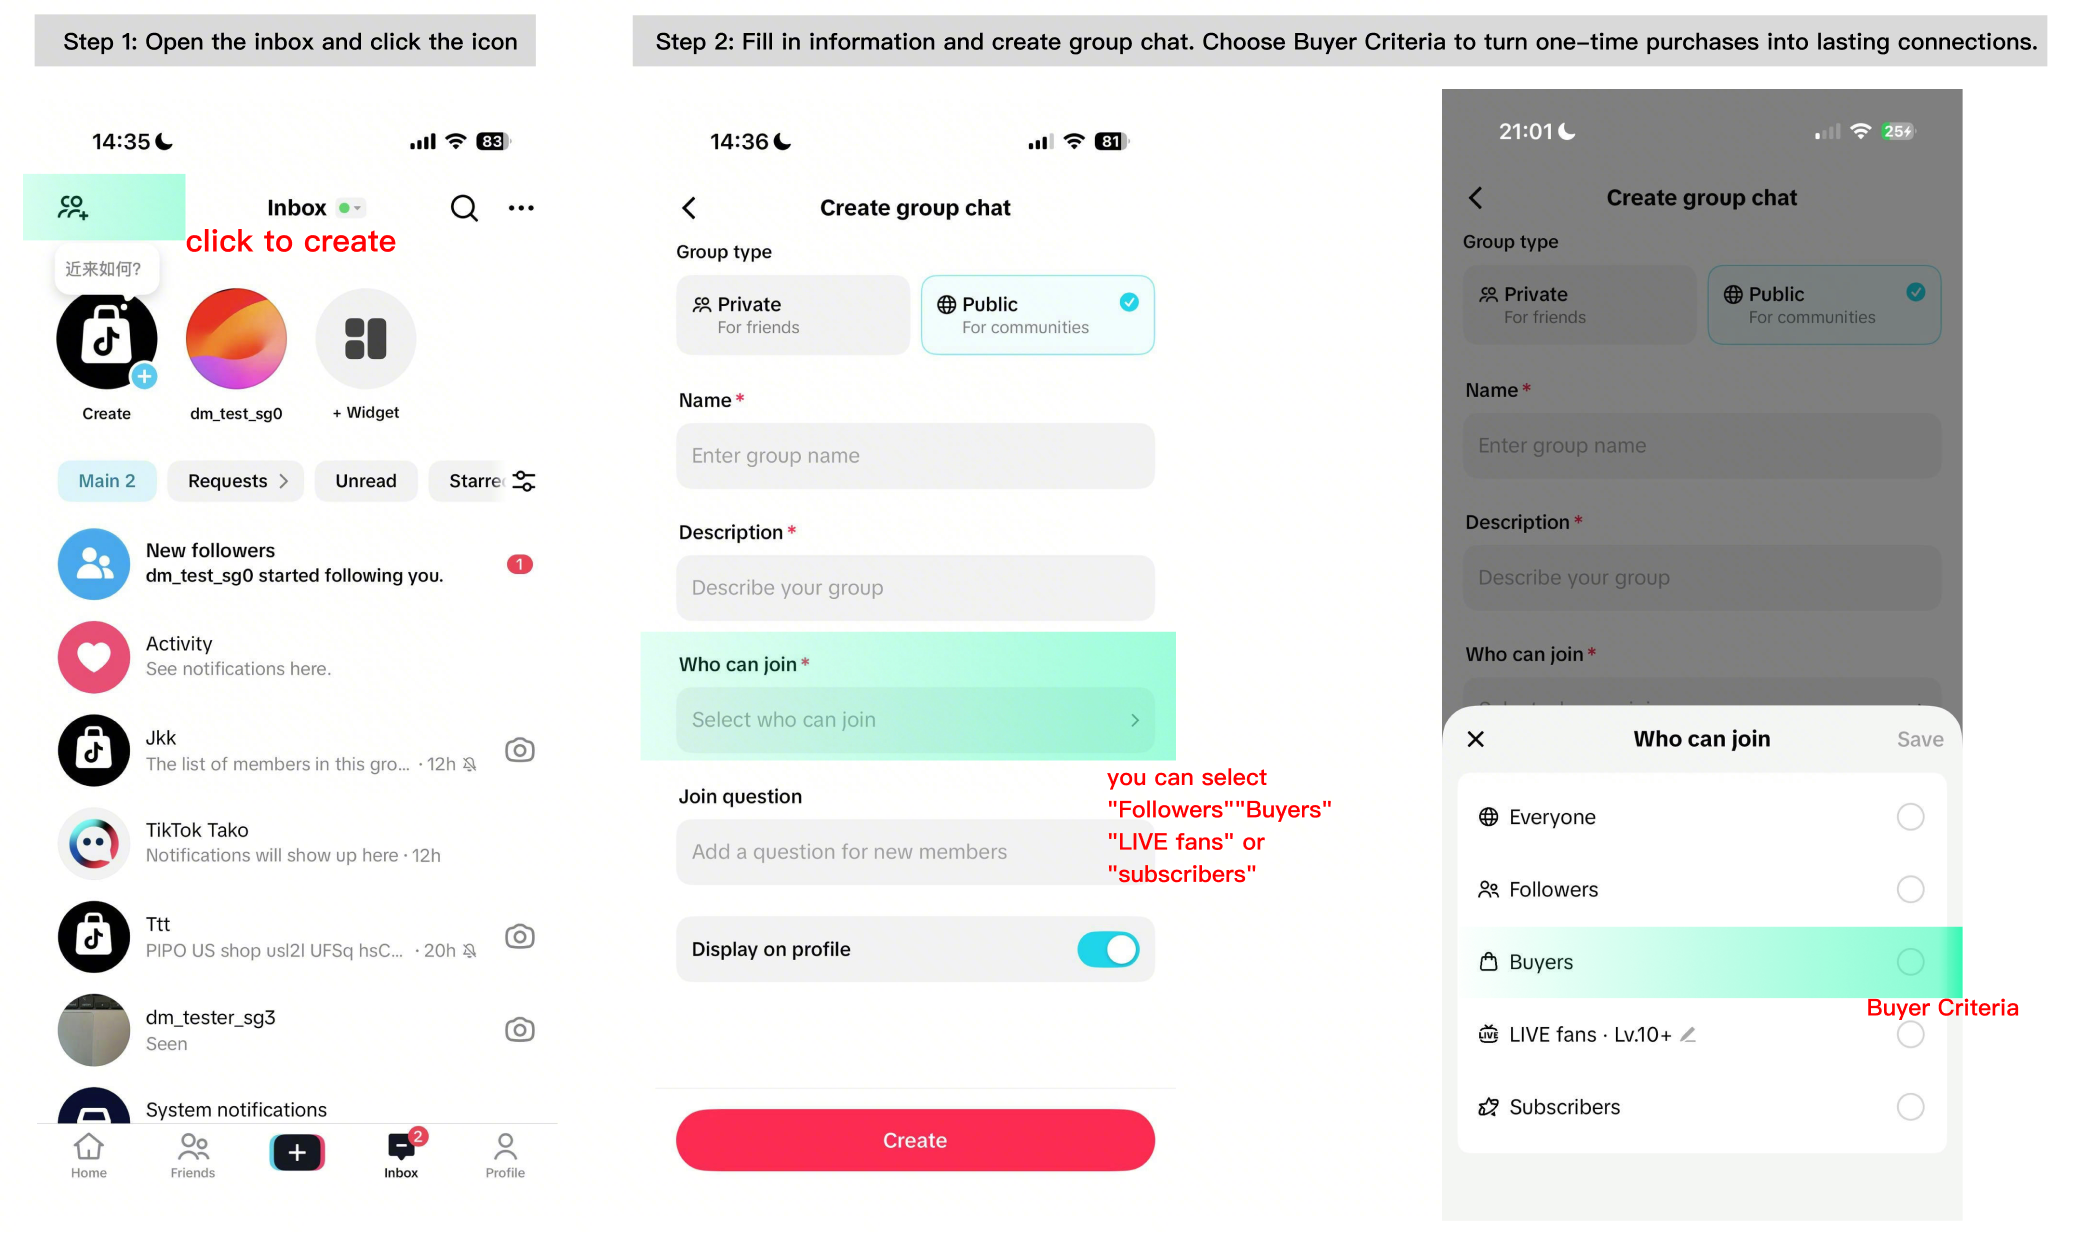
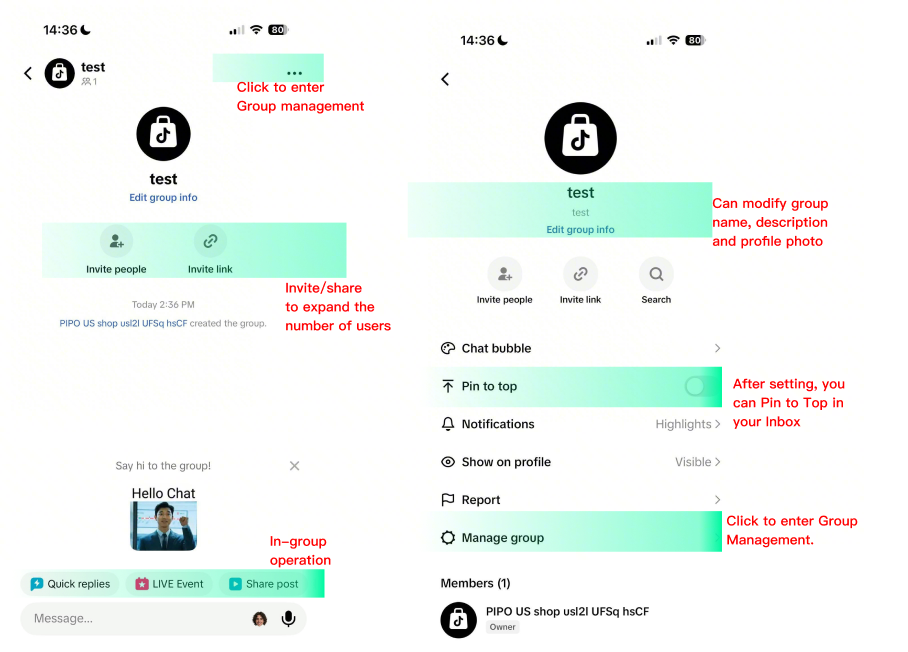
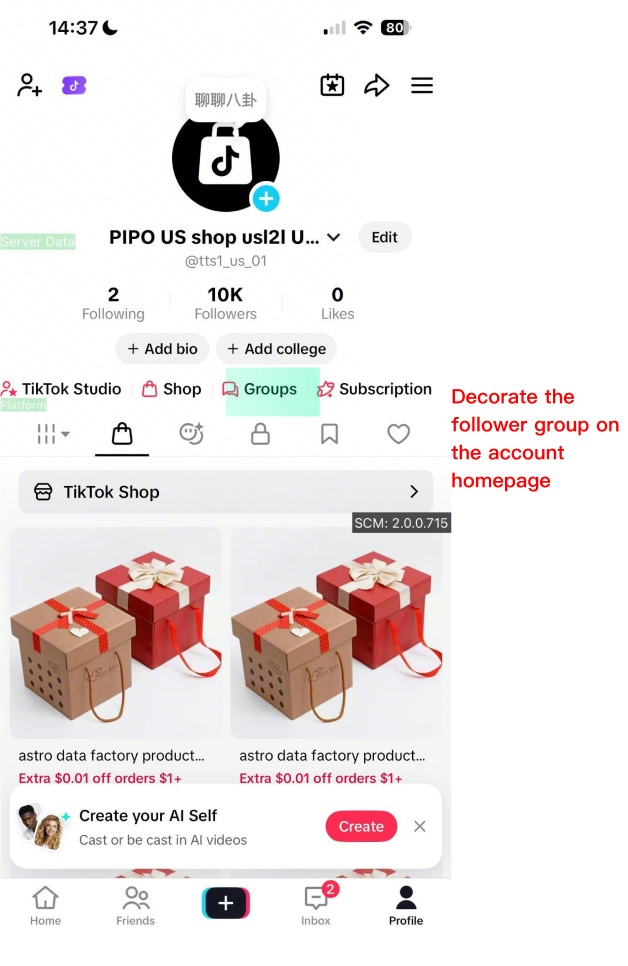
Unlike one-way outreach tools, Follower Groups create an ongoing space where members and the shop can interact. You can use the group to announce LIVEs, share products and promotions, answer questions, collect feedback, and build relationships that encourage customers to return and purchase again.
What is it?
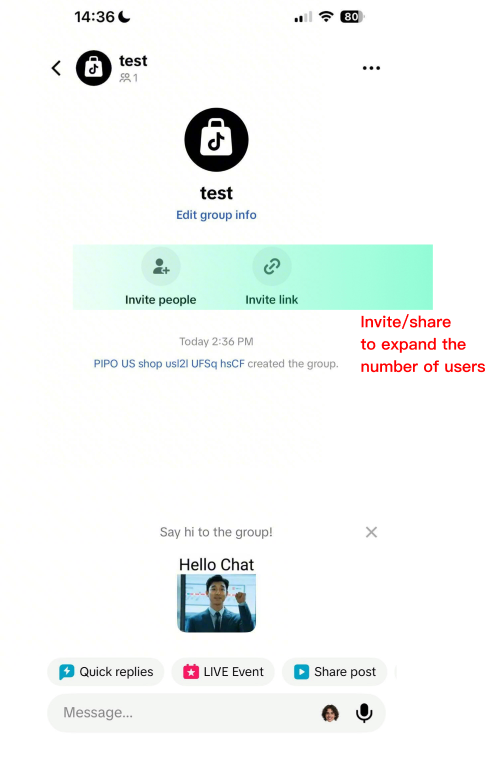
Follower Group lets eligible TikTok Shop sellers create a private community on TikTok where followers, buyers, LIVE fans, and other high-intent users can stay connected with your shop. Unlike one-way outreach tools, Follower Groups create an ongoing space where members and the shop can interact. You can use the group to announce LIVEs, share products and promotions, answer questions, collect feedback, and build relationships that encourage customers to return and purchase again. Follower Groups can help you:
Turn viewers and customers into a recurring community.
Directly reach high-intent followers before a LIVE.
Bring group members back into your LIVE, shop, or content.
Share new products, discounts, and exclusive benefits.
Answer questions and provide ongoing customer support.
Encourage repeat purchases and customer advocacy.
In the US, sellers need an eligible shop, including SPS ≥ 3.5, and must create and manage the group through an Official Account or Marketing Account bound to the shop. Each group can have up to 300 members.
*Why it drives traffic*
This is the tool that converts a one-time follow into a durable, two-way owned channel — it's where a viewer captured by a Giveaway or Follower Coupon should land next.
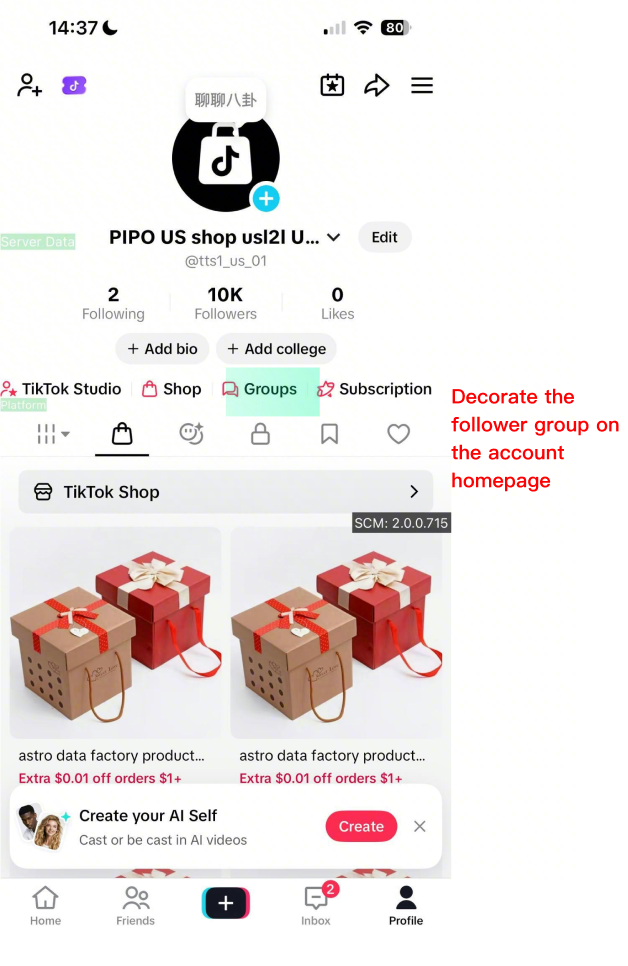
Keeping the group visible on the profile means viewers who discover your content or LIVE later can self-serve into the community without a direct invite.
How to set it up?
Step 1
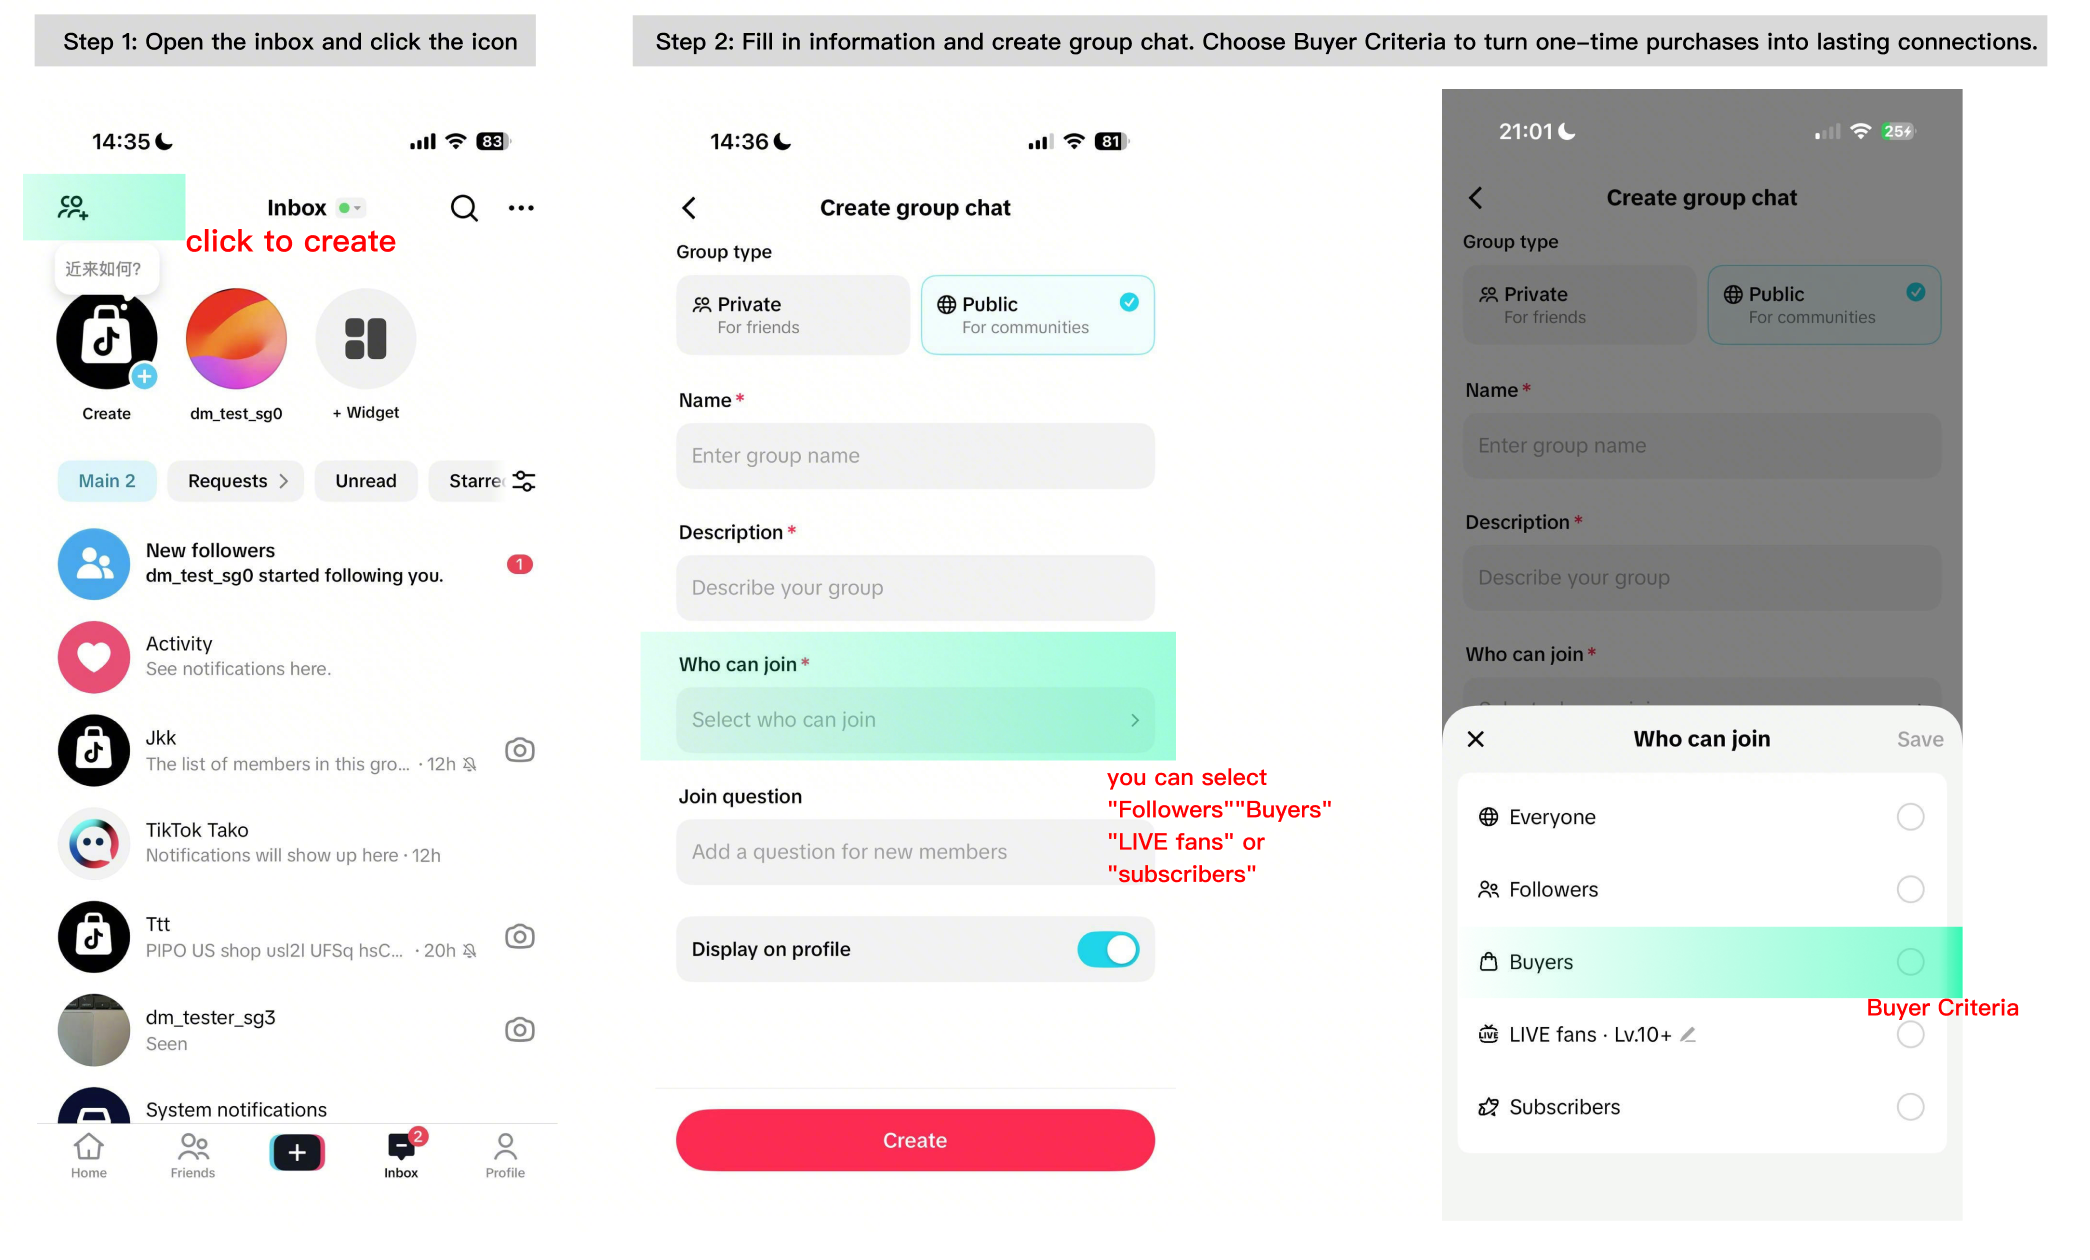
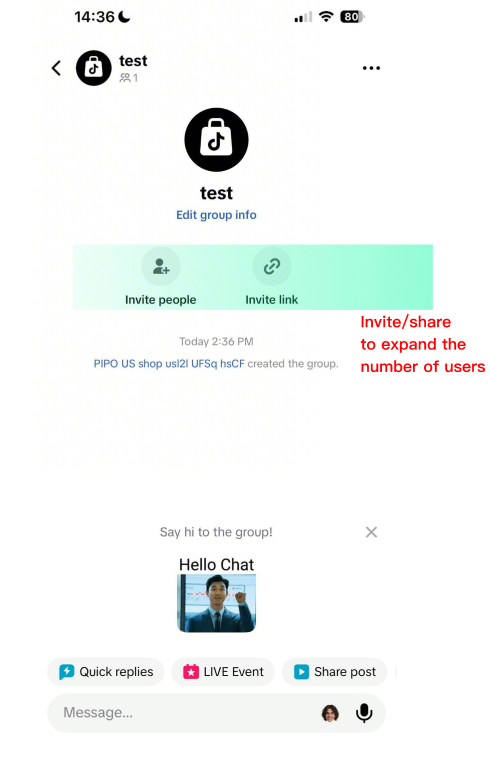
Step 1: Create Your Group From the bound Official or Marketing Account:
Open TikTok > Inbox.
Select the option to create a group chat.
Select Public group.
Enter your:
Group name
Group description
Entry requirements
Choose who can join. Available criteria can include:
Followers
Buyers
LIVE fans
Subscribers
Select Create.
Note:
Make sure you are using the latest version of the TikTok app.
If the Follower Group entry point does not appear, your account may not currently meet the feature requirements.
Mobile
Step 2
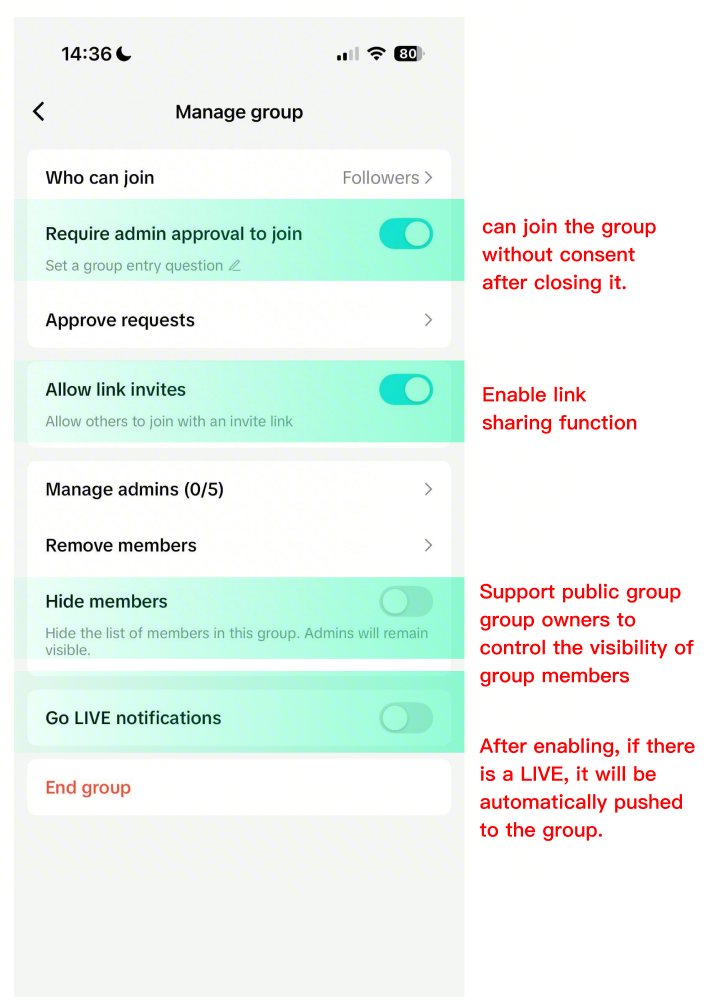
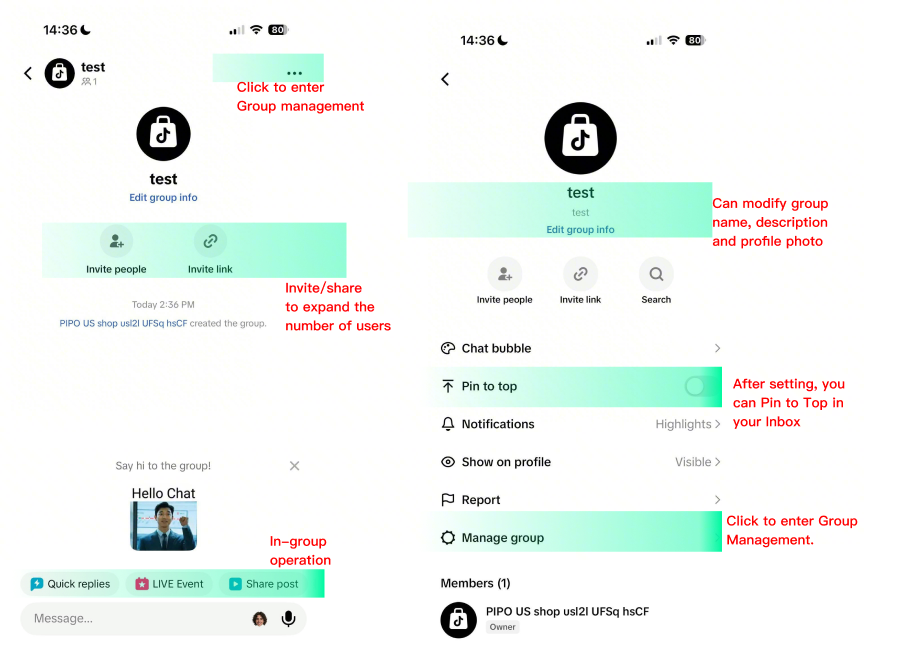
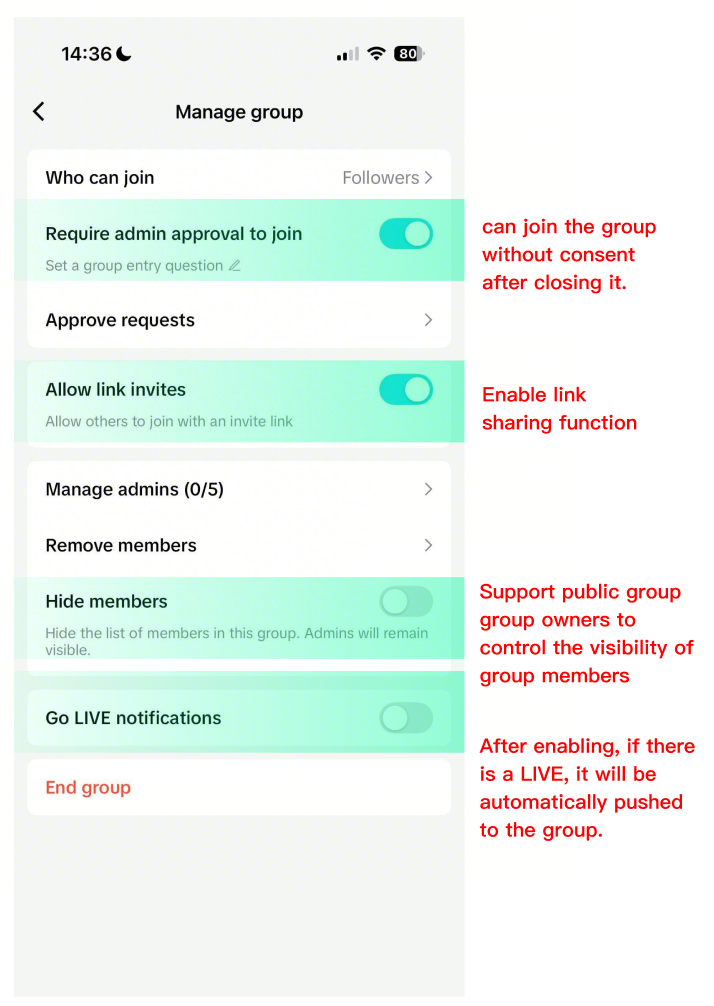
Step 2: Configure Your Group After creating the group, customize its settings based on how you plan to manage your community. You can manage settings such as:
Show on profile: Make the Follower Group visible from your account profile so more users can find and join it.
Join Approval: Require approval before a user enters the group.
LIVE Notifications: Help group members stay informed about your LIVEs.
Member Visibility: Control whether members can see the group member list.
Chat Nicknames: Manage nickname visibility.
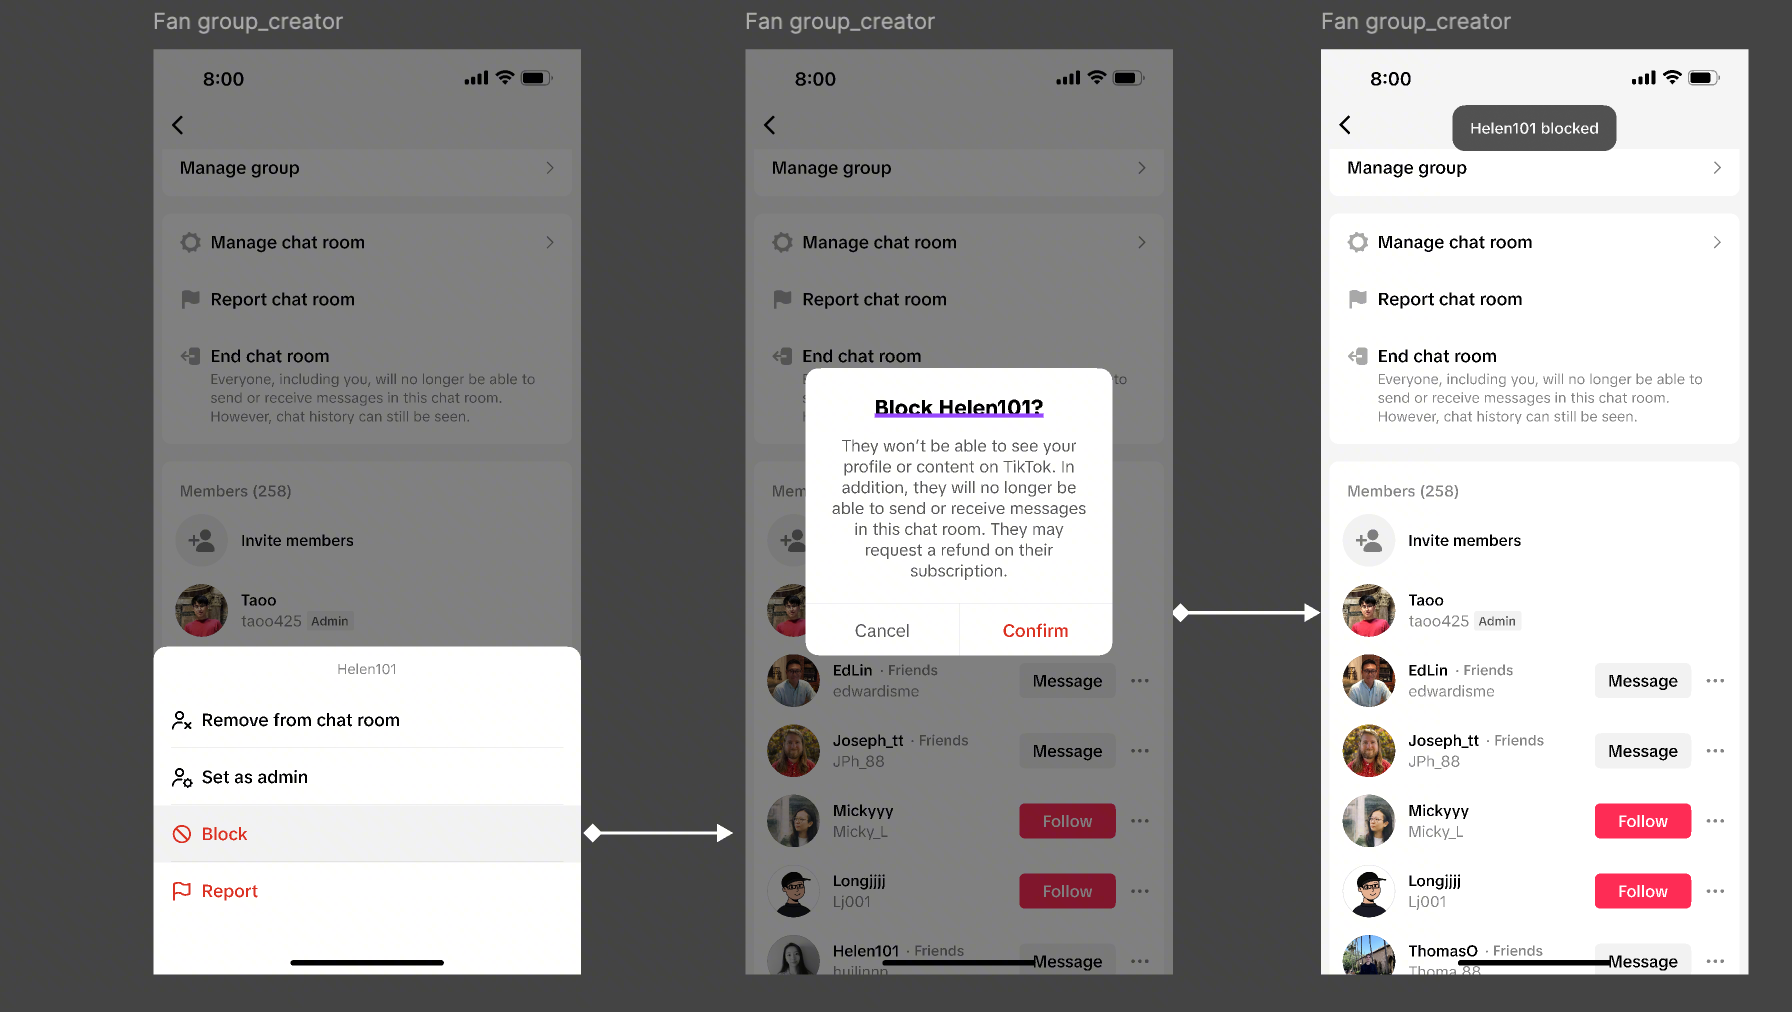
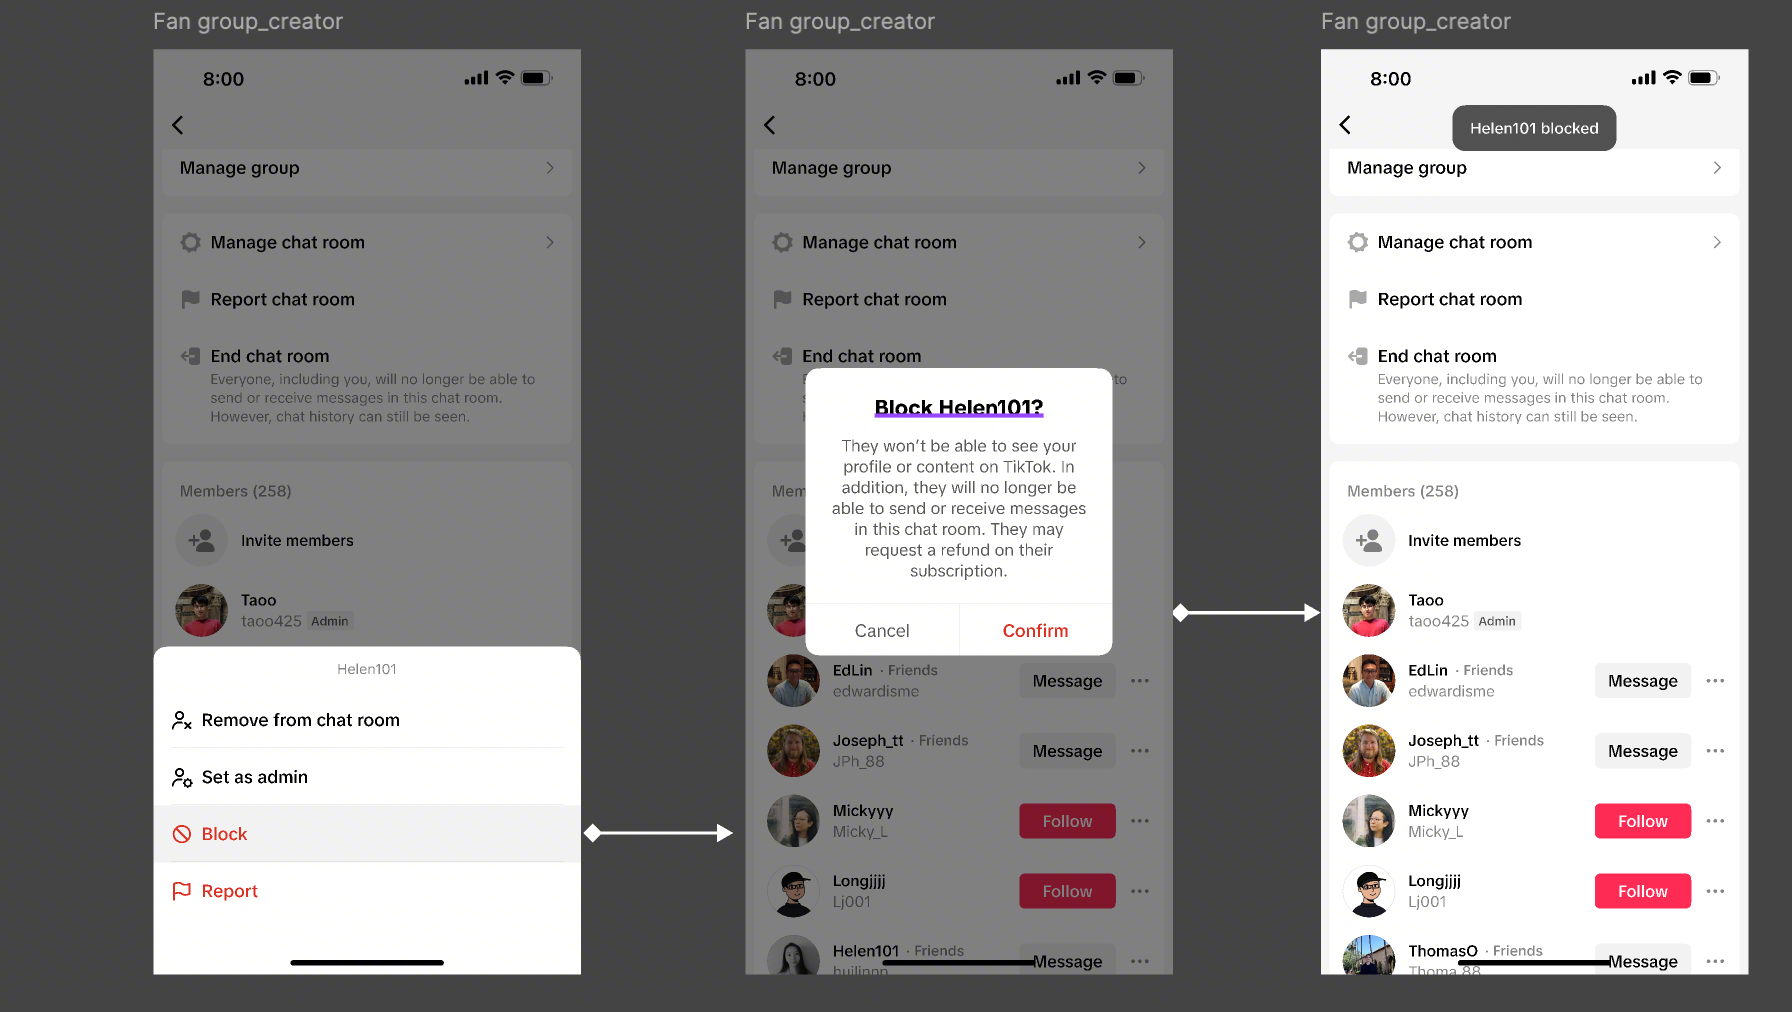
Administrators: Assign people to help manage the group.
For ongoing growth, keeping your Follower Group visible on your profile is particularly important so viewers can easily find it after discovering your content or LIVE.
Mobile
Step 3
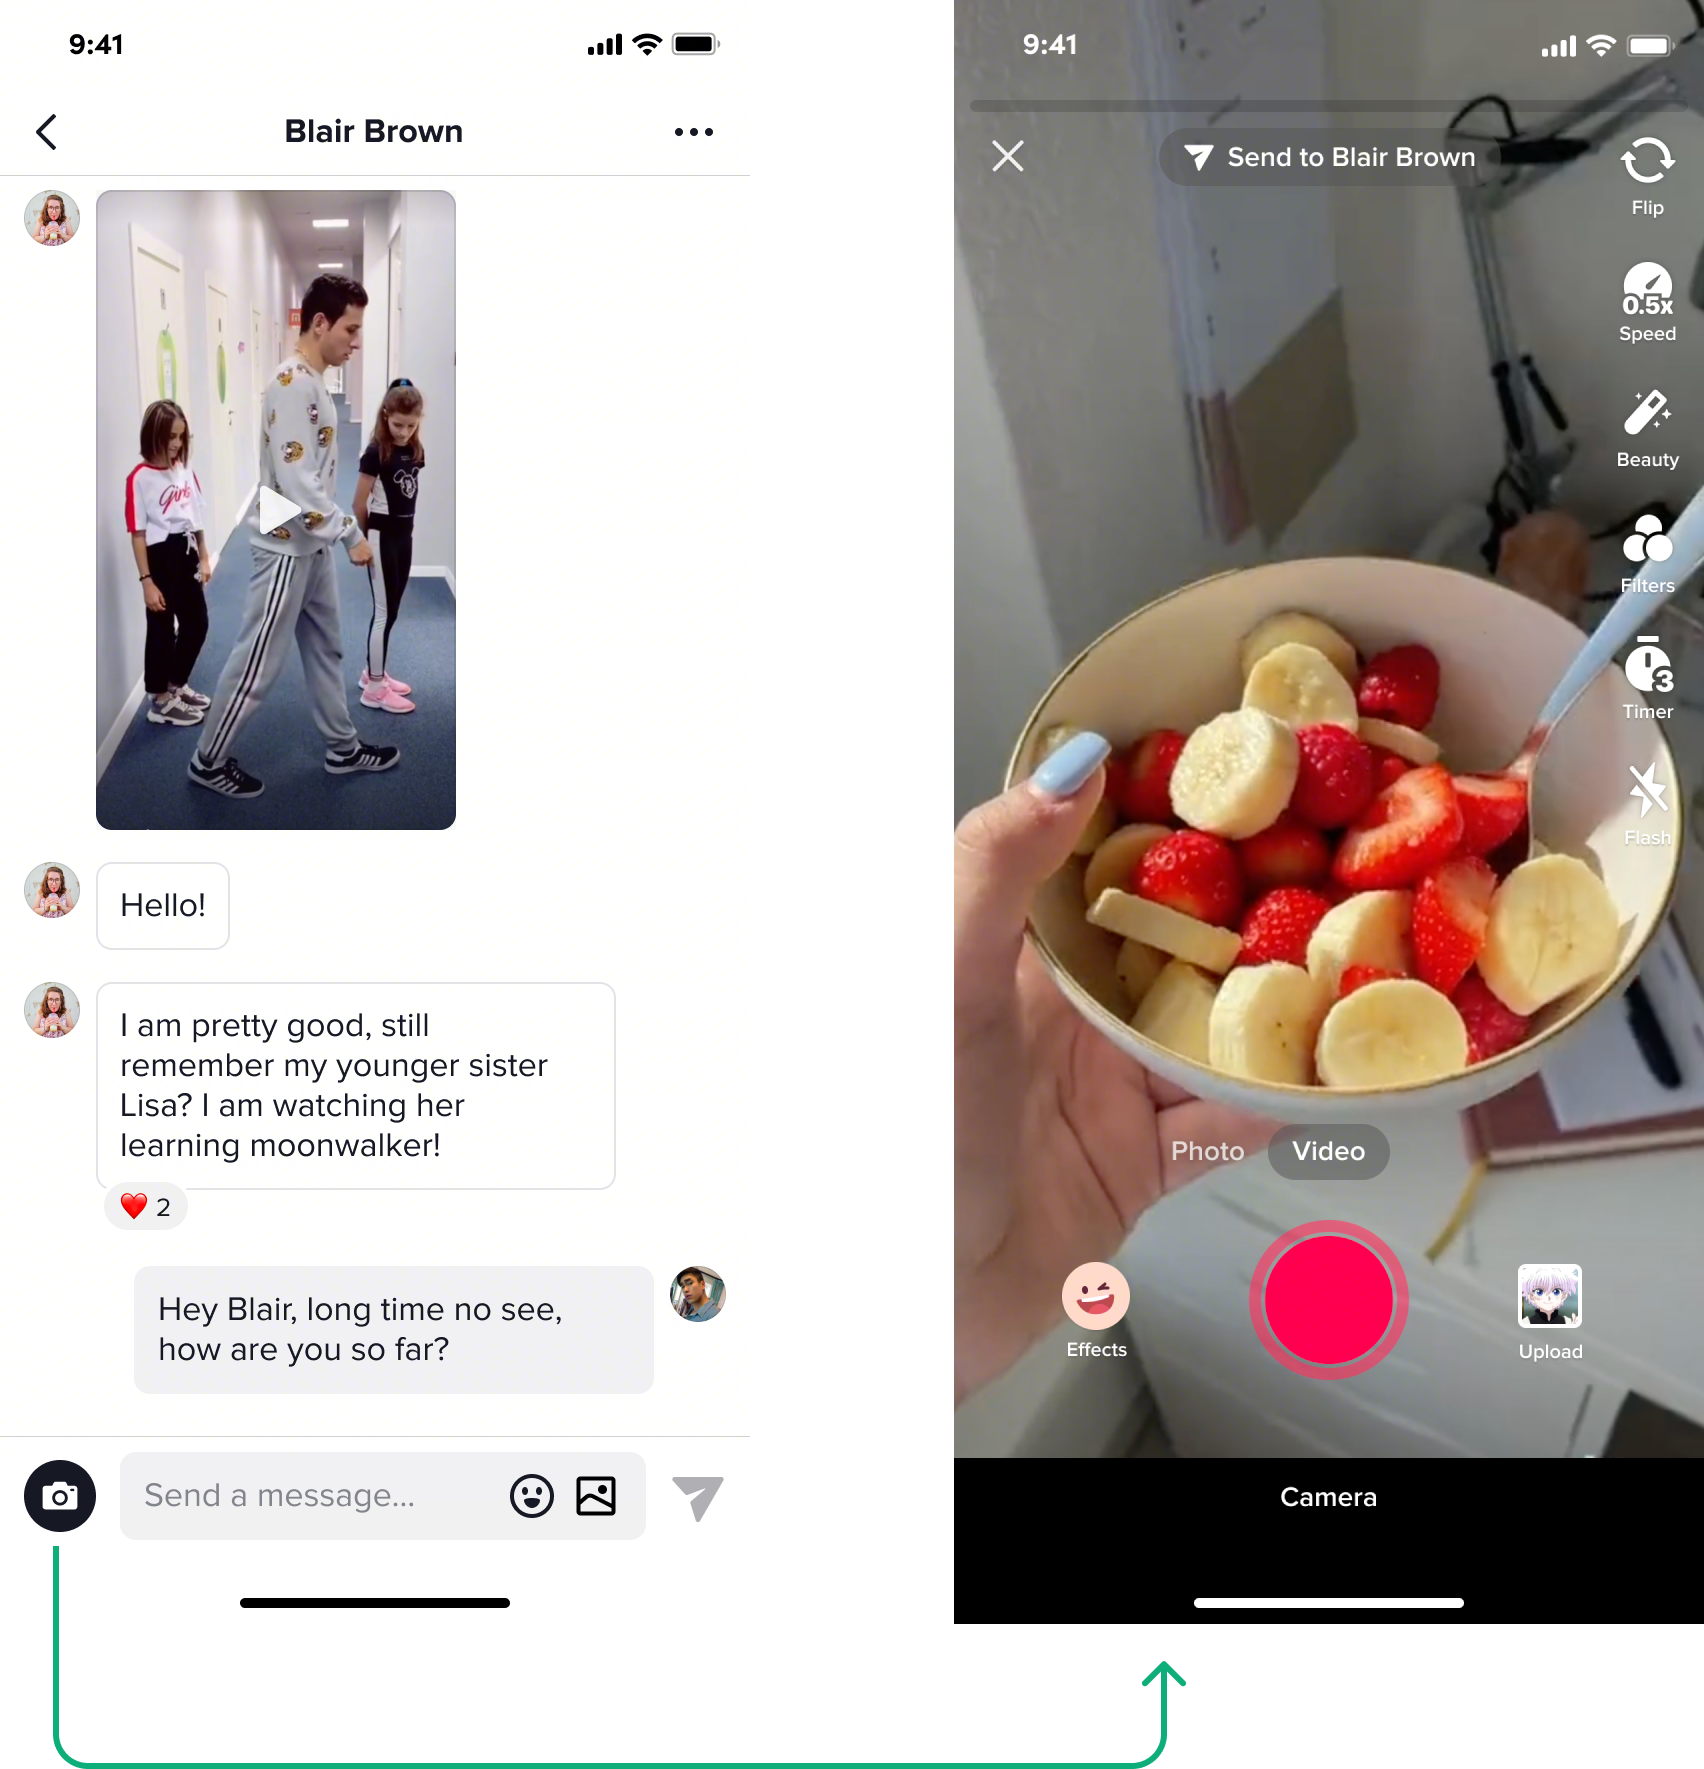
Step 3: Set Up Your Group Interactions Follower Groups support multiple ways to interact with members. Depending on your account and available capabilities, you can:
Set a welcome message for new members.
Invite users to join the group.
Send messages, photos, and videos.
Share supported links.
Remove users or inappropriate messages.
Assign administrators.
Share products and short videos.
Some commerce capabilities vary by account type. For example, the Academy guide currently notes that product sharing is available through the Official Account, but not yet through Marketing Accounts
Mobile
Step 4
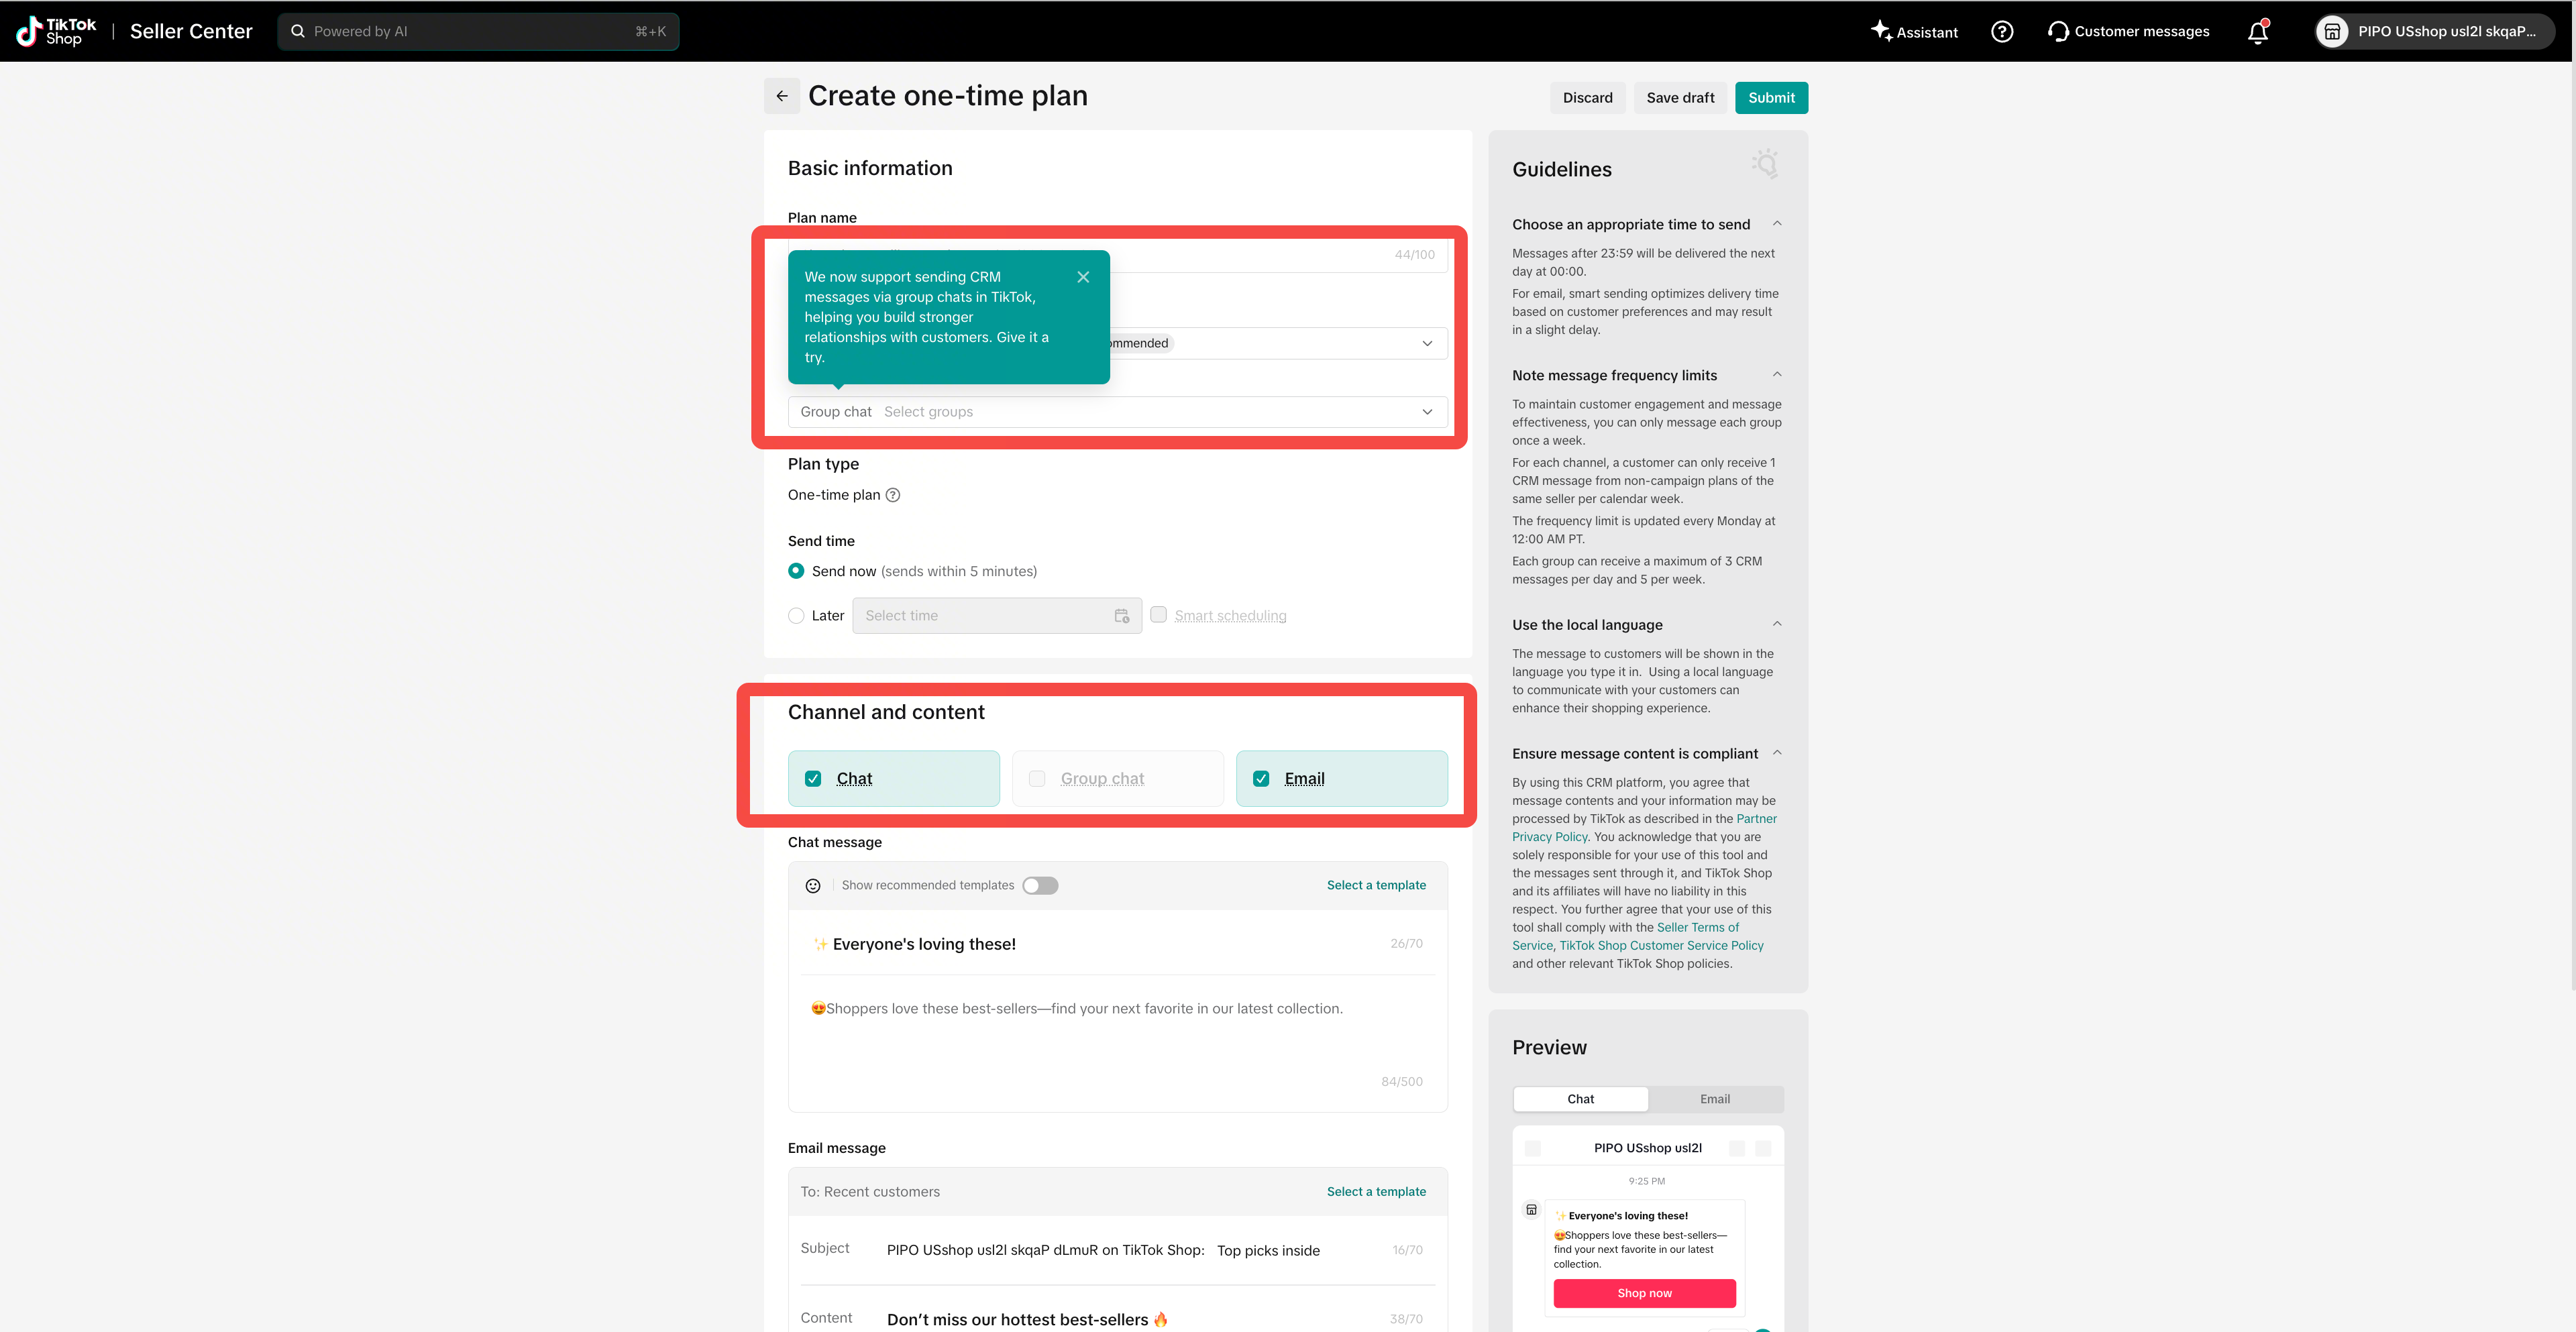
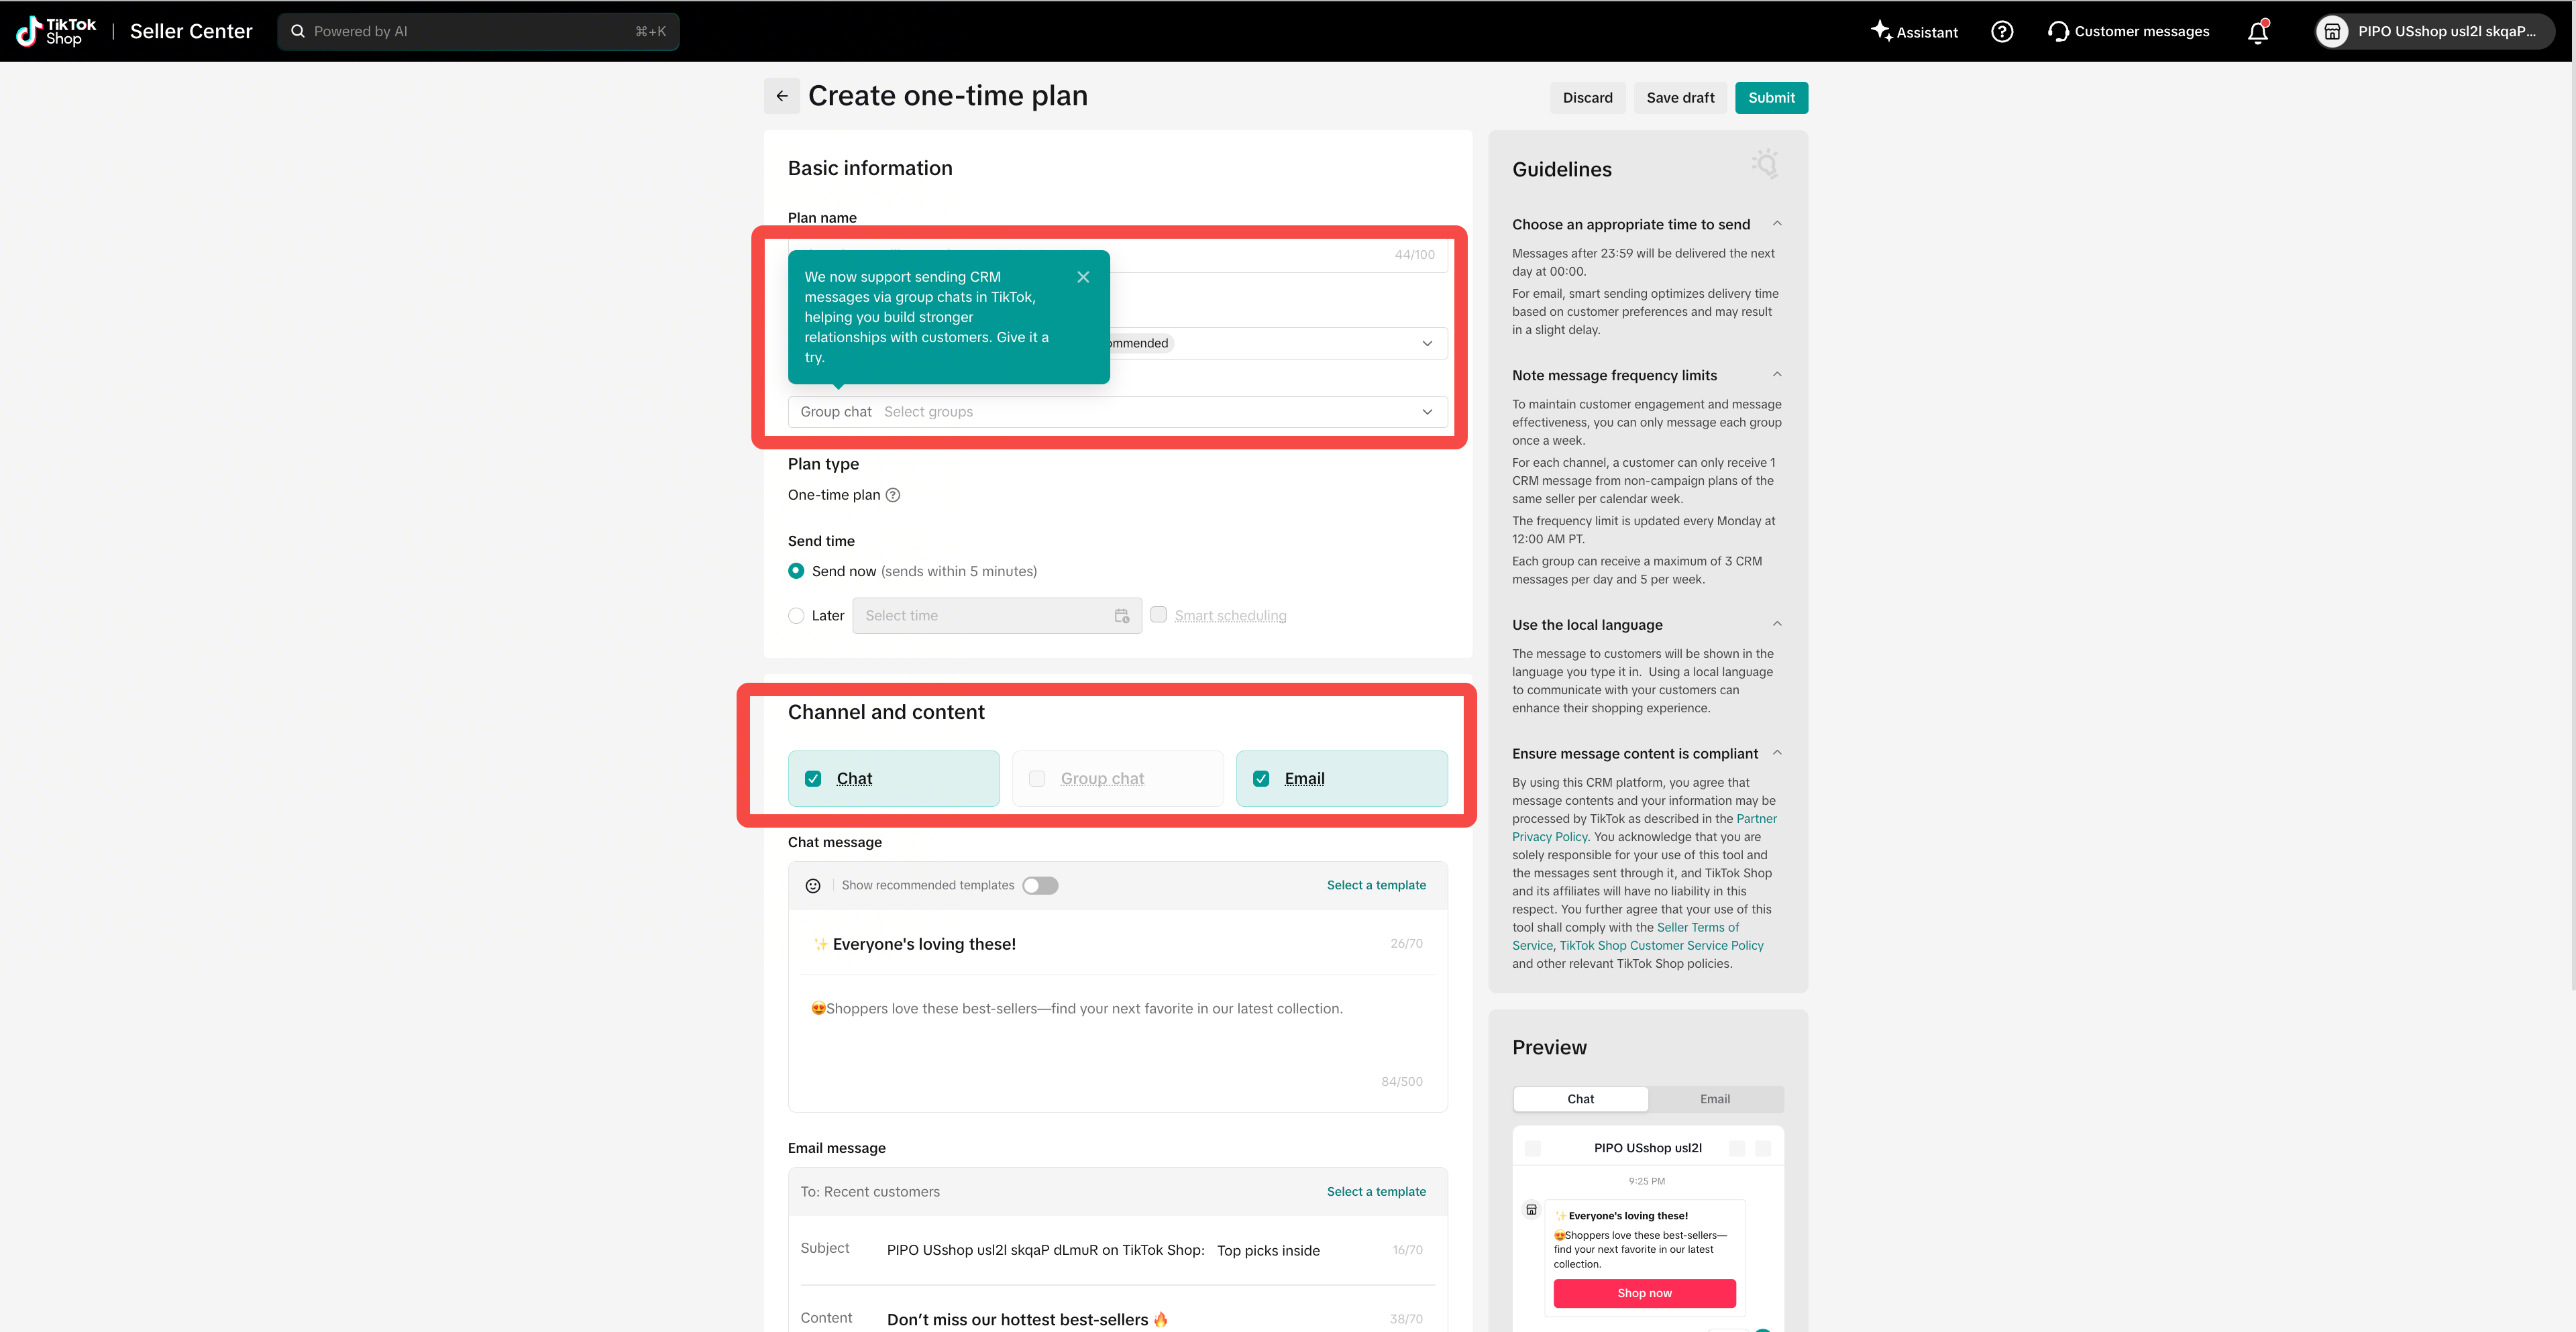
Step 4: Use CRM to Reach Your Group at Scale Eligible T2+ sellers can connect Follower Groups with TikTok Shop CRM instead of manually posting every promotional message. Go to: Seller Center > Customers > Reach > Create Plan For supported plans, select Group Chat as the delivery channel. Supported scenarios include:
Go LIVE Reminder
Promote LIVE Events
Best-selling product promotion
New product promotion
You can attach up to three products to a Group Chat CRM message. TikTok Shop currently limits CRM outreach to the same group chat to no more than three plans per day and five per wee
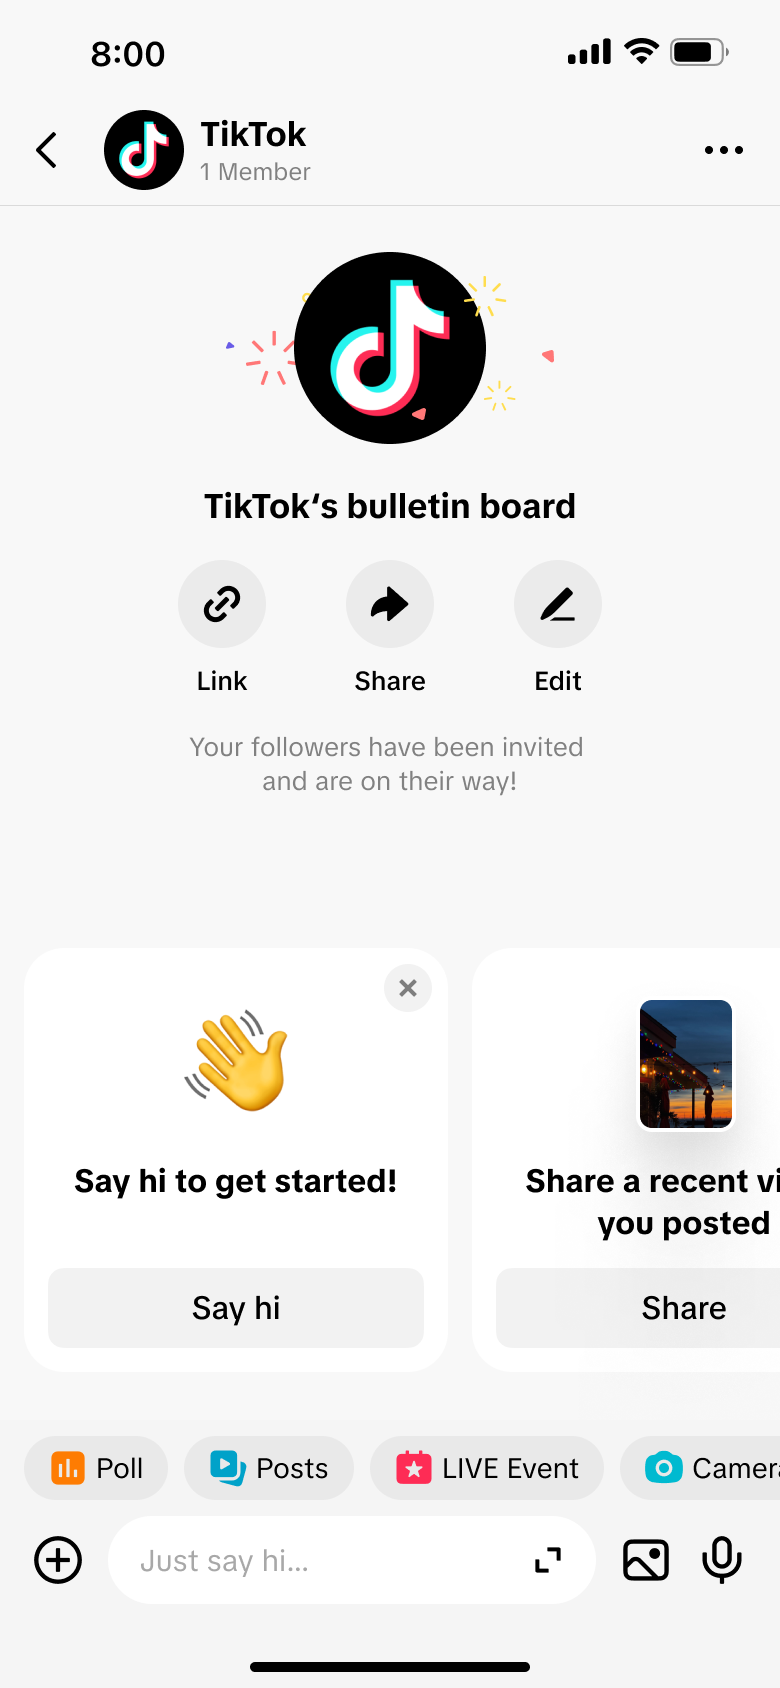
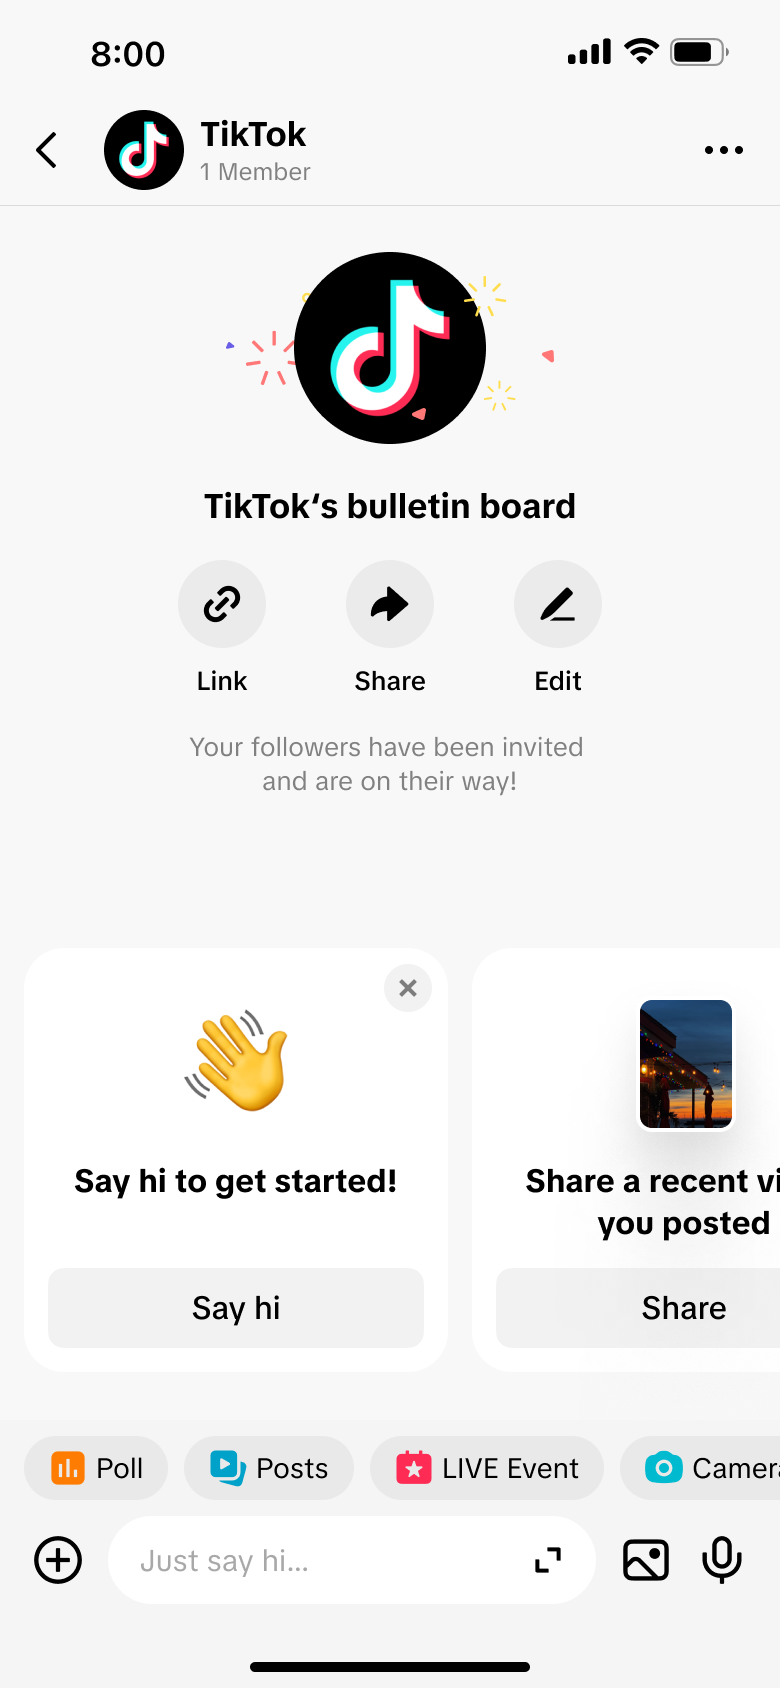
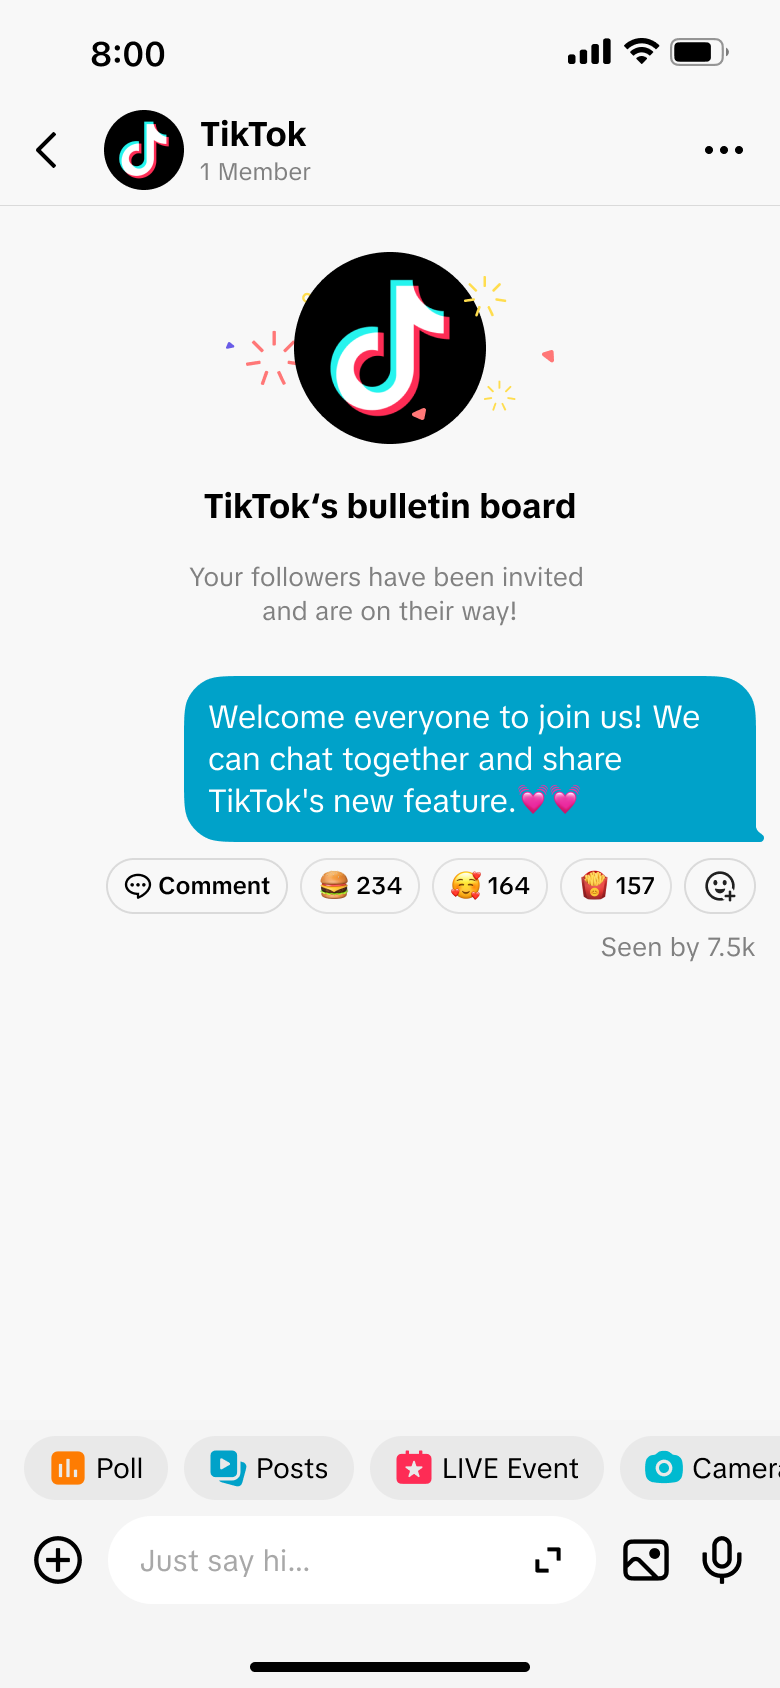
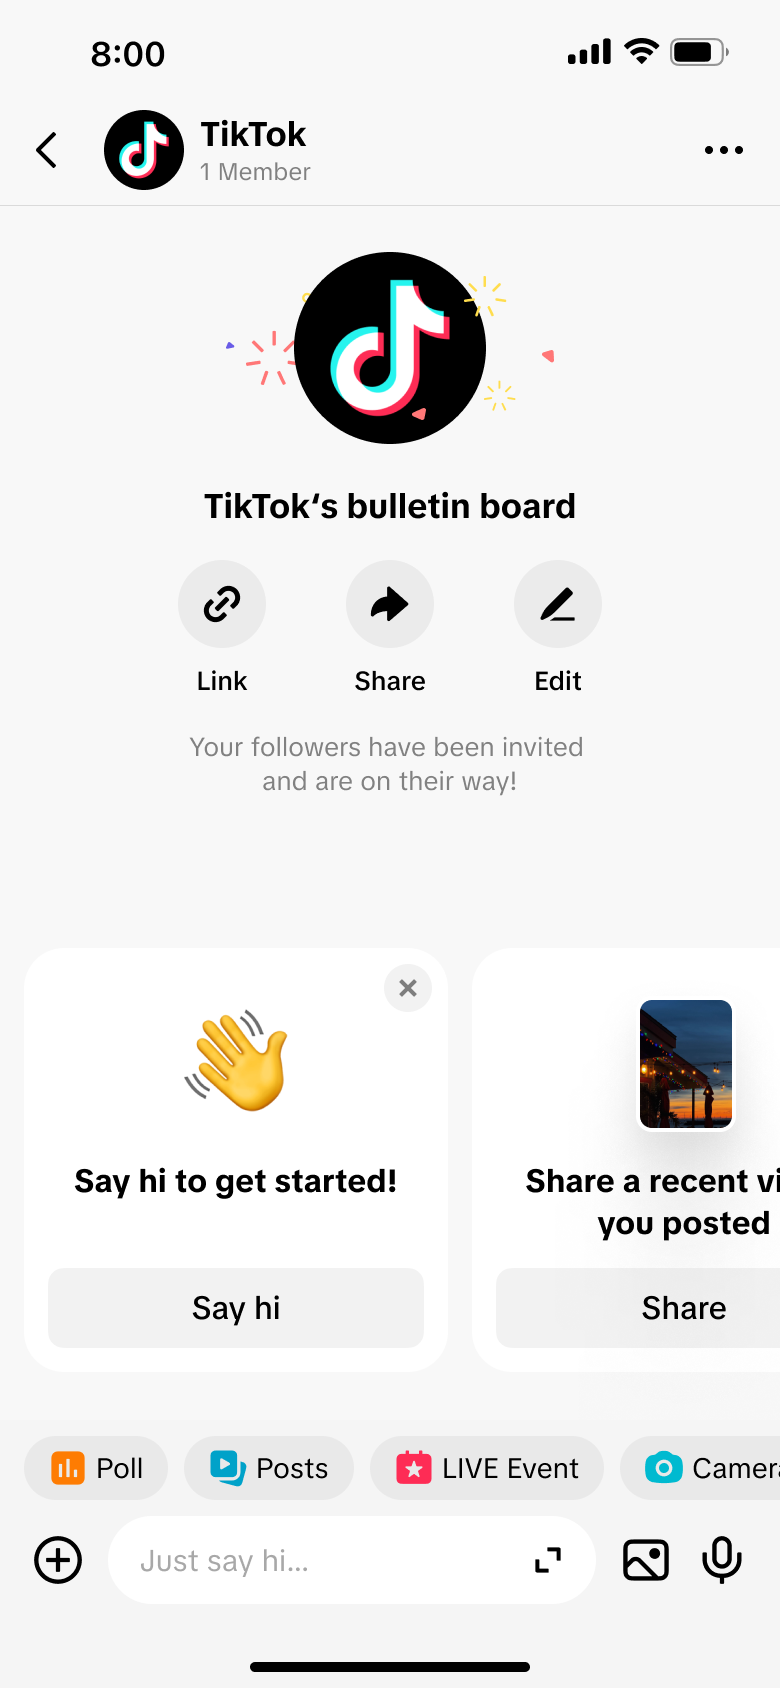
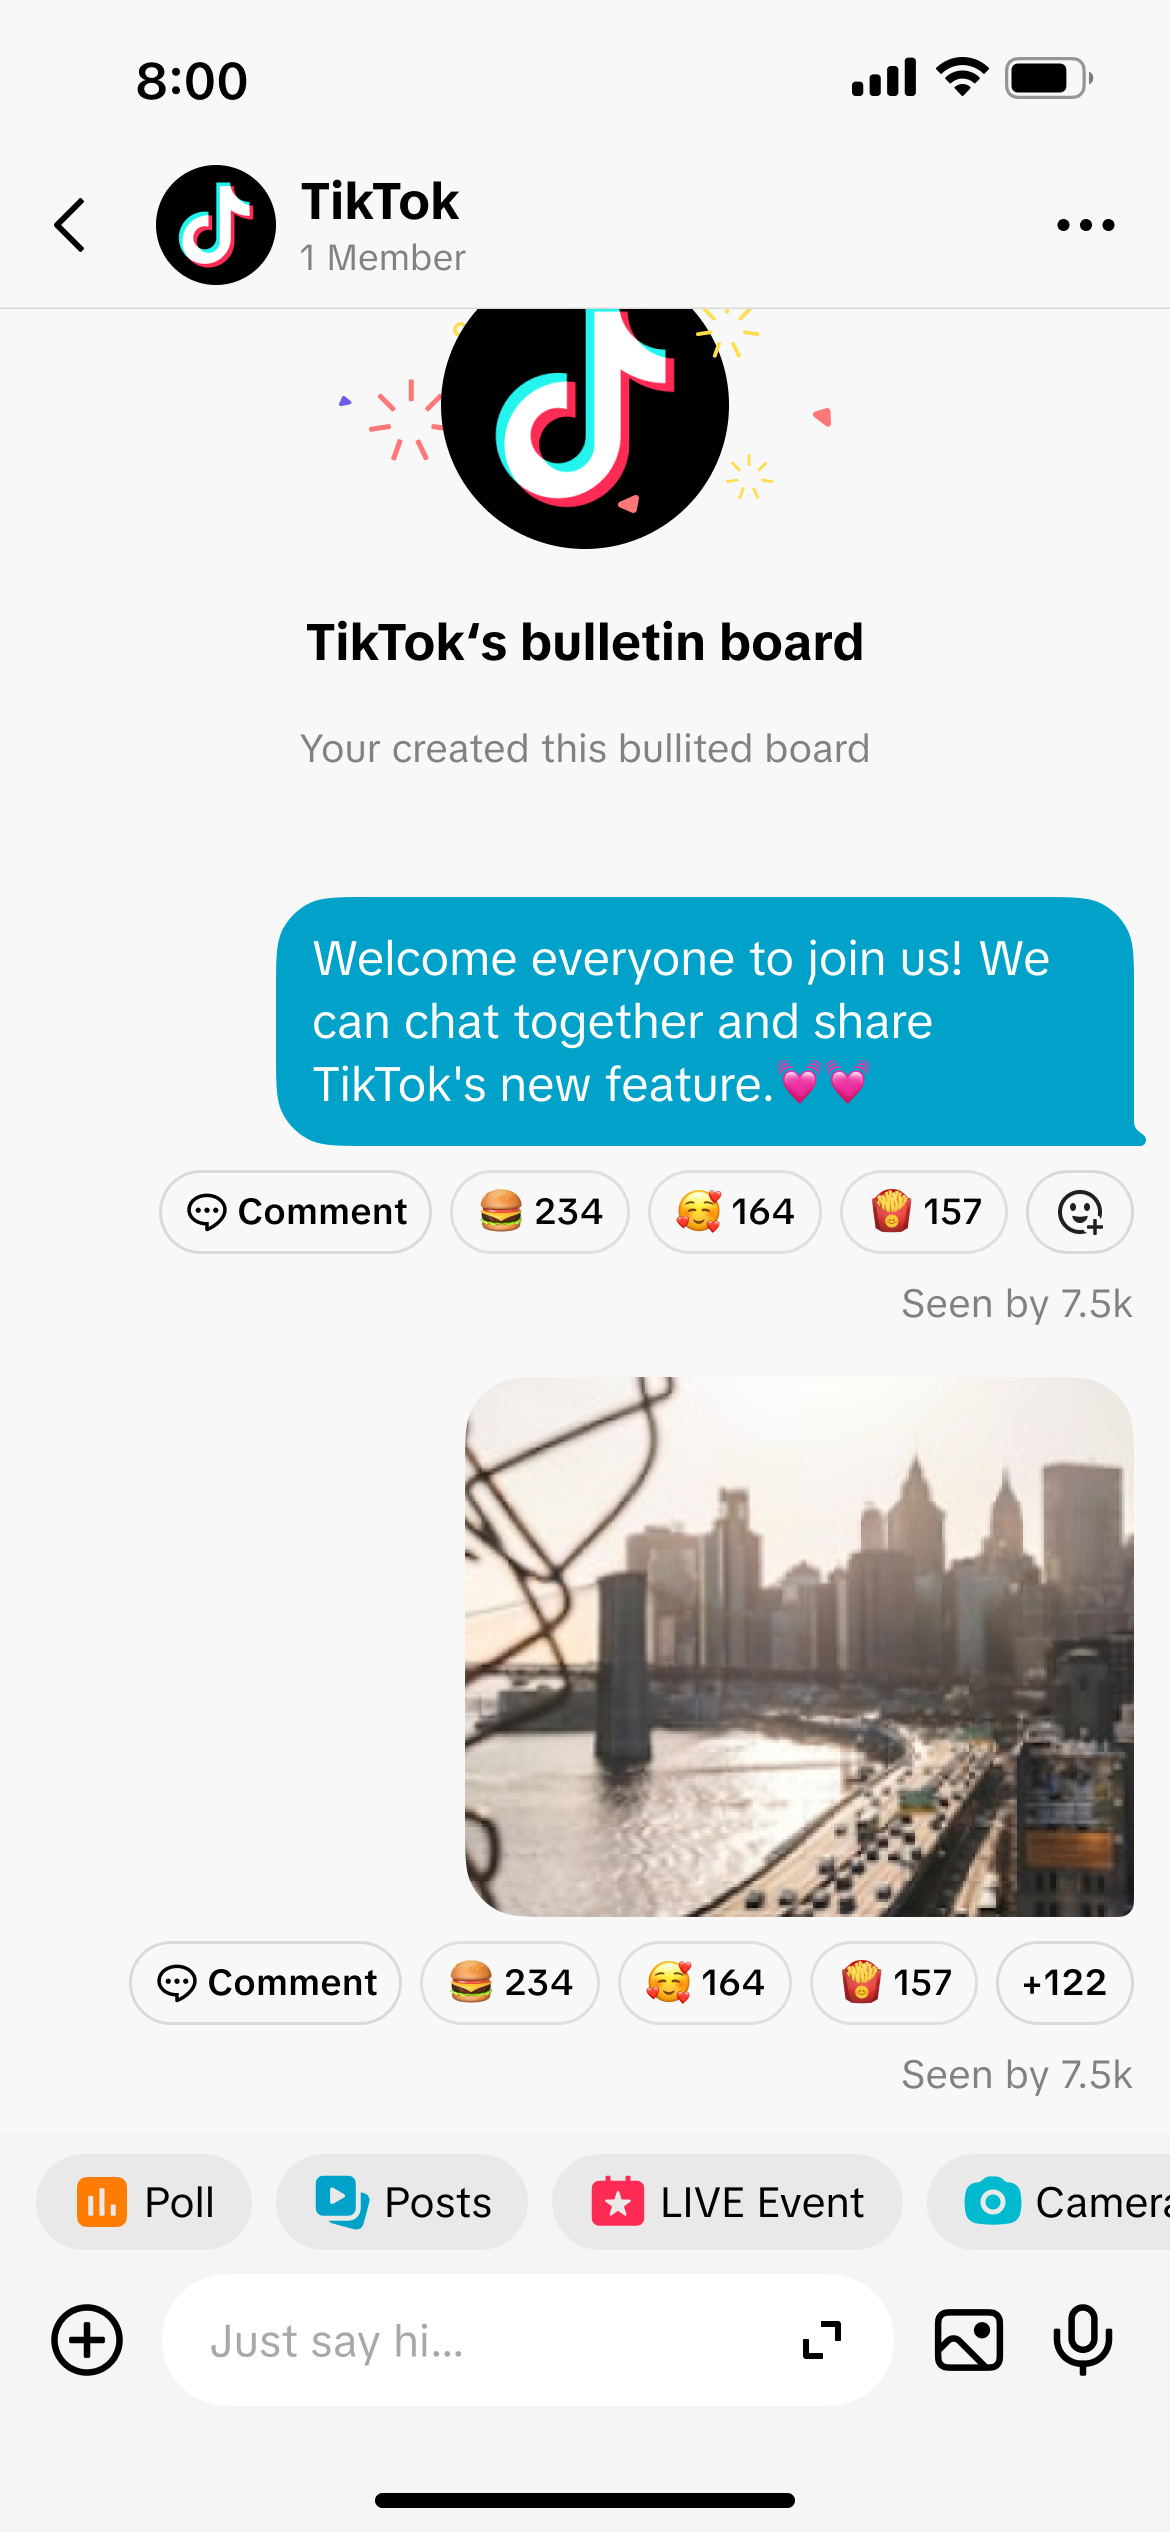
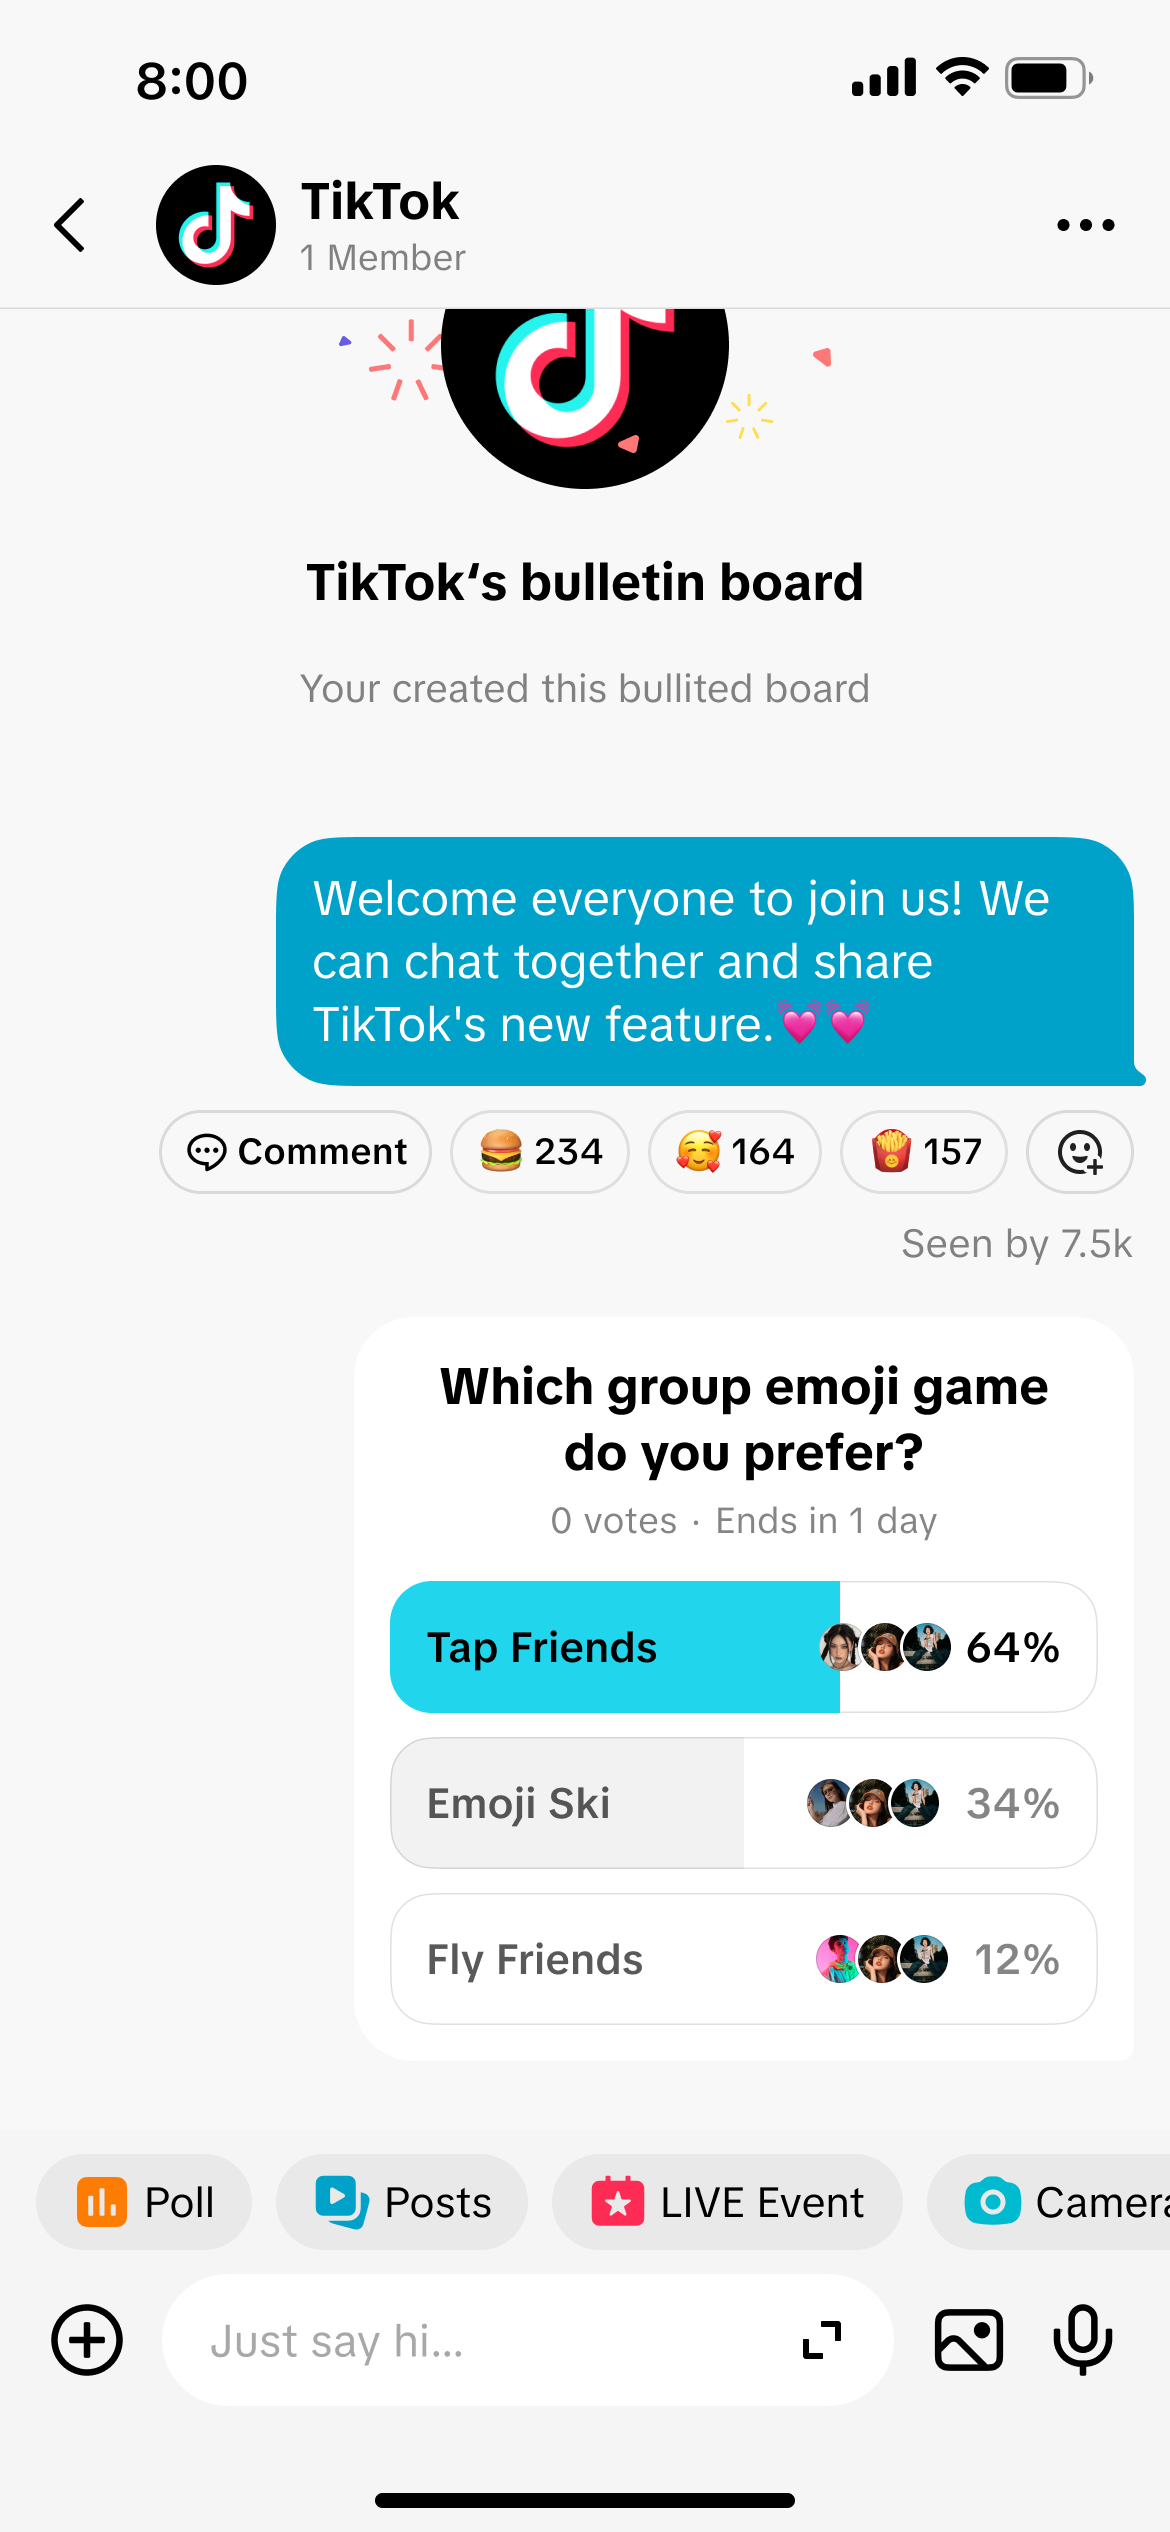
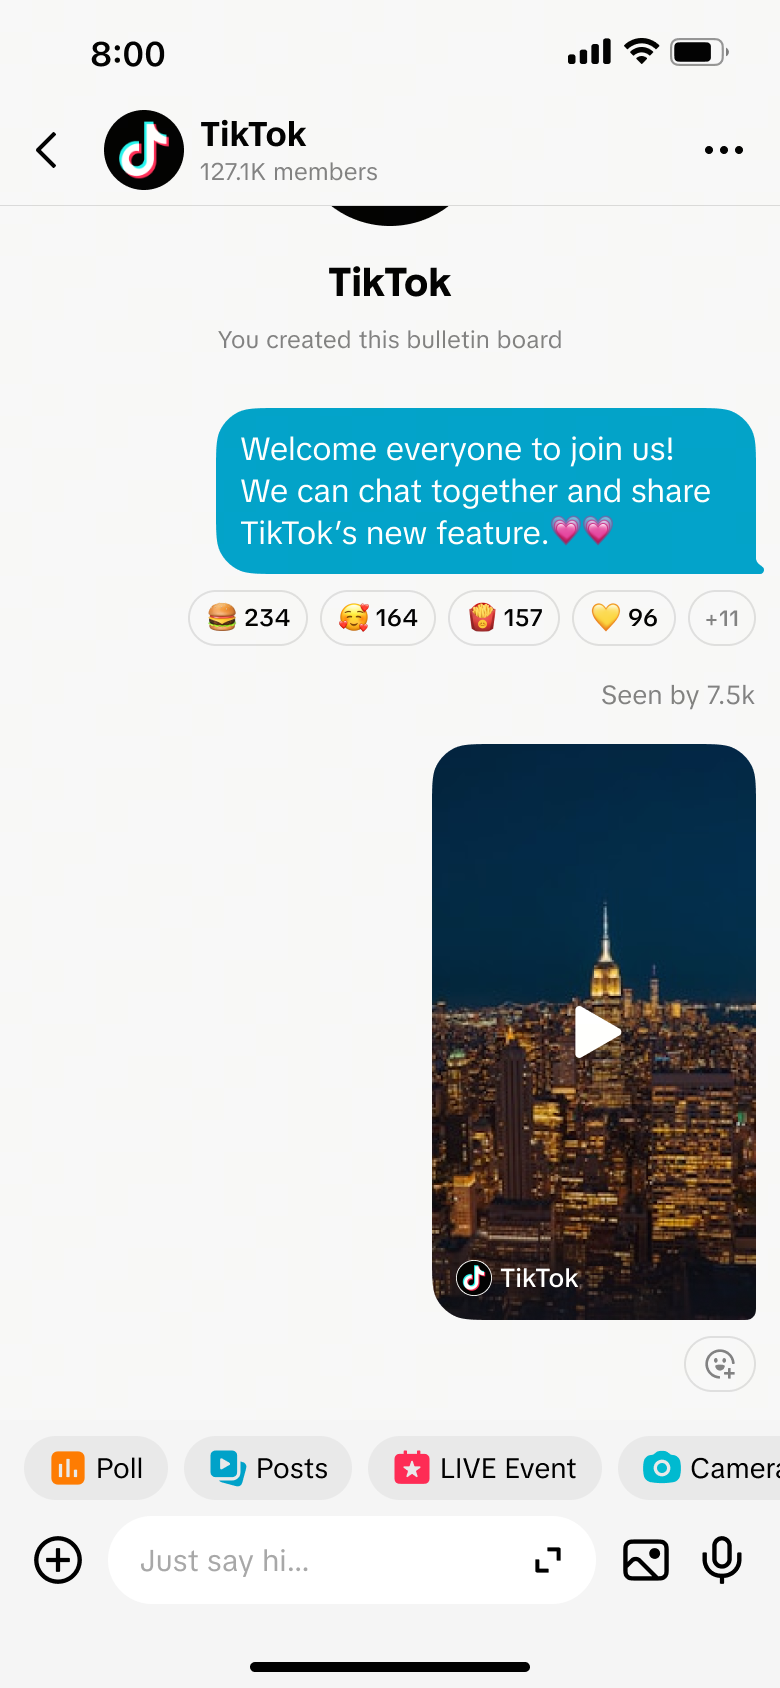
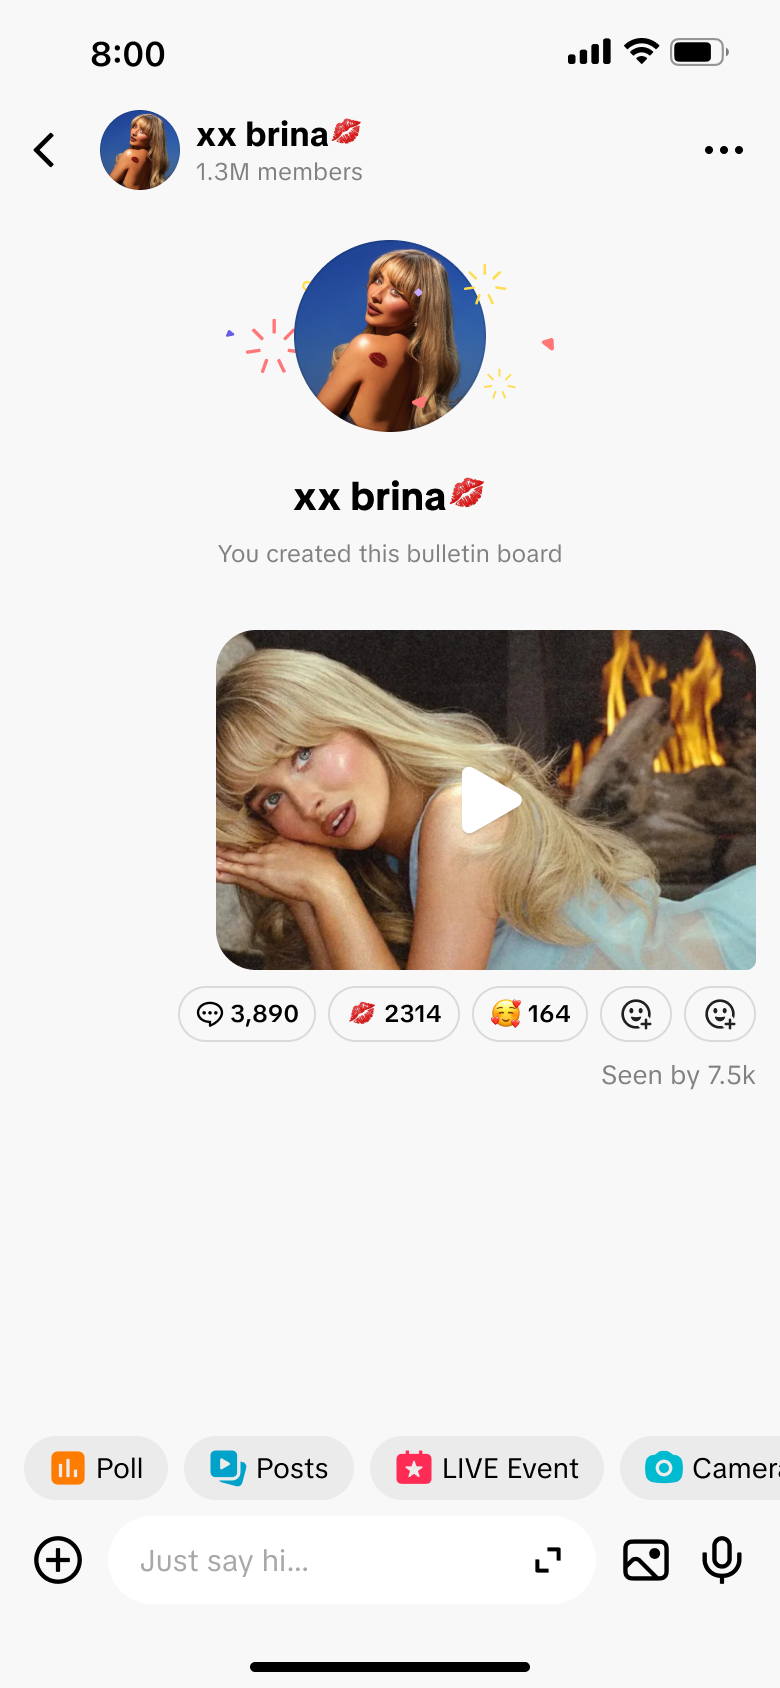
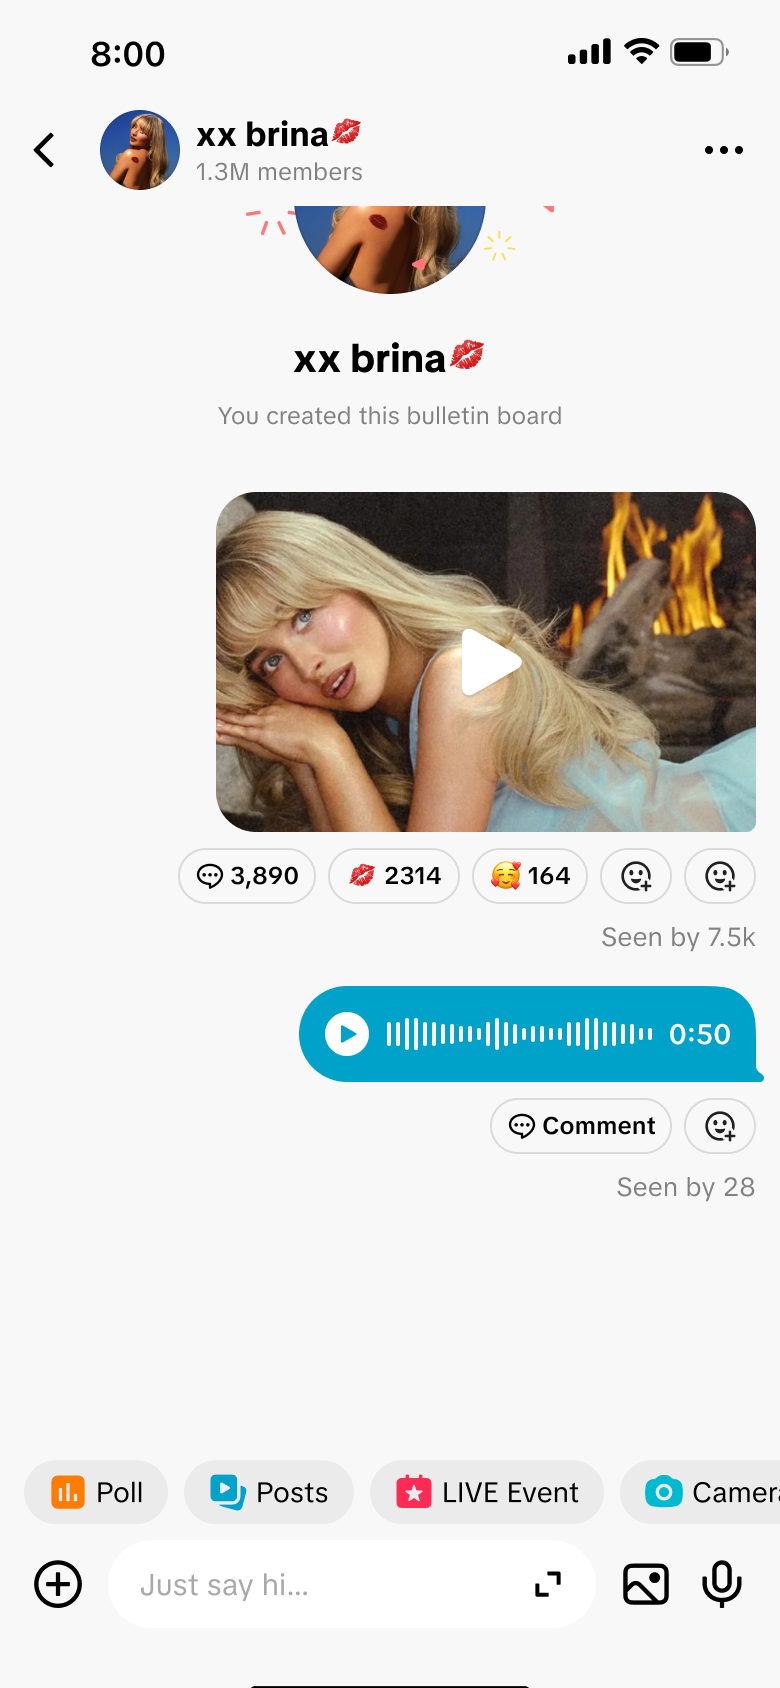
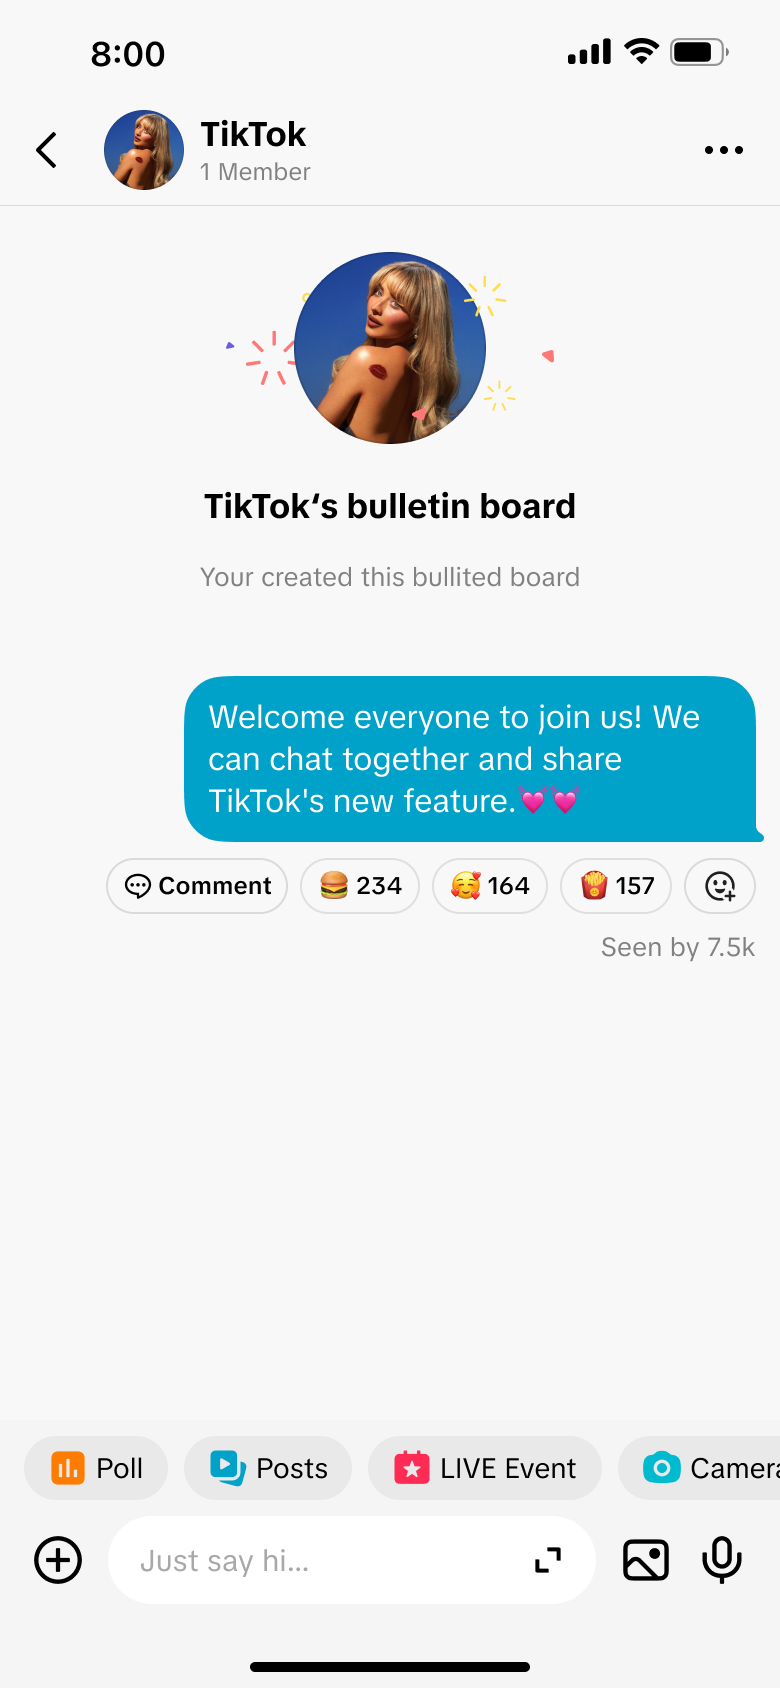
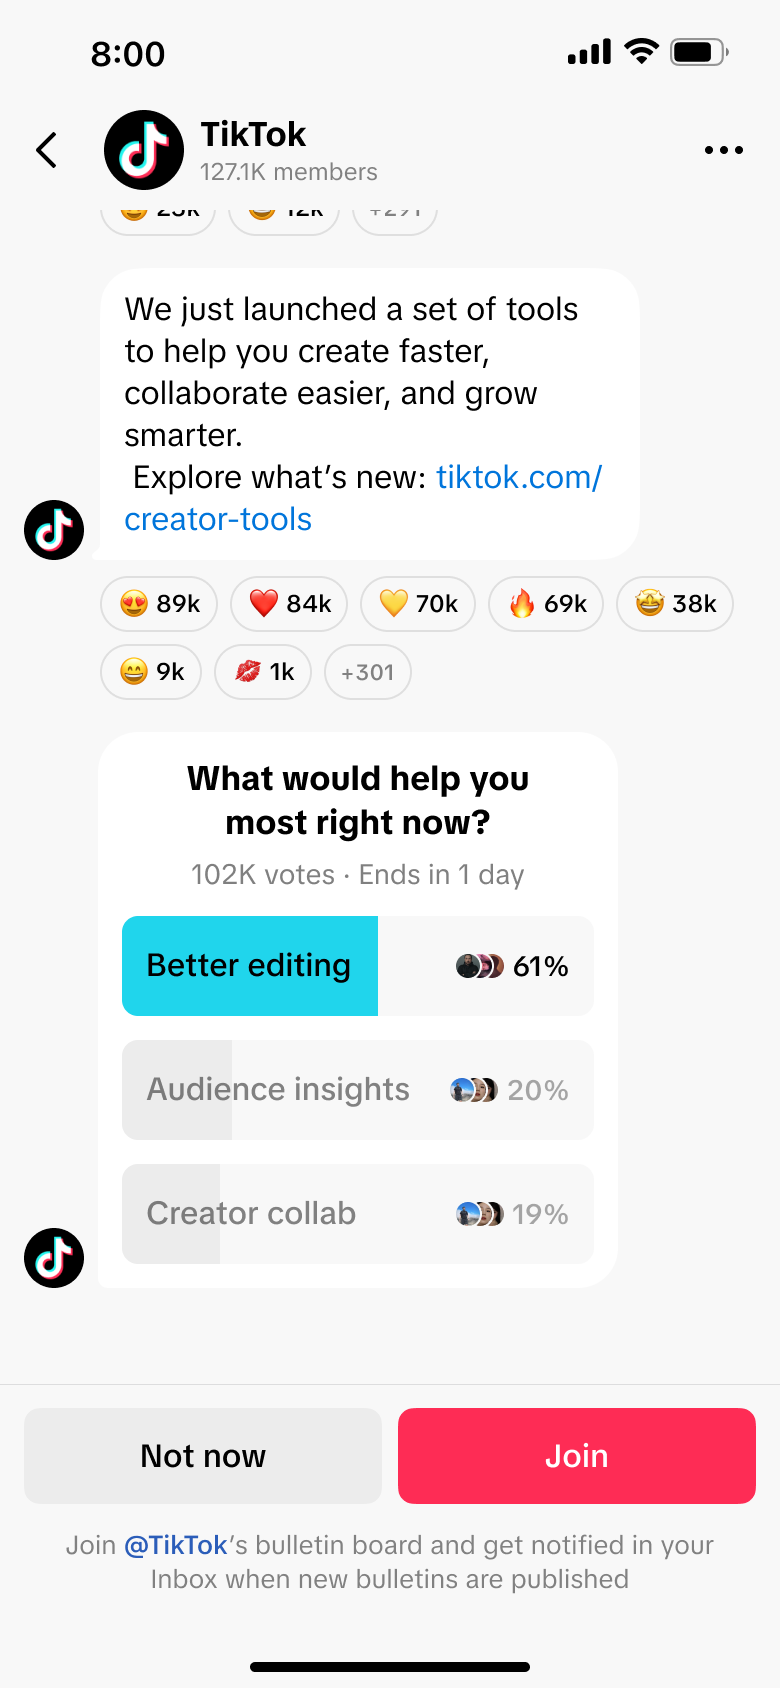
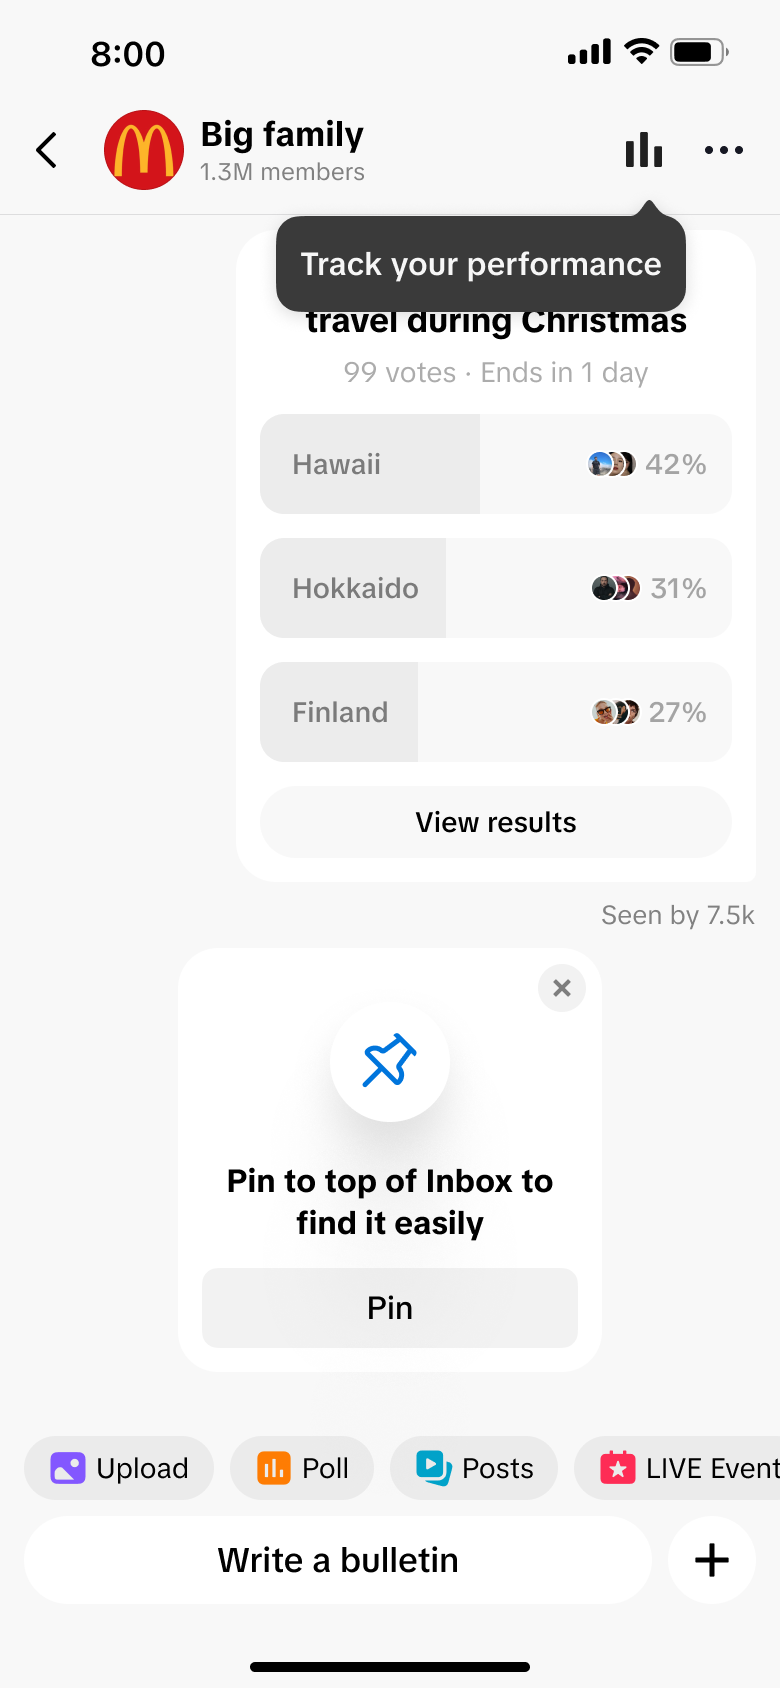
Bulletin Board is a one-to-many broadcast channel that lets you communicate directly with your subscribers. Inside your channel you can post announcements, share moments from your life, record how you're feeling, and have a more intimate conversation with the fans who choose to join. Bulletin Board is available to unrestricted creators with 50,000 or more followers, but creators under the age of 18 are currently unable to create or use a Bulletin Board.
Why it drives traffic?
It gives a large-follower account a lightweight, always-on channel to reinforce a campaign promise between LIVEs without the overhead of a two-way community – useful for reminders, polls, and updates at a cadence Follower Group and CRM don't cover.
Feed and profile distribution both help the channel find new subscribers organically, extending reach beyond people who already know to look for it.
How to set up
Step 1
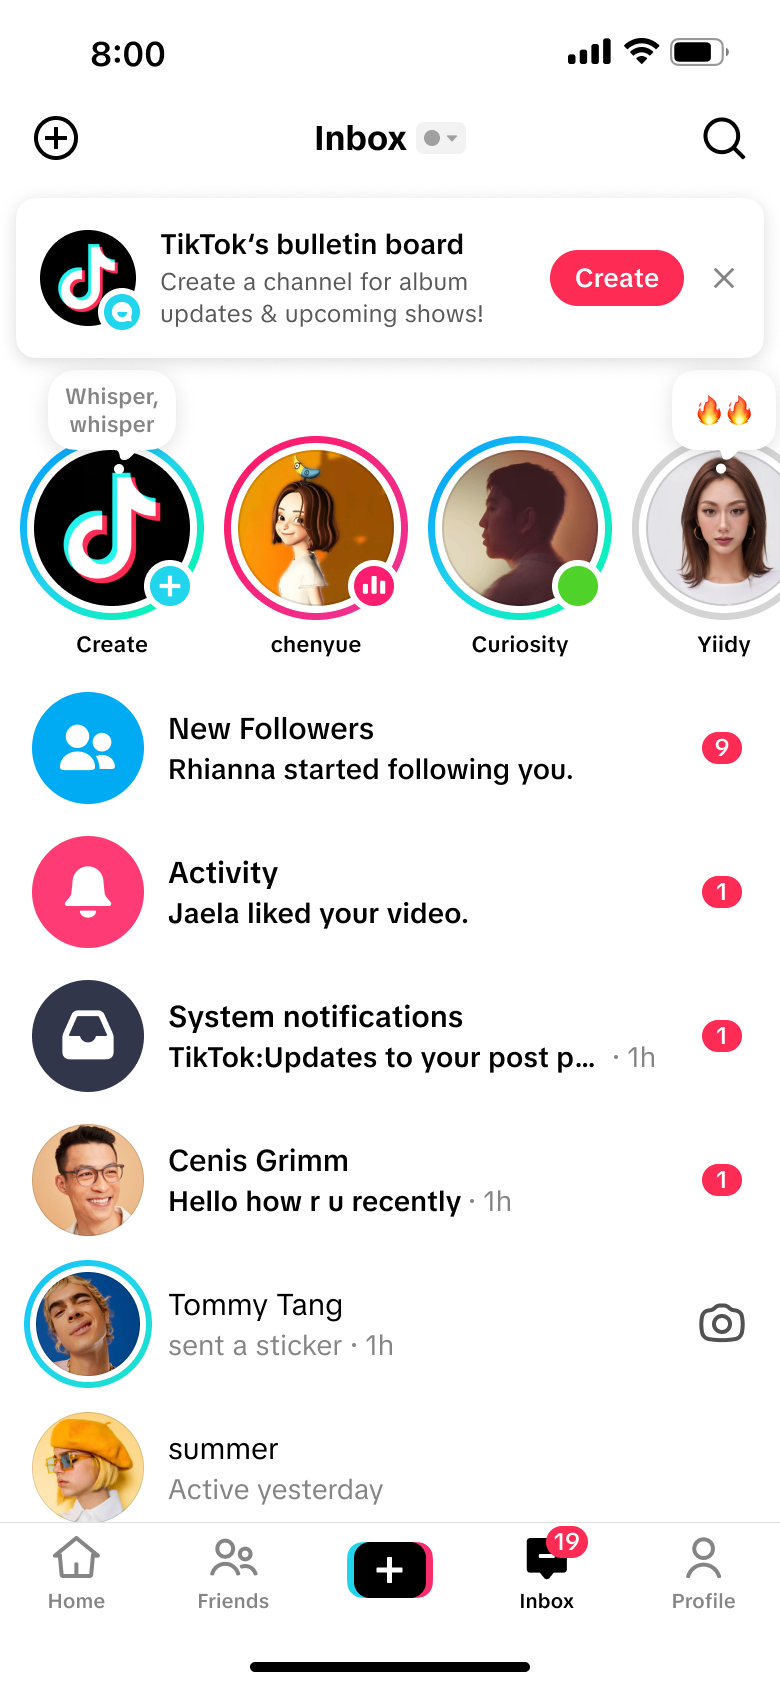
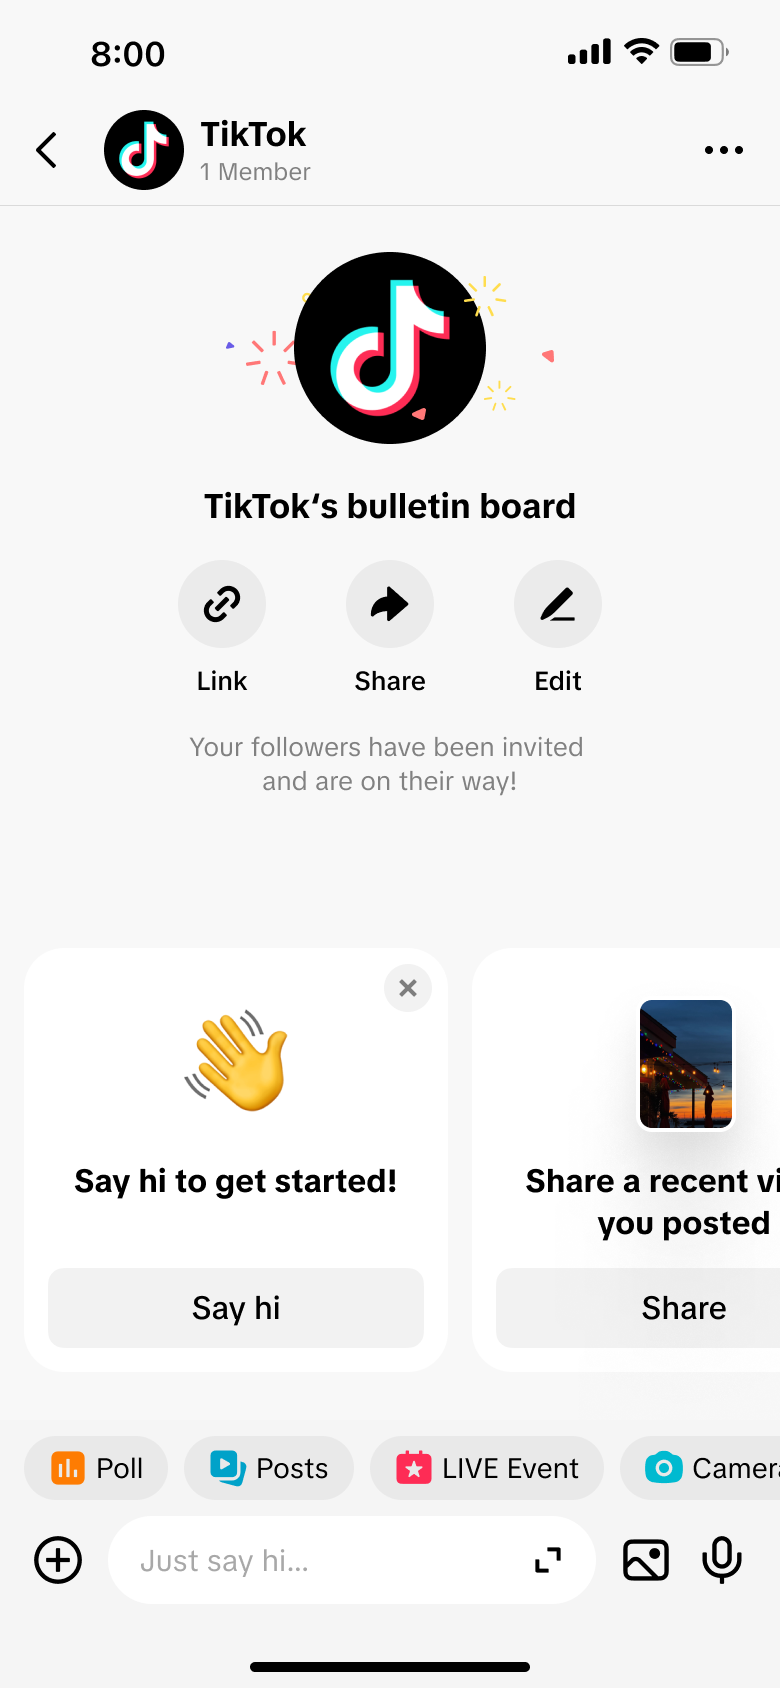
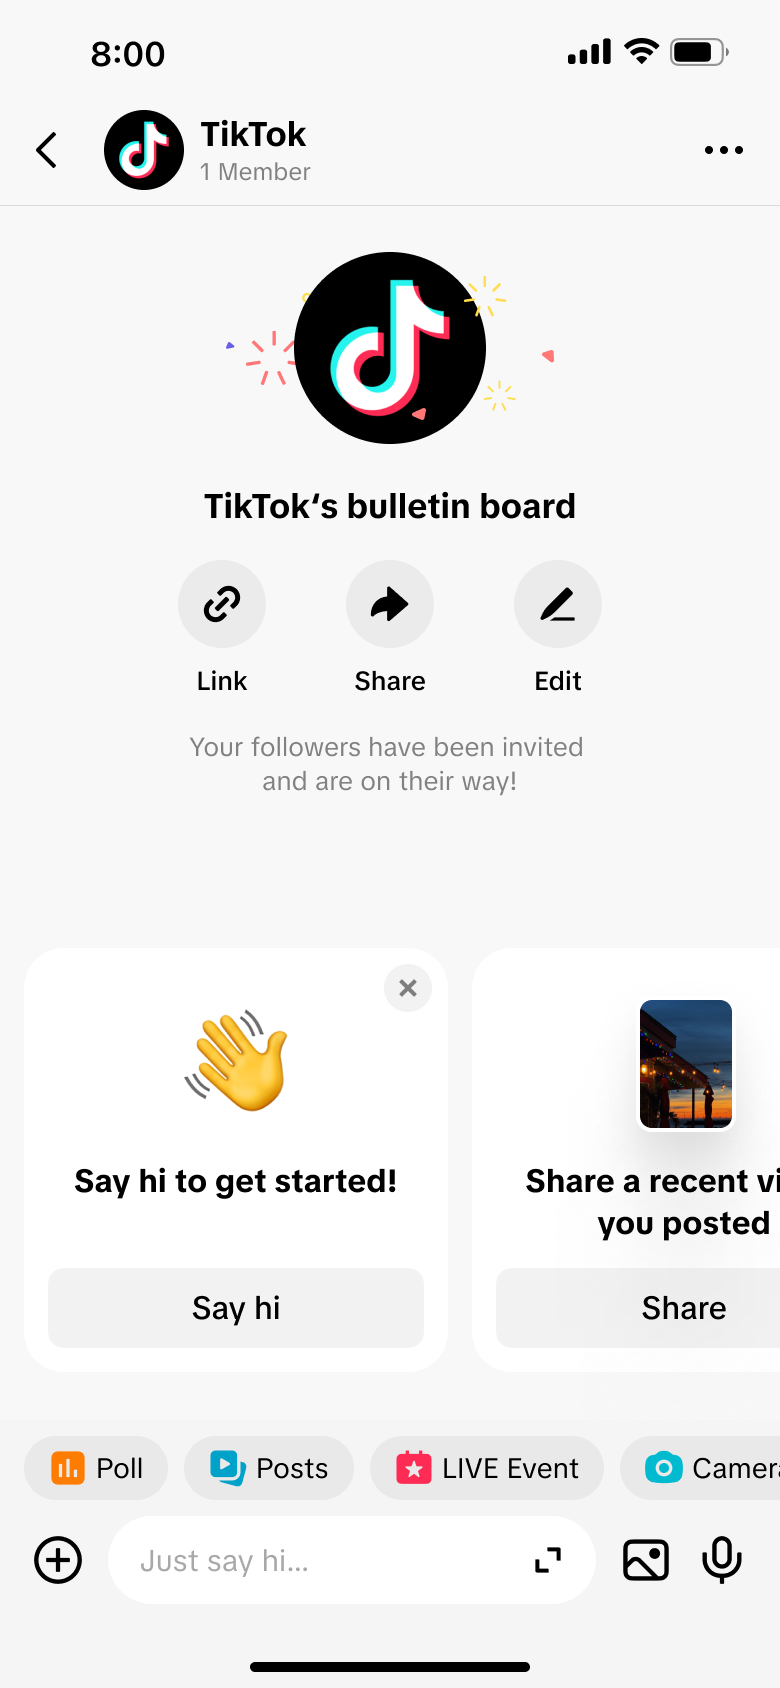
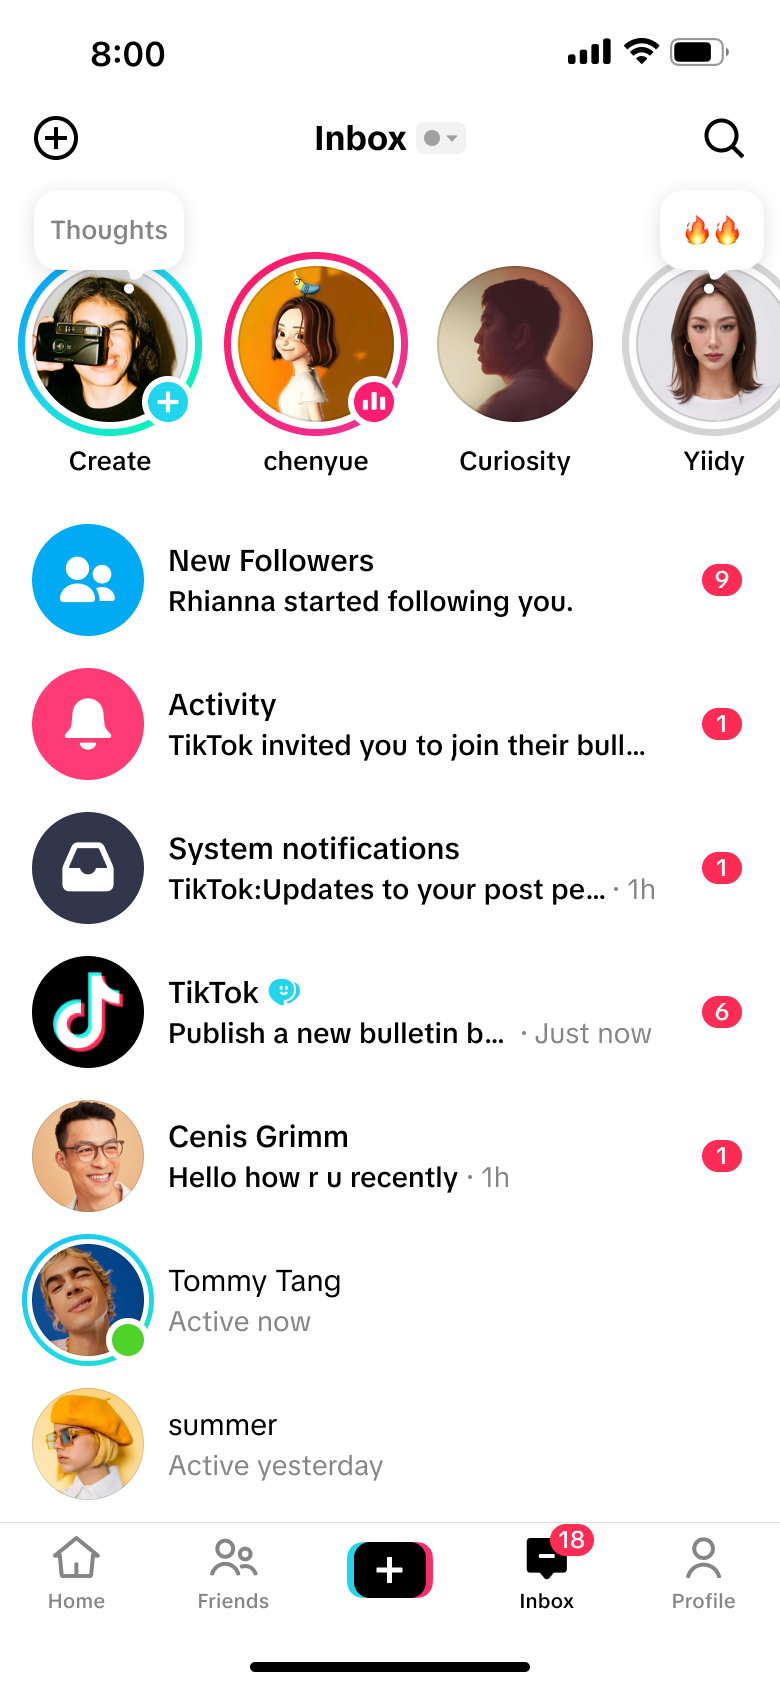
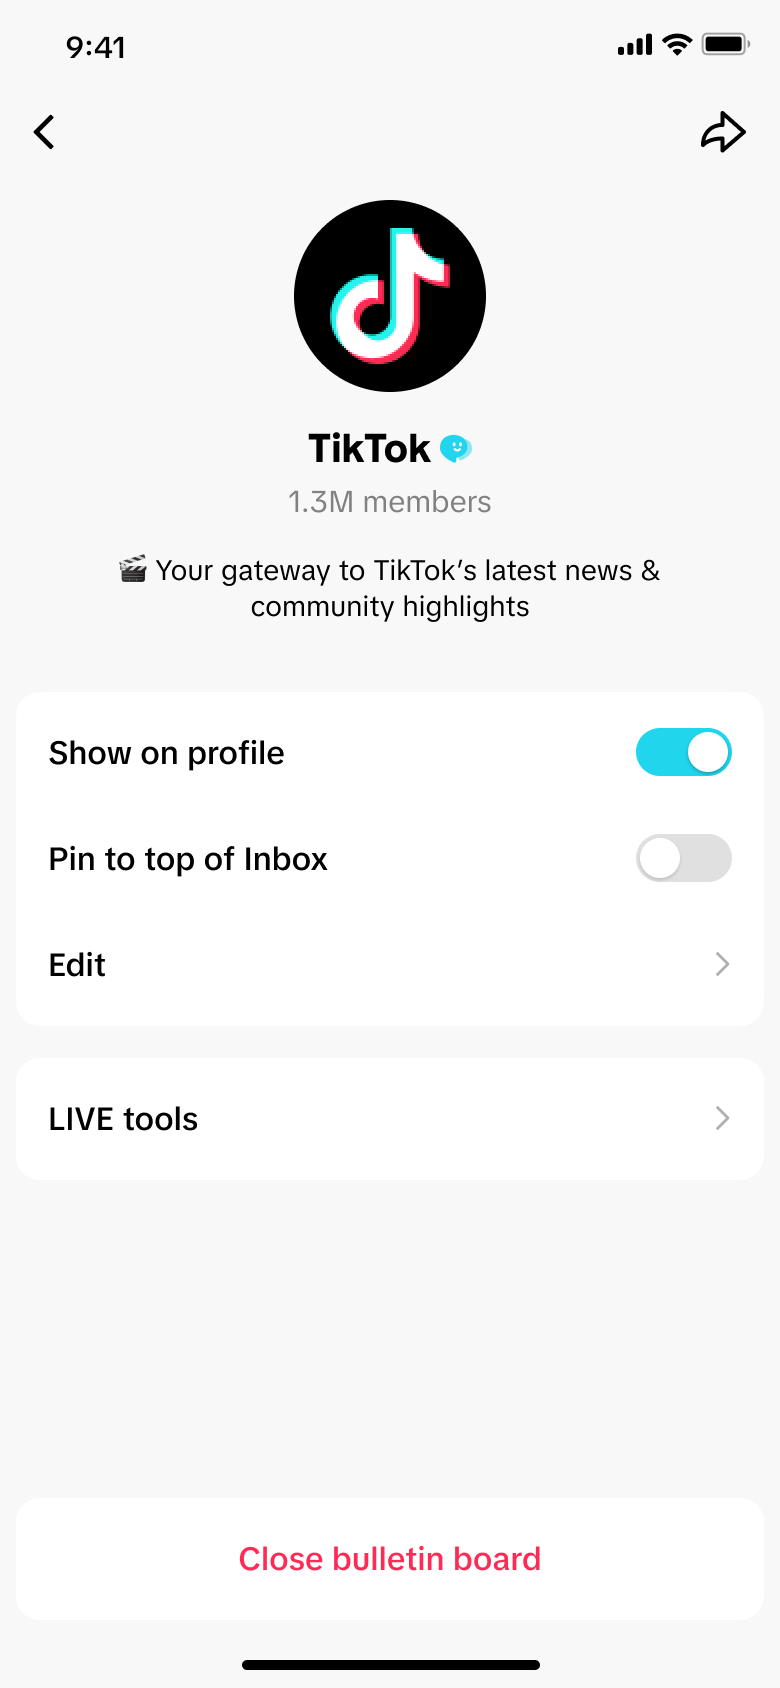
Step 1: create a bulletin board There are two ways in. Use whichever one you see.
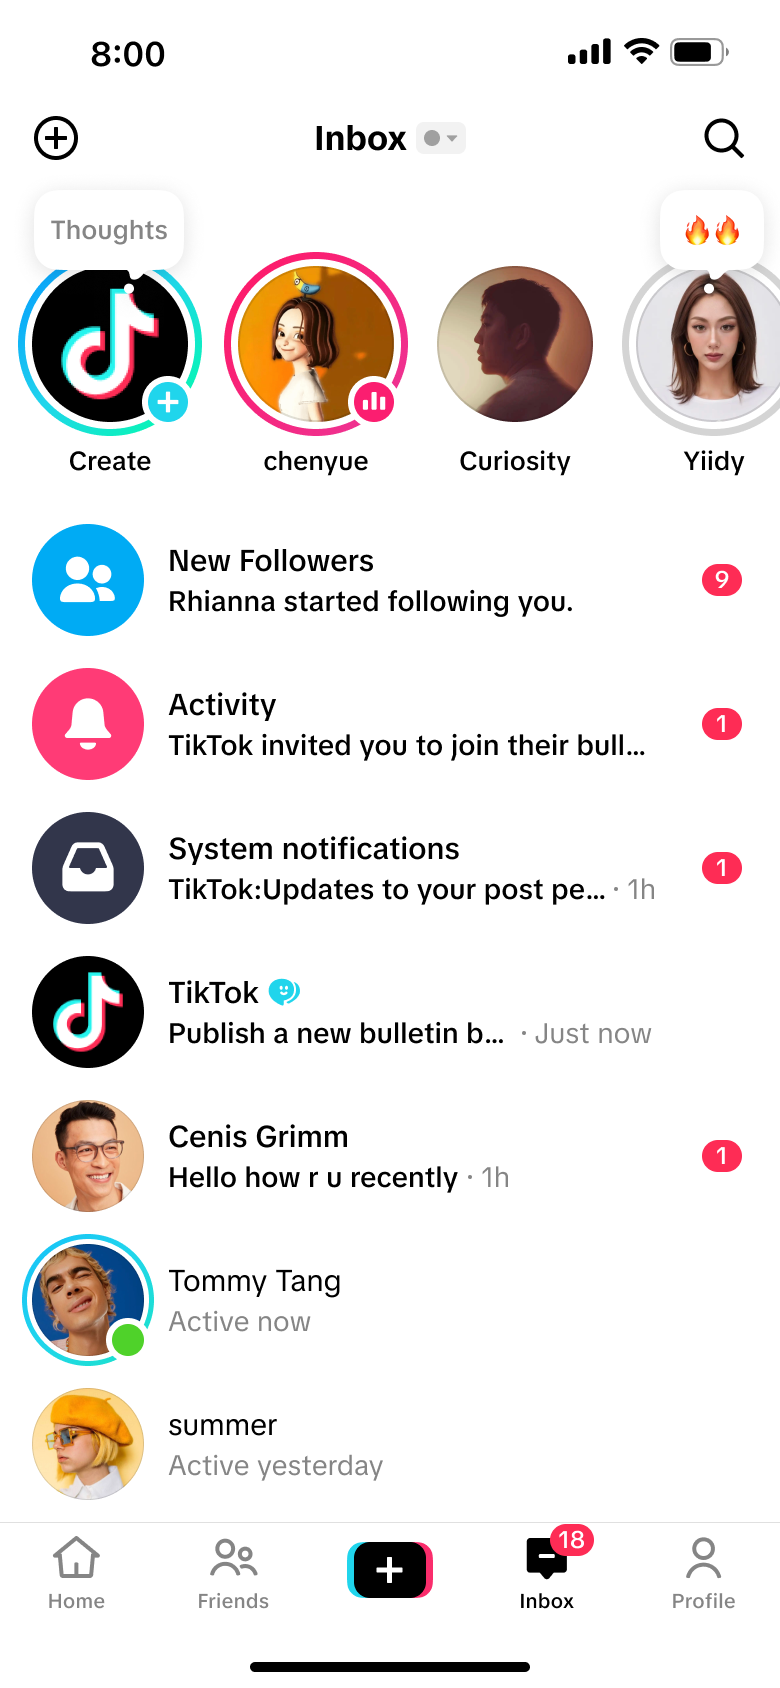
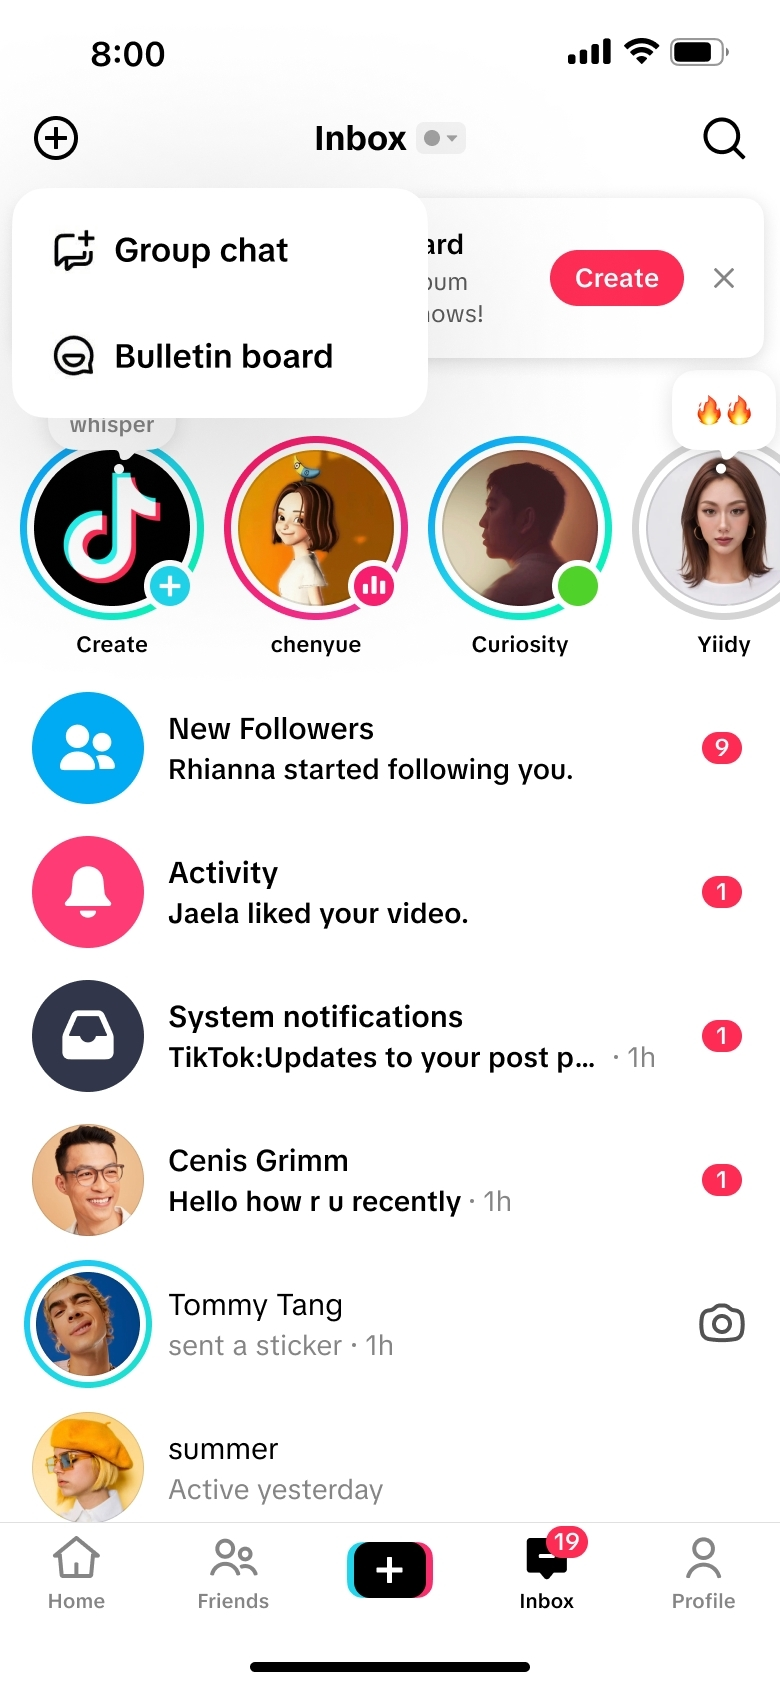
Entry 1 – the "+" in your Inbox
Go to the Inbox page.
Tap the "+" sign at the top left.
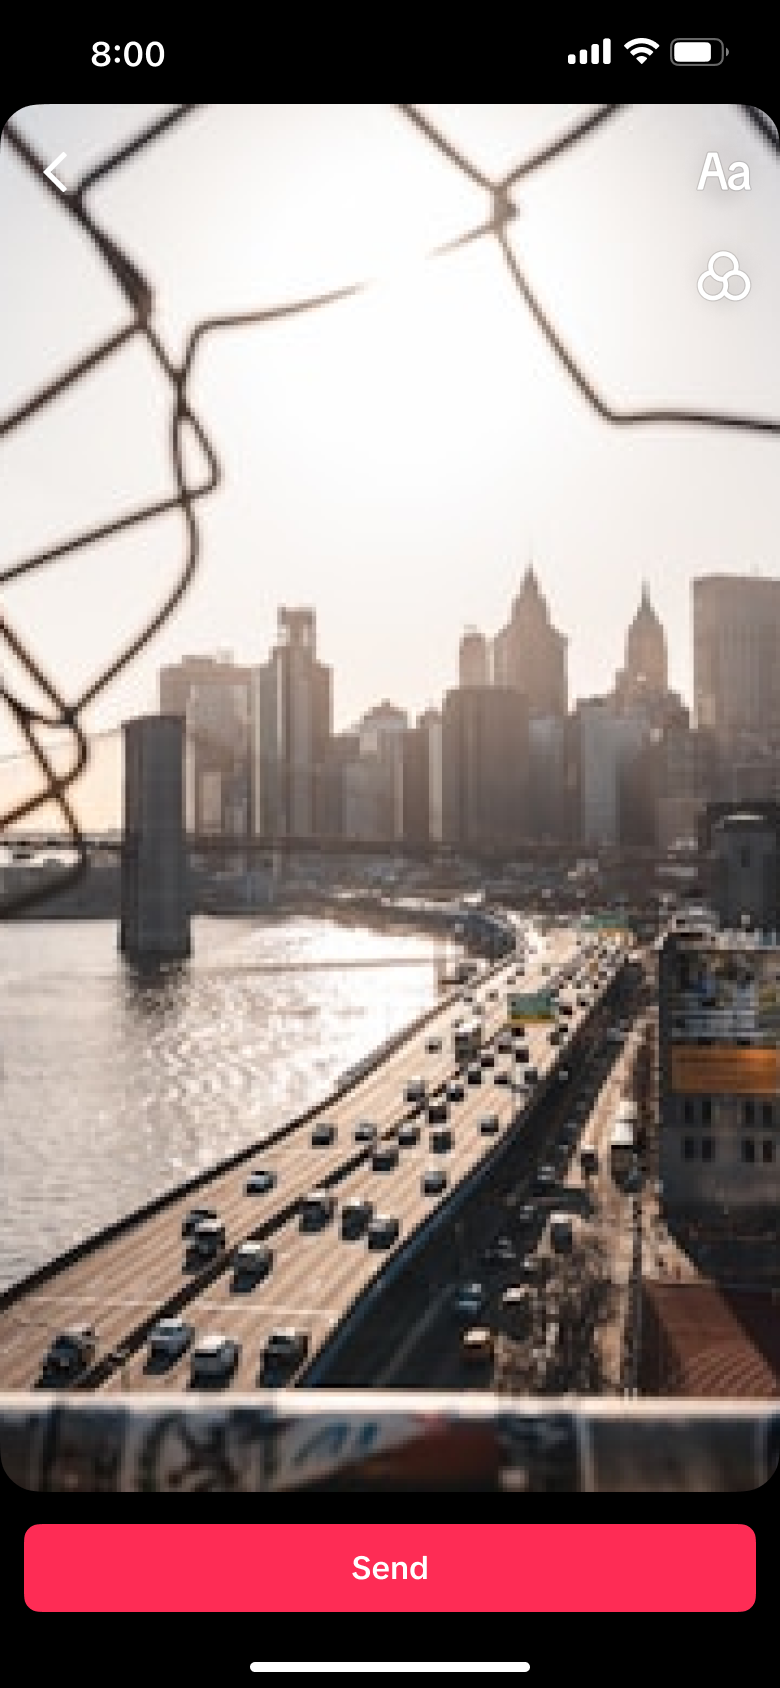
Select Create a Bulletin Board. This opens the channel creation page.
Entry 1
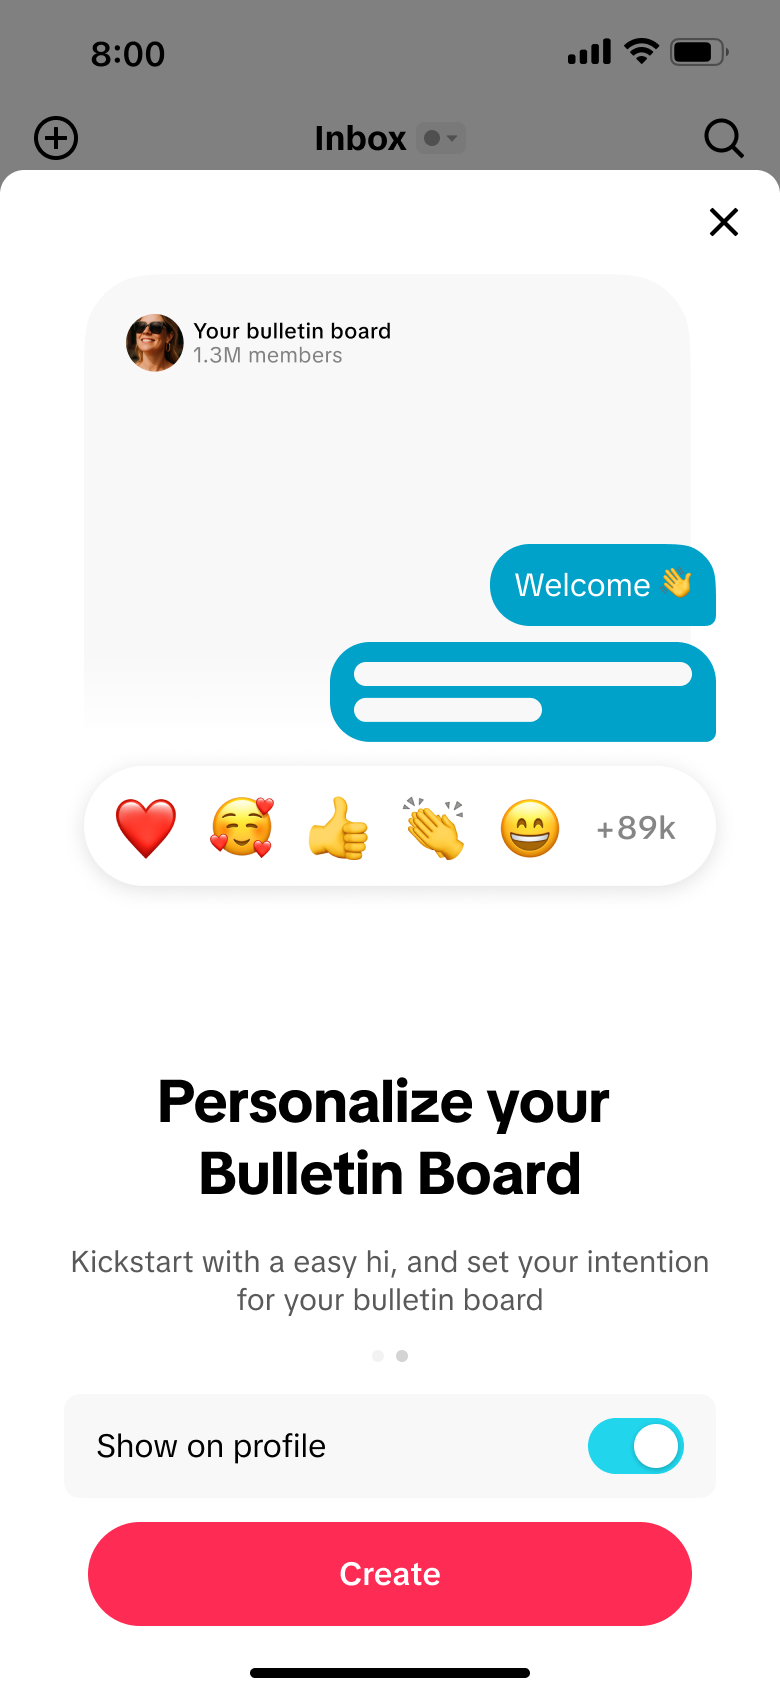
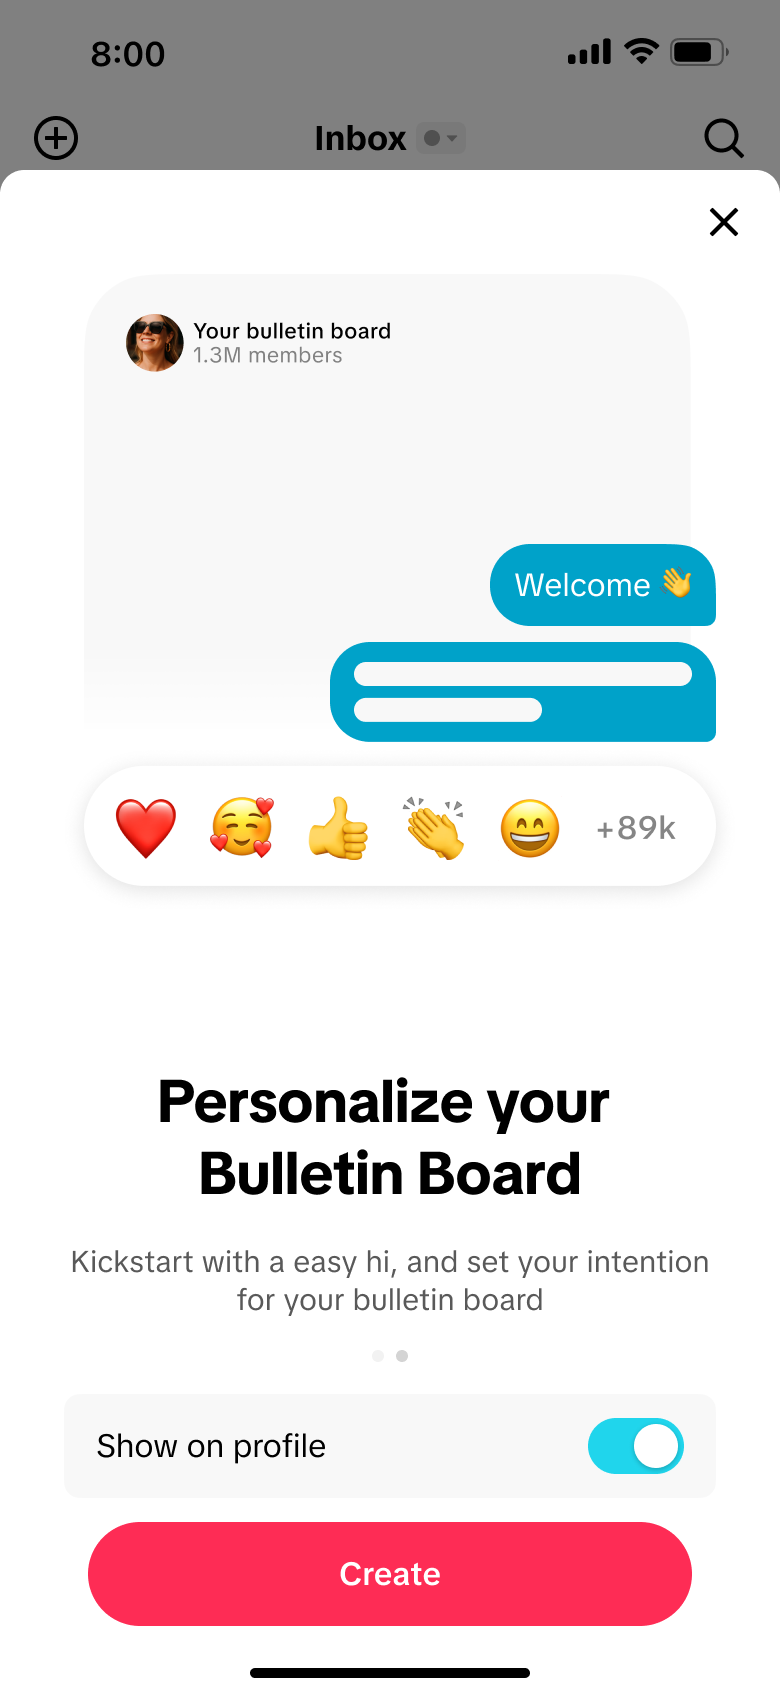
Entry 2 – the Inbox banner If your account has been granted the permission, a guide banner appears at the top of your Inbox. Tap Create in the banner. This opens the same channel creation page.
In the creation page, creators can:
Choose whether to display the channel in the profile (homepage) .
Entry 2
Step 2
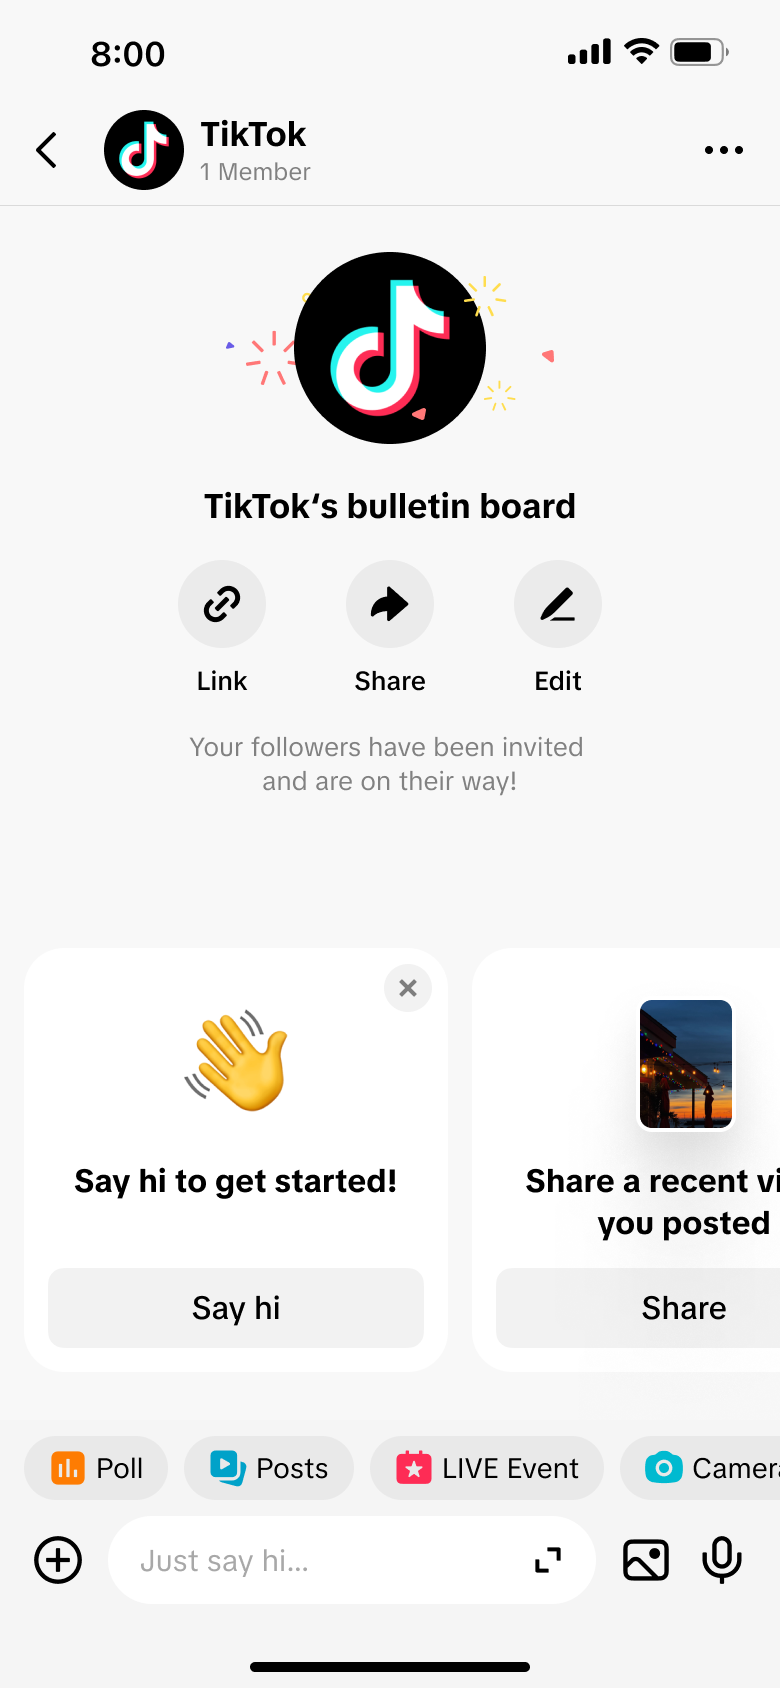
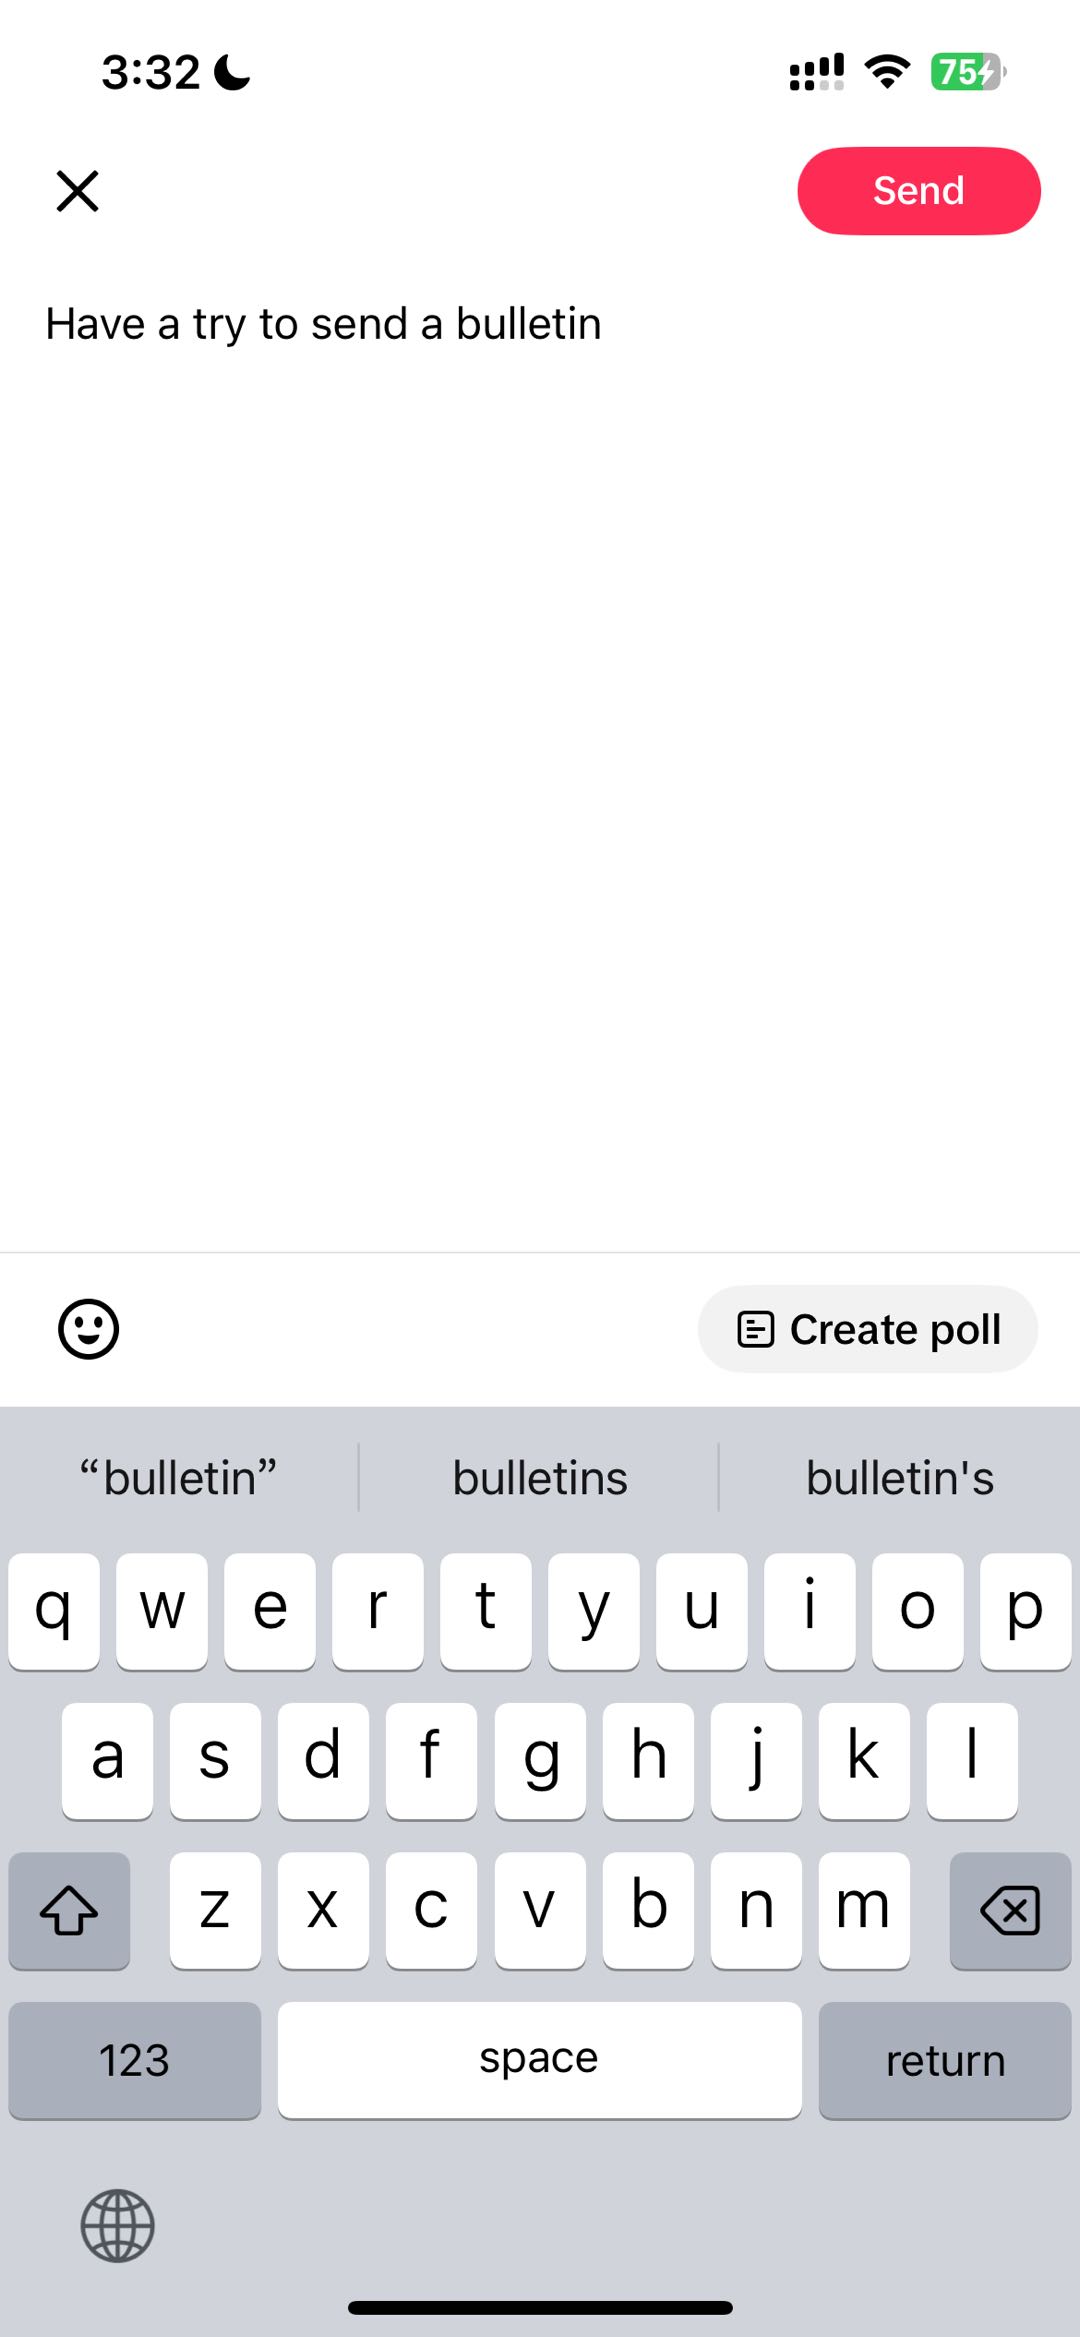
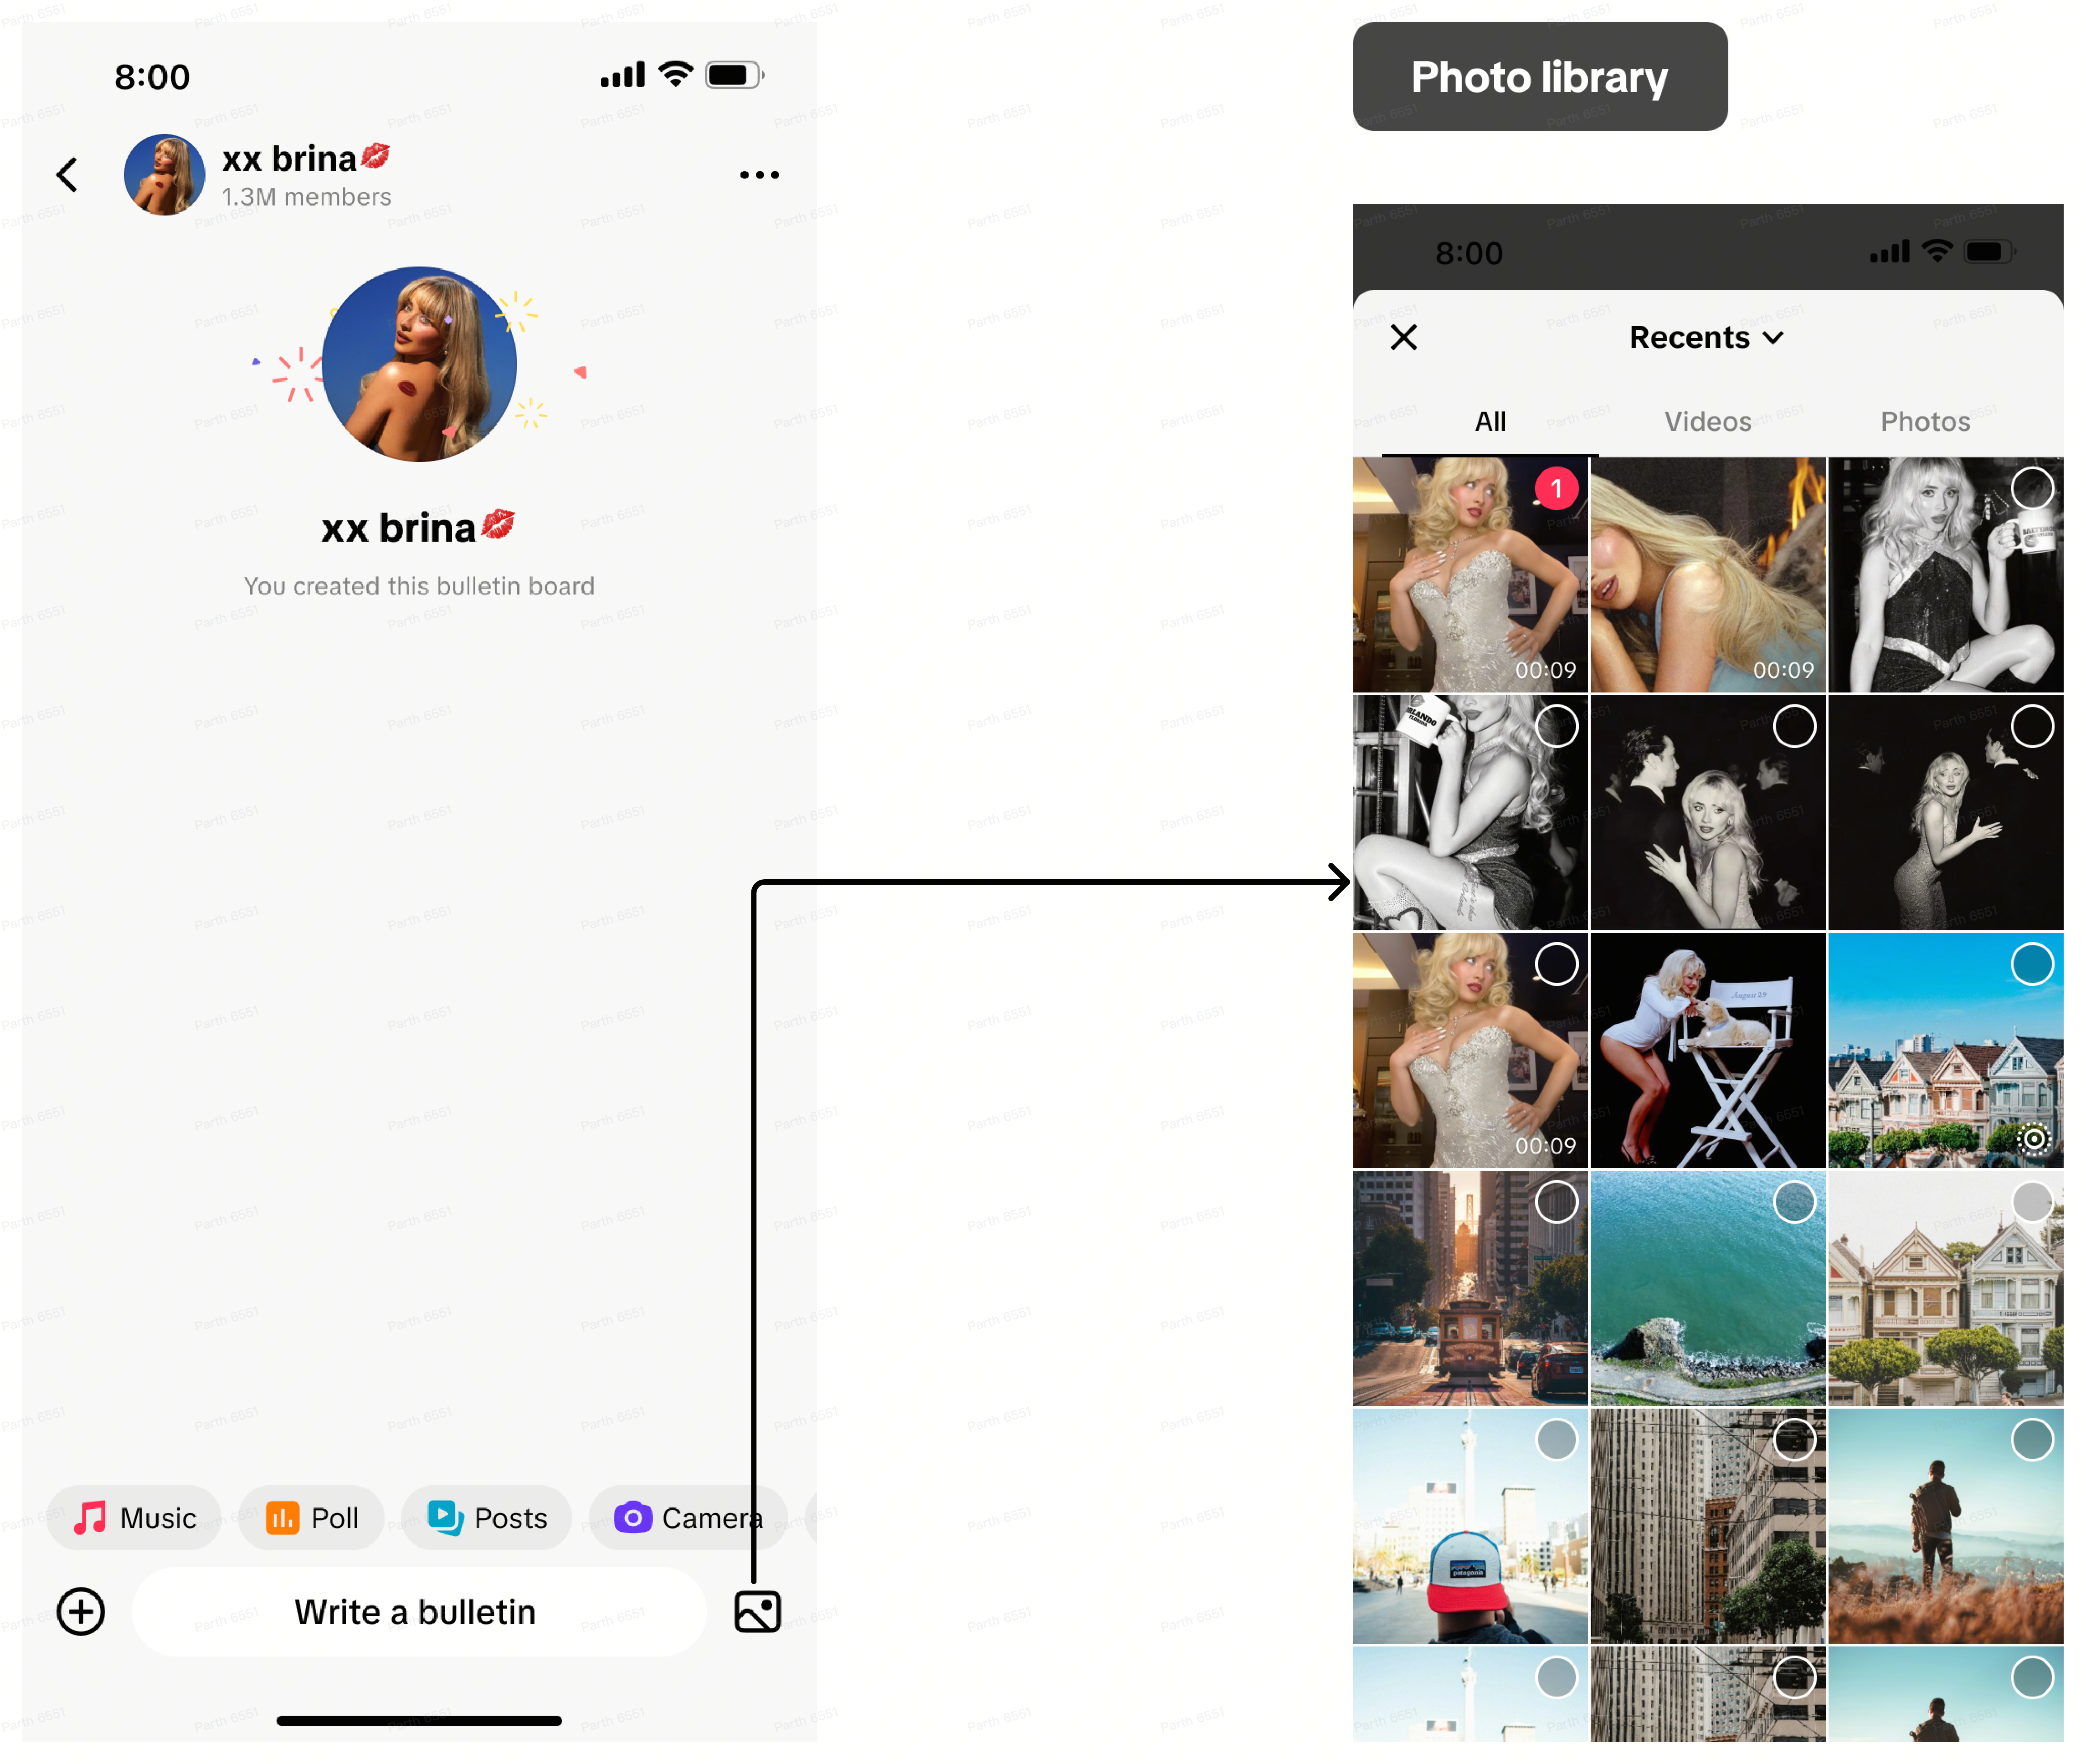
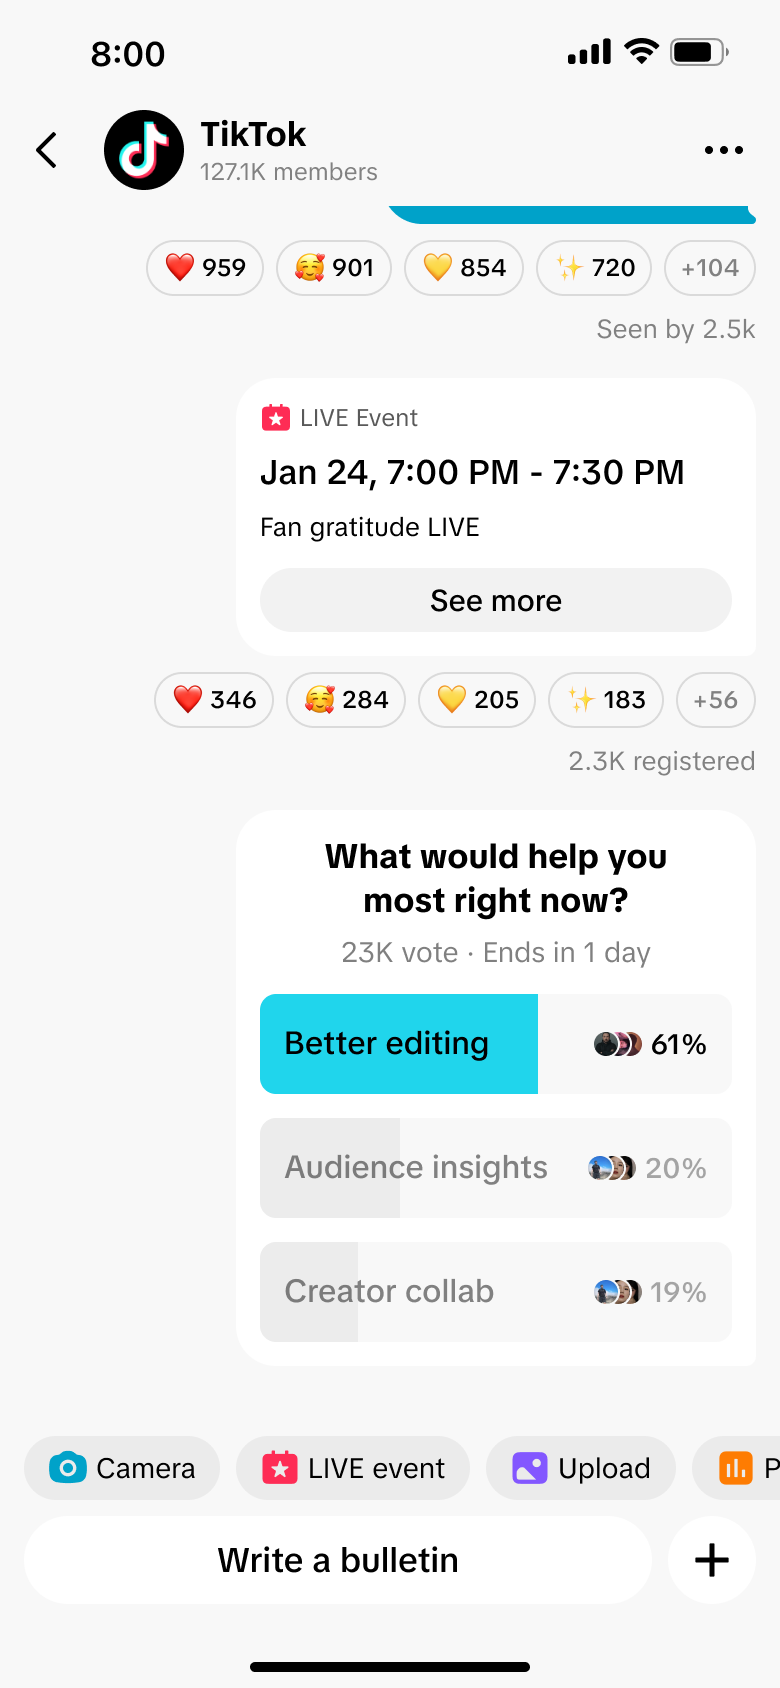
Step 2. Post your first message
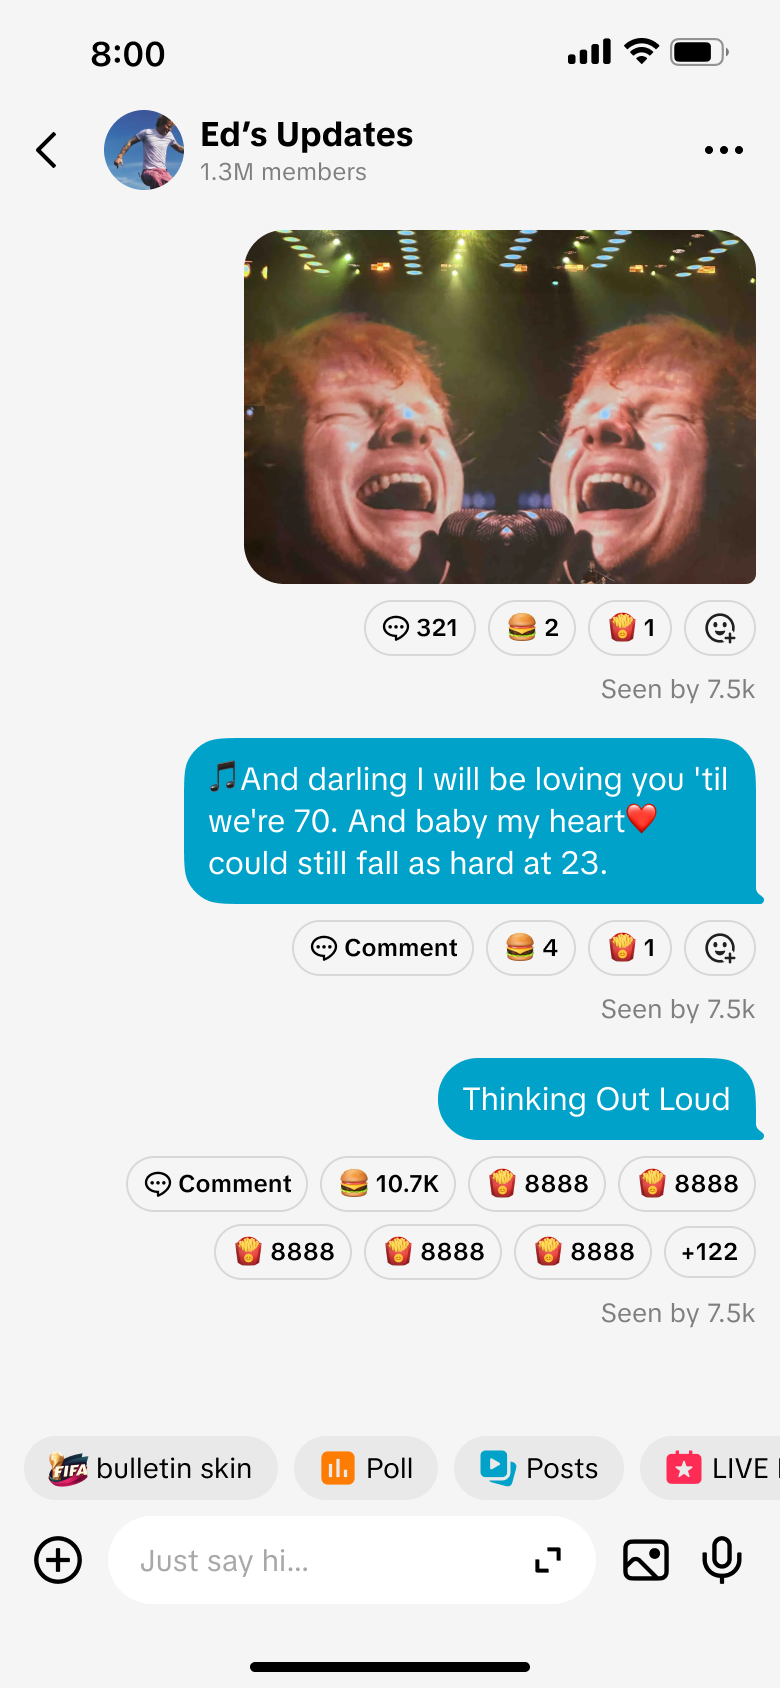
Click the text editing box at the bottom (to write an announcement):
Publish text content
Click the + sign, or the shortcut at the bottom:
Take or upload local photos
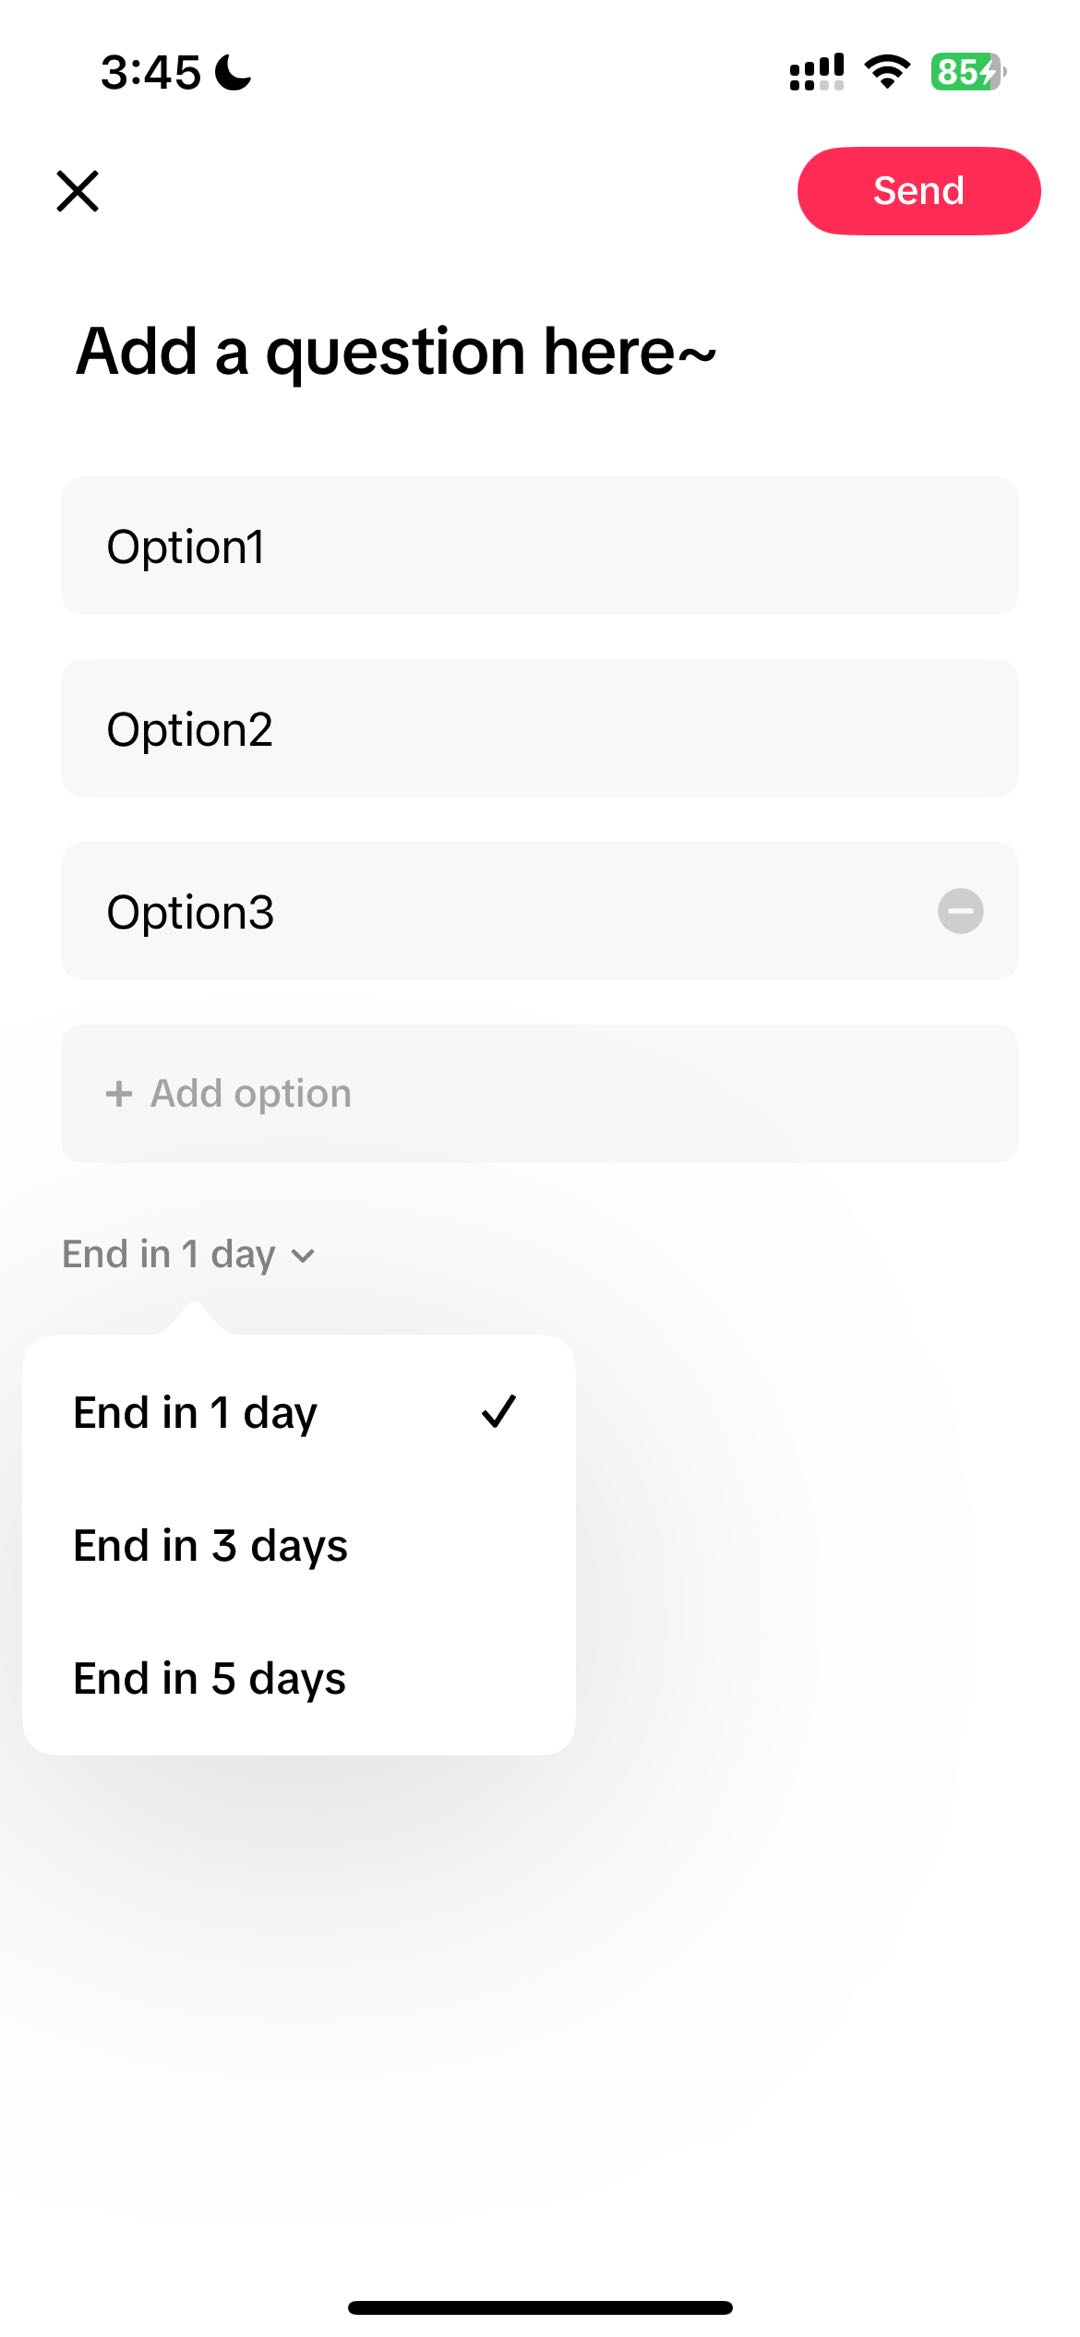
Publish poll
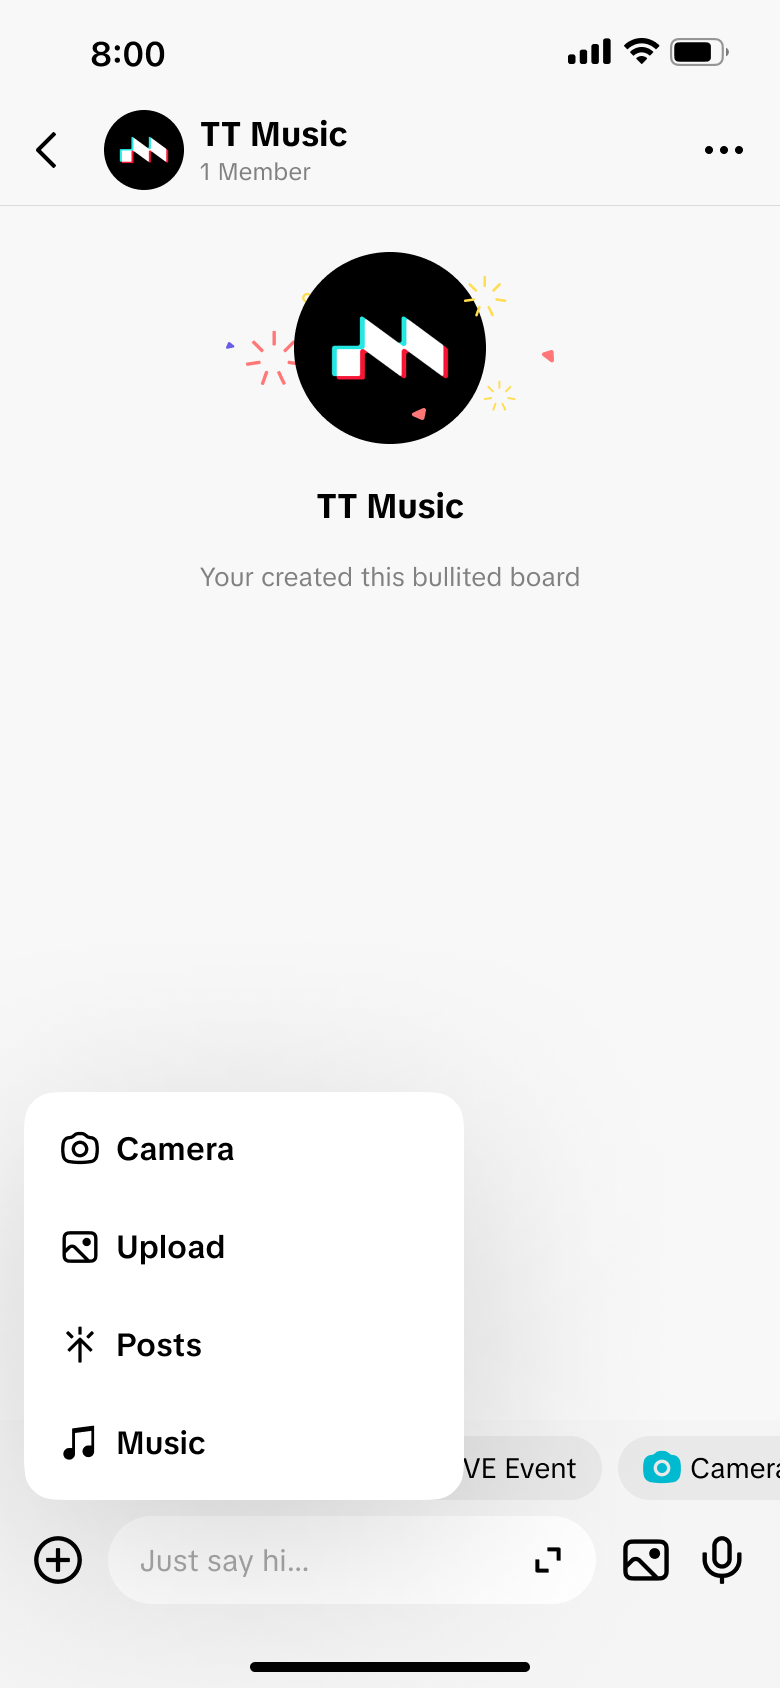
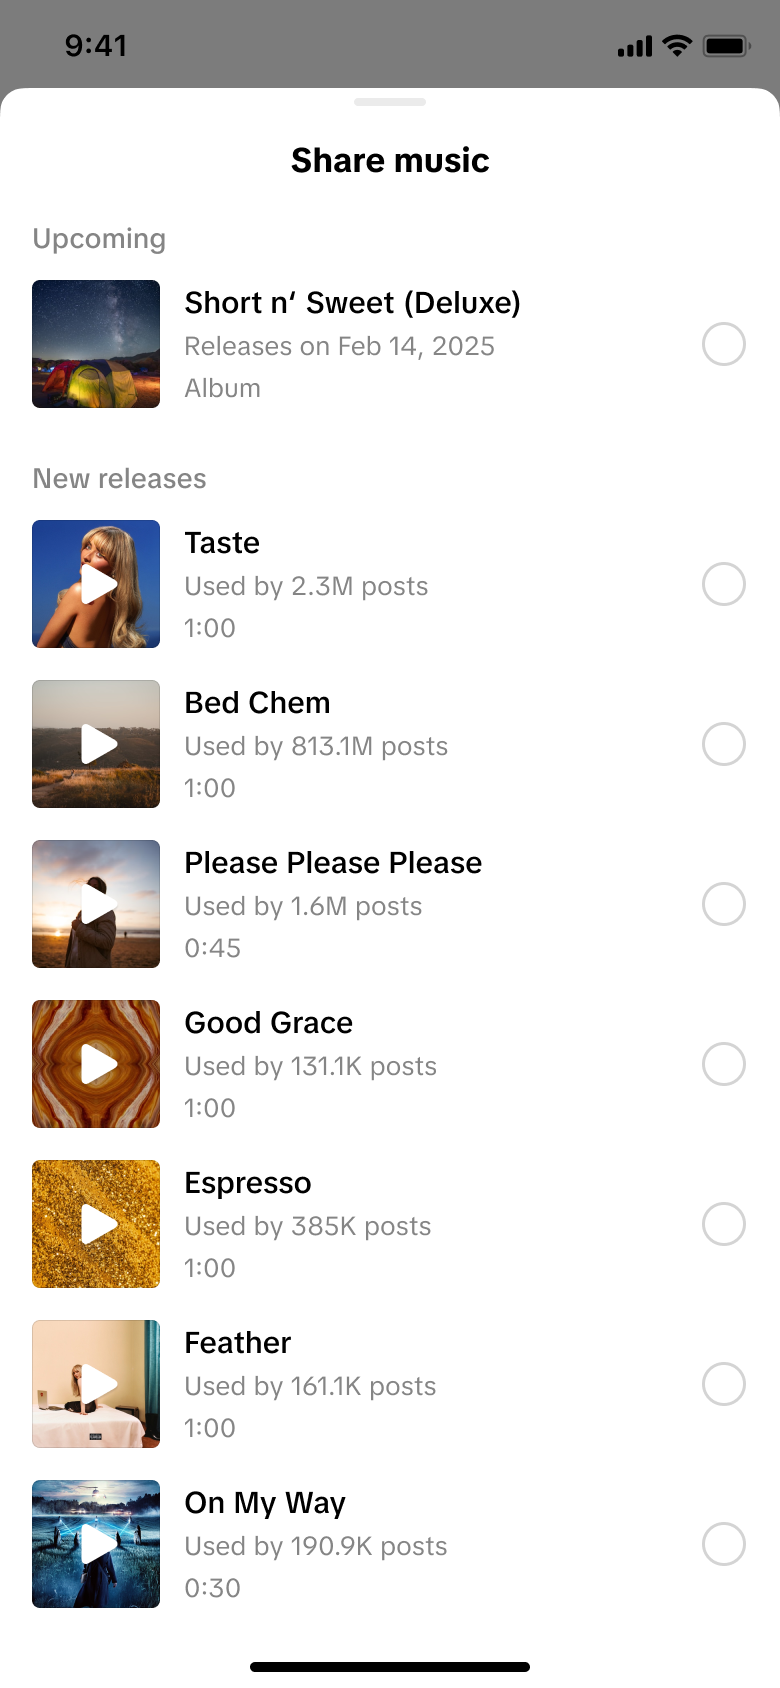
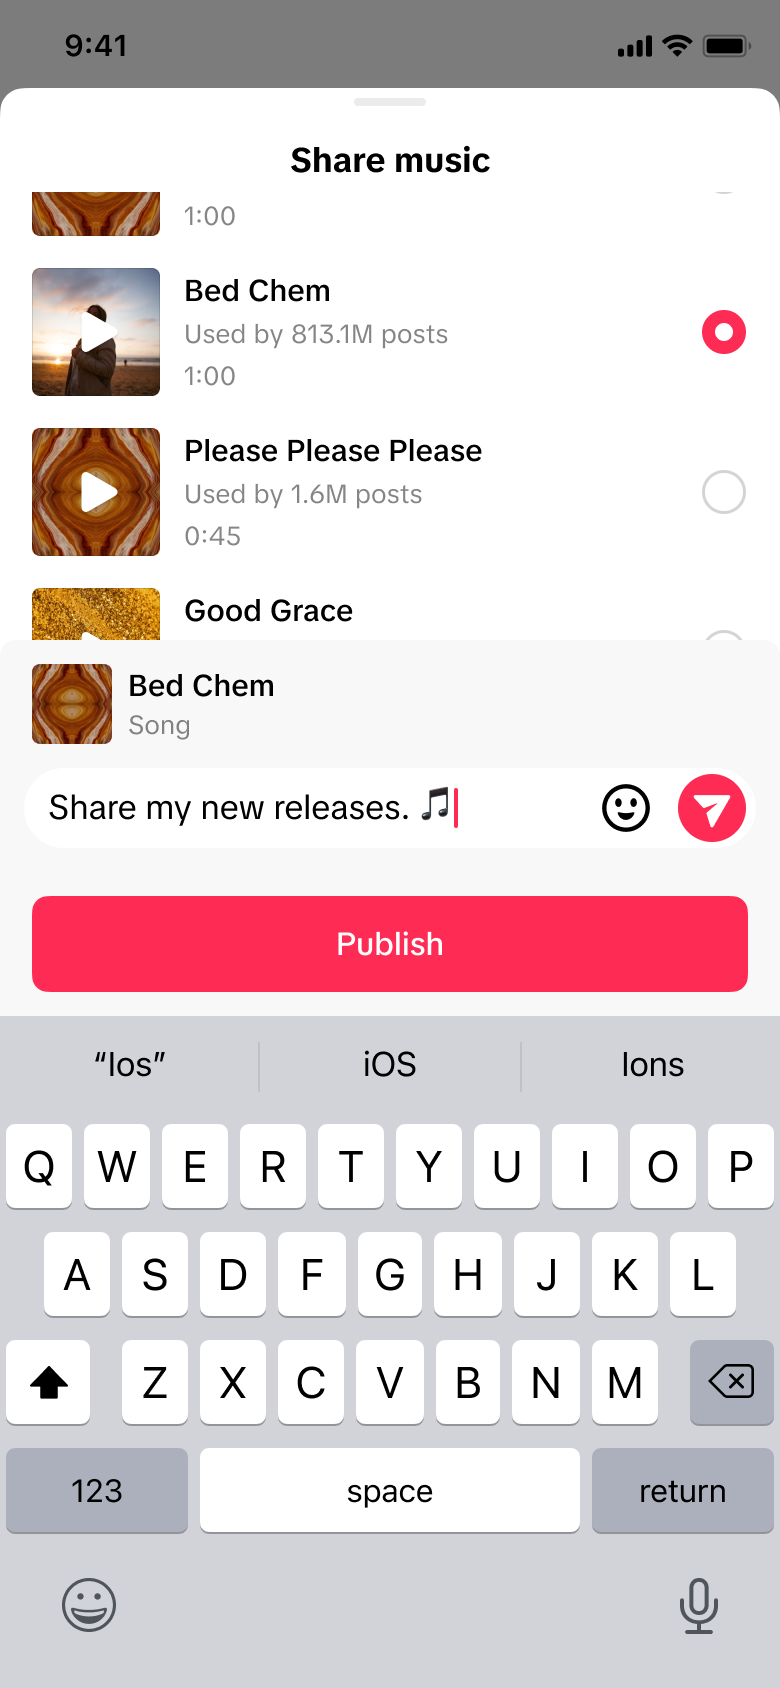
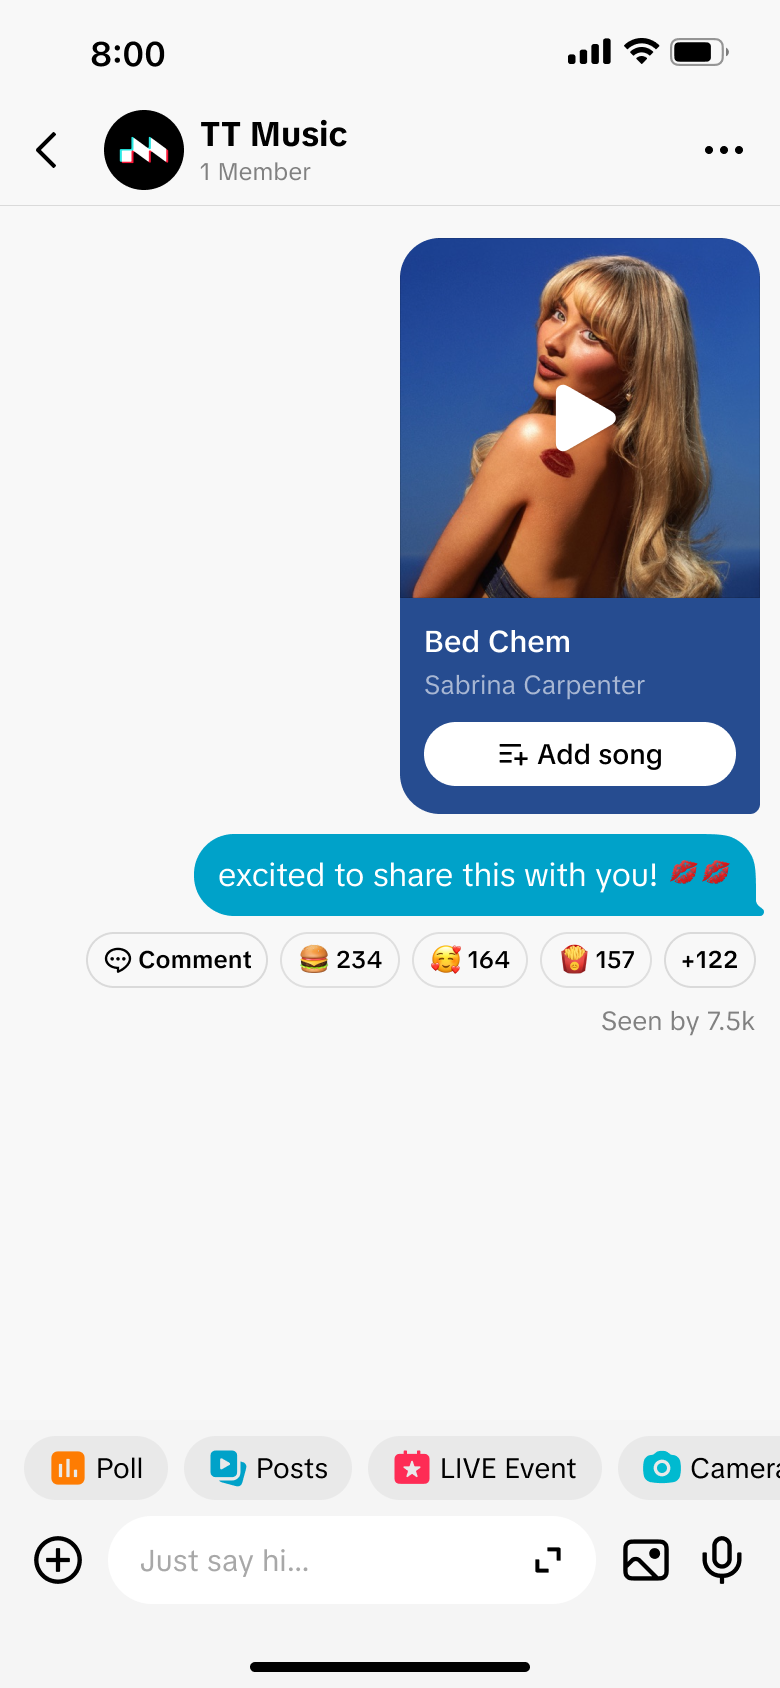
Share music cards
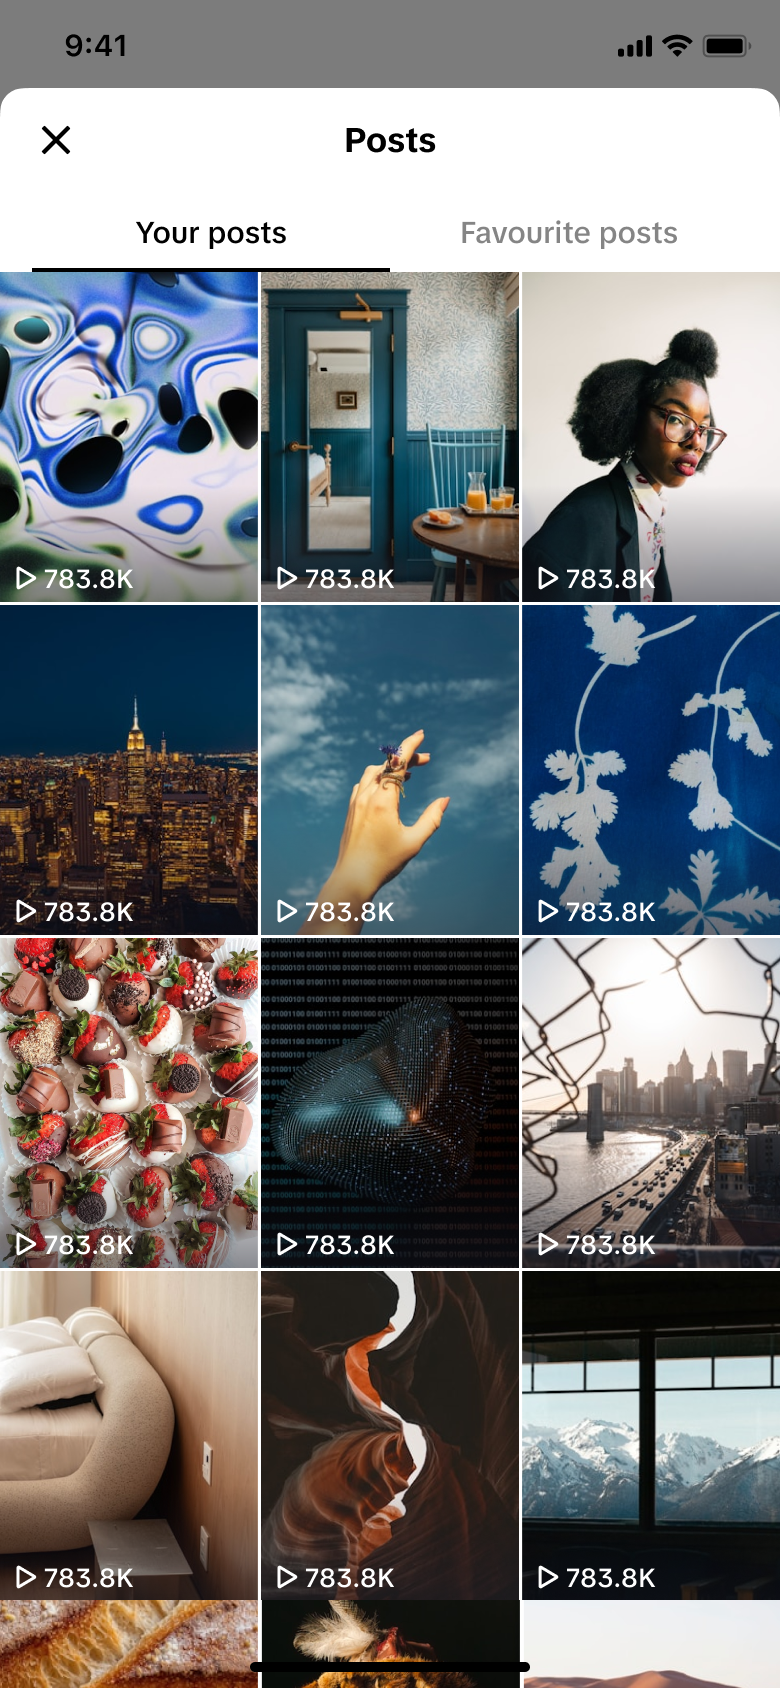
Share your own or bookmarked contributions from others
Share personal live streaming
Click on the shortcut tool at the bottom.
Other rules :
Creators can send up to 20 channel messages per day.
Supports creators to delete/recall sent messages.
Text only
Image upload (album)
Vote
Video card
Image upload (shoot)
Music card (for artists)
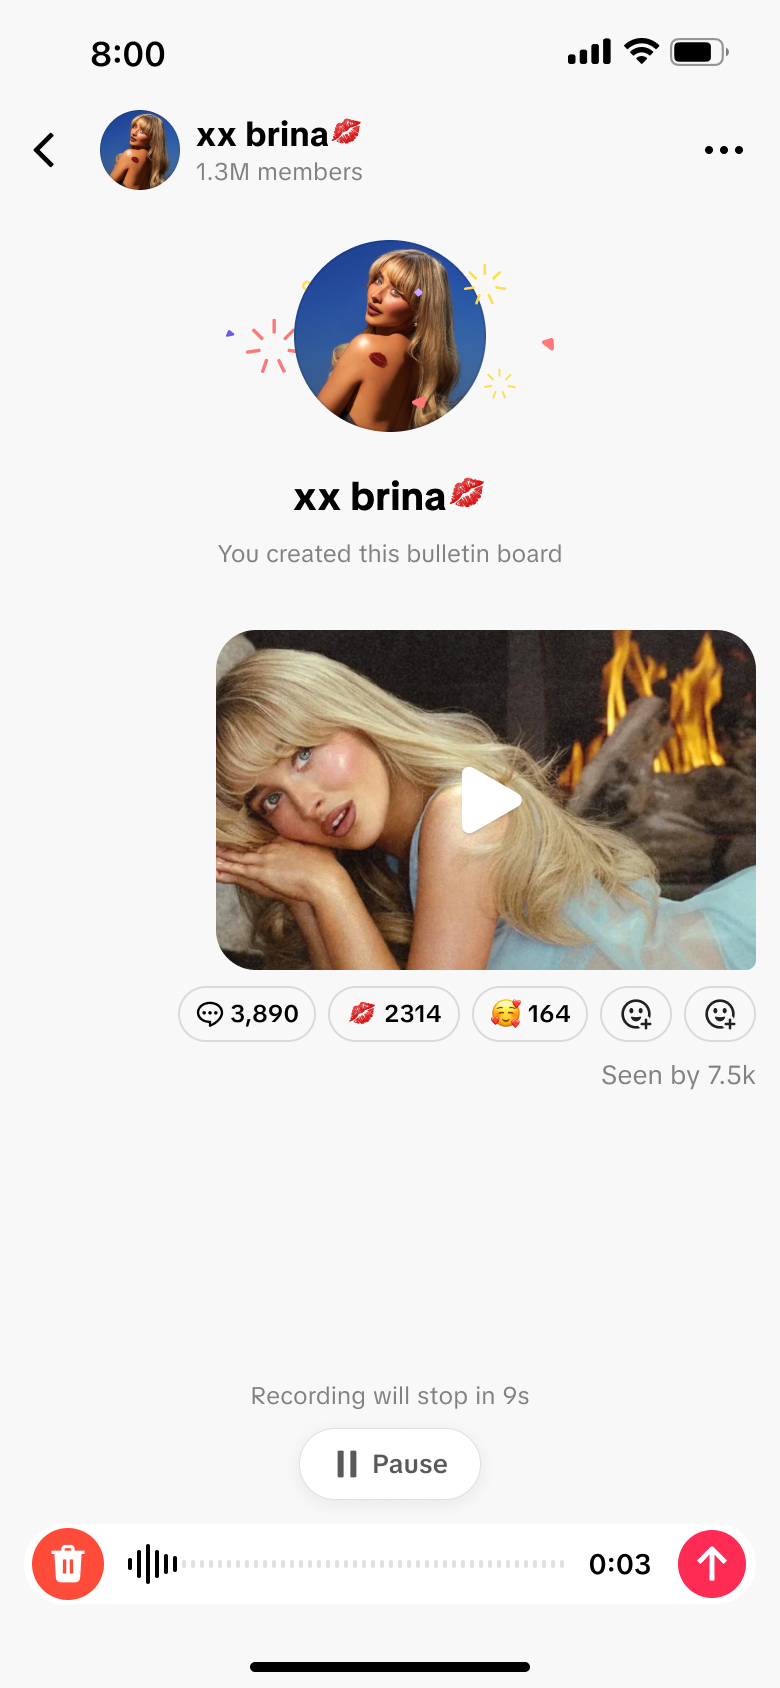
Voice card
Local video card
Step 3
Step 3. Invite people to join
Entry 1: activity page
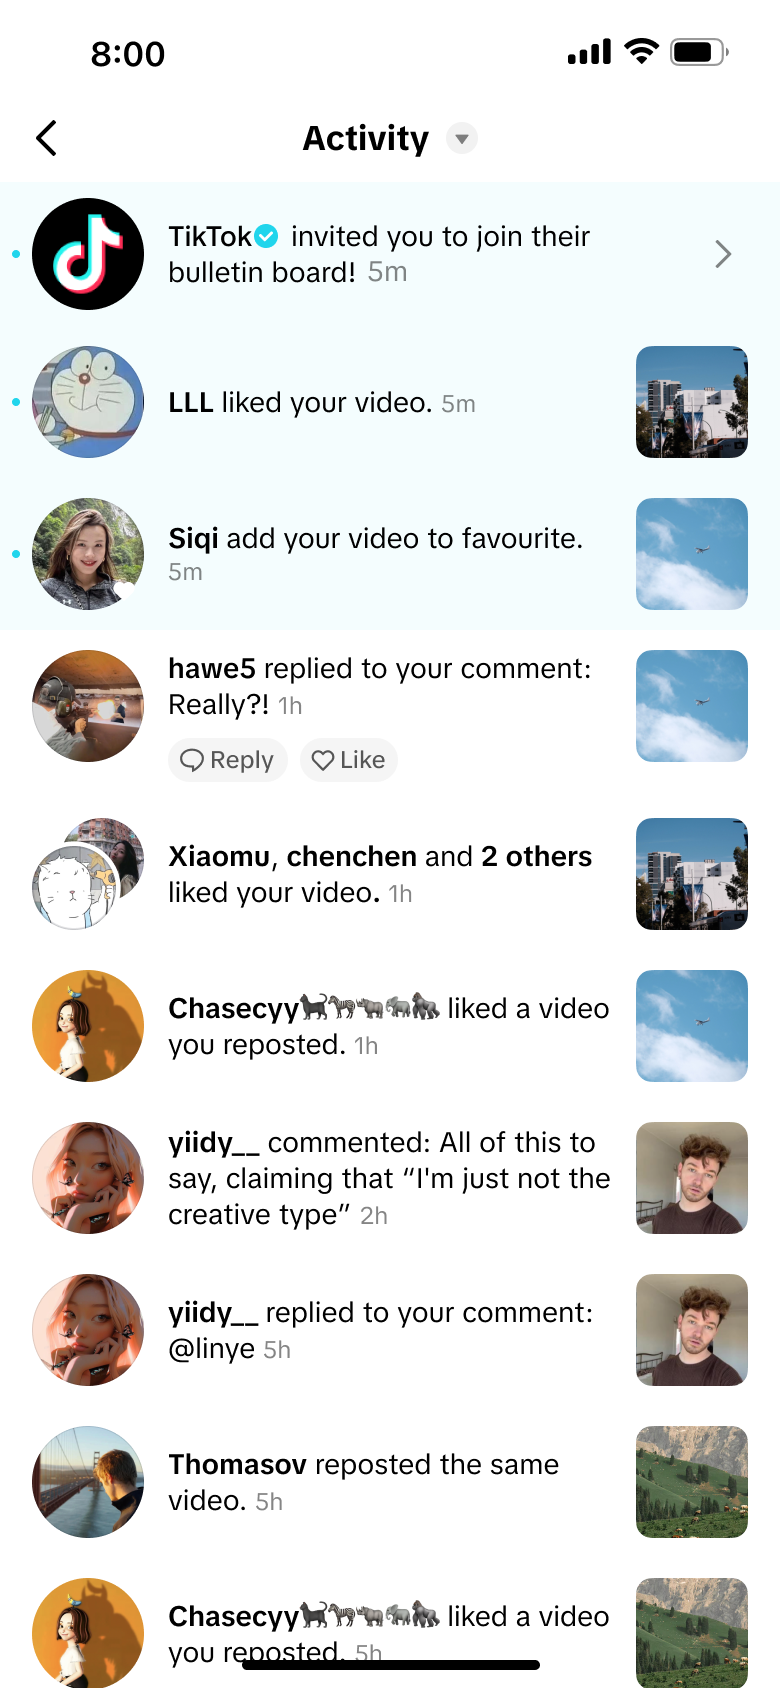
After creating a channel, the creator's fans will automatically receive a channel invitation message on the Activity page .
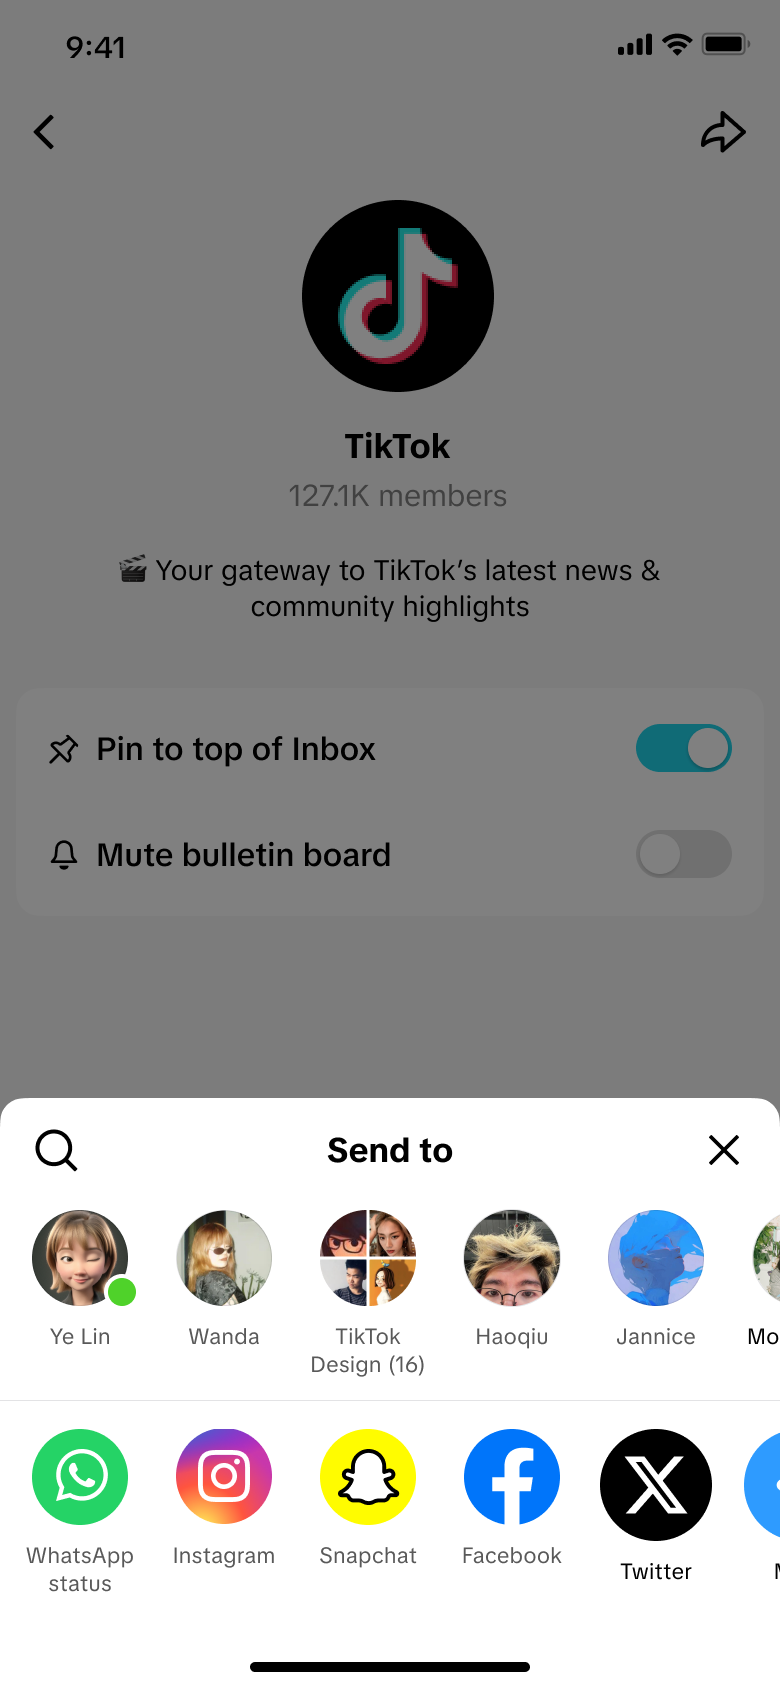
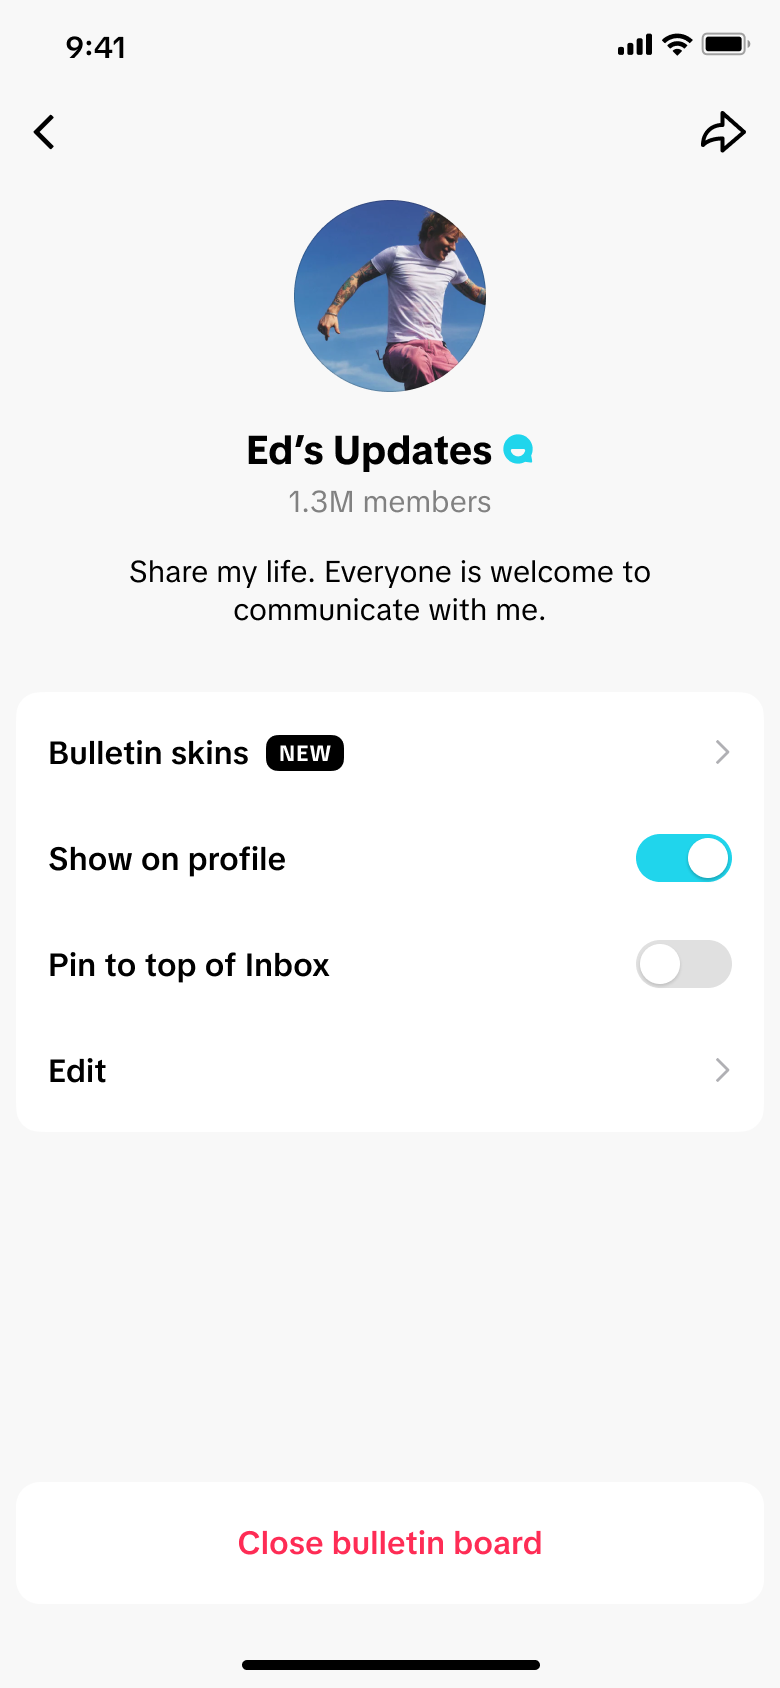
Click the share arrow on the Settings page to generate a channel sharing link.
Entry 2: feed card
The platform will distribute the homepage feed card of the corresponding creator's BB channel to the user's feed based on the relevance between the user and the creator (such as following, frequently watching their videos, etc.). Users can click on the card to join the channel.
The distribution is uniformly controlled by the platform. For creators with higher active levels, the platform traffic delivery will be tilted.
Entry 3: Settings page
Click the share arrow on the Settings page to generate a channel sharing link.
Mobile
Step 4
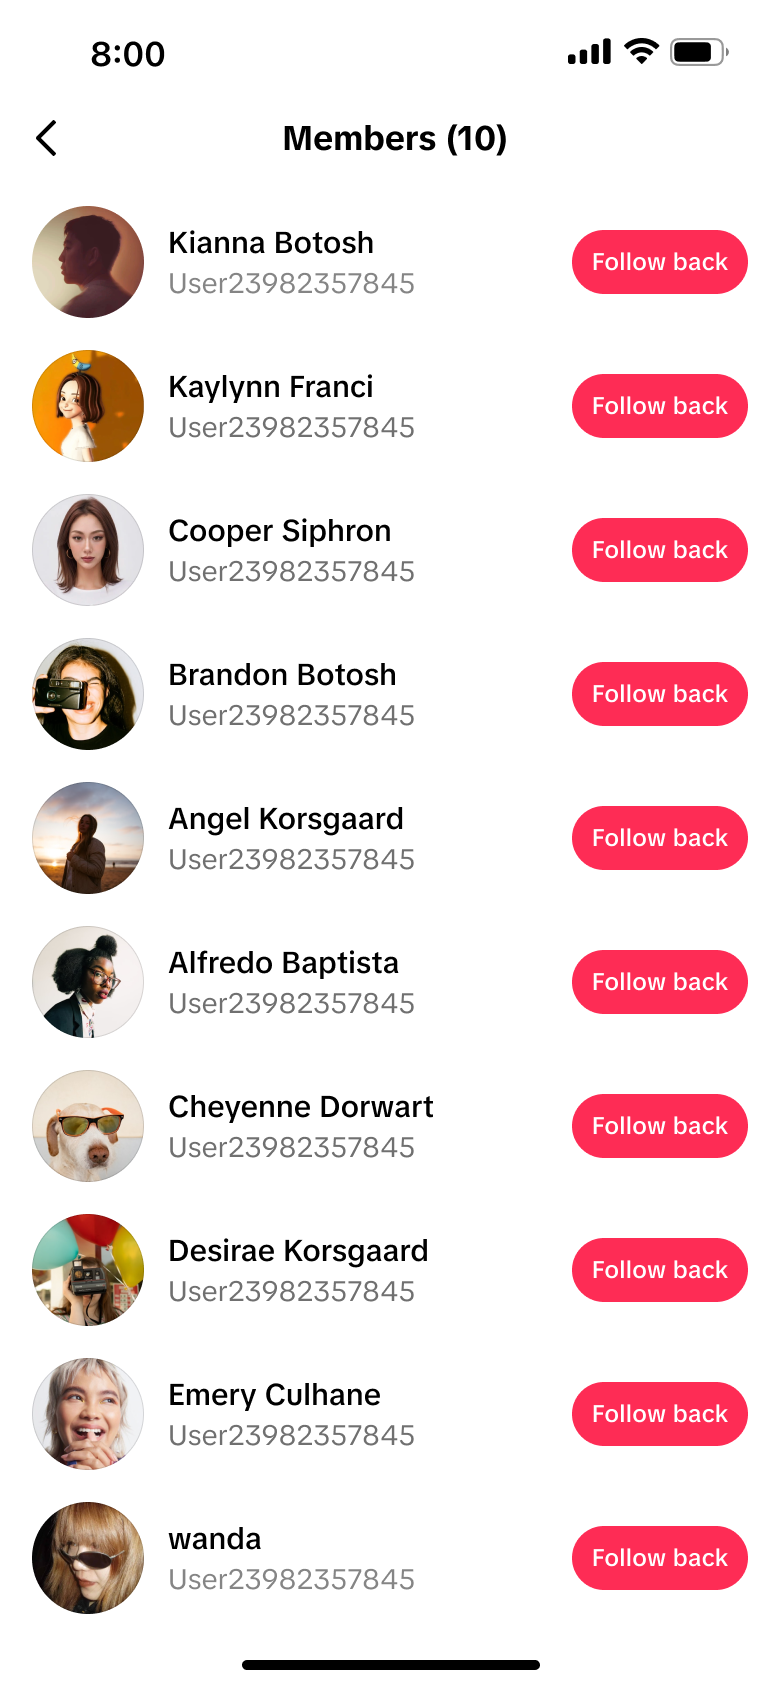
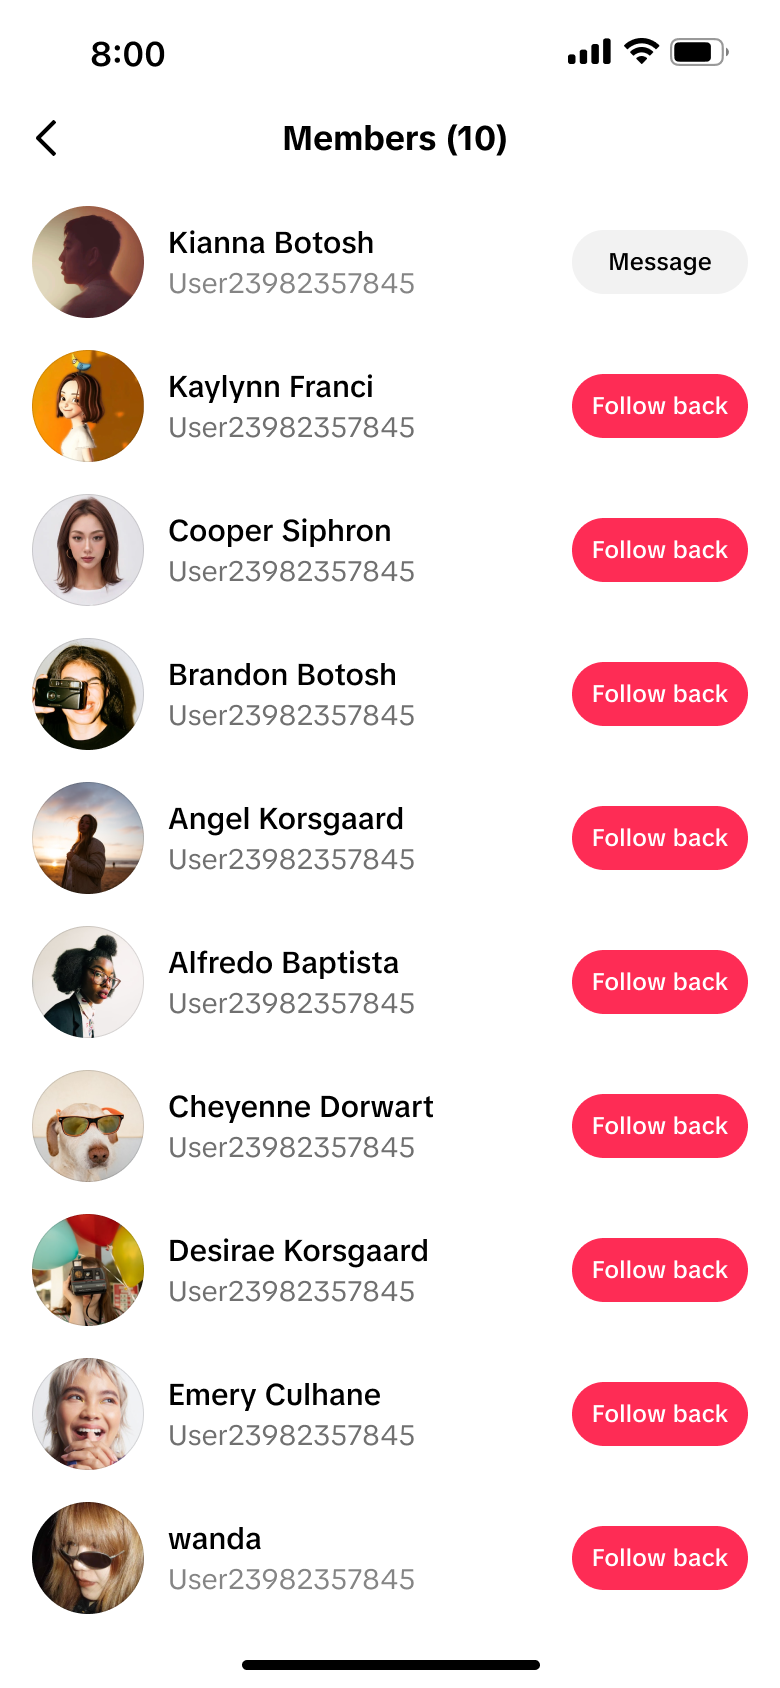
View channel subscribers
Only channels created by creators
Click on the Members (members) area at the top of the channel, or go to the Settings (settings) page to view the subscribers of the channel
Creators can choose to follow back channel subscribers.
Mobile
Step 5
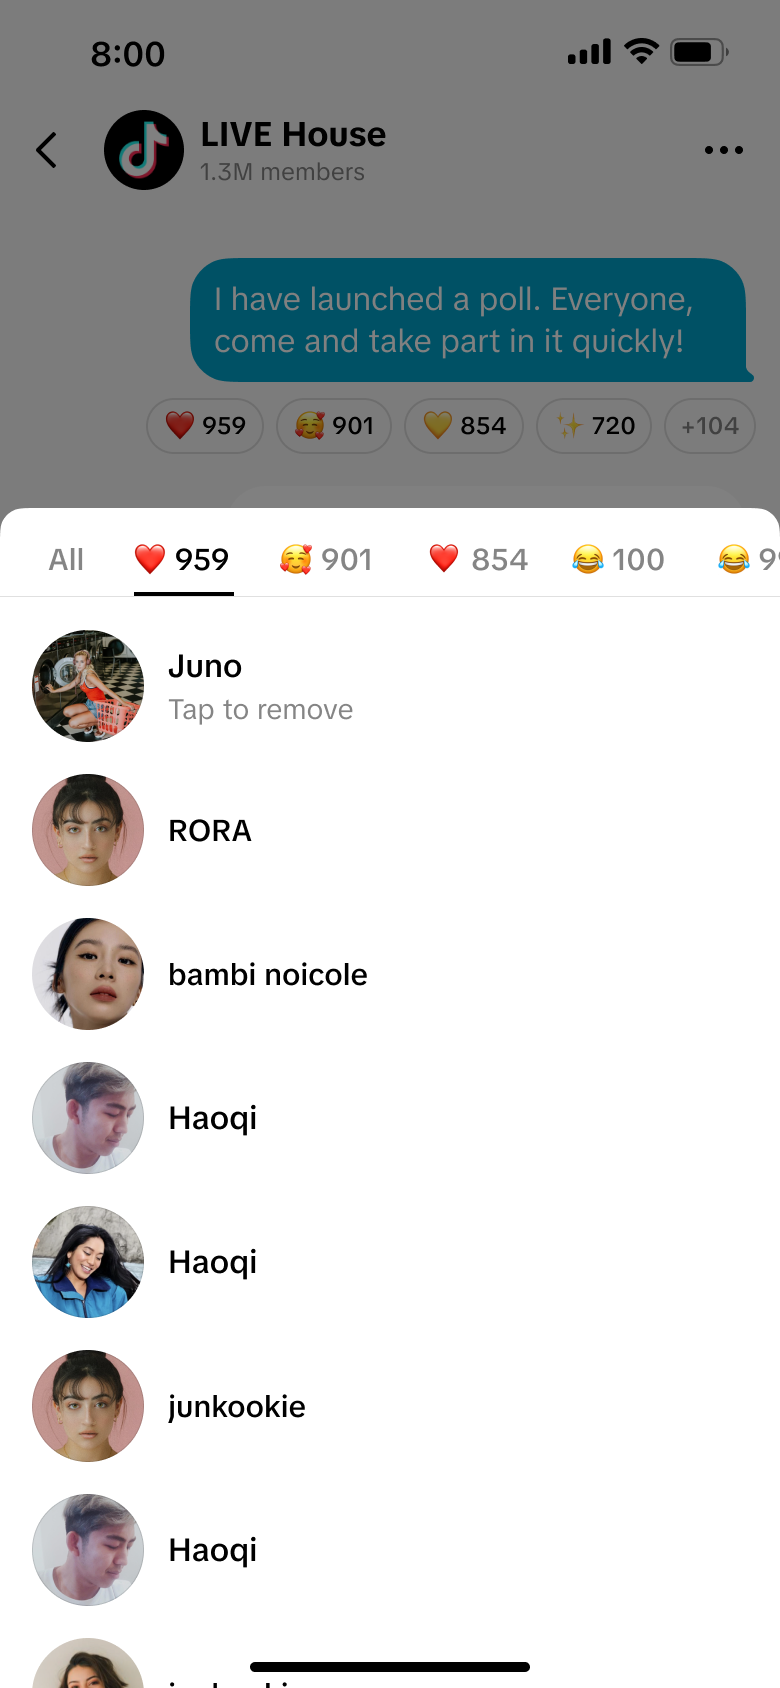
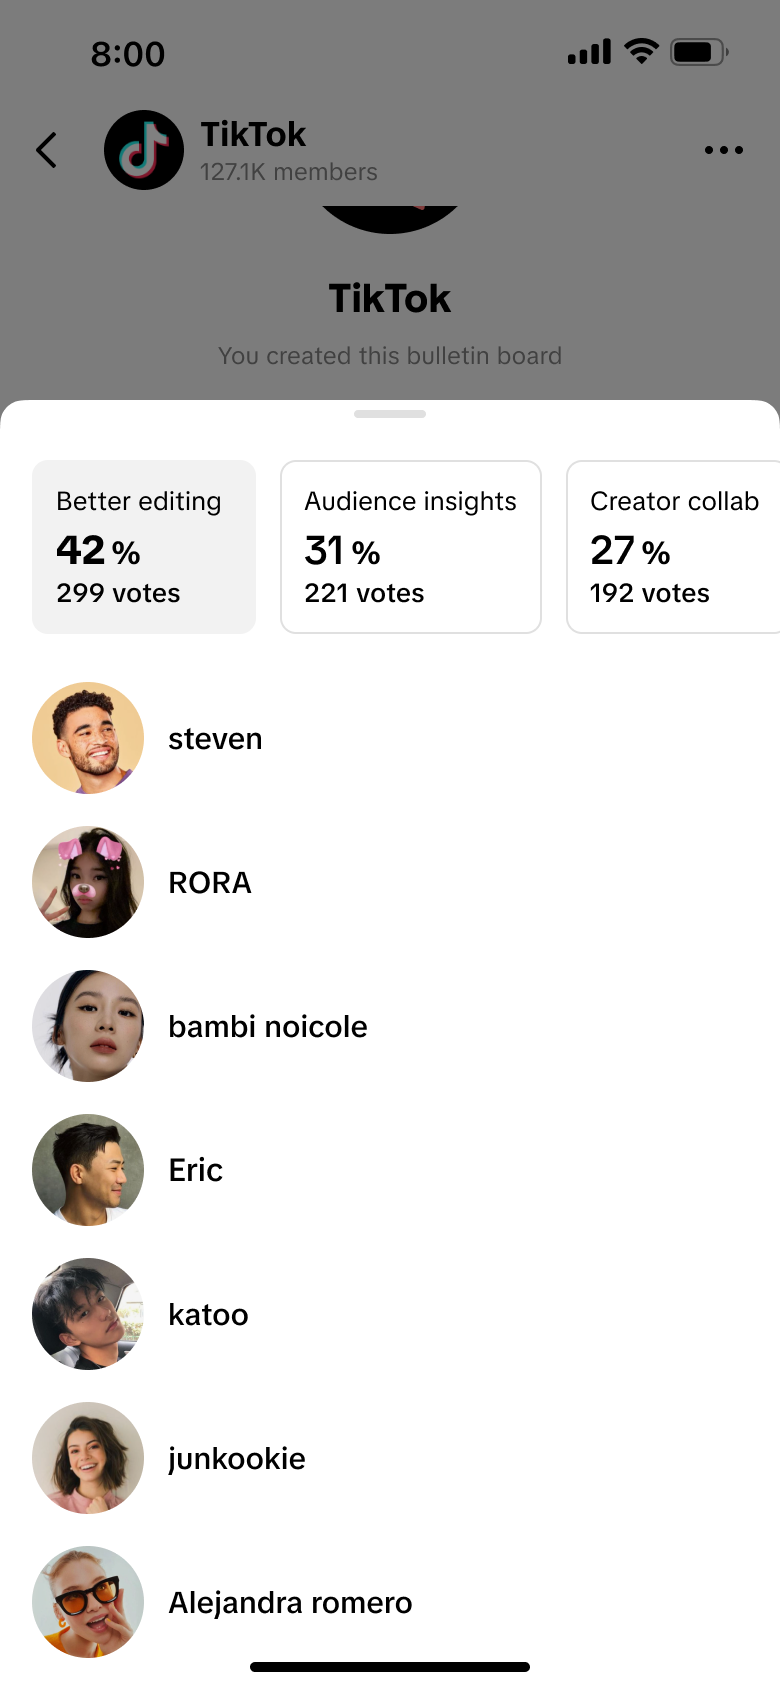
View Submission Interactive Users
View range : Interaction records of all public accounts in the creator's personal channel
View Emoji interactive users : Long press the external emoji below the submission to view the list of users who added the emoji in the pop-up panel.
View users who participated in voting : Click the title above the poll panel to view the list of users who participated in voting.
Mobile
Step 6
View Submission Comments Users
View range: all channels
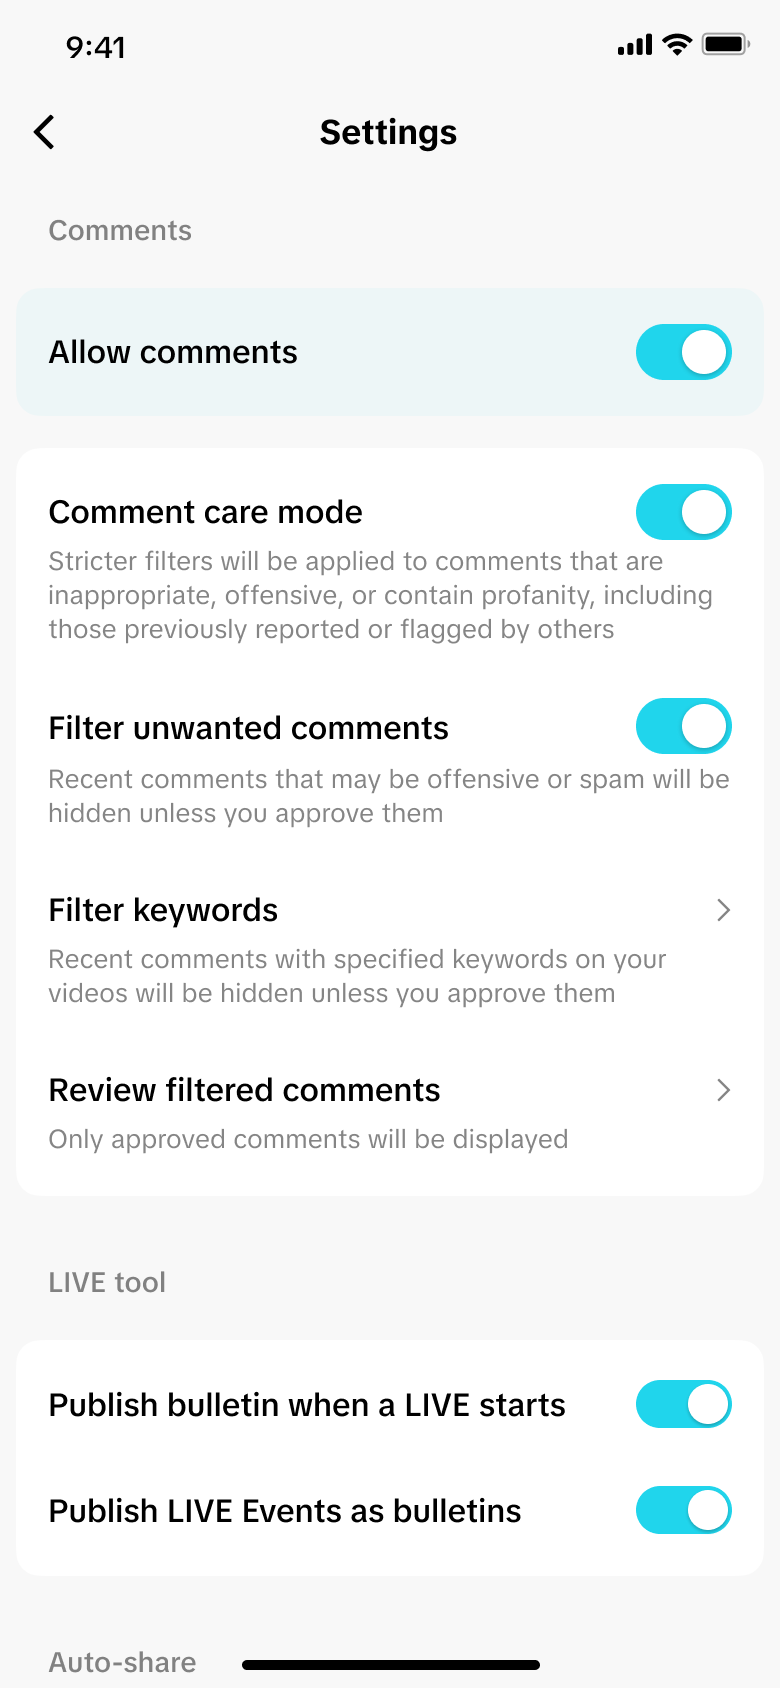
Enable comments: Click "..." at the top of the channel to enter the Settings page, turn on the "Allow comment" switch to enable comments
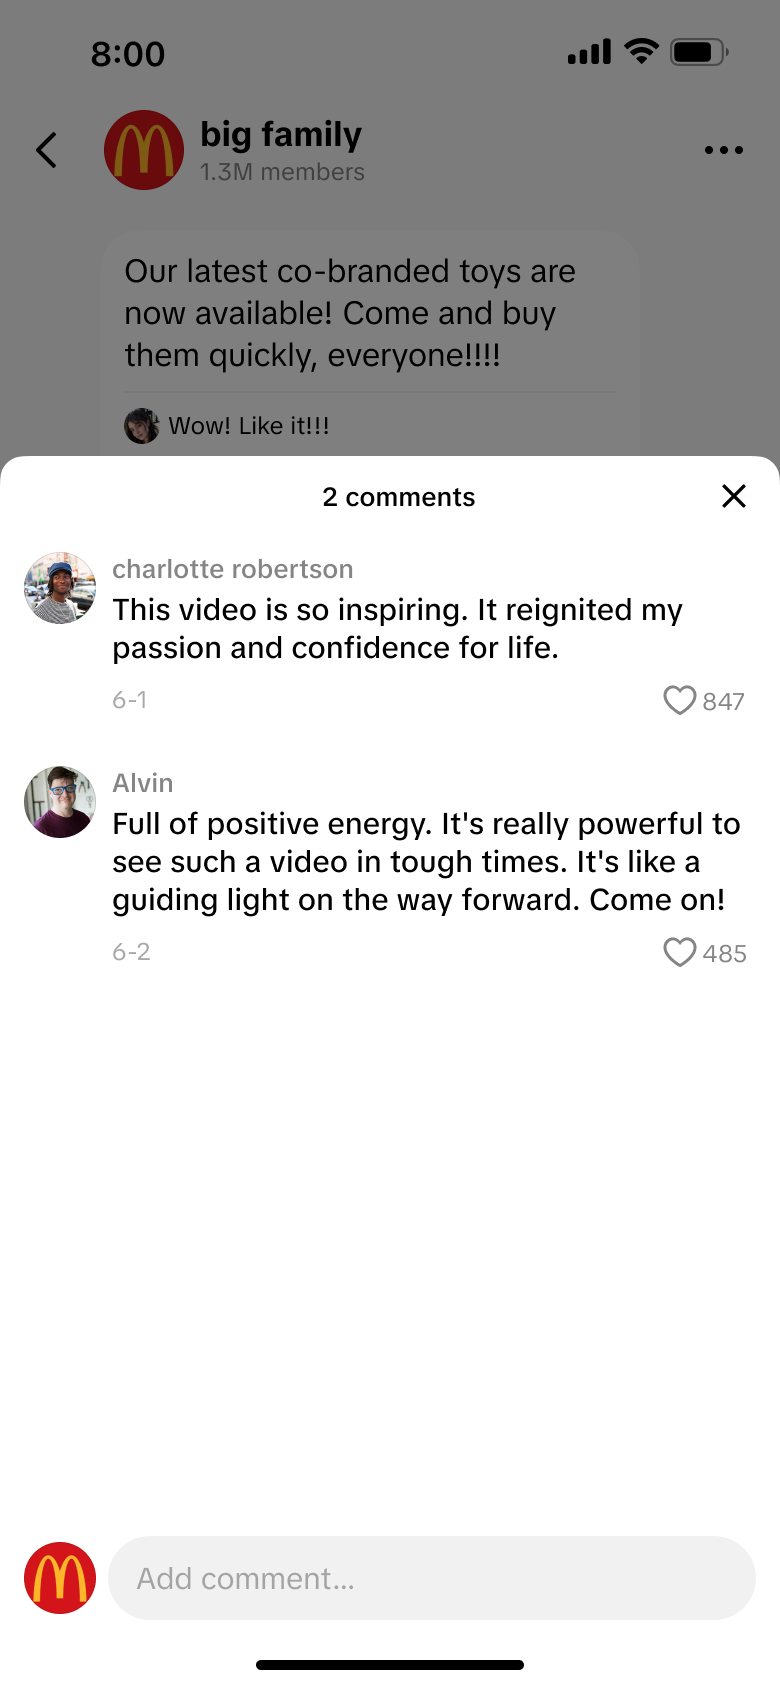
View comments: You can click the comment button under the corresponding commented submission to view comments
Reply to comments: You can reply to the corresponding comments under the commented submission
Mobile
Step 7
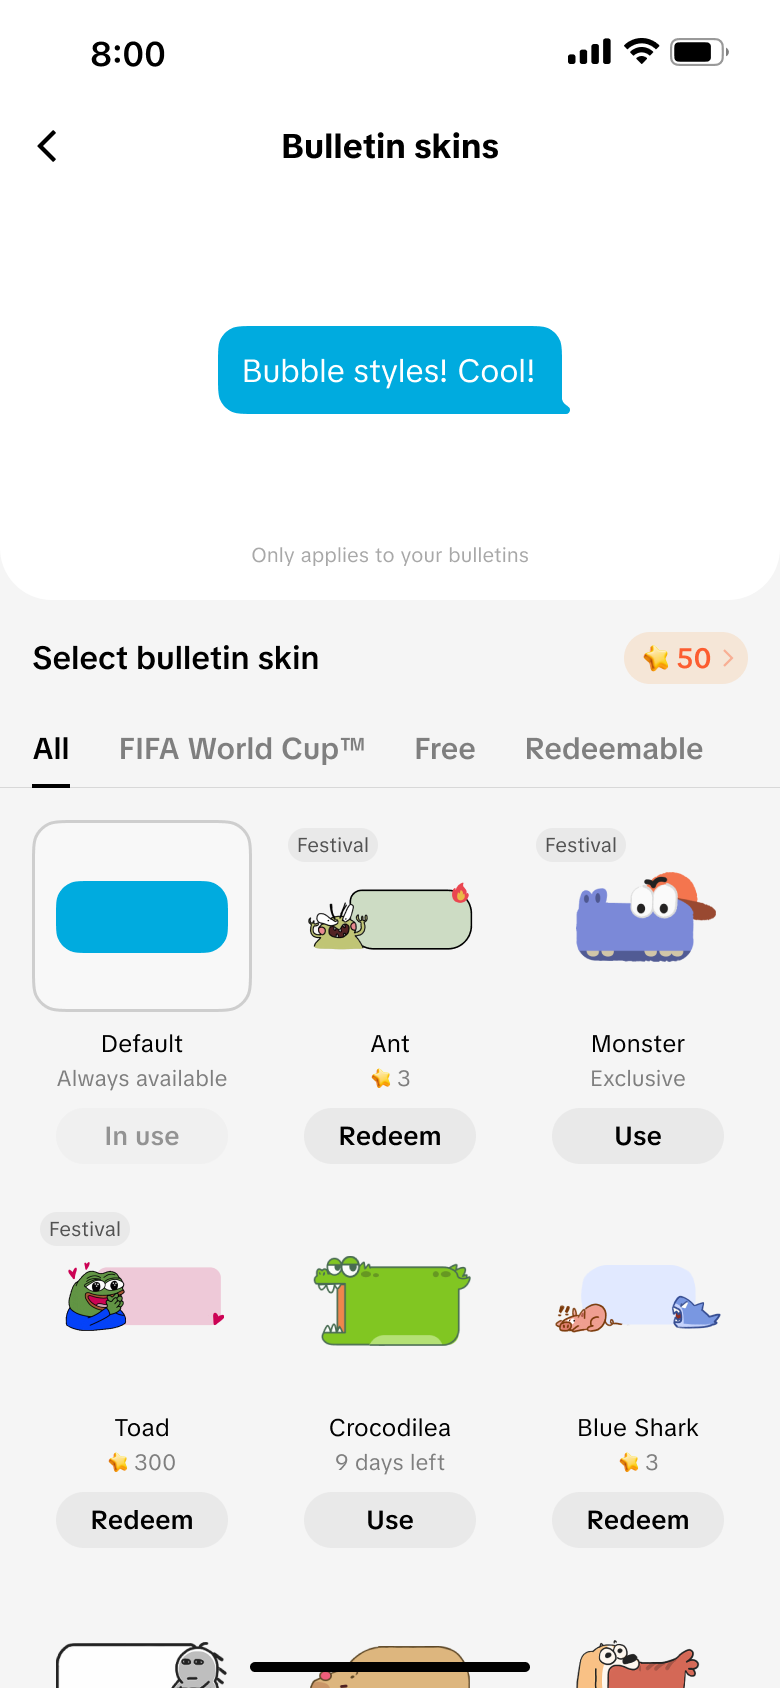
Replace bubble skin
Entrance 1: Click "..." at the top of the channel to enter the Settings page, click "Bulletin skins" to enter the skin page to select and replace the bubble skin.
Entrance 2: Click on the "Bulletin skins" action bar at the bottom of the channel page to enter the skin page for bubble skin selection and replacement.
Mobile
Step 8
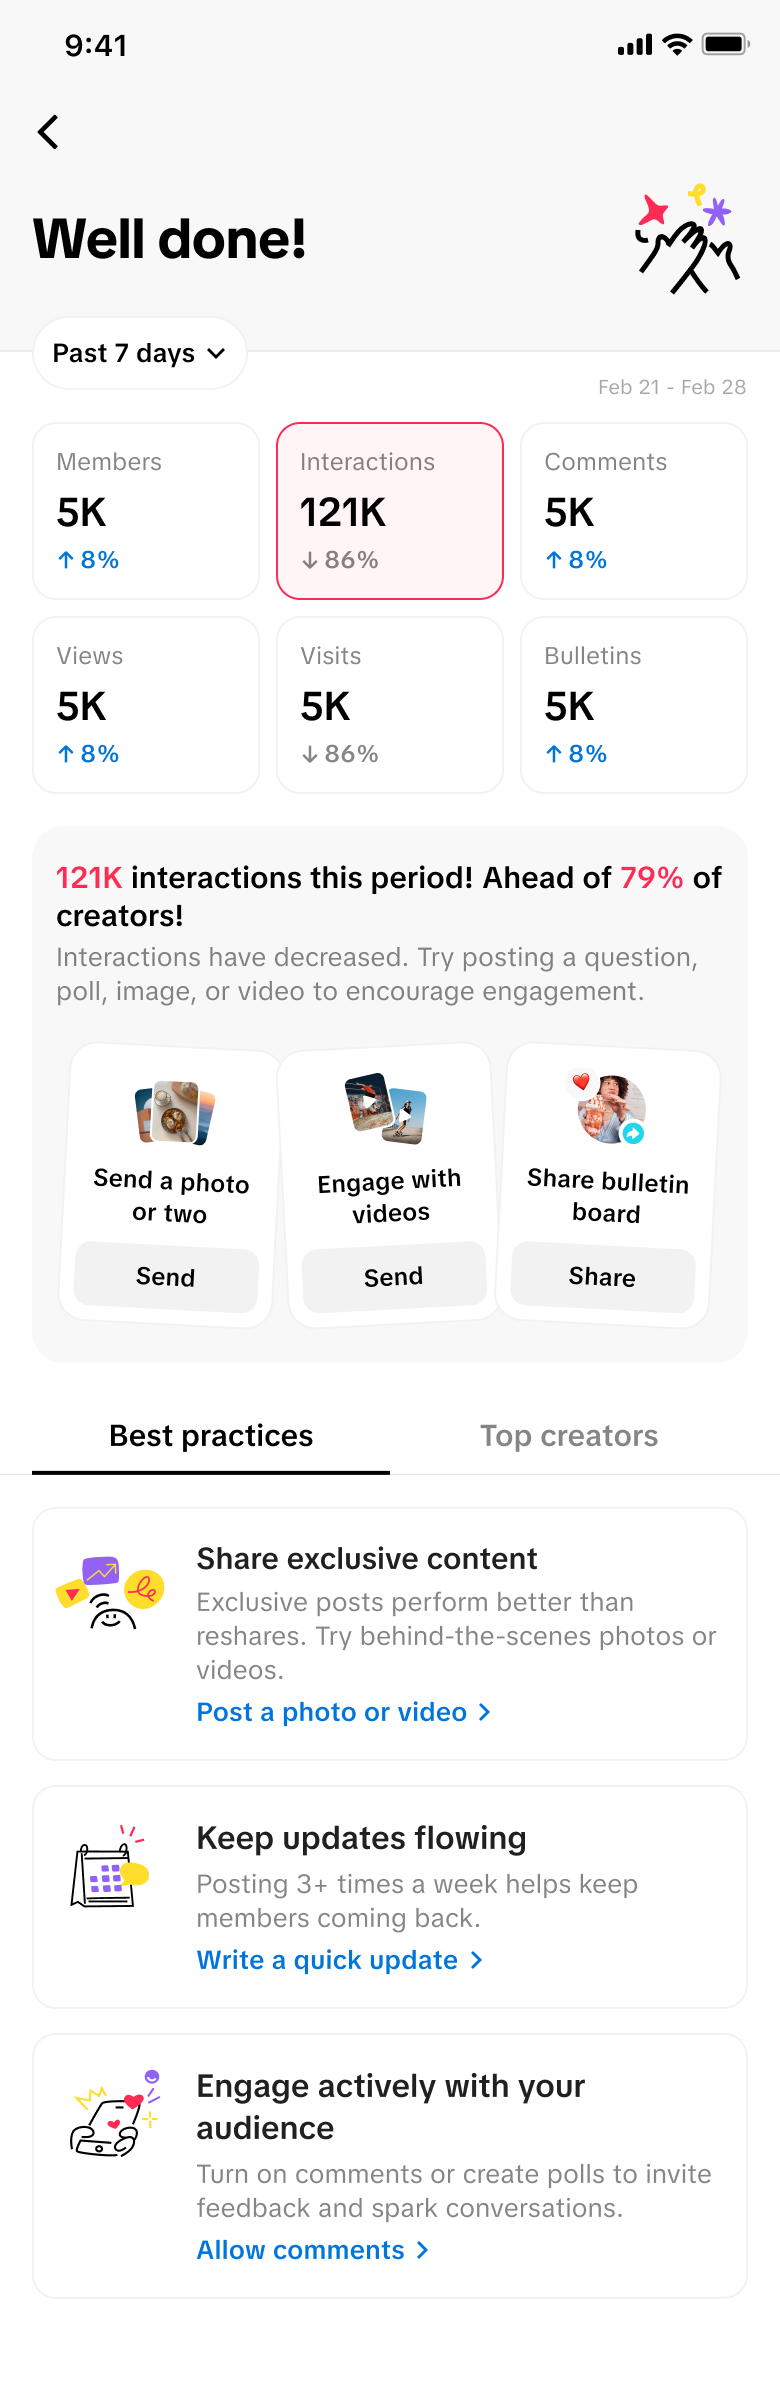
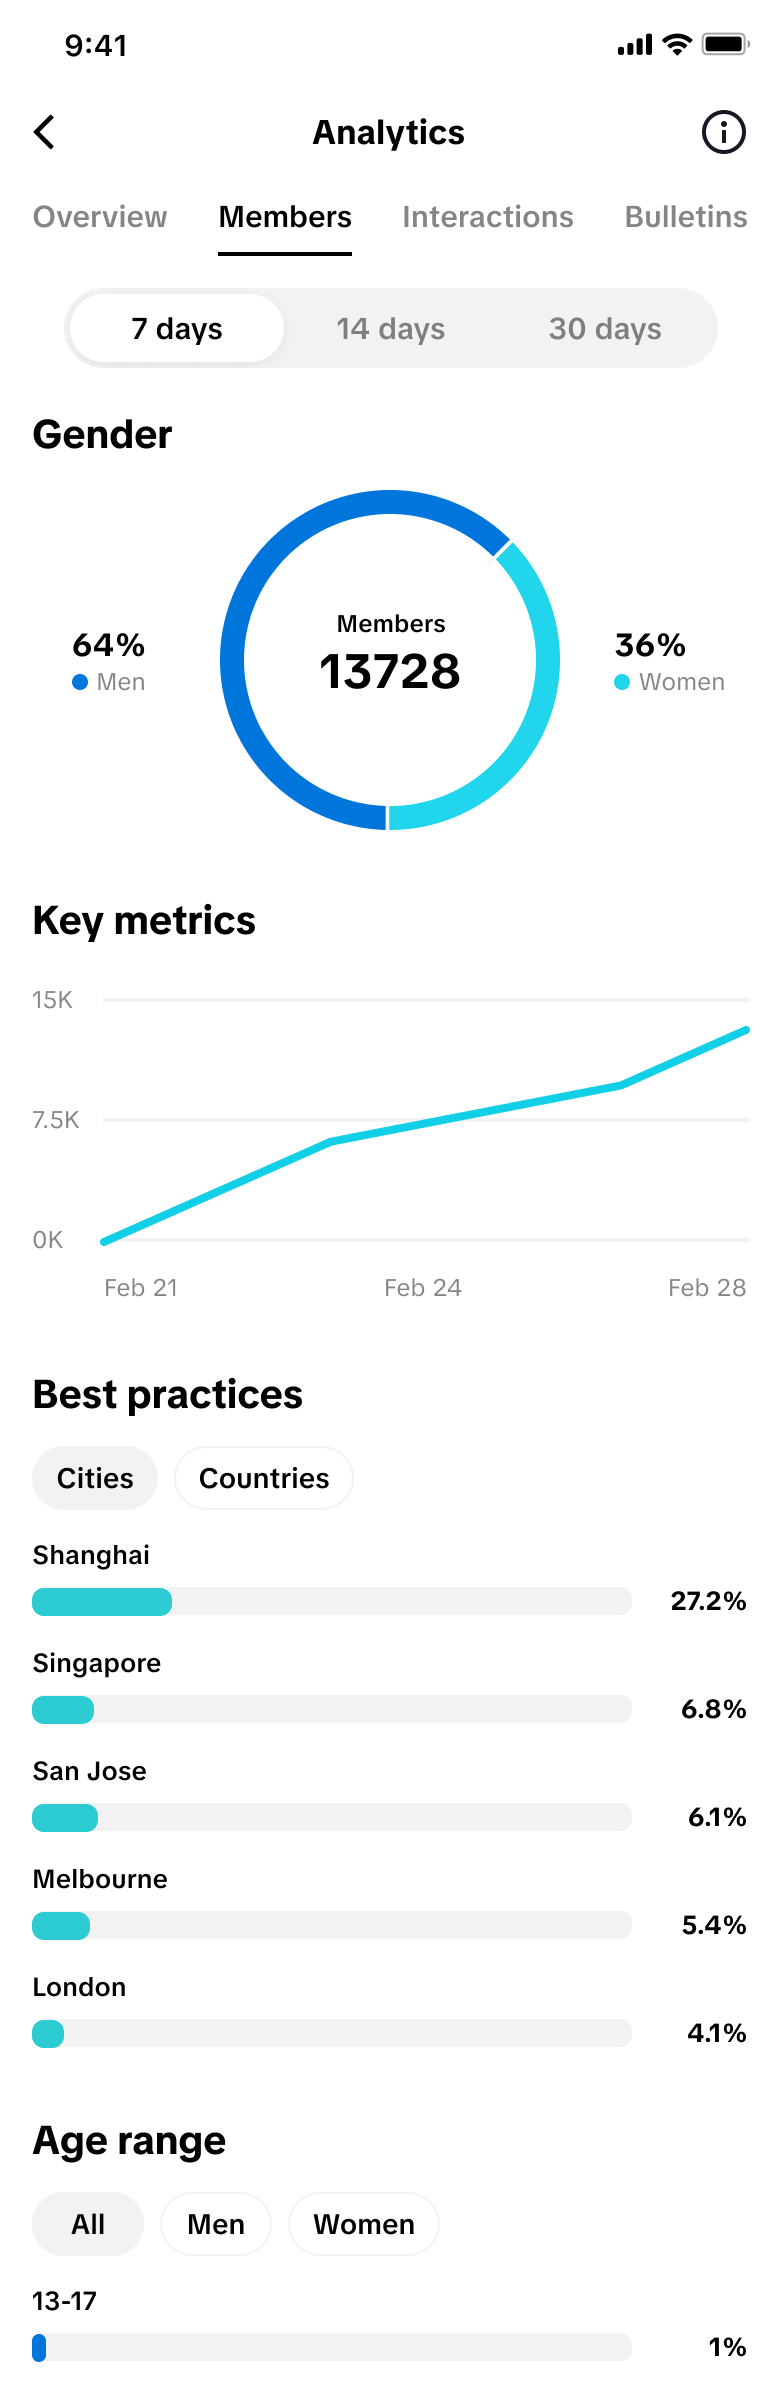
Data analytics page
Multi-dimensional data performance : Support viewing data changes in the past 7/14/30 days , covering six dimensions of fans, interactions, comments, views, visits, and submissions, helping creators observe the channel's recent performance
Submission Tips (Best Practice Module) : Based on the platform's analysis of a large number of creators' submissions and their post-submission data performance, it provides targeted submission suggestions for creators to help optimize content strategies.
Top Creators Module : Show excellent cases of top creator operation BB, for creators to observe and learn, and learn from excellent operation gameplay.
Mobile
Step 9
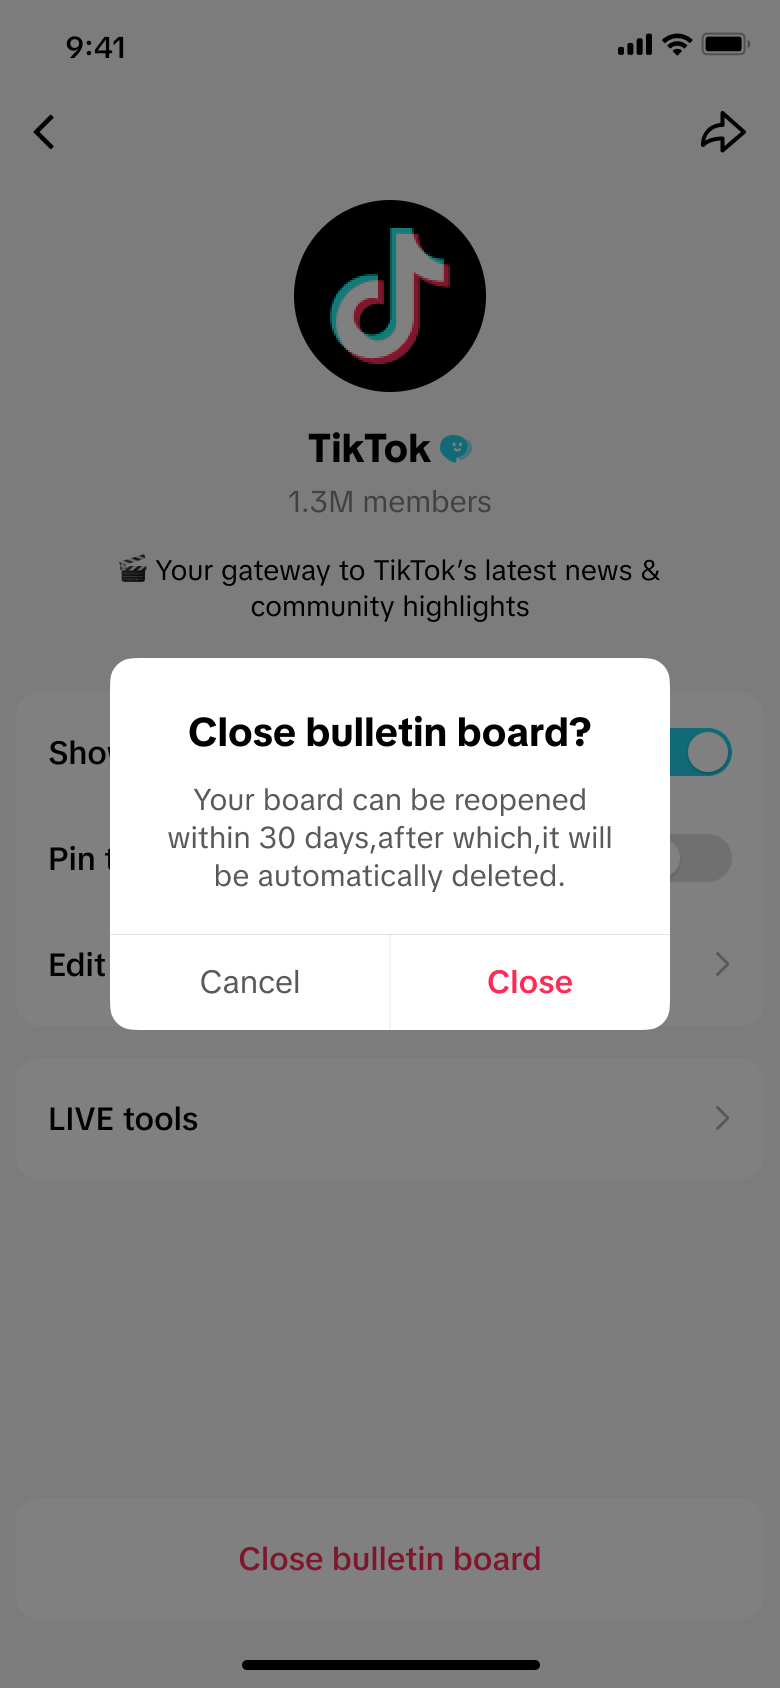
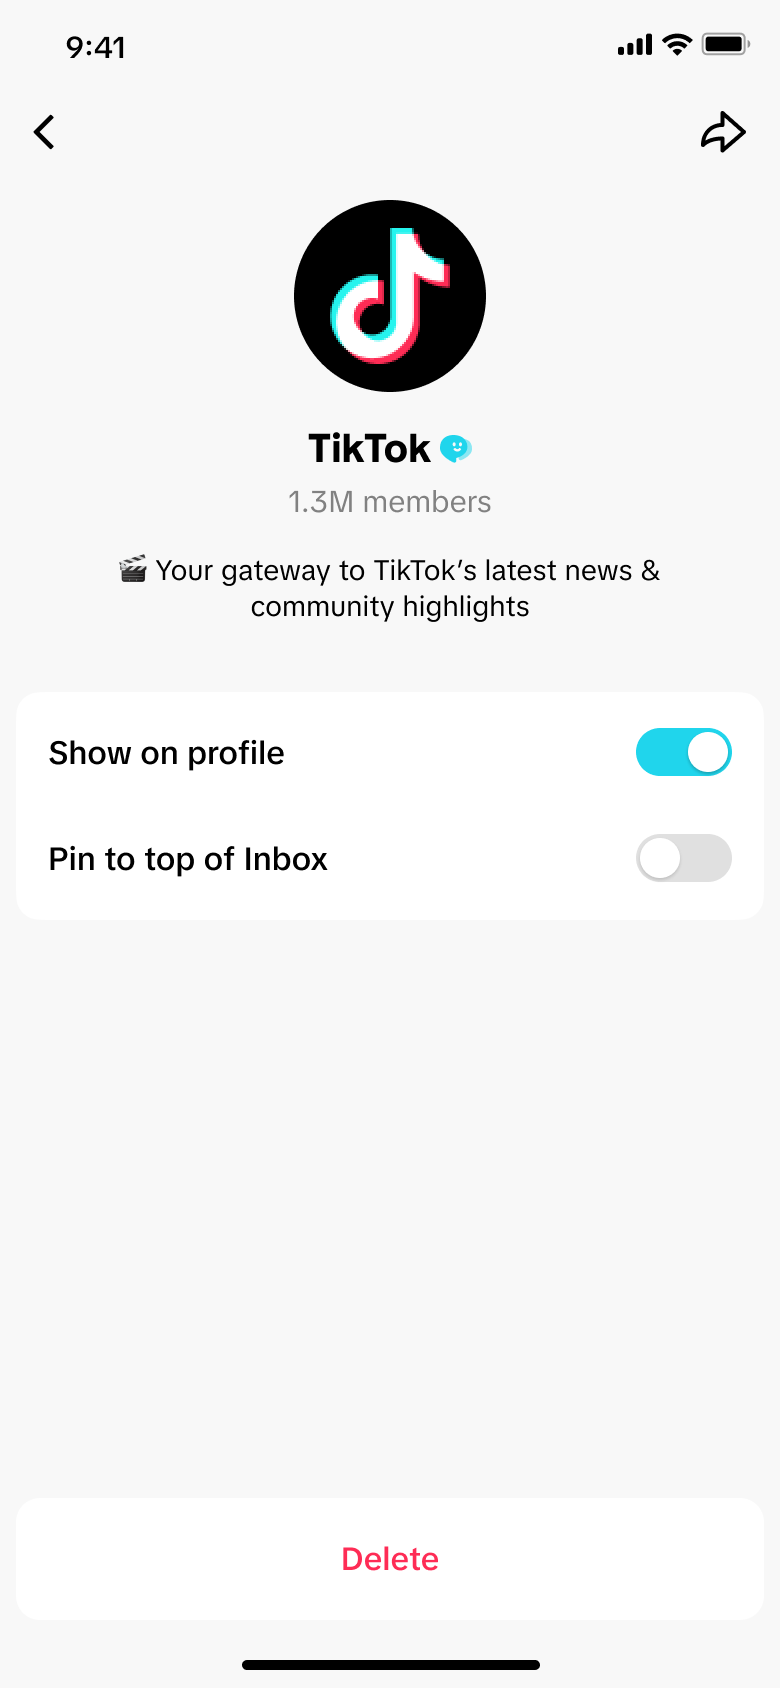
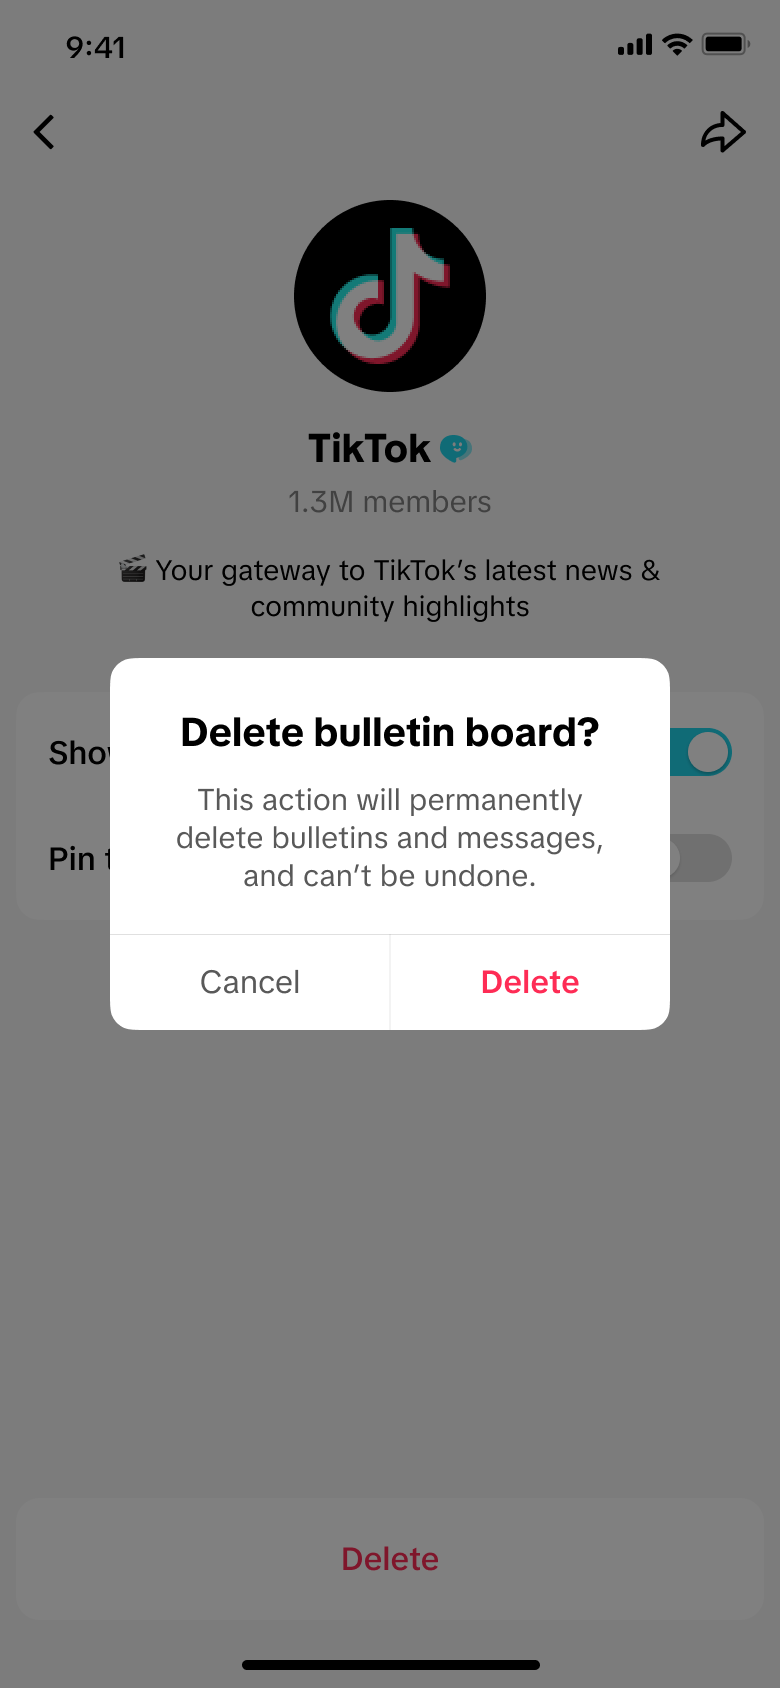
How to close or delete your channel These are two different actions. Closing is reversible for a limited time; deleting is not.
Close your bulletin board:
Tap "..." at the top of the channel to open the Settings page.
Select Close Bulletin Board.
Once closed, the channel enters a "closed state": subscribers can still view your previous posts, but they can't interact with them.
Note: You can reopen the channel at any time within 30 days of closing it. ⚠️ Important: A Bulletin Board that has not been reopened for more than 30 days is automatically deleted by the system.
Delete your bulletin board:
⚠️ Important: Deleting empties all content and cannot be undone. Please proceed with caution.
Close
Delete
Brand Live Growth · Traffic-Driving Tools
Seller CRM
Instead of sending the same message to everyone, CRM lets you reach audiences based on their relationship with your shop and their shopping behavior – for example, new followers, abandoned-cart shoppers, recent customers, repeat customers, or lapsed customers.
What is it?
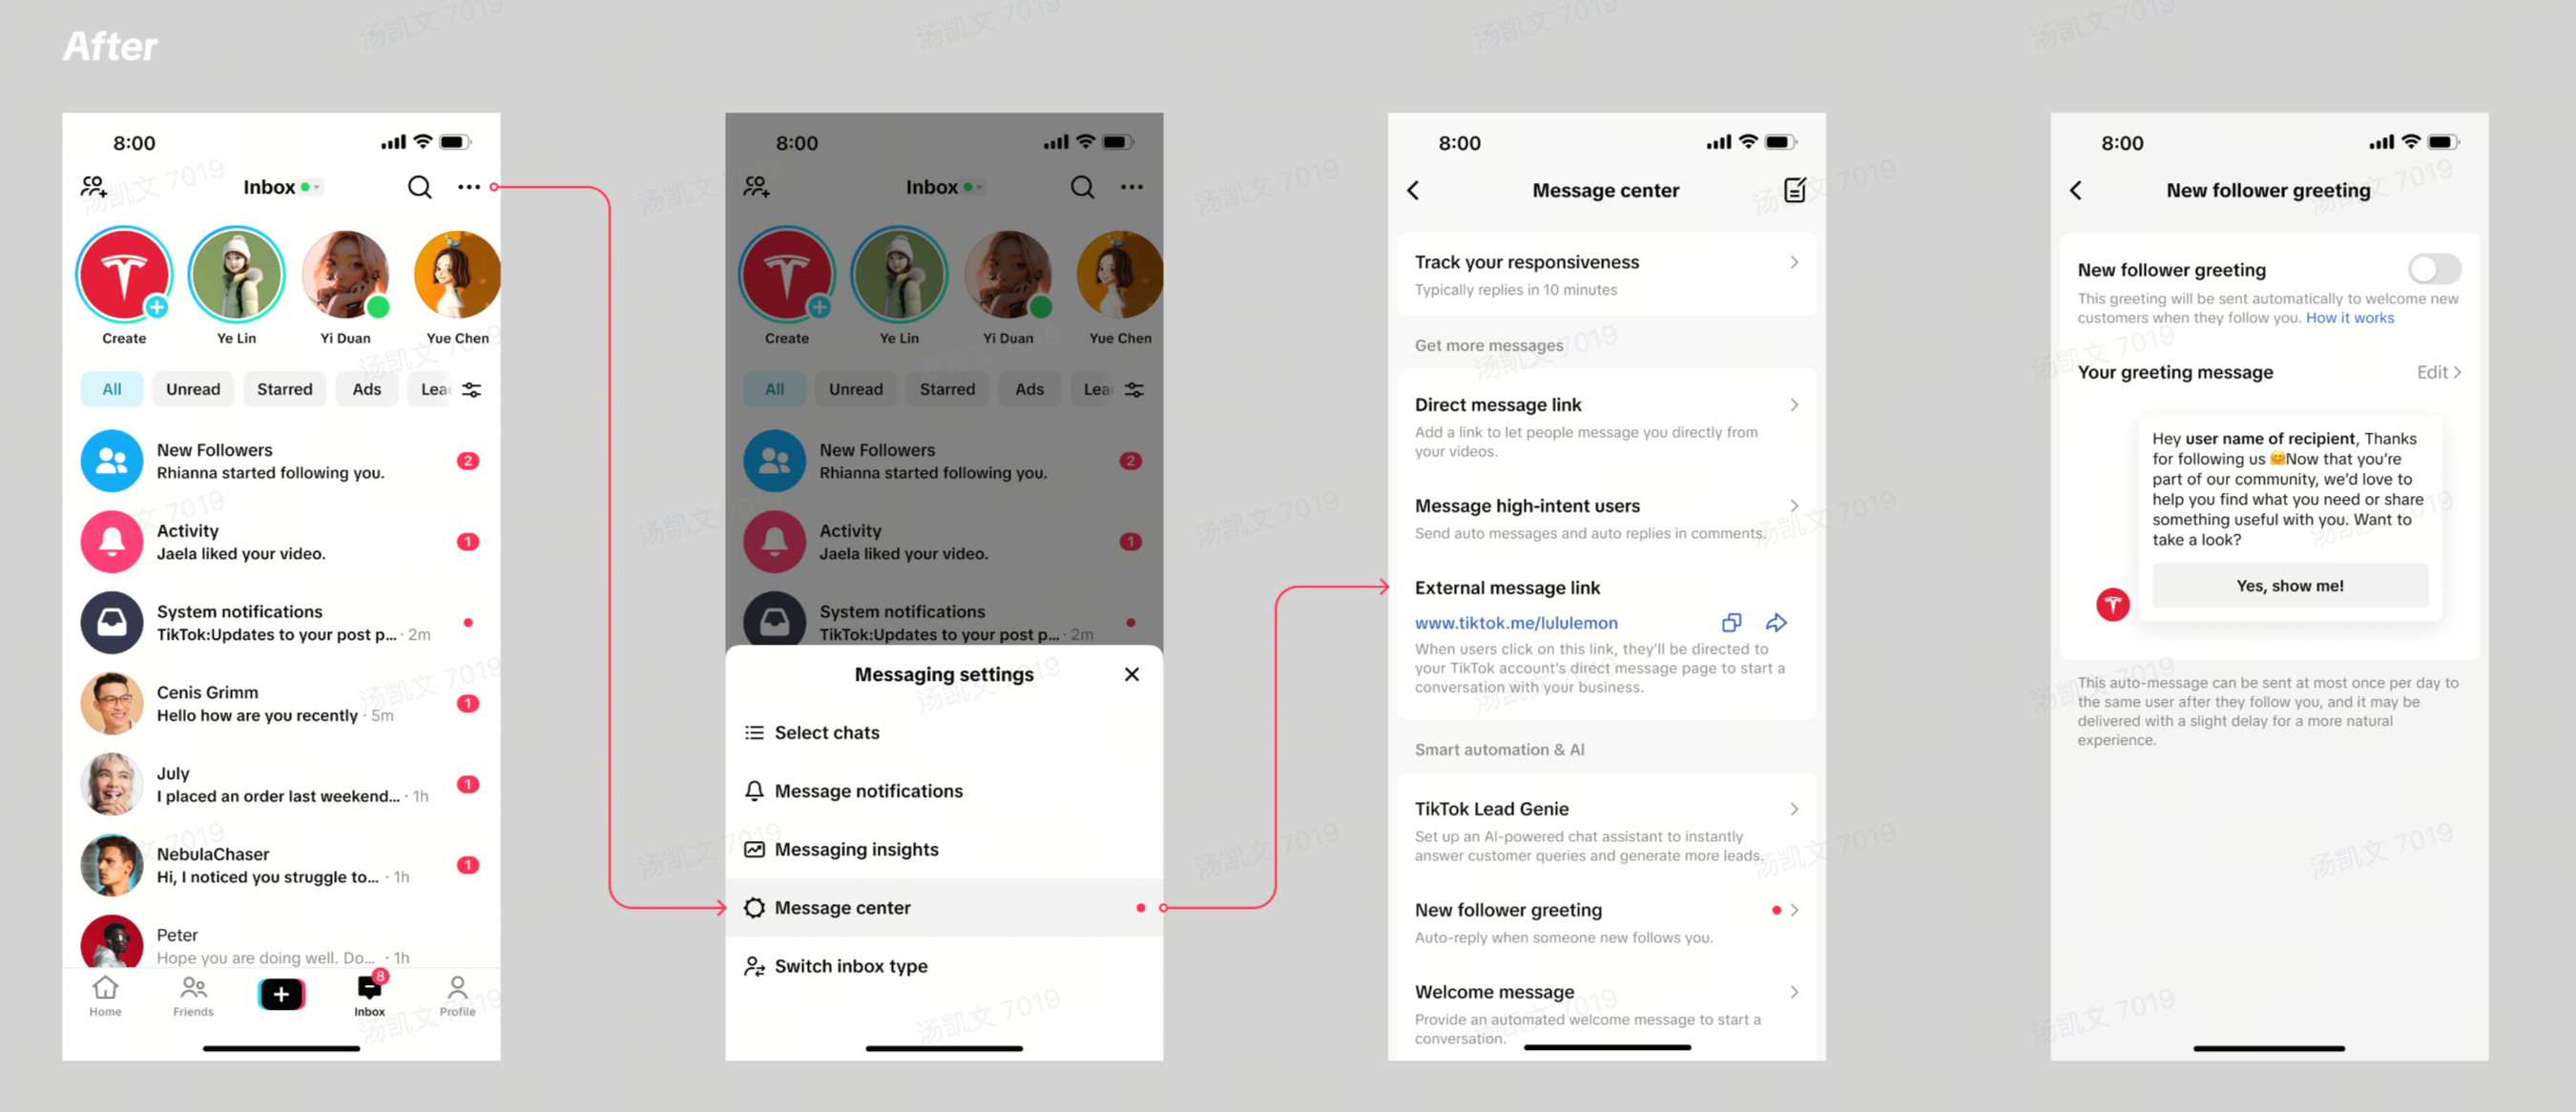
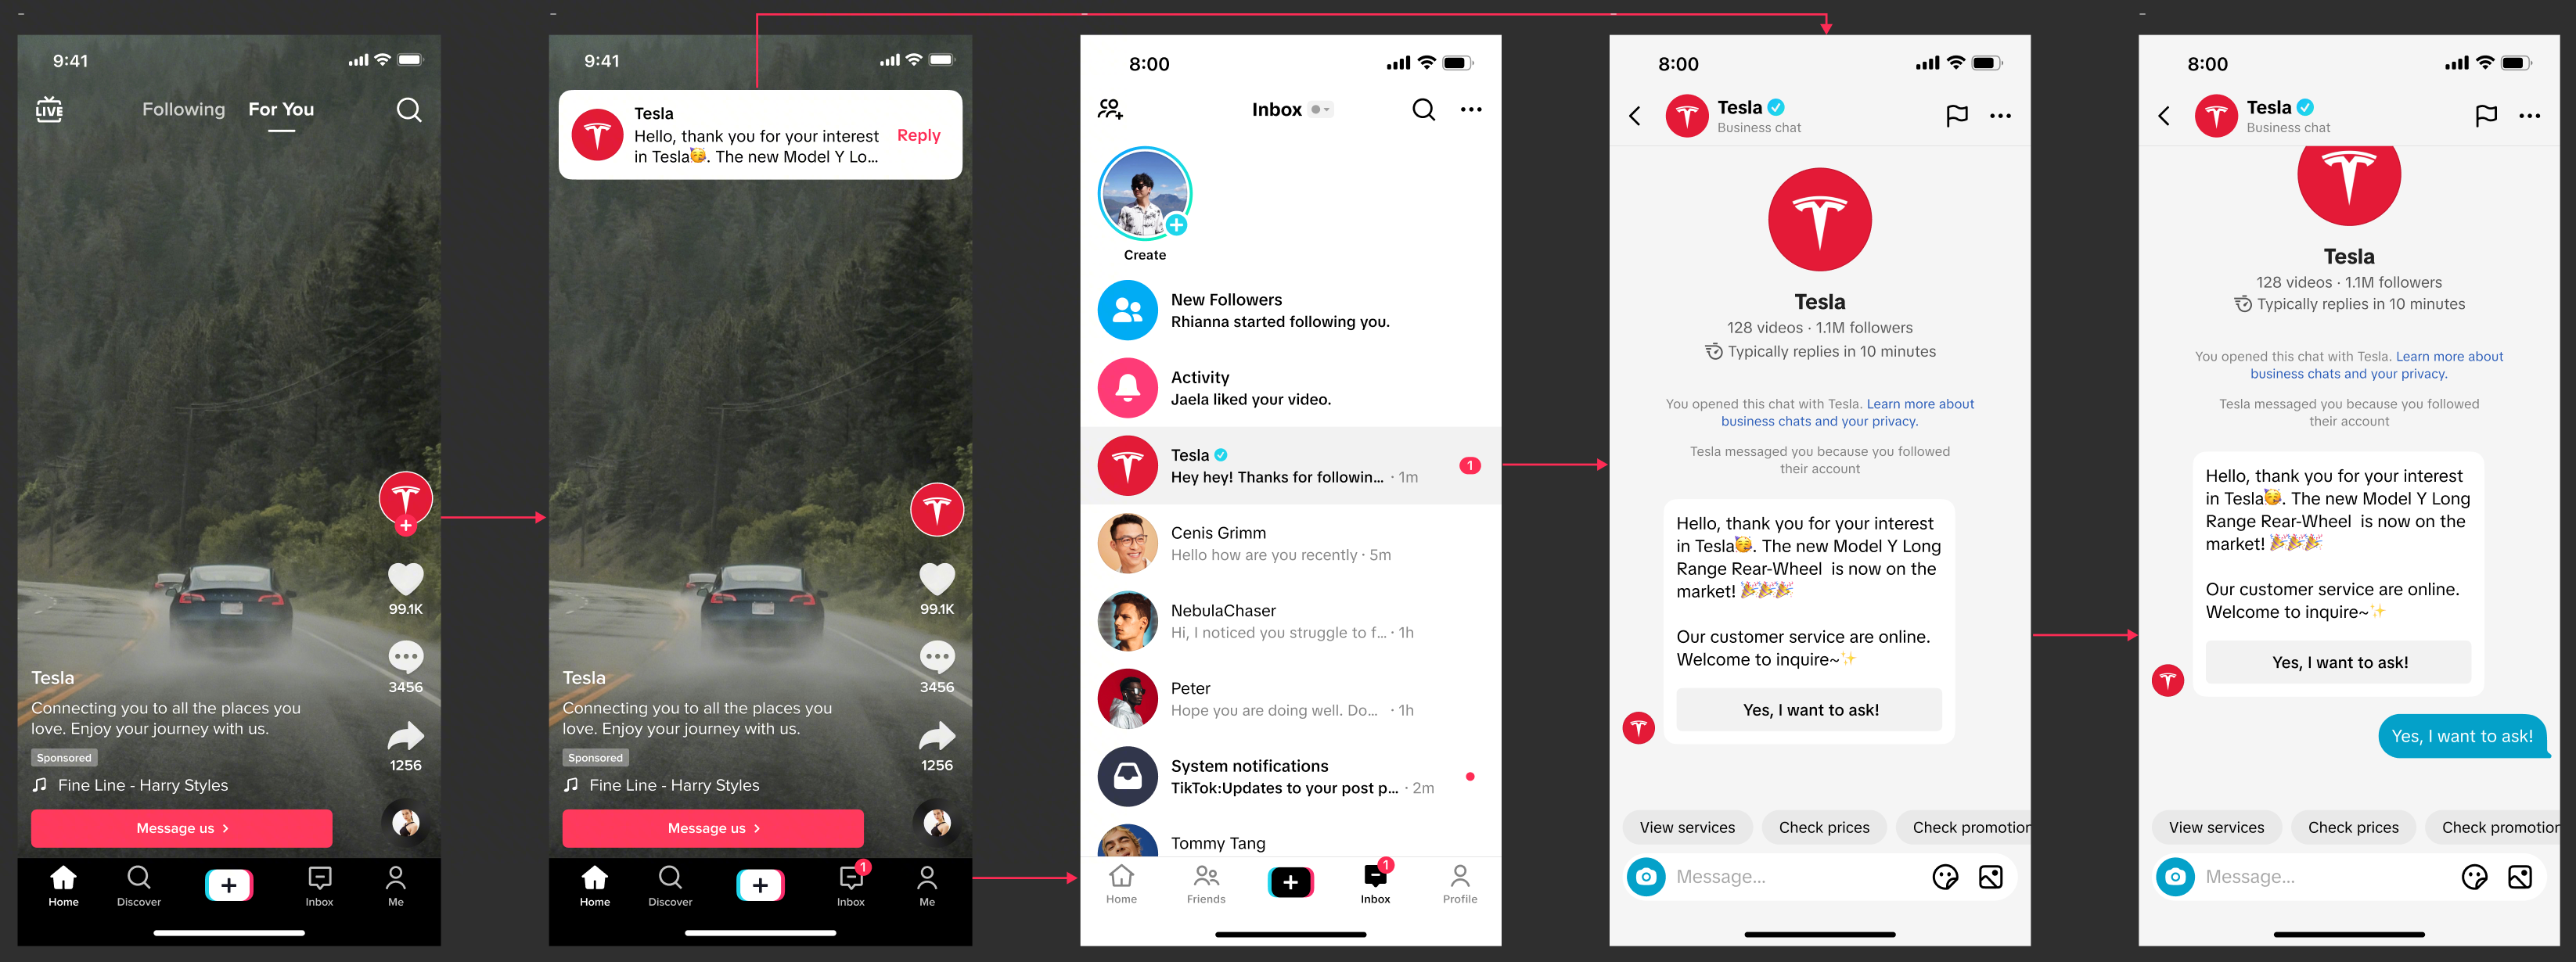
TikTok Shop's Customer Relationship Management (CRM) tools help you understand, segment, and directly reach your customers and followers with targeted messages that can bring them back to your shop or LIVE. Instead of sending the same message to everyone, CRM lets you reach audiences based on their relationship with your shop and their shopping behavior – for example, new followers, abandoned-cart shoppers, recent customers, repeat customers, or lapsed customers. You can use CRM to set up:
One-time campaigns when you want more control over what you send, who receives it, and when it is sent:
Announce an upcoming LIVE.
Promote a hero product or new product launch.
Reach a specific customer segment with an exclusive offer.
Re-engage lapsed customers.
Send a targeted message around a major selling moment.
Automated campaigns for recurring customer moments that you want TikTok Shop to trigger automatically. Examples include:
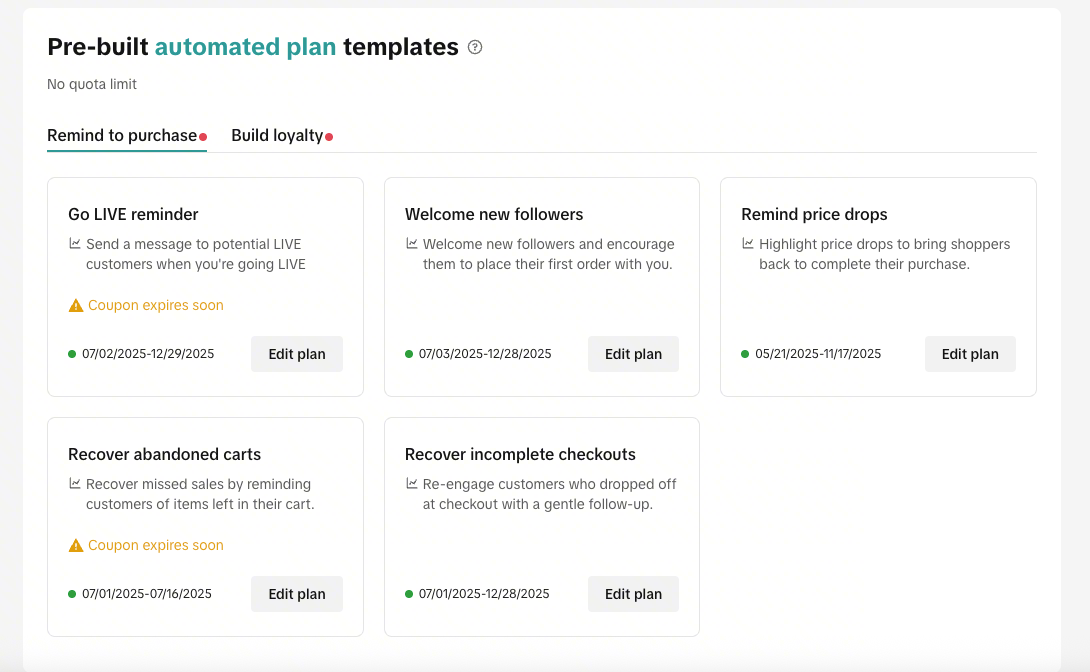
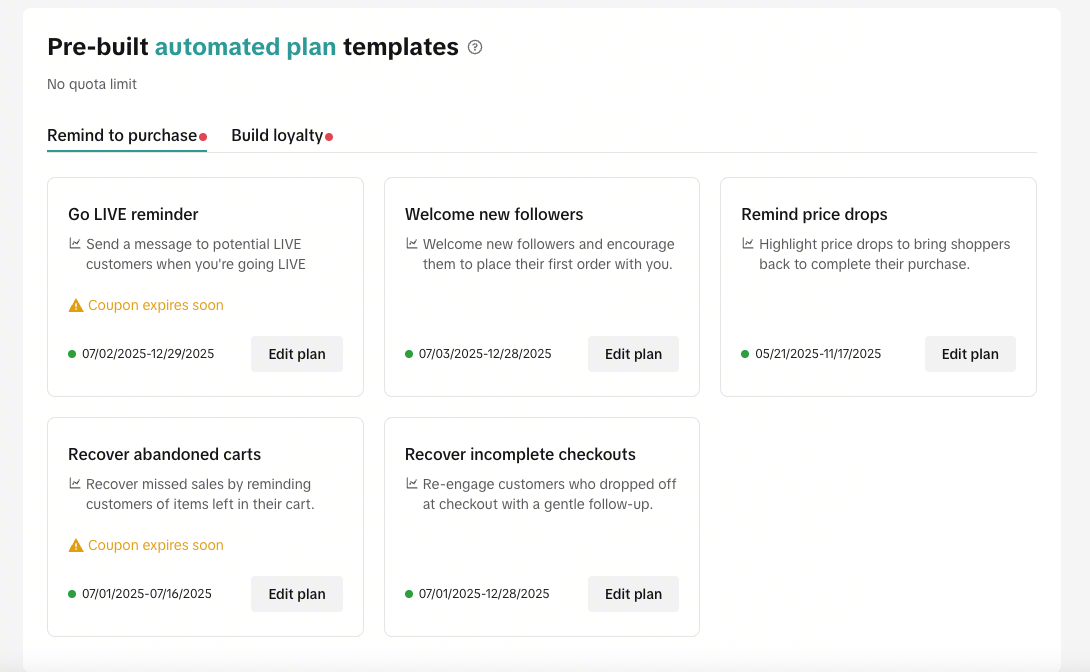
Promote LIVE Events: Reach potential LIVE viewers when you have an upcoming LIVE event.
Go LIVE Reminder: Notify potential LIVE viewers when you go LIVE.
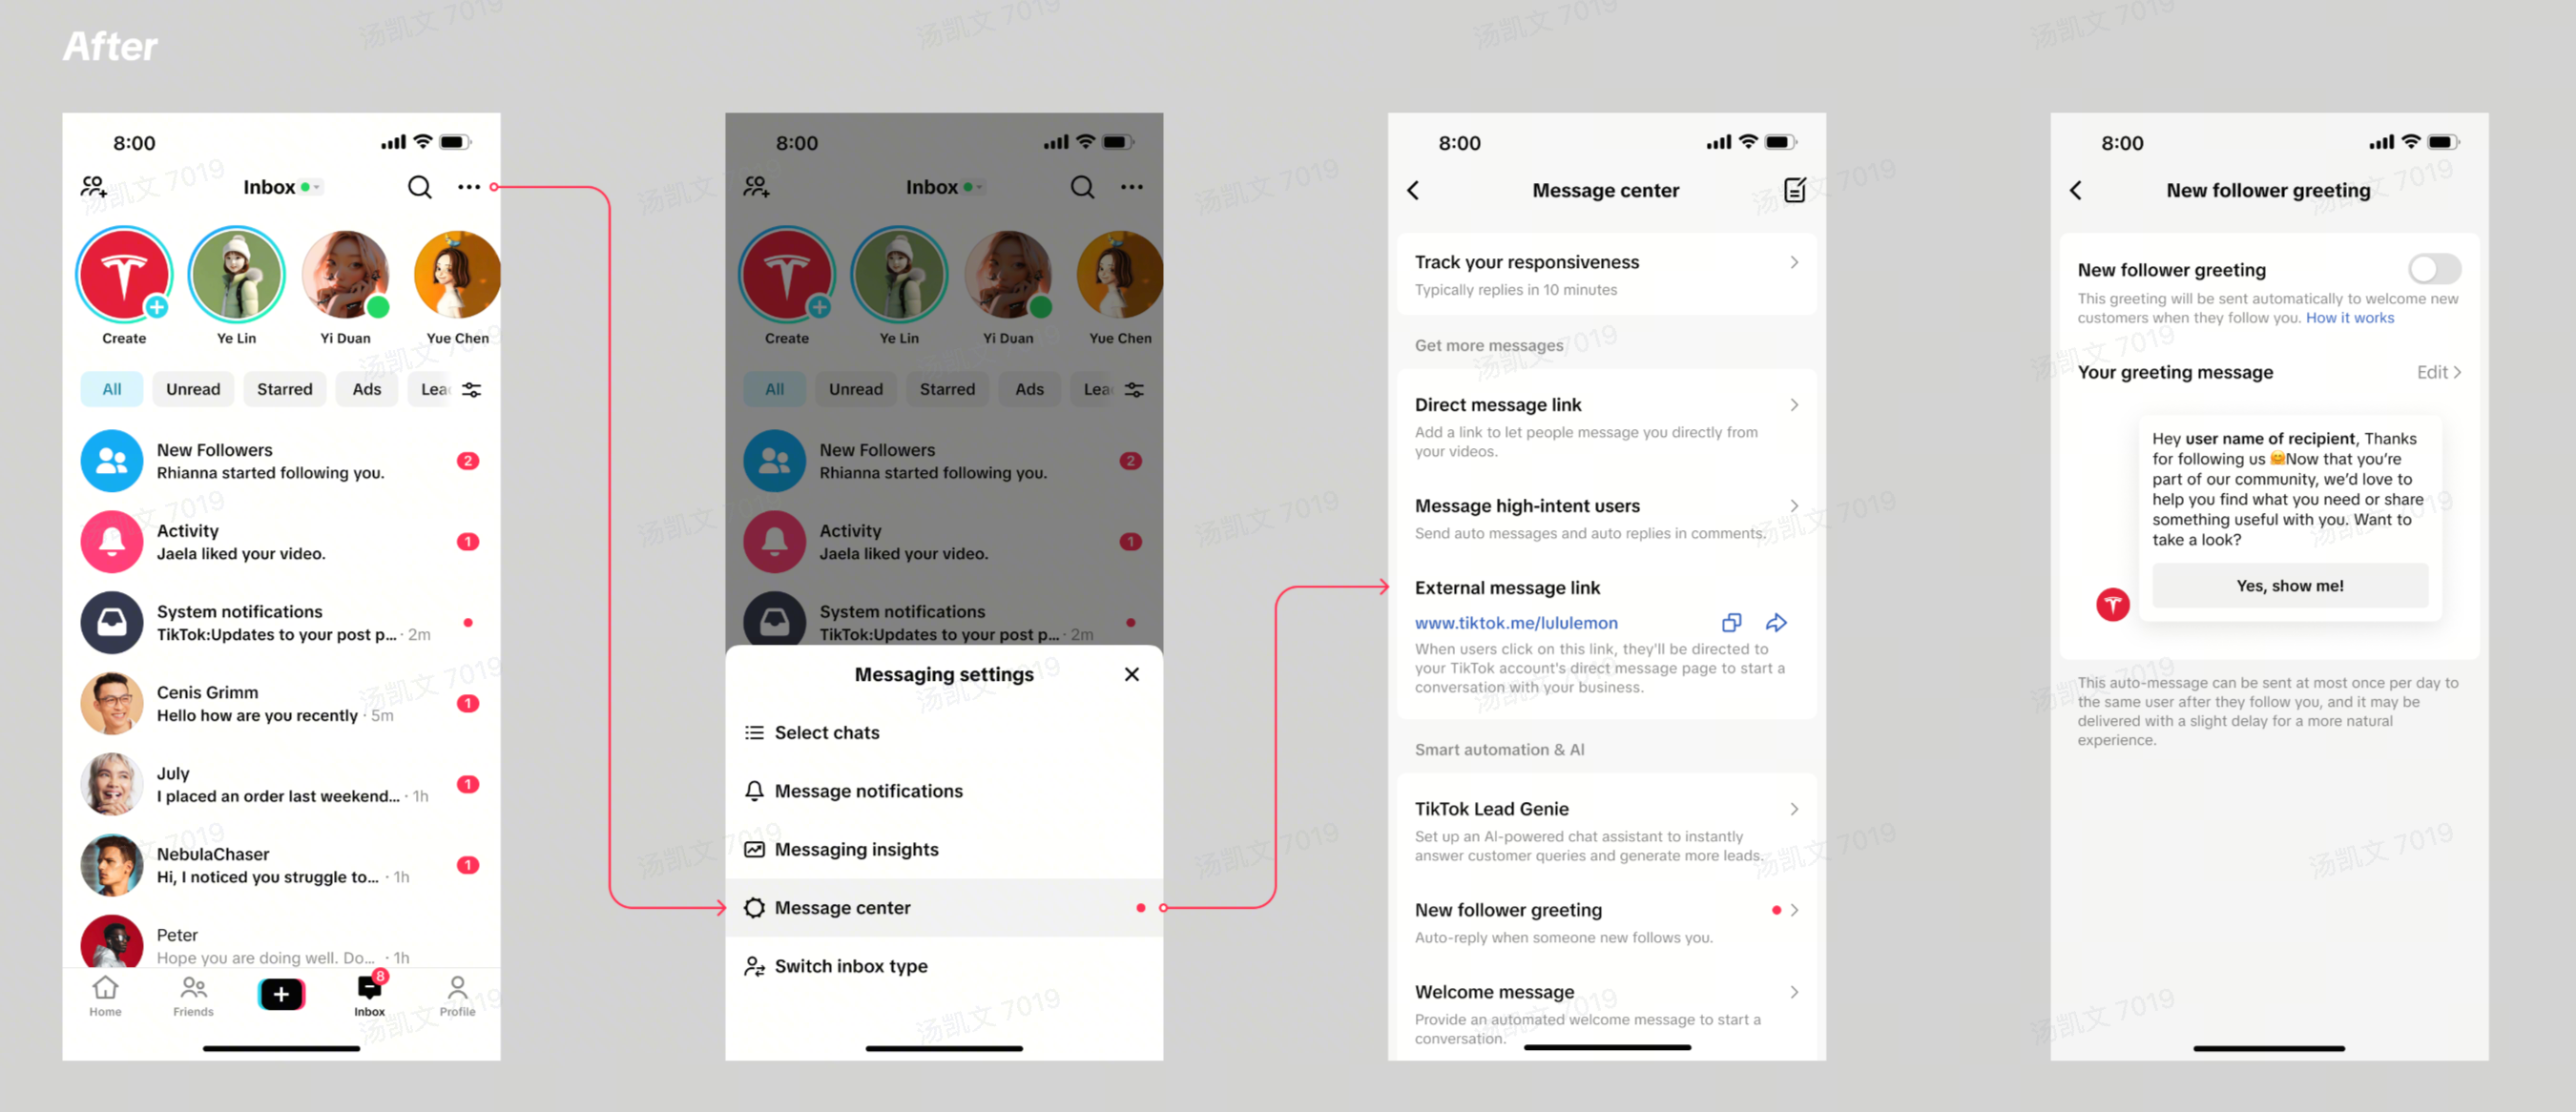
Welcome New Followers: Introduce new followers to your shop.
Abandoned Cart Reminder: Remind shoppers about products left in their cart.
Incomplete Checkout Reminder: Re-engage shoppers who started but did not finish checkout.
Price Drop Reminder: Notify interested shoppers when a product price drops.
Thank New Customers: Follow up after a customer's first purchase.
CRM is available through Seller Center > Customers. Access is based on your shop's eligibility, including Shop Performance Score requirements.
Why it drives traffic
CRM is the segmentation layer that makes every other owned-traffic tool precise instead of blunt — it's what lets a Go LIVE Reminder go only to people likely to actually show up, rather than to the entire follower base.
Automated campaigns (Promote LIVE Events, Go LIVE Reminder, Welcome New Followers) remove the manual step of remembering to message every relevant segment before and around each session.
How to set up? (automated plan)
Step 1
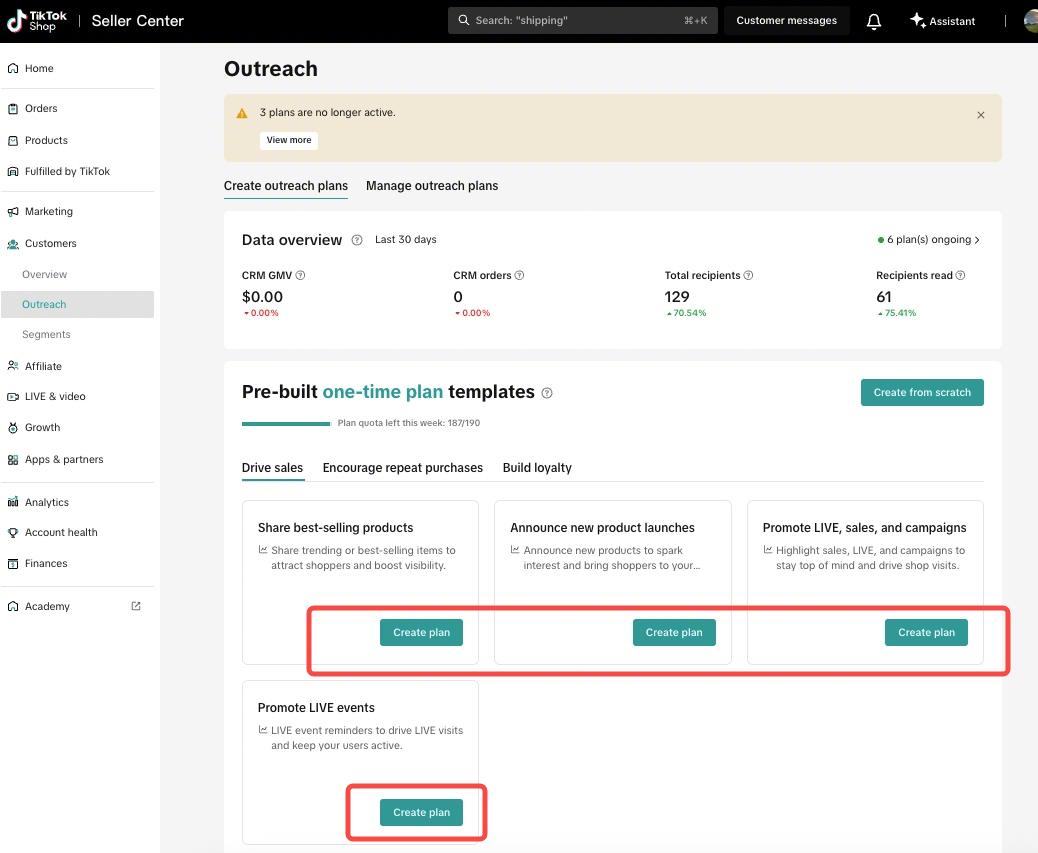
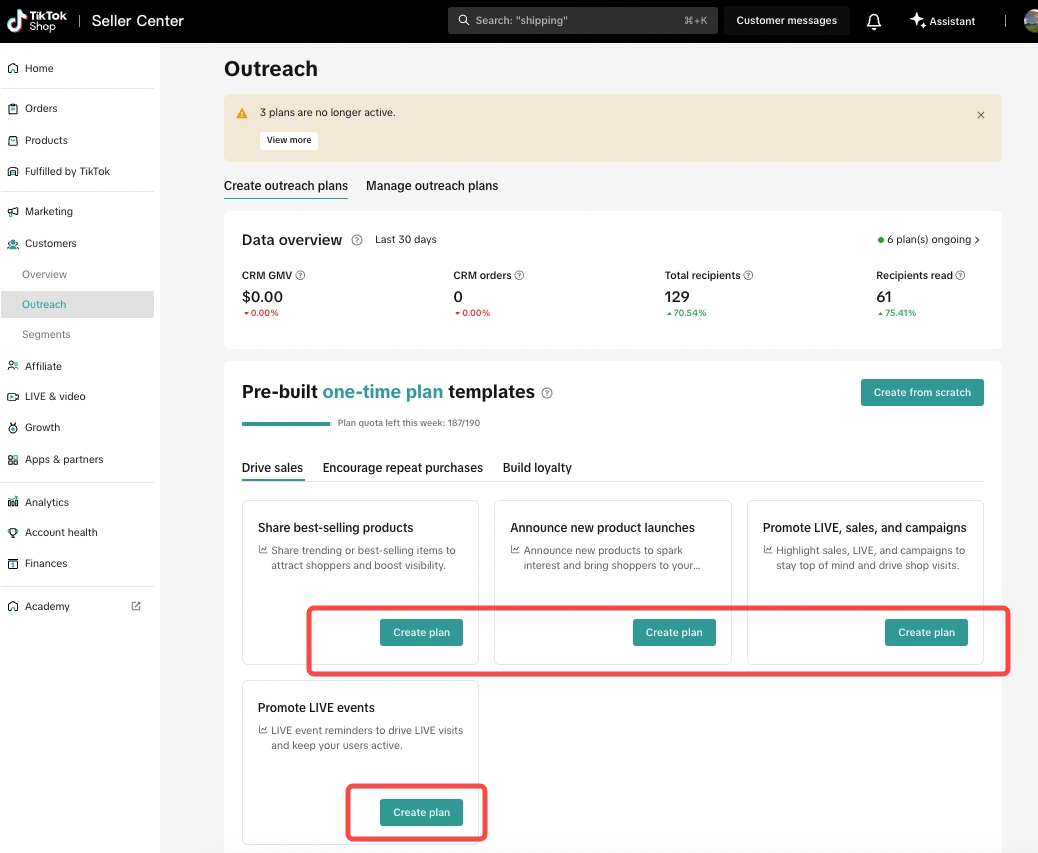
Step 1: Choose your campaign Go to Seller Center > Customers > Outreach and select the automated campaign you want to create.
Desktop
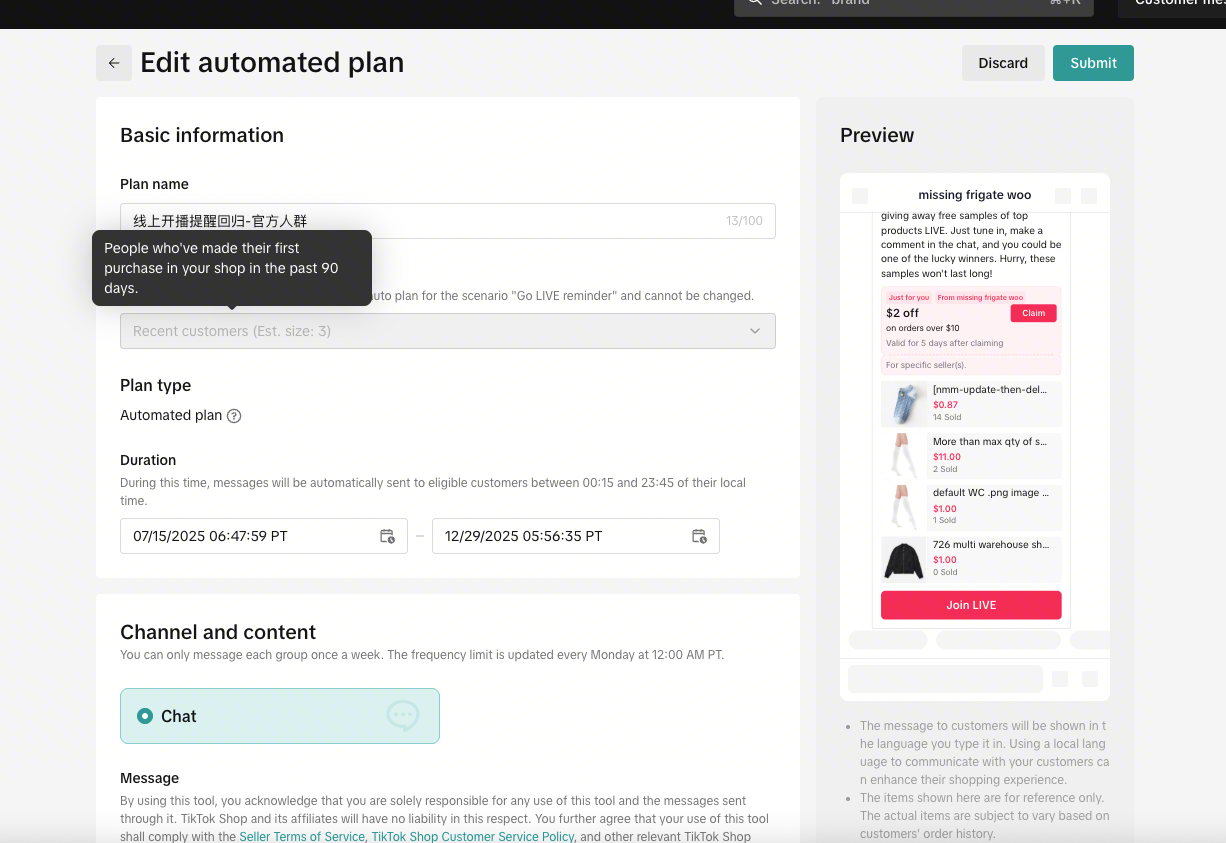
Step 2
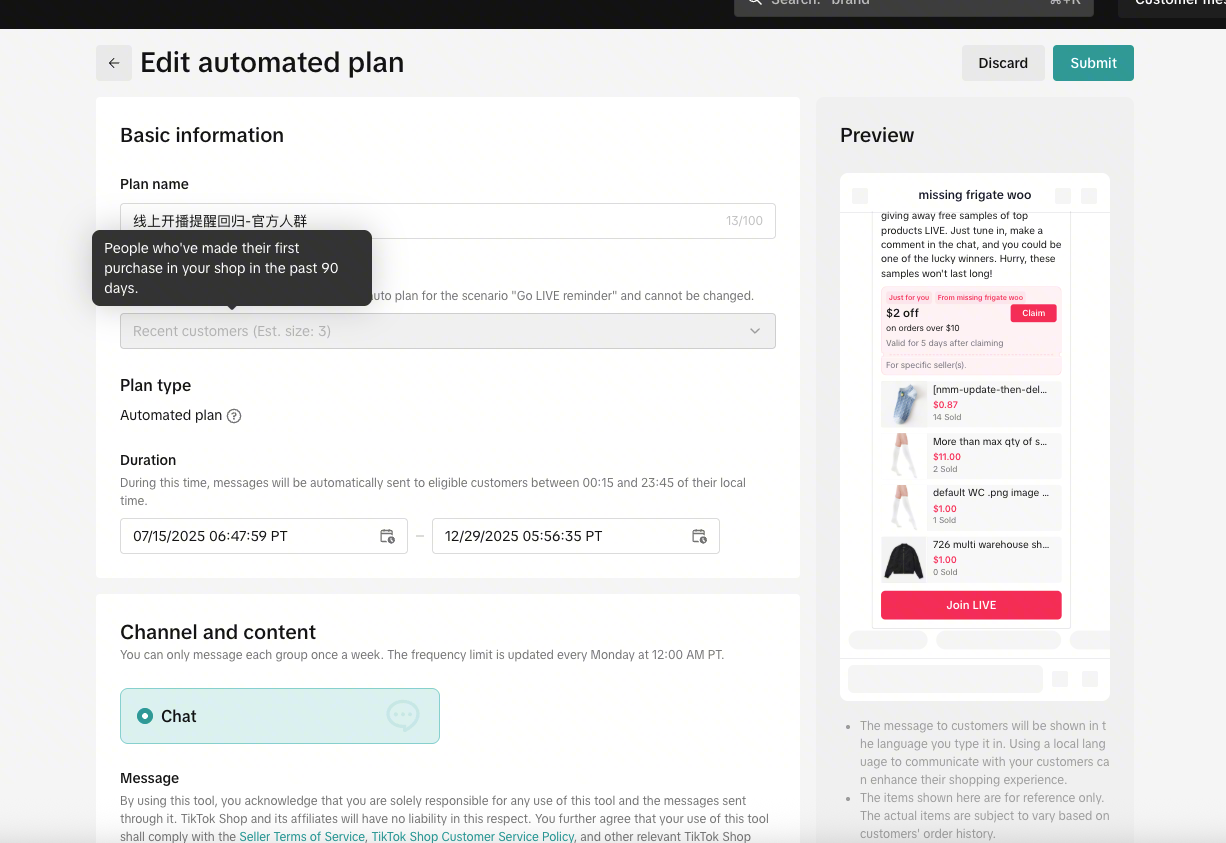
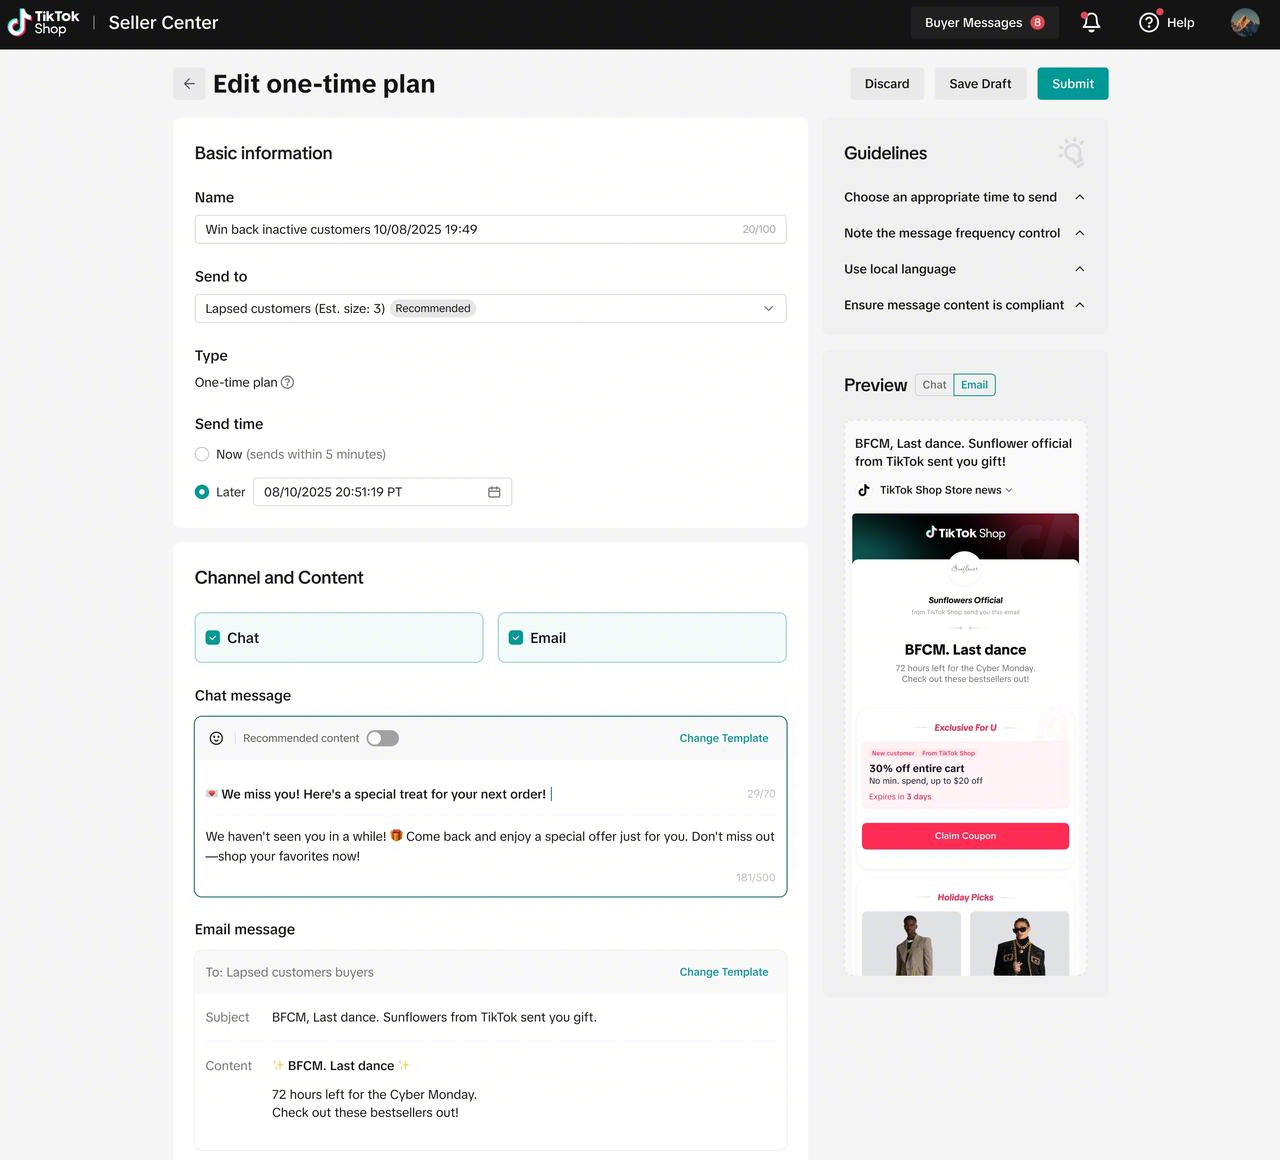
Step 2: Fill out information for automated plan.
Time: Choose the time period for this campaign to run through (up to 6 months)
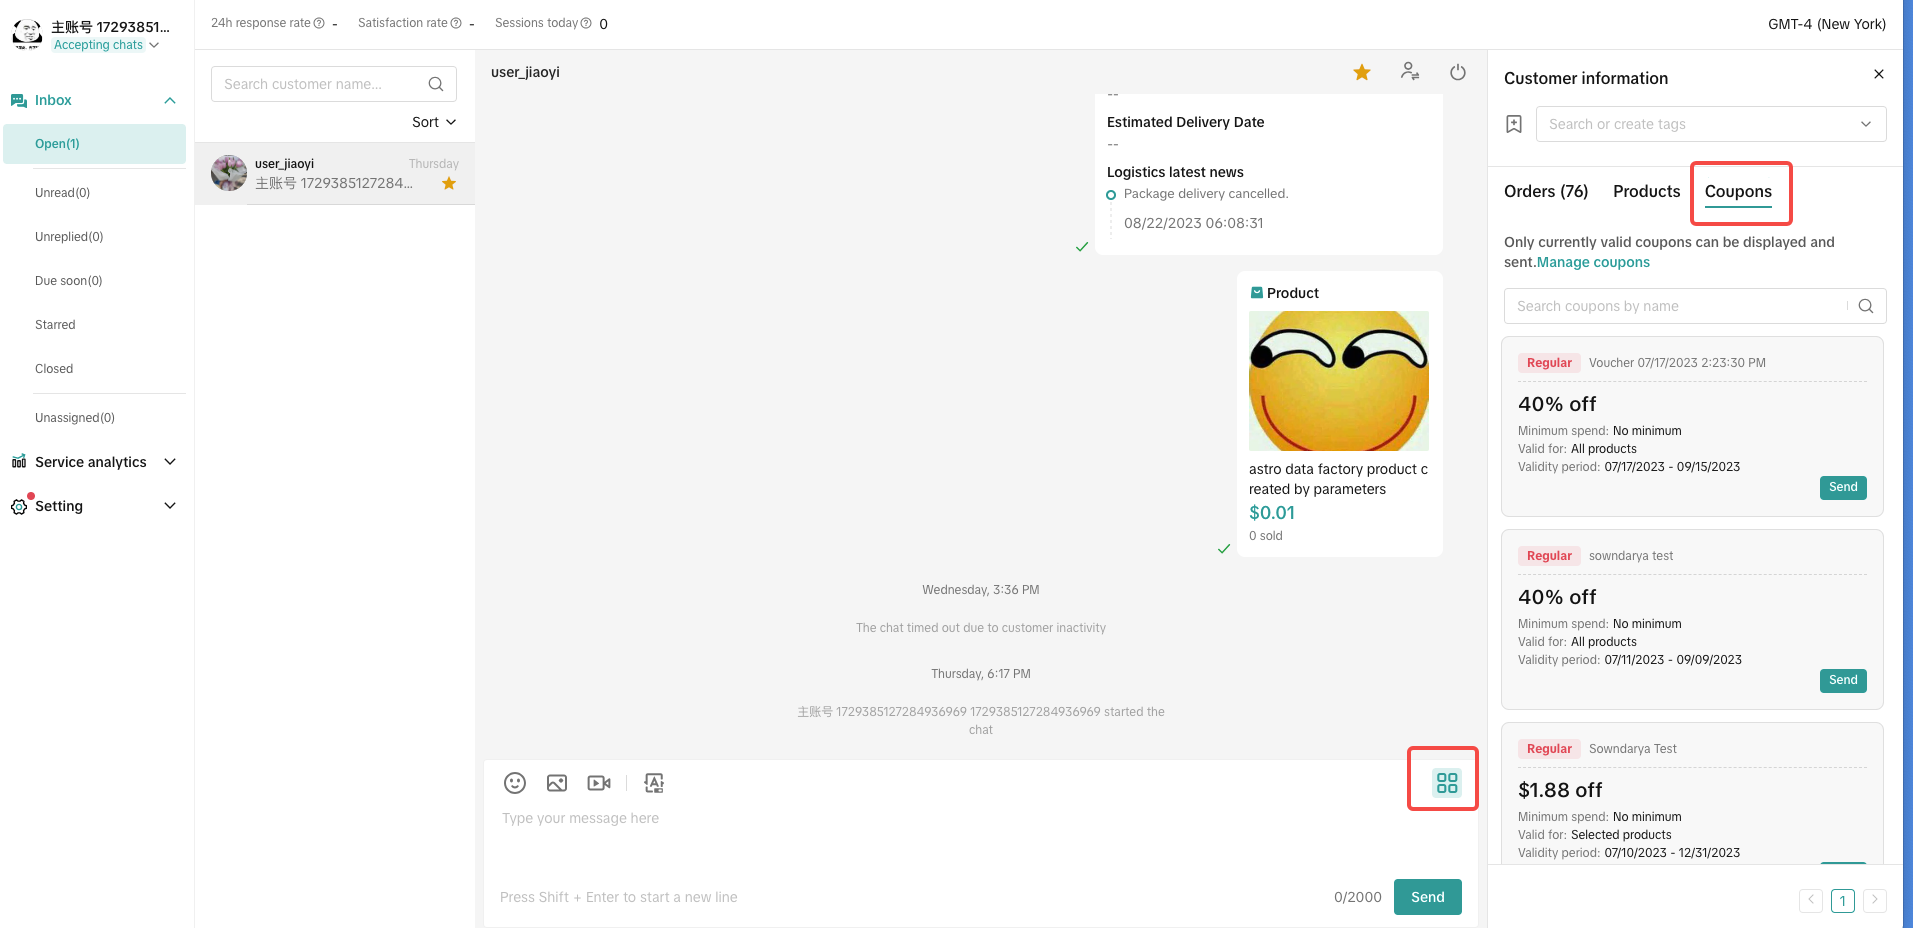
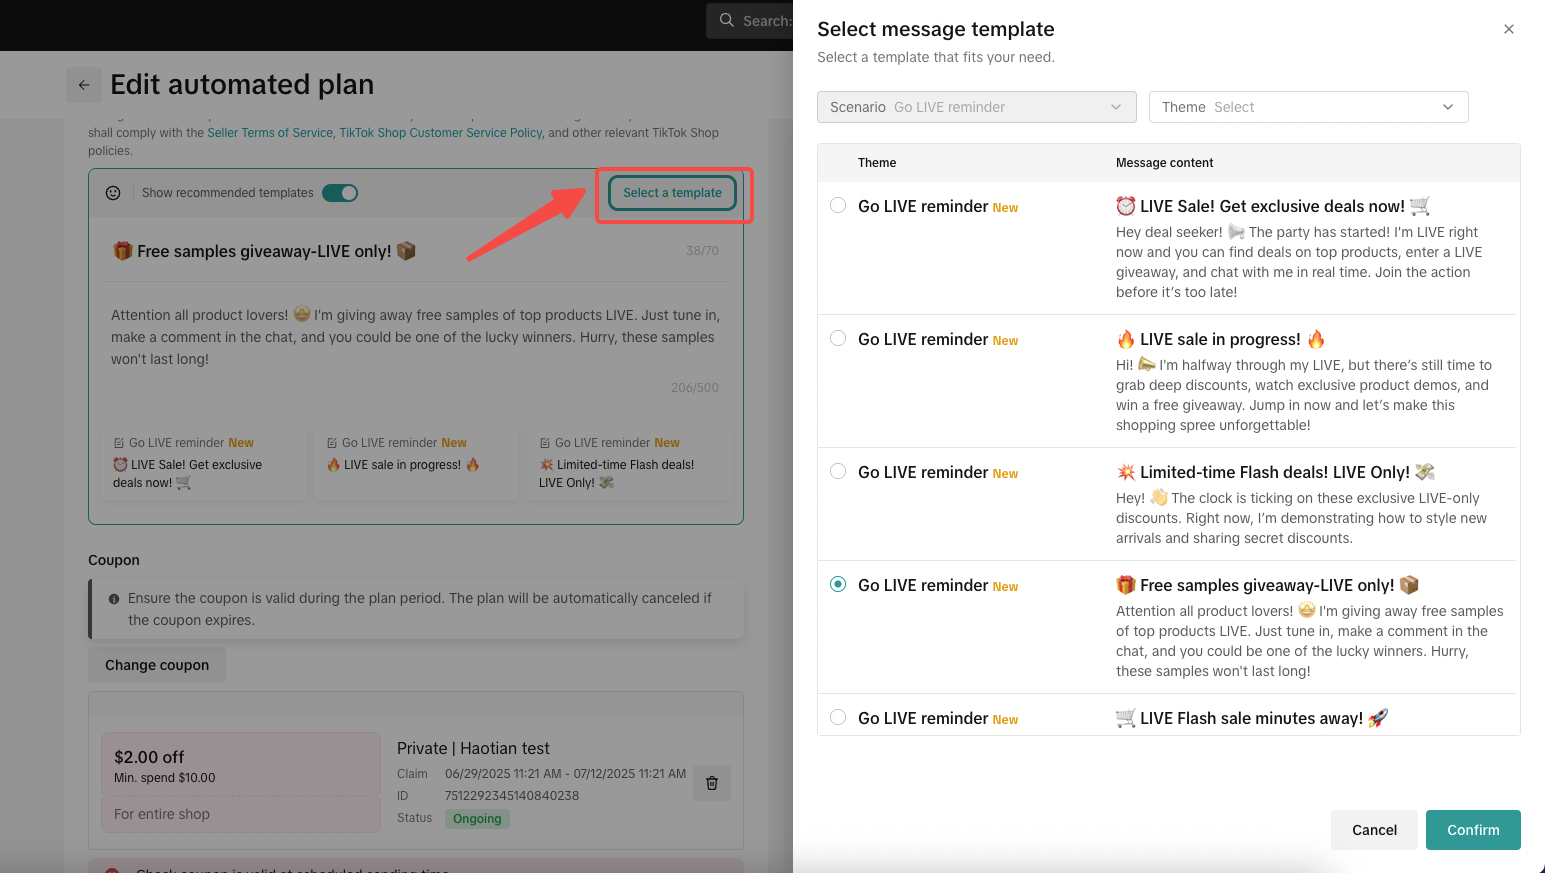
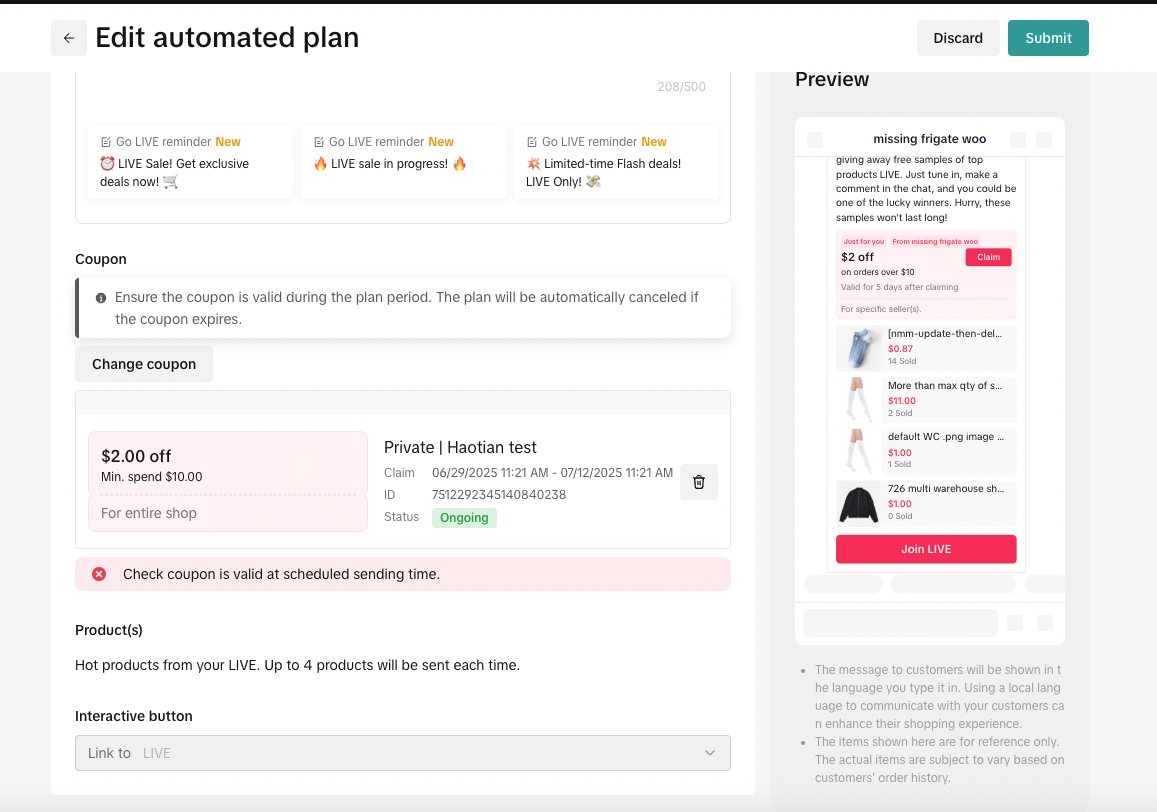
Channel: All automated plans can use the chat channel; supports T2+ sellers to select Group chat for the Send option when creating or editing plans for Go LIVE reminder and Promote LIVE events.
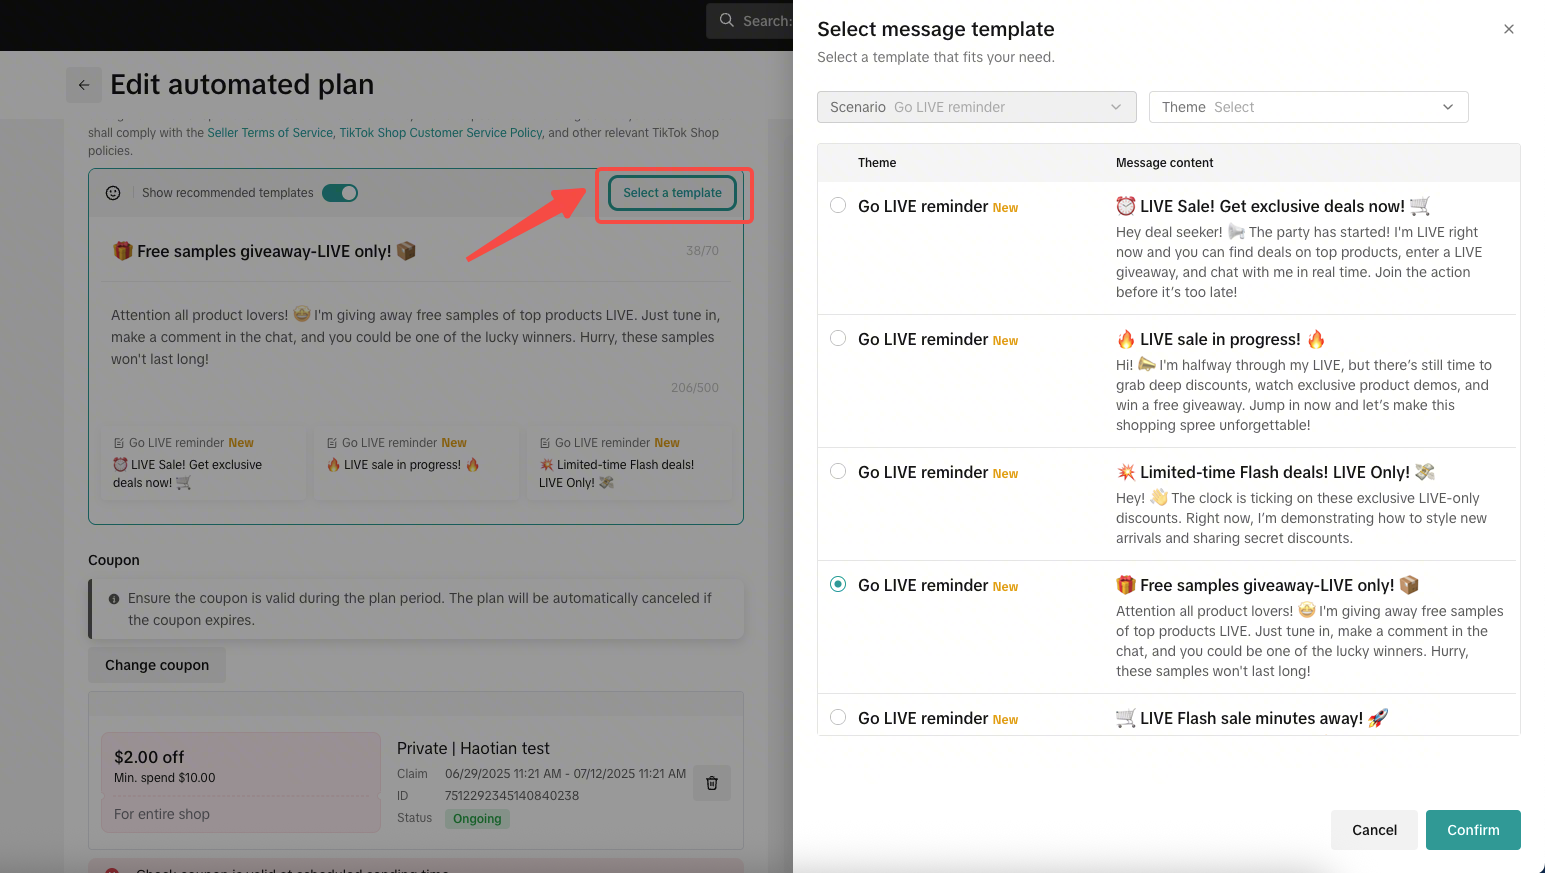
Content: Define the message content from the templates, or customize as you want
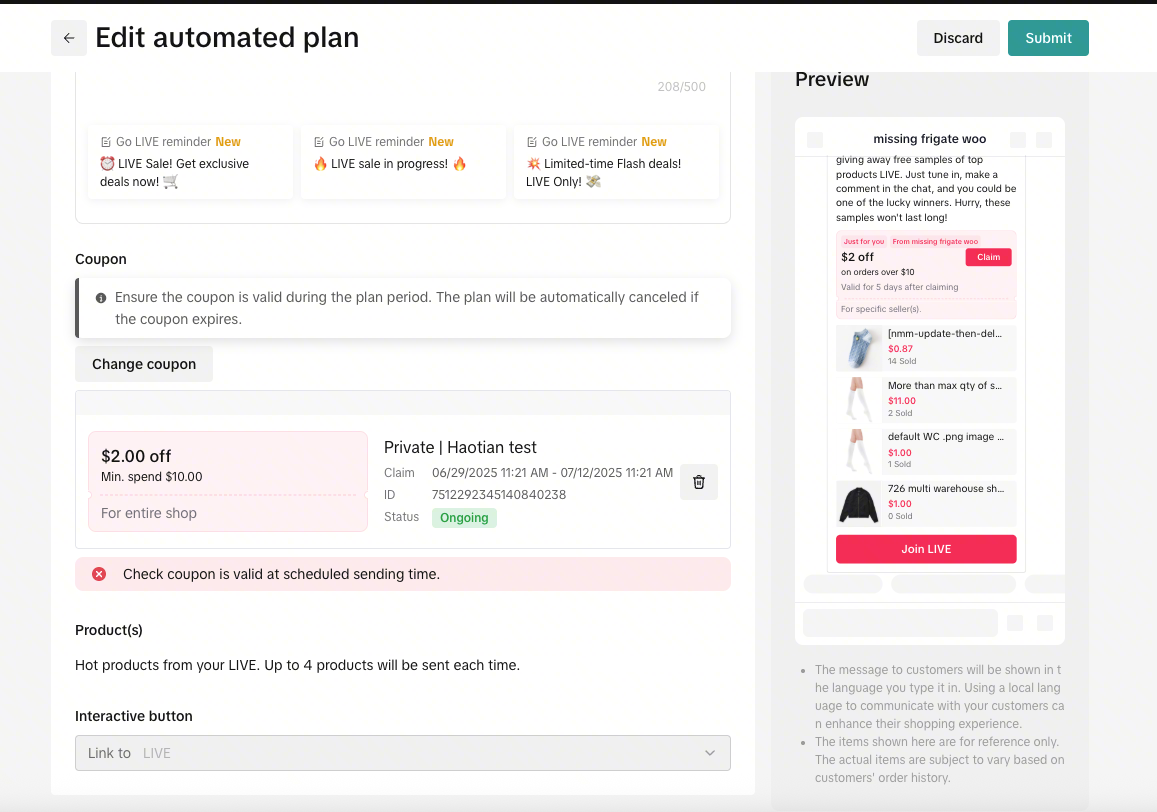
Coupons & products:
Apply coupons to increase the click rate and conversion rate;
chat/email channels allow a maximum of 4 products to be selected; group chat channels allow a maximum of 3 products to be selected.
Desktop
How to set up? (one-time campaign)
Step 1
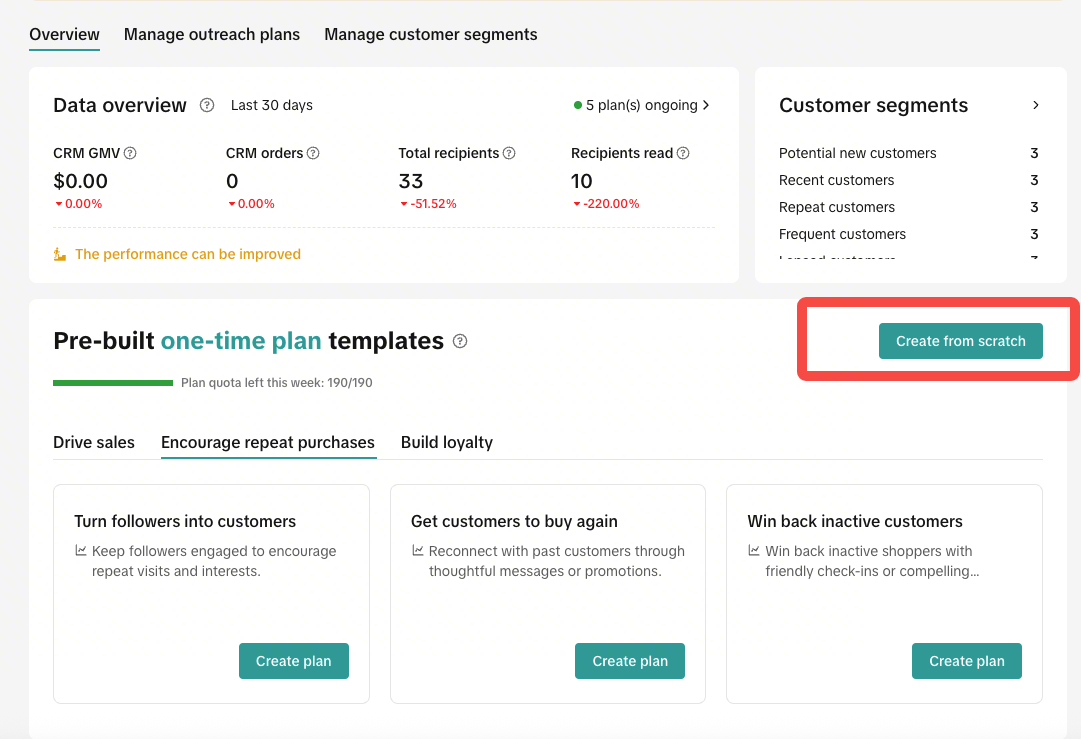
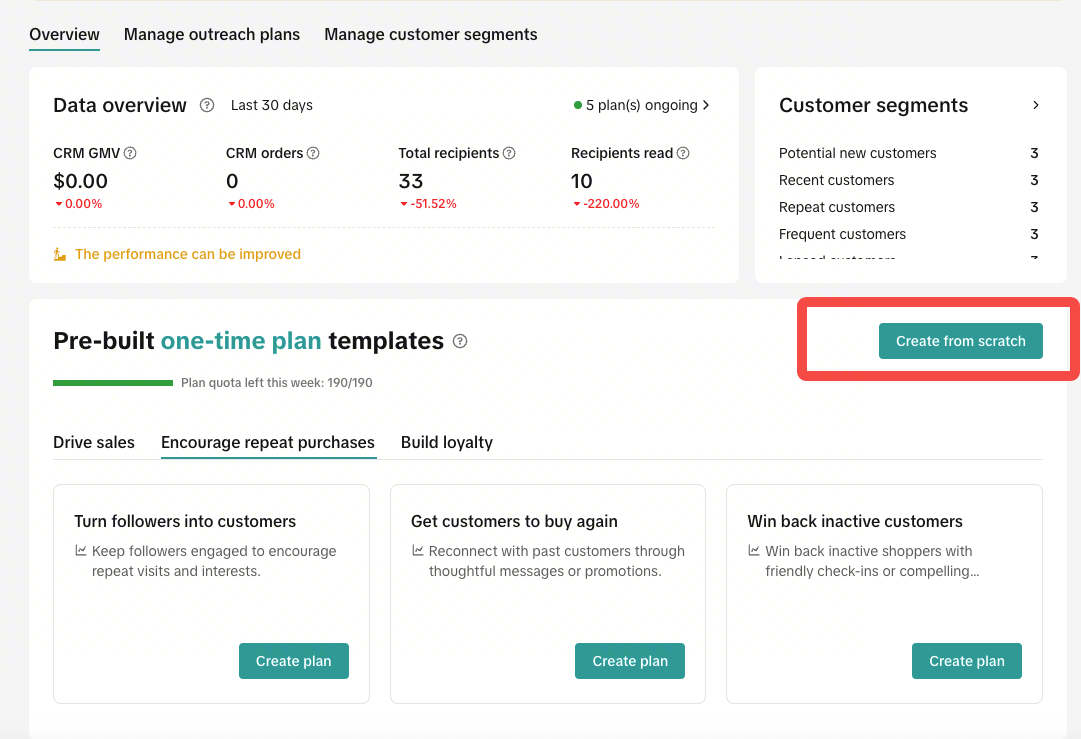
Step 1: Pick your plan and campaign type: Choose a one-time message template and select a campaign goal.
Desktop
Step 2
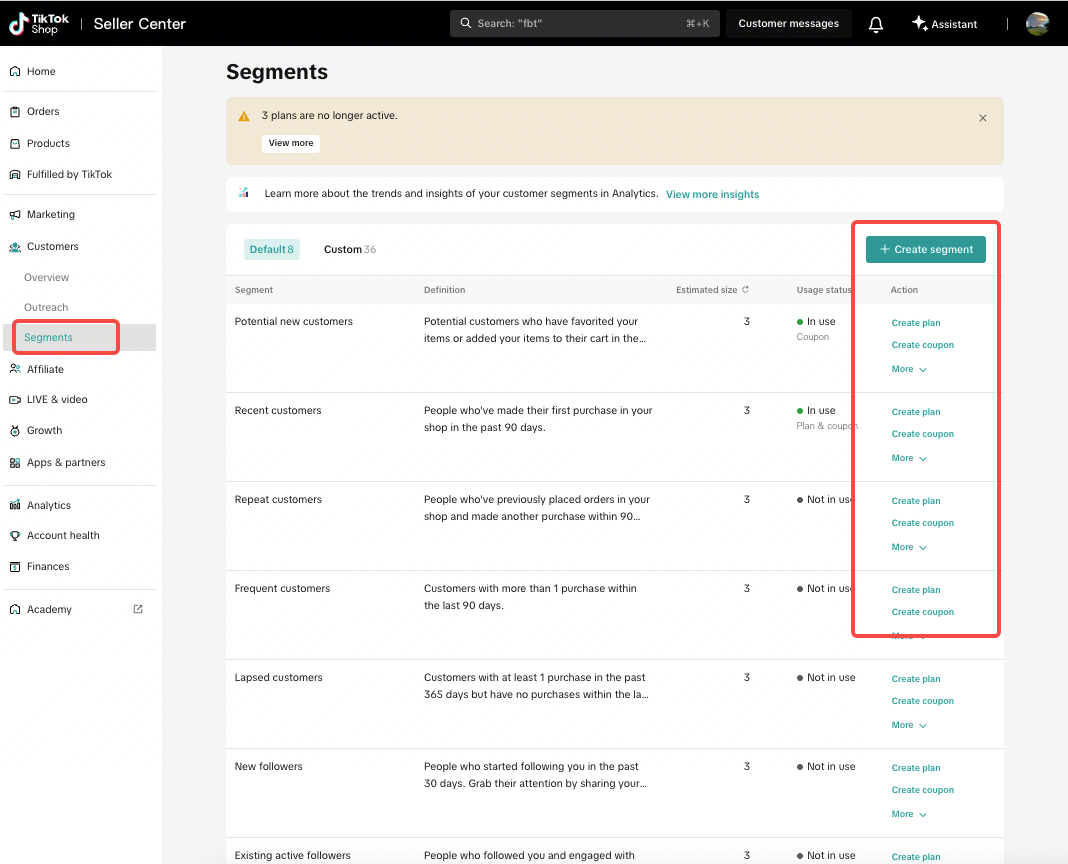
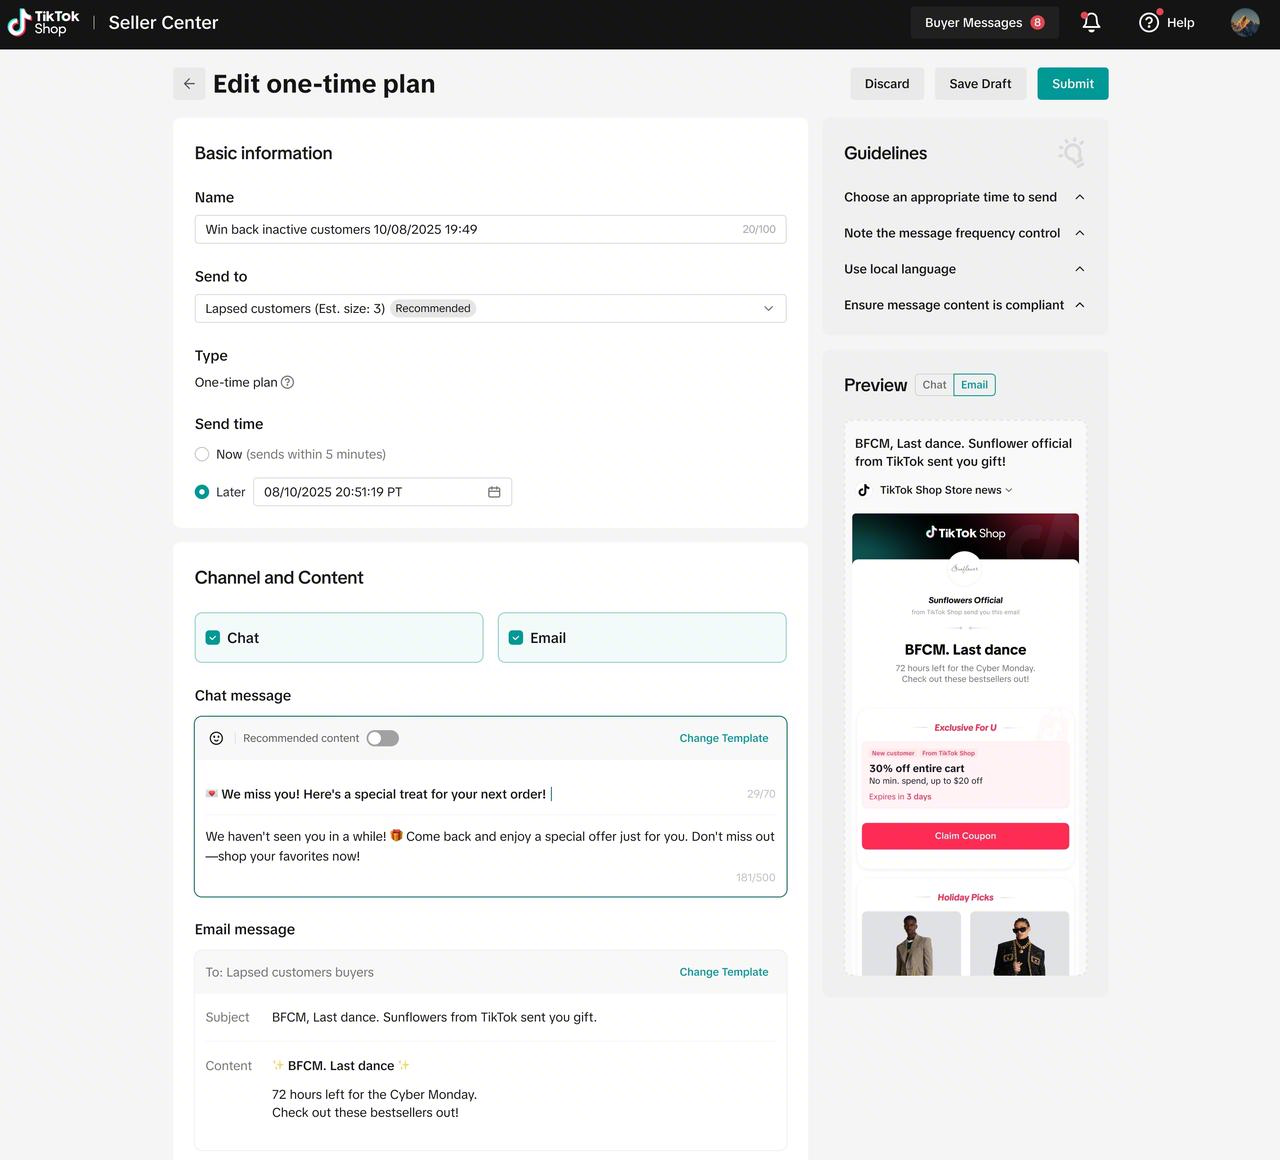
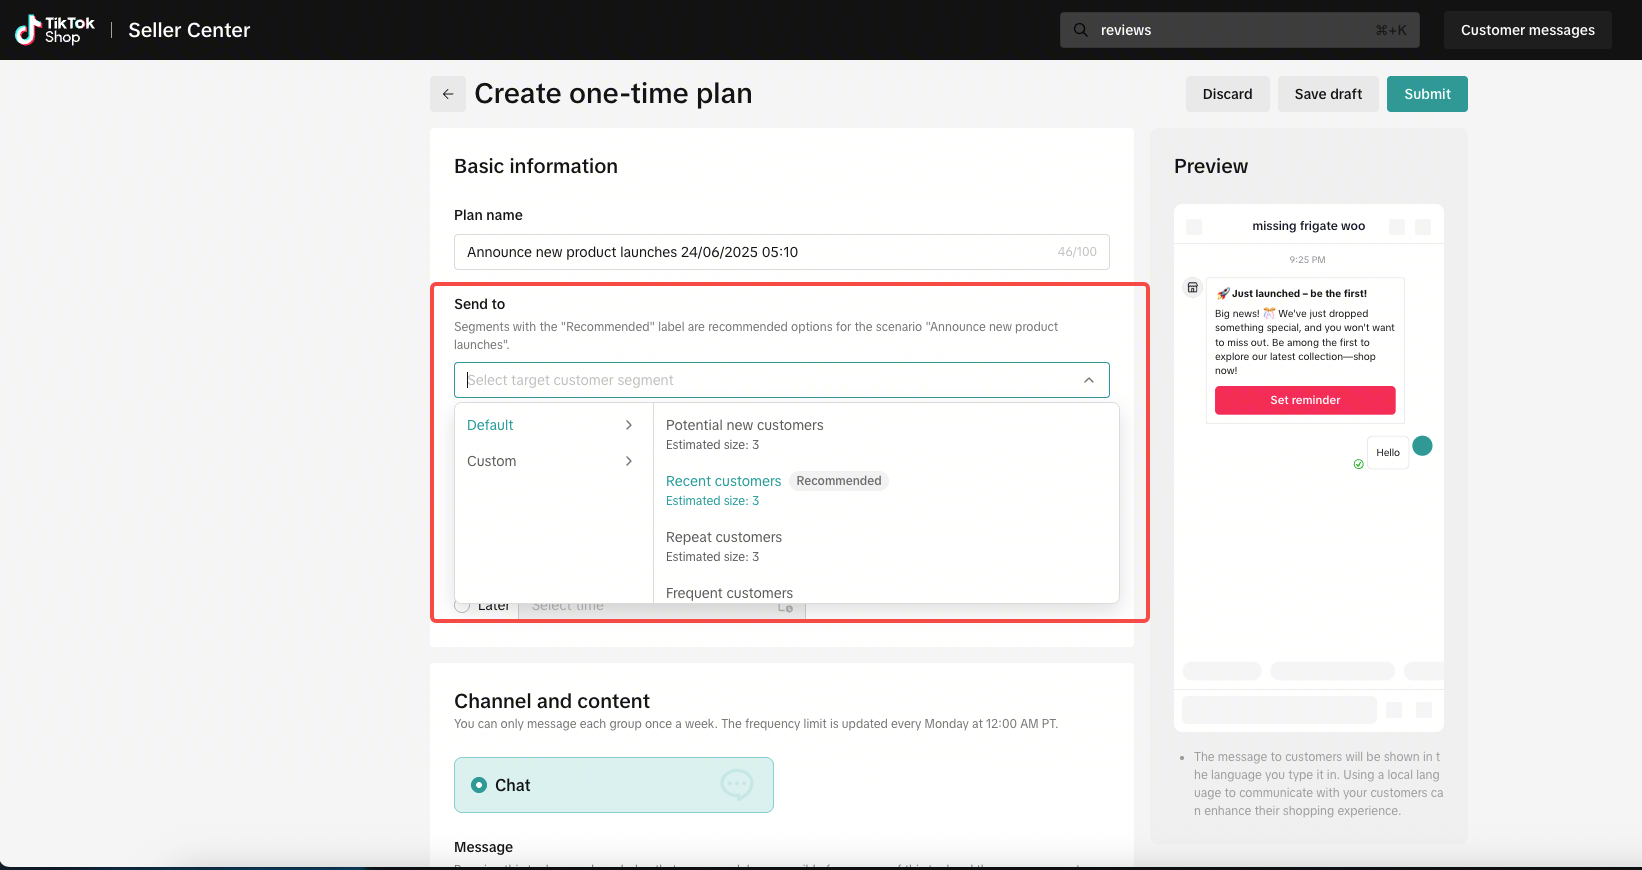
Step 2.1: You can choose to create CRM campaigns from scratch by creating customer segments.
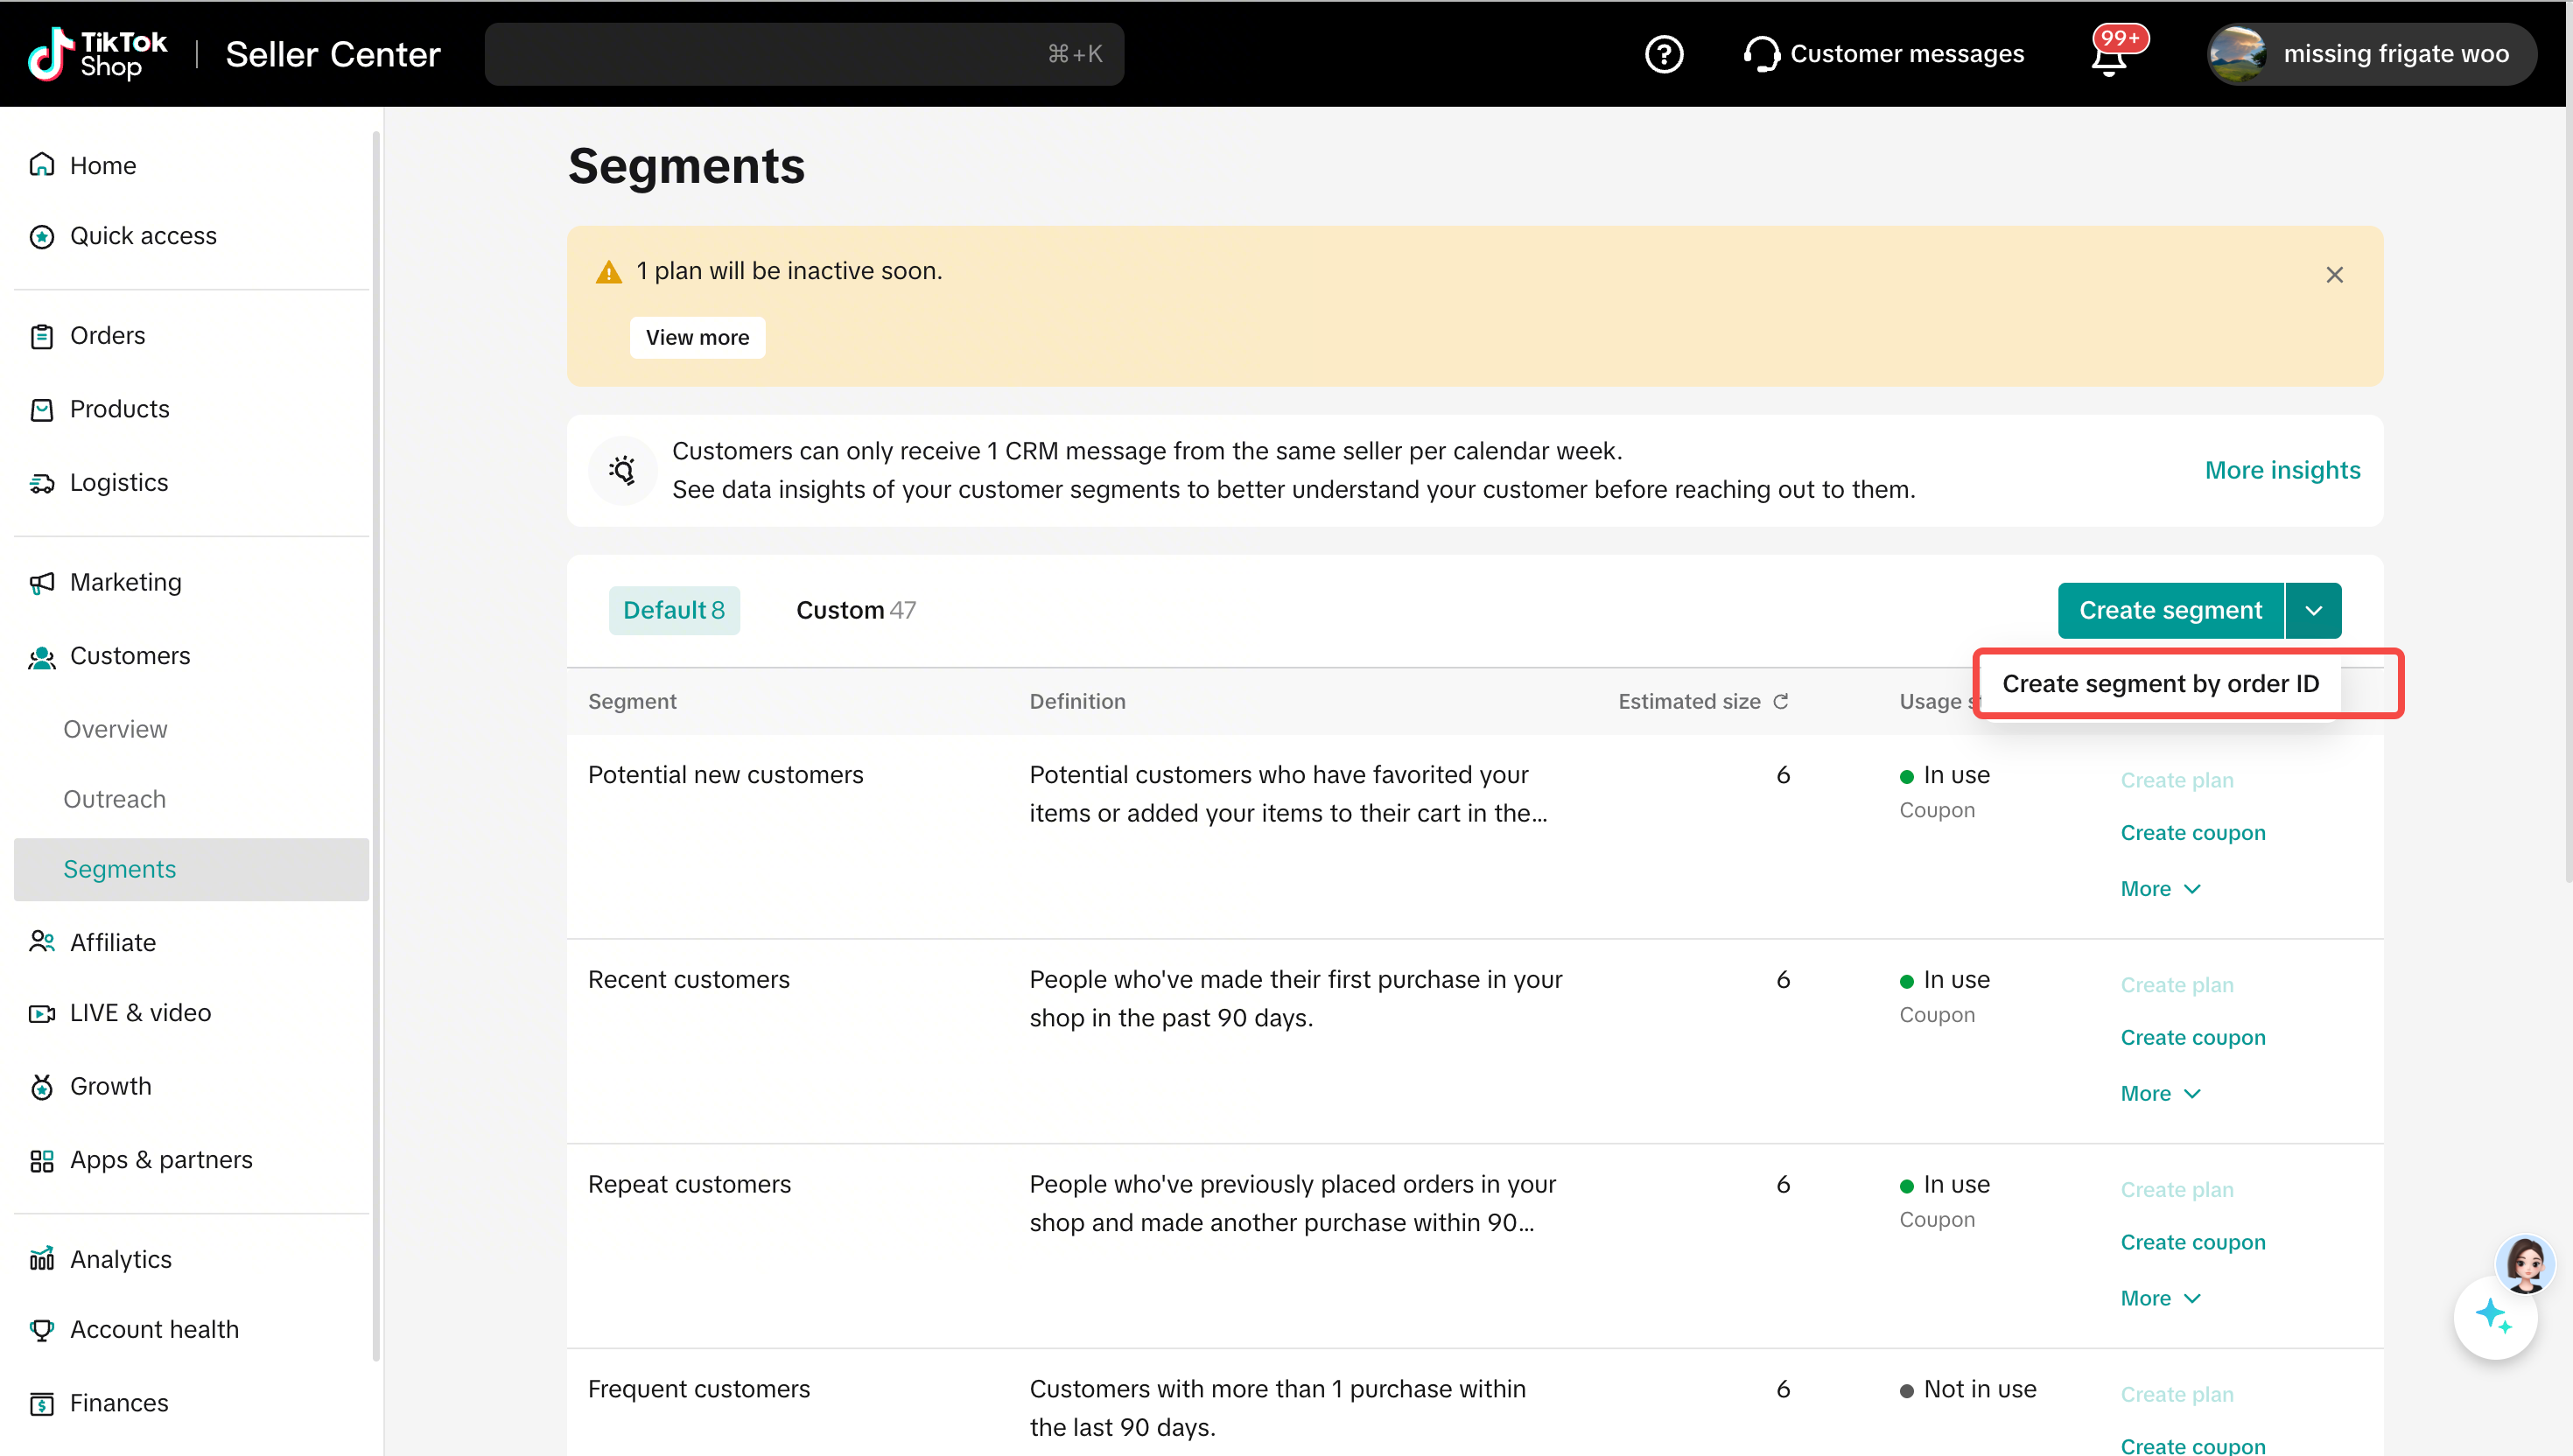
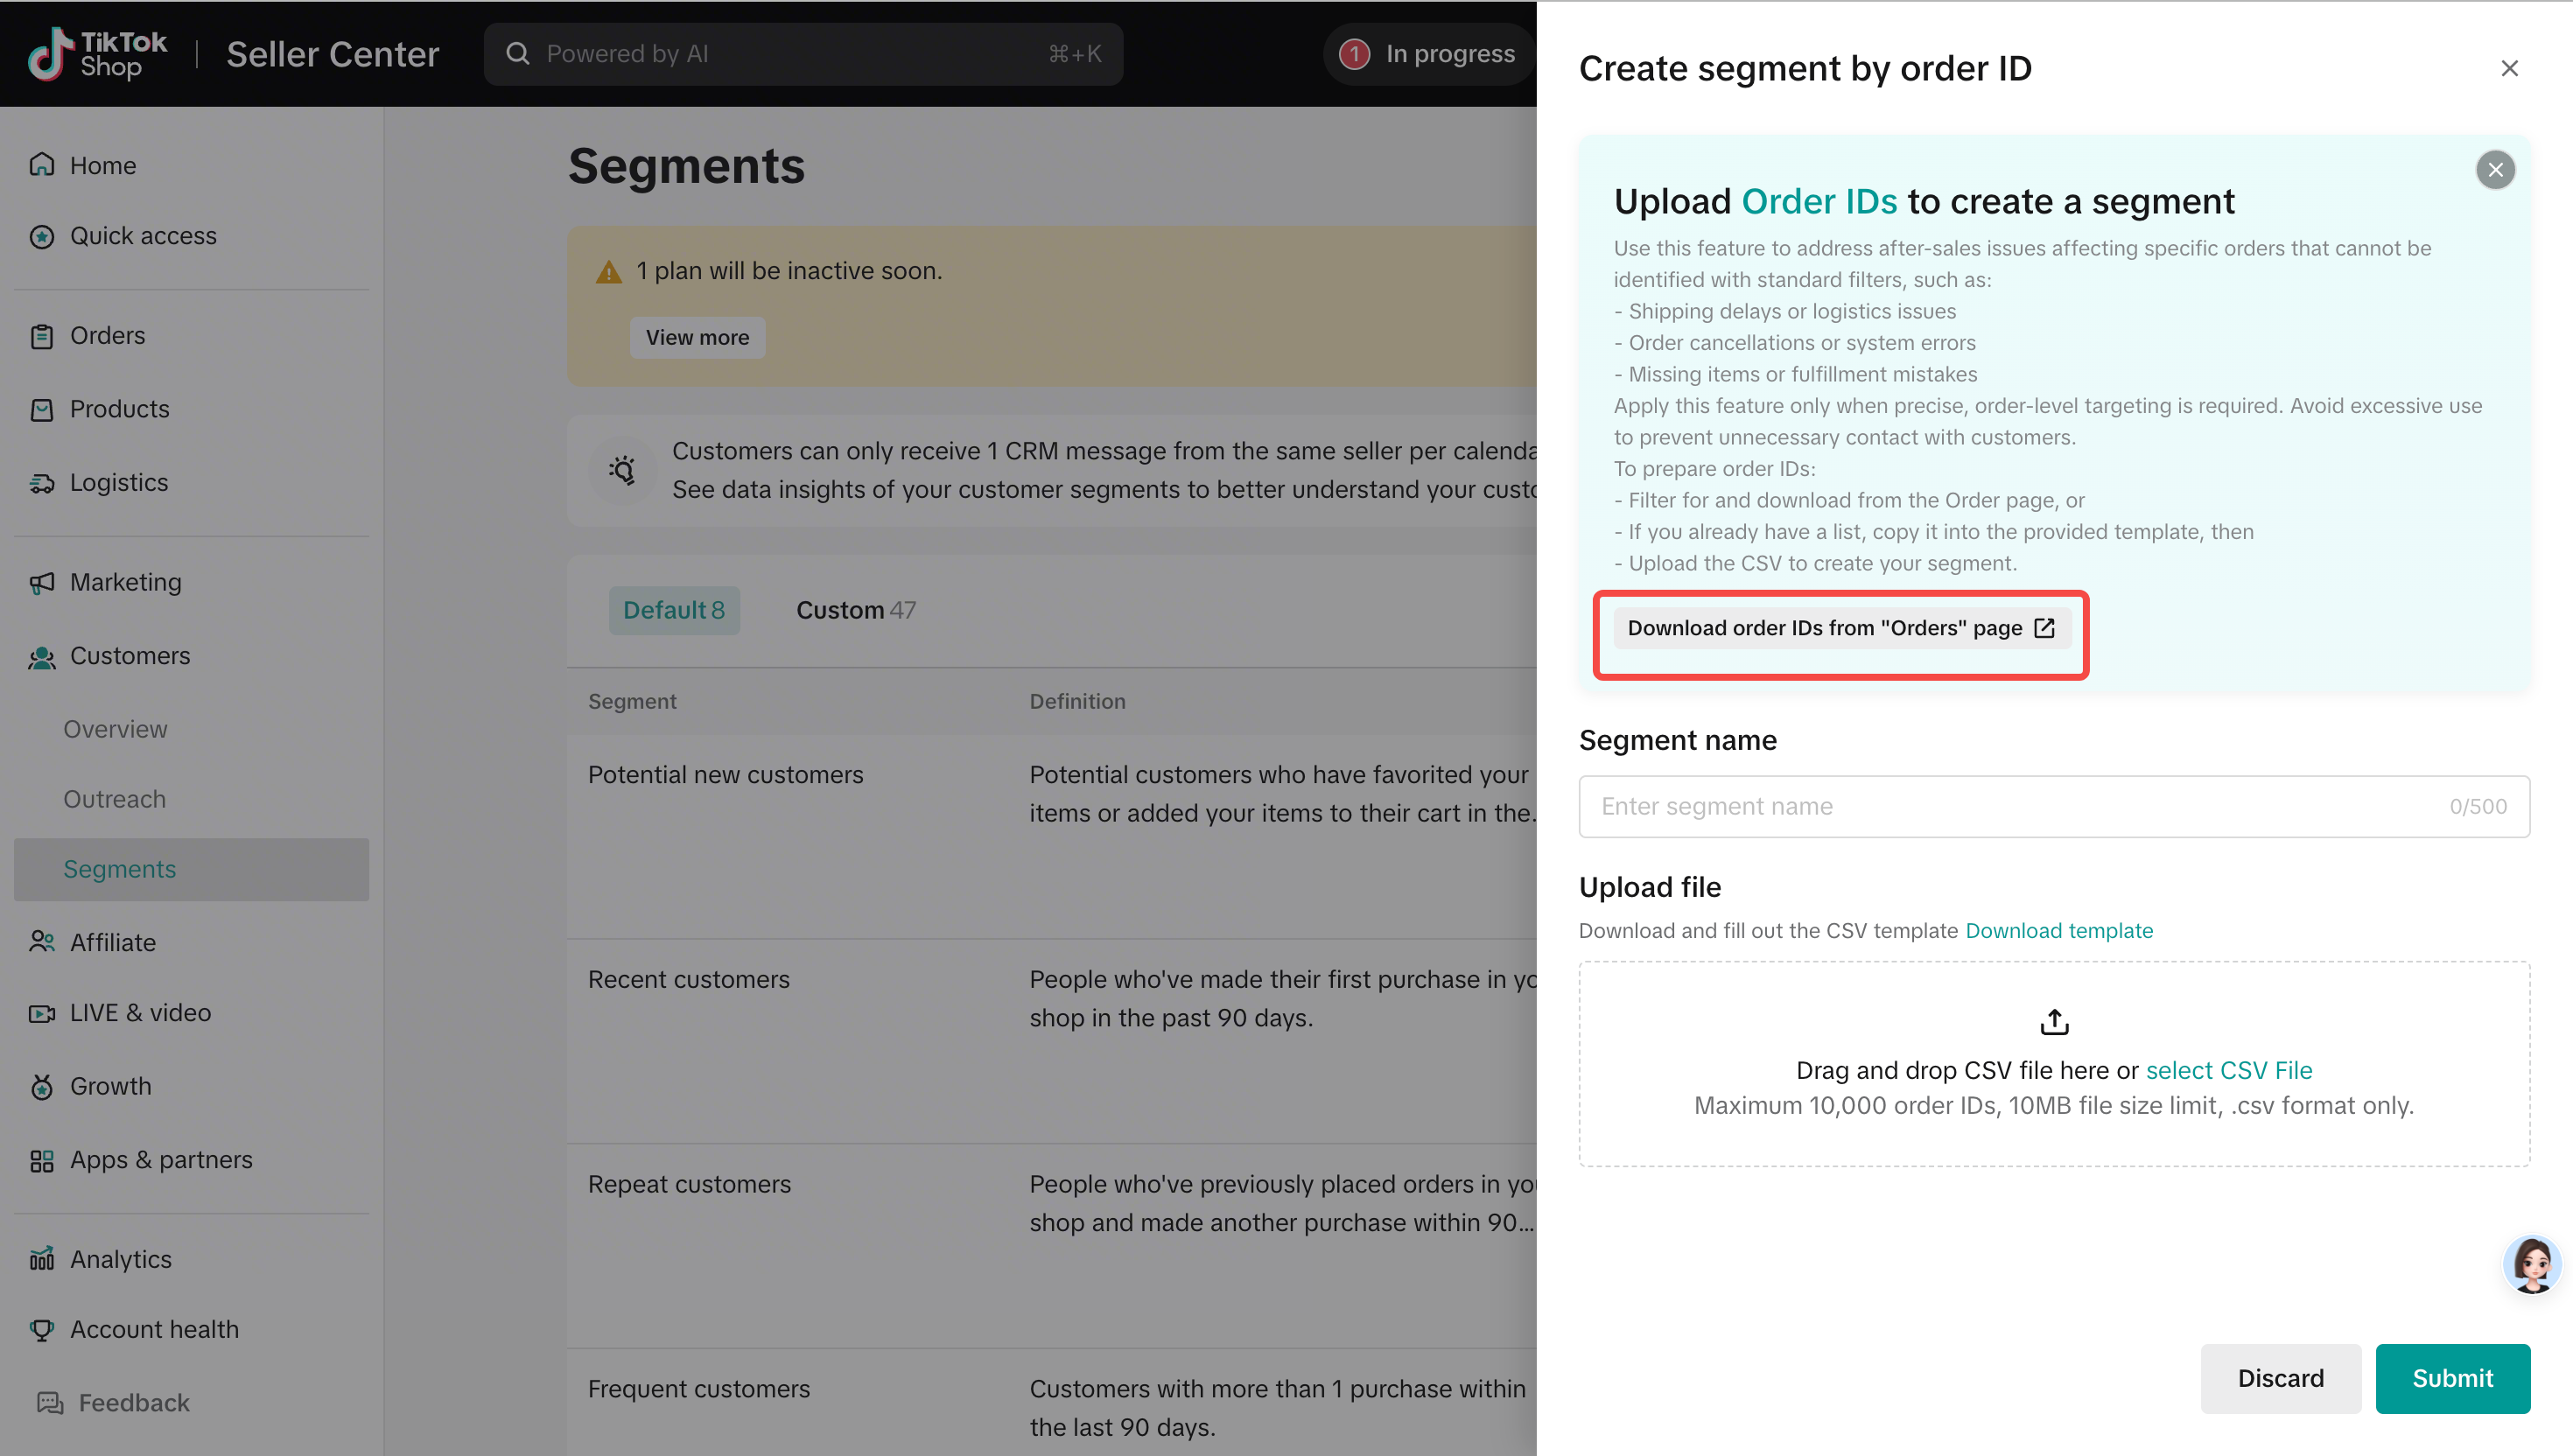
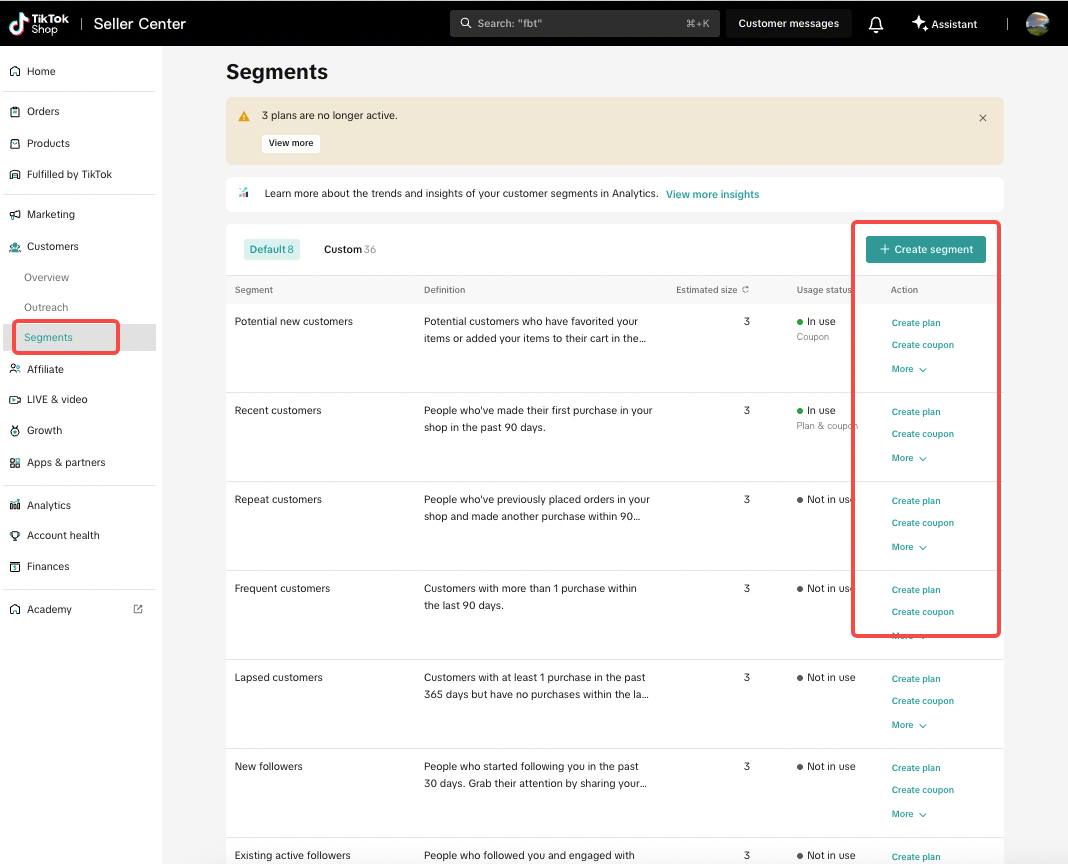
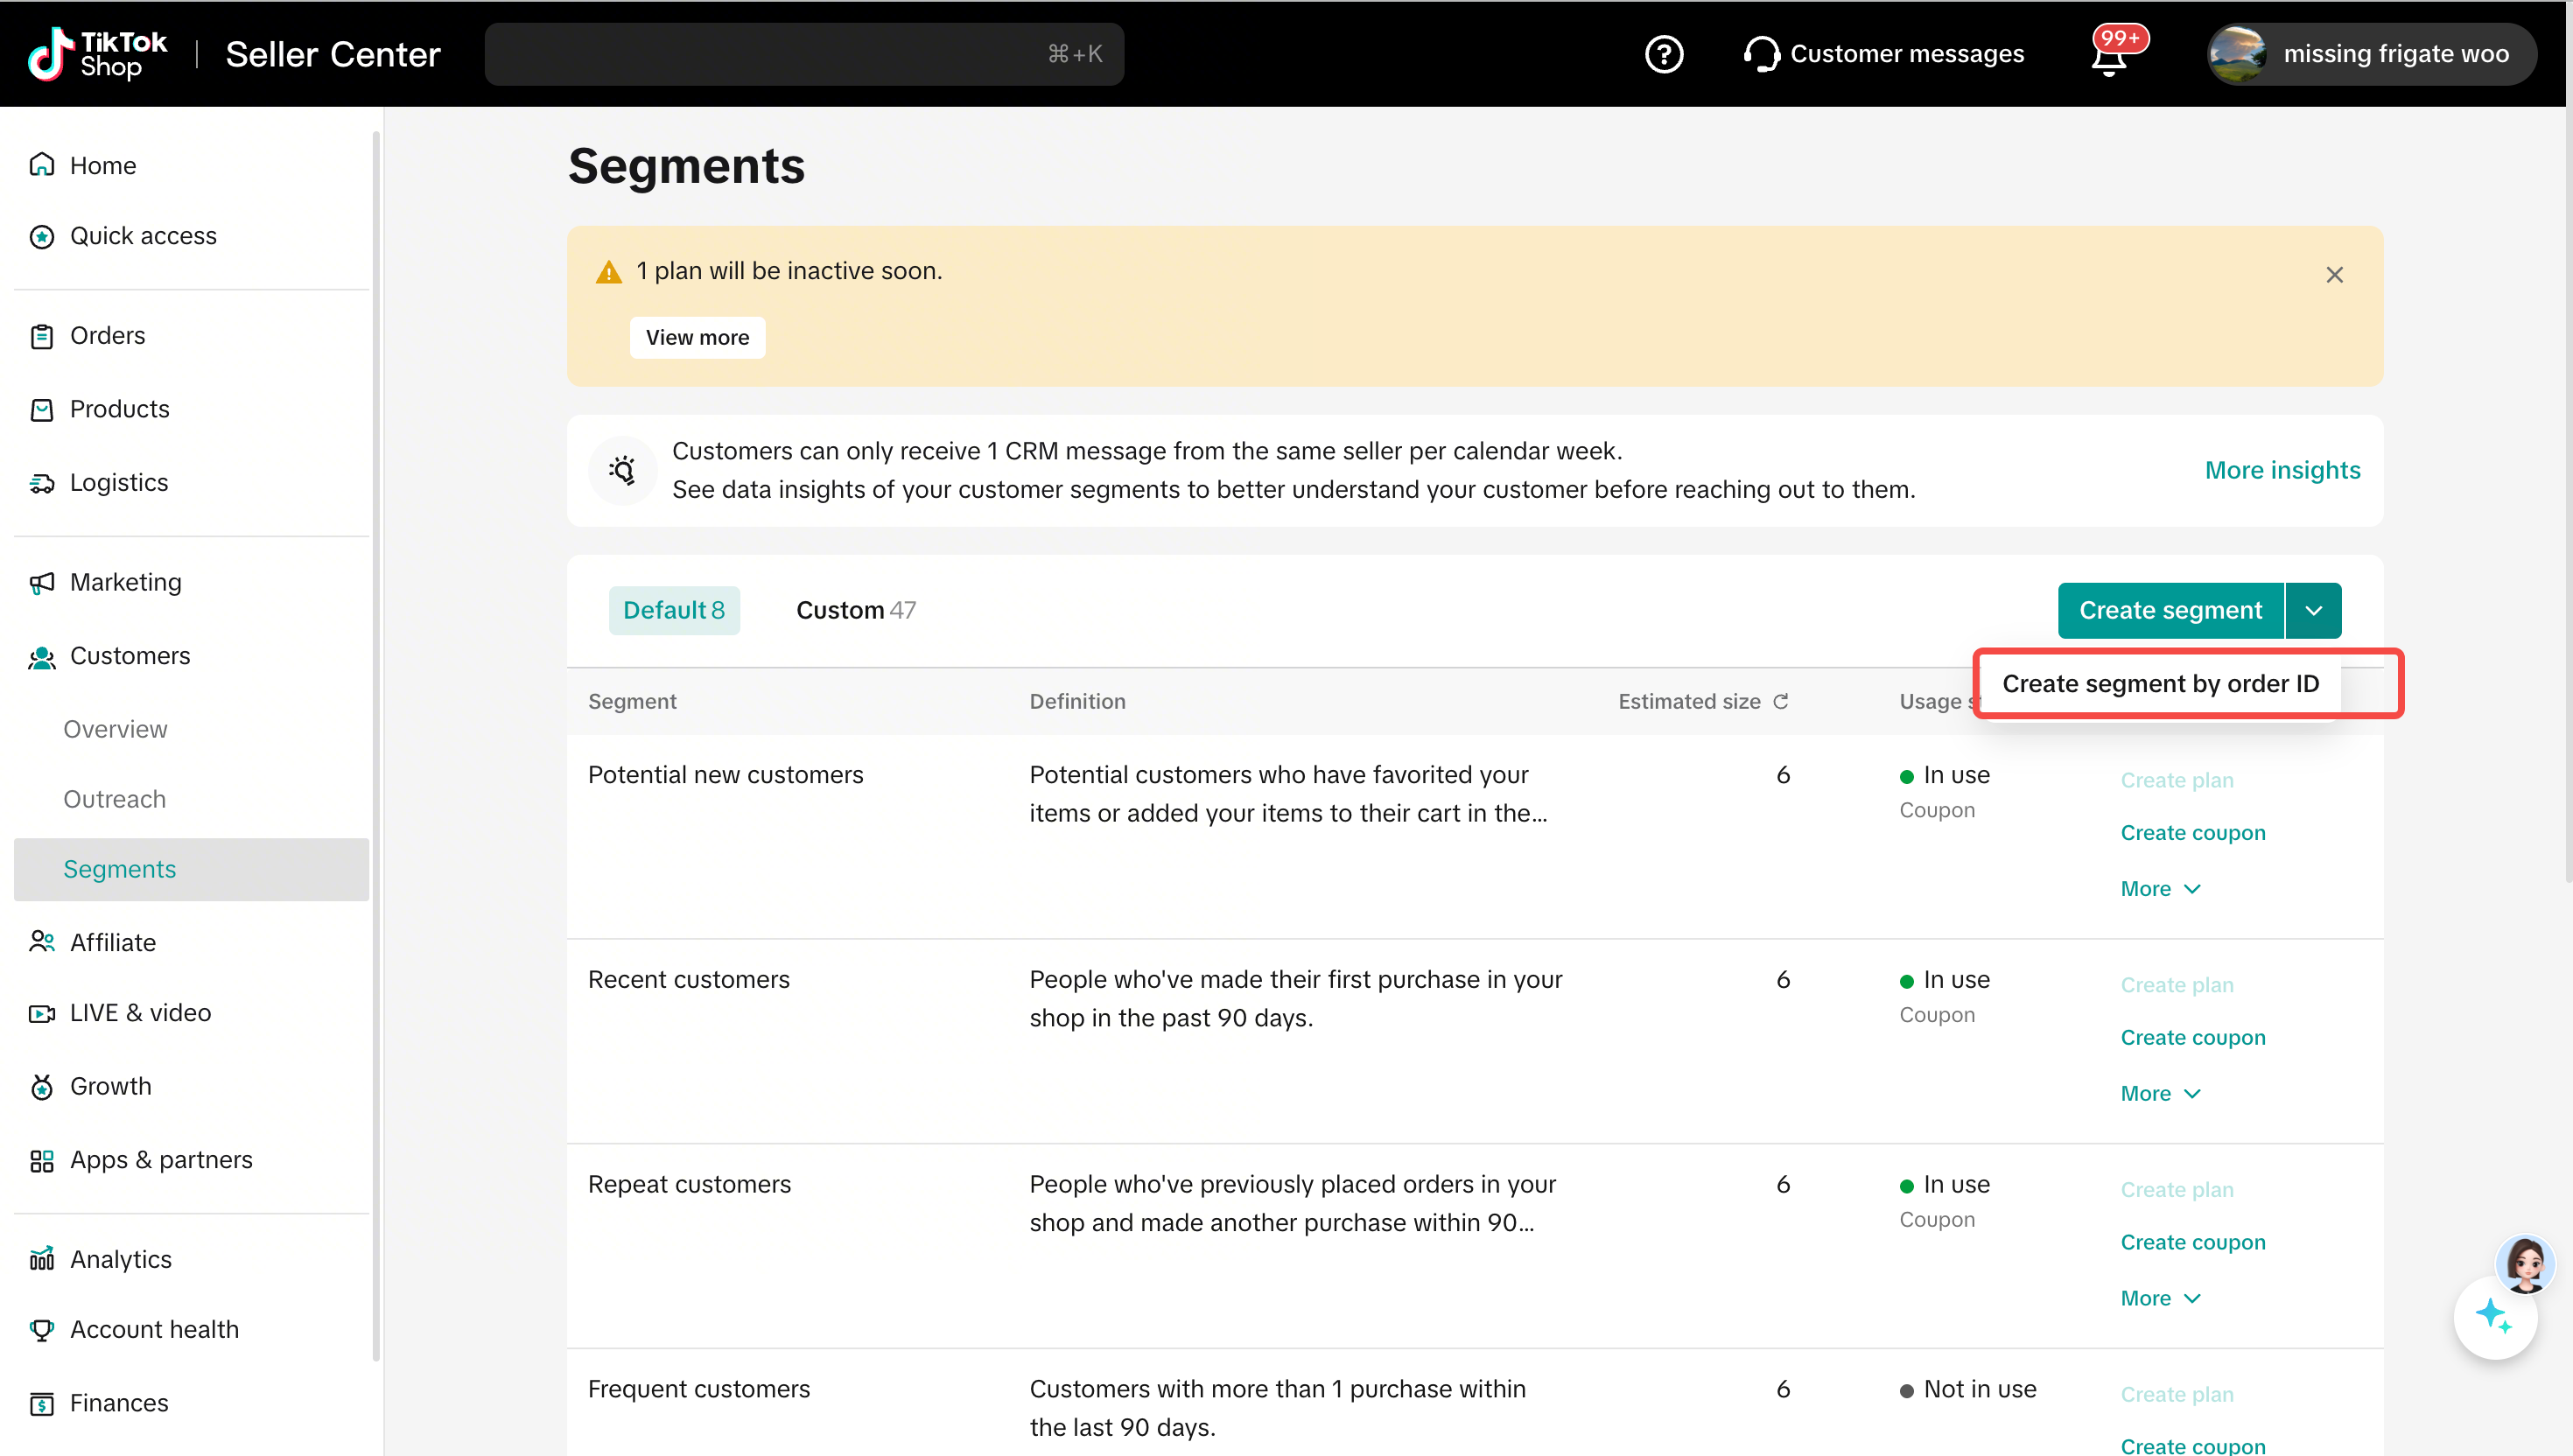
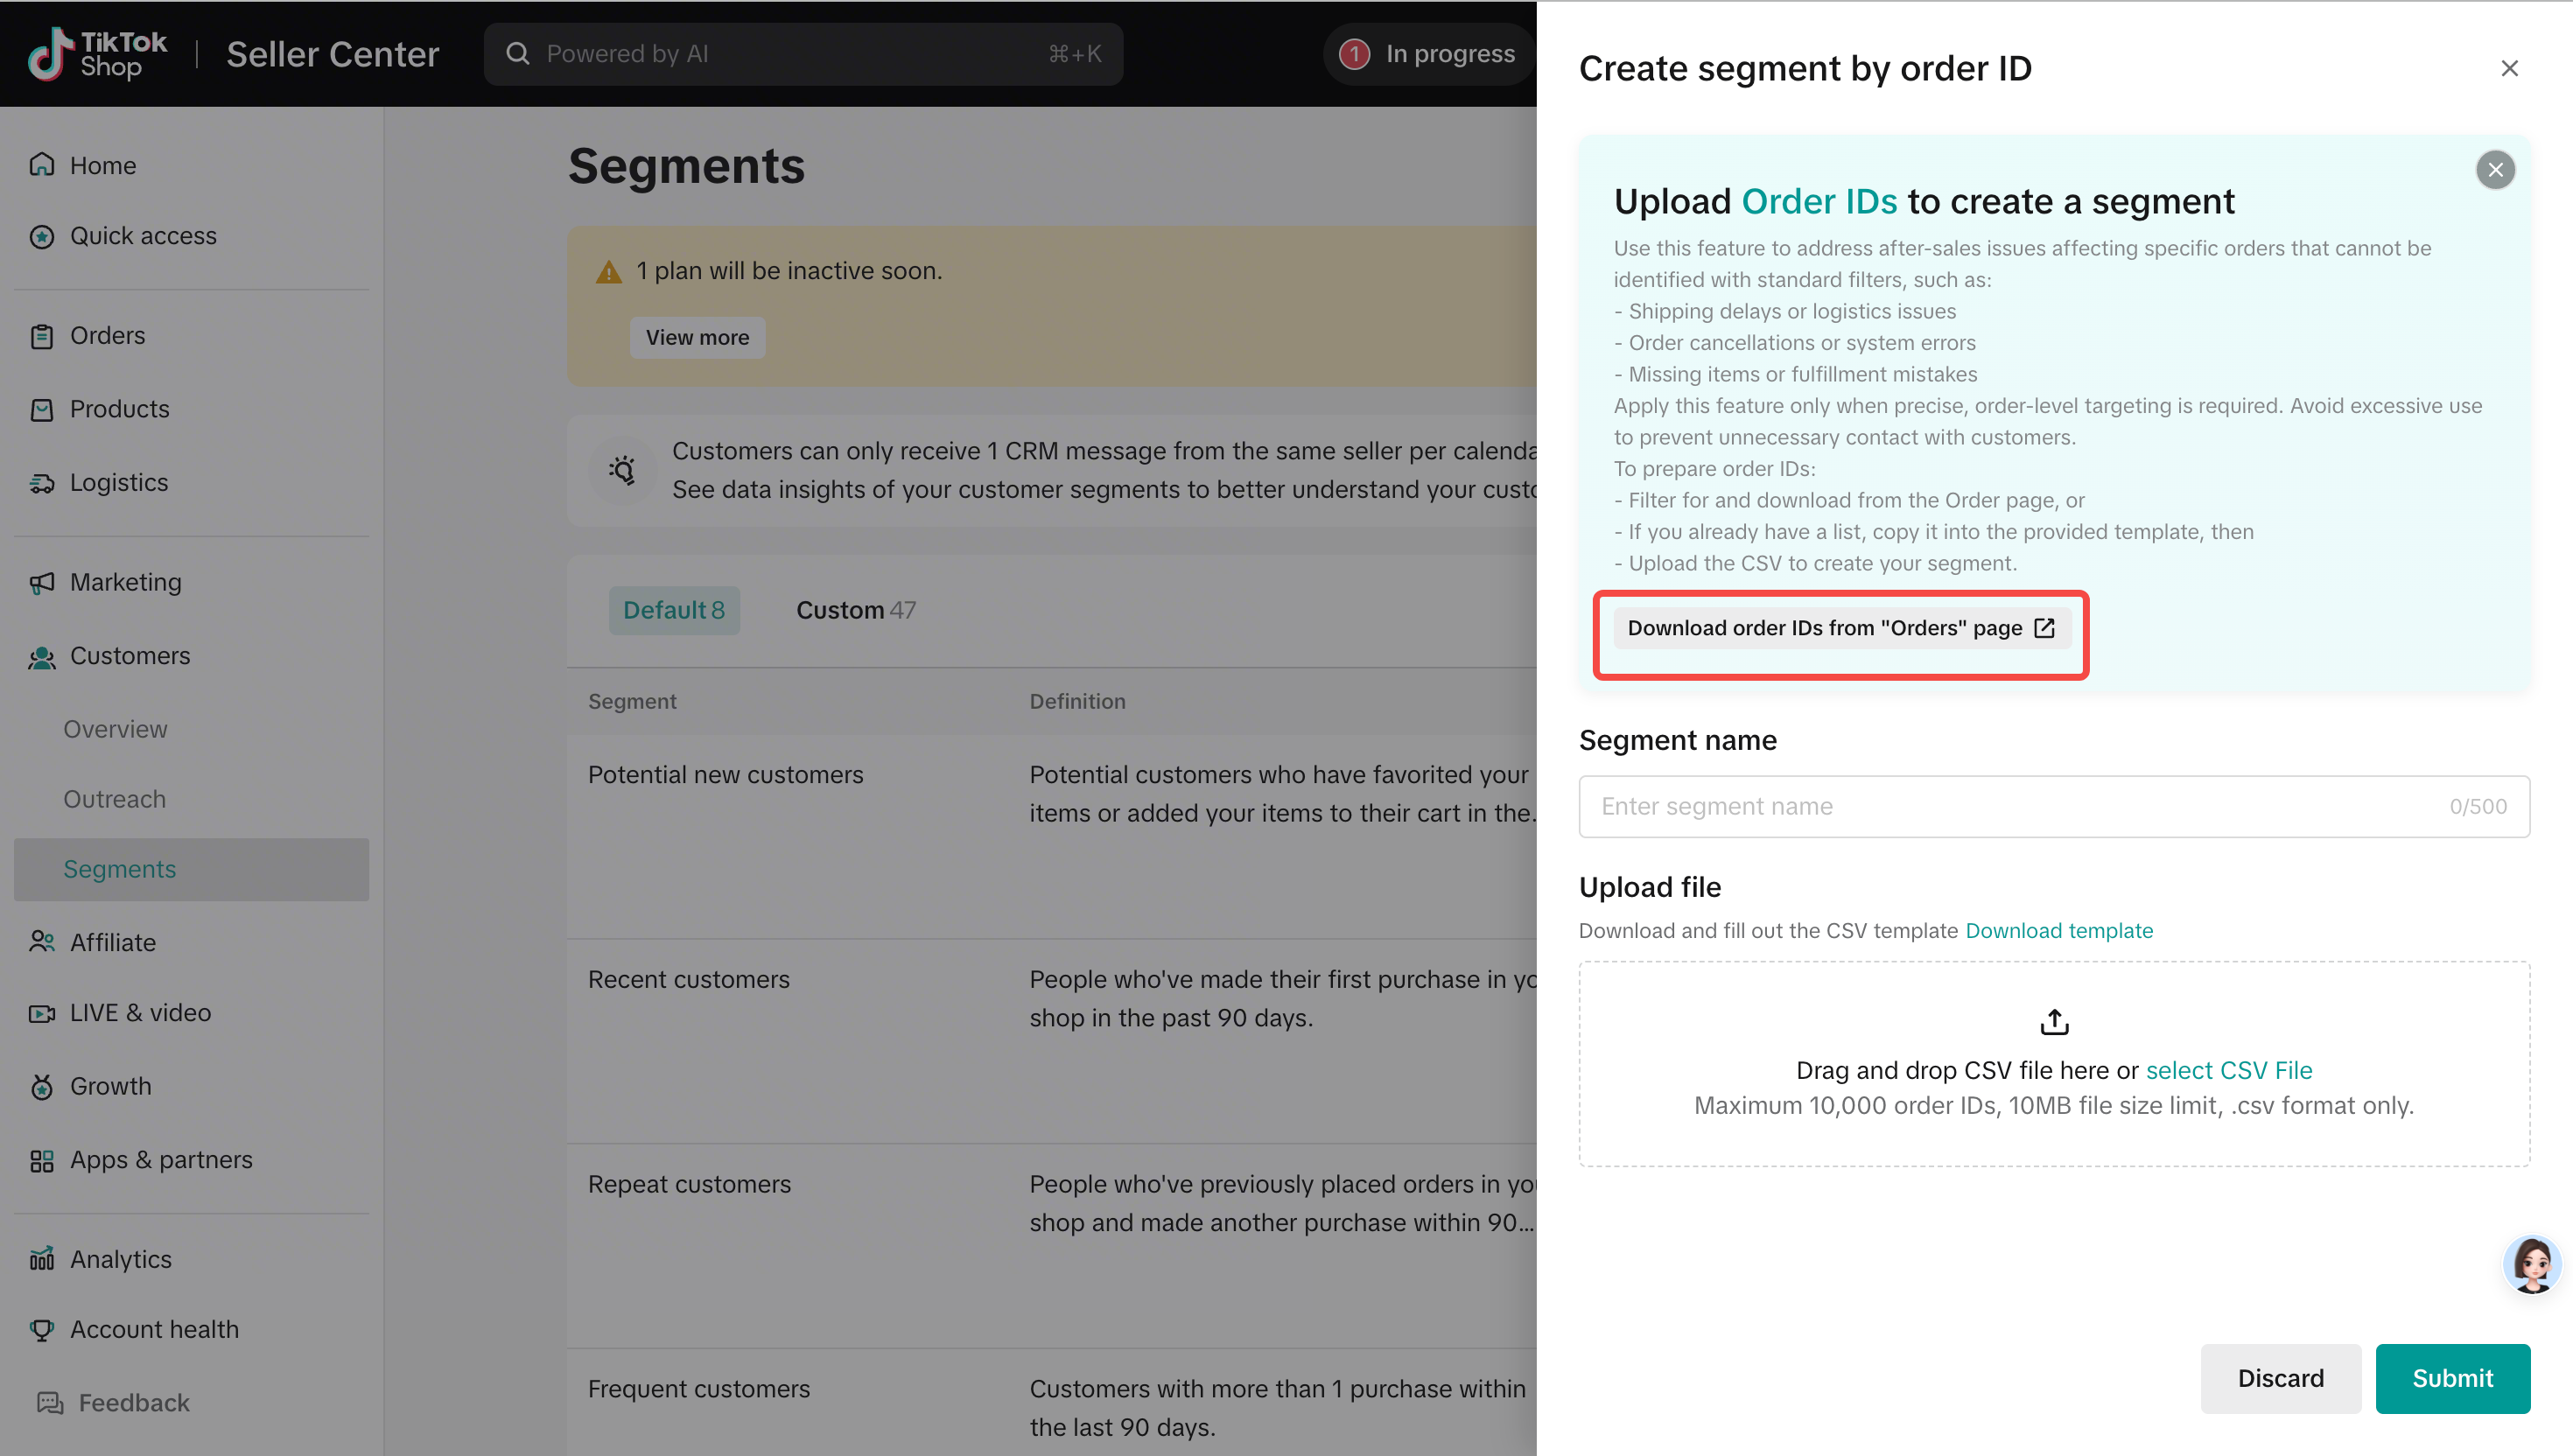
Step 1.1.1: Create custom audiences via Order ID: Go to Customers > Segments, click "Create segment by order ID" > Download order IDs from "Orders" page to open a new order page.
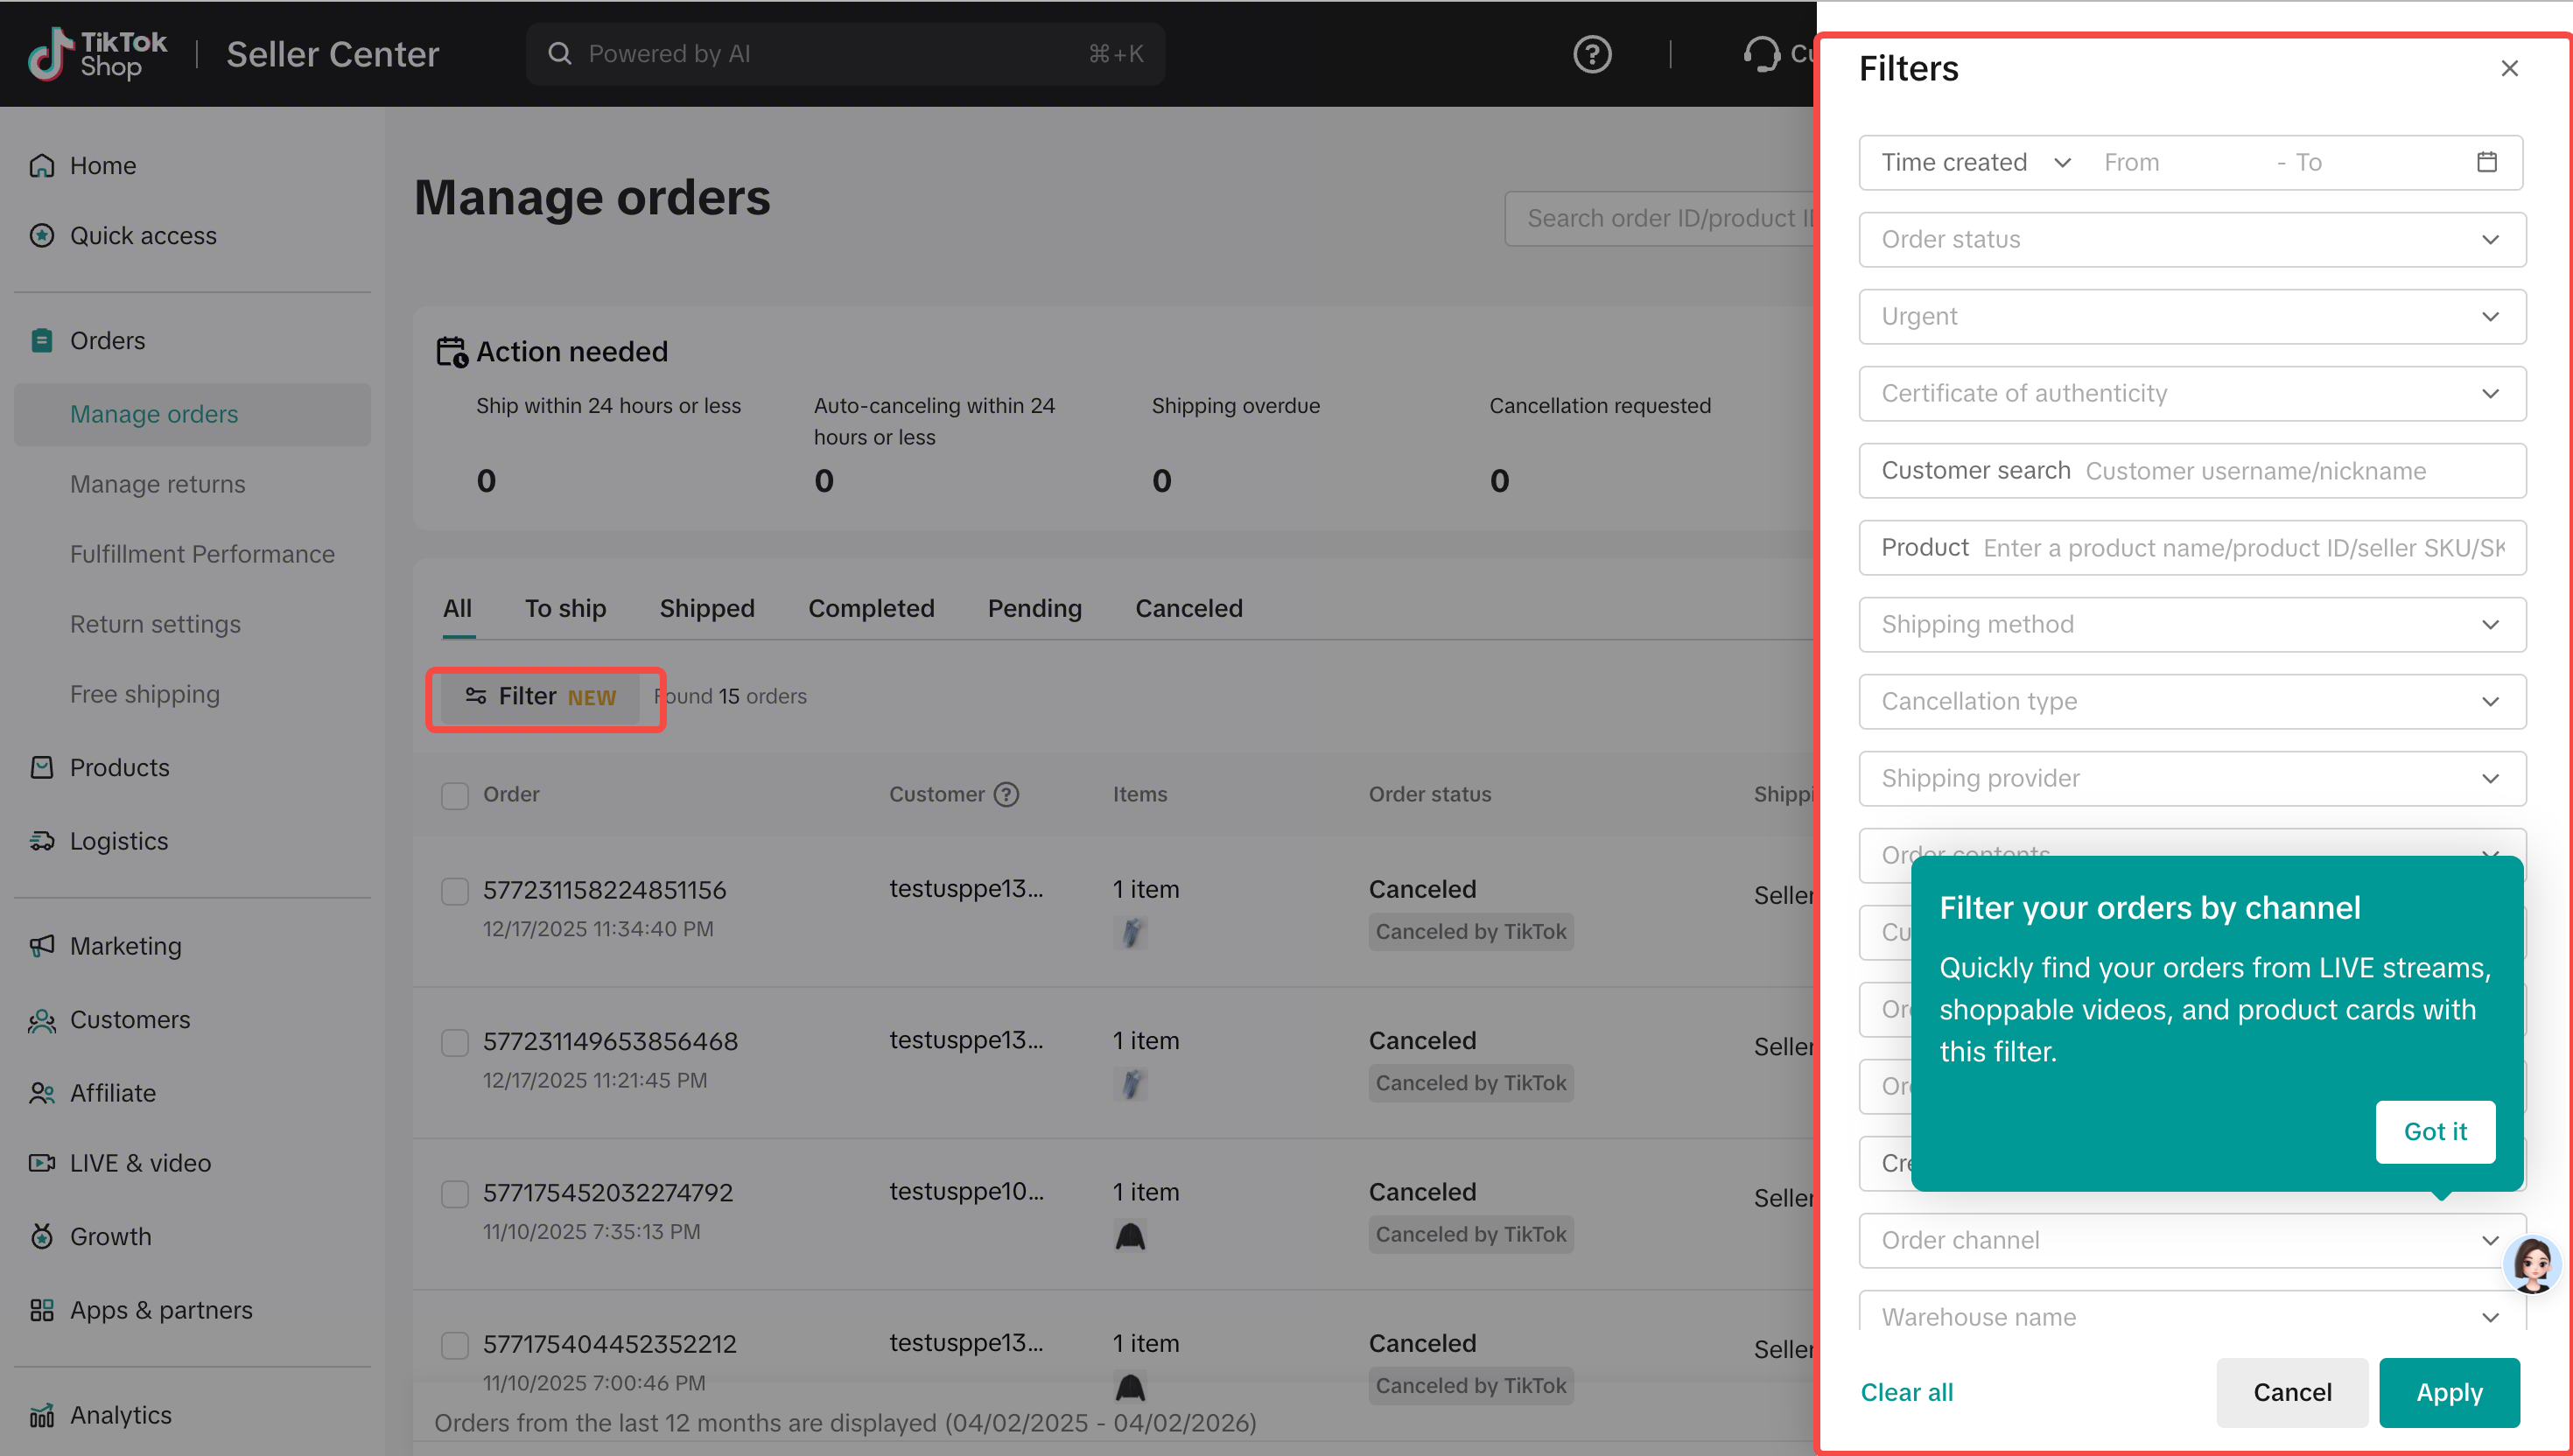
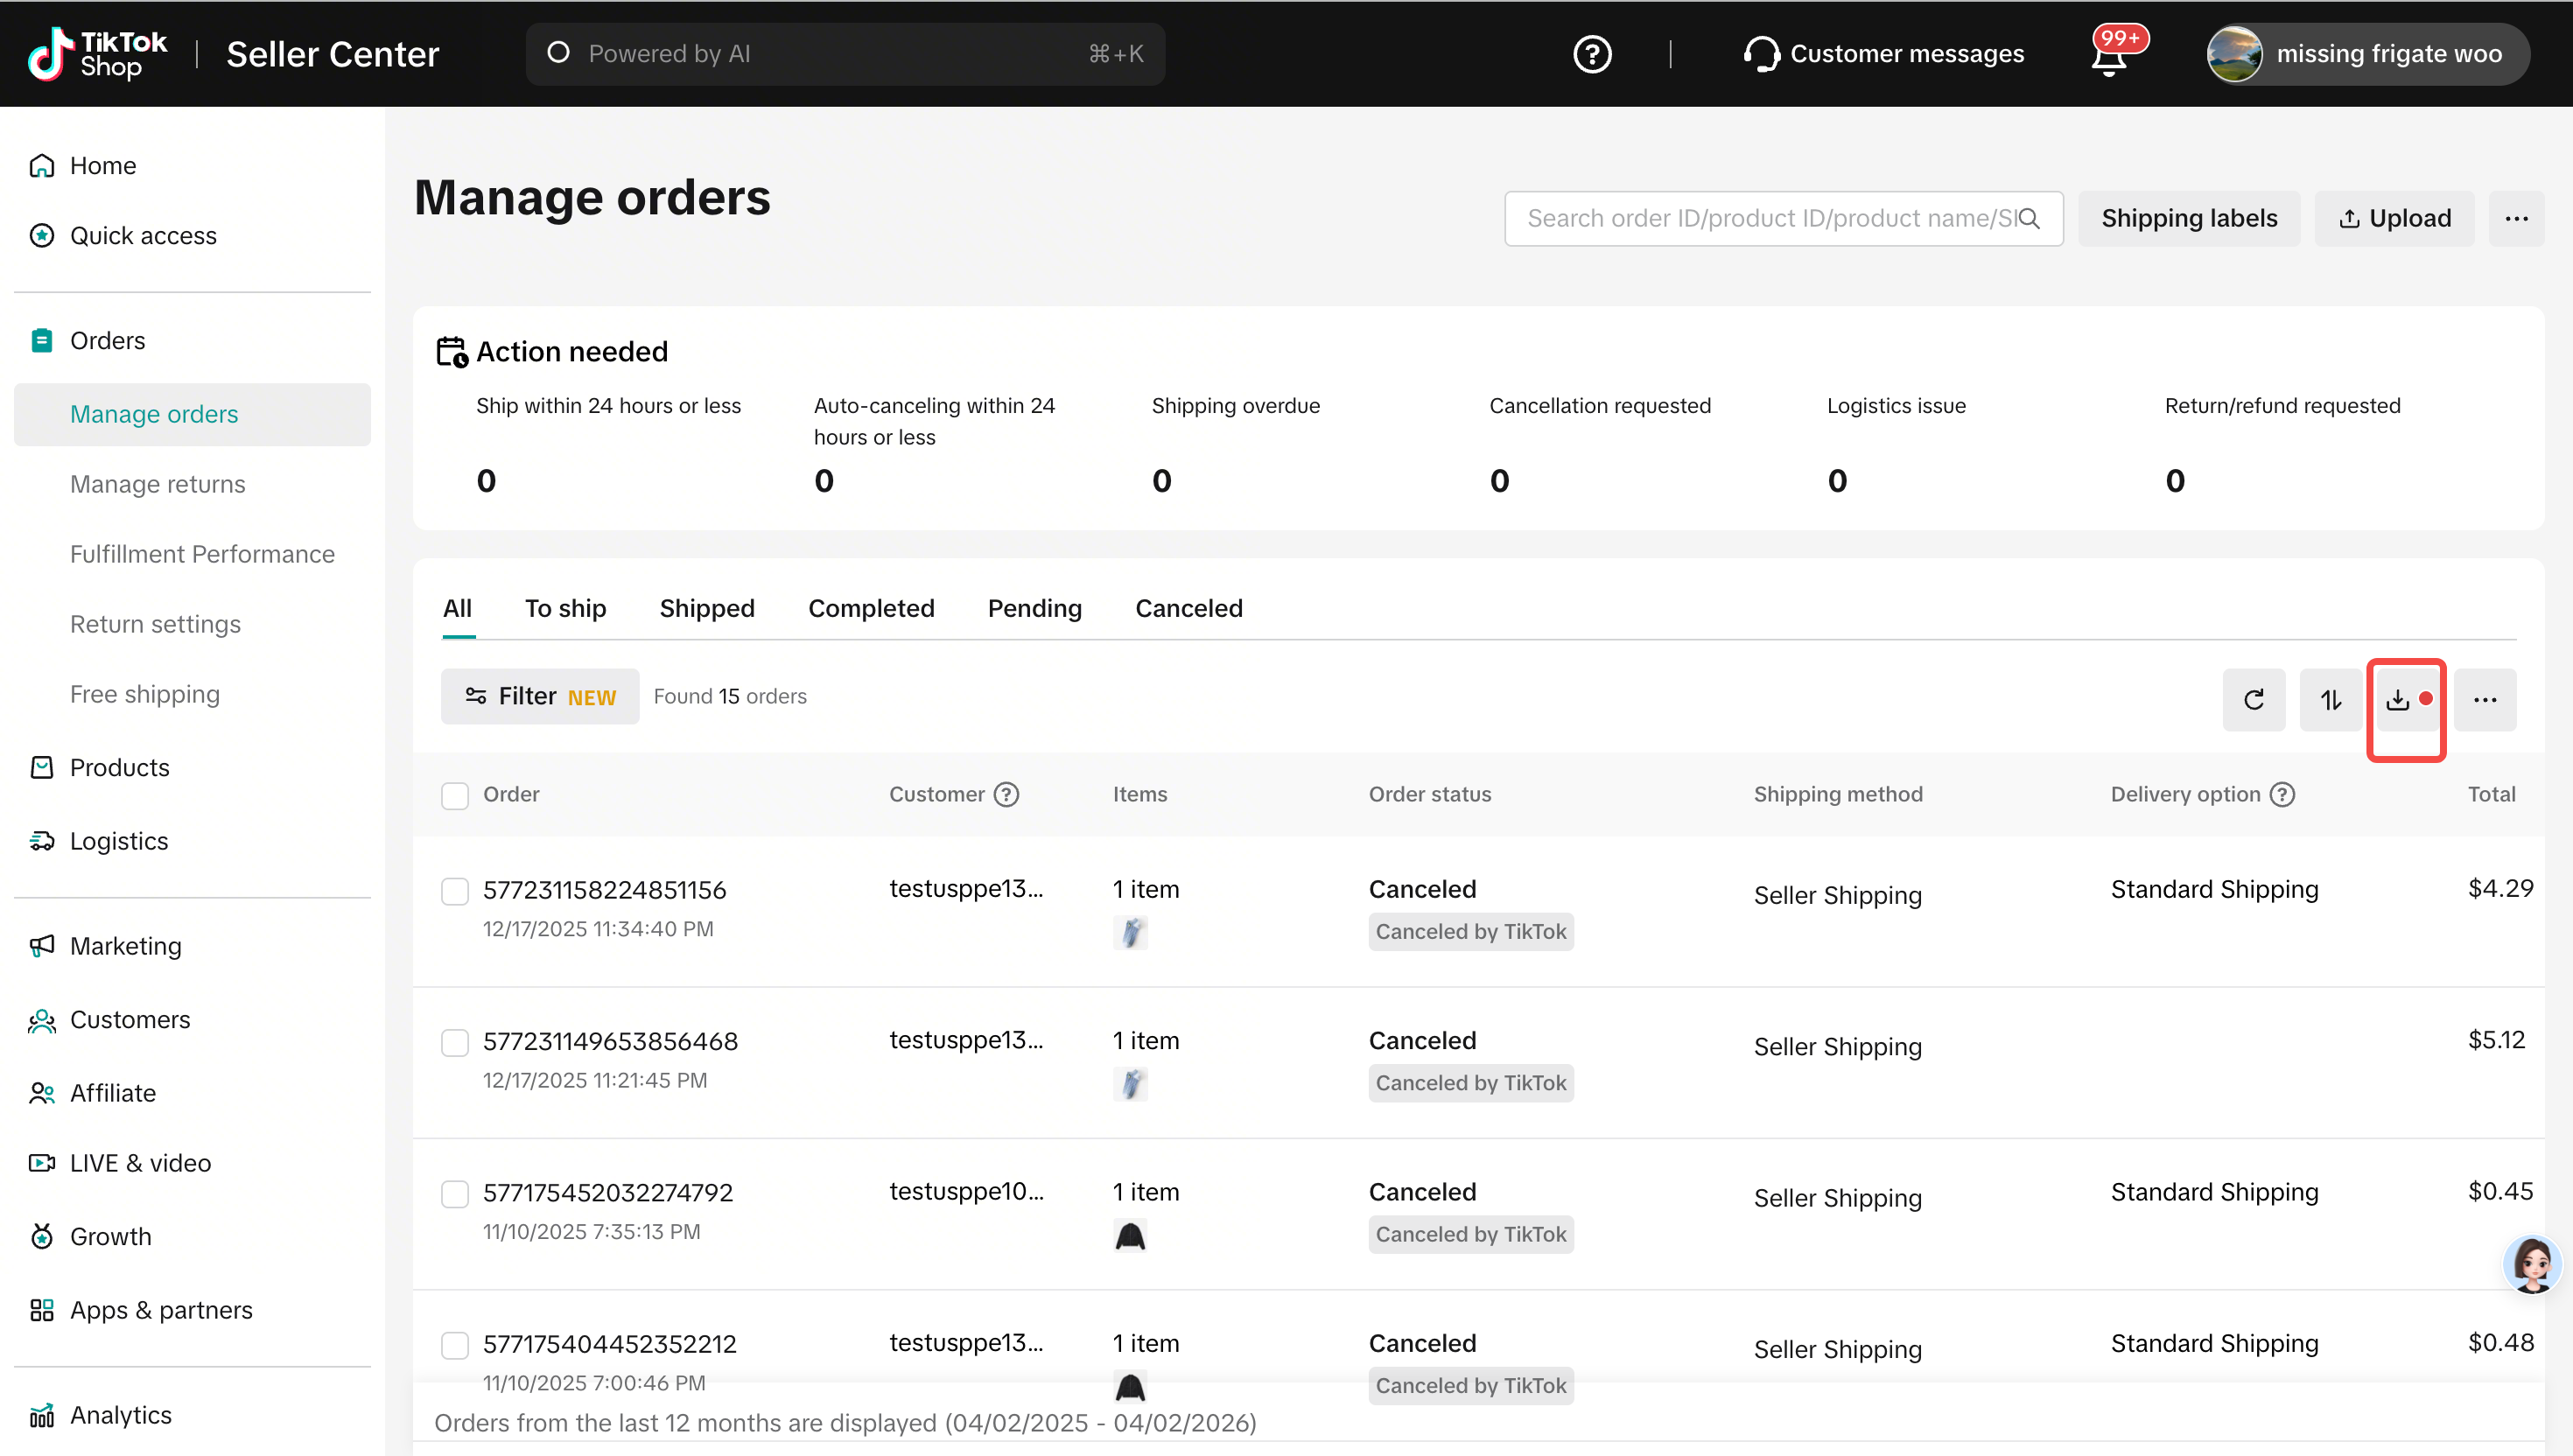
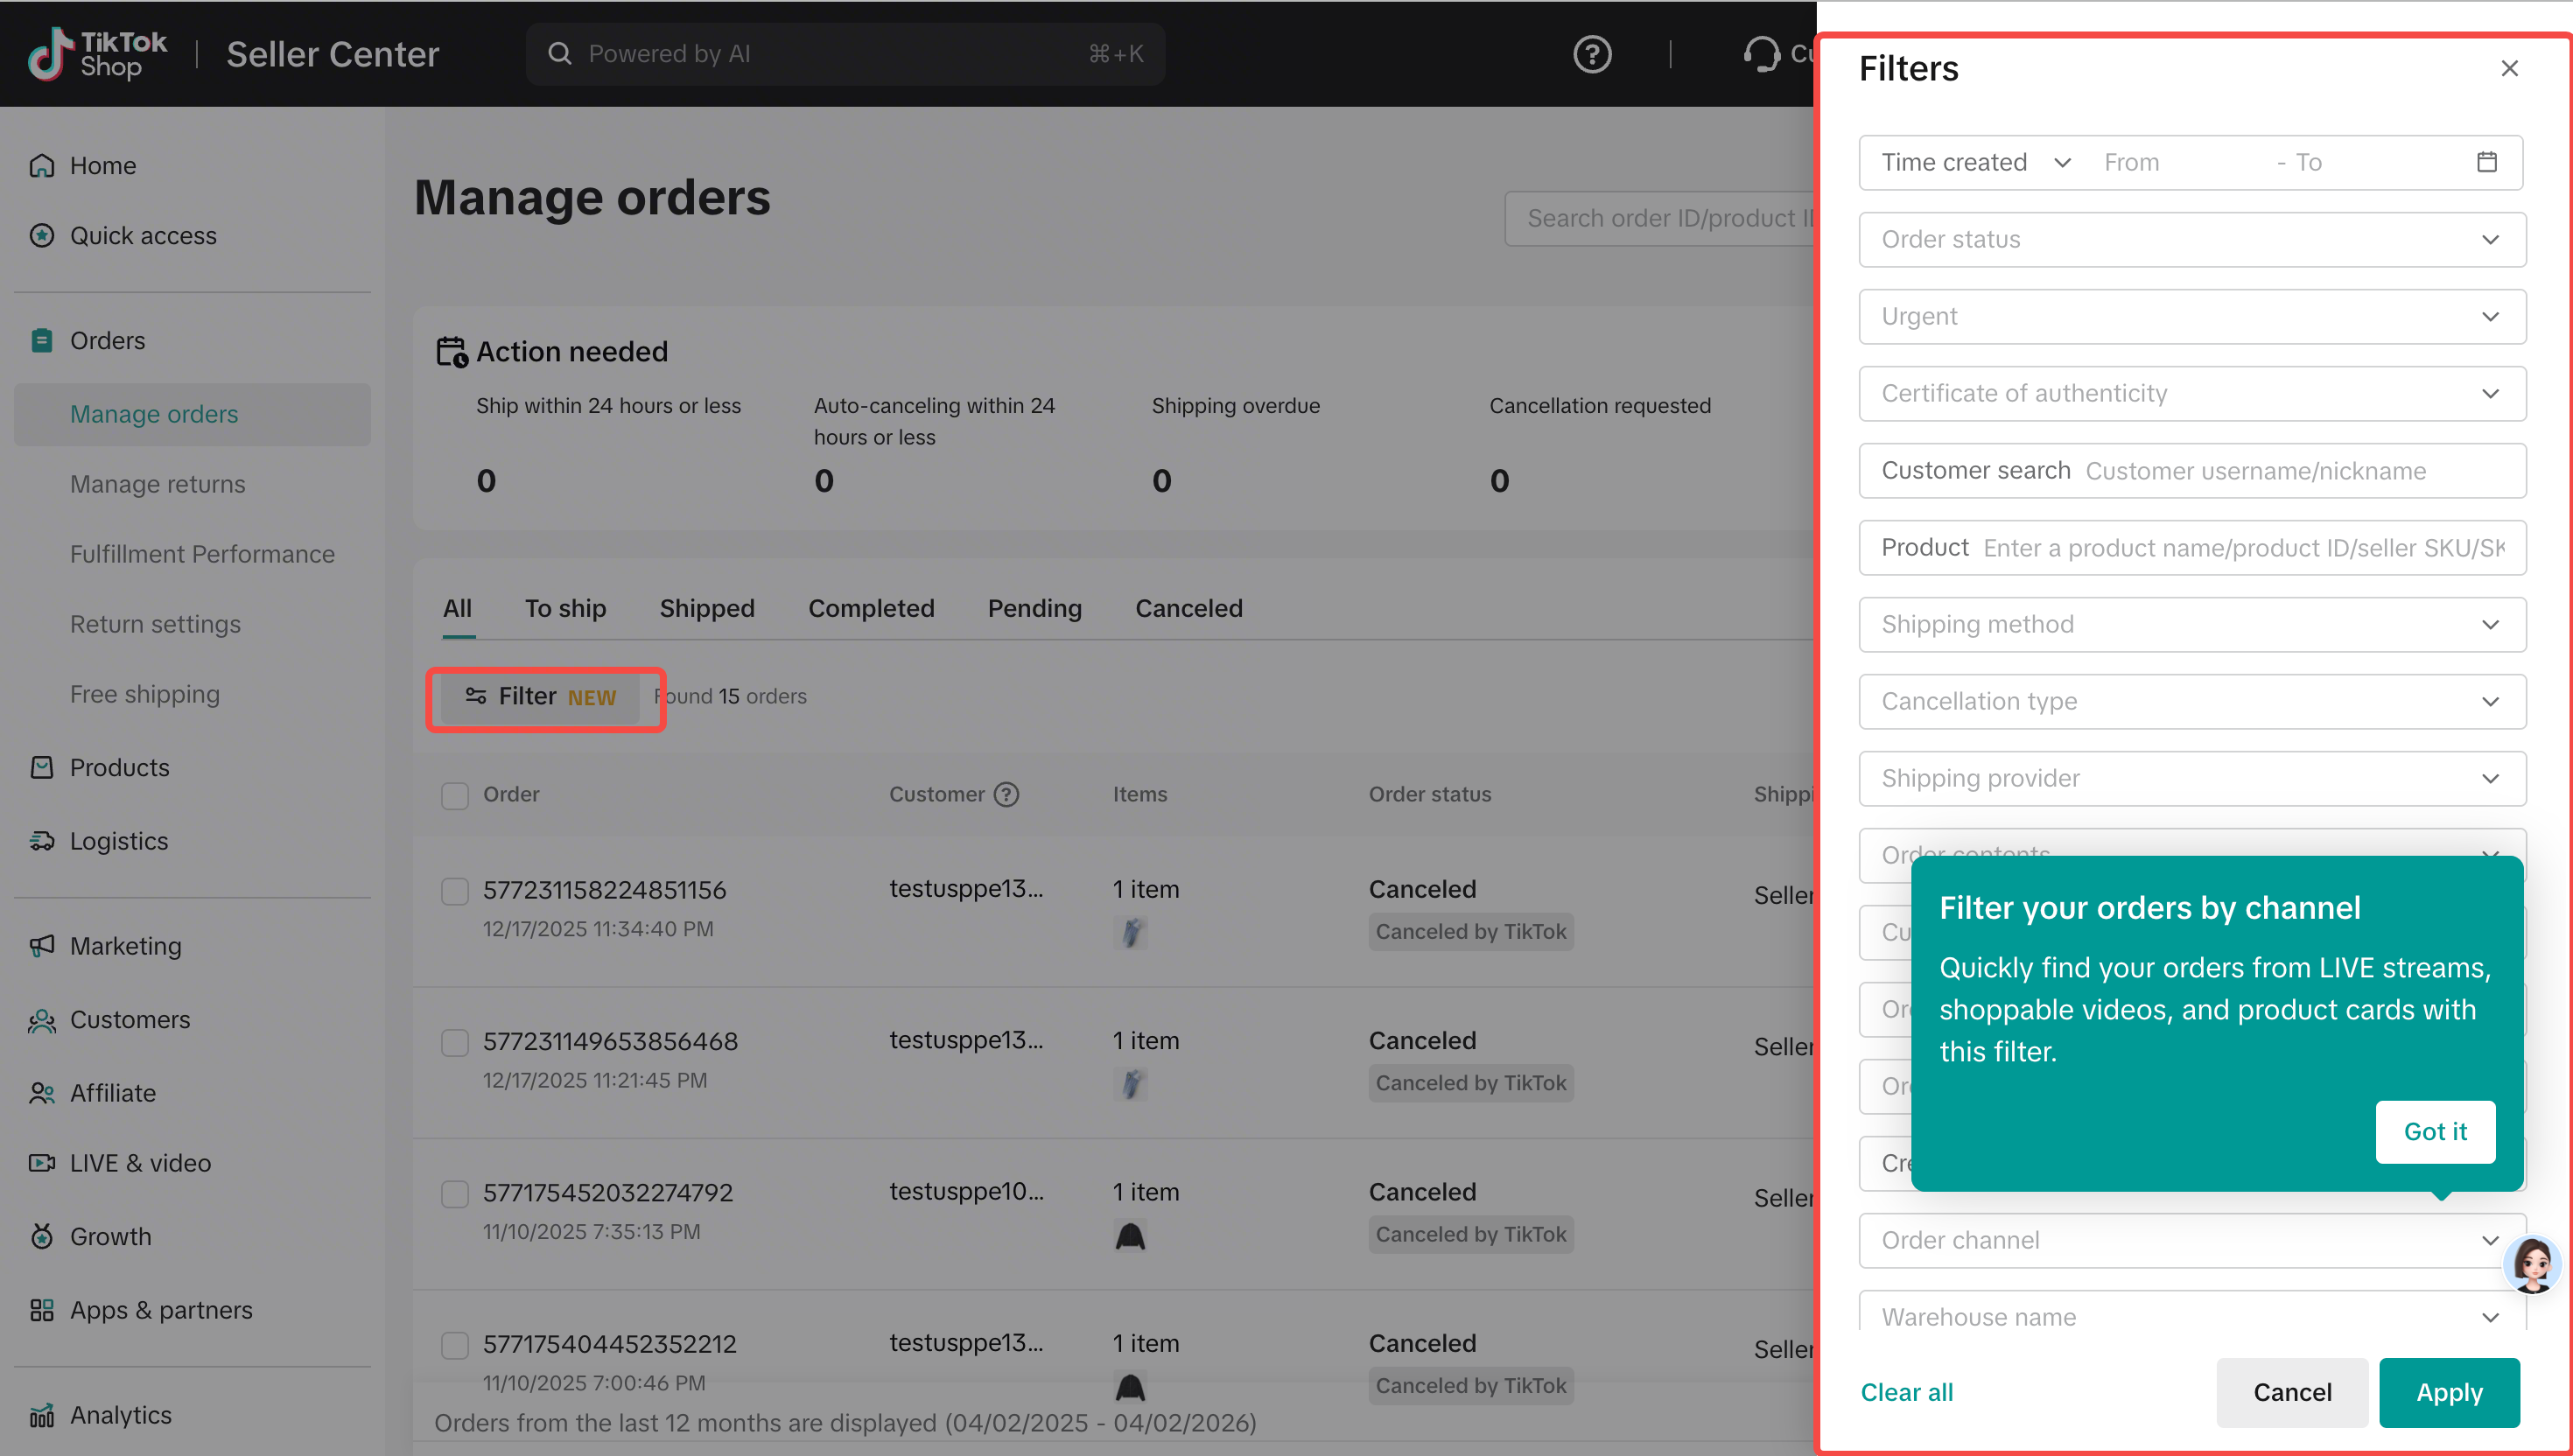
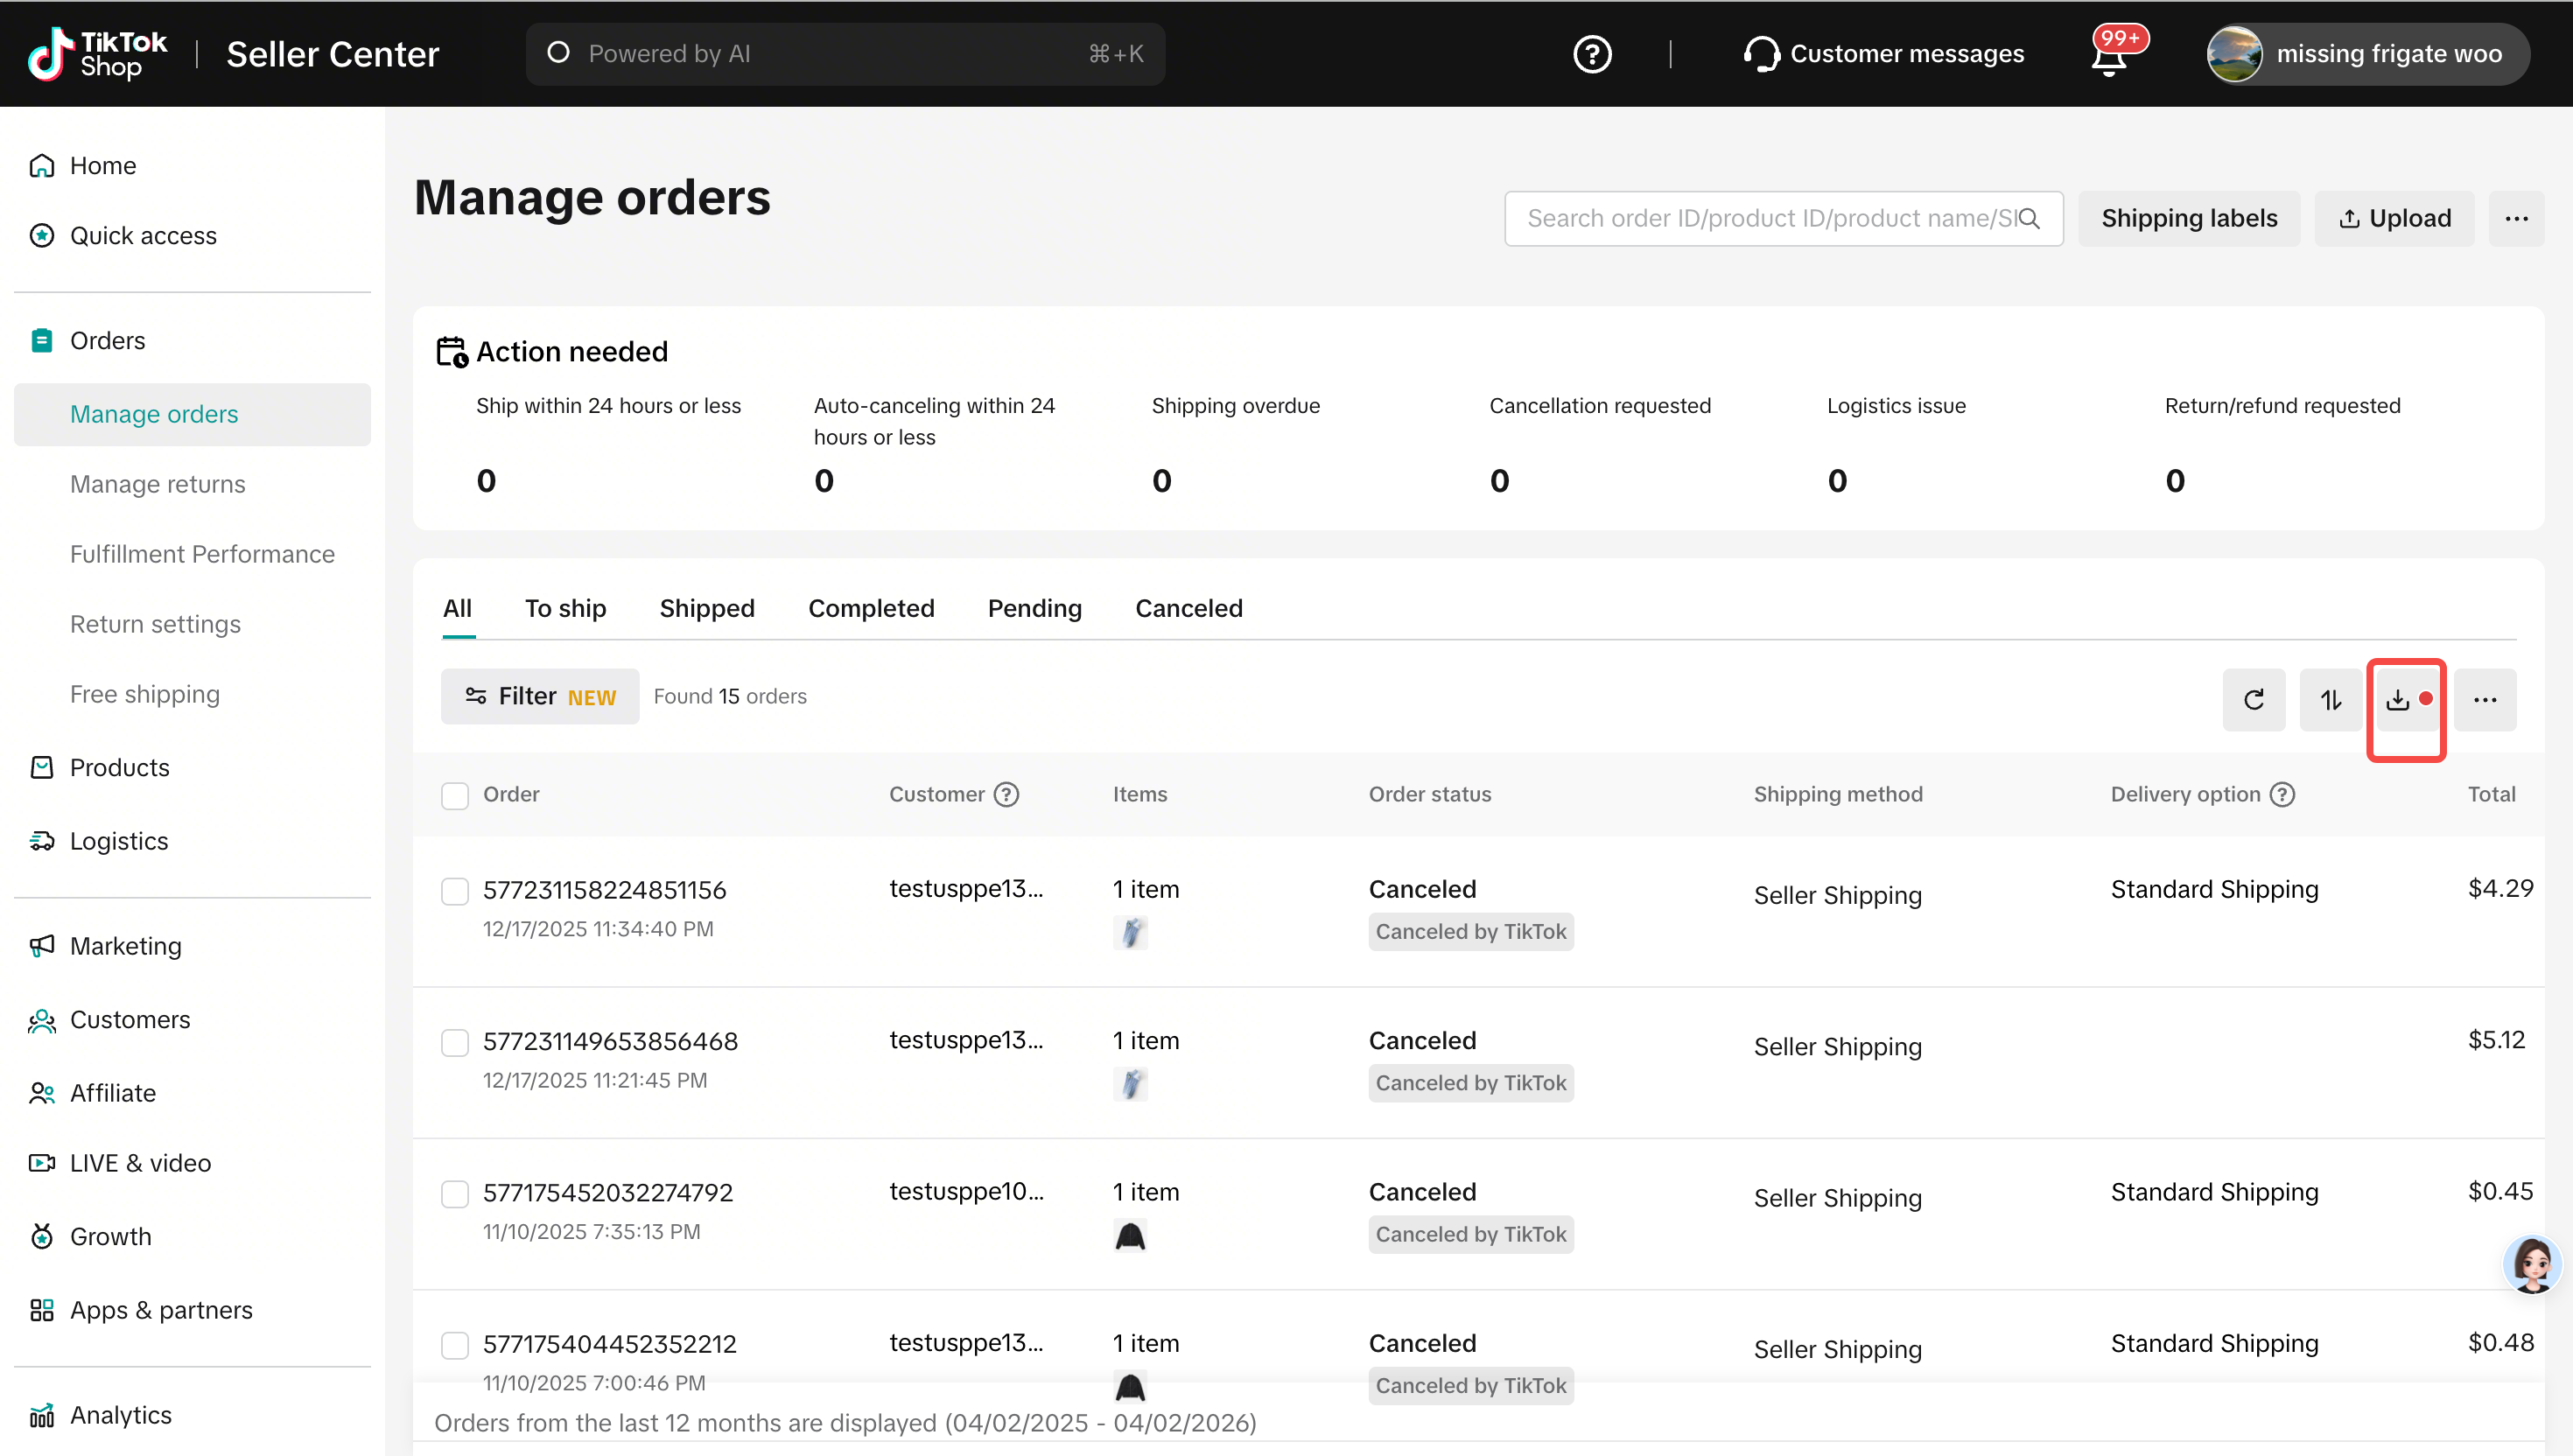
Step 1.1.2: On the new order page, you can filter by order time, status, logistics, and more. Export as a CSV file, then return to the segment creation page to upload.
Desktop
Step 3
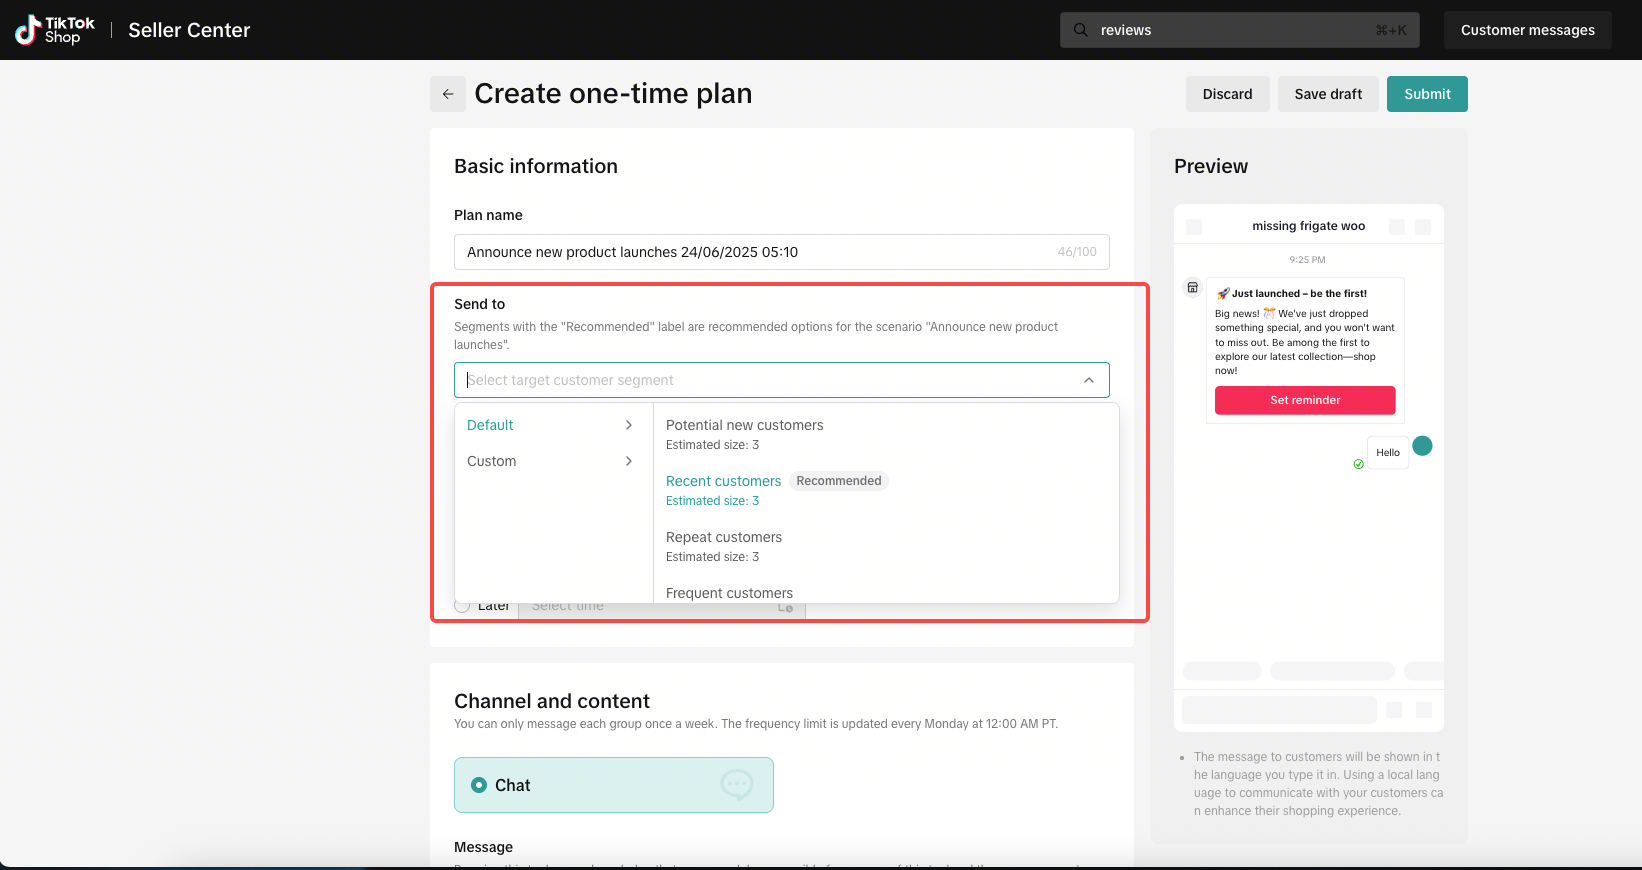
Step 2.2: Choose your audience from built-in segments Select a built-in segment to target your audience. This can be potential new customers, lapsed customers, abandoned cart shoppers, new or active followers, or first time or repeat customers. You can also create your own customer group using filters like engagement, purchase behavior, or time from the last order.
Desktop
Step 4
Step 3: Choose your outreach channel(s), content, product & coupons.
Content: Define the message content from the templates, or customize as you want
Coupons & products: Apply coupons to increase the click rate and conversion rate
Note: Email as a new outreach channel within your TikTok Shop Customers (CRM) tool is only available for a one-time plan.
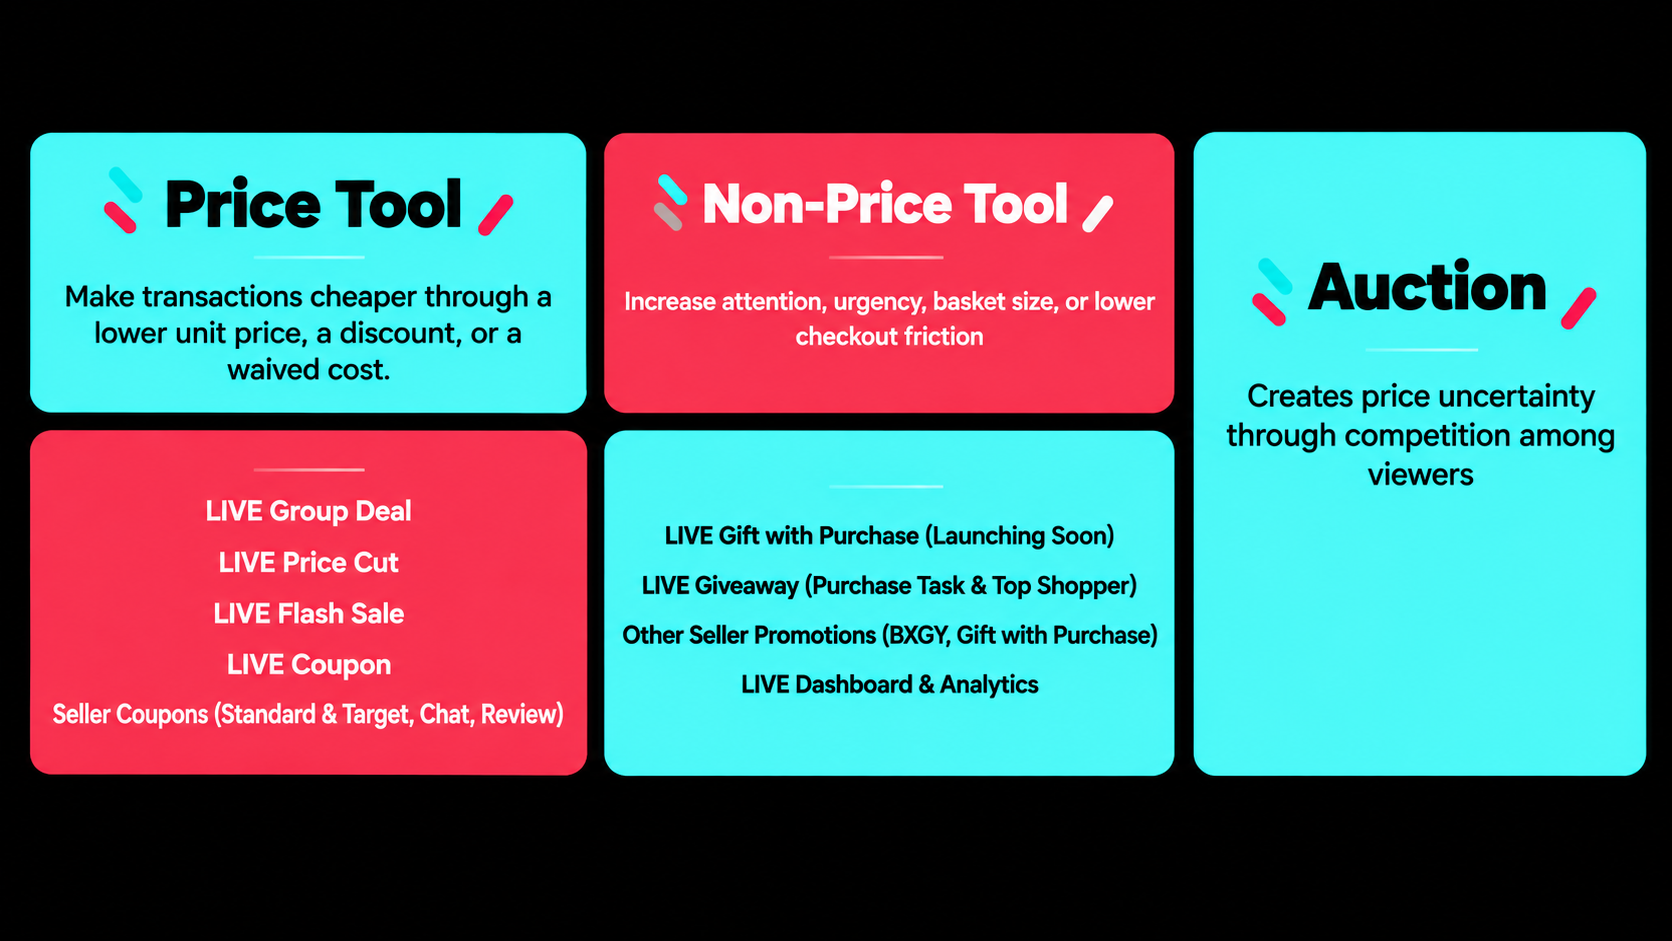
Purpose This playbook covers every tool whose primary job is turning an already-watching viewer into a buyer – what each tool is, why it drives conversion, how to set it up, and how the tools combine along the shopper decision funnel. Every tool in this kit converts by removing one of 2 kinds of barrier: it either makes the transaction cheaper, or it removes a non-price barrier – attention, urgency, basket size, or checkout friction – without touching the price at all. This edition organizes the entire toolkit around that split, because using a price tool where a non-price tool would have worked leaves margin on the table for no conversion gain, and using a non-price tool where price is the real objection wastes the moment. For the traffic-driving toolkit (tools whose primary job is bringing viewers into the LIVE), see the companion playbook. LIVE Giveaway, Seller Coupons, LIVE Dashboard & Analytics, and LIVE Auction appear in both because they genuinely serve both goals.
Conversion Tool Overview & Operating Framework
The conversion toolkit follows the shopper decision funnel. Don't lead with a discount – build interest first, create confidence through product demonstration, then apply the right incentive to the shopper's actual barrier: price, urgency, basket value, shipping cost, or trust.
Core FrameworkPrice-Reduction Tools – the mechanism is a cheaper transaction: a lower unit price, a discount, or a waived cost. Use these only once price is the diagnosed barrier – the shopper has seen the product, wants it, and is hesitating specifically over cost. Non-Price-Reduction Tools – the mechanism is something other than price: attention, urgency, reward, or reduced friction. Use these first, and for every barrier that isn't actually about cost – interest, basket size, checkout friction, and most urgency.
The Conversion Toolkit at a Glance
Price-Reduction Tools
Tool
Mechanic Type
Use It When…
Pairs Best With
Interactive collective pricing
You want communal excitement around a hero product – pre-authorized payment converts the moment a group fills.
, to time the pitch to click/comment spikes; pin the product during the preheat window.
Interactive collective pricing
Same communal-excitement goal as Group Deal, but you want a live, narratable price that visibly drops as more people join.
A host script that narrates the price in real time; to track participation.
Time-boxed urgency
You want pure countdown urgency on a specific SKU without needing interactivity – rotate it across hero SKUs instead of exhausting stock in one sweep.
An explicit host countdown cue; per-SKU purchase limits to allow reuse later in the same LIVE.
Price / friction removal
A viewer has already shown interest (comment spike, product-click spike) and you need the fastest click-to-cart-to-checkout bridge – no save-for-later behavior exists.
Deploy at the moment of expressed interest, not pre-announced early, so it converts warm intent before it cools.
(, , )
Segmented price incentive
You need a non-interactive discount for a specific audience: new/repeat customers (), an active chat conversation (), or a post-purchase review ask ().
segments to decide who receives a Coupon; customer service workflows for Coupon.
(Product Discount, Promo Code, Shipping Discount)
Price / friction removal
A straightforward price cut, shareable code, or shipping-cost removal.
Shipping Discount for cart-abandoners specifically.
Non-Price-Reduction Tools
Tool
Mechanic Type
Use It When…
Pairs Best With
LIVE Gift with Purchase (Launching Soon)
Reward / basket incentive
A LIVE-native complimentary-item mechanic once launched – check back for configuration detail.
Basket-expansion moments alongside BXGY and Top Shopper Giveaway.
(Purchase Task & Top Shopper)
Basket expansion / direct conversion
You want to make the Giveaway itself a reason to buy – the Purchase task requires a purchase to qualify, and Top Shopper rewards higher spend by ranking on GMV.
A prize that justifies buying or spending more; run alongside a live leaderboard callout for Top Shopper.
(BXGY, Gift with Purchase)
Price / basket / friction removal
The mechanic doesn't need to be interactive – a straightforward basket threshold reward or complimentary item.
BXGY / Gift with Purchase for basket-expansion moments.
Measurement layer
Continuously – to decide which products deserve more airtime, and to spot demonstrated intent (clicks, cart adds) worth a post-LIVE follow-up.
Every mechanic above – it's the signal for when and where to apply each one.
Urgency + competition
You have a unique, collectible, or limited-quantity item and want competitive pressure on top of a hard deadline.
Rotate with Flash Sale rather than stacking both – layered urgency reads as manipulative.
Priority: Sequencing Mechanics within a LIVE
Conversion tools aren't interchangeable – using the wrong one at the wrong funnel stage either leaves money on the table or trains viewers to wait for a bigger discount. Work through this sequence:
Demonstrate before discounting. Hold attention with product demos, comparisons, and proof points – via , , or plain hosting – before any price mechanic appears. Use 's click and engagement signals to decide which products deserve more airtime.
Use exactly one hero price-evaluation mechanic at a time. For communal excitement, or . For pure urgency, . For high-spend competition, Top Shopper . For unique items, . Don't run two hero mechanics simultaneously.
Layer supporting incentives only when they solve a named barrier. Add when price resistance remains; add Shipping Fee Discount when checkout cost is the issue; add Gift with Purchase or BXGY when basket size is the objective. Never add an incentive without a barrier it's removing.
Rotate urgency instead of stacking it. 's dual timers and 's hard countdown both manufacture urgency – rotate them around hero SKUs rather than running every urgency tool at once. Stacked urgency reads as manipulative and trains viewers to tune it out.
Close with targeted recovery, not a blanket message. After the LIVE, use to follow up with cart abandoners, product clickers, new followers, and buyers – each with a different, relevant message.
Shopper Decision Funnel and Tool-to-Barrier Map
Funnel Stage
Shopper Question
Best-Fit Tools
Tool Type
Why This Fits (and What to Avoid)
Product Interest
"Why should I care?"
, ,
Non-Price
Hold attention with demos and interaction before any discount appears. Watch the 's click and engagement signals to decide which products deserve more airtime – don't guess.
Price Evaluation
"Is this a good deal?"
, , , Product Discount
Price
and work because the price or progress is visible in real time – social proof does the persuading, not the discount alone. Use or Product Discount when the mechanic doesn't need to be interactive.
Urgency
"Why buy now?"
,
Price
's dual timers (countdown + duration) manufacture a real deadline. 's hard countdown adds competitive pressure on top. Rotate urgency tools around hero SKUs rather than running every one at once – stacked urgency reads as manipulative and trains viewers to tune it out.
Basket Expansion
"Should I buy more?"
BXGY & Gift with Purchase, (Top Shopper)
Non-Price
Bundle complementary products and make the incremental benefit easy to understand. Top Shopper is strongest when the prize justifies higher spend.
Checkout Friction
"What stops me from completing?"
Shipping Fee Discount, Seller , Coupons
Price
Deploy Shipping Fee Discount or a final coupon only for viewers who clicked but didn't purchase. 's Abandoned Cart and Incomplete Checkout Reminders are the only tools purpose-built for this stage – use them post-session on demonstrated intent, not cold traffic.
Repeat Purchase
"Why come back?"
Coupon, Seller , ,
Non-Price
Coupon collects volume and credibility (negative reviews qualify too) rather than inflating ratings. Pair a thank-you with a invite and the next to move buyers into the next cycle.
High-Conversion LIVE Run-of-Show
Open with a low-friction reason to stay. Start with a or follow benefit to stabilize watch time and capture followers.
Demonstrate before discounting. Explain product use cases, proof points, comparisons, and bundles before revealing the strongest offer.
Use one hero conversion mechanic at a time. For communal excitement, use or . For pure urgency, use Flash Sale. For high-spend competition, use Top Shopper . For unique items, use .
Layer supporting incentives only when they solve a barrier. Add when price resistance remains; add shipping discount when checkout cost is the issue; add gift with purchase or BXGY when basket size is the objective.
Close with targeted recovery. After the LIVE, use to follow up with cart abandoners, product clickers, new followers, and buyers. Do not send the same message to every segment.
Brand Live Growth · Conversion-Driving Tools
Live Group Deal
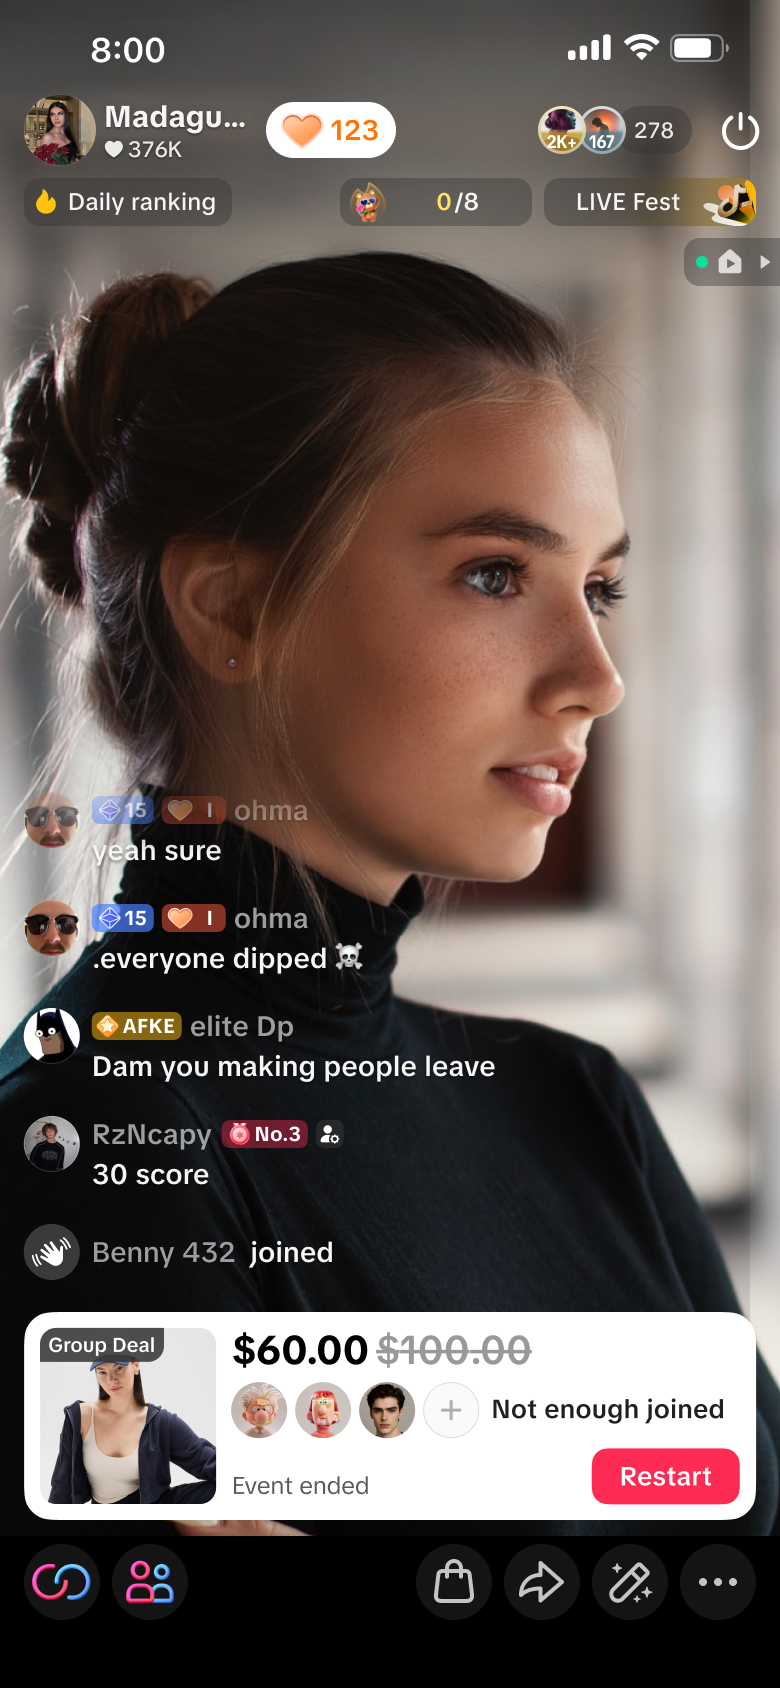
The feature is designed to turn a static promotional discount into a visible, progress-based LIVE activity - giving sellers a way to concentrate order volume while giving shoppers a clear collective goal to unlock the deal price.
What is It?
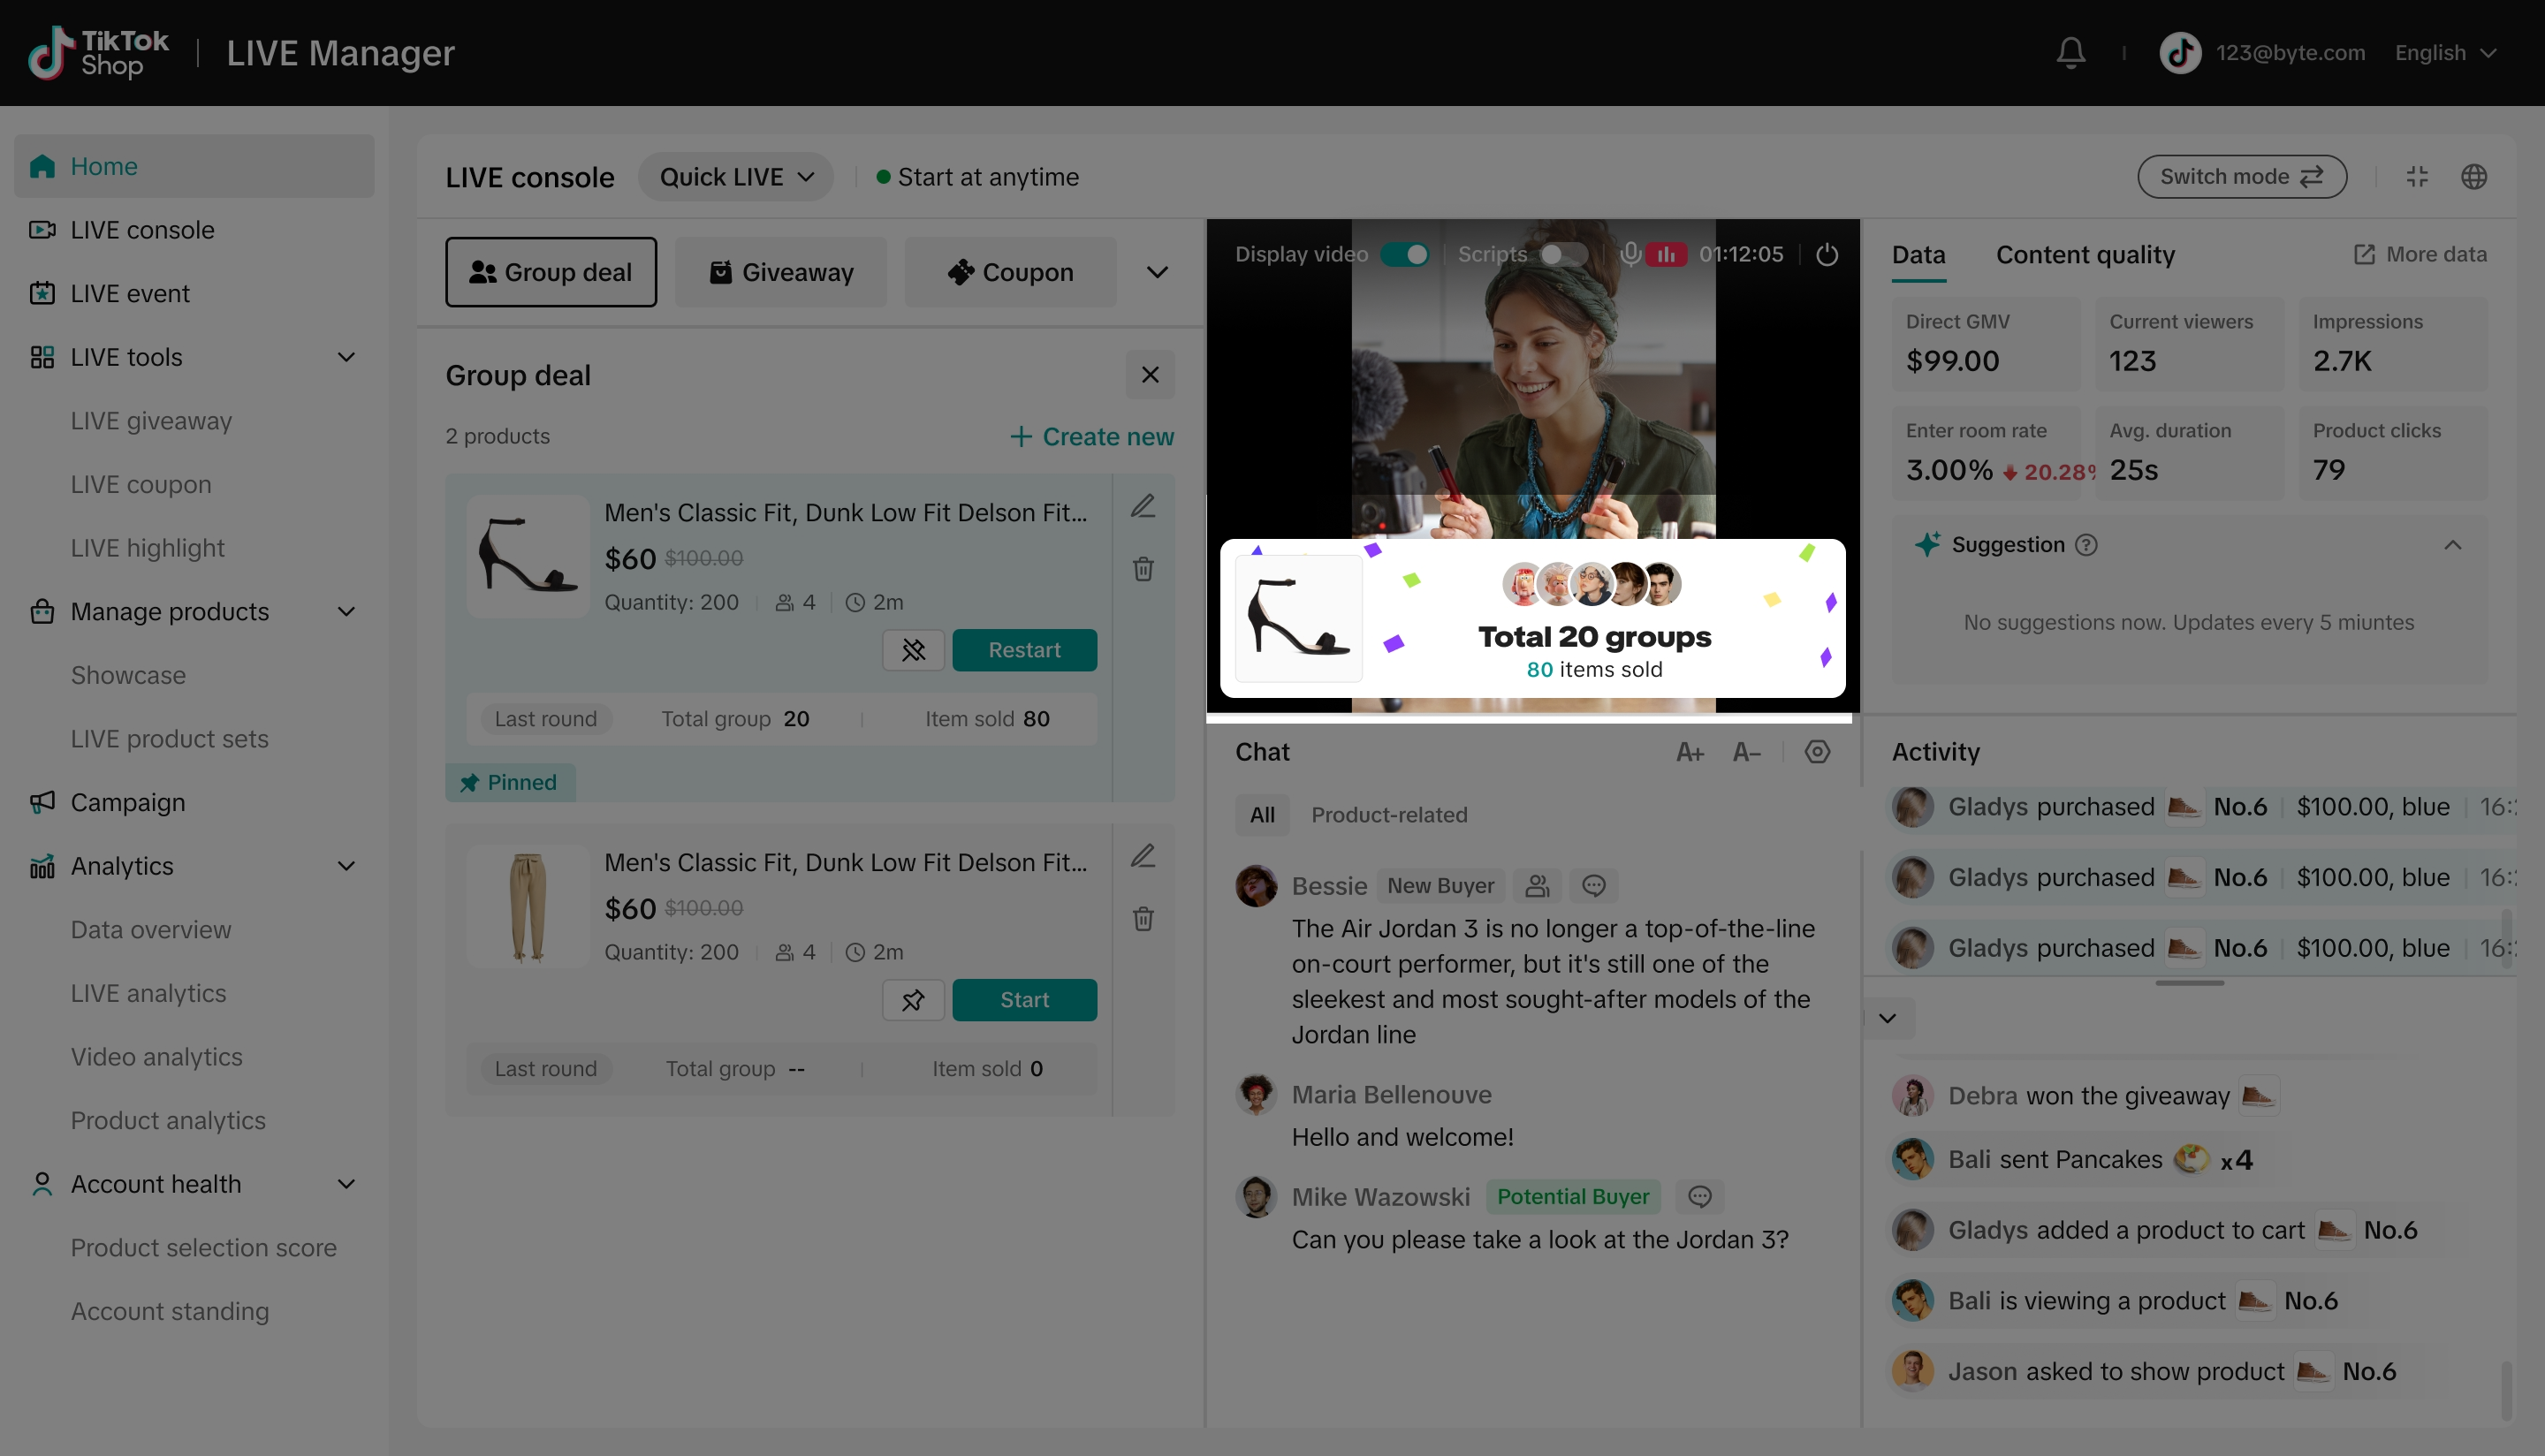
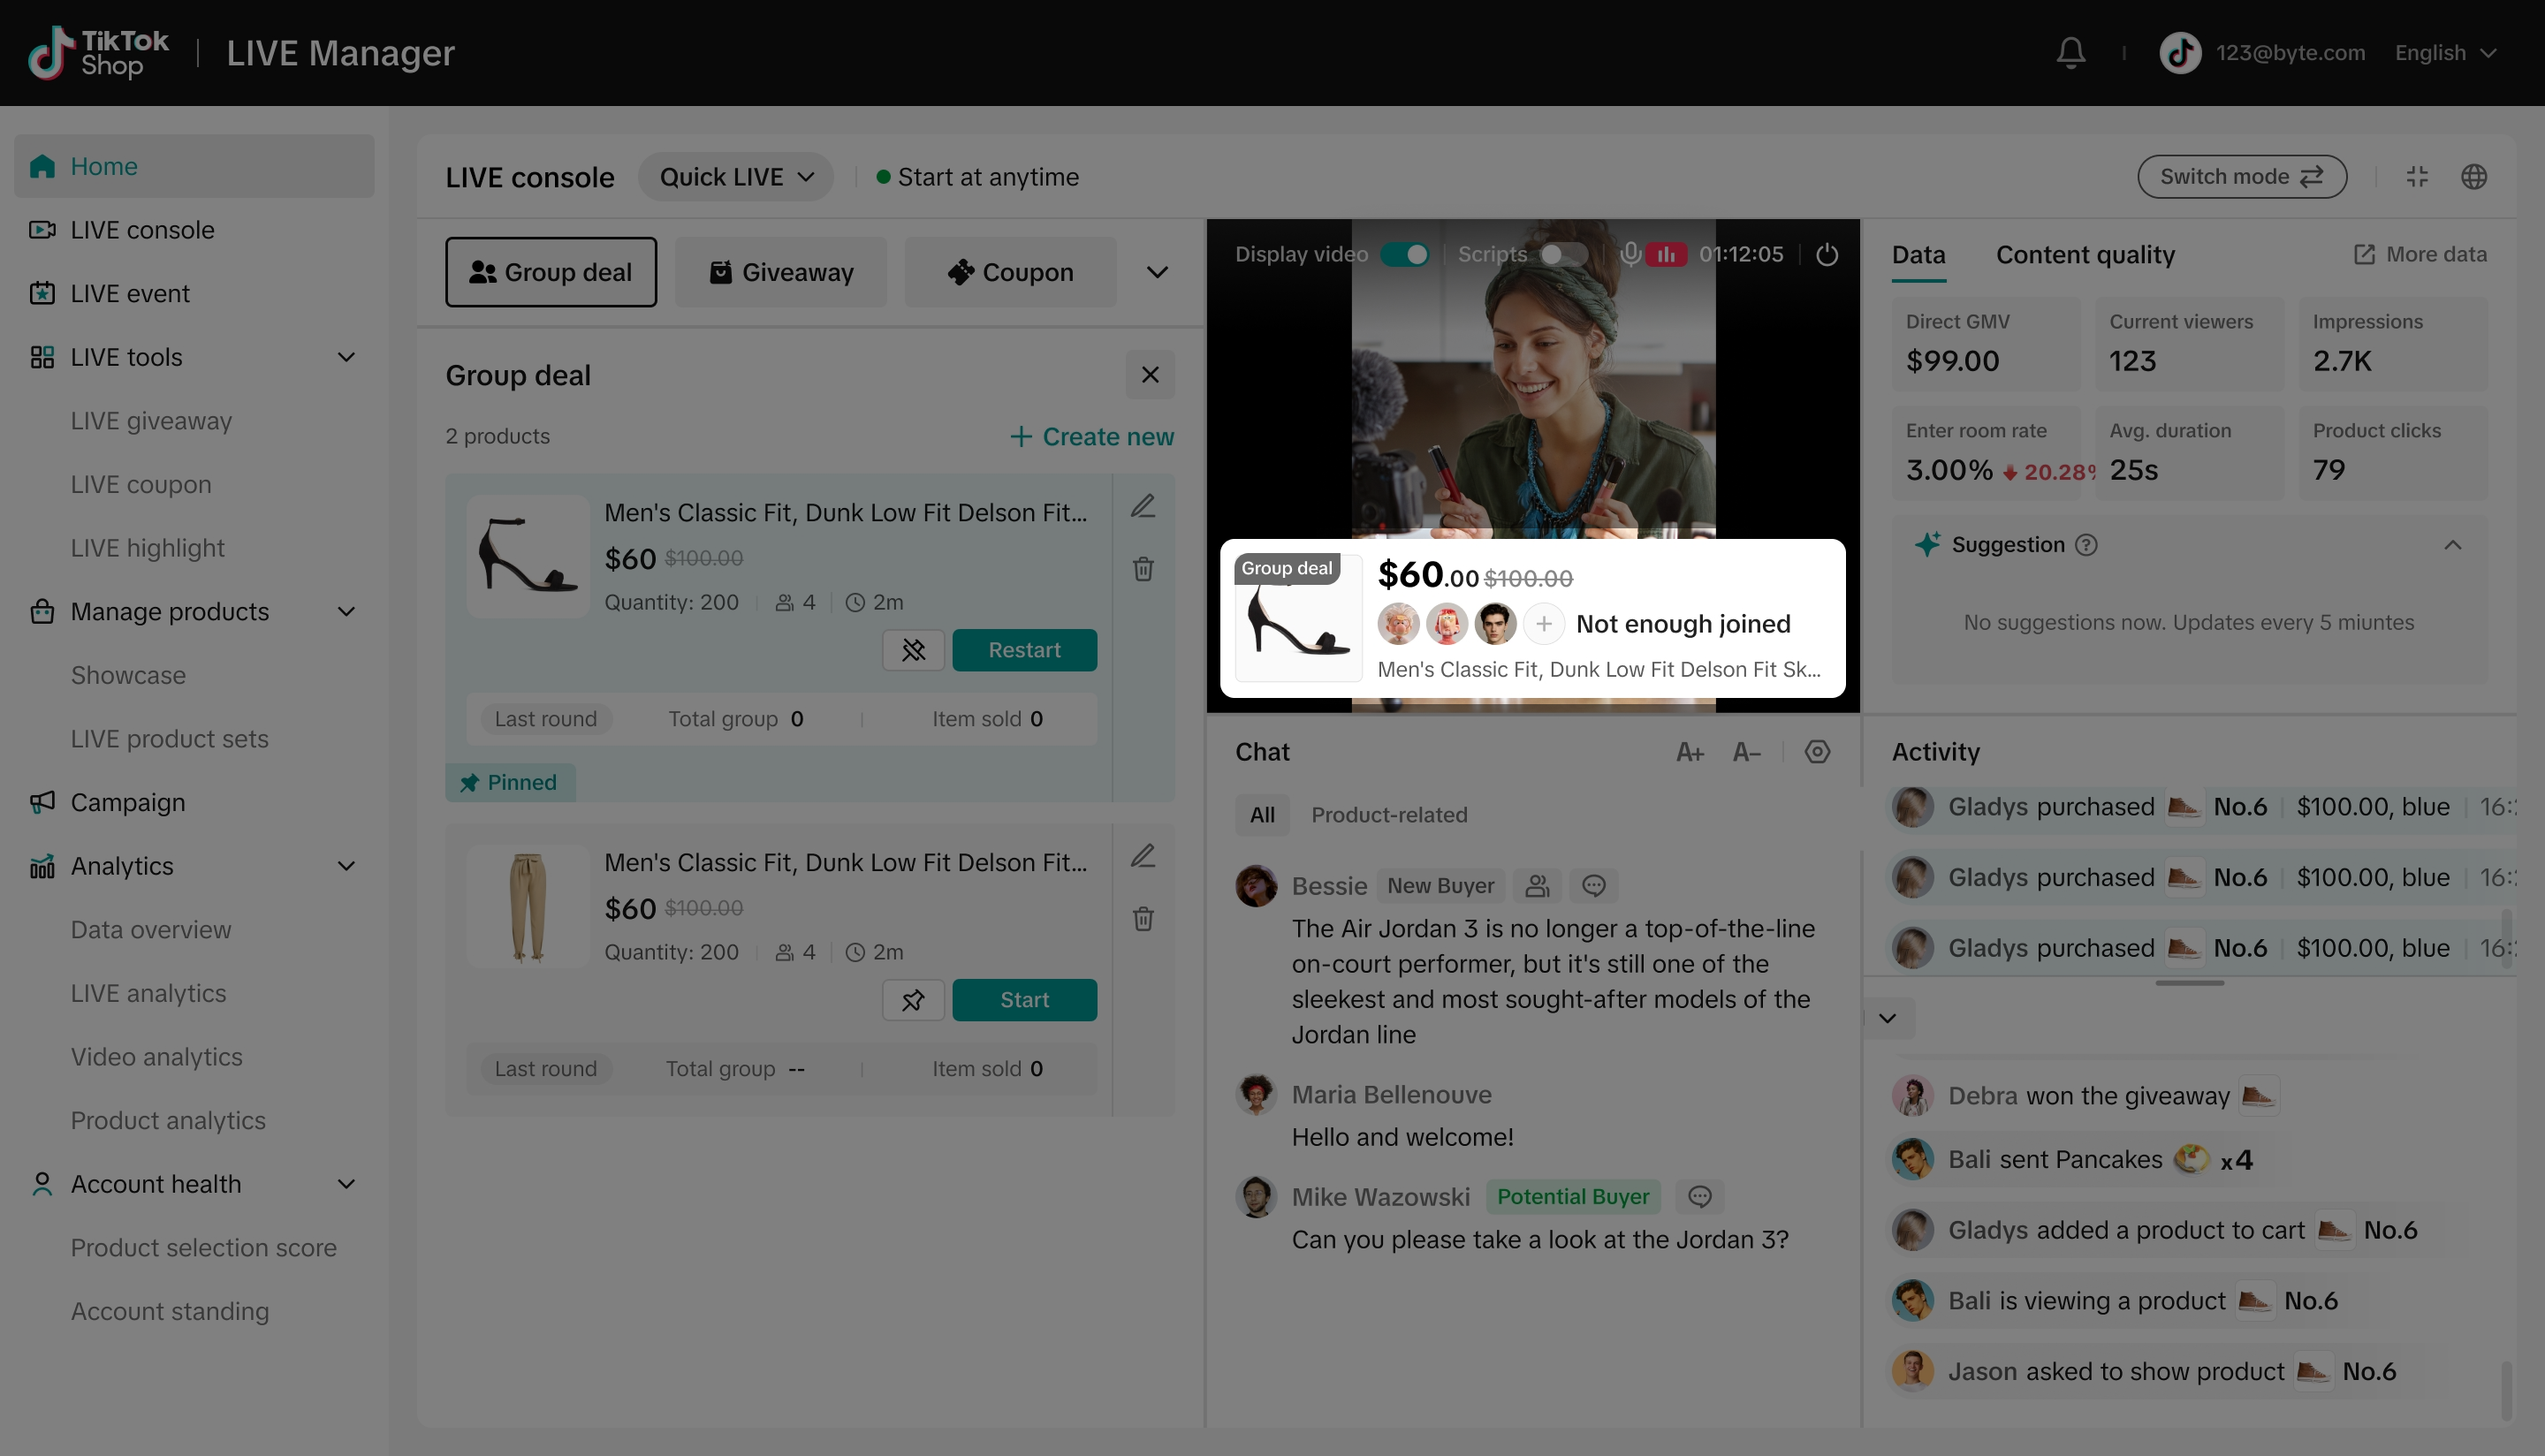
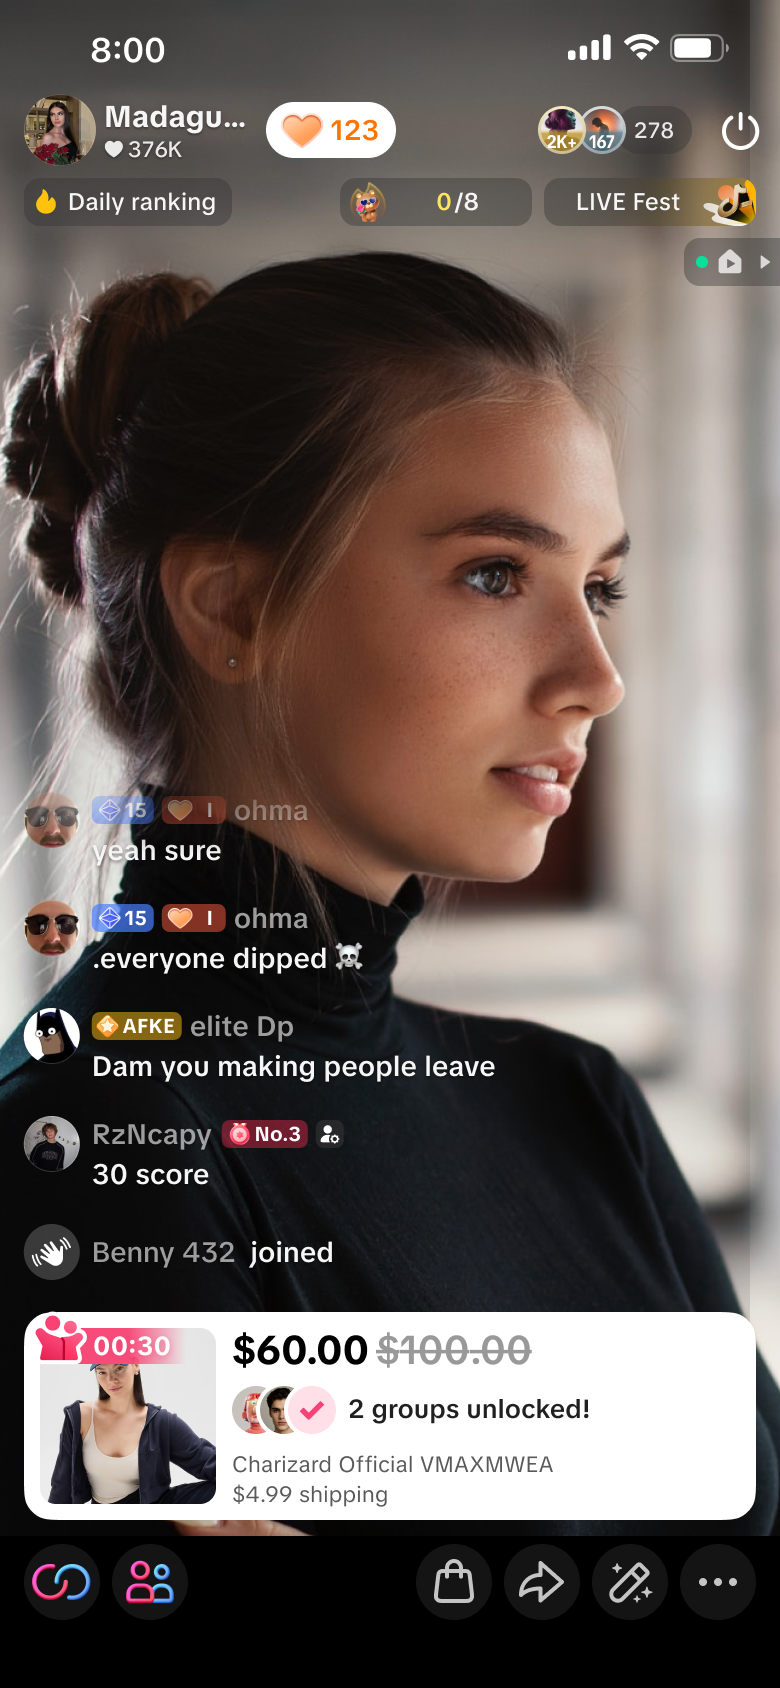
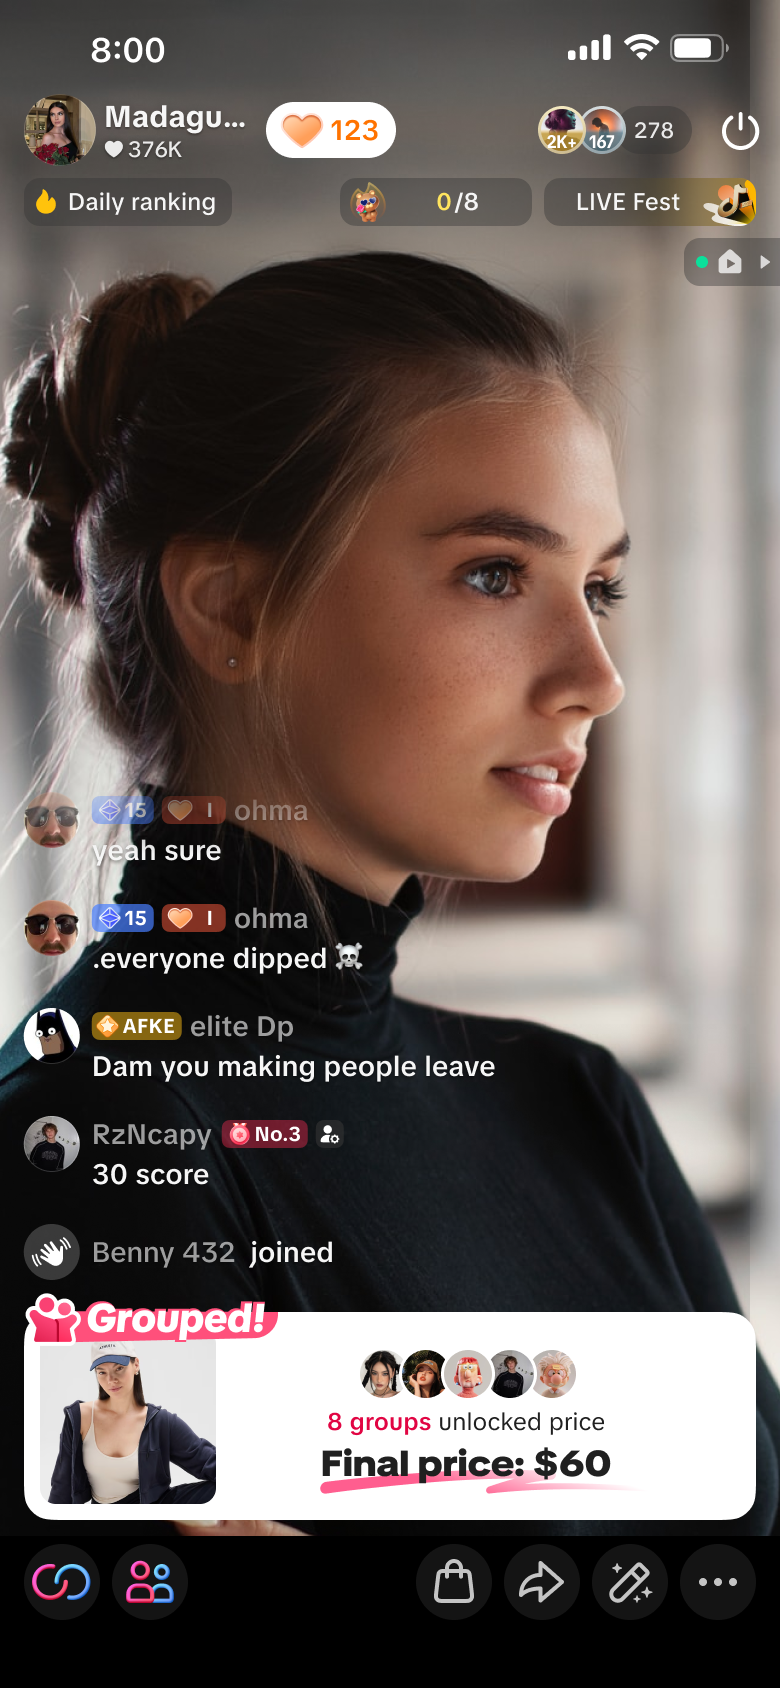
LIVE Group Deal is a new interactive LIVE room mechanic that lets shoppers join small groups to unlock a fixed deal price together. Sellers choose an eligible product and set the Group Deal price, required group size, activity quantity, and activity duration. Shoppers pre-authorize payment when they join. Once a group reaches the required size, the group is settled immediately and participating shoppers are charged automatically; if a group does not fill before the activity ends, shoppers in that incomplete group are not charged. While the activity remains live and stock is available, the next group opens automatically so multiple groups can form within the same activity. The feature is designed to turn a static promotional discount into a visible, progress-based LIVE activity - giving sellers a way to concentrate order volume while giving shoppers a clear collective goal to unlock the deal price.
Why it drives conversion?
Pre-authorization at join removes the checkout-decision step entirely for winners – unlike a coupon, which can still be abandoned at cart, a filled Group Deal charges automatically. That converts idle interest into a locked commitment the moment someone taps join.
The visible, real-time group-fill count ("3 of 5 needed") is social proof a static discount can't offer: viewers see other shoppers already committing to the same product, which softens the "is this a good deal" hesitation in the Price Evaluation stage.
Automatic rollover into the next group means one well-explained pitch can keep converting for the whole activity window without the host re-pitching from scratch.
How to set it up?
Step 1
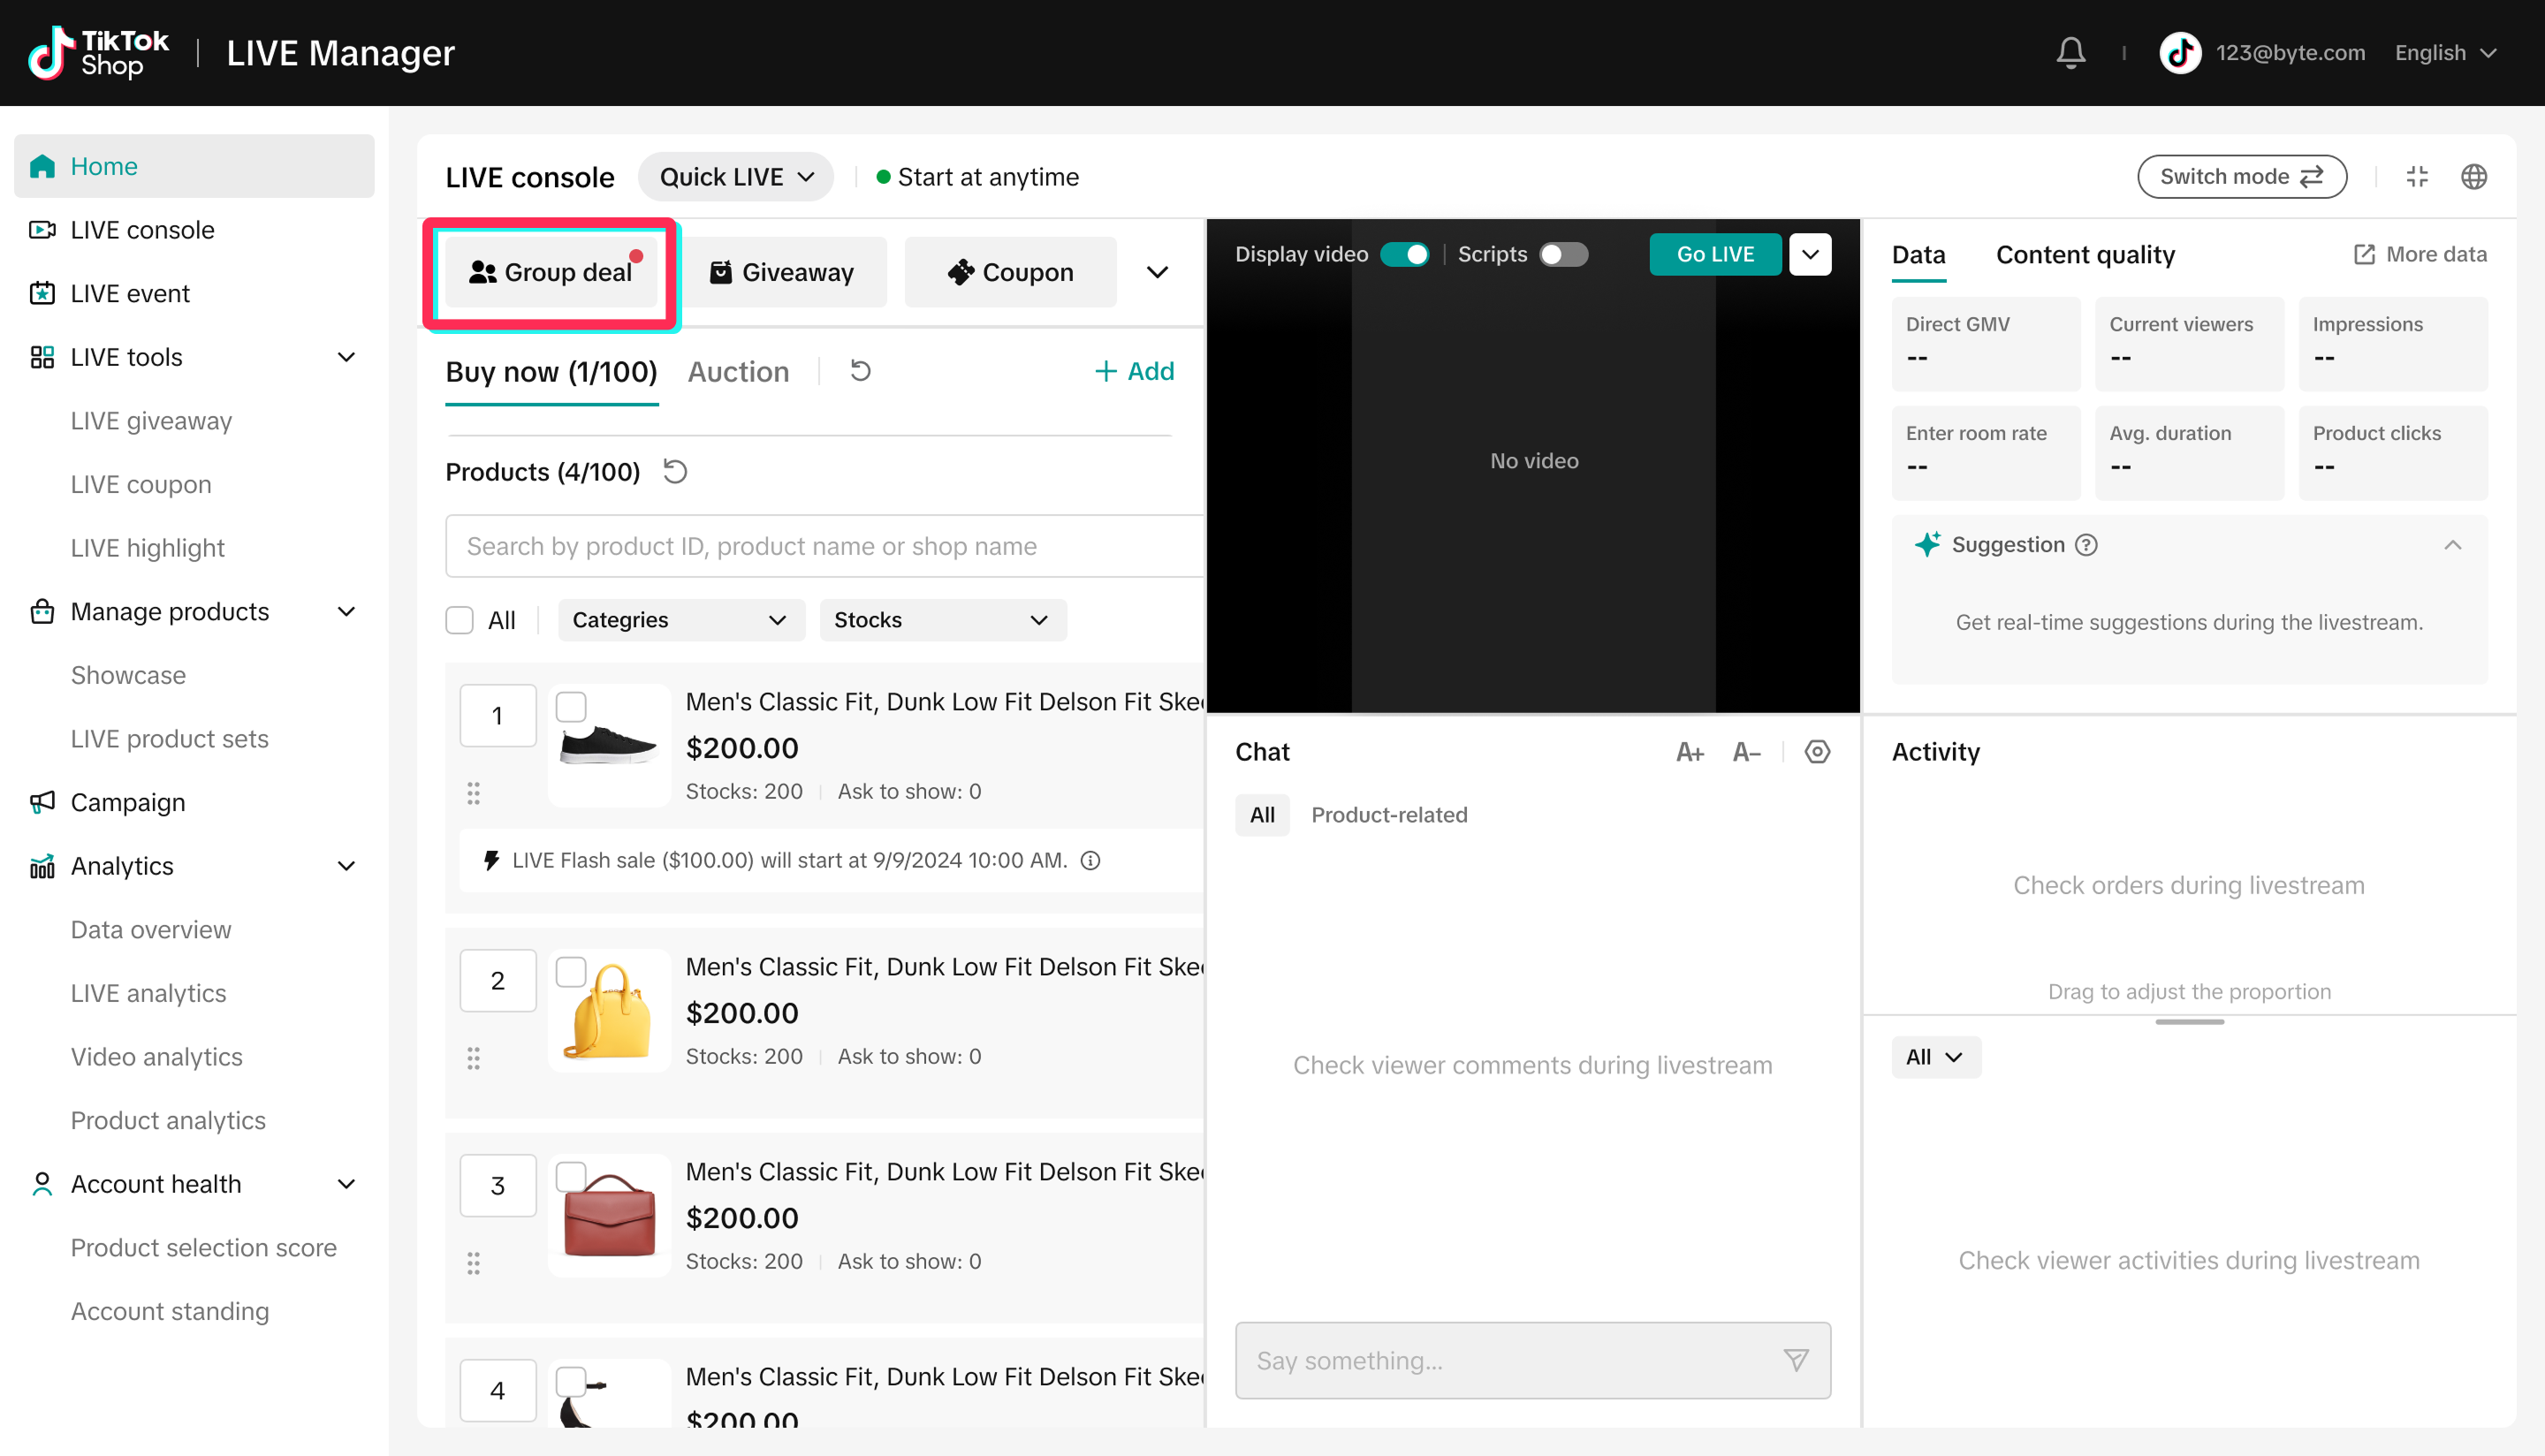
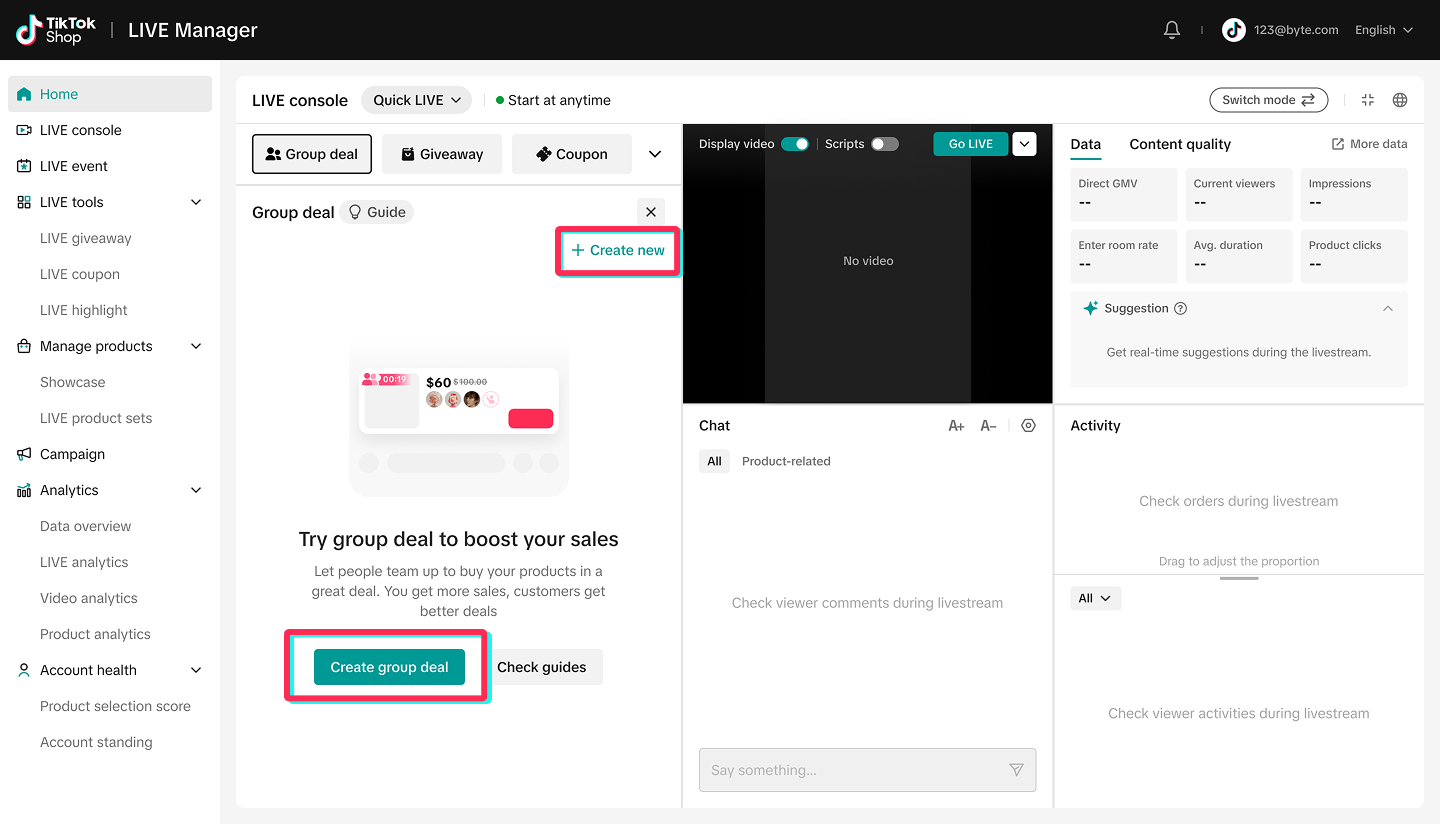
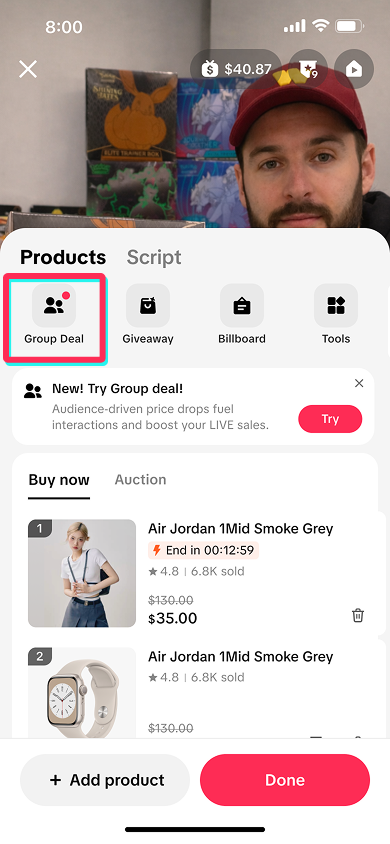
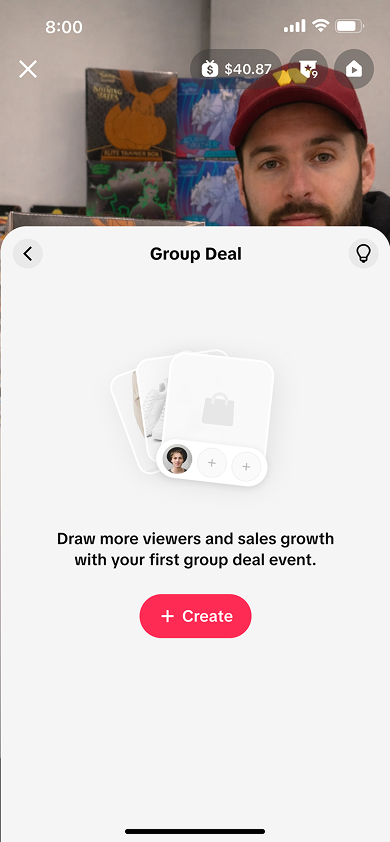
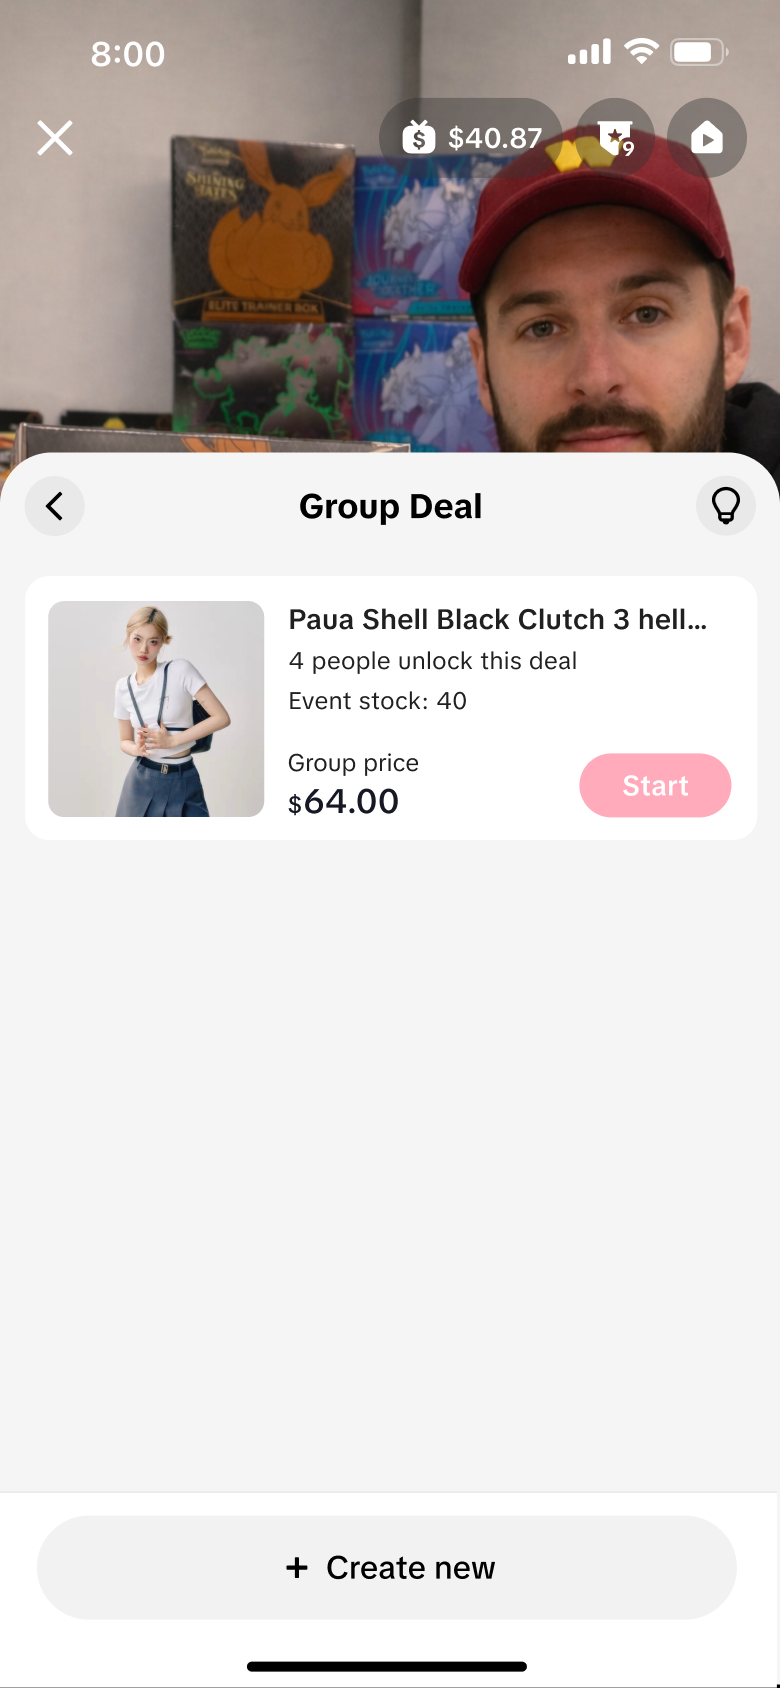
Step 1: Access the Feature Before or during LIVE, open LIVE console and enter the Group Deal tab and access the feature.
Desktop
Mobile
Step 2
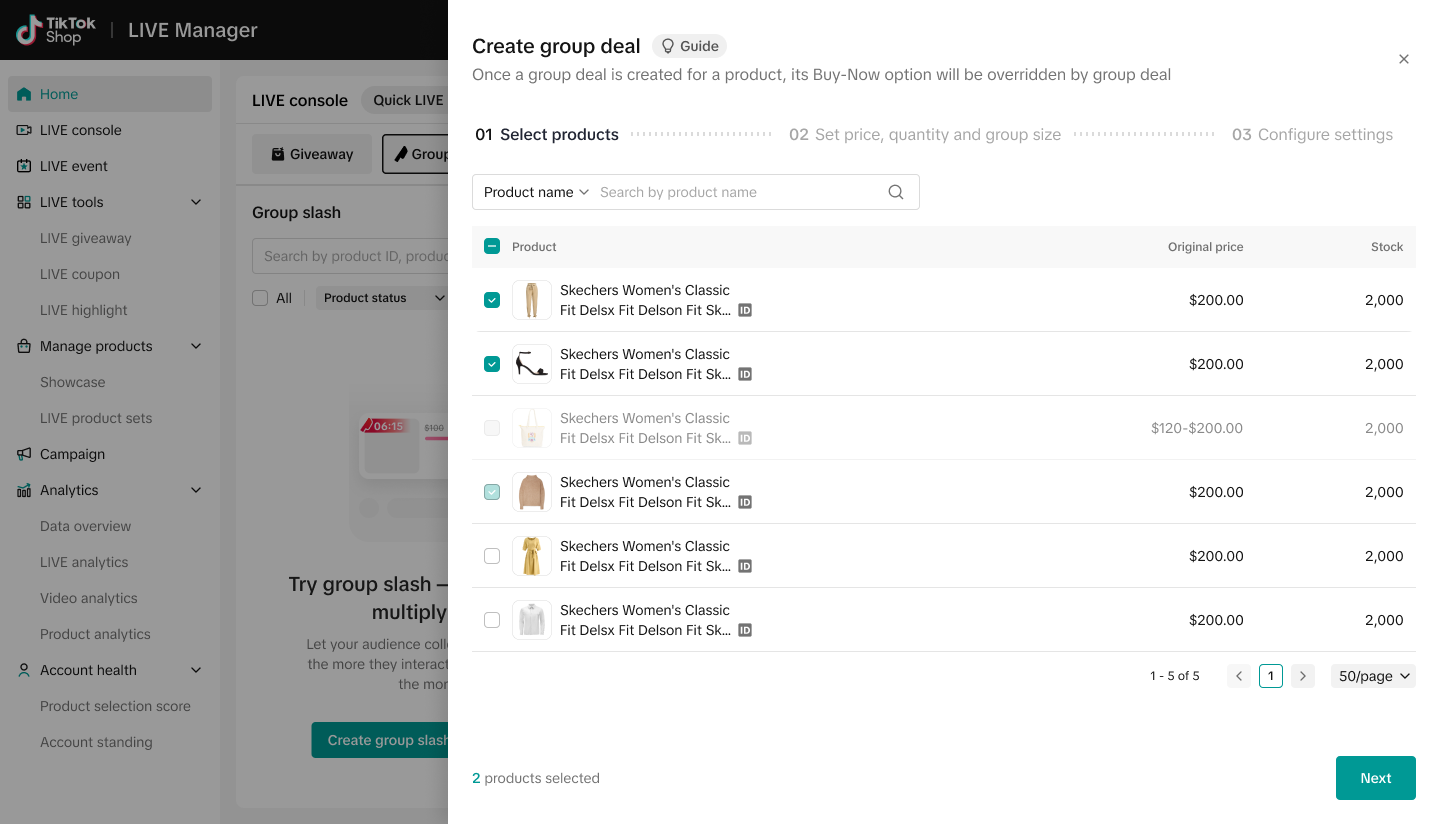
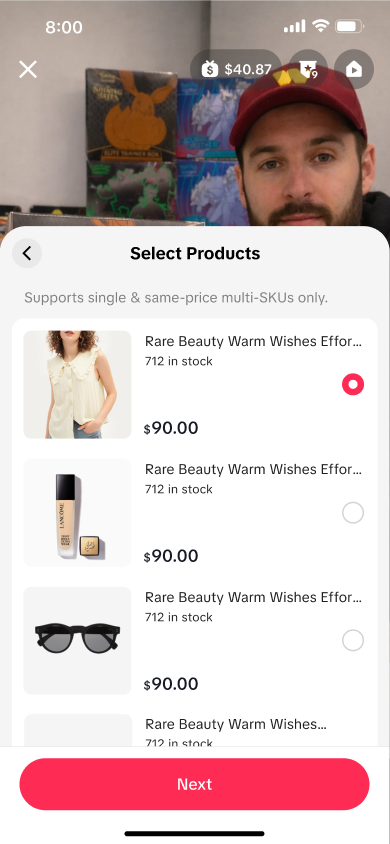
Step 2: Select the Products Choose an eligible product. Adding the product through the Group Deal tab also adds it to the shopping bag.
Note that only products with one selling price across SKUs are eligible in Phase 1.
DesktopMobile
Step 3
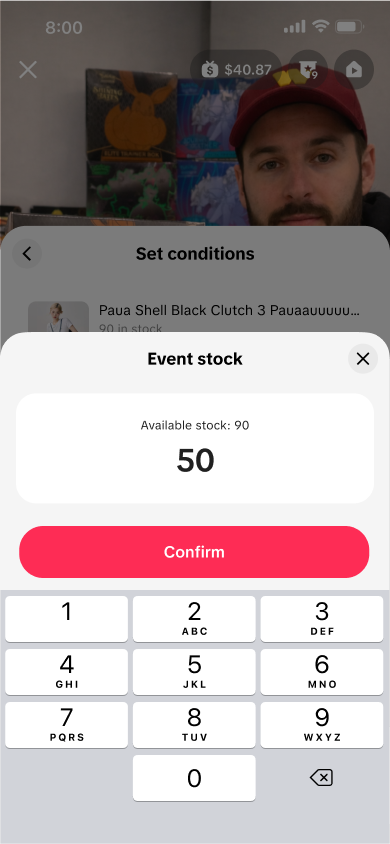
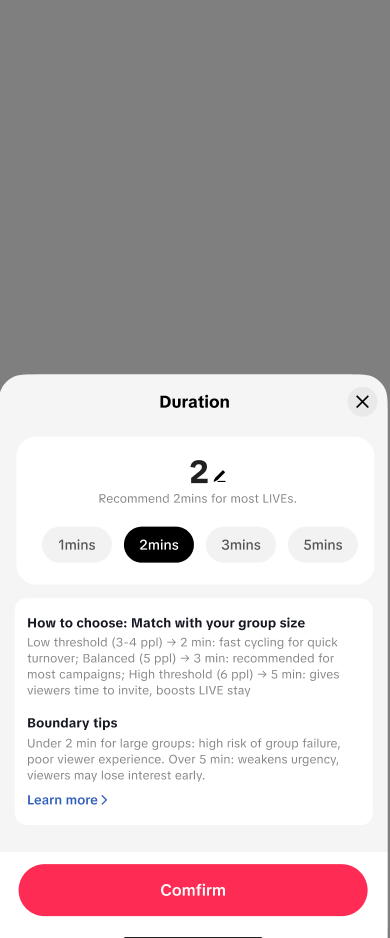
Step 3: Configure the Activity
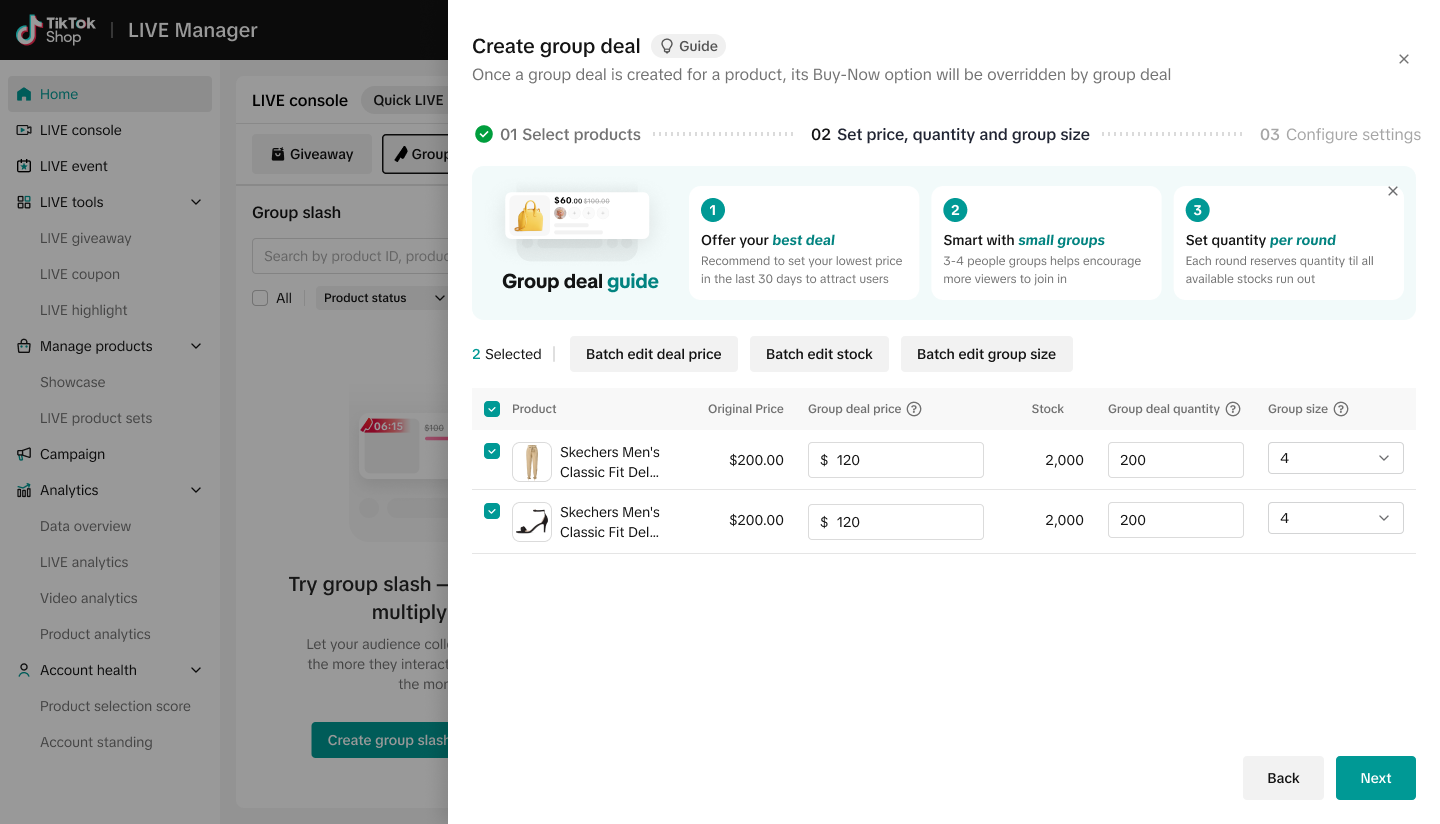
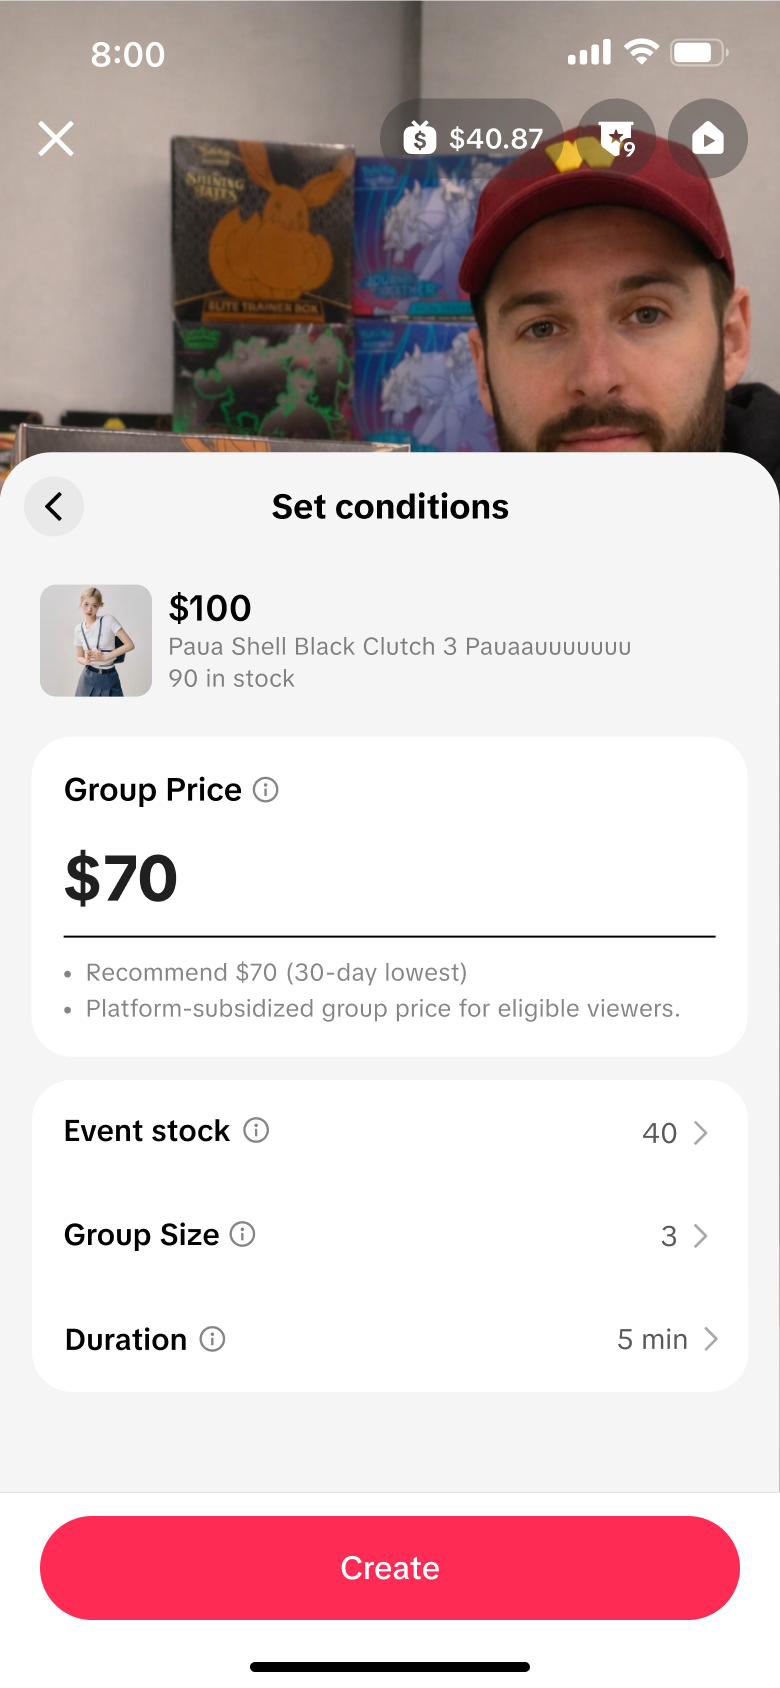
Set group deal price: how much the audience will pay when the set group size / the number of shoppers joining in one group is reached.
Group deal quantity: the total product quantity allocated for this group deal
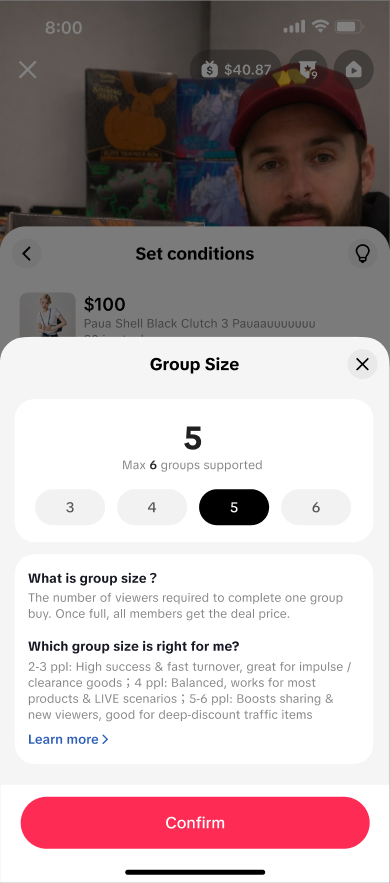
Group size: the number of shoppers joining in one group in order to unlock the group deal orice.
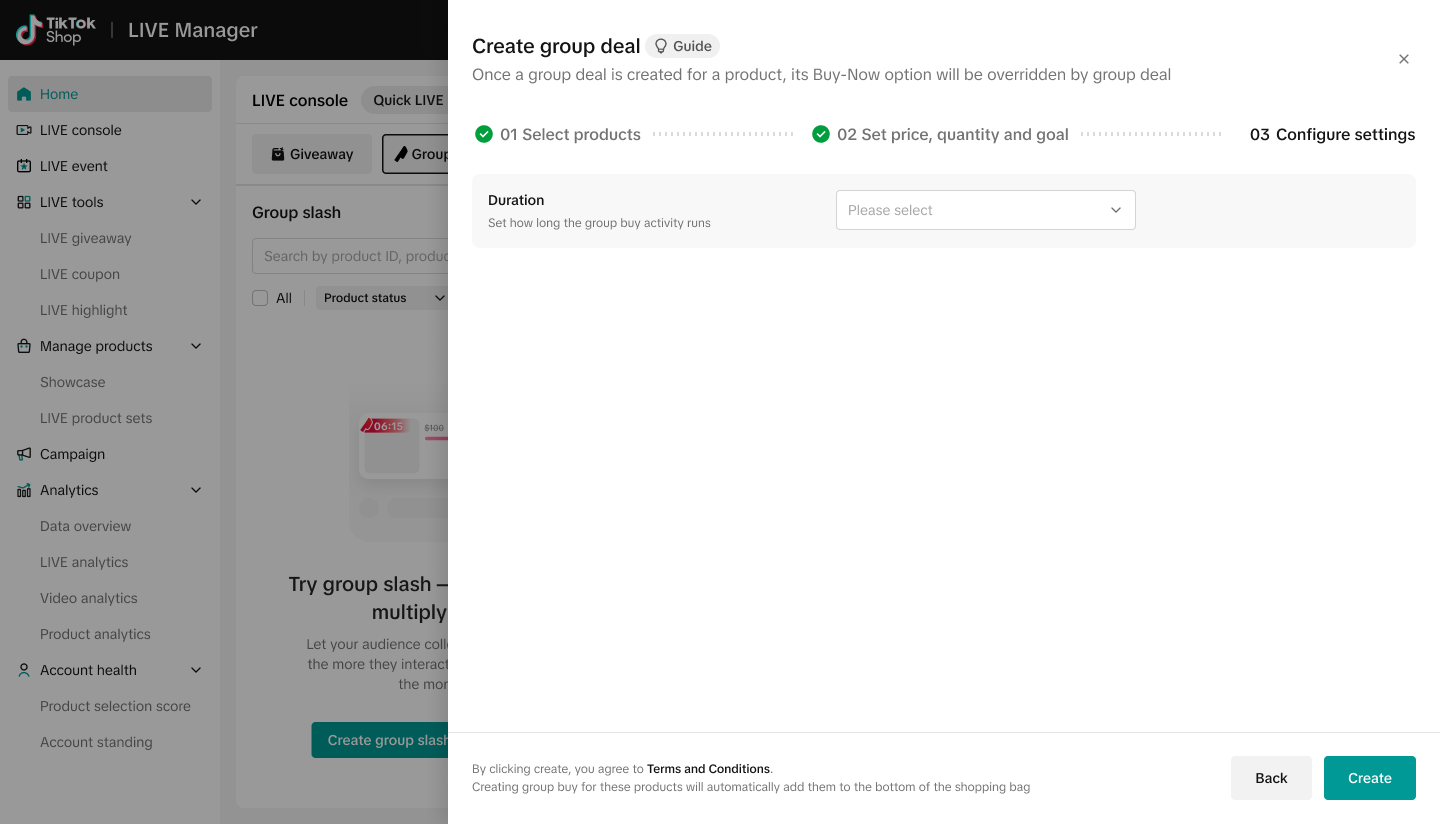
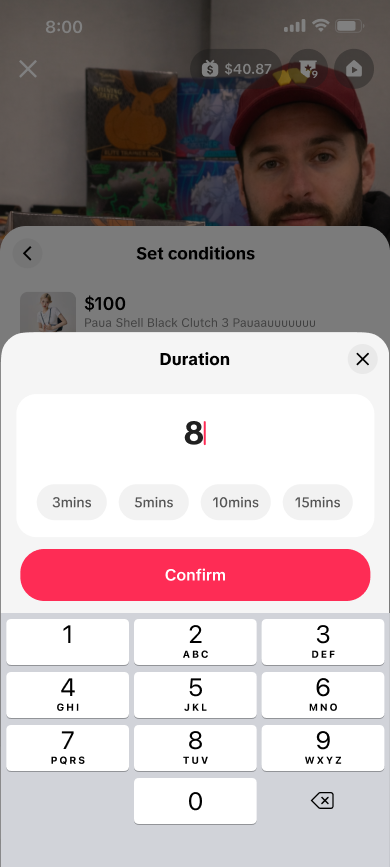
Duration: how much time is allocated for shoppers to join the group deal activity.
For example, if a seller sets the group size = 5, and the group deal price = $10, and the group deal quantity = 50, and the duration = 5min. If 28 shoppers joined the group deal in the 5min time frame, they will form 5 groups, so the first 25 shoppers will successfully unlock the group deal price of $10, the last 3 customers will fail to unlock the group deal price and the order will not go through.
Desktop
Mobile
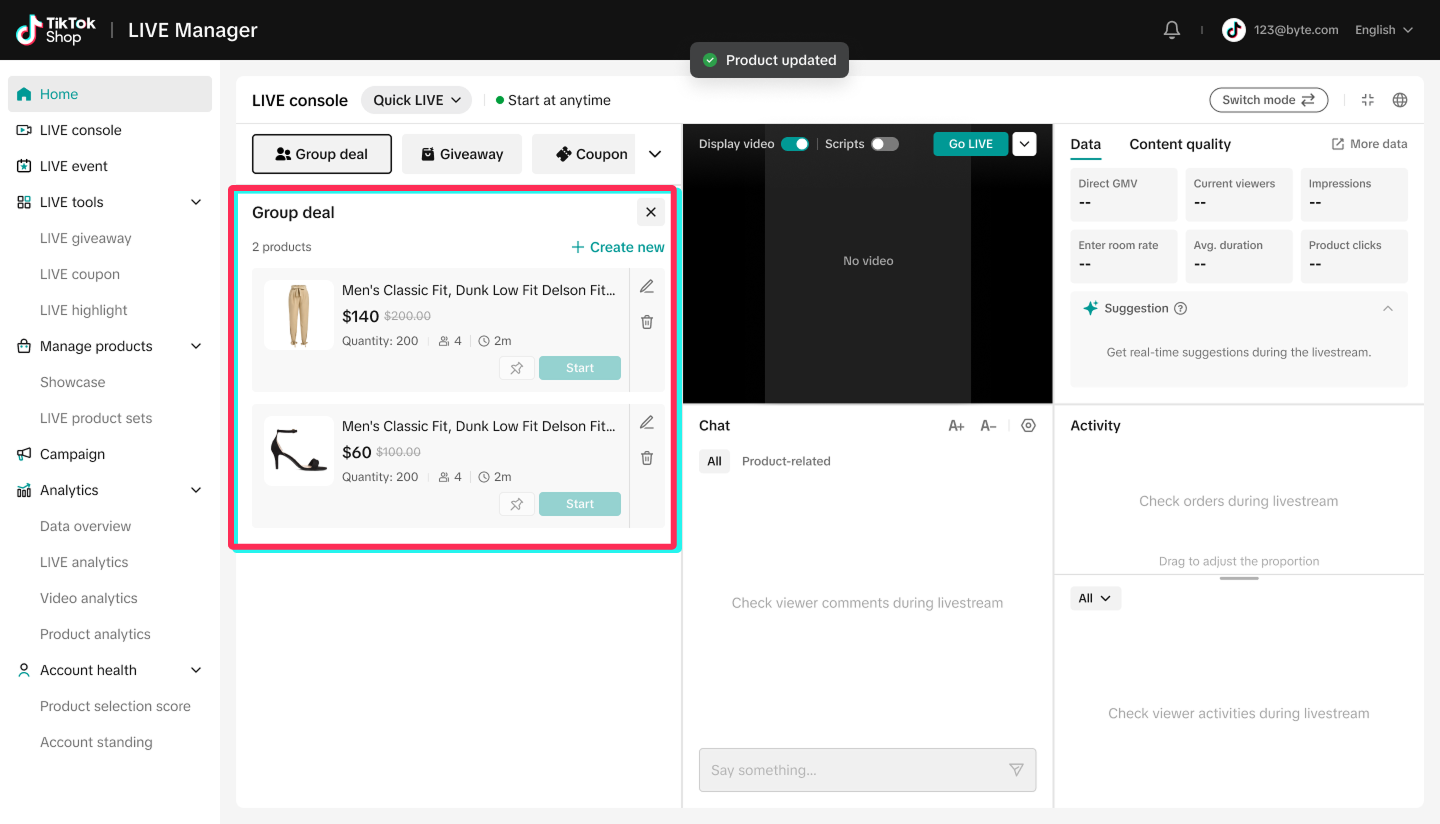
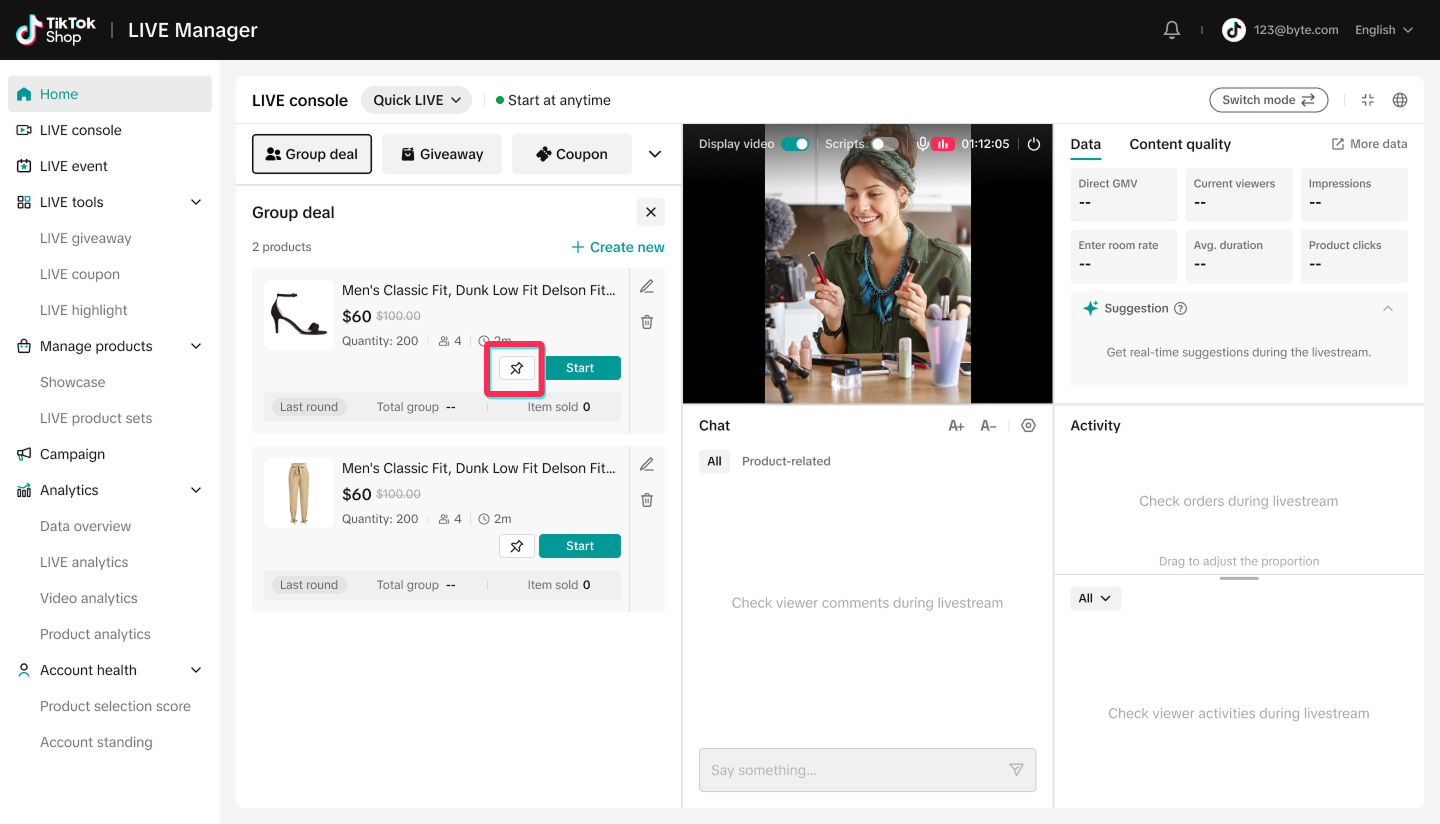
Step 4
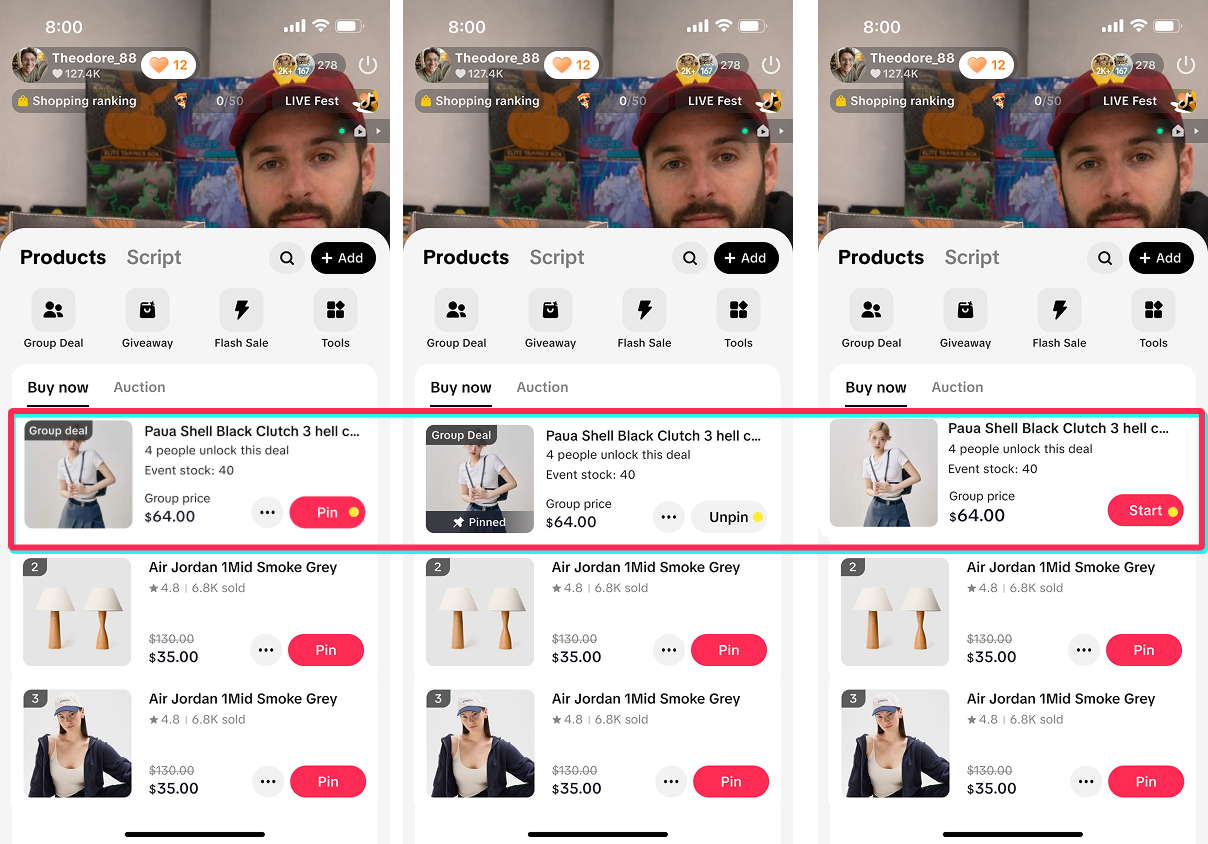
Step 4: Publish and Warm up Once created, the product enters the upcoming / preheat state. Before starting, pin the Group Deal product to build awareness and purchase intent.
Desktop
Mobile
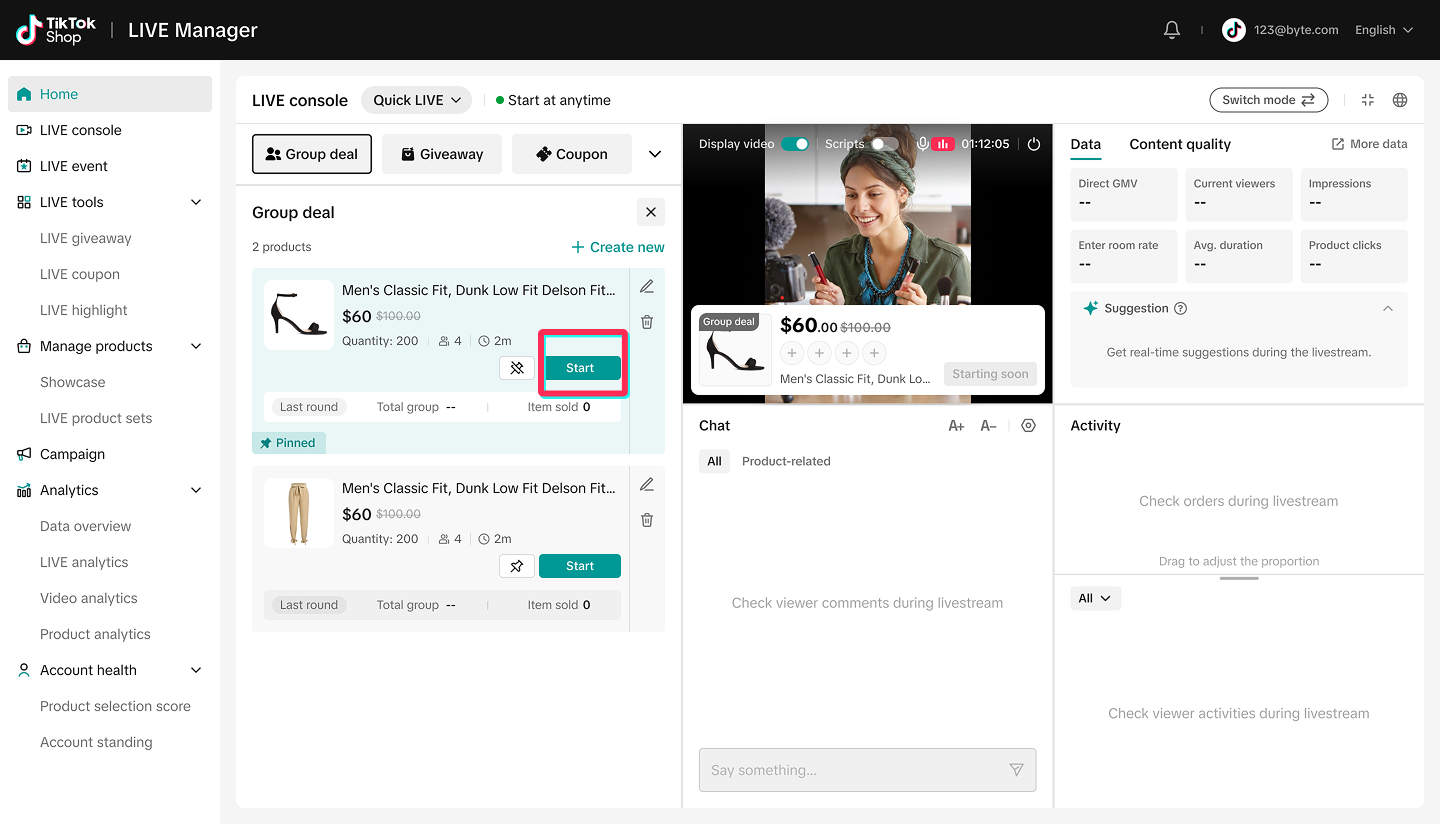
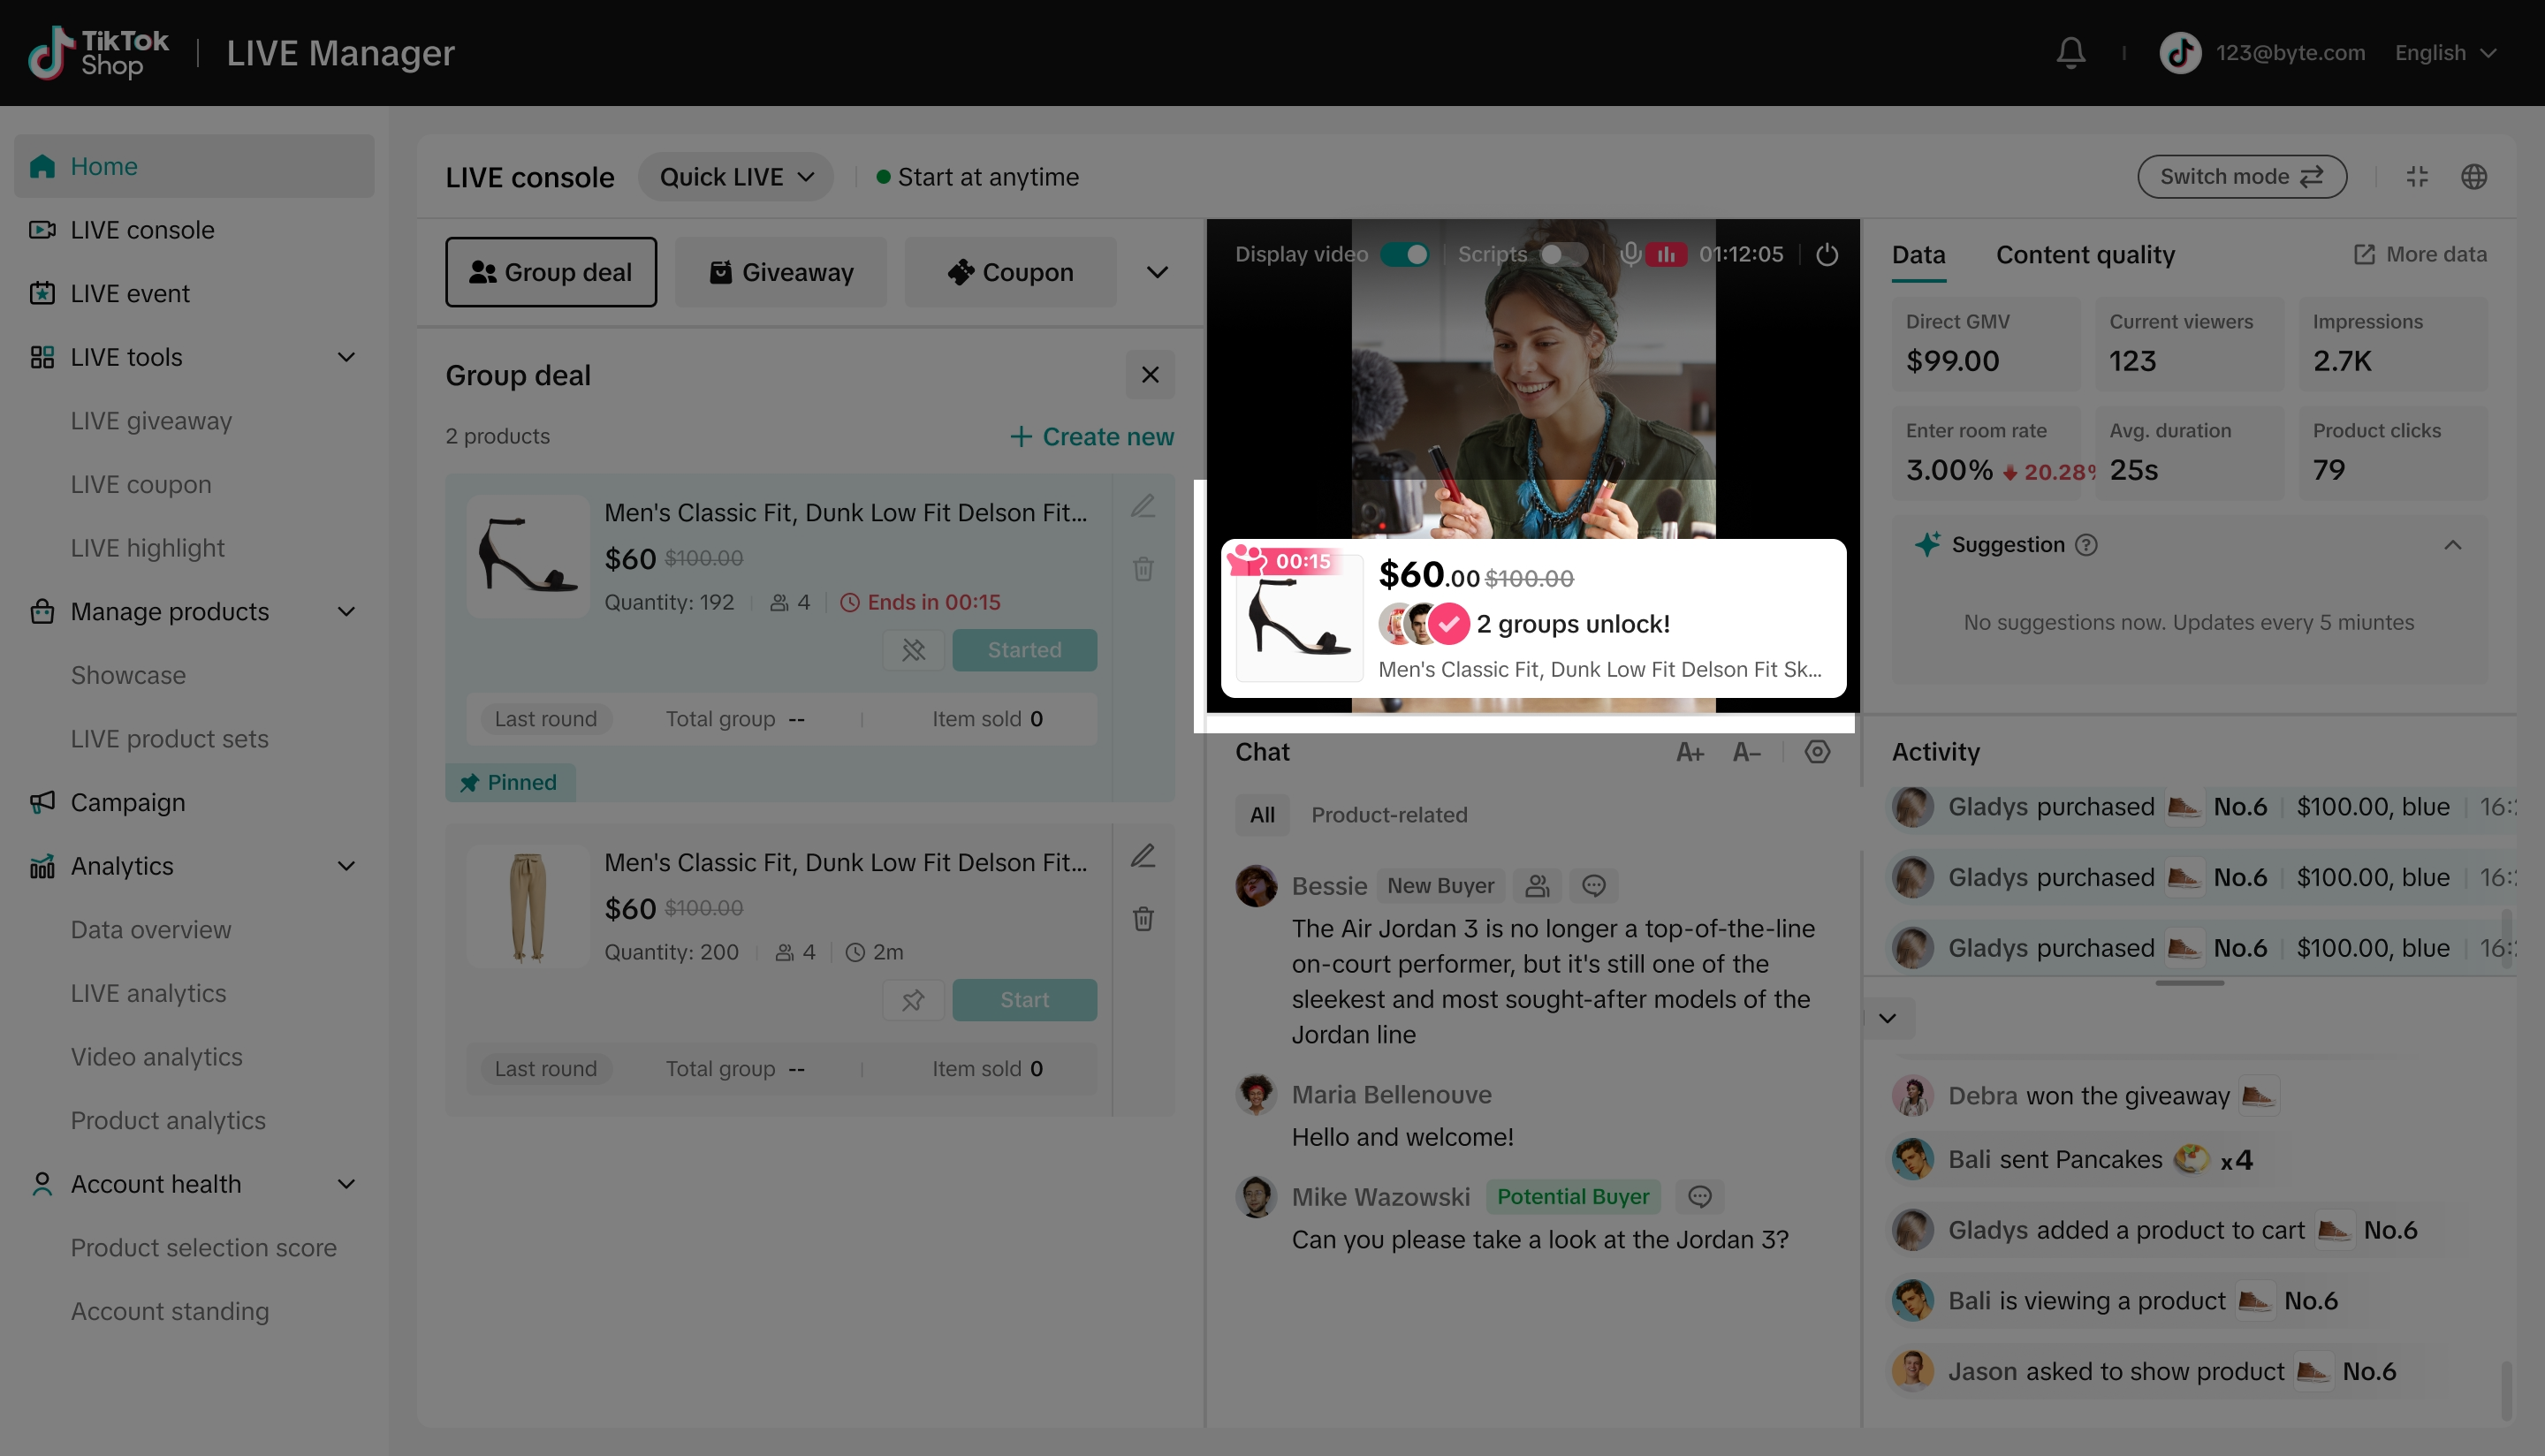
Step 5
Step 5: Start the Activity Track groups formed, activity quantity, and remaining time. Each full group settles immediately and the next group opens automatically until the activity ends or stock is exhausted.
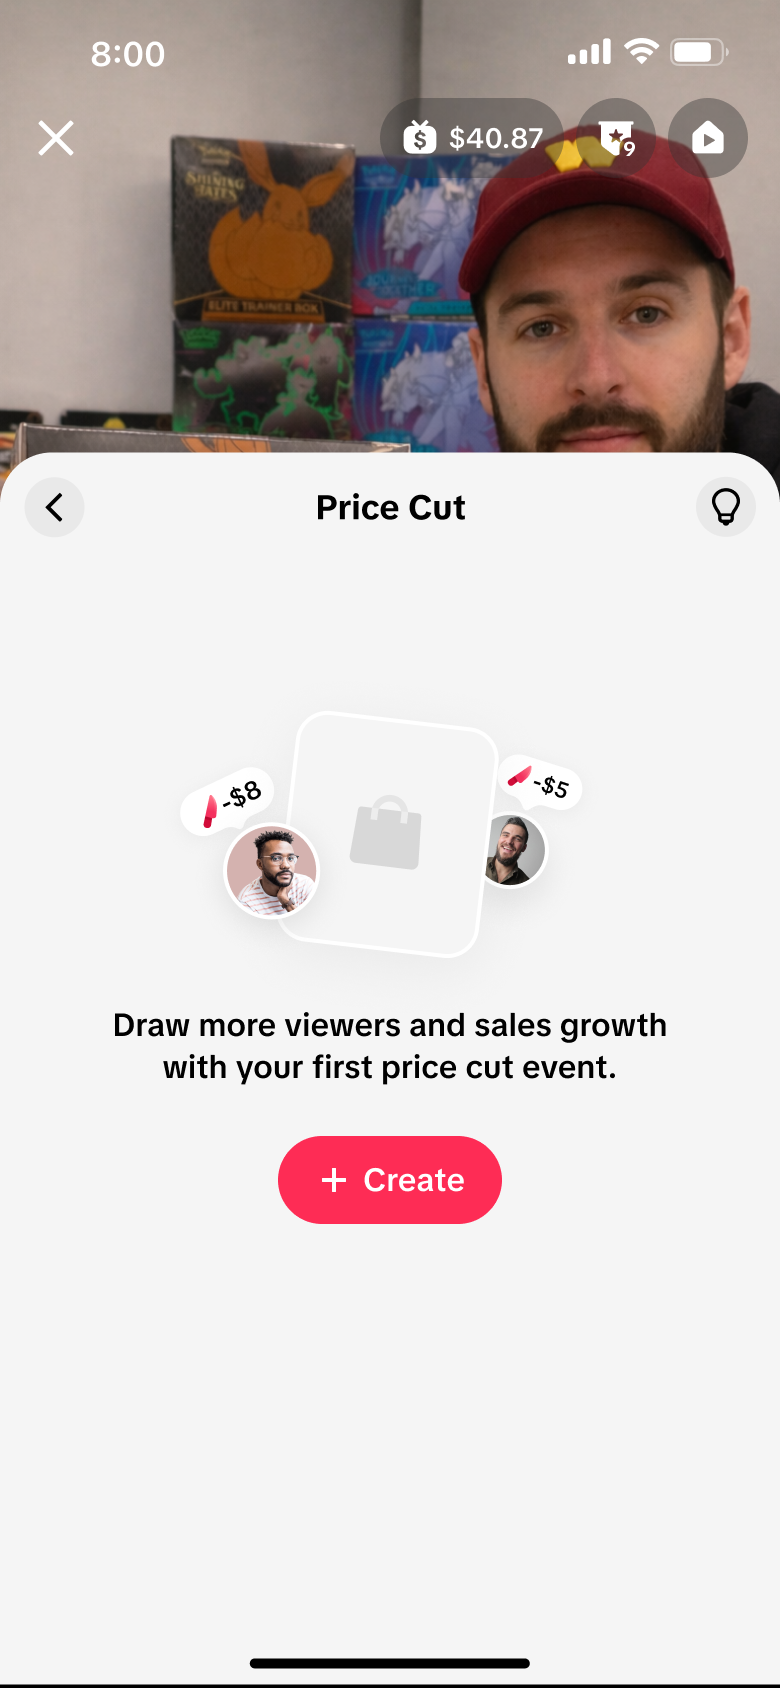
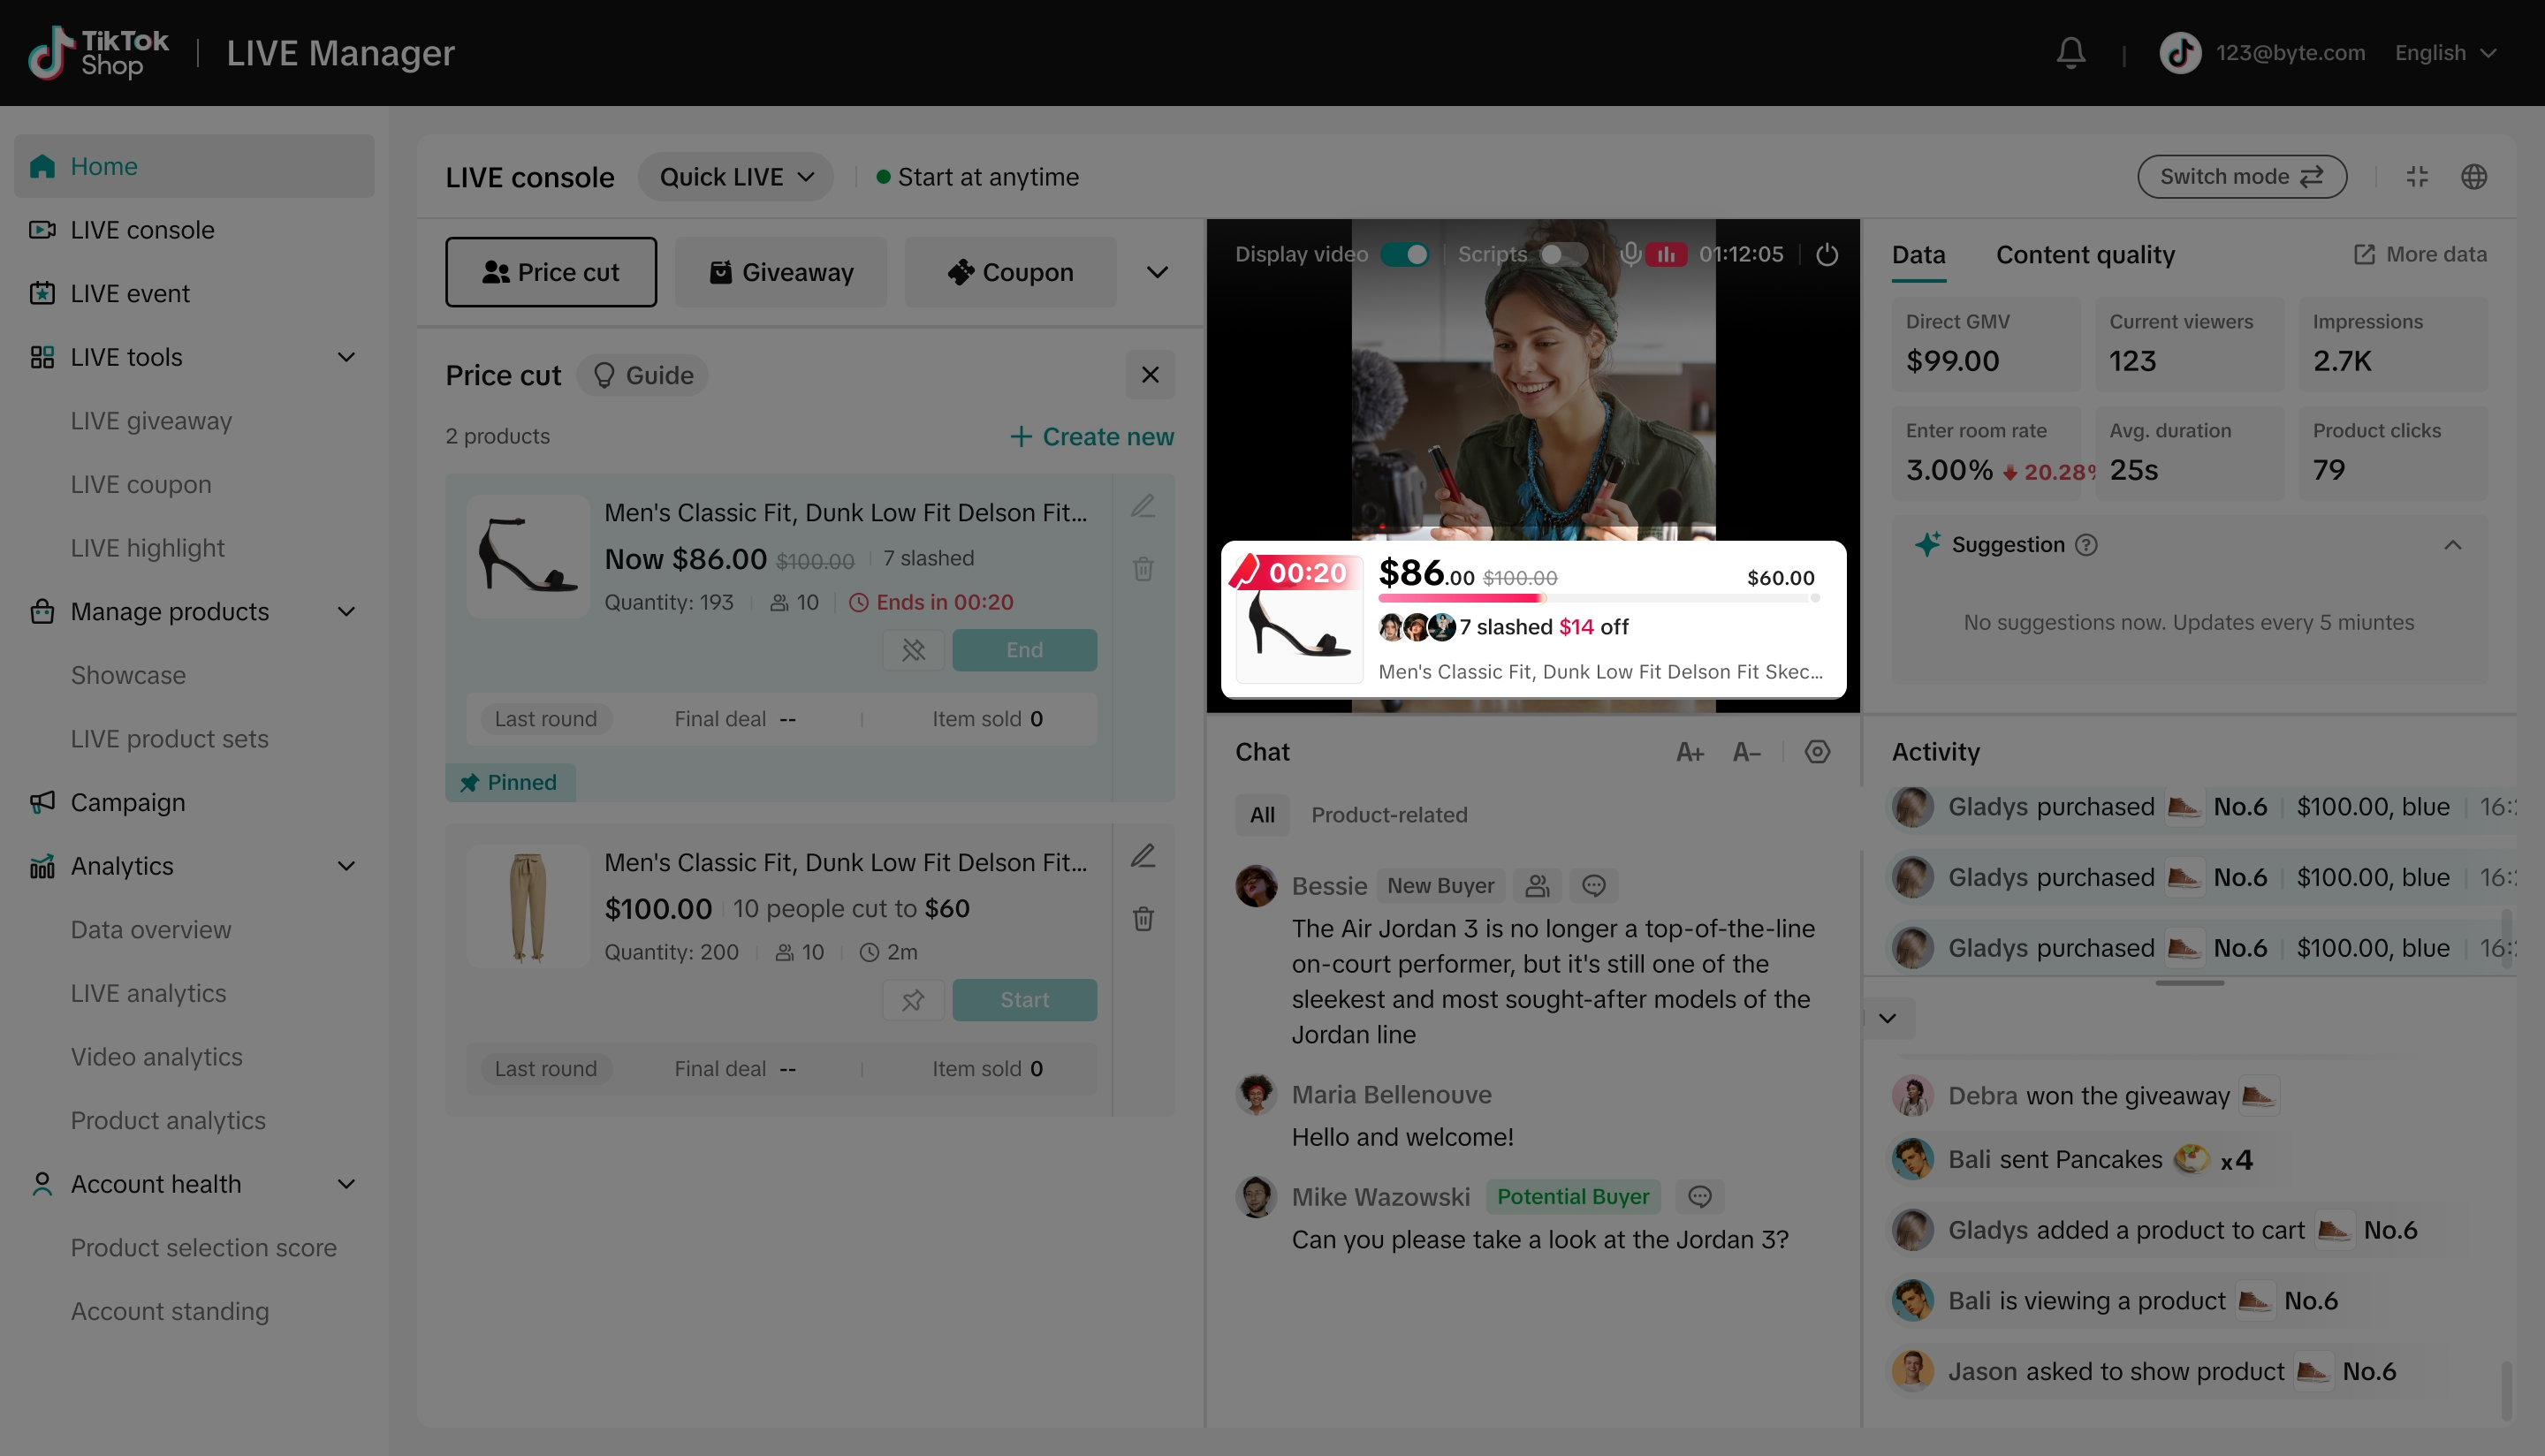
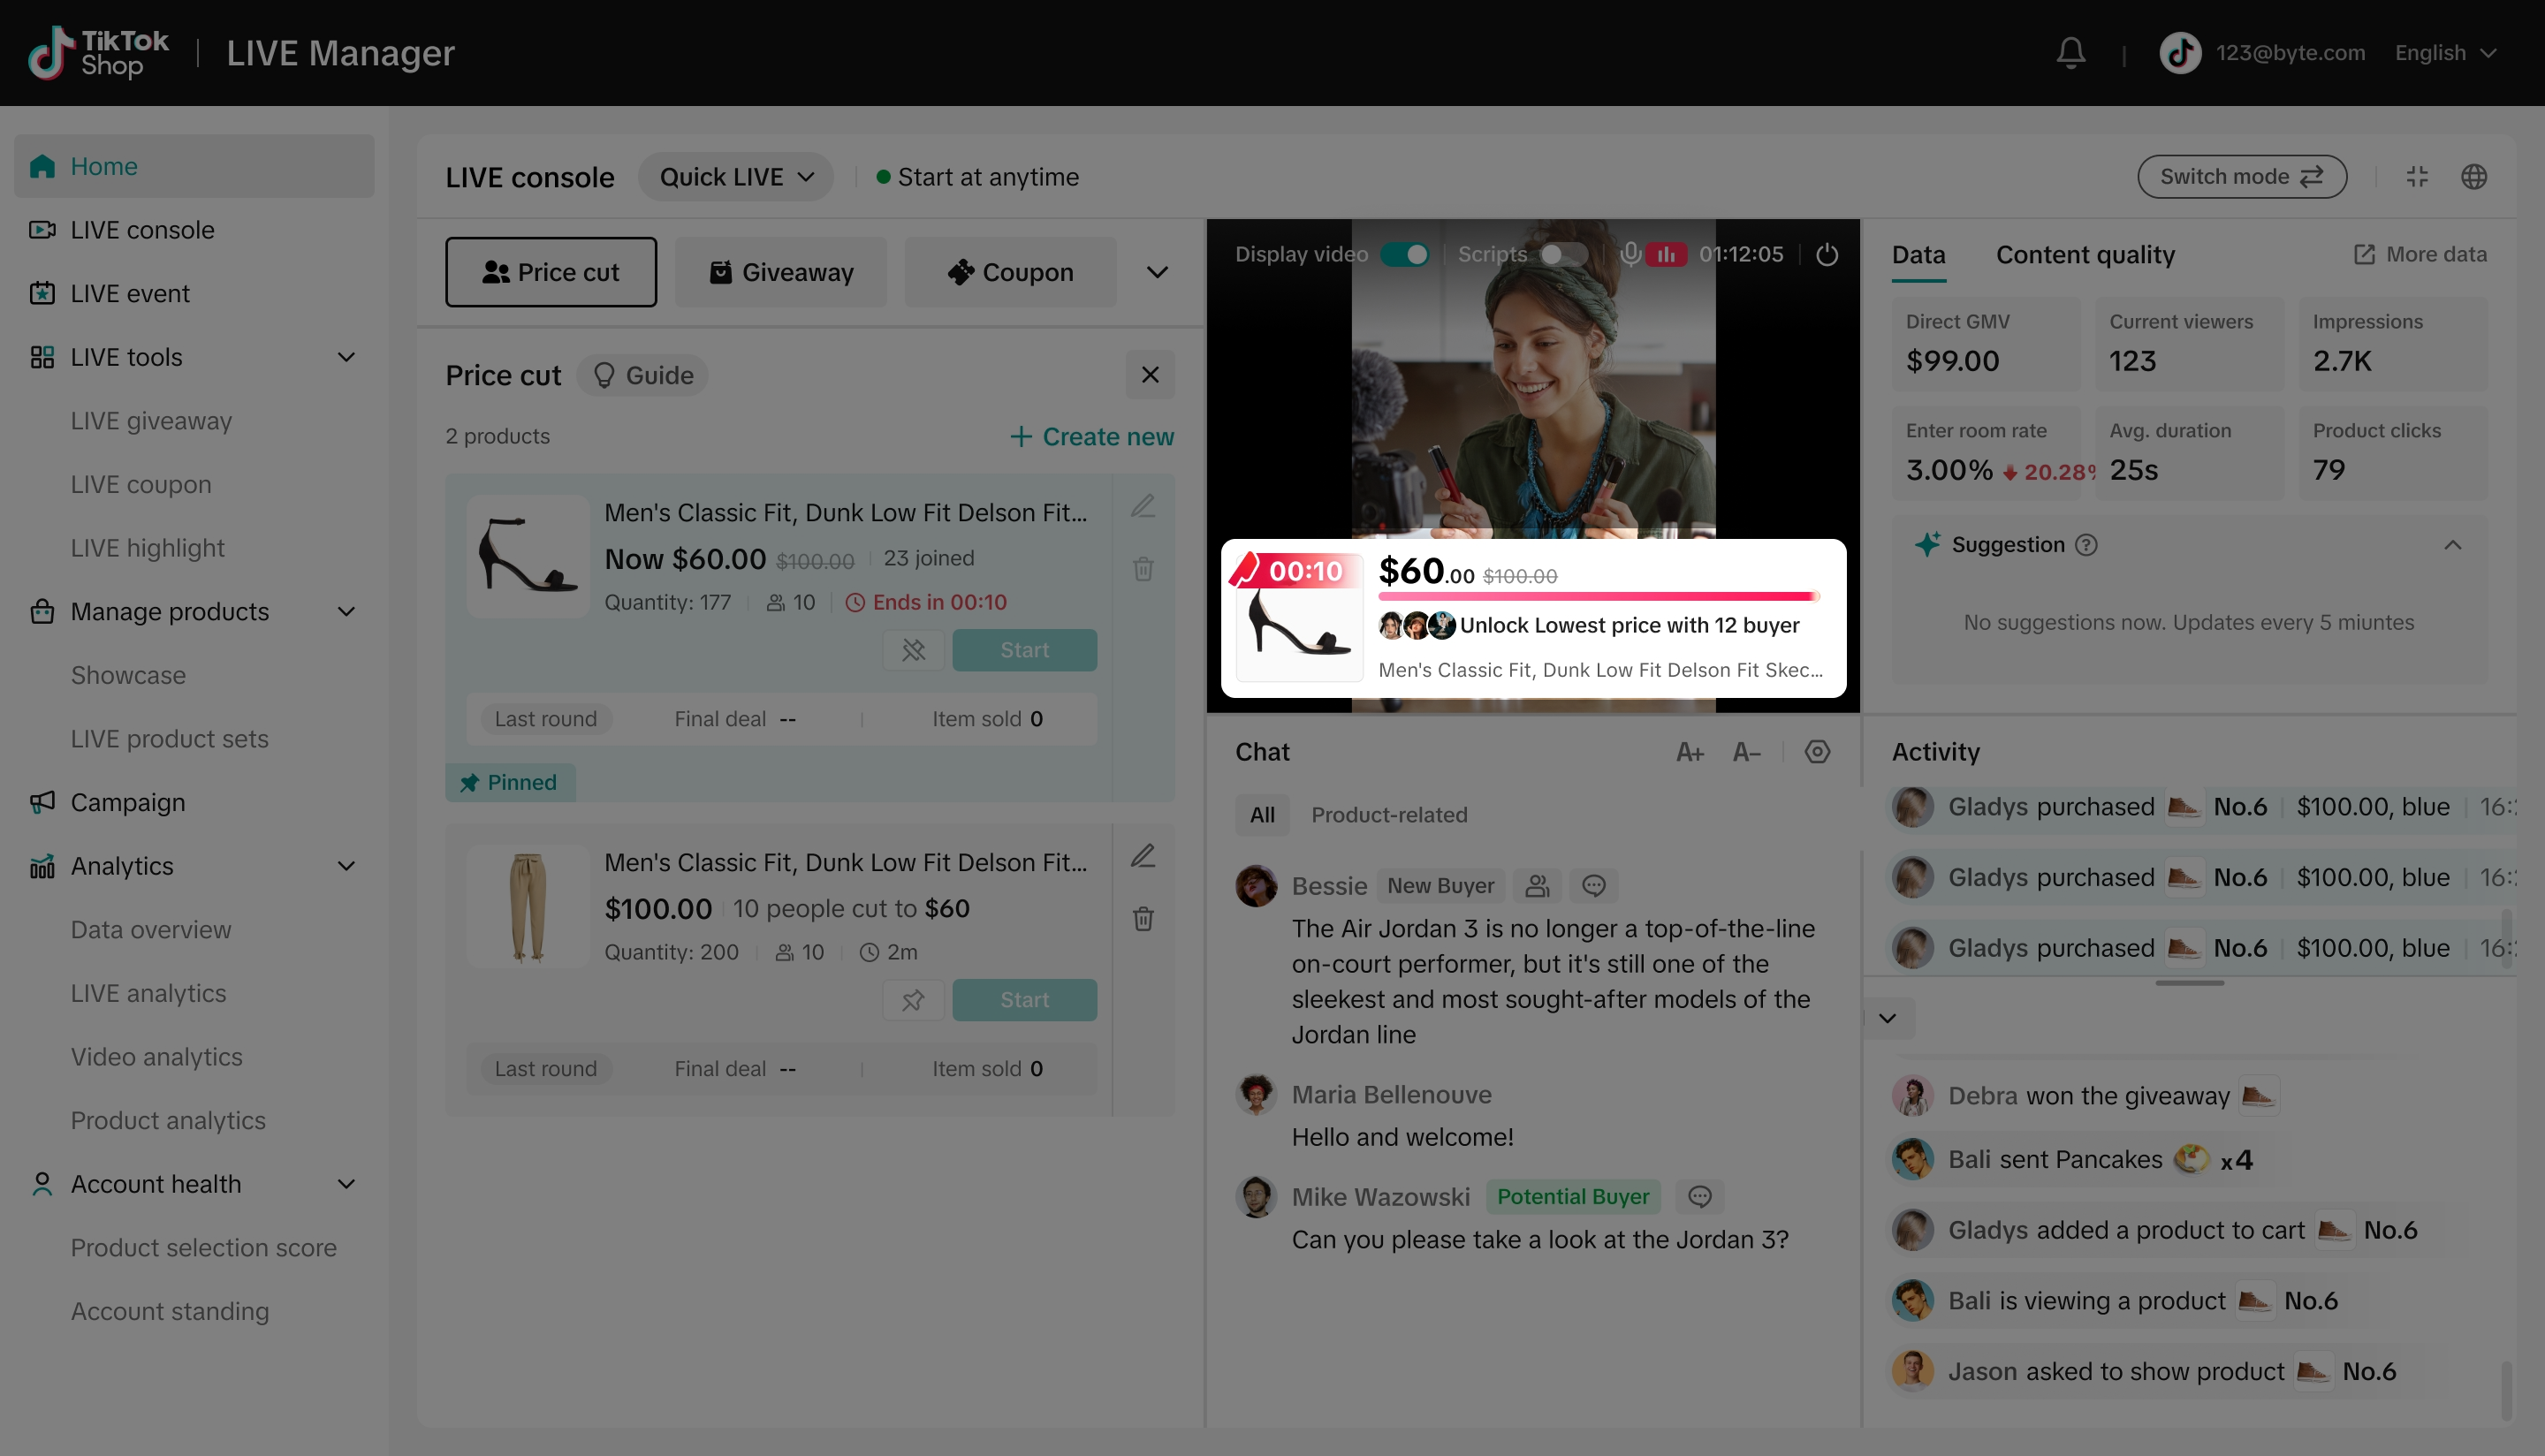
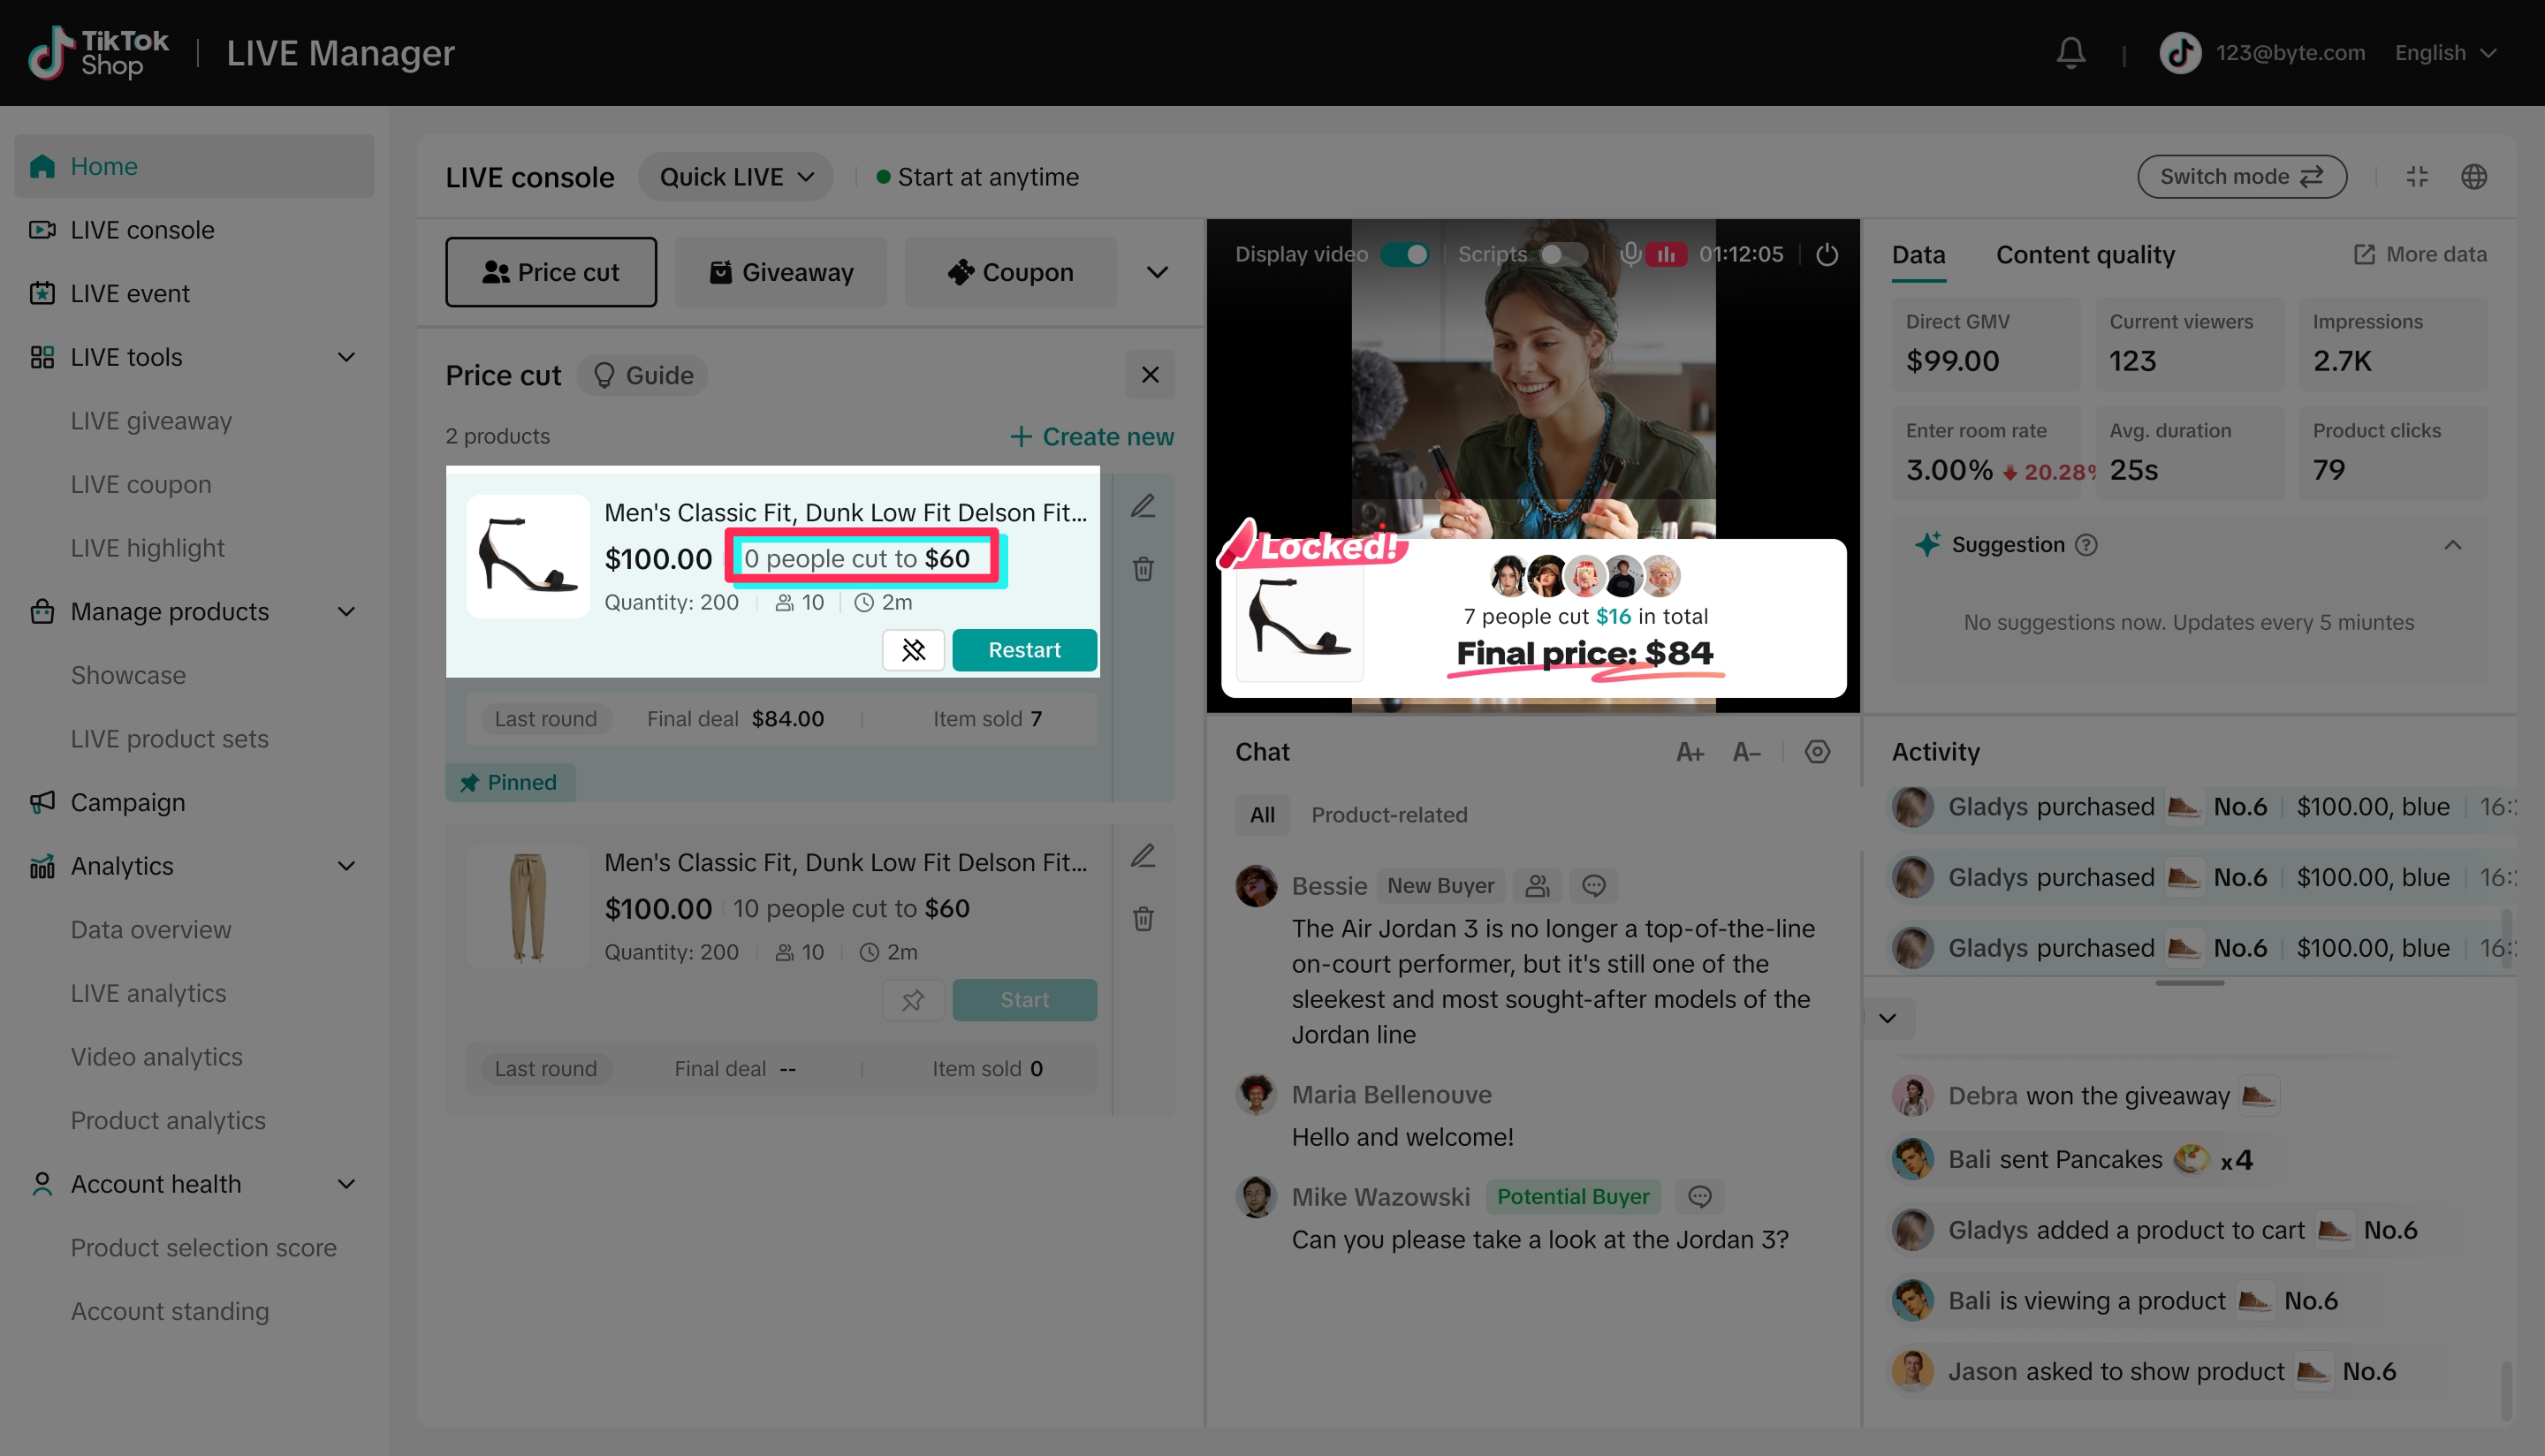
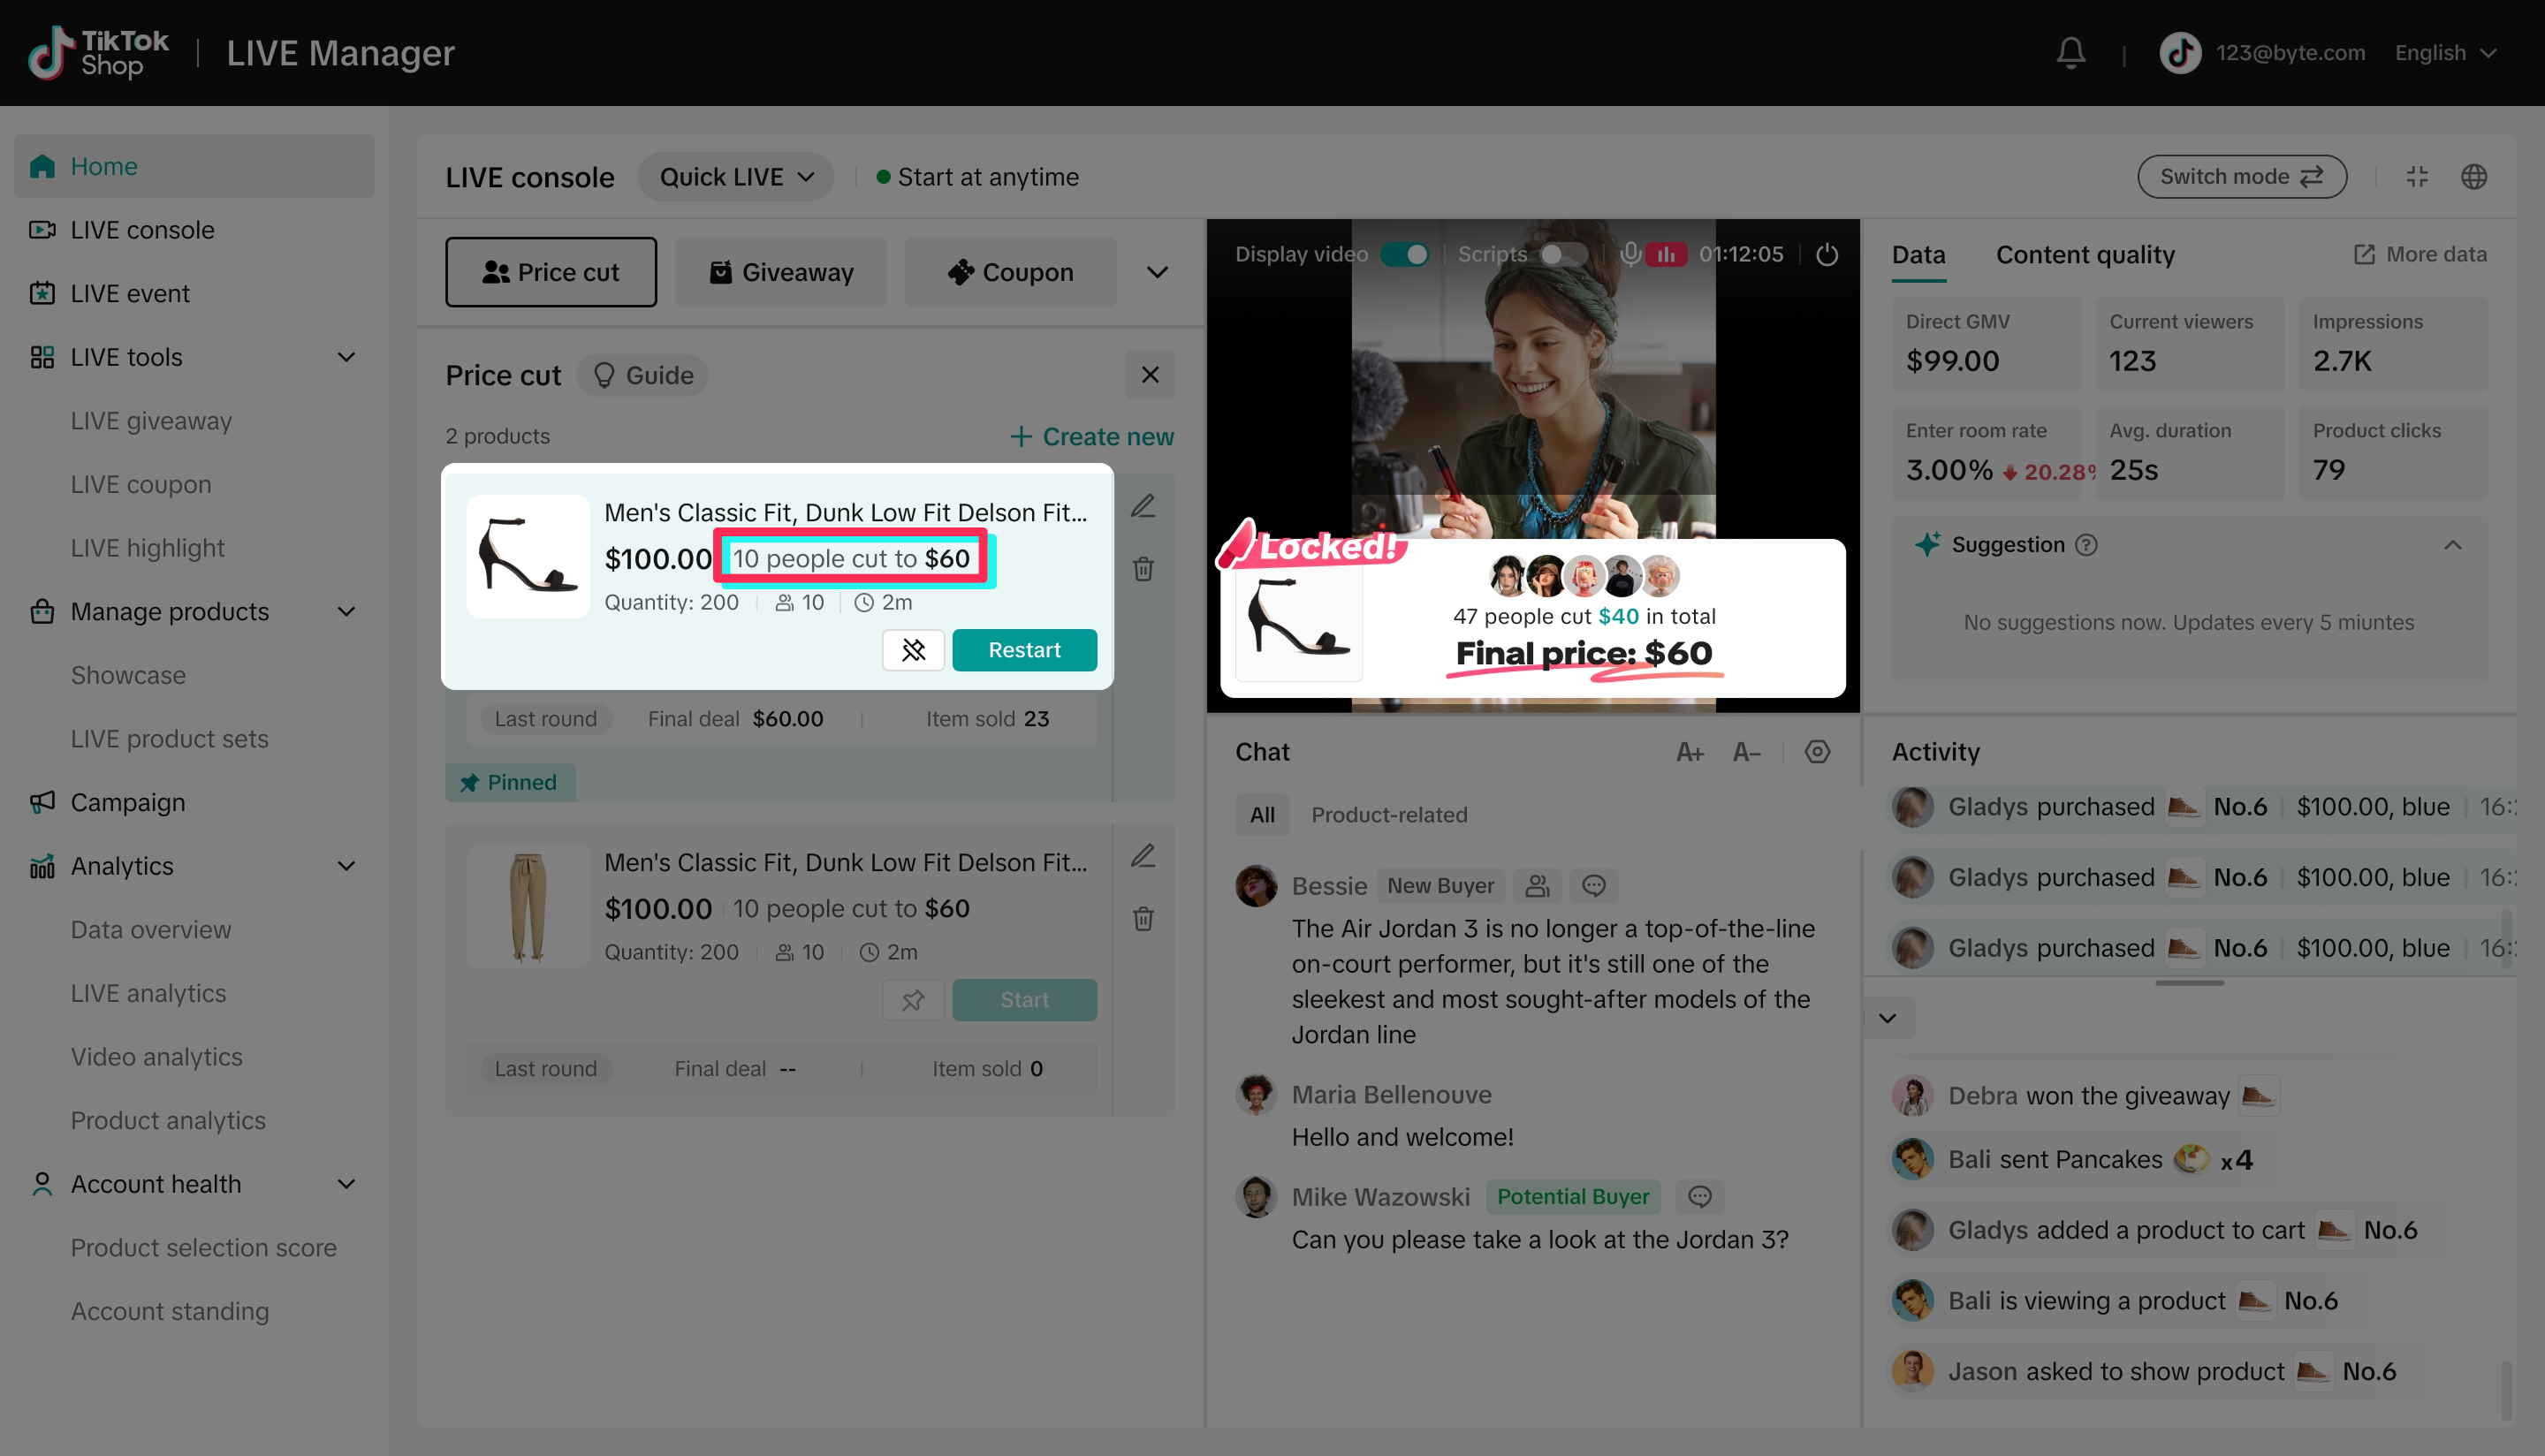
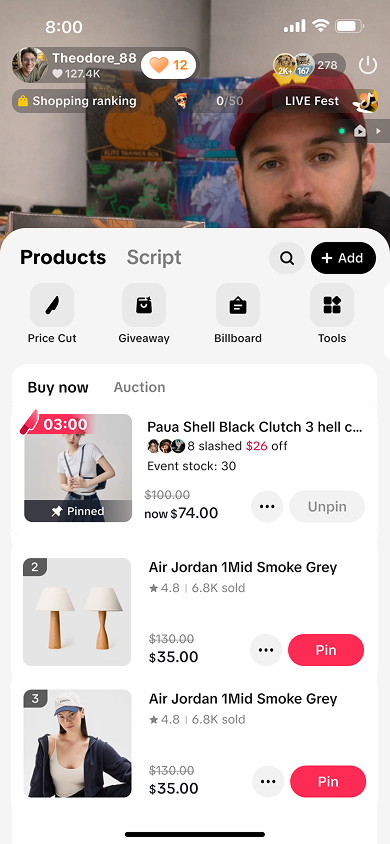
LIVE Price Cut is a new interactive LIVE pricing mechanic where a seller sets the lowest price, target participant count, activity inventory, and activity duration. Shoppers participate in the Price Cut by pre-authorizing payment and helping lower the price in real time. Before the target count is reached, each participating shopper lowers the activity price, with larger drops earlier and smaller drops later. When the activity ends, participating shoppers are automatically charged at the final achieved price. If the floor price is reached before the timer ends and activity inventory remains, other shoppers can purchase at the floor price before the activity ends.
Why it drives conversion?
The "bigger drops early, smaller drops late" design deliberately front-loads visible momentum, so the first few joins produce the biggest on-screen price movement – that's the moment to push hardest for participation, since the value of joining is highest right at the start, then the pull shifts to floor-price urgency as the count nears target.
Because the price is public and updates live, it doubles as a spectator visualization the host can narrate continuously – turning a plain percentage discount into an event that holds attention through both the Price Evaluation and Urgency stages of the funnel at once.
The floor-price fallback (non-participants can buy once the floor is hit) means the mechanic never wastes remaining inventory on people who watched but didn't formally join.
How to set it up
Step 1
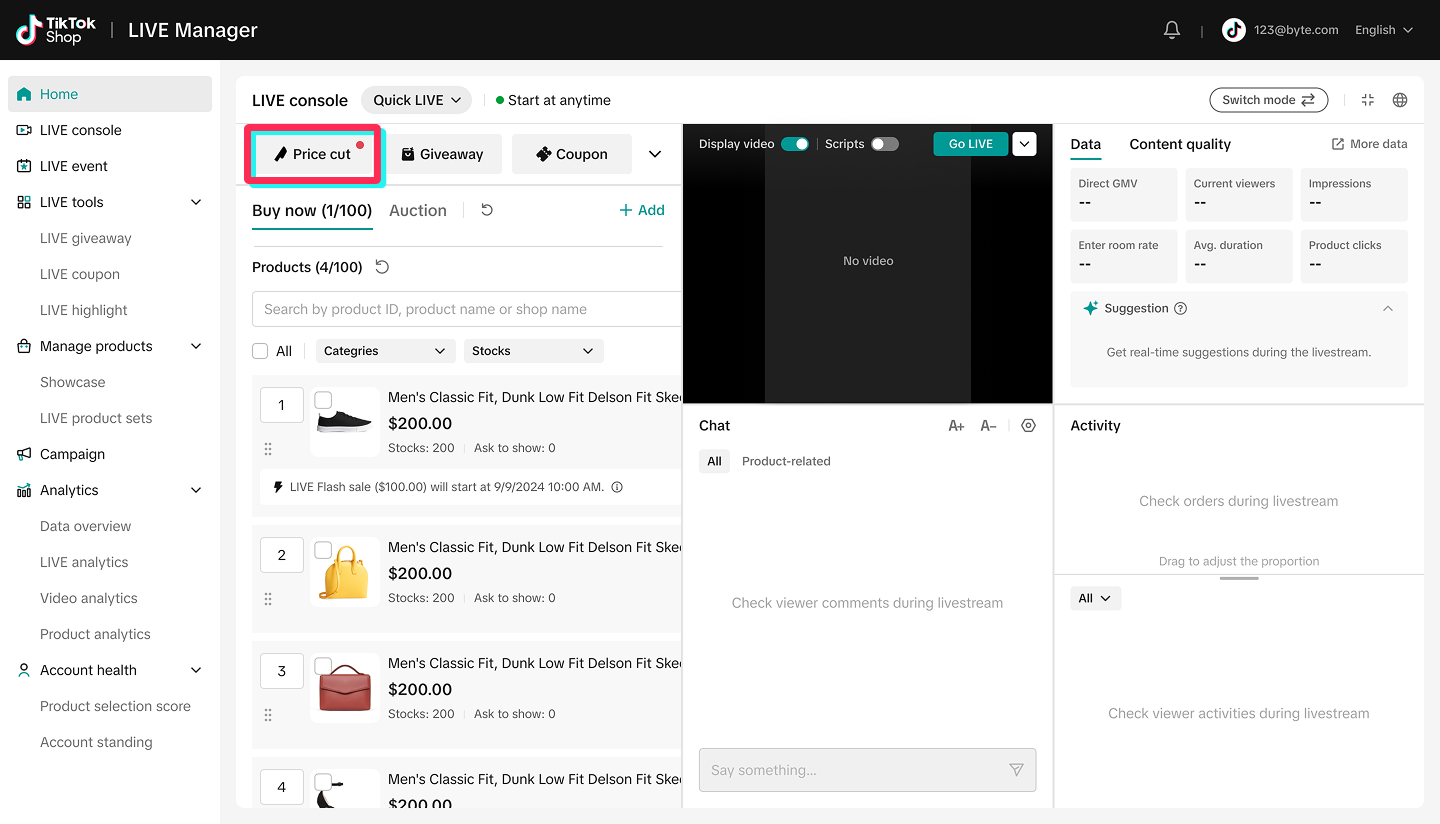
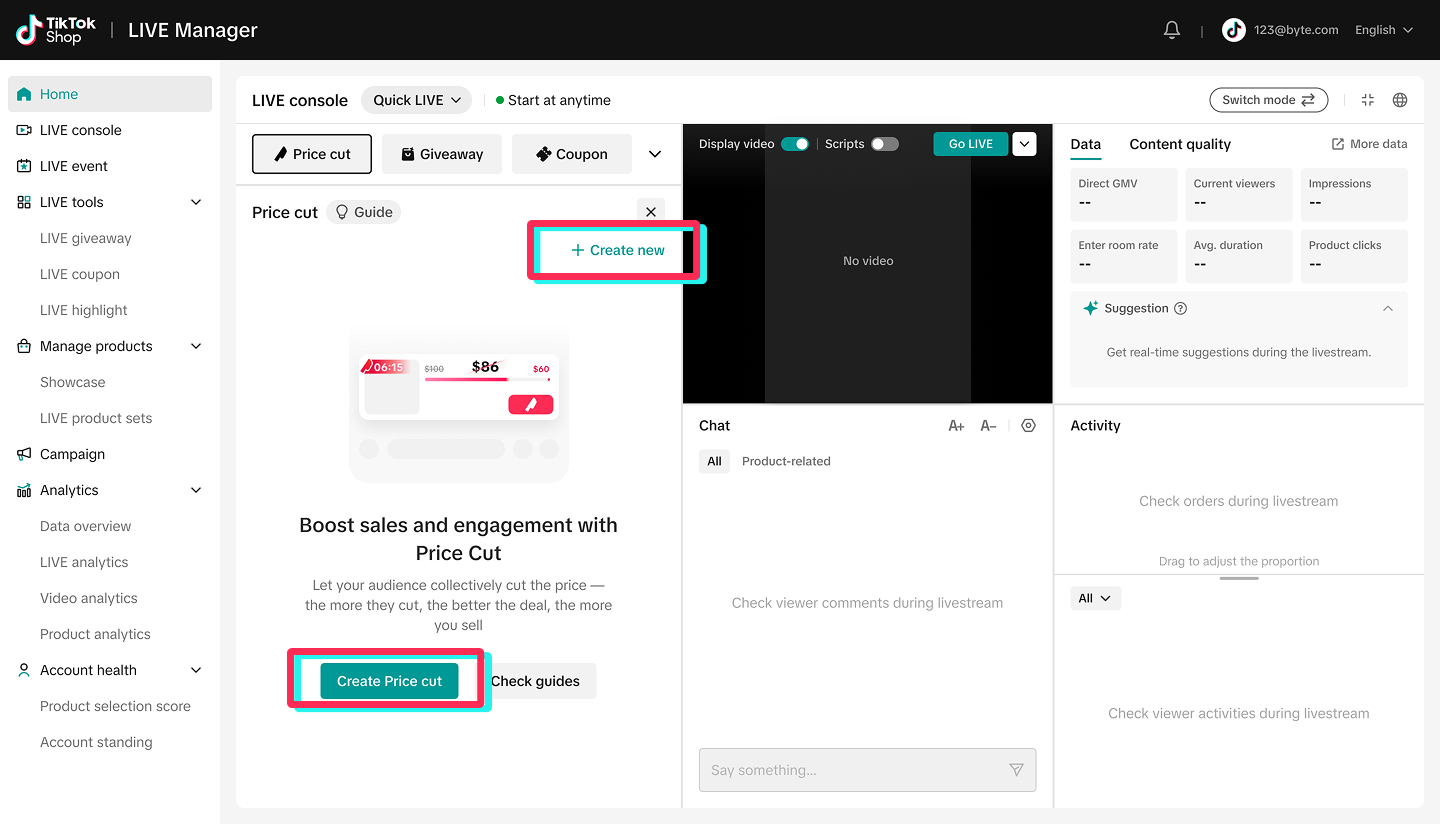
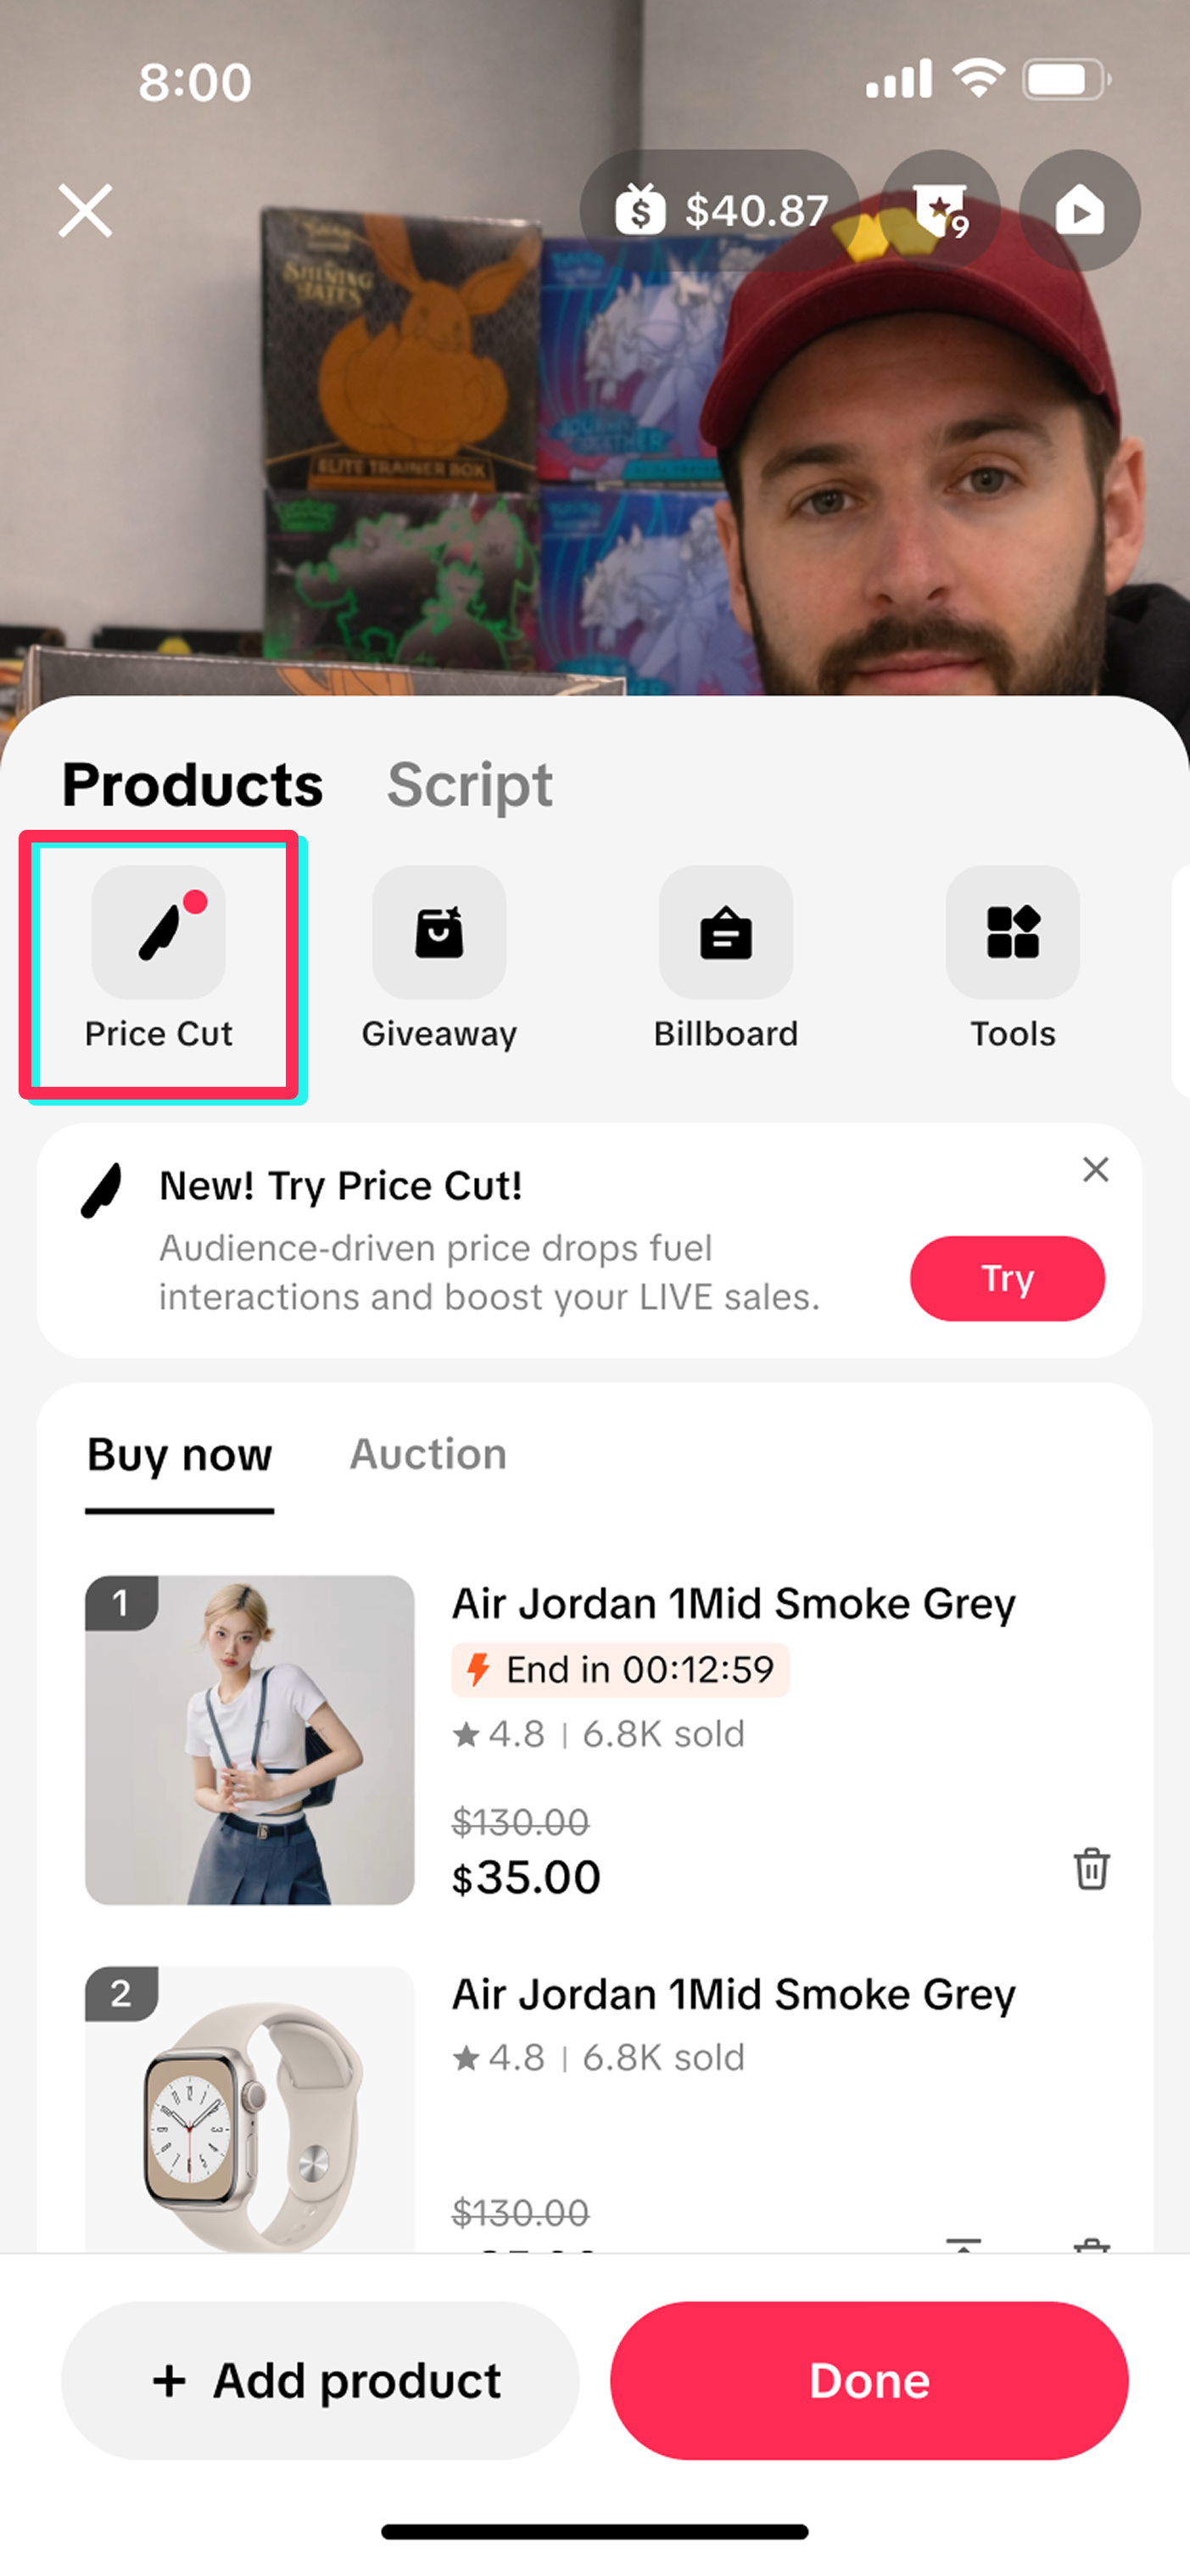
Step 1: Access the Feature Before or during LIVE, open LIVE console and enter the Group Deal tab and access the feature.
Desktop
Mobile
Step 2
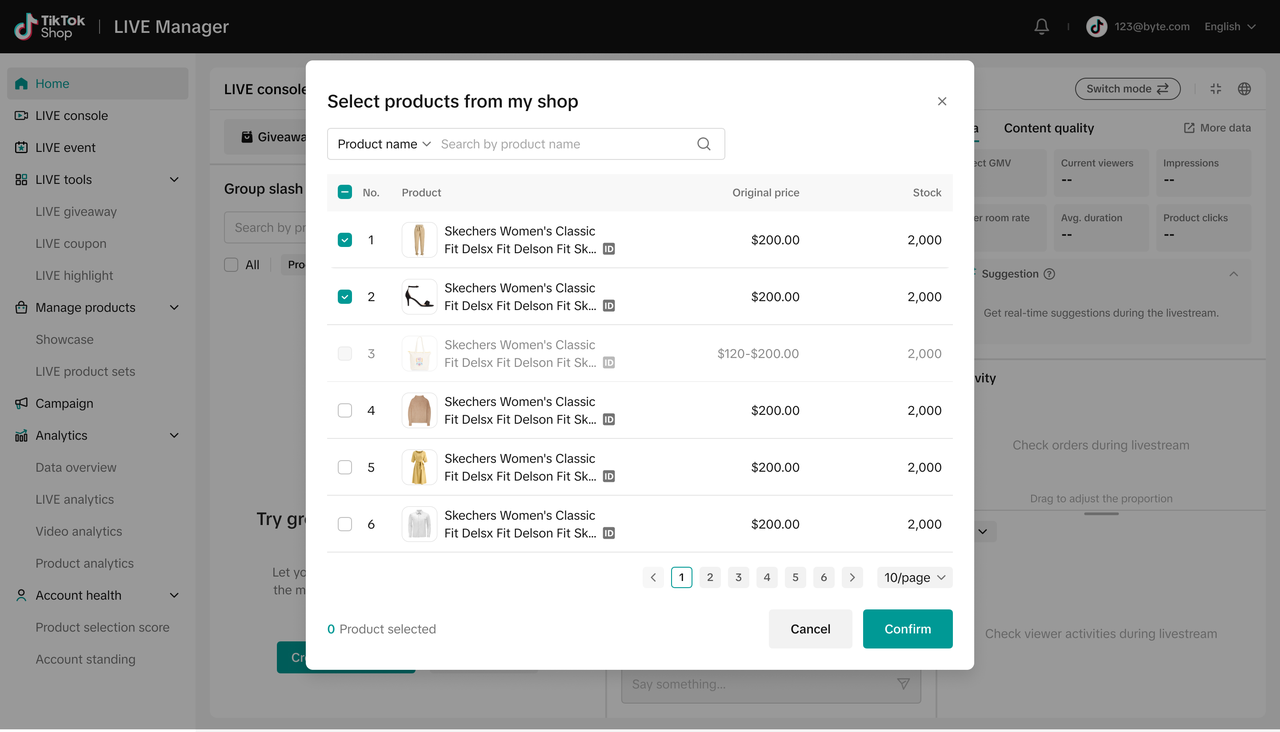
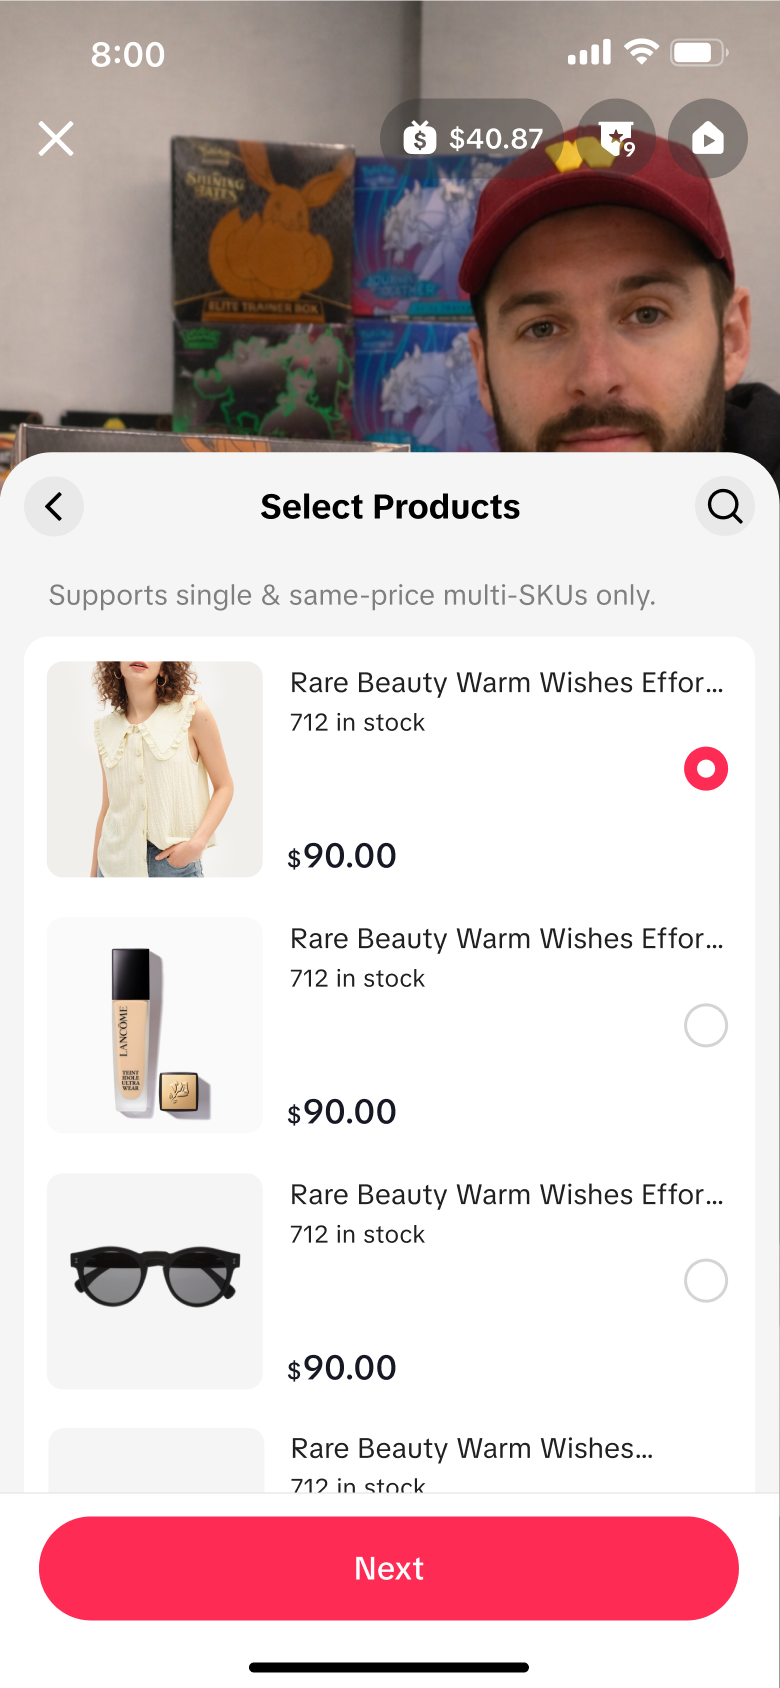
Step 2: Select the Products Choose an eligible product. Adding the product through the Price Cut tab also adds it to the shopping bag.
Note that only products with one selling price across SKUs are eligible in Phase 1.
DesktopMobile
Step 3
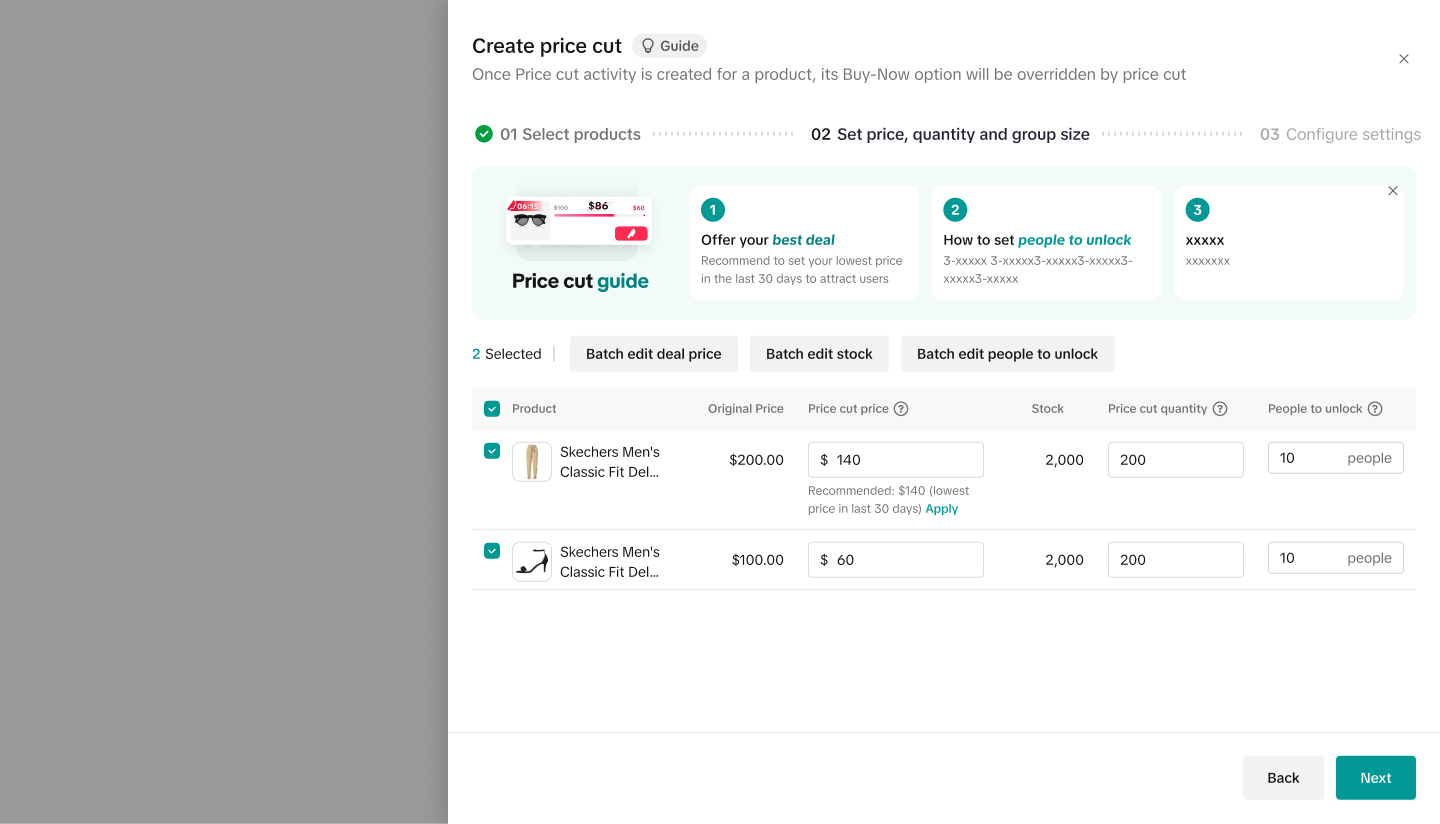
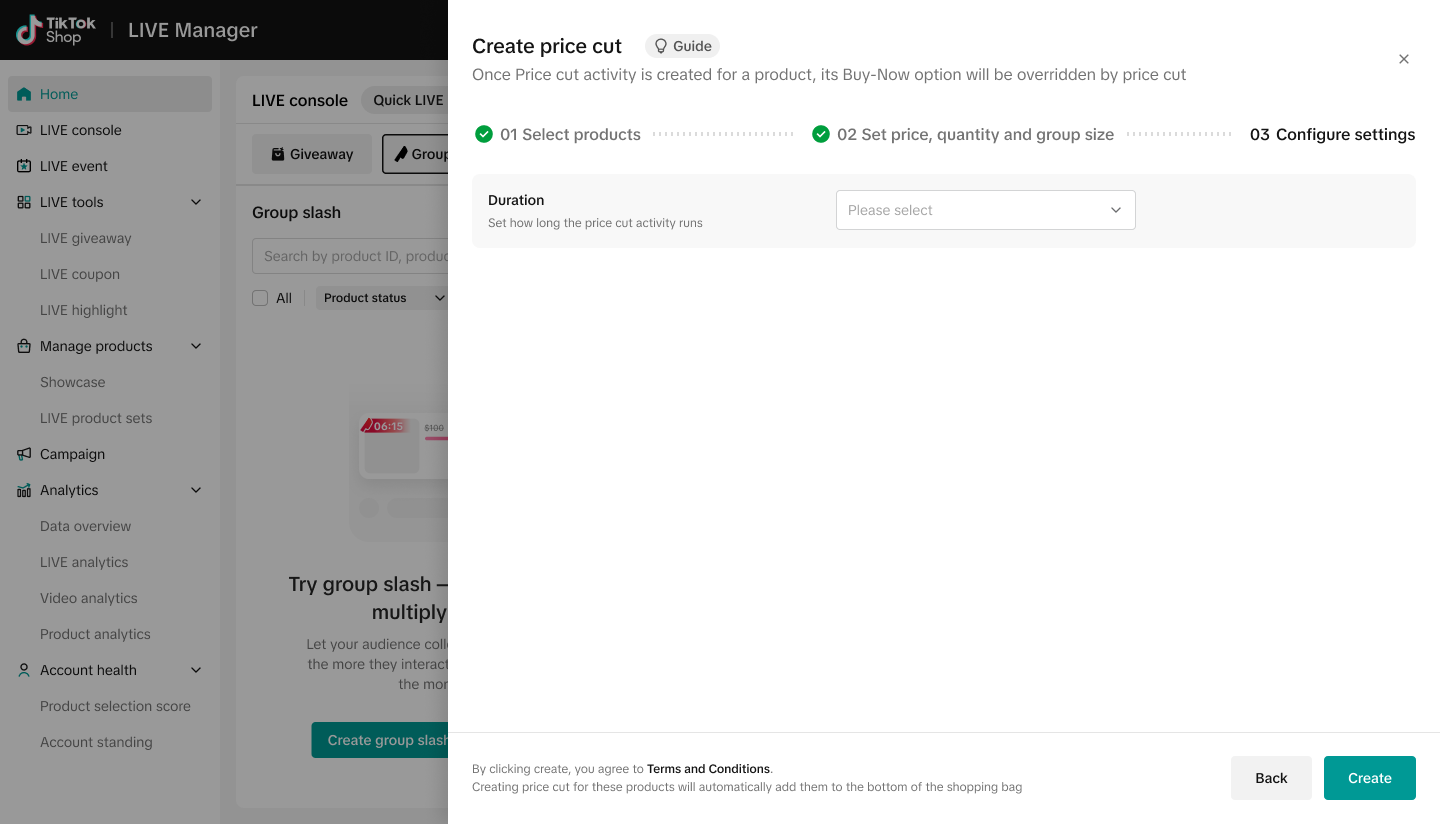
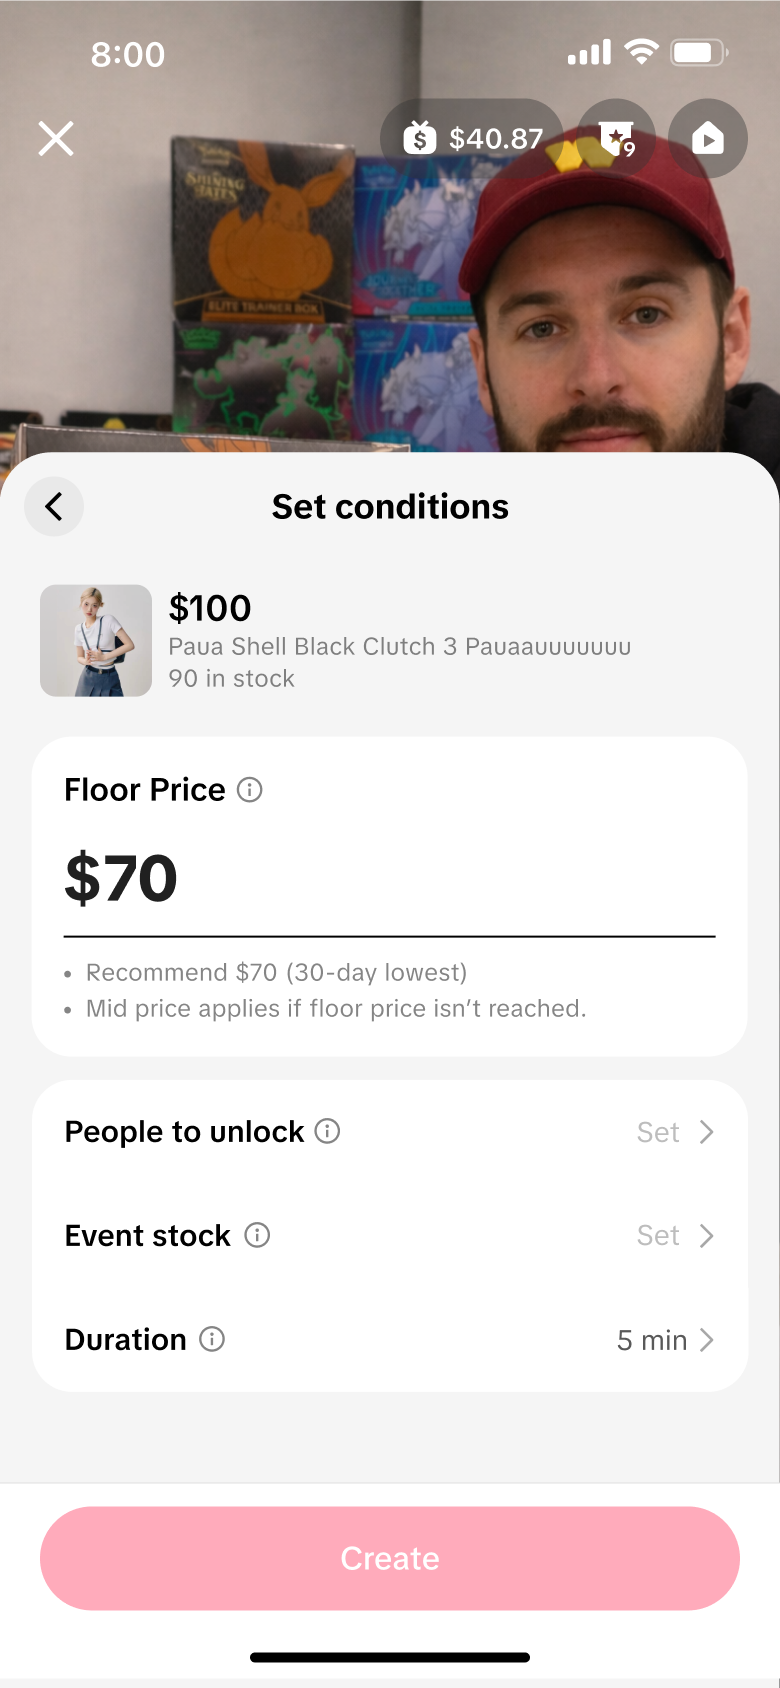
Step 3: Configure the Activity
Price cut price: the lowest price the activity can reach.
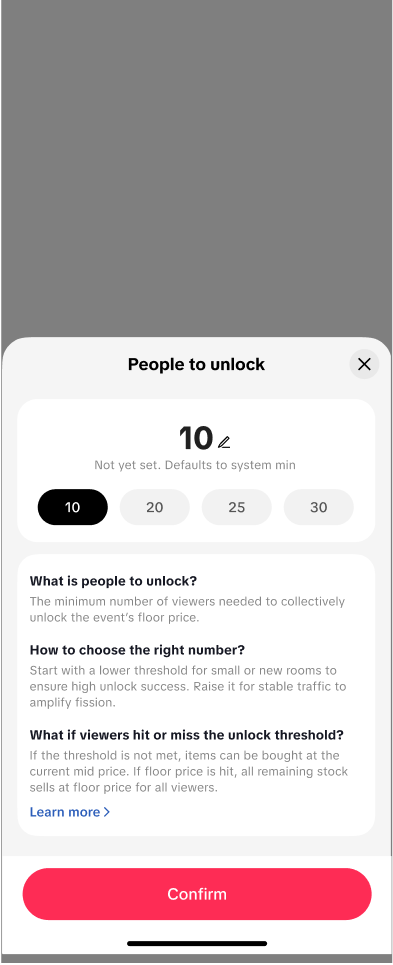
People to unlock: number of shoppers whose price cutting is needed to unlock the price cut price.
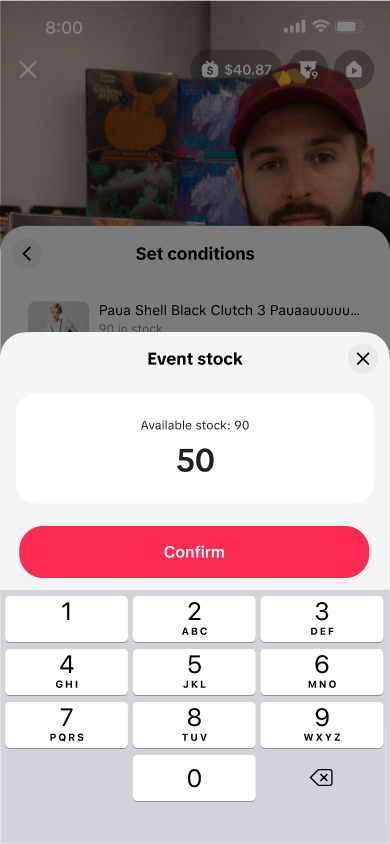
Activity inventory: total units allocated to the activity.
Duration: how much time is allocated for shoppers to join and price cut.
Each participating shopper lowers the price in real time – larger drops earlier, smaller drops as it nears the floor. If the floor price is reached before time runs out and inventory remains, non-participating shoppers can also buy at the floor price. If the floor price is not reached within the activity duration, the participating shoppers will buy at the last dropped price.
Desktop
Mobile
Step 4
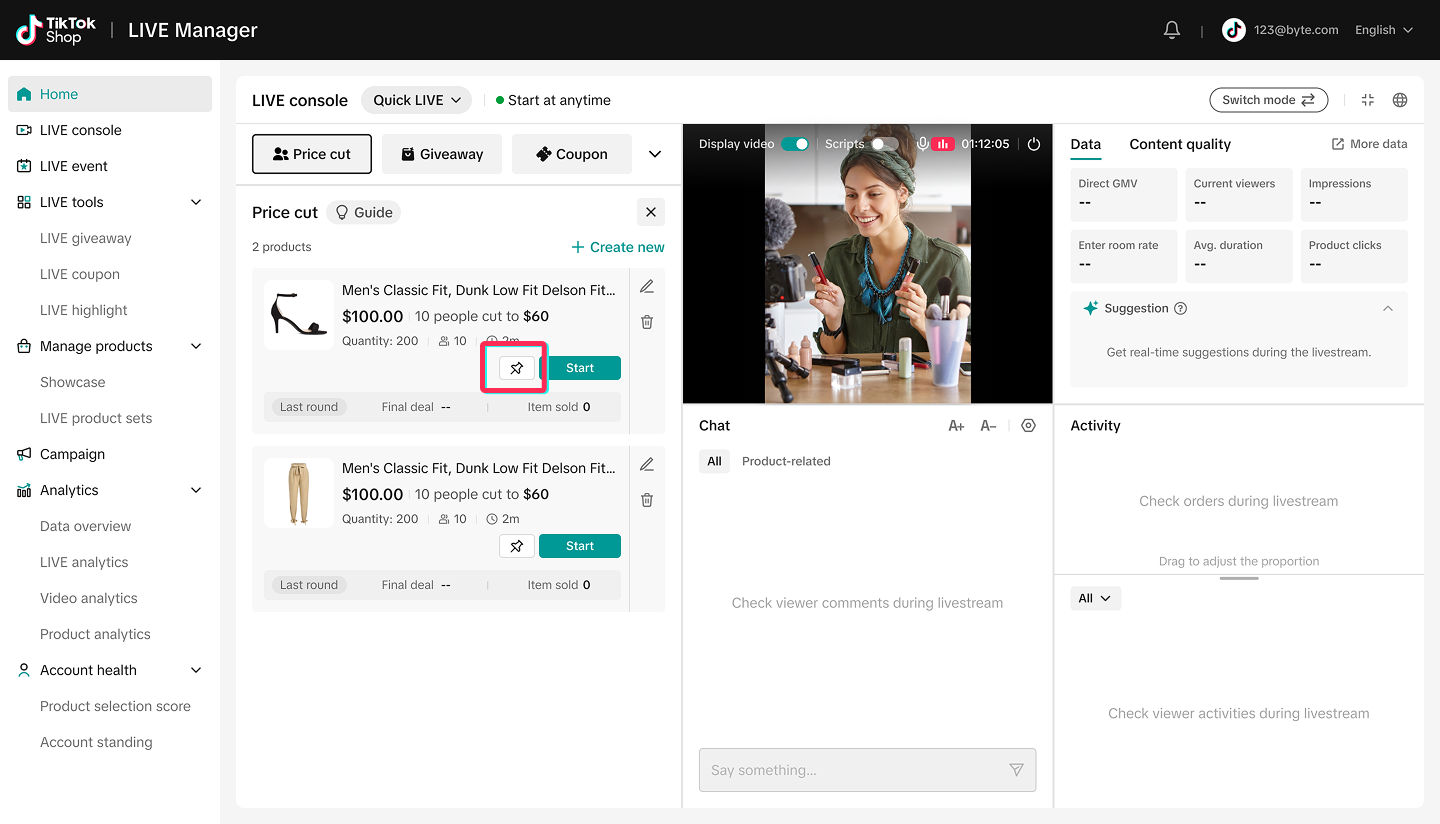
Step 4: Publish and Warm up Once created, the product enters the upcoming / preheat state. Before starting, pin the Price Cut product to build awareness and purchase intent.
Desktop
Step 5
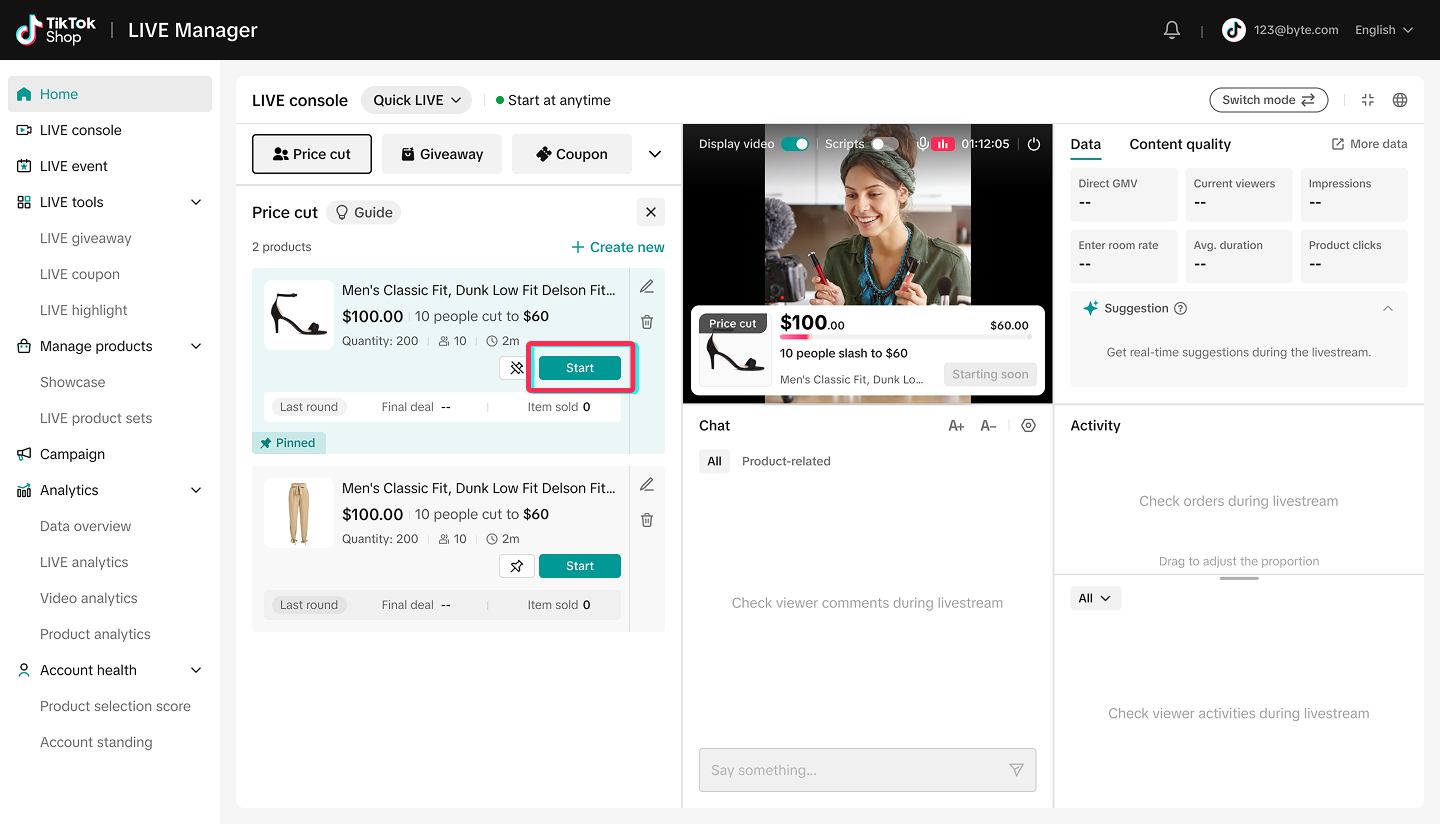
Step 5: Start the Activity Track the current price, how many shoppers have joined, and whether the floor price / activity has ended.
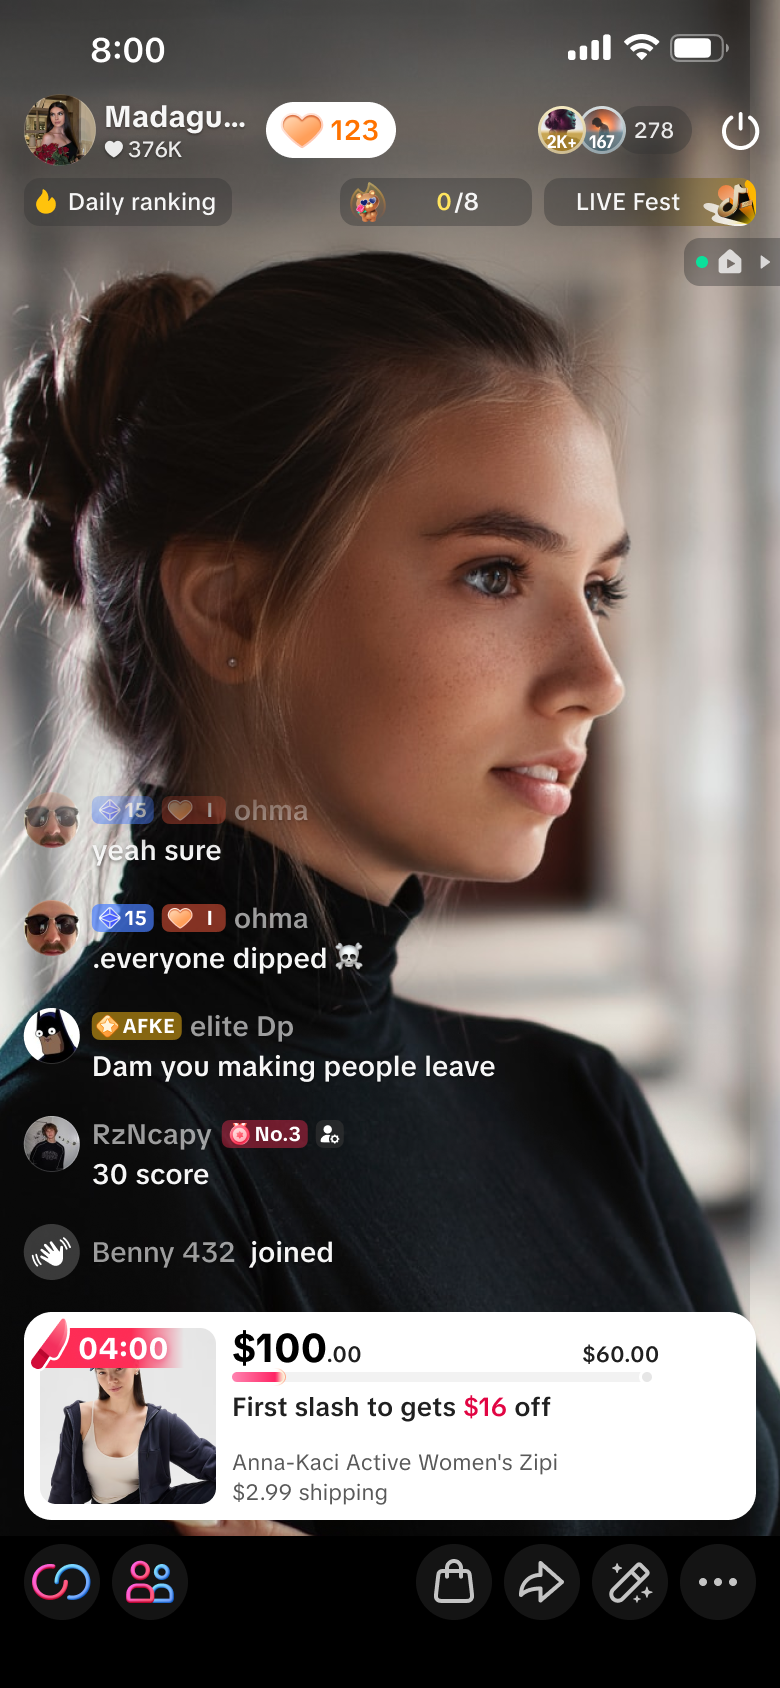
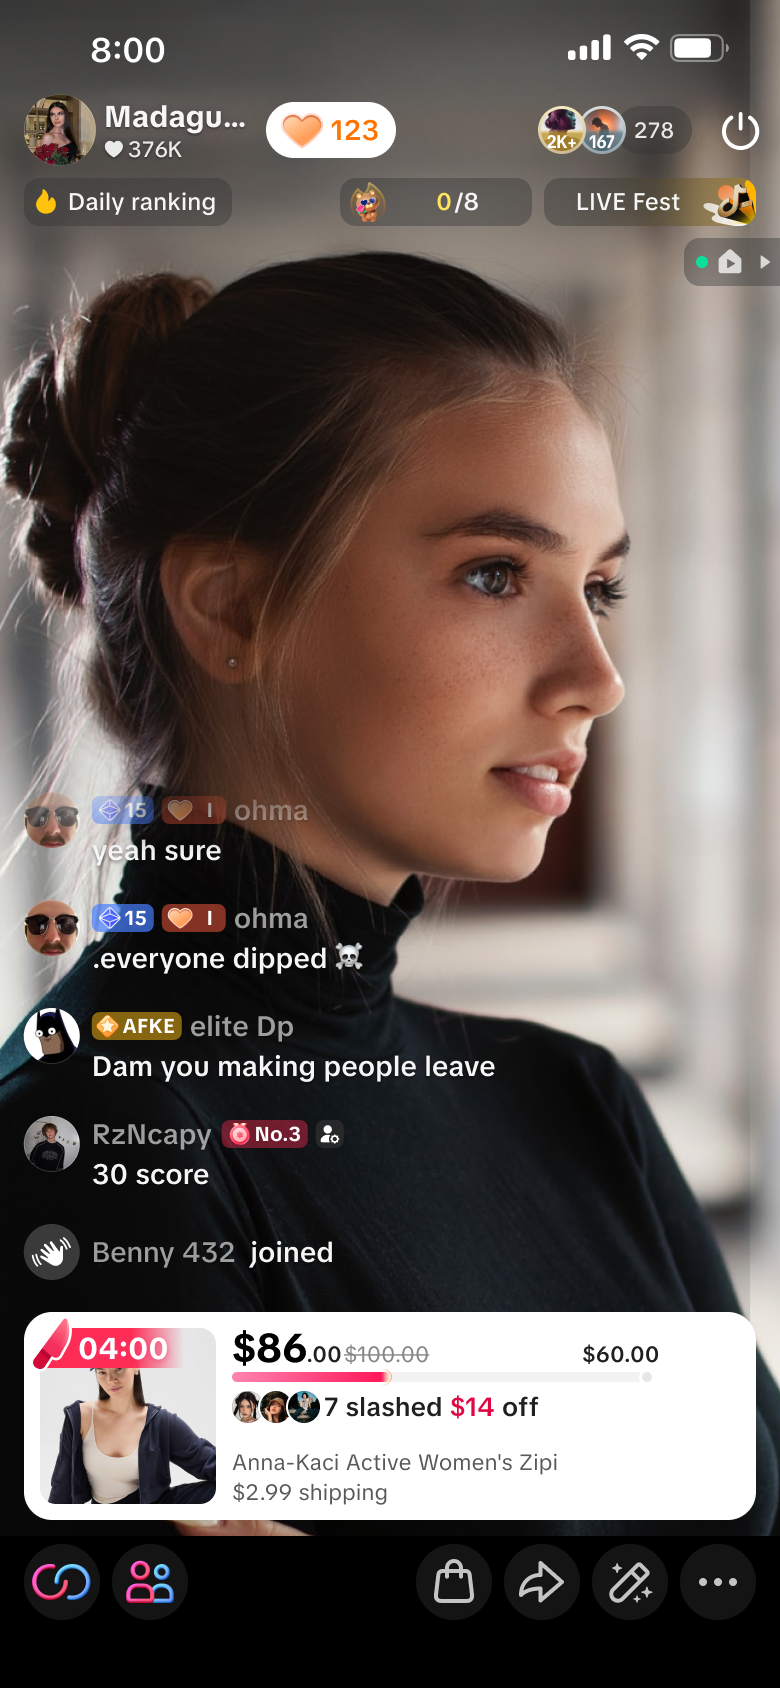
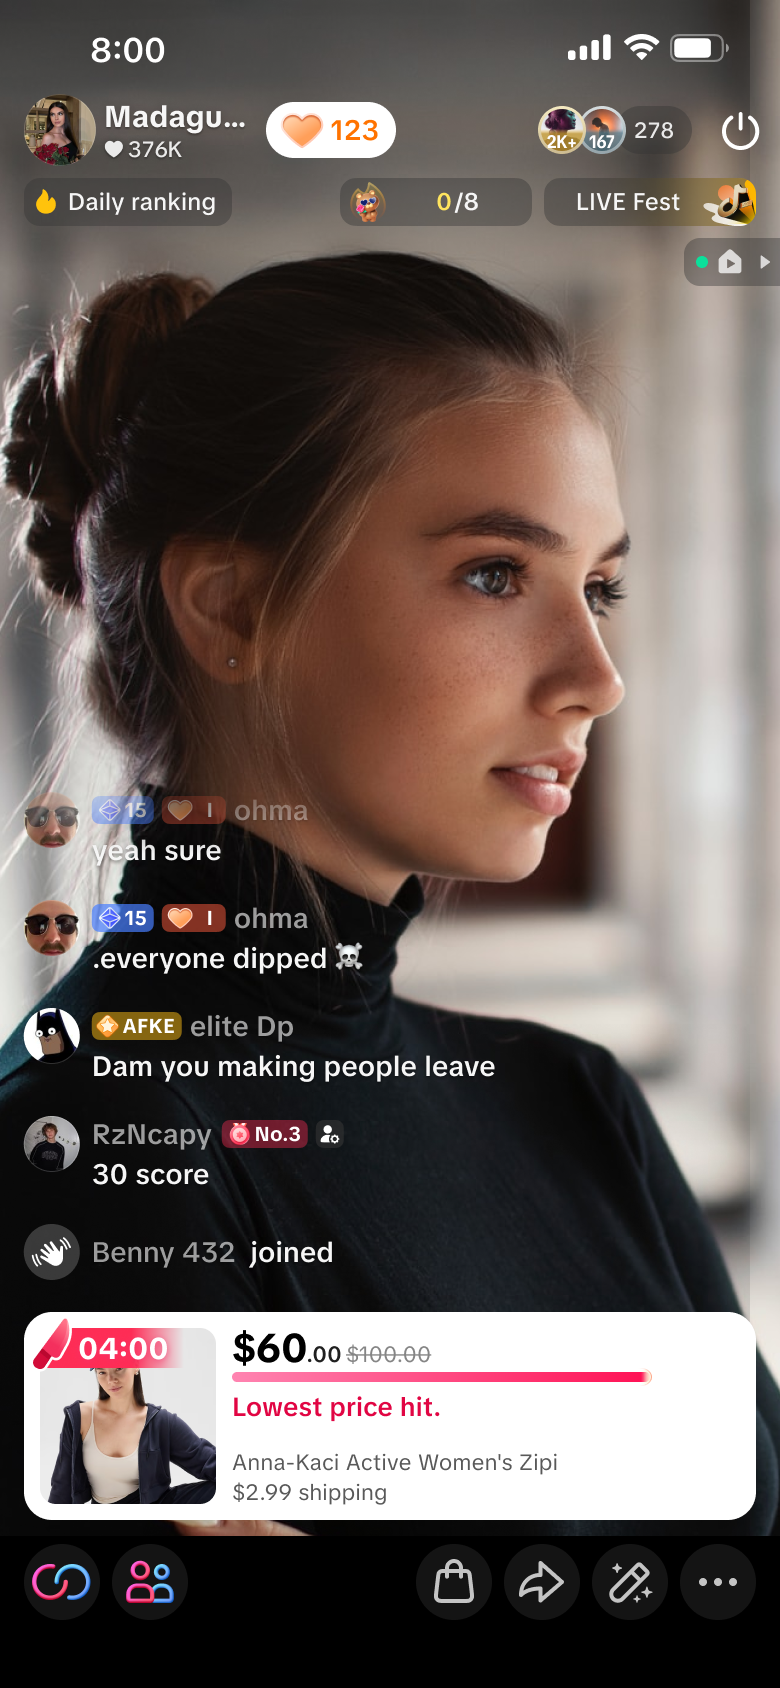
LIVE Flash Sale is a seller-funded promotion tool that allows sellers to create limited-time Sales with a countdown timer to create a sense of urgency and encourage immediate purchases. Exclusive Sales which will be displayed only on livestream channels of official and marketing accounts. Customers can enjoy LIVE Flash Sale by adding the product to cart and purchasing the product from the seller's or creator's livestream channel.
Why it drives conversion?
Two independently configurable timers – a short countdown to start, and a short overall duration – let the host manufacture urgency at the exact moment engagement is highest, instead of running one long sale that loses urgency after the first few minutes. Pair the countdown with an explicit spoken cue ("sale starts in 30 seconds") to spike concurrent add-to-carts right as it hits zero.
Total Purchase Limit and Customer Purchase Limit are set per SKU, so the same urgency mechanic can be reused several times in one LIVE – rotate it across hero SKUs instead of exhausting all stock in a single sweep.
Because the sale is exclusive to livestream channels, it cannot be found or price-matched off-LIVE – this is the strongest single lever in the kit for "why buy now instead of later."
How to set it up?
Step 1
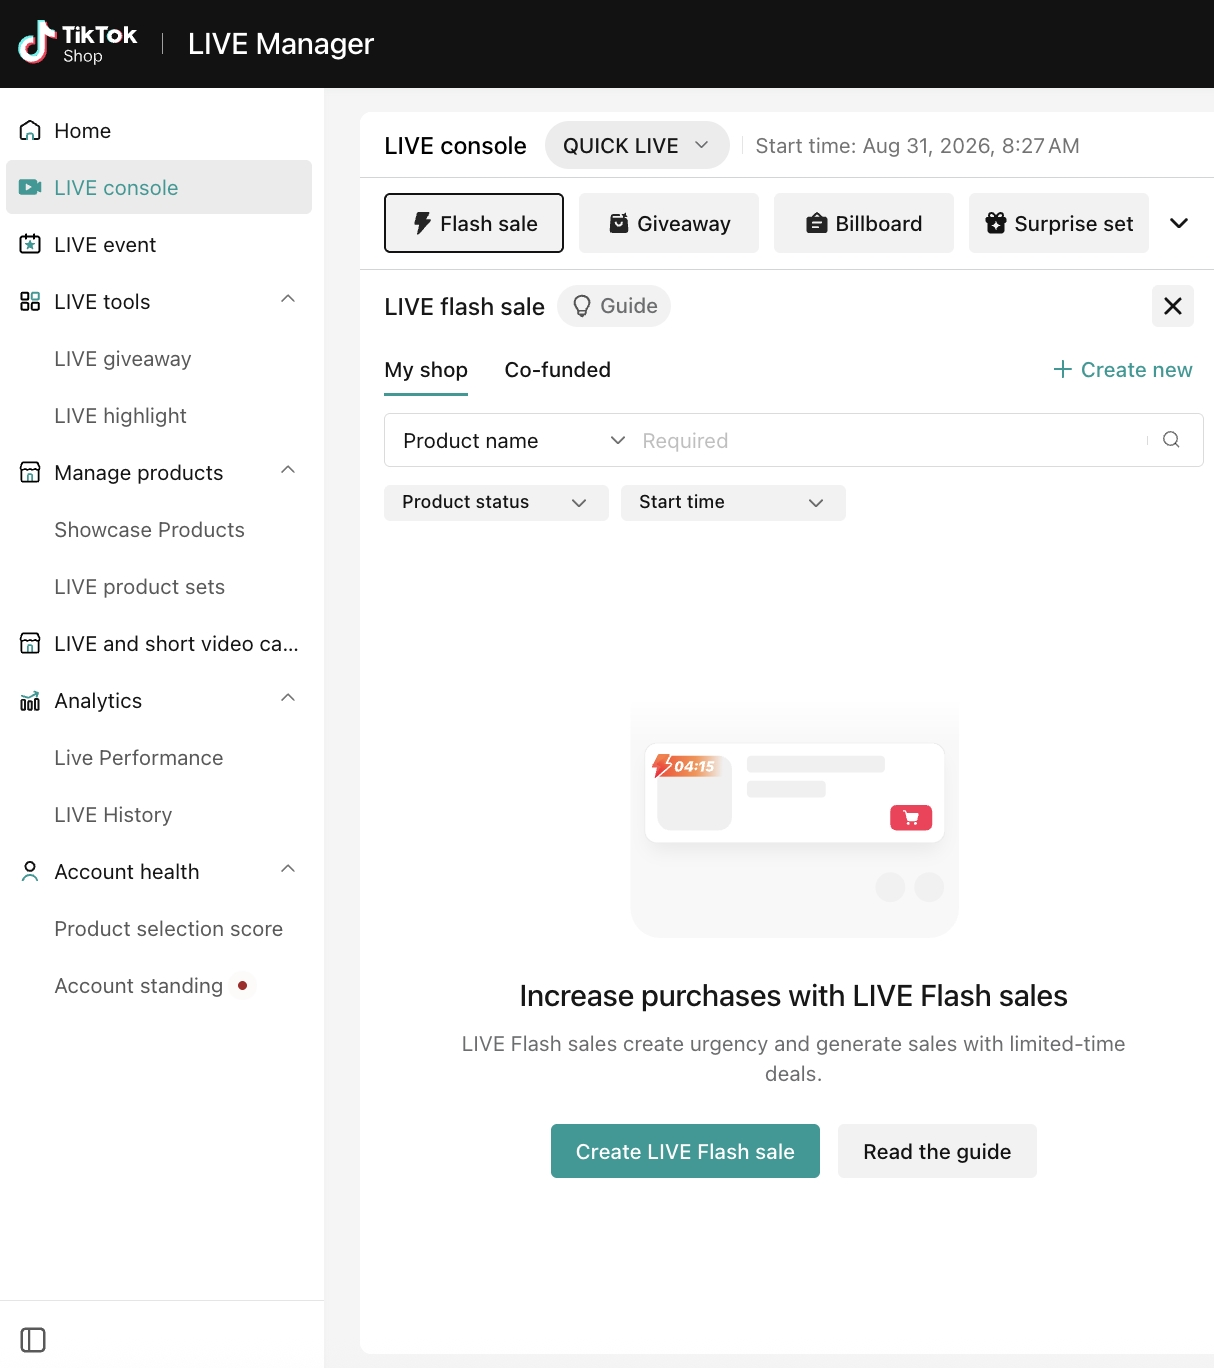
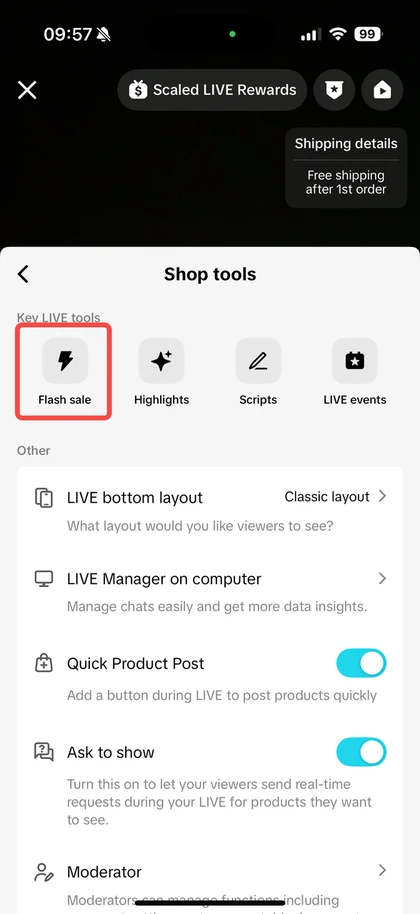
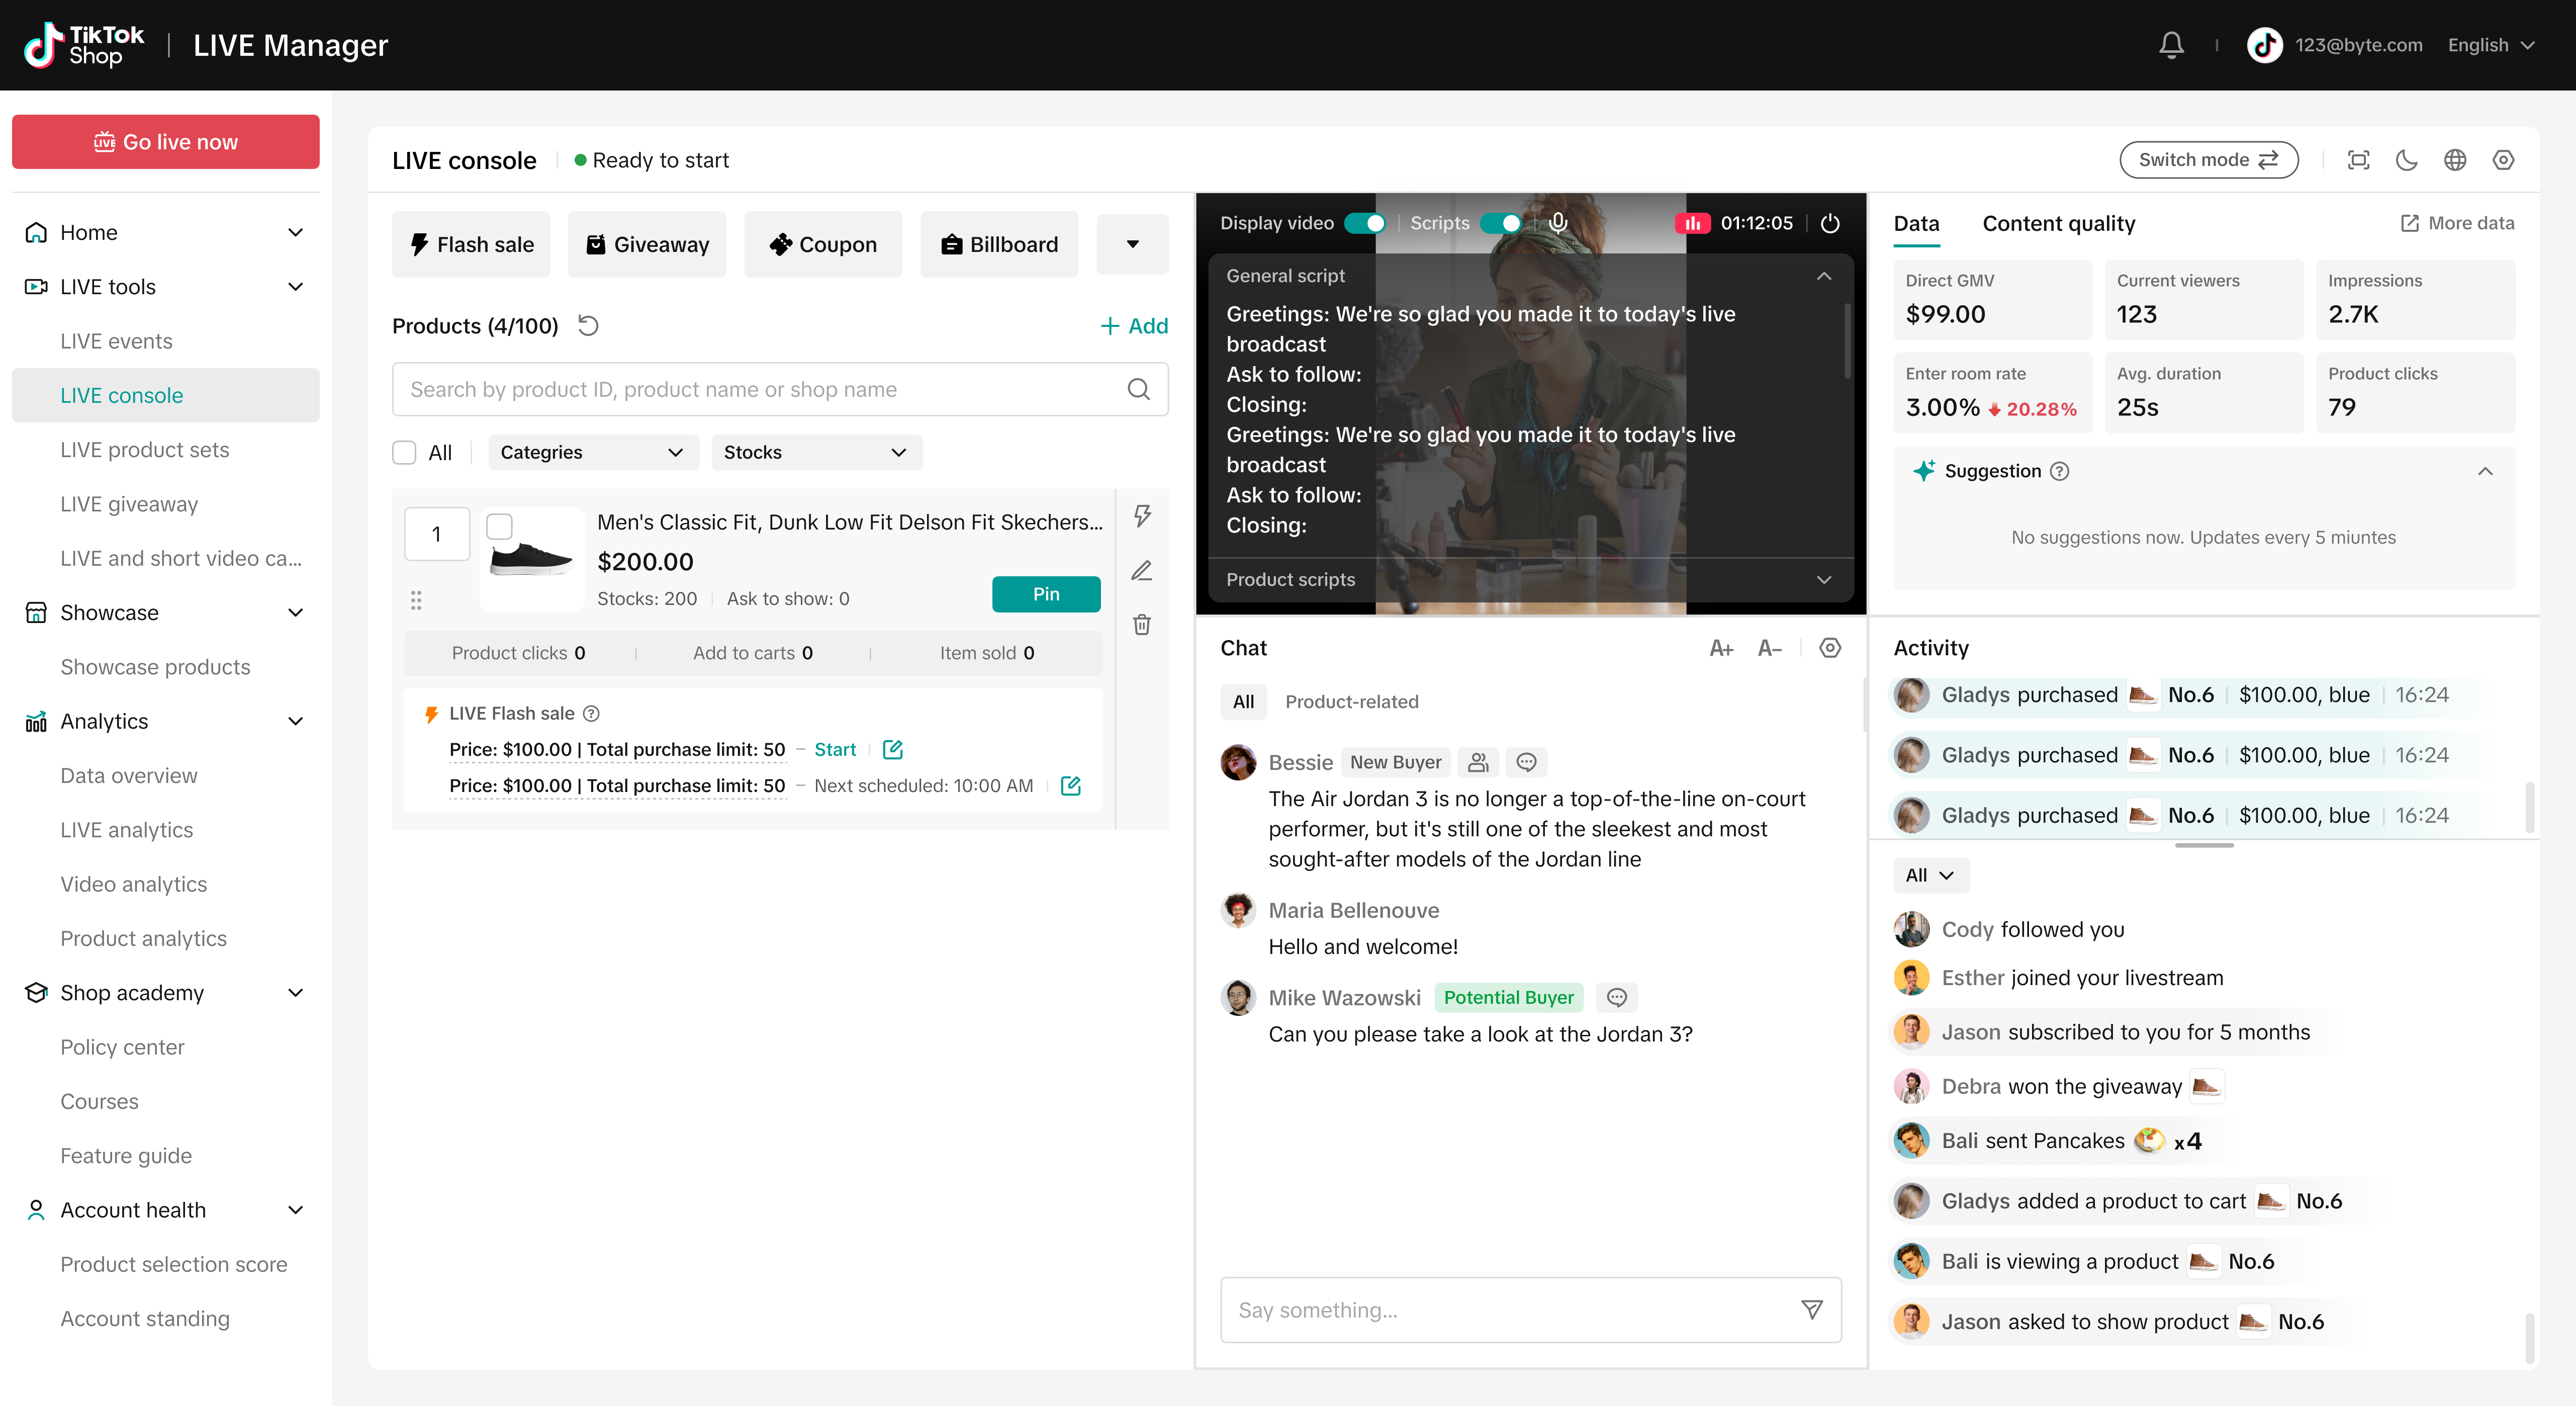
Step 1: Access the Feature To create a LIVE Flash Sale before or during a livestream, log into LIVE Manager and click on LIVE Console from the left navigation bar.Click on Flash Sale tab and click on the "+ Create new" button.
DesktopMobile
Step 2
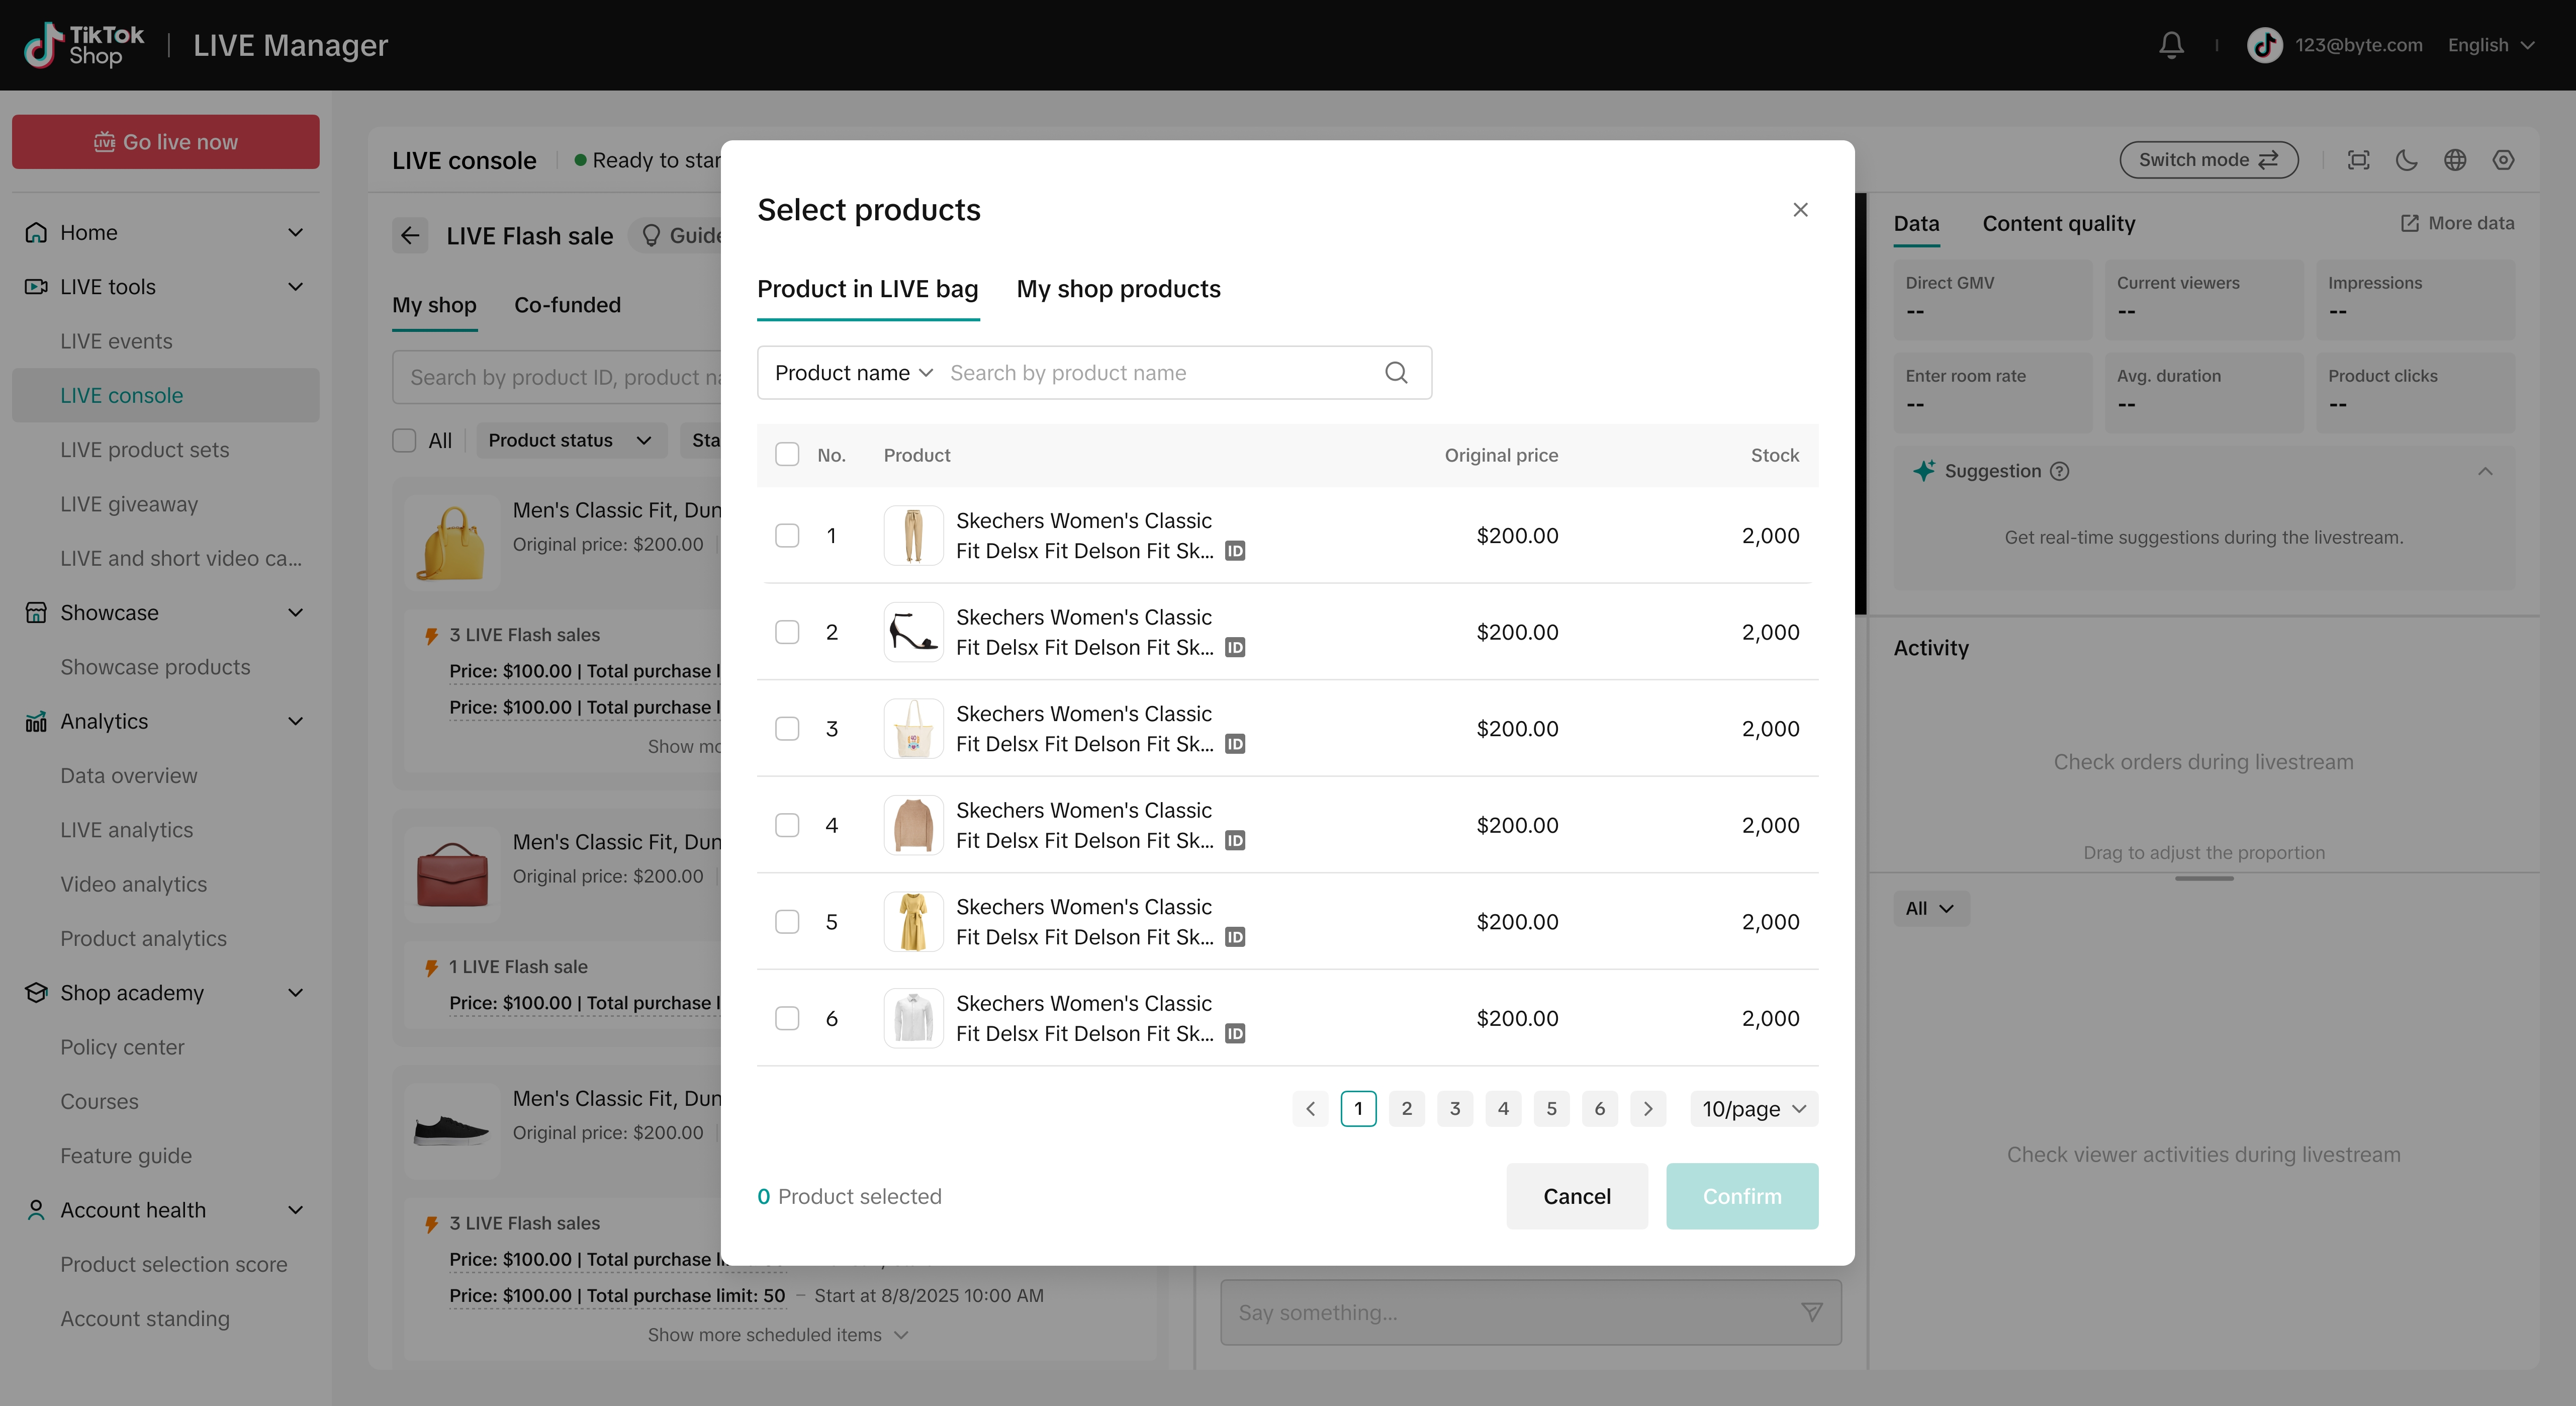
Step 2: Select Products A pop-up window will show the products that are currently in your LIVE shopping bag and are eligible for flash sales. Select the product you want to include in the Flash Sale.
DesktopMobile
Step 3
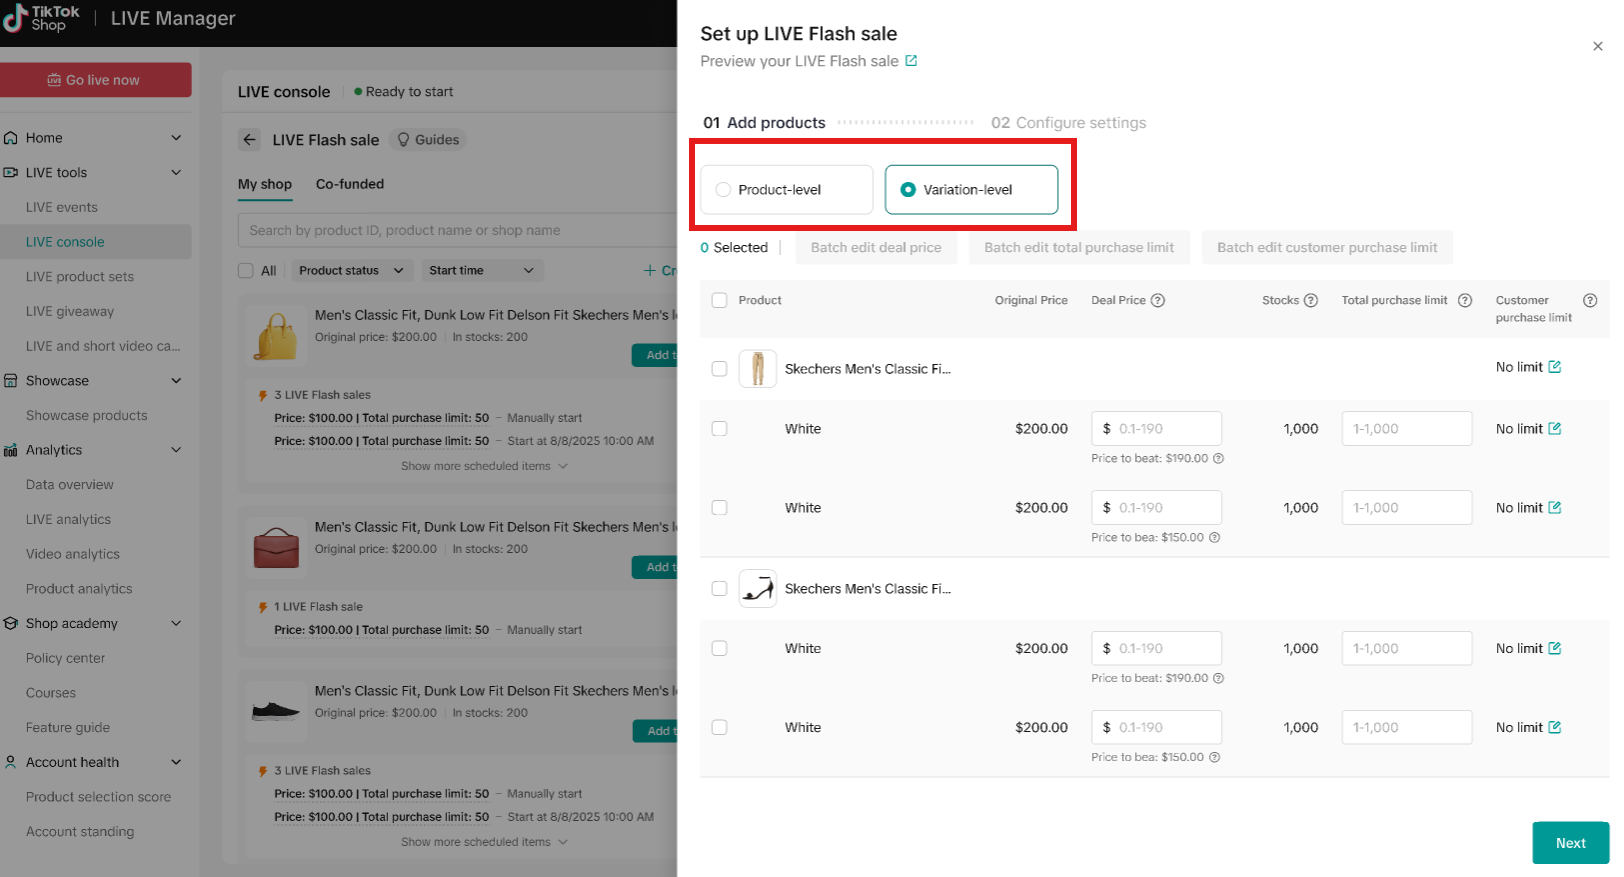
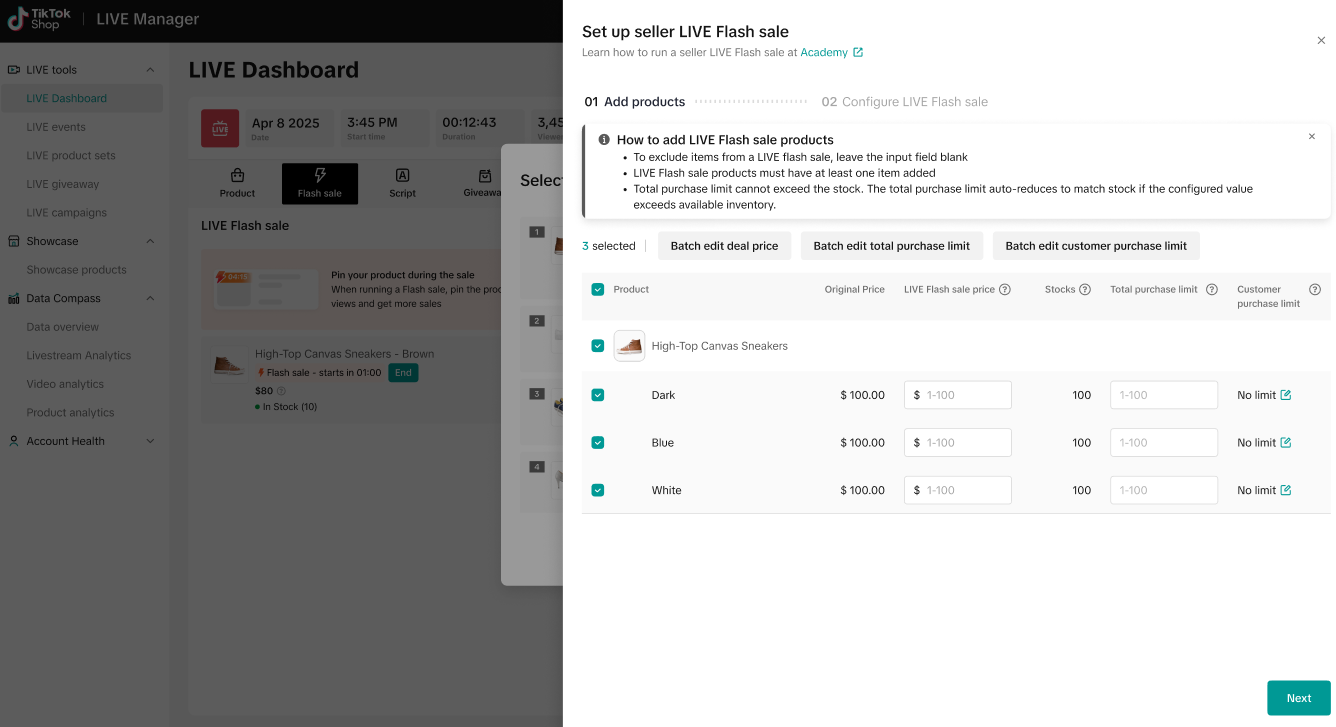
Step 3: Create Variation After selecting a product, all of its SKUs will be displayed. Flash Sales can be created either at the Product level or at the SKU level. You can select one or multiple SKUs to include in your Flash Sale. Use batch edit to update the Deal Price, Total Purchase Limit, and Customer Purchase Limit.To exclude a specific SKU from the Flash Sale, leave its Deal Price and Total Purchase Limit fields blank.
Desktop
Step 4
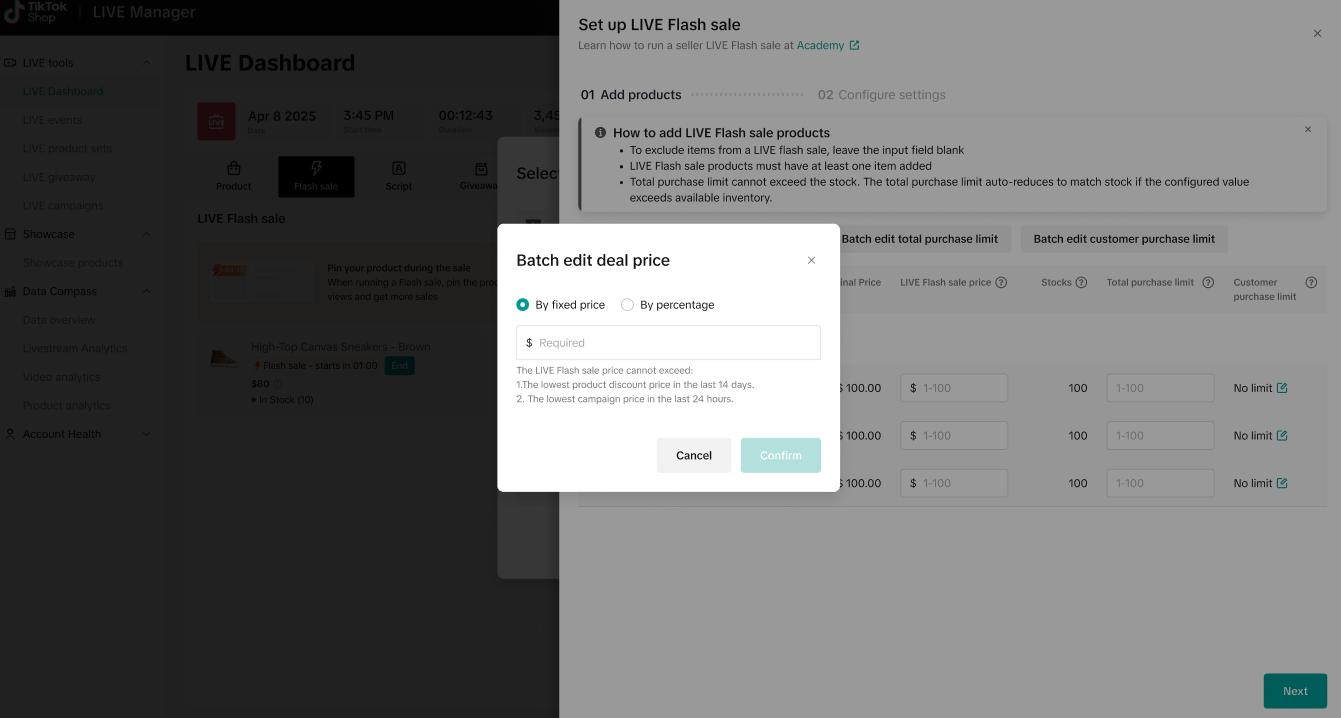
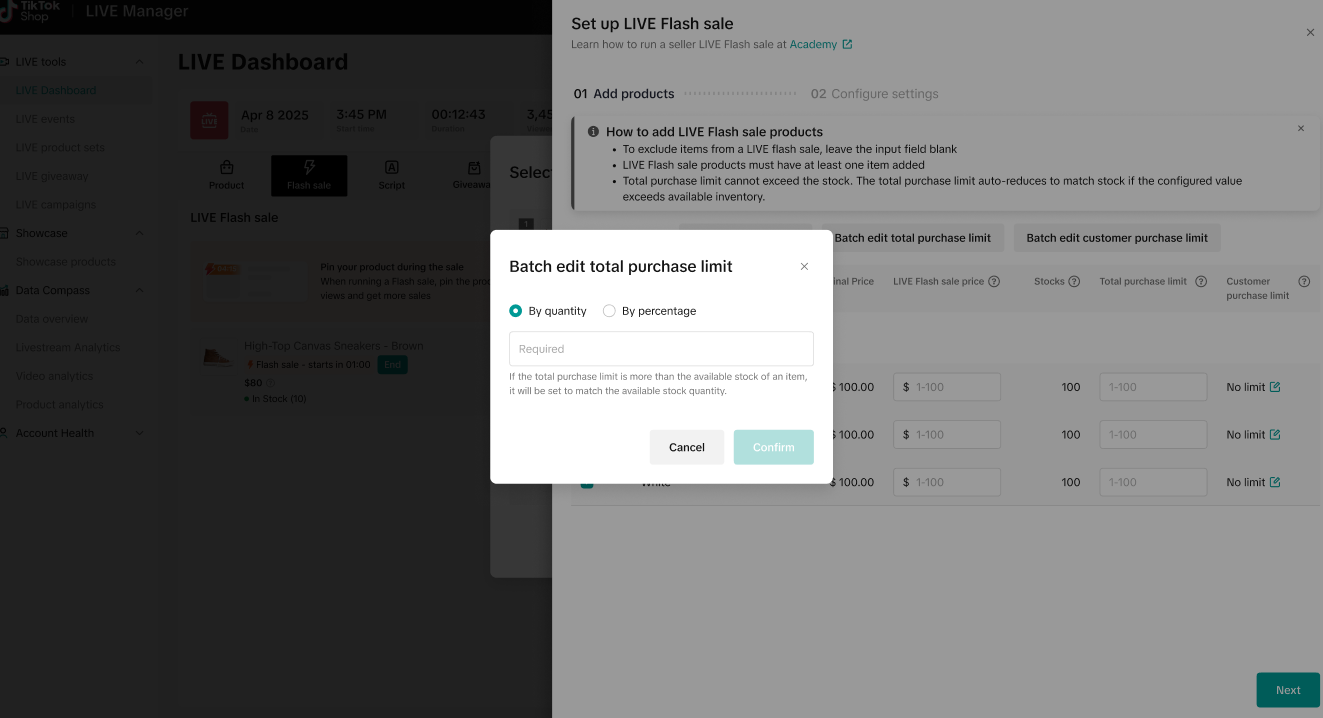
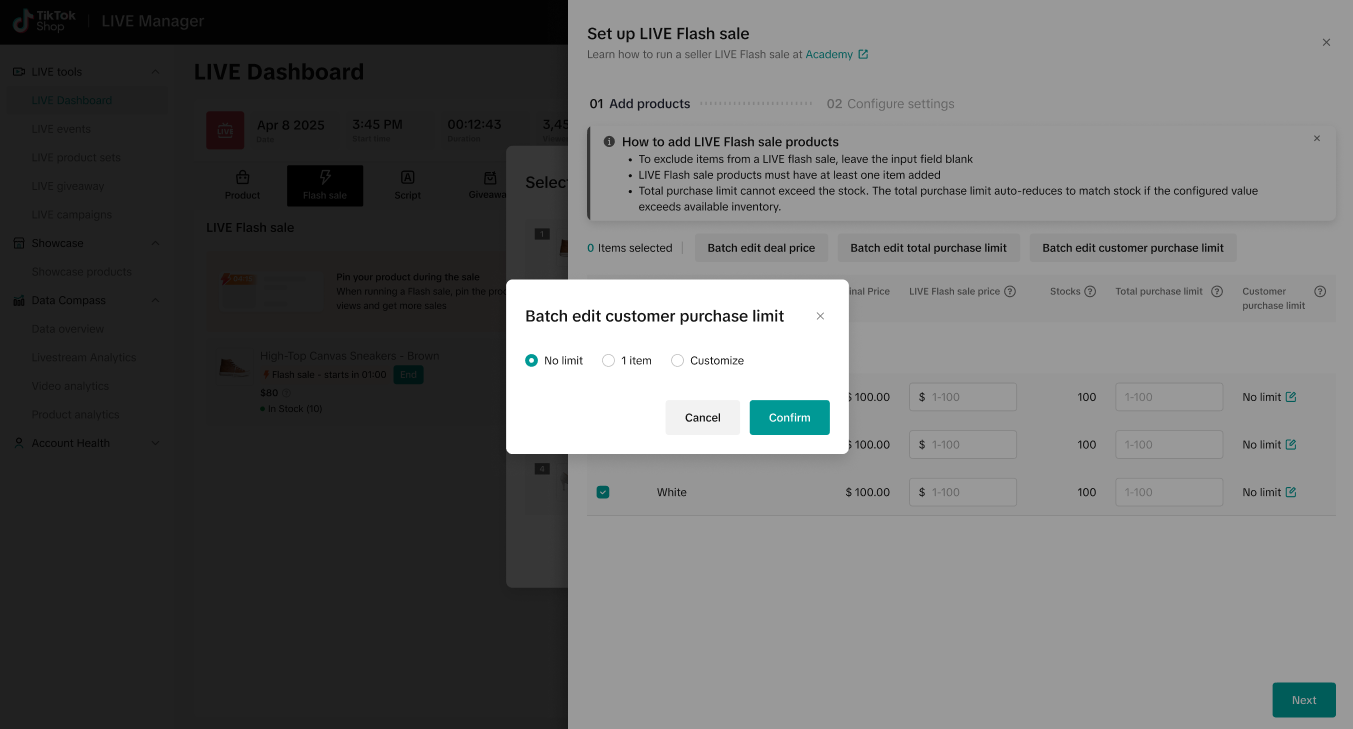
Step 4: Batch Edit Deal Price, Purchase Limit, Customer Purchase Limit You can either manually edit each SKU, or select all SKUs and click "Batch Edit Deal Price", "Batch Edit Total Purchase Limit", or "Batch Edit Customer Purchase Limit" option. Once you're done, click Confirm to save your changes. Click Next to proceed to Configure Settings.
Desktop
Step 5
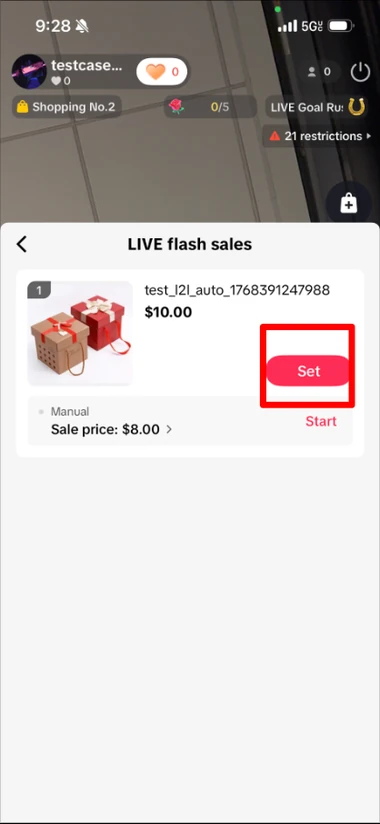
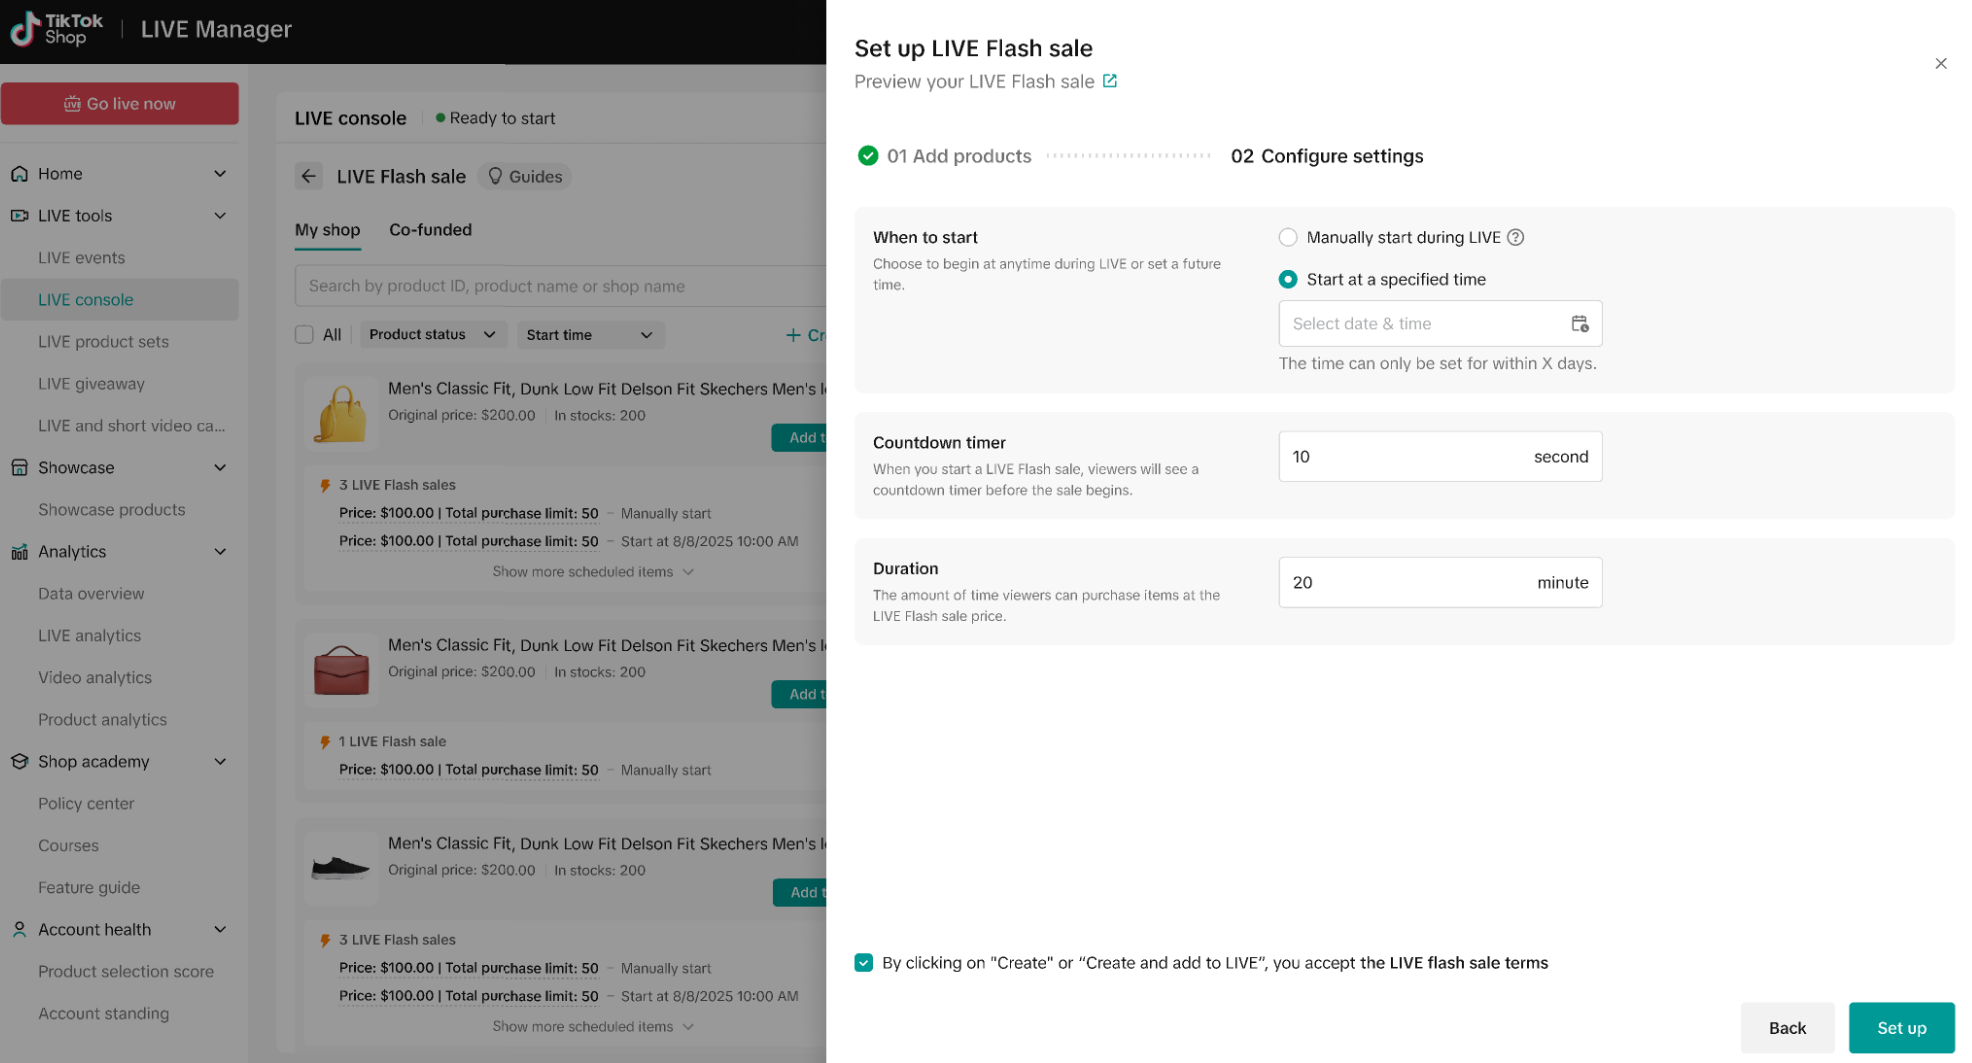
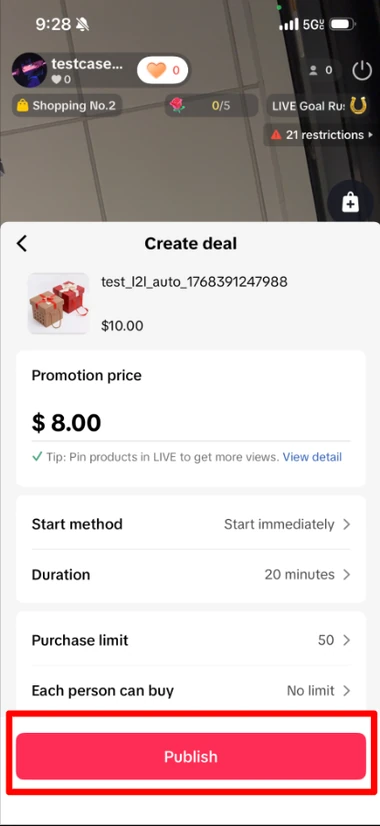
Step 5: Configure Flash Sale Settings Set when you want your flash sale to start (see note section below). Set your countdown timer (between 10 and 300 seconds) and Flash Sale duration (between 1 and 20 minutes). When you're ready, click "Create and Publish." Click Set up once you're complete. Note: There are three types of LIVE Flash Sales you can create in LIVE Manager: Pre-LIVE:
You can create a Flash Sale that you start manually.
You can schedule a Flash Sale to start automatically at a specific time.
During LIVE (*includes both options above*):
You can create a Flash Sale that starts immediately after you set it up.
From a conversion standpoint, LIVE Giveaway has two relevant mechanics. The first is the Purchase task within Task-based Giveaway: hosts can select purchase as one of up to two required tasks (paired with a required non-purchase entry method, such as follow, comment, or watch-time), so a viewer must buy something to qualify for that entry path. The second is Top Shopper Giveaway, where viewers compete based on total purchase GMV during the LIVE – both Auction and Buy Now purchases count toward the ranking, and the top shoppers when the Giveaway ends automatically win, with ties going to whoever reached that amount first. Hosts select the prize, set the number of winners, choose the duration, and launch directly during the LIVE. Only one Giveaway can be active at a time, regardless of format.
Why it drives conversion?
The Purchase task turns the Giveaway itself into a direct conversion mechanic – a viewer who was only planning to watch now has a concrete, immediate reason to complete a purchase before the Giveaway closes, not just engage.
Because the purchase task must be paired with a required non-purchase entry method, it still captures viewers who won't buy, while giving buyers an extra edge – that combination lifts both entries and purchases in the same mechanic.
Top Shopper is structurally an AOV mechanic, not a traffic mechanic: ranking by total GMV explicitly rewards shoppers for spending more, making it the clearest basket-expansion lever in the kit.
Top Shopper is strongest when the prize justifies higher spend – pair a meaningfully desirable prize with a live leaderboard callout to keep competitive pressure visible.
How to set it up?
Step 1
Step 1: Open LIVE Giveaway On desktop, log in to LIVE Manager and go to LIVE Console > Giveaway. You can create a Giveaway before your LIVE or while you are LIVE. Select + New giveaway to get started. From your LIVE in the TikTok app, open LIVE tools > LIVE Giveaway. Existing Giveaways will appear here. Select Create new to create a Giveaway.
DesktopMobile
Step 2
Step 2: Select a Prize Choose the prize you want to offer. You can set up:
A custom prize, such as merchandise or another reward; or
A product prize from your shop.
Then, set the prize quantity or number of winners.
DesktopMobile
Step 3
Step 3: Choose How Viewers Can Win Select your Giveaway participation method: Task-based Giveaway Choose up to two participation tasks:
Follow the host
Comment with a specified phrase
Watch the LIVE for a minimum amount of time
Make a purchase*
*Viewers must also be provided a non-purchase method of entry in accordance with TikTok Shop requirements. Top Shopper Giveaway Under How to participate, select top customers. Choose the number of winners. Viewers who purchase during the LIVE are automatically ranked by GMV, and the top shoppers when the Giveaway ends will win. Both Auction and Buy Now purchases count. If shoppers have the same GMV, the shopper who reached that amount first ranks higher.
DesktopMobile
Step 4
Step 4: Set the Number of Winners and Duration of the Giveaway Choose how many winners and how long the Giveaway will run. Note: For a task-based Giveaway with a minimum watch-time requirement, the Giveaway must run for at least 2 minutes longer than the required watch time. For example, if viewers must watch for 3 minutes, the Giveaway must run for at least 5 minutes.
DesktopMobile
Step 5
Step 5: Create and Launch Review your settings and select Finish > Create. Your Giveaway will appear under the Giveaway tab. You can edit it before launch or select Publish when you're ready to start it during your LIVE.
LIVE Coupon lets you offer discounts to shoppers during your TikTok Shop LIVE to drive engagement, encourage purchases, and improve conversion. You can use LIVE Coupon to:
Attract new shoppers and reward existing customers with exclusive offers.
Create urgency and encourage viewers to purchase while watching your LIVE.
Offer either a fixed-amount or percentage discount, with configurable minimum spend, quantity, validity period, and eligible products.
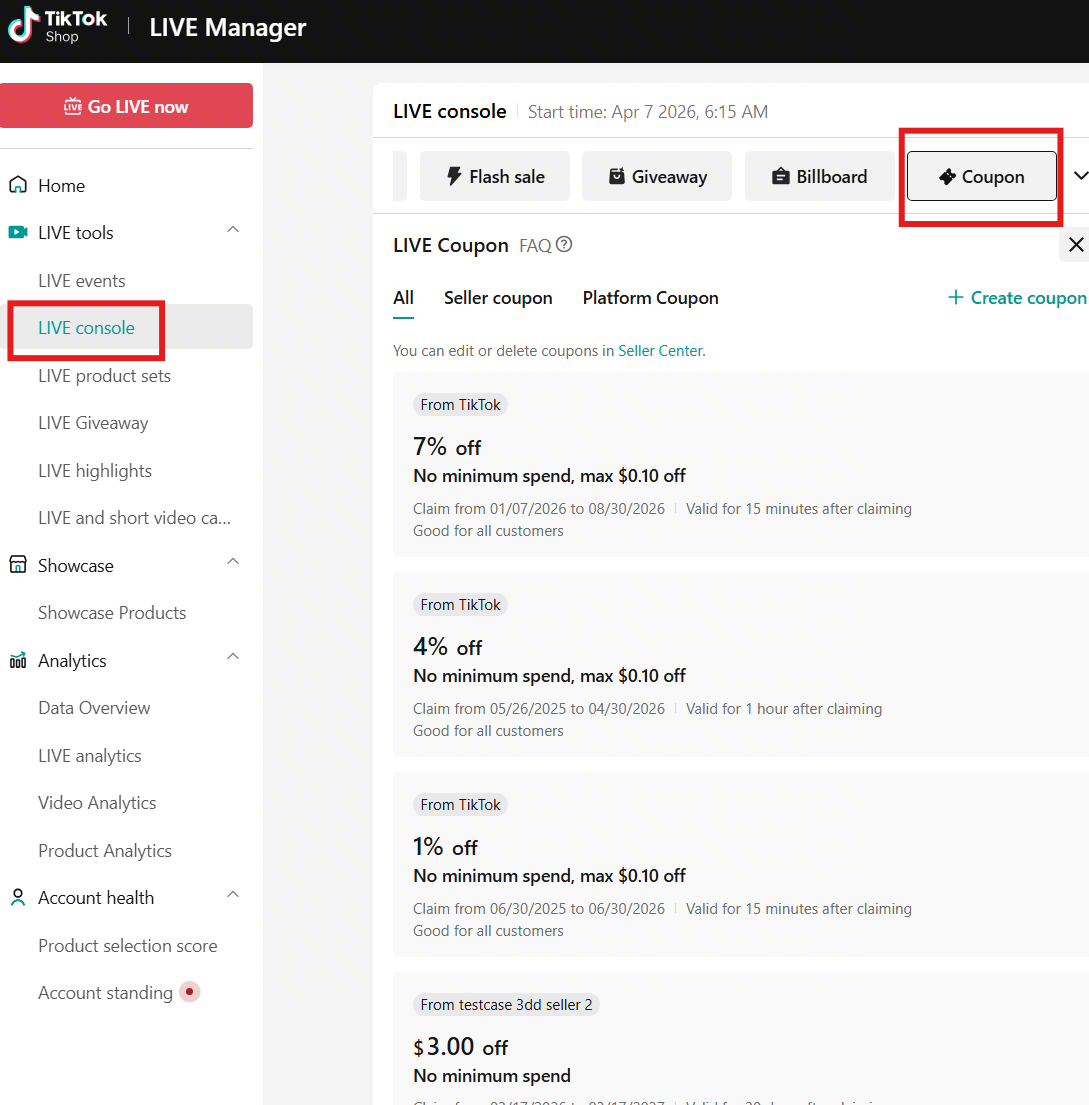
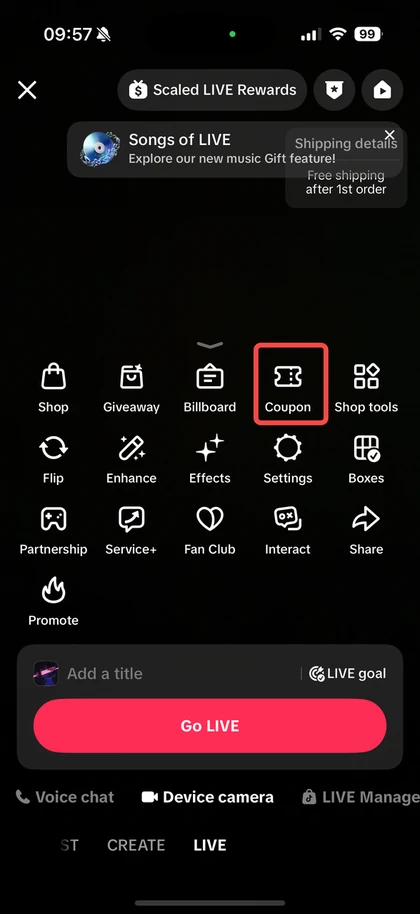
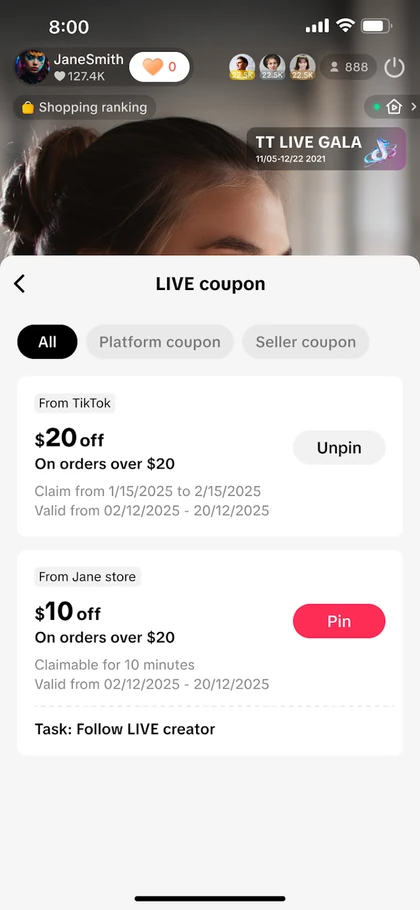
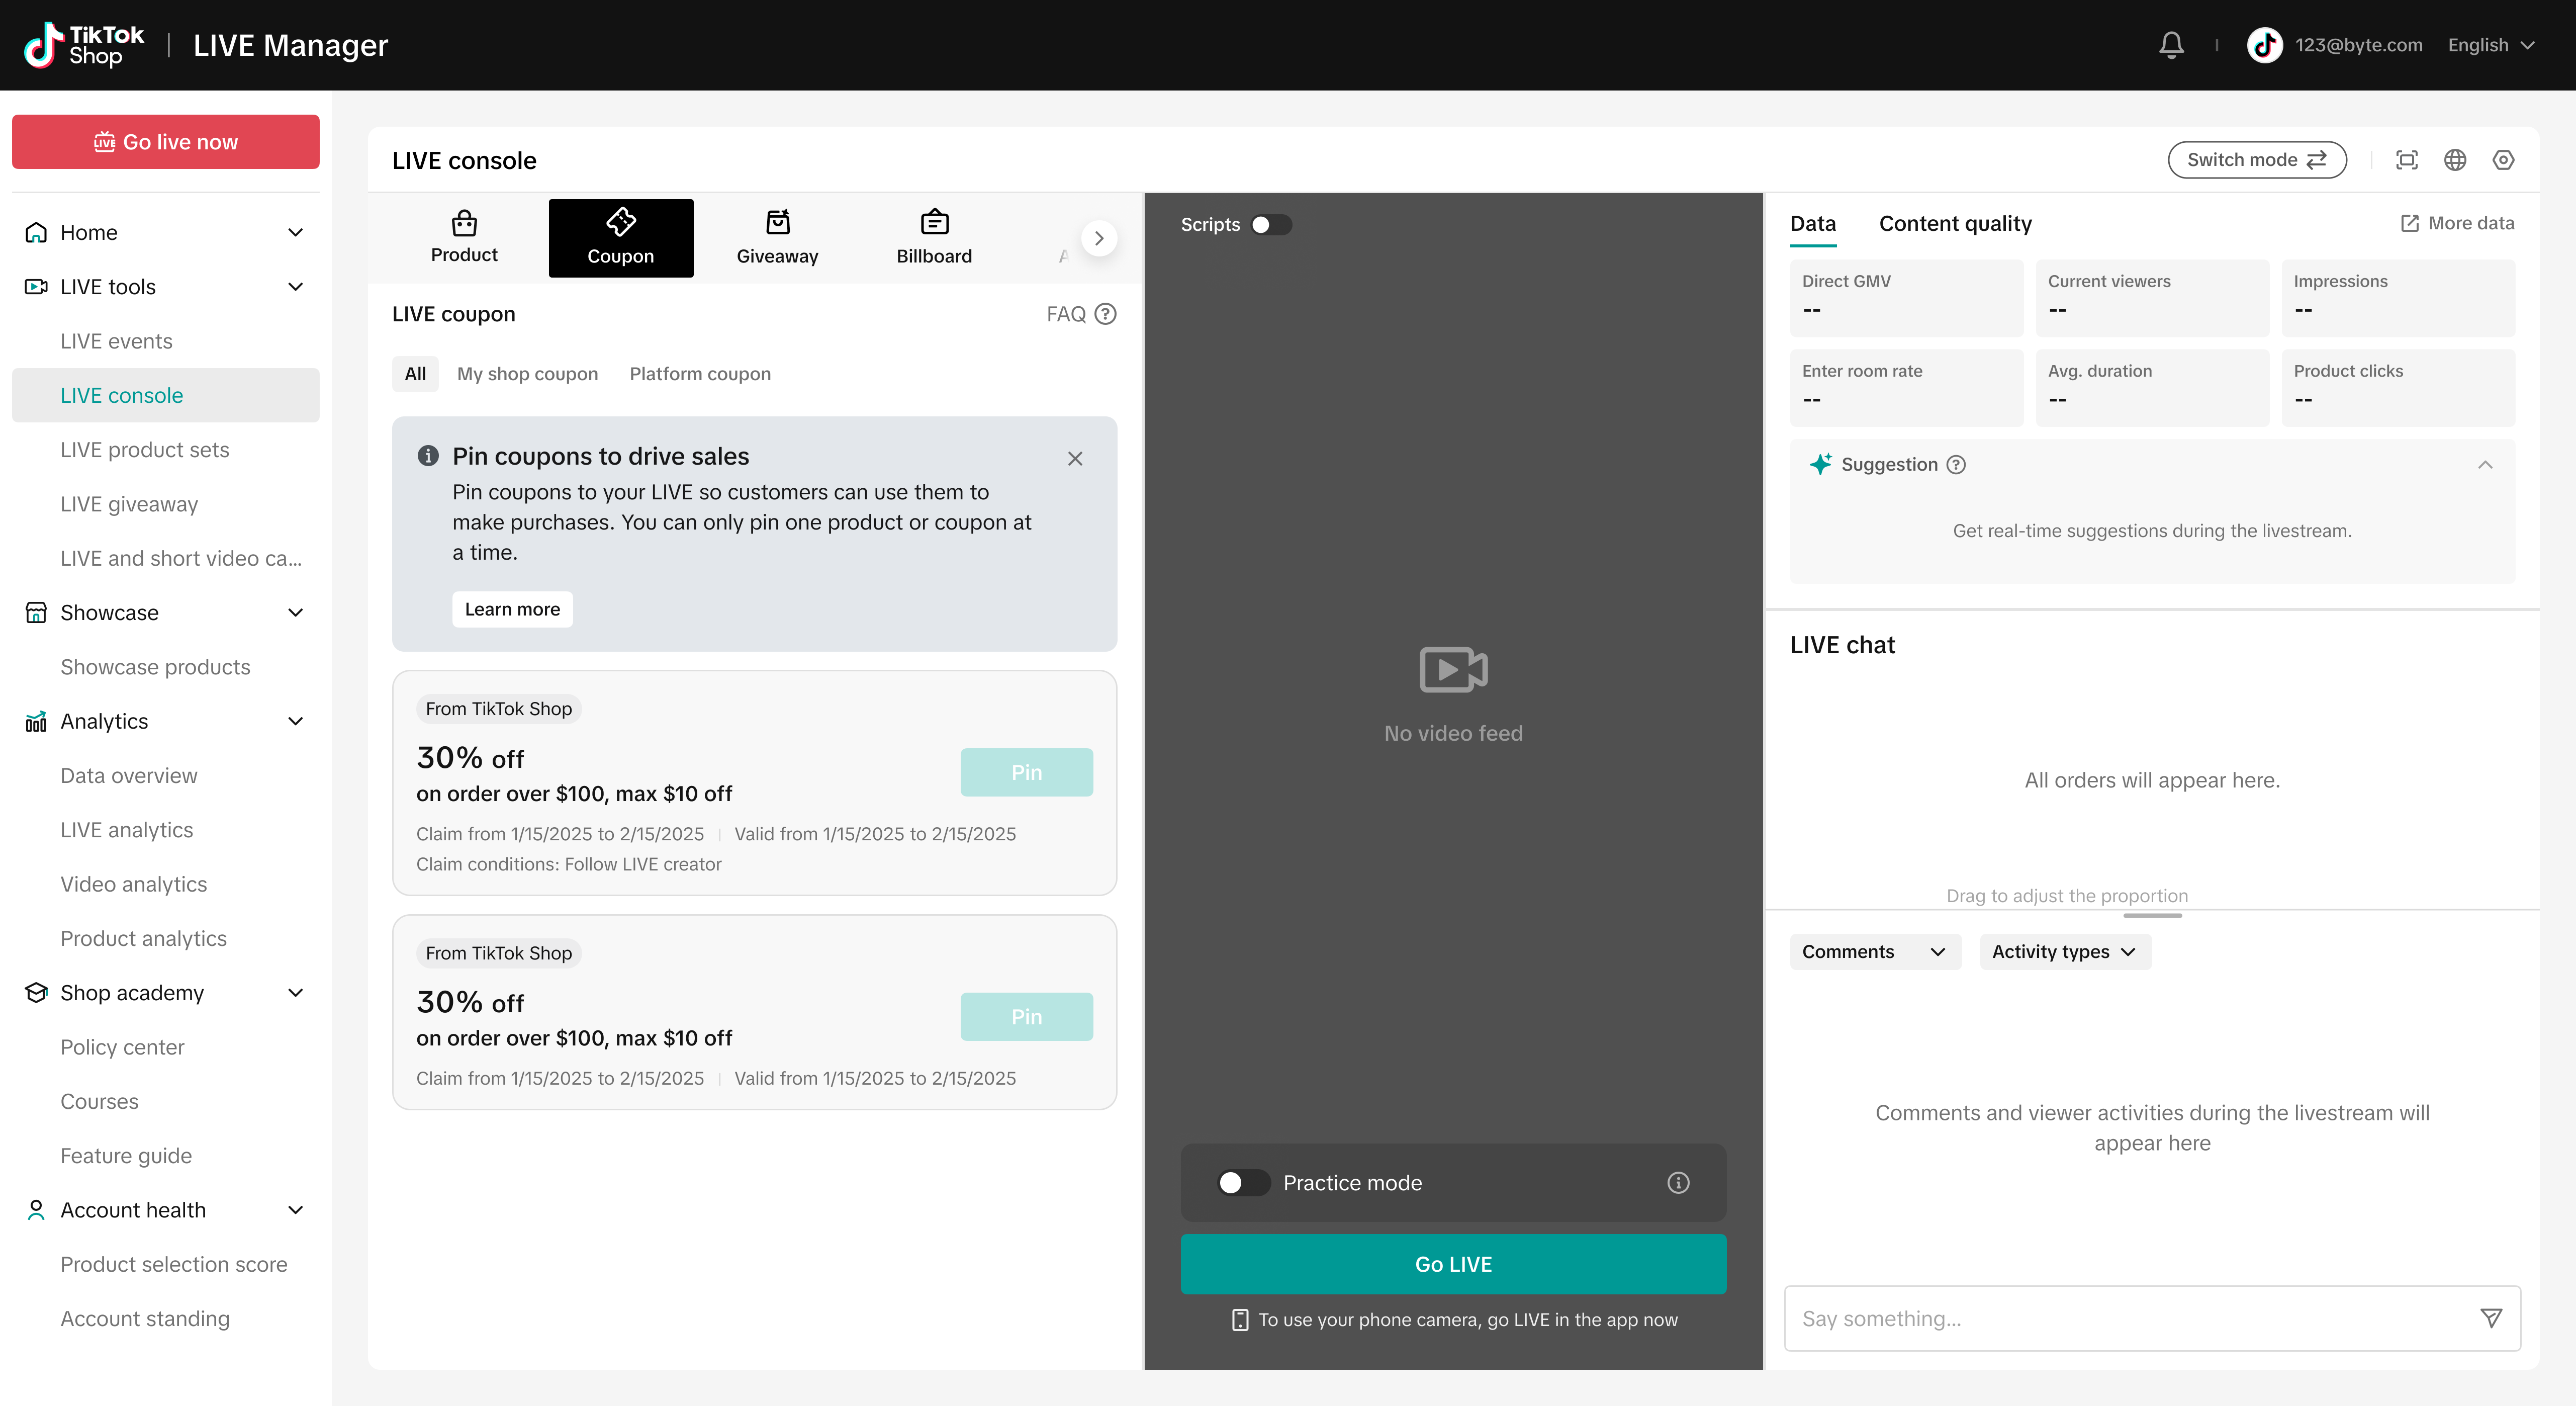
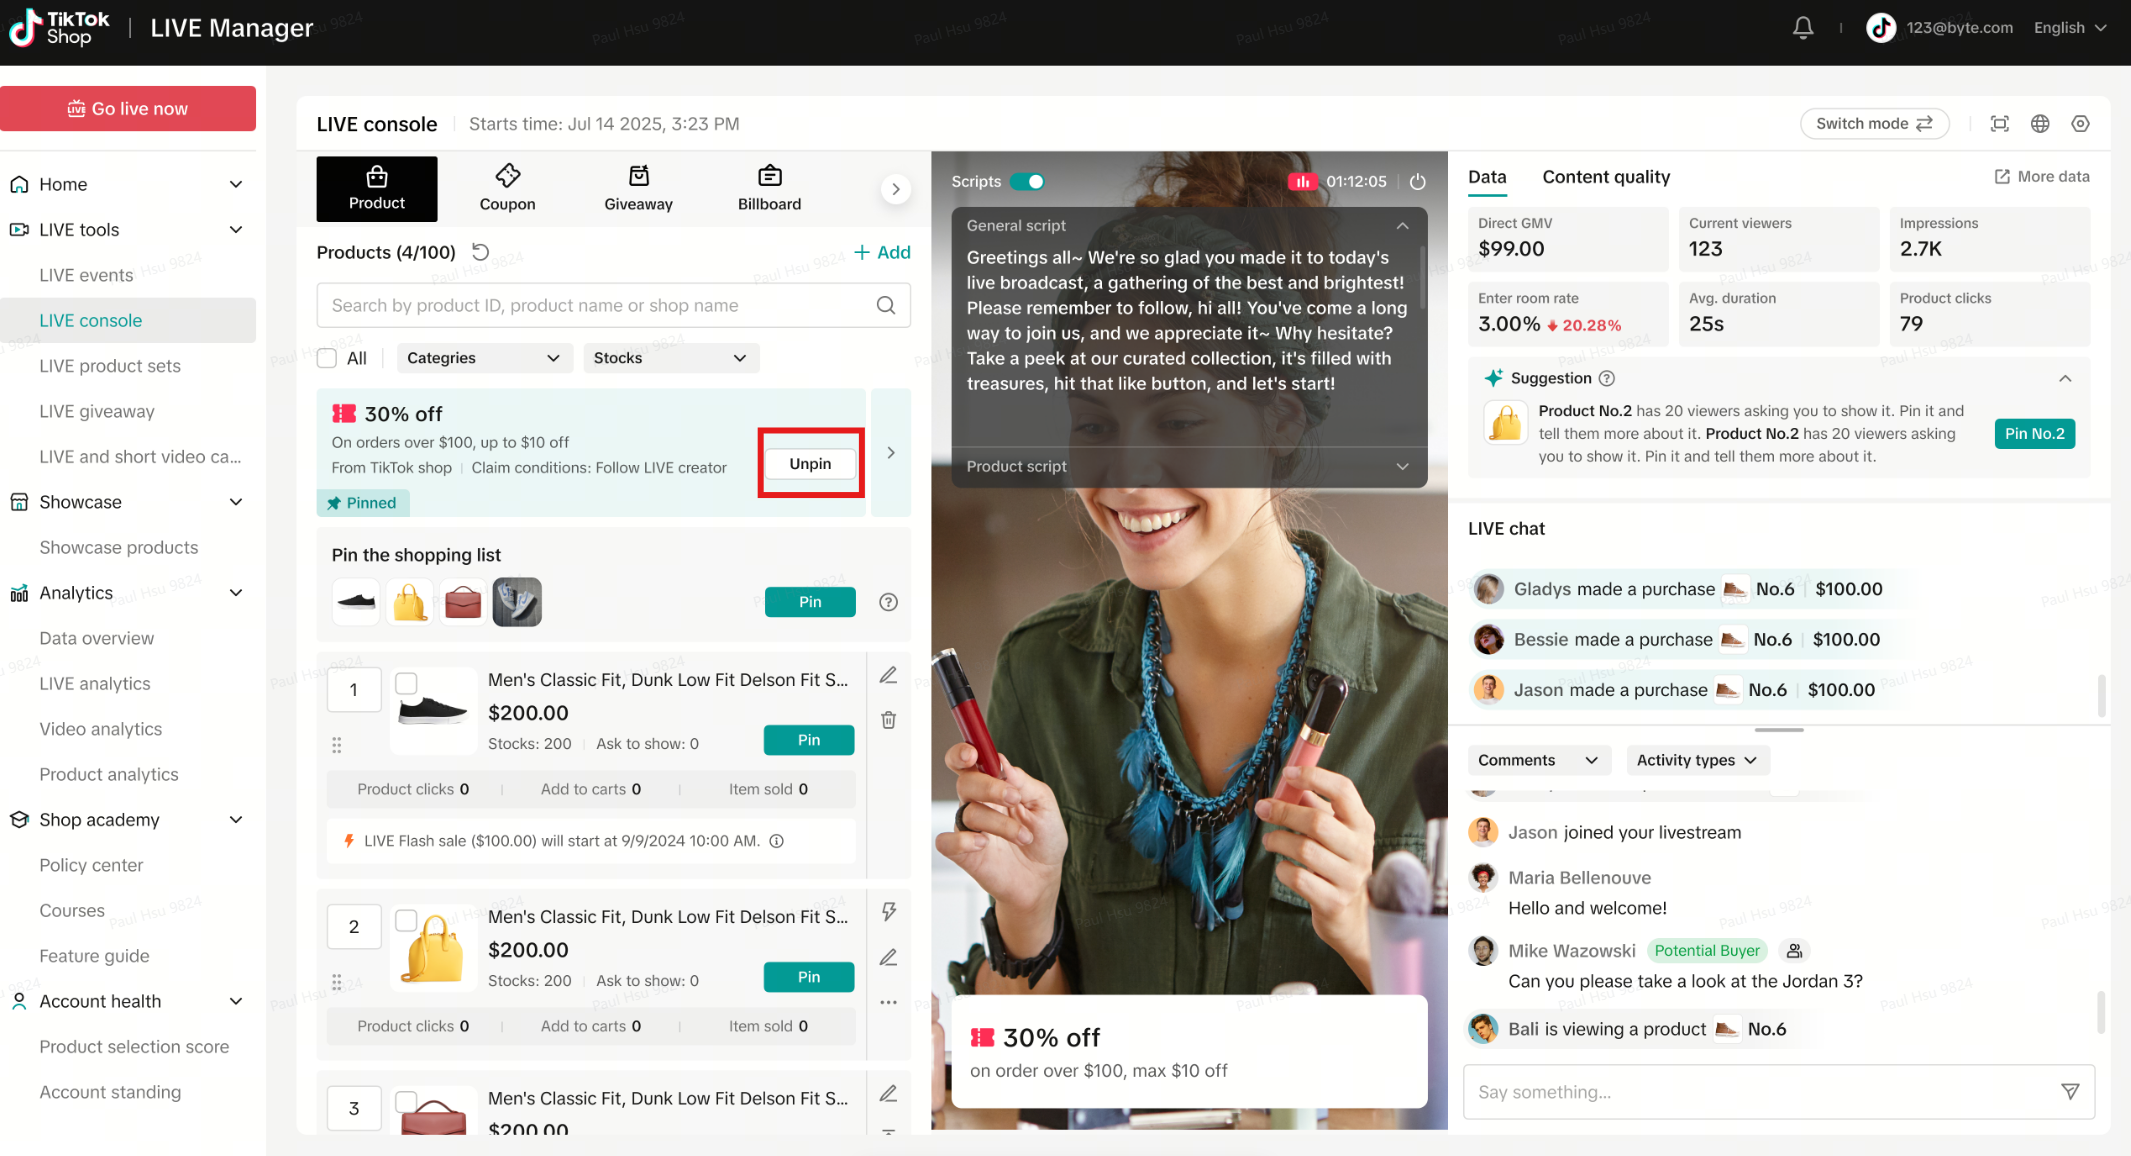
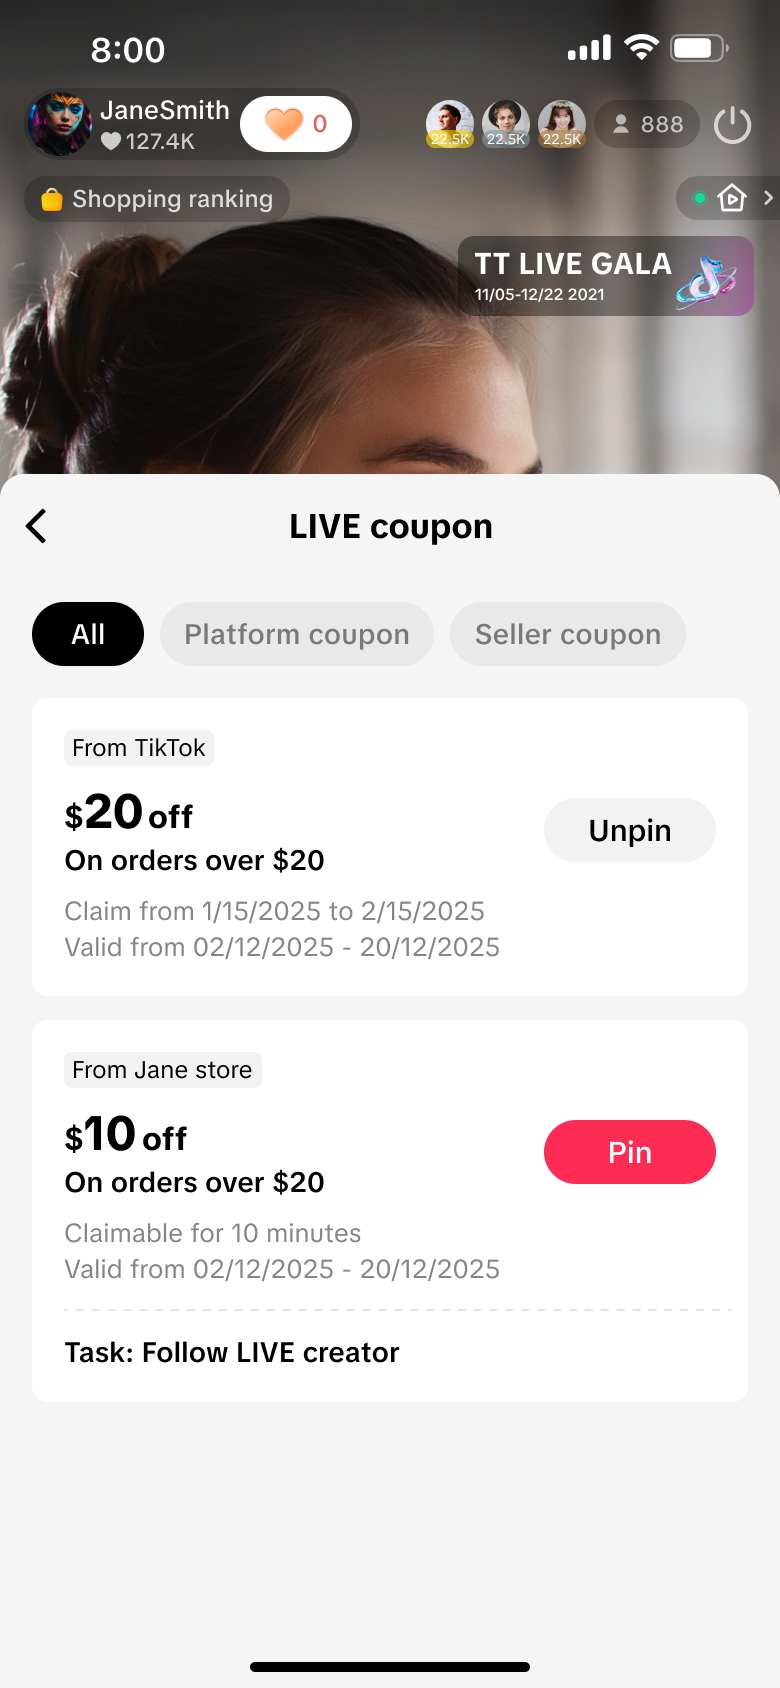
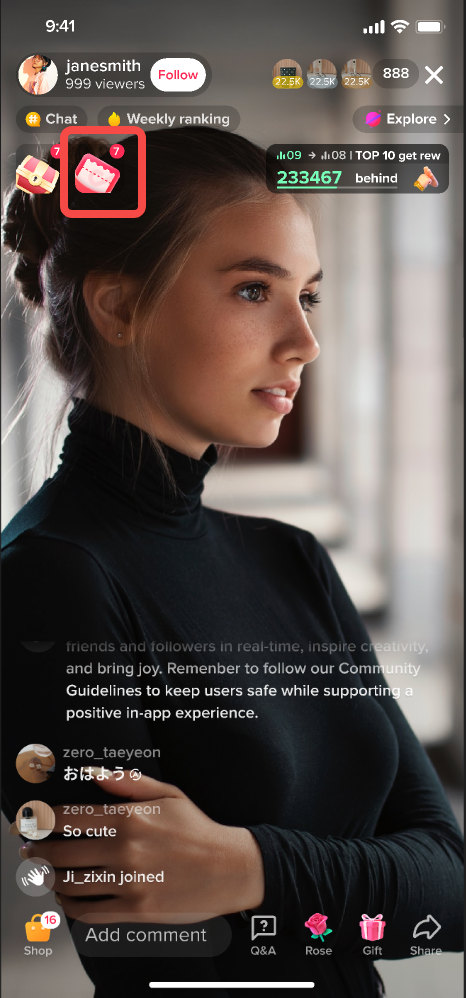
LIVE Coupons can be created from Seller Center or LIVE Manager on desktop. Once an eligible coupon is available for products in your LIVE, shoppers can see and claim it while watching. You can also pin a coupon during your LIVE to give it additional visibility.
Why it drives conversion?
LIVE Coupon is the fastest possible click-to-cart-to-checkout bridge for a viewer who is already watching and already interested – there is no "save it for later" behavior available.
It should be deployed at the exact moment a viewer has expressed interest (a comment spike, a product-click spike on the Dashboard) rather than pre-announced early, so it converts warm intent before it cools instead of training viewers to wait for a discount.
How to set it up?
Step 1
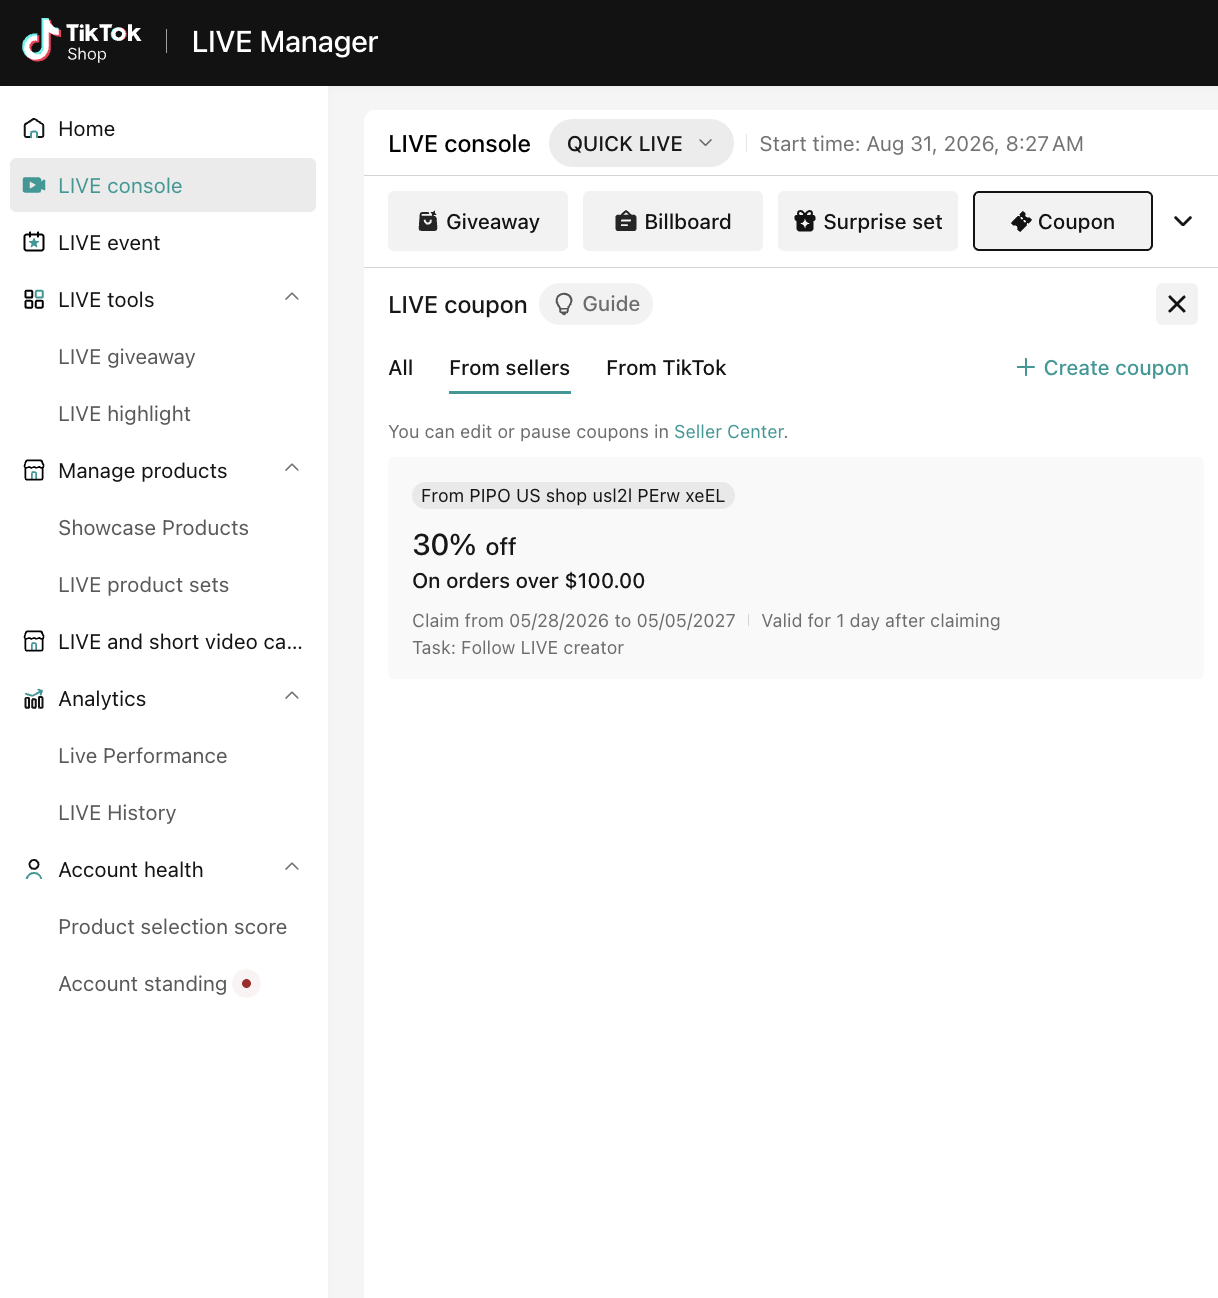
Step 1: Access LIVE Coupon
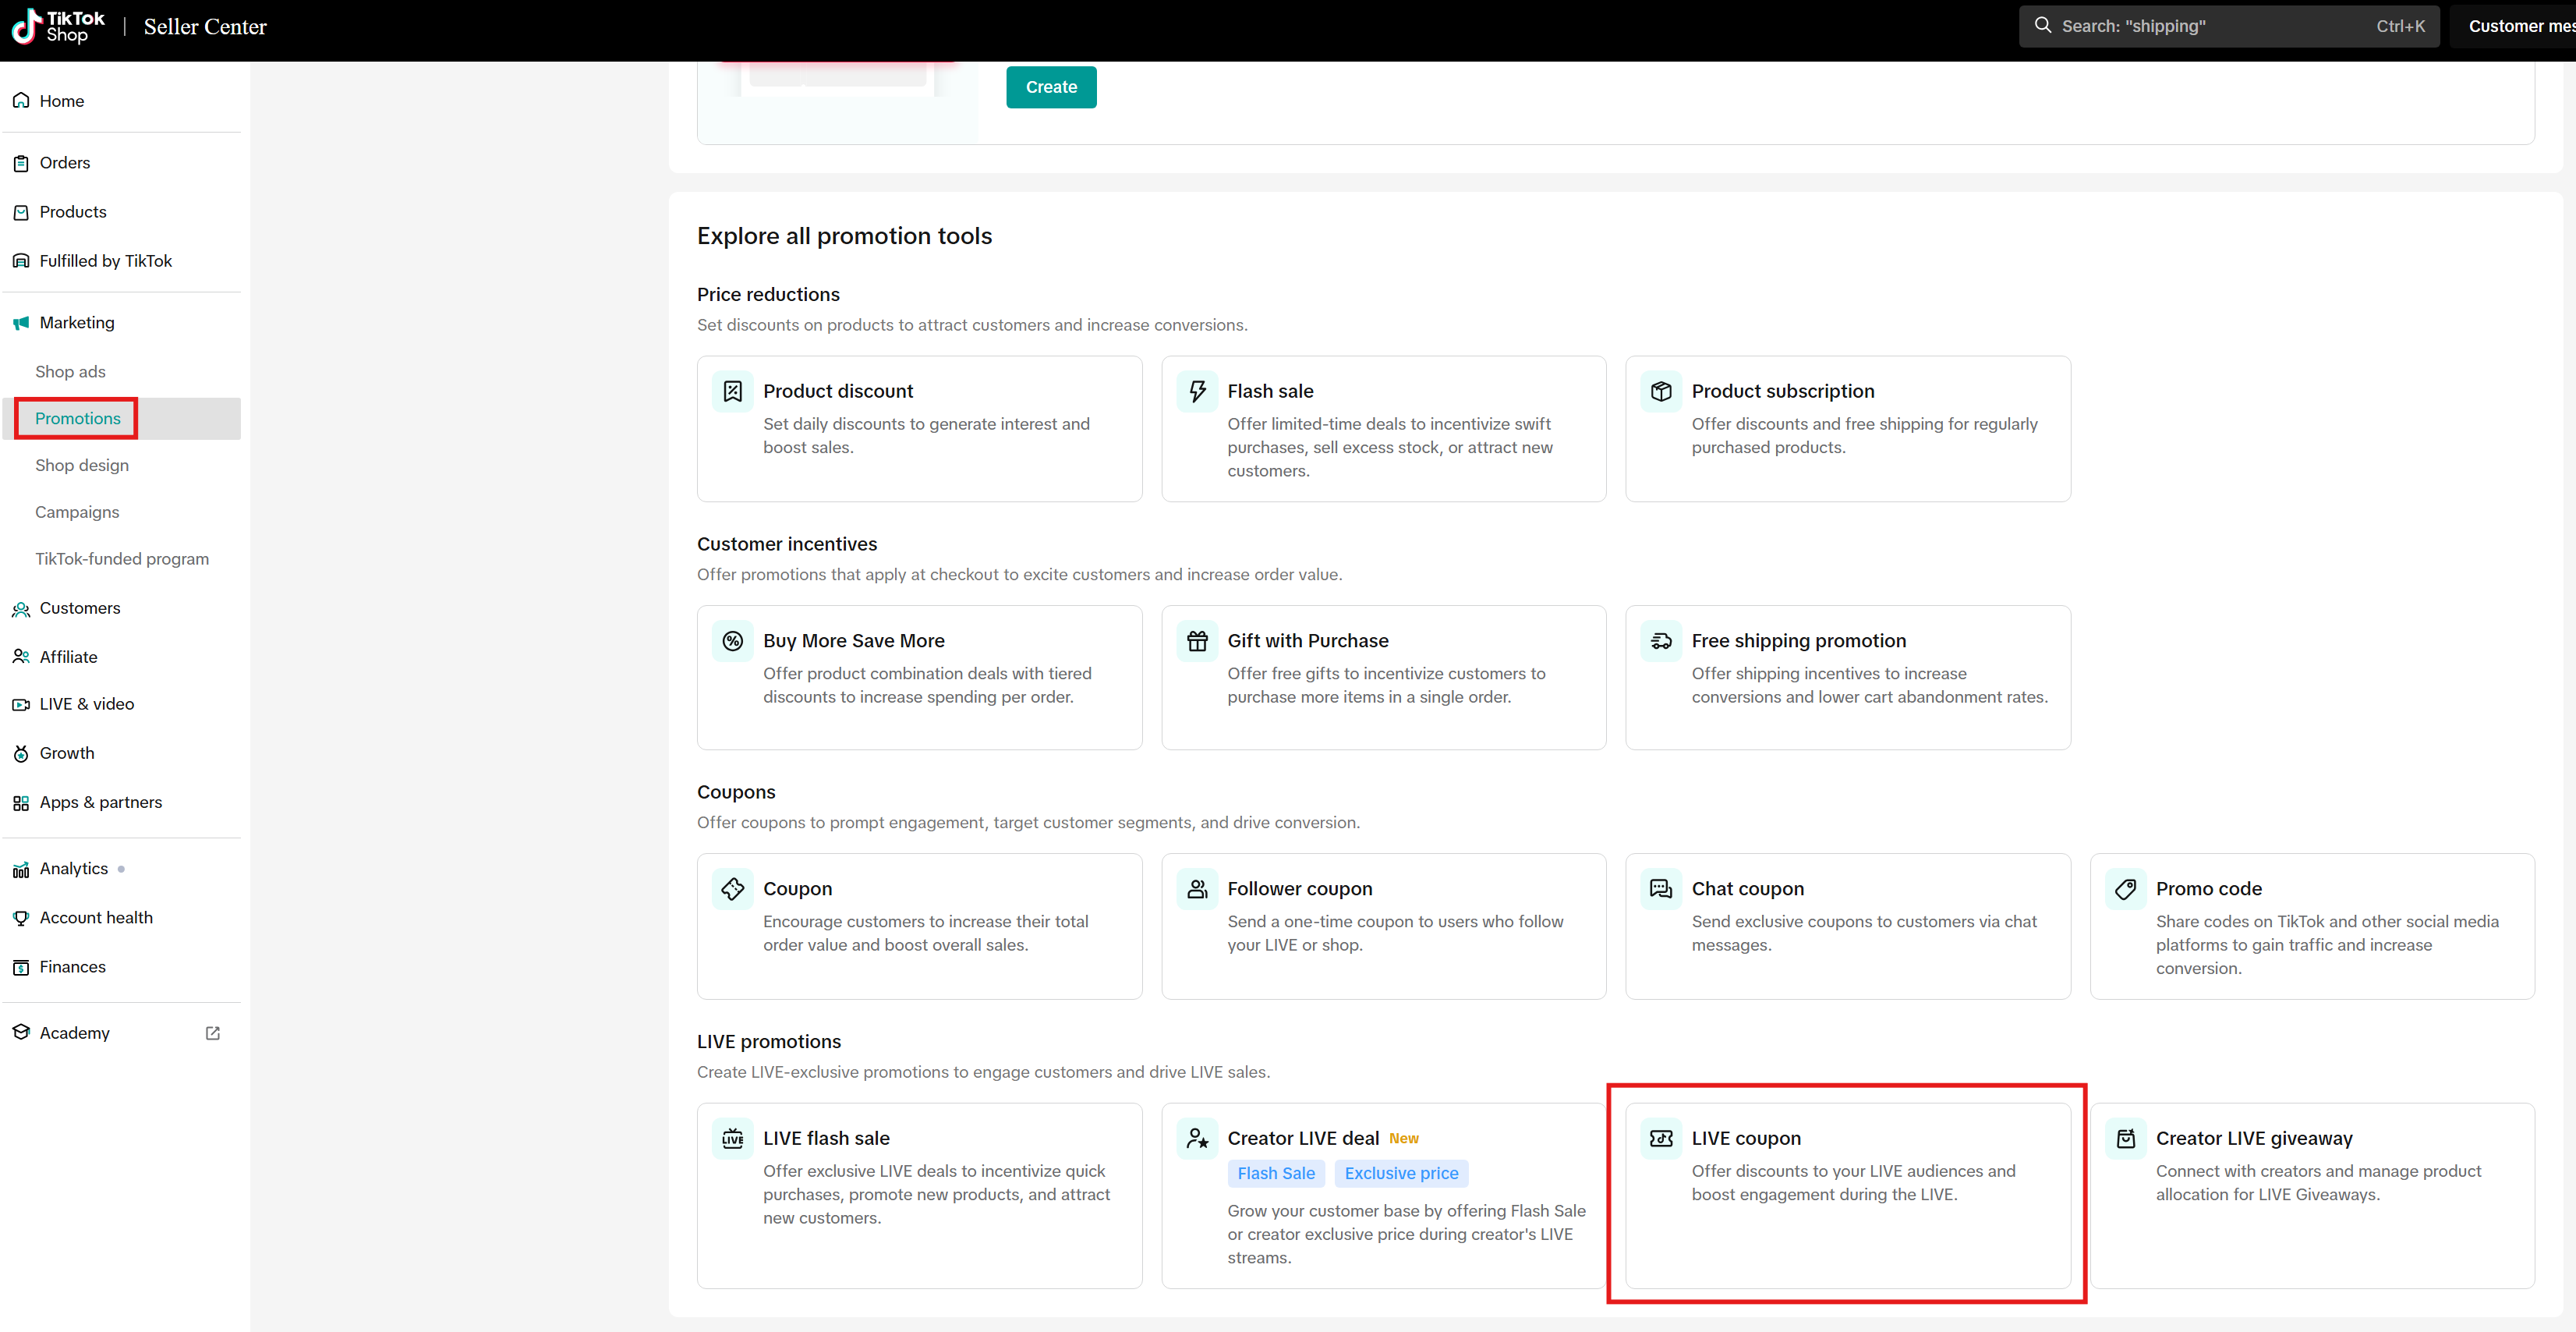
Seller Center: Go to Marketing > Promotions > LIVE Coupon, then create a new LIVE Coupon.
LIVE Manager: Go to LIVE Console > Coupon > Create coupon.
Note: Seller Center provides the full LIVE Coupon promotion setup, while LIVE Manager lets you quickly create coupons directly as you prepare your LIVE.
Desktop
Step 2
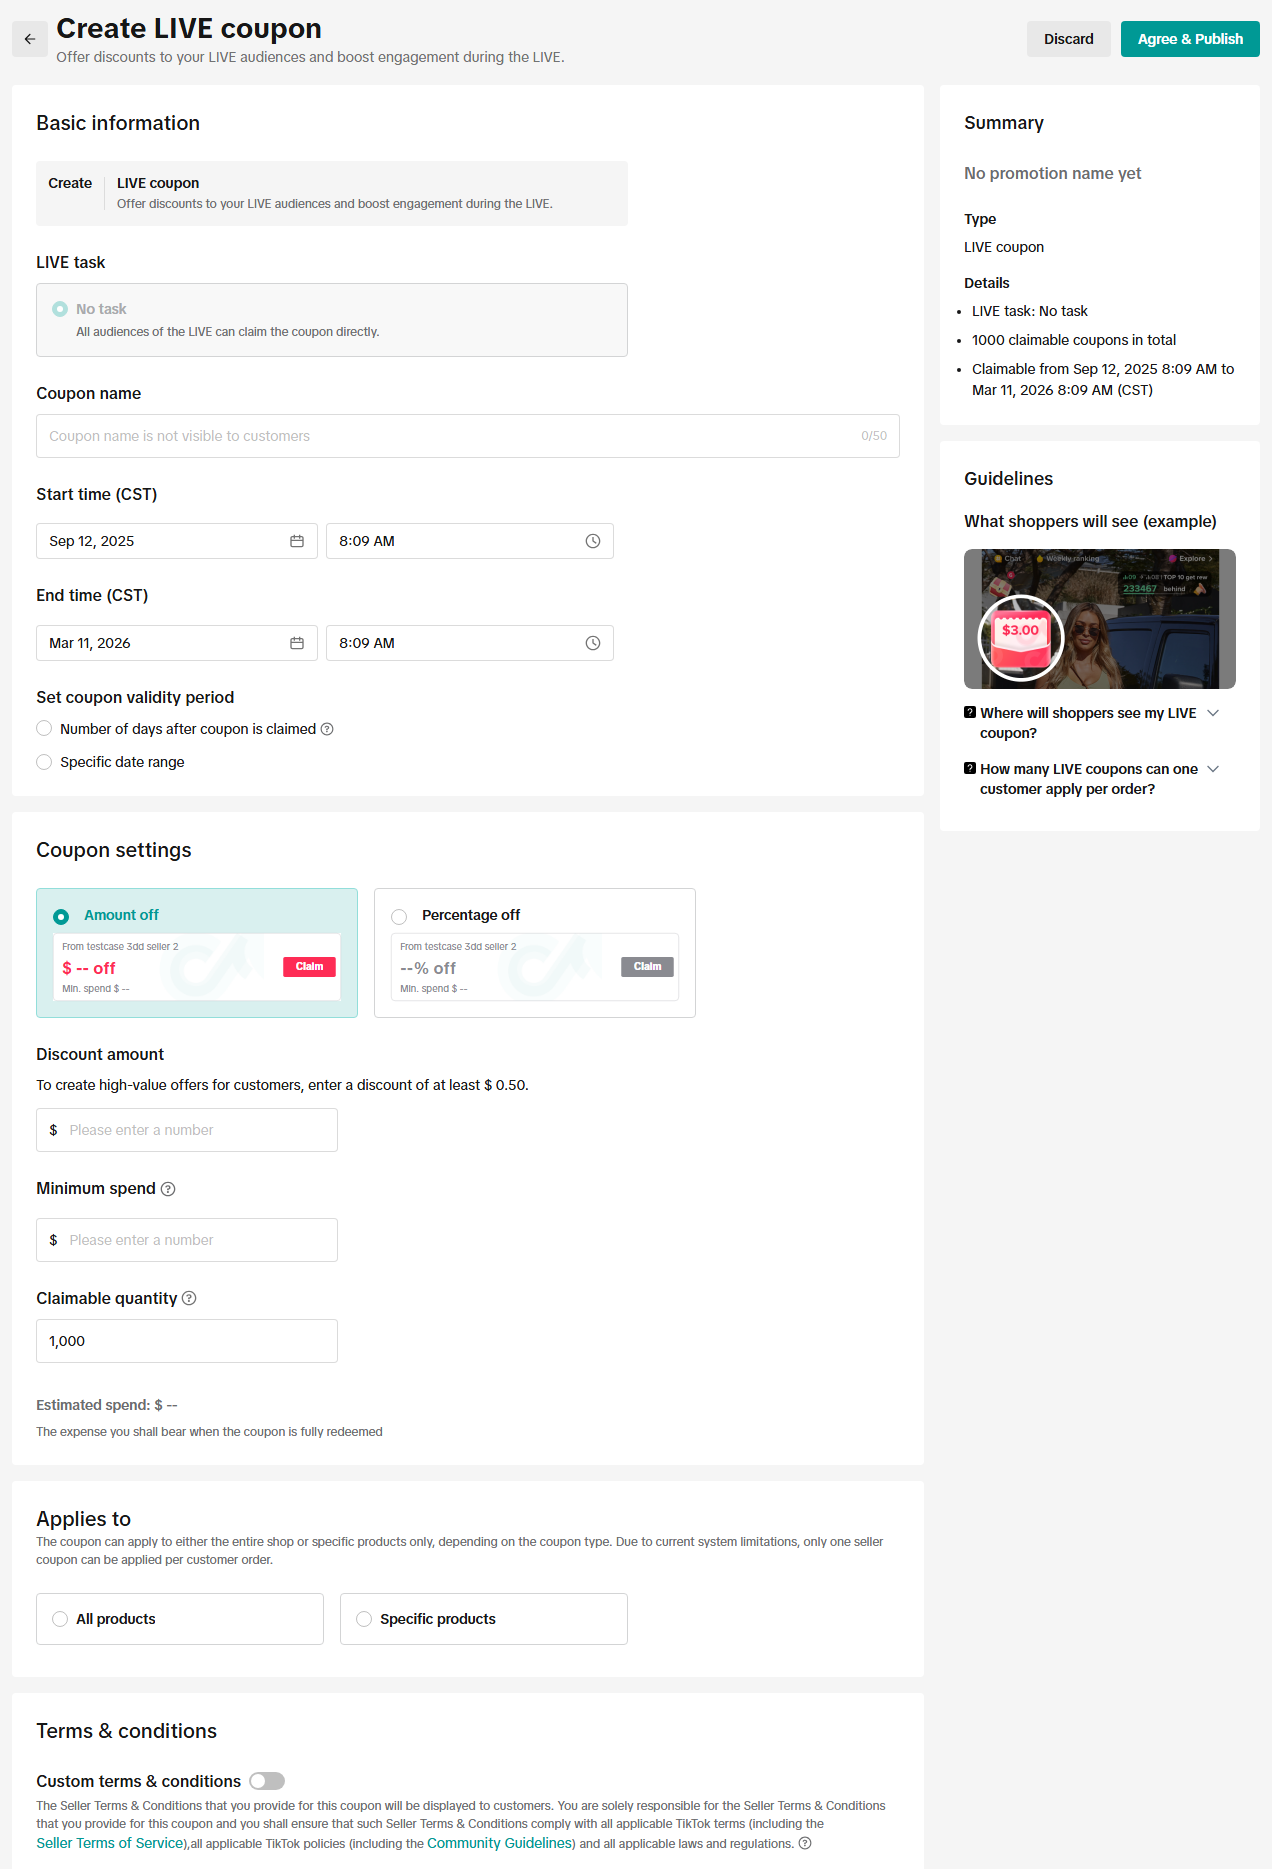
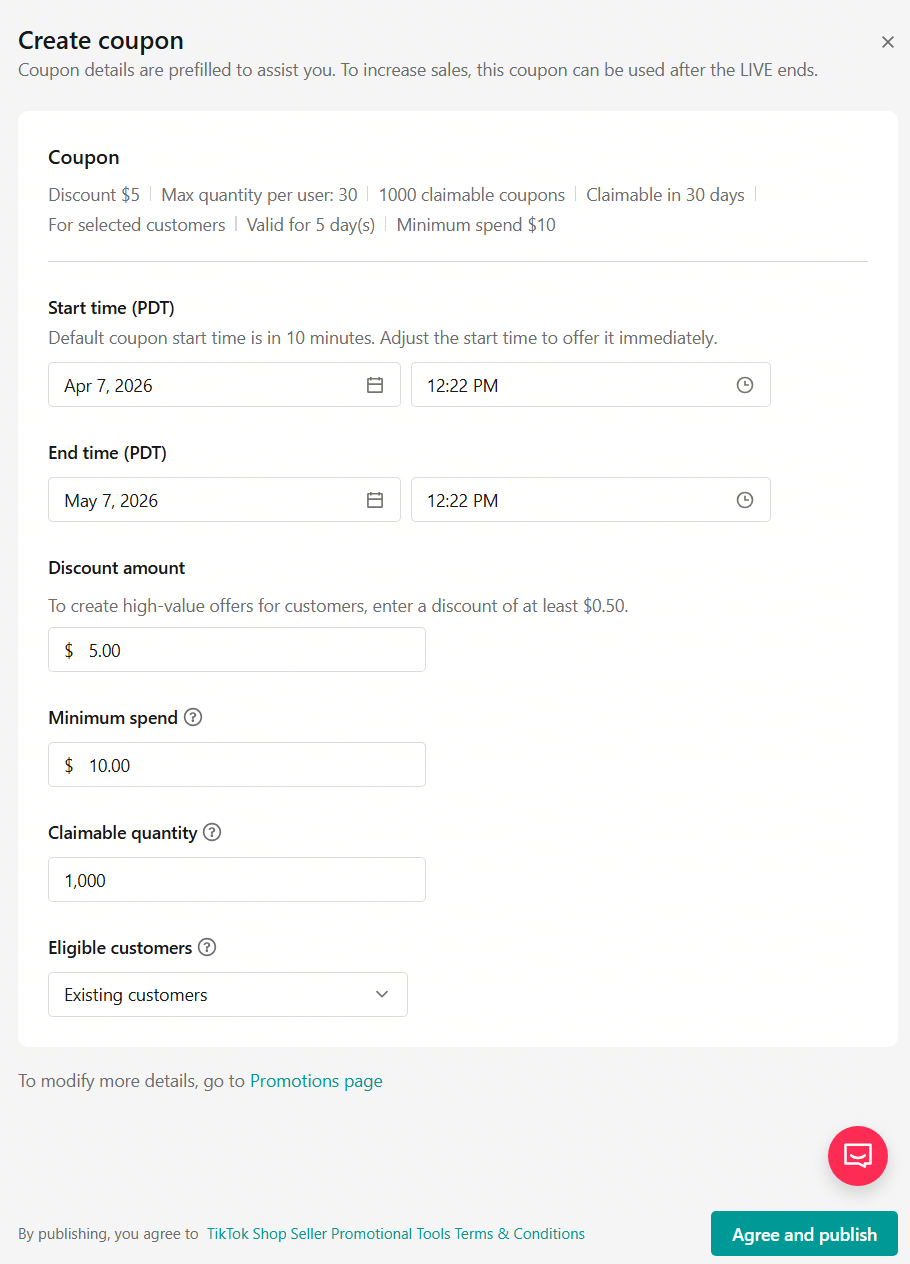
Step 2: Set Up Your Coupon Configure your coupon settings:
Coupon name: Create an internal name to help you manage the promotion.
Start and end time: Choose when the coupon will be available.
Coupon validity: Set how long shoppers can redeem the coupon after claiming it.
Eligible customers: Where available, choose whether the coupon targets new or existing customers.
Discount: Set a fixed-amount or percentage discount.
Minimum spend: Set the minimum order value required to use the coupon.
Claimable quantity: Set how many coupons are available.
Eligible products: Apply the coupon to your entire shop or selected products.
For coupons created directly in LIVE Manager, the discount amount cannot exceed 50% of the minimum spend, and the claimable quantity must be at least 30. Review your settings, agree to the applicable terms, then select Agree & Publish.
Desktop
Step 3
Step 3: Check Coupon Before Your LIVE In LIVE Manager, coupons associated with eligible products will appear in the Coupon or Product tab. A coupon must have eligible products included in your LIVE shopping bag before viewers can access it. On Mobile, open Coupon from your LIVE tools to view coupons currently available for your LIVE.
DesktopMobile
Step 4
Step 4: Pin and Promote Your Coupon During LIVE Select Pin on the coupon you want to highlight. The coupon will appear on screen for viewers. Select Unpin when you want to stop highlighting it. If a coupon expires during your LIVE, make sure to unpin it.
A Standard Coupon is a seller-funded discount that can be offered broadly to customers shopping in your store.
What is it?
A Standard Coupon is a seller-funded discount that can be offered broadly to customers shopping in your store. You can also use customer targeting to create Target Coupons for specific customer groups:
New customers: Customers who have never made a purchase from your shop.
Repeat customers: Customers who previously purchased from your shop and made another purchase within 90 days.
Target Coupons allow you to tailor the incentive and minimum spend requirement to different customer groups. They can help you acquire first-time customers or encourage previous customers to return and purchase again.
How to set it up?
Step 1
Step 1: Access Coupons In Seller Center, go to Marketing > Promotions > Coupon > Create.
Desktop
Step 2
Step 2: Set Up Your Coupon Enter the coupon name, claim period, and coupon validity. Then select who can claim the coupon:
All customers
New customers
Repeat customers
Desktop
Step 3
Step 3: Configure the Offer Choose between:
Amount off: A fixed dollar amount off the order.
Percentage off: A percentage discount.
Set the minimum spend requirement, discount value, claimable quantity, and eligible products as applicable.
Desktop
Step 4
Step 4: Publish Your Coupon Review the promotion settings and publish the coupon. Eligible customers will be able to discover and claim it during the configured promotion period.
A Chat Coupon is a private coupon you can send directly to an individual customer through TikTok Shop customer chat.
What is it?
A Chat Coupon is a private coupon you can send directly to an individual customer through TikTok Shop customer chat. It is useful when a customer is already asking about a product or considering a purchase and you want to provide a personalized incentive to help drive conversion. Unlike broadly distributed coupons, Chat Coupons are delivered directly through an active customer conversation. When sent, the coupon is automatically claimed for the customer and also appears in their coupon list.
How to set it up?
Step 1
Step 1: Access Chat Coupon In Seller Center, go to Marketing > Promotions > Chat Coupon > Create.
Desktop
Step 2
Step 2: Set Up Your Coupon Enter:
Coupon name
Claim period
The display channel is automatically set to Inbox.
Desktop
Step 3
Step 3: Configure the Offer Choose the coupon discount and other standard coupon settings, such as minimum spend, eligible products, and claimable quantity. Percentage discounts for Chat Coupons can currently be set between 5% and 99%.
Desktop
Step 4
Step 4: Send the Coupon Open an active customer conversation in Inbox and access the coupon workbench. Find the coupon you want to offer and select Send. The coupon card will be sent directly to the customer and automatically claimed on their account. Chat Coupons can only be sent into active chats.
A Review Coupon rewards customers who submit qualifying reviews for products they purchased from your shop.
What is it?
A Review Coupon rewards customers who submit qualifying reviews for products they purchased from your shop. The coupon is seller-funded and automatically issued when an eligible buyer submits a review that meets TikTok Shop's requirements. Review Coupons are designed to help you collect more detailed customer feedback, strengthen product credibility, and encourage repeat purchases. A qualifying review must:
Be for an eligible purchased product.
Include at least 11 words or media such as a photo or video.
Meet TikTok Shop's review requirements and be approved by the platform.
The review does not need to be positive. A qualifying negative review can also receive the coupon. Reviews collected through this promotion are labeled Verified Purchase Incentivized Review.
How to set it up?
Step 1
Step 1: Access Review Coupon In Seller Center, go to Marketing > Promotions > Review Coupon > Create.
Desktop
Step 2
Step 2: Set Up Your Coupon Enter:
Promotion name
Claim period
Coupon validity period
The claim period can run from 30 to 180 days. Coupon validity defaults to 60 days and can be set for up to 180 days after the coupon is issued.
Desktop
Step 3
Step 3: Configure the Offer Choose between:
Fixed amount: At least $3 off.
Percentage off: Between 5% and 50%.
Then configure the applicable minimum spend, claimable quantity, and eligible products. A Review Coupon promotion can include up to 2,000 products.
Desktop
Step 4
Step 4: Publish the Promotion Review your settings and publish the Review Coupon. Once active, TikTok Shop automatically issues the coupon to eligible customers after their qualifying review has been submitted and approved. Only one Review Coupon promotion can be active at a time, although you can schedule another promotion whose dates do not overlap.
Step 5
Step 5: Track Performance You can review Review Coupon performance from either:
Manage Your Promotions > Review Coupon > View Data, or
In addition to coupons, TikTok Shop offers seller-funded promotional tools that help you reduce product prices, encourage shoppers to buy more, promote specific products together, offer free shipping, or reward purchases with free gifts.
What are they?
In addition to coupons, TikTok Shop offers seller-funded promotional tools that help you reduce product prices, encourage shoppers to buy more, promote specific products together, offer free shipping, or reward purchases with free gifts. These promotions can support different business goals:
Product Discount: Lower the price of individual products or SKUs.
Buy More, Save More / Buy X, Get Y: Encourage larger baskets or cross-selling by rewarding shoppers who meet a purchase threshold.
Promo Code: Share a unique code that shoppers can enter to unlock a discount.
Shipping Fee Discount: Reduce or remove shipping costs for eligible orders.
Gift with Purchase: Give shoppers a complimentary product when they meet defined purchase requirements.
Why they drive conversion?
Use Product Discount or Promo Code when the mechanic doesn't need to be interactive – a simple, always-on price cut for viewers who arrive after a LIVE-only mechanic has ended.
Shipping Fee Discount is one of only two tools purpose-built for checkout friction (alongside CRM's reminders) – deploy it specifically for viewers who clicked or carted but didn't complete.
BXGY and Gift with Purchase are the direct basket-expansion levers when the incremental benefit needs to be easy to understand at a glance.
Brand Live Growth · Conversion-Driving Tools
LIVE Analytics & LIVE Dashboard
Use LIVE Performance to get a high-level view of your LIVE business. You can compare performance across time periods and accounts, customize the metrics you want to track, review individual LIVE sessions, and identify changes or opportunities that may need a closer look.
What is it?
LIVE Performance and LIVE Dashboard help you understand how your Shoppable LIVEs are performing – from overall trends across multiple LIVE sessions to detailed insights from an individual LIVE. Use LIVE Performance to get a high-level view of your LIVE business. You can compare performance across time periods and accounts, customize the metrics you want to track, review individual LIVE sessions, and identify changes or opportunities that may need a closer look. When you want to investigate a specific LIVE, open the LIVE Dashboard. The dashboard provides a detailed view of that session during and after the LIVE, including key performance metrics, traffic sources, conversion trends, product performance, audience insights, promotions, violations, and more. Together, these tools can help you:
Track overall LIVE performance and changes over time.
Compare performance across linked and affiliate accounts.
Identify your strongest and weakest LIVE sessions.
Monitor key metrics during an ongoing LIVE and adjust your strategy in real time.
Understand where viewers are coming from and where they may drop off in the conversion funnel.
See which products and promotions are driving engagement and sales.
Review performance trends after your LIVE to improve future sessions.
Why it drives conversion?
This is the signal that tells you which products deserve more airtime before you apply a discount – don't guess which SKU to feature next; check click and engagement signals first.
During an ongoing LIVE, product- and conversion-level metrics update in real time, which is exactly the signal that should trigger a LIVE Coupon deployment at the moment interest peaks rather than on a pre-set schedule.
Post-LIVE, product clickers and cart-adders identified here are the demonstrated-intent audience that CRM's Abandoned Cart and Incomplete Checkout Reminders should target – not cold traffic.
How to set it up? (Live Performance)
Step 1
Step 1: Open LIVE Performance From Seller Center, go to: Analytics > LIVE & Video Analytics > LIVE Performance
Desktop
Step 2
Step 2: Select a Time Period Use the date selector in the upper-right corner to choose:
Today
Last 7 Days
Last 30 Days
A custom date range
For historical periods, LIVE Performance automatically compares your results with the previous period of the same length so you can quickly identify increases or decreases.
Desktop
Step 3
Step 3: Customize your key metrics Select the edit icon in the Account data analysis section. Choose the metrics most relevant to your LIVE goals, remove metrics you don't need, and select Save. You can also select a metric and turn on Trend to see how its performance changes over time or across accounts.
Desktop
Step 4
Step 4: Choose the accounts you want to analyze Switch between:
Total: View aggregated LIVE performance.
Linked Accounts: Review Official and Marketing Account performance.
Affiliate Accounts: Review LIVE performance generated by affiliate creators.
Desktop
Step 5
Step 5: Review individual LIVE sessions Scroll to the LIVE List to see the sessions included in your selected filters. You can:
Customize the metrics shown in the list.
Sort sessions by supported metrics.
Filter sessions by linked or affiliate account.
Compare sessions to identify high- or low-performing LIVEs.
For an ongoing LIVE, select the LIVE session name or the creator's avatar with the LIVE badge to open its LIVE Dashboard.
Desktop
How to set it up? (Live Dashboard)
Step 1
Step 1: Open the LIVE Dashboard Open LIVE Manager on desktop and select the LIVE Dashboard. You can also enter the dashboard directly from an ongoing session listed under LIVE Performance.
Desktop
Step 2
Step 2: Review your key LIVE metrics Start with the Key Data tab to see an overview of your LIVE performance. You can customize the metrics displayed based on your goals. During a LIVE, metrics update in real time; after the LIVE, you can review the session's final aggregated results. The dashboard can also highlight metrics performing below relevant benchmarks, helping you quickly identify areas that may need attention.
Desktop
Step 3
Step 3: Understand when performance changed Open Performance Trends to see how key metrics changed throughout the LIVE. You can:
Compare up to two metrics at a time.
Review the whole LIVE or focus on shorter periods such as the last 30 or 5 minutes.
Select a custom time range.
Compare changes in performance with key LIVE events such as product pins, promotions, and violations.
After the LIVE, you can also use the timeline alongside the LIVE replay to review what was happening when a spike or drop occurred.
Desktop
Step 4
Step 4: Analyze your traffic sources Open the Traffic Source tab to understand where LIVE viewers came from. Compare traffic channels using metrics such as impressions, views, GMV, and conversion-related metrics. You can also select multiple traffic sources to compare their performance trends. Use these insights to understand which channels are contributing the most traffic and sales and where you may have opportunities to improve.
Desktop
Step 5
Step 5: Review product performance Use the product-level data to understand how individual products performed during the LIVE. You can review metrics related to product exposure, conversion, and sales, search for individual products, customize the metrics displayed, and sort products based on the data most important to you. During an ongoing LIVE, you can also take product-level actions such as pinning or unpinning products.
Desktop
Step 6
Step 6: Review additional LIVE insights Depending on the session and available data, the LIVE Dashboard can also help you:
Compare followers vs. non-followers.
Understand viewer and customer demographics.
Review violations and recommended actions.
Evaluate Giveaway performance.
Review your LIVE broadcast alongside viewer comments.
Identify how specific events during the LIVE affected performance.
Use these insights after every LIVE to understand what worked, what didn't, and what you can adjust for your next session.
Instead of purchasing at a fixed price, viewers place bids while the auction countdown is running. When the auction ends, the highest bidder wins the item.
What is it?
LIVE Auction lets you sell products through real-time bidding during a LIVE, creating a more interactive and competitive shopping experience for viewers. Instead of purchasing at a fixed price, viewers place bids while the auction countdown is running. When the auction ends, the highest bidder wins the item. LIVE Auction can help you:
Create urgency with countdown-based bidding.
Increase viewer participation and engagement.
Showcase unique, collectible, or limited-quantity products.
Encourage purchase decisions through real-time competition.
LIVE Auction is available to eligible sellers and creators and can be managed through LIVE Manager on desktop or directly in the TikTok app.
Why it drives conversion?
Auction's hard countdown adds competitive pressure on top of a standard deadline – best suited to unique or scarce items where competitive bidding itself is the persuasive mechanic, not just the time limit.
Rotate Auction with Flash Sale rather than running both at once for the same moment – layered urgency mechanics read as manipulative and train viewers to tune the urgency out entirely.
How to set it up?
Step 1
Step 1 : Create Auction Product Listing (Option 1) In Seller Center, when creating a product listing, select fixed price only and auction to allow the same listing to also sell through LIVE auctions.
Desktop
Step 2
Step 1 : Create Auction Product Listing (Option 2) Open LIVE Console > Auction. Select Create temporary auction listing and enter the required product information, including:
Product name and category
Starting bid
Quantity
Package and shipping information
Avoid using terms such as "Bid" or "Auction" in the product name, as this may prevent the listing from passing review.
Desktop
Mobile
Step 3
Step 2: Configure your auction Once the listing appears under the Auction tab, select the edit icon to configure the auction settings. Set:
Auction duration: From 3 seconds to 2 minutes.
Extend Auction: Automatically resets the countdown to a preset time when a bid arrives at the last moment.
Sudden Death: Prevents the countdown from extending when a last-second bid is placed.
Select Submit when finished.
Desktop
Mobile
Step 4
Step 3: Pin the product Select the pin icon next to the auction product you want viewers to see.
Desktop
Mobile
Step 5
Step 2: Start the auction When you're ready, select Start. The auction countdown will begin and viewers can start placing bids. Once an auction starts, it must run until the countdown ends.
Instead of sending the same message to everyone, CRM lets you reach audiences based on their relationship with your shop and their shopping behavior – for example, new followers, abandoned-cart shoppers, recent customers, repeat customers, or lapsed customers.
What is it?
TikTok Shop's Customer Relationship Management (CRM) tools help you understand, segment, and directly reach your customers and followers with targeted messages that can bring them back to your shop or LIVE. Instead of sending the same message to everyone, CRM lets you reach audiences based on their relationship with your shop and their shopping behavior – for example, new followers, abandoned-cart shoppers, recent customers, repeat customers, or lapsed customers. You can use CRM to set up:
One-time campaigns when you want more control over what you send, who receives it, and when it is sent:
Announce an upcoming LIVE.
Promote a hero product or new product launch.
Reach a specific customer segment with an exclusive offer.
Re-engage lapsed customers.
Send a targeted message around a major selling moment.
Automated campaigns for recurring customer moments that you want TikTok Shop to trigger automatically. Examples include:
Promote LIVE Events: Reach potential LIVE viewers when you have an upcoming LIVE event.
Go LIVE Reminder: Notify potential LIVE viewers when you go LIVE.
Welcome New Followers: Introduce new followers to your shop.
Abandoned Cart Reminder: Remind shoppers about products left in their cart.
Incomplete Checkout Reminder: Re-engage shoppers who started but did not finish checkout.
Price Drop Reminder: Notify interested shoppers when a product price drops.
Thank New Customers: Follow up after a customer's first purchase.
CRM is available through Seller Center > Customers. Access is based on your shop's eligibility, including Shop Performance Score requirements.
How to set up? (automated plan)
Step 1
Step 1: Choose your campaign Go to Seller Center > Customers > Outreach and select the automated campaign you want to create.
Desktop
Step 2
Step 2: Fill out information for automated plan.
Time: Choose the time period for this campaign to run through (up to 6 months)
Channel: All automated plans can use the chat channel; supports T2+ sellers to select Group chat for the Send option when creating or editing plans for Go LIVE reminder and Promote LIVE events.
Content: Define the message content from the templates, or customize as you want
Coupons & products:
Apply coupons to increase the click rate and conversion rate;
chat/email channels allow a maximum of 4 products to be selected; group chat channels allow a maximum of 3 products to be selected.
Desktop
How to set up? (one-time campaign)
Step 1
Step 1: Pick your plan and campaign type: Choose a one-time message template and select a campaign goal.
Desktop
Step 2
Step 2.1: You can choose to create CRM campaigns from scratch by creating customer segments.
Step 1.1.1: Create custom audiences via Order ID: Go to Customers > Segments, click "Create segment by order ID" > Download order IDs from "Orders" page to open a new order page.
Step 1.1.2: On the new order page, you can filter by order time, status, logistics, and more. Export as a CSV file, then return to the segment creation page to upload.
Desktop
Step 3
Step 2.2: Choose your audience from built-in segments Select a built-in segment to target your audience. This can be potential new customers, lapsed customers, abandoned cart shoppers, new or active followers, or first time or repeat customers. You can also create your own customer group using filters like engagement, purchase behavior, or time from the last order.
Desktop
Step 4
Step 3: Choose your outreach channel(s), content, product & coupons.
Content: Define the message content from the templates, or customize as you want
Coupons & products: Apply coupons to increase the click rate and conversion rate
Note: Email as a new outreach channel within your TikTok Shop Customers (CRM) tool is only available for a one-time plan.
Unlike one-way outreach tools, Follower Groups create an ongoing space where members and the shop can interact. You can use the group to announce LIVEs, share products and promotions, answer questions, collect feedback, and build relationships that encourage customers to return and purchase again.
What is it?
Follower Group lets eligible TikTok Shop sellers create a private community on TikTok where followers, buyers, LIVE fans, and other high-intent users can stay connected with your shop. Unlike one-way outreach tools, Follower Groups create an ongoing space where members and the shop can interact. You can use the group to announce LIVEs, share products and promotions, answer questions, collect feedback, and build relationships that encourage customers to return and purchase again. Follower Groups can help you:
Turn viewers and customers into a recurring community.
Directly reach high-intent followers before a LIVE.
Bring group members back into your LIVE, shop, or content.
Share new products, discounts, and exclusive benefits.
Answer questions and provide ongoing customer support.
Encourage repeat purchases and customer advocacy.
In the US, sellers need an eligible shop, including SPS ≥ 3.5, and must create and manage the group through an Official Account or Marketing Account bound to the shop. Each group can have up to 300 members.
How to set it up?
Step 1
Step 1: Create Your Group From the bound Official or Marketing Account:
Open TikTok > Inbox.
Select the option to create a group chat.
Select Public group.
Enter your:
Group name
Group description
Entry requirements
Choose who can join. Available criteria can include:
Followers
Buyers
LIVE fans
Subscribers
Select Create.
Note:
Make sure you are using the latest version of the TikTok app.
If the Follower Group entry point does not appear, your account may not currently meet the feature requirements.
Mobile
Step 2
Step 2: Configure Your Group After creating the group, customize its settings based on how you plan to manage your community. You can manage settings such as:
Show on profile: Make the Follower Group visible from your account profile so more users can find and join it.
Join Approval: Require approval before a user enters the group.
LIVE Notifications: Help group members stay informed about your LIVEs.
Member Visibility: Control whether members can see the group member list.
Chat Nicknames: Manage nickname visibility.
Administrators: Assign people to help manage the group.
For ongoing growth, keeping your Follower Group visible on your profile is particularly important so viewers can easily find it after discovering your content or LIVE.
Mobile
Step 3
Step 3: Set Up Your Group Interactions Follower Groups support multiple ways to interact with members. Depending on your account and available capabilities, you can:
Set a welcome message for new members.
Invite users to join the group.
Send messages, photos, and videos.
Share supported links.
Remove users or inappropriate messages.
Assign administrators.
Share products and short videos.
Some commerce capabilities vary by account type. For example, the Academy guide currently notes that product sharing is available through the Official Account, but not yet through Marketing Accounts
Mobile
Step 4
Step 4: Use CRM to Reach Your Group at Scale Eligible T2+ sellers can connect Follower Groups with TikTok Shop CRM instead of manually posting every promotional message. Go to: Seller Center > Customers > Reach > Create Plan For supported plans, select Group Chat as the delivery channel. Supported scenarios include:
Go LIVE Reminder
Promote LIVE Events
Best-selling product promotion
New product promotion
You can attach up to three products to a Group Chat CRM message. TikTok Shop currently limits CRM outreach to the same group chat to no more than three plans per day and five per wee
LIVE Events helps you plan, promote, and manage upcoming TikTok Shop LIVE sessions before you go LIVE. By scheduling a LIVE Event in advance, you can:
Set the date, start time, and expected duration of your LIVE.
Prepare products and LIVE Giveaways before the session starts.
Promote the upcoming LIVE through videos, event links, and QR codes.
Let viewers discover the event and register in advance.
Launch the scheduled LIVE from either desktop or mobile.
Review individual LIVE sessions and performance after the event.
LIVE Events created on desktop can include multiple LIVE sessions within one event. This means you can pause, take a break, and resume streaming during the scheduled event period without creating a new event. There is also an important scheduling difference between platforms: LIVE Events created on mobile must be scheduled at least 2 hours in advance, while desktop LIVE Manager lets you schedule an event in advance or start immediately.
How to Set It Up?
Step 1
Step 1: Create Your LIVE Event In LIVE Manager, go to LIVE tools > LIVE events. In the TikTok app, go to your Profile > Menu > Creator tools > LIVE Events
DesktopMobile
Step 2
Step 2: Create LIVE Event Select New LIVE event, then enter your event details, including:
Event information
Start time
Duration
The event duration must be between 30 minutes and 13 hours. Note: LIVE Events created on mobile must be scheduled at least 2 hours in advance.
DesktopMobile
Step 3
Step 3: Prepare Products and Promotions Open your scheduled event to enter its LIVE console. Add the products you plan to feature during the event. You can add up to 100 products from sources such as:
LIVE product sets
Showcase
Seller product links
Collaboration invitations
DesktopMobile
Step 4
Step 4: Attach Giveaway, Flash Sale to Your LIVE Event
Desktop
Step 5
Step 5: Attach Short Videos to Your LIVE Event
Mobile
Step 6
Step 6: Promote Your LIVE Event From LIVE Events, select Promote next to your scheduled event. You can:
Create a promotional short video with a link to the event.
Copy the event URL and share it on or off TikTok.
Download the event QR code for digital or offline promotion.
Scan the QR code with your phone to open the event in the TikTok app and create promotional content.